
A production environment is the client-facing environment that focuses on good performance and availability. Setting up production environments is not really something we developers tend to do, especially if there are robust requirements around scaling, load balancing, high availability, and similar. Sometimes, however, we need to set up a simple production environment. There are various cloud providers that offer quick and simple solutions to this. For the purpose of this section, we will turn to Amazon Web Services.
Amazon Web Services (AWS) is a collection of remote computing services frequently referred to as web services. AWS provides on-demand computing resources and services in the cloud, with pay-as-you-go pricing. Amazon gives a nice comparison of its AWS resources, saying that using AWS resources instead of your own is like purchasing electricity from a power company instead of running your own generator.
If we stop and think about it for a minute, this makes it interesting to not only system operation roles but also for developers like us. We (developers) are now able to spin various databases, web application servers, and even complex infrastructures in a matter of minutes and a few mouse clicks. We can run these services for a few minutes, hours, or days then shut them down. Meanwhile, we only pay for the actual usage, not the full monthly or yearly price as we do with most of the hosting services. Although the overall AWS pricing for certain services might not be the cheapest out there, it certainly provides a level of commodity and usability unlike many other services. Commodity comes from things like auto-scaling resources, a feature that often offers significant cost savings compared to the equivalent on-premises infrastructure.
Quality training and a certification program is another important aspect of the AWS ecosystem. Certifications are available for Solutions Architect, Developer, and SysOps Administrator, across associate and professional levels. Though the certification is not mandatory, if we deal with AWS on a regular basis, we are encouraged to take one. Earning the certification puts the seal on our expertise to design, deploy, and operate highly available, cost-effective, and secure applications on the AWS platform.
We can manage our AWS through a simple and intuitive web-based user interface called AWS management console, which is available at https://aws.amazon.com/console. Signing into AWS, we should be able to see a screen similar to the following one:
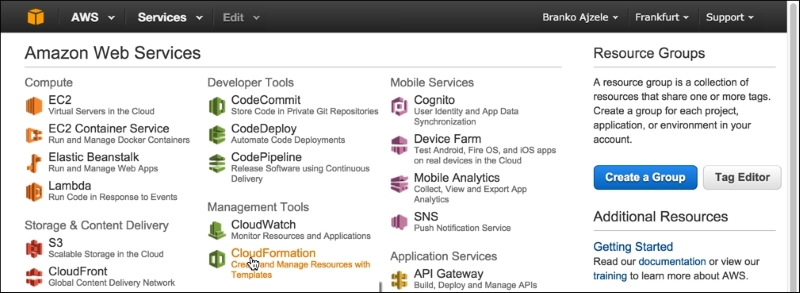
The preceding image shows how the AWS management console groups the AWS services visually into several major groups, as follows:
- Compute
- Developer Tools
- Mobile Services
- Storage & Content Delivery
- Management Tools
- Application Services
- Database
- Security & Identity
- Networking
- Analytics
- Enterprise Applications
As part of this chapter, we will be taking a look at the EC2 service found under the Compute group and the S3 service found under the Storage & Content Delivery group.
Amazon Elastic Compute Cloud (Amazon EC2) is a web service that provides a re-sizable compute capacity in the cloud. We can think of it as a virtual computer machine in the cloud that we can turn on and off at any time, within minutes. We can further commission one, hundreds, or even thousands of these machine instances simultaneously. This makes for the re-sizable compute capacity.
S3 provides secure, durable, and highly scalable object storage. It is designed to provide durability of 99.99% of objects. The service provides a web service interface to store and retrieve any amount of data from anywhere on the web. S3 is charged only per storage that is actually used. S3 can be used alone or together with other AWS services such as EC2.
As part of our production environment, it is good to have reliable storage where we can archive database and media files. Amazon S3 stands out as a possible solution.
In order to properly set access to the S3 scalable storage service, we need to take a quick look into AWS Identity and Access Management (IAM for short). IAM is a web service that helps us securely control access to AWS resources for our users. We can use IAM to control authentication (who can use our AWS resources) and authorization (what resources they can use and in what ways). More specifically, as we will soon see, we are interested in Users and Groups.
This section describes how to create IAM users. An IAM user is an entity that we create in AWS to represent the person or service using it when interacting with AWS.
Log in to the AWS console.
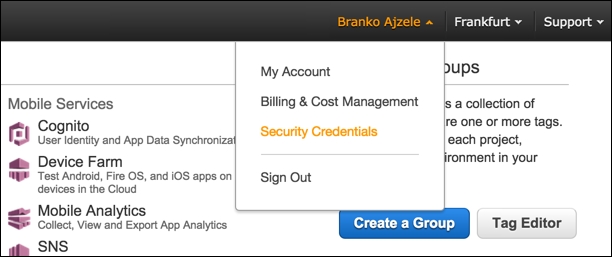
Under the user menu, click on Security Credentials as shown in the following screenshot:
This opens up the security dashboard page.
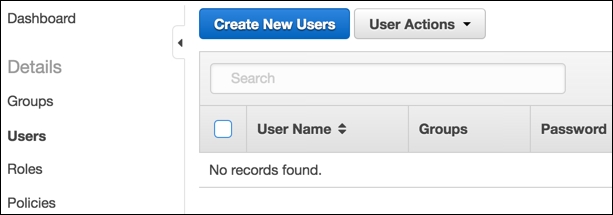
Clicking on the Users menu should open a screen like the following one:
On the Users menu, we click on Create New User, which opens a page like the following:

Here, we fill in the desired username for one or more users, something like foggy_s3_user1, and then click on the Create button.
We should now see a screen like the following one:

Here, we can click on Download Credentials to initiate the CSV format file download or copy and paste our credentials manually.
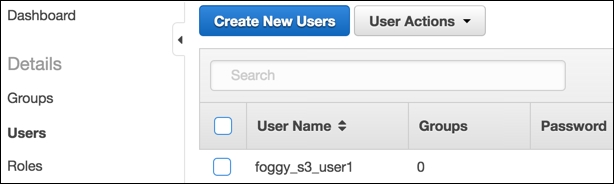
Clicking the close link takes us back to the Users menu, showing our newly created user listed as shown in the following screenshot:
This section describes how to create IAM groups. Groups are collections of IAM users that we can manage as a single unit. So let's begin:
- Log in to the AWS console.
- Under the user menu, click on Security Credentials as shown in the following screenshot:

- This opens up the security dashboard page. Clicking on the Groups menu should open a screen like the following one:

- On the Groups menu, we click on Create New Group, which opens a page like the following:

- Here, we fill in the desired group name, something like
FoggyS3Test. - We should now see a screen like the following one, where we need to select the group Policy Type and click the Next Step button:
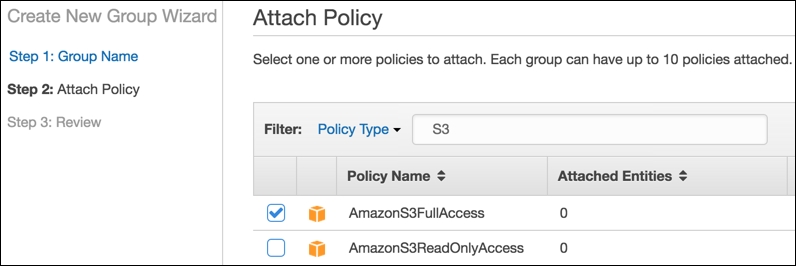
- We select the AmazonS3FullAccess policy type and click the Next Step button. The Review screen is now shown, asking us to review the provided information:

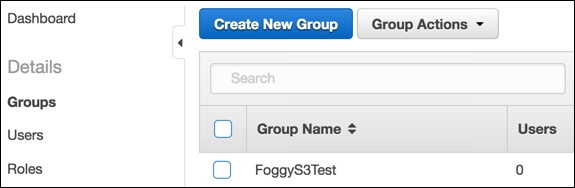
- If the provided information is correct, we confirm it by clicking the Create Group button. We should now be able to see our group under the Groups menu as shown in the following screenshot:
- Mark the checkbox to the left of Group Name, click the Group Actions dropdown, and then select Add Users to Group as shown in the following screenshot:

- This opens the Add Users to Group page as shown in the following screenshot:
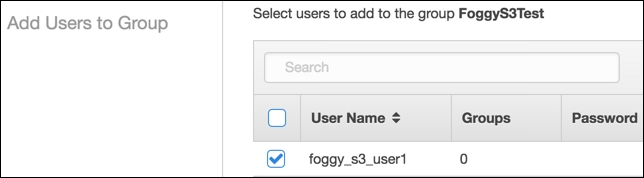
- Mark the checkbox to the left of User Name and click on the Add Users button. This should add the selected user to the group and throw us back to the Groups listing.
The result of this user and group creation process is a user with Access Key Id, Secret Access Key, and assigned user group with the AmazonS3FullAccess policy. We will use this information later on when we demonstrate backing up the database to S3.
S3 consists of buckets. We can think of a bucket as the first level directory within our S3 account. We then set the permissions and other options on that directory (bucket). In this section, we are going to create our own bucket, with two empty folders called database and media. We will use these folders later on during our environment setup in order to back up our MySQL database and our media files.
We start by logging in to the AWS management console.
Under the Storage & Content Delivery group, we click on S3. This opens a screen similar to the following:

Click on the Create Bucket button. This opens a popup like the one shown in the following screenshot:

Let's provide a unique Bucket Name, preferably something identifying the project for which we will be backing up the database and media file, and click the Create button. For the purpose of this chapter, let's imagine we selected something like foggy-project-dhj6.
Our bucket should now be visible under the All Buckets list. If we click on it, a new screen opens like the one shown in the following screenshot:

Here, we click on the Create Folder button and add the necessary database and media folders.
While still within the root bucket directory, click on the Properties button and fill in the Permissions section as shown in the following screenshot:
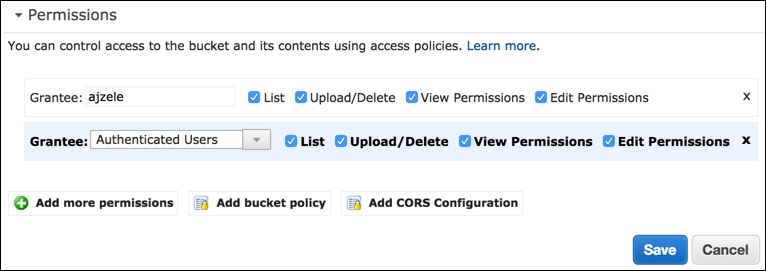
Here, we are basically assigning all permissions to Authenticated Users.
We should now have an S3 bucket to which we can potentially store our database and media backups using the s3cmd console tool that we will soon reference.
Similar to the Vagrantfile shell provisioners, let's go ahead and create a sequence of bash shell commands we can use for a production setup.
The first block of commands goes as follows:
#!/bin/bash
apt-get update
apt-get -y install s3cmd
Here, start with the #!/bin/bash expression. This specifies the type of script we are executing. Then we have a system update and s3cmd tool installation. The s3cmd is a free command-line tool and client for uploading, retrieving, and managing data in Amazon S3. We can use it later on for database and media file backups and restores.
We then install the postfix mail server, using the following commands. Since the postfix installation triggers a graphical interface in the console, asking for mailname and main_mailer_type, we bypass those using sudo debconf-set-selections. Once installed, we reload postfix.
sudo debconf-set-selections <<< "postfix postfix/mailname string magentize.me"
sudo debconf-set-selections <<< "postfix postfix/main_mailer_type string 'Internet Site'"
sudo apt-get install -y postfix
sudo /etc/init.d/postfix reload
Using mail server directly on the EC2 box is fine for smaller production sites, where we do not expect high traffic or a large number of customers. For more intensive production sites, we need to pay attention to Amazon, possibly putting a throttle on port 25, thus resulting in outgoing e-mail timeouts. In which case we can either ask Amazon to remove the limitation on our account, or move on to more robust services like Amazon Simple Email Service.
We then install all things related to PHP. Notice how we even install xdebug, though immediately turning it off. This might come in handy for those very rare moments when we really need to debug the live site, then we can turn it off and play with remote debugging. We further download and set composer to the user path:
apt-get -y install php5 php5-dev php5-curl php5-imagick php5-gd php5- mcrypt php5-mhash php5-mysql php5-xdebug php5-intl php5-xsl
php5enmod mcrypt
php5dismod xdebug
service php5-fpm restart
apt-get -y install phpunit
echo "Starting Composer stuff" >> /var/tmp/box-progress.txt
curl -sS https://getcomposer.org/installer | php
mv composer.phar /usr/local/bin/composer
We then move on to MySQL installation. Here, we are also using debconf-set-selections to automate the console part of providing input parameters to the installation. Once installed, MySQL is started and added to the boot process.
debconf-set-selections <<< 'mysql-server mysql-server/root_password password RrkSBi6VDg6C'
debconf-set-selections <<< 'mysql-server mysql-server/root_password_again password RrkSBi6VDg6C'
apt-get -y install mysql-server
service mysql start
update-rc.d mysql defaults
Alongside MySQL, another major component is Apache. We install it using the following commands. With Apache, we need to pay attention to its apache2.conf file. We need to change AllowOverride None to AllowOverride All for the Magento directory:
apt-get -y install apache2
update-rc.d apache2 defaults
service apache2 start
a2enmod rewrite
awk '/<Directory />/,/AllowOverride None/{sub("None", "All",$0)}{print}' /etc/apache2/apache2.conf > /tmp/tmp.apache2.conf
mv /tmp/tmp.apache2.conf /etc/apache2/apache2.conf
awk '/<Directory /var/www/>/,/AllowOverride None/{sub("None", "All",$0)}{print}' /etc/apache2/apache2.conf > /tmp/tmp.apache2.conf
mv /tmp/tmp.apache2.conf /etc/apache2/apache2.conf
service apache2 restart
Now that we have MySQL and Apache installed, we move on to getting the source code files in place. Next, we are pulling from the official Magento Git repository. This is not the same as repo.magento.com we used when setting up the vagrant. Though in this case the Magento Git repository is public, the idea is to be able to pull the code from the private GitHub repository. Based on the production environment we tend to set up, we can easily replace the next part with pulling from any other private Git repository.
sudo rm -Rf /var/www/html/*
git clone https://github.com/magento/magento2.git /var/www/html/.
sudo composer config --global github-oauth.github.com 7d6da6bld50dub454edc27db70db78b1f8997e6
sudo composer install --working-dir="/var/www/html/"
mysql -uroot -pRrkSBi6VDg6C -e "CREATE DATABASE magento;"
PUBLIC_HOSTNAME="'wget -q -O - http://instance-data/latest/meta- data/public-hostname'"
The PUBLIC_HOSTNAME variable stores the response of the wget command that calls the http://instance-data/latest/meta-data/public-hostname URL. This URL is a feature of AWS that allows us to get the current EC2 instance metadata. We then use the PUBLIC_HOSTNAME variable during Magento installation, passing it as the --base-url parameter:
php /var/www/html/bin/magento setup:install --base- url="http://$PUBLIC_HOSTNAME" --db-host="127.0.0.1" --db- user="root" --db-password="RrkSBi6VDg6C" --db-name="magento" -- admin-firstname="John" --admin-lastname="Doe" --admin- email="[email protected]" --admin-user="admin" --admin- password="pass123" --backend-frontname="admin" -- language="en_US" --currency="USD" --timezone="Europe/London"
The preceding command takes a lot of per project specific configuration values, so we need to be sure to paste in our own information here appropriately before simply copying and pasting it.
Now we make sure the Magento mode is set to production, and cache is turned on and flushed, so it regenerates fresh:
php /var/www/html/bin/magento deploy:mode:set production
php /var/www/html/bin/magento cache:enable
php /var/www/html/bin/magento cache:flush
Finally, we reset the permissions on the /var/www/html directory in order for our Magento to function properly:
chown -R ubuntu:www-data /var/www/html
find /var/www/html -type f -print0 | xargs -r0 chmod 640
find /var/www/html -type d -print0 | xargs -r0 chmod 750
chmod -R g+w /var/www/html/pub
chmod -R g+w /var/www/html/var
chmod -R g+w /var/www/html/app
chmod -R g+w /var/www/html/vendor
We need to take caution with the preceding Git and Magento installation example. The idea here was to show how we could automatically set Git pull from the public or private repository. The Magento installation part is a little bonus for this specific case, not something we would actually do on our production machine. The whole purpose of this script would be to serve as a blueprint for powering up new AMI images. So ideally what we would usually do once the code is pulled, is to restore the database from some private storage like S3 and then attach it to our installation. Thus making for a complete restore of files, database, and media once the script is finished.
Putting that thought aside, let's get back to our script, further adding the daily database backup using the set of command as follows:
CRON_CMD="mysql --user=root --password=RrkSBi6VDg6C magento | gzip -9 > ~/database.sql.gz"
CRON_JOB="30 2 * * * $CRON_CMD"
( crontab -l | grep -v "$CRON_CMD" ; echo "$CRON_JOB" ) | crontab -

CRON_CMD="s3cmd  --access_key="AKIAINLIM7M6WGJKMMCQ" -- secret_key="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" put ~/database.sql.gz s3://foggy-project-ghj7/database/database_'date +"%Y-%m-%d_%H-%M"'.sql.gz"
CRON_JOB="30 3 * * * $CRON_CMD"
( crontab -l | grep -v "$CRON_CMD" ; echo "$CRON_JOB" ) | crontab -
Here, we are adding the 2:30 AM cron job for backing up the database into the home directory file named database.sql.gz. Then we are adding another cron job that executes at 3:30 AM, which pushes the database backup to S3 storage.
Similar to the database backup, we can add media backup instructions to our script using the set of command as follows:
CRON_CMD="tar -cvvzf ~/media.tar.gz /var/www/html/pub/media/"
CRON_JOB="30 2 * * * $CRON_CMD"
( crontab -l | grep -v "$CRON_CMD" ; echo "$CRON_JOB" ) | crontab -

CRON_CMD="s3cmd --access_key="AKIAINLIM7M6WGJKMMCQ" -- secret_key="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" put ~/media.tar.gz s3://foggy-project-ghj7/media/media_'date +"%Y-%m- %d_%H-%M"'.tar.gz"
CRON_JOB="30 3 * * * $CRON_CMD"
( crontab -l | grep -v "$CRON_CMD" ; echo "$CRON_JOB" ) | crontab -
The preceding commands have several pieces of information coded in them. We need to make sure to paste in our access key, secret key, and S3 bucket name accordingly. For simplicity sake, we are not addressing security implications such as hardcoding the access tokens into the cron jobs. Amazon provides an extensive AWS Security Best Practices guide that can be downloaded via the official AWS website.
Now that we have some understanding of what the bash script for automated EC2 setup could look like, let's proceed to setting up the EC2 instance.
Follow these steps to get the setting done:
- Log in to the AWS console
- Under the Compute group, click on EC2, which should open a screen like the following:

- Click on the Launch Instance button, which should open a screen like the following:

- Click on the Community AMIs tab to the left, and type in
Ubuntu Vividinto the search field, as shown in the following screenshot: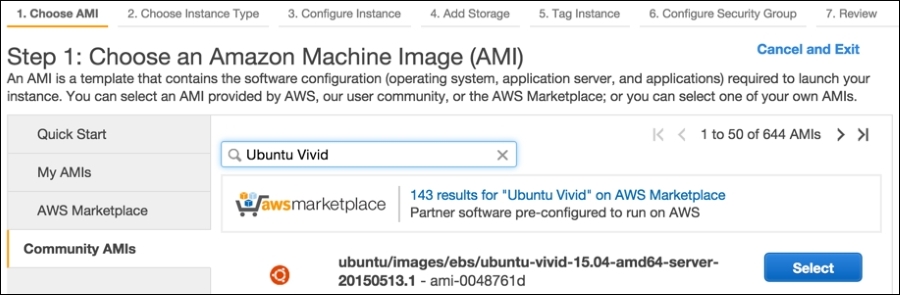
We should now see a screen like the following:
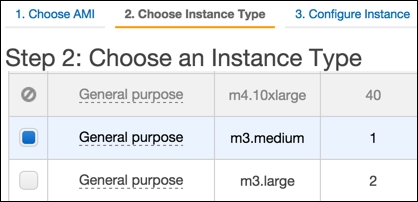
- Choose an instance type and click the Next: Configure Instance Details button. We should now see a screen like the following:

- Make sure Shutdown behavior is set to Stop.
- While still on the Step 3: Configure Instance Details screen, scroll down to the bottom Advanced Details area and expand it. We should see a screen like the following:

- The User Data input is where we will copy and paste the
auto-setup bashscript described in the previous section, as shown in the following screenshot:
- Once we copy and paste in the User Data, click on the Next: Add Storage button. This should bring up the screen as shown in the following screenshot:
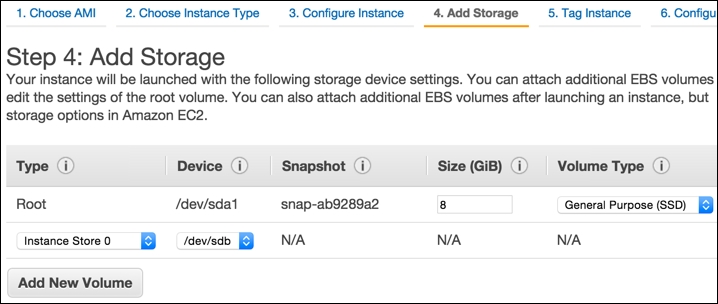
- Within Step 4: Add Storage, we can select one or more volumes to attach to our EC2 instance. Preferably, we should select the SSD type of storage for faster performance. Once the volume is set, click on Next: Tag Instance. We should now see a screen like the following:

- The Tag Instance screen allows us to assign tags. Tags enable us to categorize our AWS resource by purpose, owner, environment, or some other way. Once we have assigned one or more tags, we click on the Next: Configure Security Group button. We should now see a screen like the following:

- The Configure Security Group screen allows us to set rules for inbound and outbound traffic. We want to be able to access SSH, HTTP, HTTPs, and SMTP services on the box. Once we add the rules we want, click on the Review and Launch button. This opens a screen like the following:

- The Review Instance Launch screen is where we can view the summary of the box we configured up to this point. If needed, we can go back and edit individual settings. Once we are satisfied with the summary, we click on the Launch button. This opens a popup like the following:

- Here, we get to choose an existing security key, or create a new one. Keys are provided in PEM format. Once we select the key, we click on the Launch Instance button.
We should now see the Launch Status screen like the following:
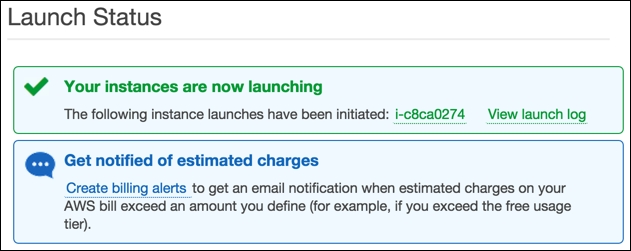
- Clicking on the instance name link should throw us back at the EC2 Dashboard like shown in the following screenshot:

With regard to the preceding image, we should now be able to connect to our EC2 box with either one of the following console commands:
ssh -i /path/to/magento-box.pem [email protected]

ssh -i /path/to/magento-box.pem [email protected]
It might take some time for our EC2 box to execute all of the shell commands passed to it. We can conveniently SSH into the box and then execute the following command to get an overview of current progress:
sudo tail -f /var/tmp/box-progress.txt
With this, we conclude our instance launch process.
Now that we have an EC2 box in place, let's go ahead and create the so-called Elastic IP for it. The Elastic IP address is a static IP address designed for dynamic cloud computing. It is tied to the AWS account, and not some specific instance. This makes it convenient to easily re-map it from one instance to another.
Let's go ahead and create an Elastic IP as follows:
- Log in to the AWS console.
- Under the Compute group, click on EC2, which should get us to the EC2 Dashboard.
- Under the EC2 Dashboard, in the left area under Network and Security grouping, click on Elastic IPs. This should open a screen like the following:

- Click on the Allocate New Address button, which should open a popup like the following:
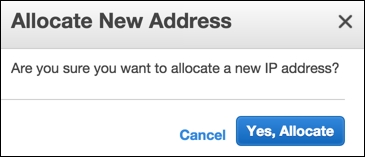
- Click on the Yes, Allocate button, which should open another popup like the following:

- Now that the Elastic IP address is created, right-clicking on it within the table listing should bring up the options menu as shown in the following screenshot:
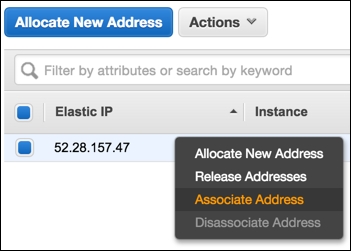
- Click on the Associate Address link. This should open a popup like the following:
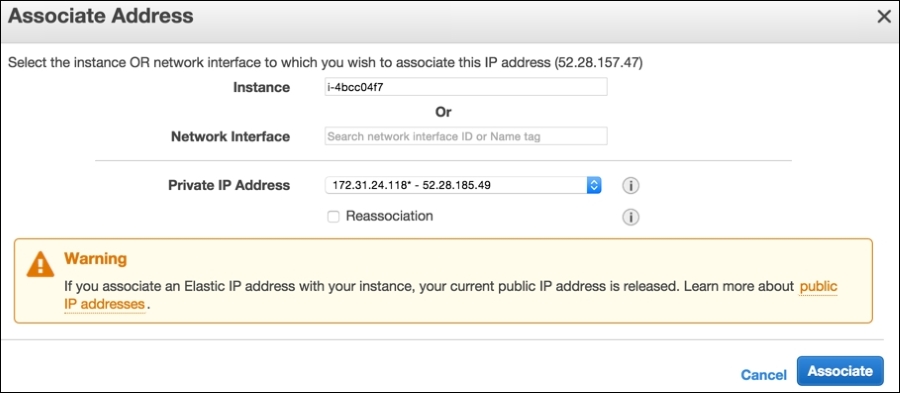
- On the Associate Address popup, we select the Instance to which we want to assign the Elastic IP address and click on the Associate button.
At this point, our EC2 box has a static (Elastic IP) address assigned. We can now log in to our domain registrar and point the A-record of our DNS to the Elastic IP we just created.
Until we wait for the DNS change to kick in, there is one more thing we need to address. We need to SSH into our box and execute the following set of commands:
mysql -uroot -pRrkSBi6VDg6C -e "USE magento; UPDATE core_config_data SET value = 'http://our-domain.something/' WHERE path LIKE "%web/unsecure/base_url%";"
php /var/www/html/bin/magento cache:flush
This will update the Magento URL, so we can access it via a web browser once the DNS change kicks in. With a little bit of upfront planning, we could have easily made this bit a part of the user data for our EC2 instance, simply by providing the right --base-url parameter value in the first place.