
Managing customers is another important aspect of the Magento platform. Most of the time, customer creation is something that is left for a new customer to do. A new customer who visits a store initiates the registration process and finishes up with a customer account being created. Once registered, customers can then further edit their account details on the storefront under the My Account page, which is usually available on a link such as http://magento2.ce/index.php/customer/account/index/.
As a part of this section, we are interested in the possibility of managing customer accounts by using the admin area, code, and API.
The following steps outline the customer account creation process from within the admin interface:
- Log in to Magento admin area.
- In the Customers | All Customers menu, click on the Add New Customer button. This opens a screen that looks similar to the one shown in the following screenshot:

- Fill in some values for the required fields (Associate to Website, Group, First Name, Last Name, and Email) and click on the Save Customer button.
Once the customer is saved, you will see the You saved the customer. success message in the browser.
The Associate to Website value is probably the most important value for cases like this one, where customer accounts are being indirectly created by a user who's not a customer.
Note
Since Magento supports the setting up of multiple websites, customer accounts can be set to either the Global or Per Website value, depending on the Stores | Settings | Configuration | Customers | Customer Configuration | Account Sharing Option | Share Customer Accounts option. Thus, if the Share Customer Accounts option has been set to Per Website, it is of the utmost important to point the Associate to Website value to the proper website. Otherwise, a customer account will be created but the customer won't be able to log in to it on the storefront.
The Magento_Customer module uses the EAV structure to store customer data. Thus, there is no single table that stores customer information. Rather, multiple tables exist, depending on the customer property and its data type.
The following list comprises tables that store customer entity:
customer_entitycustomer_entity_datetimecustomer_entity_decimalcustomer_entity_intcustomer_entity_textcustomer_entity_varchar
Customer accounts will not really be complete without a customer address. The address can be added via the Addresses tab under the customer edit screen in the admin area, as shown in the following screenshot:
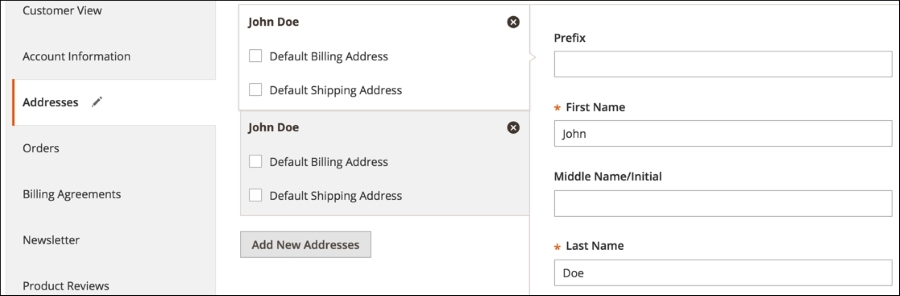
Note that Magento enables us to set one of the addresses as Default Shipping Address and Default Billing Address.
Like the customer entity, the customer address entity also uses the EAV structure to store its data.
The following list comprises tables that store the customer address entity:
customer_address_entitycustomer_address_entity_datetimecustomer_address_entity_decimalcustomer_address_entity_intcustomer_address_entity_textcustomer_address_entity_varchar
Besides the manual creation via the admin interface, we can create customers via code, as shown in the following code snippet:
$model = $this->_objectManager-> create('MagentoCustomerModelCustomer');
$model->setWebsiteId(1);
$model->setGroupId(1);
$model->setFirstname('John');
$model->setLastname('Doe');
$model->setEmail('[email protected]');
$model->save();
Here, we are using the instance manager to create a new model instance of the MagentoCustomerModelCustomer class. We can then set some properties through the defined methods and finally call the save method.
We can load and update an existing customer by using a code snippet that is similar to the following one:
$model = $this->_objectManager-> create('MagentoCustomerModelCustomer');
$model->setWebsiteId(1);
//$model->loadByEmail('[email protected]');
$model->load(1);
$model->setFirstname('Updated John');
$model->save();
We can use either the load or loadByEmail method call. The load method accepts the integer ID value of the existing customer entity, while loadByEmail accepts a string e-mail address. It is worth noting that setWebsiteId has to be called prior to any of the load methods. Otherwise, we will get an error message that says A customer website ID must be specified when using the website scope.
Finally, we can manage the creation and updating of customer information using the available API method. The following code snippet shows how to create a customer via a console cURL REST API call:
curl -X POST "http://magento2.ce/index.php/rest/V1/customers"
     -H "Content-Type:application/json"
     -H "Authorization: Bearer r9ok12c3wsusrxqomyxiwo0v7etujw9h"
     -d '{"customer": {"website_id": 1, "group_id": 1, "firstname": "John", "lastname": "Doe", "email": "[email protected]"}, "password":"abc123"}'
Once we have the authentication token, we can make a V1/customers POST request, passing a JSON object as data.
We can get the newly created customer via an API by executing a snippet of code that is similar to the following one:
curl -X GET "http://magento2.ce/index.php/rest/V1/customers/24"
     -H "Content-Type:application/json"
     -H "Authorization: Bearer lcpnsrk4t6al83lymhfs86jabbi9mmt8"
We can update an existing customer through an API by executing a snippet of code that is similar to the following one:
curl -X PUT "http://magento2.ce/index.php/rest/V1/customers/24"
     -H "Content-Type:application/json"
     -H "Authorization: Bearer r9ok12c3wsusrxqomyxiwo0v7etujw9h"
     -d '{"customer": {"id":24, "website_id": 1, "firstname": "John Updated", "lastname": "Doe", "email": "[email protected]"}, "password_hash":"cda57c7995e5f03fe07ad52d99686ba130e0d3e fe0d84dd5ee9fe7f6ea632650:cEf8i1f1ZXT1L2NwawTRNEqDWGyru6h3:1"}'
Here, we used the HTTP PUT method, passing the integer 24 as a part of the V1/customers/24 and as part of the body URL. The number 24 represents the ID value of a customer in the database. Also, note the password_hash value; without it, the update will fail.
Similar to customers, we can create a customer address using code, as shown in the following code snippet:
$model = $this->_objectManager-> create('MagentoCustomerModelAddress');
//$model->setCustomer($customer);
$model->setCustomerId(24);
$model->setFirstname('John');
$model->setLastname('Doe');
$model->setCompany('Foggyline');
$model->setStreet('Test street');
$model->setCity('London');
$model->setCountryId('GB');
$model->setPostcode('GU22 7PY');
$model->setTelephone('112233445566');
$model->setIsDefaultBilling(true);
$model->setIsDefaultShipping(true);
$model->save();
Here, we used the instance manager to create a new model instance of the MagentoCustomerModelAddress class. We then set some properties through the defined methods and finally called the save method.
We can load and update the existing customer address by using a code snippet that is similar to the following one:
$model = $this->_objectManager-> create('MagentoCustomerModelAddress');
$model->load(22);
$model->setCity('Update London');
$model->save();
Here, we used the load method to load an existing address by its ID value. Then, we called the setCity method passing it the updated string. After the save method is executed, the address should reflect the change.
Surprisingly, a customer address cannot be created or updated directly via an API call, as there is no POST or PUT REST API defined. However, we can still get the existing customer address information by using an API, as follows:
curl -X GET "http://magento2.ce/index.php/rest/V1/customers /addresses/22"
     -H "Content-Type:application/json"
     -H "Authorization: Bearer lcpnsrk4t6al83lymhfs86jabbi9mmt8"
The entire list of available customer APIs can be seen in the vendor/magento/module-customer/etc/webapi.xml file.