Section 9. Creating Custom Merges with Word Fields
The simple mail merges you've learned about so far insert data by referencing fields in the specified data source. Nine times out of ten, that's all you need for a mail merge. But wouldn't it be nice for that tenth time to be able to do something a little more complex?
Suppose you are creating a letter to all your customers, but you want the letter to say different things depending on the values in certain fields of your database. For example, perhaps you want customers who have not ordered from you in more than six months to receive a special promotional offer. Or perhaps you want to be able to enter a different promotional offer each time you run the merge and be prompted to enter the offer in a dialog box. All that and more is possible by using fields.
There are two types of fields: merge fields and Word fields. So far you have used merge fields—that is, fields that come from the data source you specify for a mail merge. These fields exist only because of the data source connection. Word fields, on the other hand, are preprogrammed into Word itself and can be used in any type of document, not just merge documents.
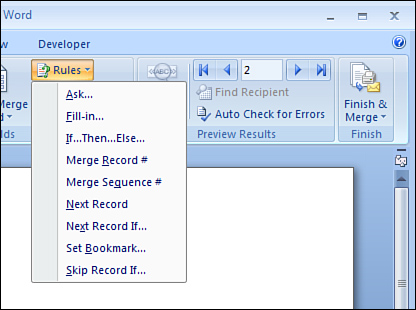
The subject of fields and their syntax is complex enough to fill a Short Cut all its own. For now, though, let's look at a few specific fields that are useful when doing merges. They're so useful for merges, in fact, that they appear on a special menu on the Mailings tab. Click Rules to see the list, as shown in Figure 1.28.
Figure 1.28. Certain Word fields that are especially useful in mail merges appear on the Rules menu on the Mailings tab.
Collecting Information with a {Fillin} Field
A {Fillin} field prompts the user for an entry and then places it in the document. You can set it up to ask you only once per merge or to ask you separately for each copy.
For example, suppose you have a standard form letter in which you offer customers a certain percentage of discount if they bring the letter with them into your store on certain dates. You can reuse the same main document time after time and set it up to ask you each time how much discount you want to offer and what the date range should be.
To insert a {Fillin} field, follow these steps:
- Position the insertion point where you want the field to appear.
- On the Mailings tab, click Rules and then choose Fill-In. The Insert Word Field: Fill-In dialog box opens.
In the dialog box it's listed as Fill-In, but the actual field code that is inserted is {Fillin}.
- In the top part of the dialog box, enter the prompt that will appear to the user.
- (Optional) In the bottom part of the dialog box, shown in Figure 1.29, enter a default value that will be used if the user does not fill in the dialog box (for example, if he clicks Cancel or closes the dialog box without typing anything).
Figure 1.29. Create a {Fillin} field.

- (Optional) If the value should be the same for every record in the merge, mark the Ask Once check box. Otherwise, Word will ask you repeatedly, once for each record.
- Click OK to insert the field.
Whenever the document is opened or the merge is initiated, the field will be updated and will prompt the user for the entry.
{Fillin} fields are useful in situations in which the value that the user enters does not need to be stored for reuse. In the aforementioned example, the user enters a discount amount to offer to the customers, but that discount amount does not need to be stored for calculations; it is simply placed in the document. If you need to store the user's entry as a variable and then perform a calculation on it or reprint it later in the document, use an {Ask} field instead, as described in the following section.
Collecting and Storing Information with an {Ask} Field
An {Ask} field is like a {Fillin} field, except the value that the user enters is stored in a bookmark for later reuse. So, for example, you could prompt for a certain value, such as a discount percentage, and then have that value be repeated in several places in the document.
A bookmark is a named location or text entry in the document. Bookmarks have a variety of uses. You can create bookmarks to mark certain paragraphs and then set up hyperlinks that jump directly to those paragraphs, for example.
When you use an {Ask} field to prompt the user for an entry, that entry is stored in a bookmark. The bookmark in this case is like a variable you might set in computer programming. You can then insert that bookmark's content in various places in the document by using a {Ref} field.
For example, at the beginning of the mail merge, you might use an {Ask} field to prompt the user for a salesperson's name and to store that name in a bookmark called Employee. Then that person's name can be set to appear in the body of the letter and also on the signature line.
To insert an {Ask} field and then reference its bookmark in the document, follow these steps:
- Move the insertion point to the beginning of the document. Do not select any text.
- Create the bookmark. To do so:
• On the Insert tab, click Bookmark.
• In the Bookmark dialog box, type the name you want to use.
• Click Add.
- Create references to the bookmark as needed in the document. To do this:
• Move the insertion point to the location where the bookmark's content should be inserted.
• On the Insert tab, click Quick Parts and then click Field.
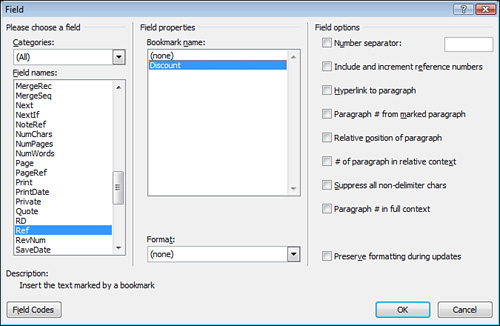
• On the Field Names list, click Ref.
• In the Bookmark Name list, click the bookmark name (see Figure 1.30).
Figure 1.30. Reference a bookmark with the {Ref} field.
• Click OK.
- Move the insertion point to the beginning of the document.
- On the Mailings tab, click Rules and then click Ask. The Insert Word Field: Ask dialog box opens.
- On the Bookmark list, select the bookmark you created earlier.
- In the Prompt box, type the text that should appear in the user prompt.
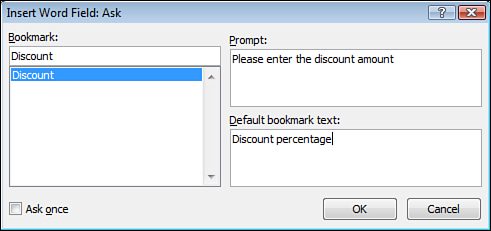
- In the Default Bookmark Text box, type the default text to use if the user does not enter any text. Figure 1.31 shows the completed dialog box.
Figure 1.31. Create an {Ask} field that prompts the user to fill in the value for a bookmark.
- Click OK.
- To test the field(s) in the document, select the entire document (Ctrl+A) and press F9 to update all the fields.
Setting Up Conditions with an If…Then…Else Field
The {If} field (aka the If…Then…Else field) can be used to insert different text in each copy of the merge depending on the value of a certain field. For example, suppose you are going to send the mail merge letter to customers in several different countries, and depending on the country, you would like to offer a different promotion. In the spot where the sentences will appear with the promotional offer, you can insert an {If} field and specify the value of the Country field as the condition in choosing one block of text or another to be inserted.
To create an {If} field that displays different text based on a condition, follow these steps:
- Position the insertion point where you want the conditional text to appear.
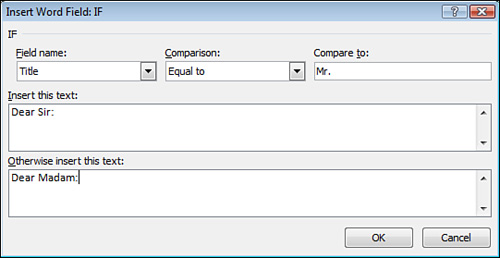
- On the Mailings tab, click Rules and then click If…Then…Else. The Insert Word Field: IF dialog box opens.
- In the Field Name list, select the field that will provide the criterion.
- In the Comparison list, select the comparison operator, such as Equal To or Greater Than.
- In the Compare To box, type the value to which to compare the field.
- In the Insert This Text box, type the text string to display if the comparison is true. (Leave it blank if you want nothing to display if true.)
- In the Otherwise Insert This Text box, type the text string to display if the comparison is false. (Leave it blank if you want nothing to display if false.) Figure 1.32 shows a completed example.
Figure 1.32. Use an {If} field to set up different scenarios based on the entry in one of the fields.
- Click OK to insert the field.
Be sure to preview the merge before sending it to a printer after inserting an {If} field to make sure the results are as you intended.
Using a Field to Set Bookmark Text
Earlier you saw how to use {Ask} to set a bookmark's value based on input from the user. A related field, {Set}, is used to set a bookmark without user input. You could use this to set an initial value for a bookmark, for example. (Then later in the merge you could allow the user to change that value with a {Fillin} or {Ask}.)
To insert a {Set} field into a document, follow these steps:
- From the Mailings tab, click Rules and then click Set Bookmark. The Insert Word Field: Set dialog box opens.
- On the Bookmark list, click the bookmark name for which you want to set a value.
- In the Value box, type the value to which to set the bookmark.
- Click OK.
One important usage for the {Set} field is within an {If} field. You might want a bookmark to be set one way if an {If} statement is true and another way if it is false. For example, if a letter recipient is female, you might want the pronouns in the document to be feminine (her/hers); otherwise, the pronouns should be masculine (him/his).
However, to nest a {Set} within an {If}, you must manually edit the field code, and you must manually create the {If} statement. (You can't use the Rules button's If…Then…Else insertion method.) Therefore, this might be a topic you want to postpone until you've spent some time studying field usage in Word. A good resource for this is Special Edition Using Microsoft Office Word 2007 by Faithe Wempen (Que Publishing, ISBN 0-7897-3608-X).
Assigning Numbers to Merge Records
Sometimes when creating a large number of merged copies, you need to sequentially number the copies as they are generated so that each copy has a unique identifying number. There are two ways of doing this in Word: Merge Record # {MergeRec} and Merge Sequence # {MergeSeq}.
The {MergeRec} field assigns a number to each copy based on the actual number of the record within the data source. If you skipped over any records in the data source, the numbering skips, too. For example, if a filter excluded the first 100 records, {MergeRec} would begin with 101.
The {MergeSeq} field assigns a number to each copy based on the records that were included in the merge, not the records in the original data source. So even if you skipped over 100 records, {MergeSeq} would always begin with 1.
To insert either of these, select it from the Rules menu on the Mailings tab: Merge Record # or Merge Sequence #. There are no options for either of these; they simply insert a code.
Advancing to the Next Record (or Not)
As you saw in the section "Setting Up Fields in Directories," you can insert a {NextRecord} field to force the merge to continue to the next record without starting a new copy of the main document. To do this, on the Mailings tab, choose Rules, Next Record. This is the same field function as the <<NextRecord>> merge field you saw earlier, but in this case because it is a manually inserted Word field, it uses curly braces.
Two related fields, {NextRecordIf} and {SkipRecordIf}, enable you to set up conditions whereby you either process or skip the next record in the merge according to certain conditions you specify. Each of these has its own command for insertion on the Rules menu, and each opens a dialog box in which you can set up a criterion based on the contents of a field in the data source. Neither of these are very commonly used; if you want to skip certain records based on the content of a certain merge field, it's easier to simply set up a filter for the data source that excludes certain values for that field.