Section 2. Performing a Letter Merge with the Mail Merge Wizard
The Mail Merge Wizard is a carryover feature from Word 2003. It guides you through the process of setting up a mail merge for letters, email messages, envelopes, labels, or a directory. Mail merge beginners find it useful because it prompts you for each step of the process; mail merge experts seldom use it because it is a bit clunky and because when you understand the process, creating your own merges on-the-fly is faster.
Because the rest of this Short Cut covers each step of the mail merge process in much greater detail, I won't go into detail for each step here. Instead, I'll step you through a simple Letters type of merge using the Mail Merge Wizard and your Microsoft Outlook contact list. After you've completed the rest of this Short Cut, you can come back to the Mail Merge Wizard with a better understanding of its options.
To use the Mail Merge Wizard to create a set of mail-merged letters based on the addresses in your Microsoft Outlook contact list, follow these steps:
- Open a new blank document (using the New command on the Office menu).
- Click the Mailings tab. In the Start Mail Merge group, click Start Mail Merge and then click Step by Step Mail Merge Wizard. The Mail Merge task pane appears.
- In the Mail Merge task pane, click Letters (see Figure 1.2, left). Then at the bottom of the task pane, click Next: Starting Document.
Figure 1.2. Steps 1 through 3 of the Mail Merge Wizard.
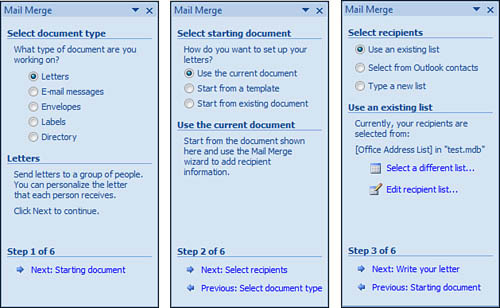
- In the Select Starting Document section of the task pane, leave Use the Current Document selected (see Figure 1.2, center). Then click Next: Select Recipients.
- Click Select from Outlook Contacts.
- Make sure the correct contact list is selected by doing the following:
• Click Choose Contacts Folder.
• In the Select Contacts dialog box, click the desired contact folder. The name of the folder depends on your mail setup.
• Click OK.
- If the Mail Merge Recipients dialog box does not open automatically, click Edit Recipient List.
- (Optional) If you don't want to send the letter to every contact in the data source, clear the check box next to each entry you want to exclude.
- Click OK.
- At the bottom of the task pane, click Next: Write Your Letter.
- Position the insertion point at the top of the document and then click Address Block (see Figure 1.3, left).
Figure 1.3. Steps 4 through 6 of the Mail Merge Wizard.

- In the Insert Address Block dialog box, select any options to fine-tune the formatting of the recipient address and then click OK. An <<AddressBlock>> code appears in the document.
To save you some time, Word has some built-in merge blocks that combine the data from multiple fields. To make up a standard postal mailing address, Word combines fields such as first name, last name, address, city, state, and ZIP into a single field called <<AddressBlock>>. Similarly, it combines fixed text such as "Dear" with first and/or last name fields to create the <<GreetingLine>> field.
You are free to use individual fields in the mail merge if you prefer, or if the address and greeting blocks aren't delivering the results you want. To access the full list of available fields in the Mail Merge Wizard, choose the More Items option instead of Address Block or Greeting Line.
- Press Enter a few times after the <<AddressBlock>> code to create some space and then click Greeting Line in the task pane. A greeting line is the line at the beginning of a letter that usually starts with "Dear." It's similar to an address block in that Word builds it automatically by drawing from multiple fields in the database.
- In the Insert Greeting Line dialog box, choose a greeting style and then click OK. A <<GreetingLine>> code appears in the document.
- Finish composing the letter as you would any other letter. When you are finished, at the bottom of the task pane, click Next: Preview Your Letters.
- In the Preview Your Letters section of the task pane, use the << and >> buttons to move between previews of the letters. To exclude a recipient, click Exclude This Recipient when that person's preview appears (see Figure 1.3, center).
- At the bottom of the task pane, click Next: Complete the Merge.
- To send the letters to the printer, click Print (see Figure 1.3, right). A Print dialog box appears; print the letters from there.
Or to open the letters in a new document for further editing, follow these steps:
• Click Edit Individual Letters. The Merge to New Document dialog box appears.
• Click OK. The letters open in a new document.
- Save the main document if you think you will want to perform this same merge again. Otherwise, close the main document without saving.
Now that you've seen a bit of what mail merge can do via the semi-automated wizard process, let's take a closer look at each step of the process.