
Chapter 1. Helicopters
An airplane by its nature wants to fly....A helicopter does not want to fly. There is no such thing as a gliding helicopter.
—Harry Reasoner, US broadcast journalist
There is something amazing when you really look at a helicopter hovering in the sky. Airplanes must keep moving forward so that the airflow over the wings provides lift and keeps it in the sky. But helicopters behave differently, don’t they?
What can we observe about a hovering helicopter?
- Its largest blade is parallel to the ground, as opposed to an airplane’s propeller being perpendicular.
- The small blade on the rear of the helicopter is perpendicular to the ground, but it points away from the side of the helicopter instead of to the front like an airplane.
Now consider the following questions:
- Why do the blades on a helicopter have to be at a slight angle? Explore how an airplane’s wings get lift and then try to determine what the “wing” on a helicopter is and how it creates lift.
- Do helicopters take more or less energy to stay in the sky than an airplane?
- What are things helicopters can do that airplanes cannot?
Paper Catapult Helicopter
This simple little paper and tape helicopter project has been popular for a long time and done with many different styles. The traditional copters can easily be thrown a few feet in the air for a few feet of flight. For a slightly longer flight, it can be dropped from a second story balcony. But there’s actually a much easier way to get the helicopter up to a good height—just create a rubber band catapult! Using a notched dowel or your finger, you can fire this little copter 30’ in the air for long flights down! For our helicopter, we’ve also chosen to add an LED (and battery) that adds some nice flash to the project. Even better, the helicopter can be flown at night so that an interesting lighting effect is produced as it comes down.
But don’t stop there! Each chapter in this book (and future books) will have multiple projects. For the second helicopter project, we’ll be building a pull-string stick heli, a fun little project that uses PVC, a material you might not have worked with before. We’ll also examine how a person’s muscles can be used to transfer energy to the helicopter.
Let’s take a look first at what’s needed to build the basic paper helicopter (seen in Figure 1-1) and rubber band launcher.

Figure 1-1. The paper catapult helicopter.
Build the Paper Catapult Helicopter
The following steps each include a photo that can be used by the instructor or student to verify a task before moving on to the next step.
Step 1Gather the supplies shown in Figure 1-2. You can find a complete list of the materials required for this project in “Tools and Supplies”.
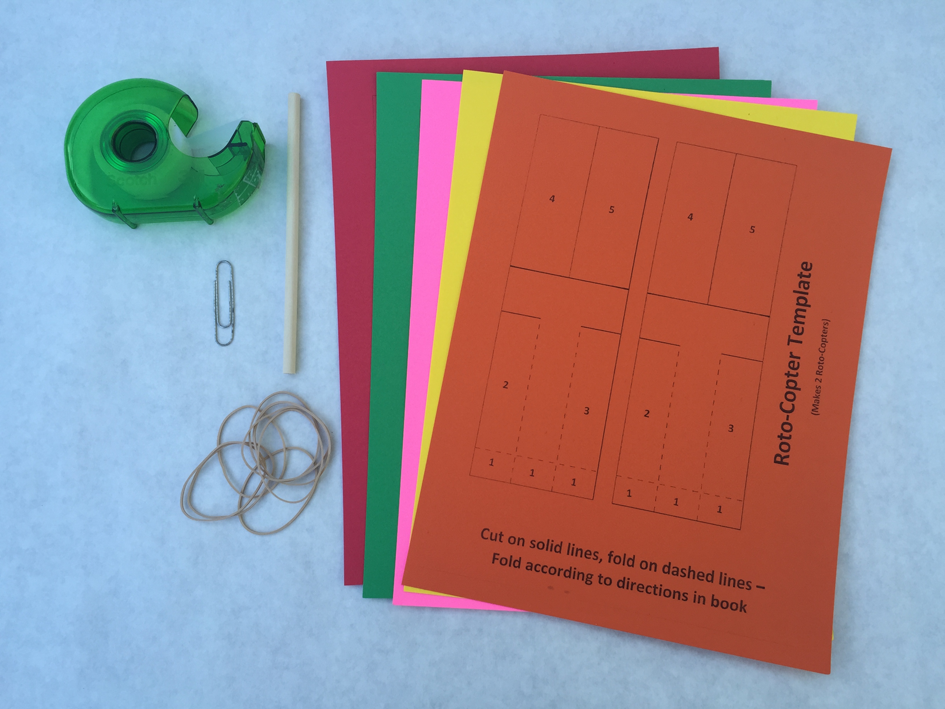
Figure 1-2. Basic supplies for paper catapult helicopter.
Step 2Cut out the paper pieces, making sure to cut only on the solid lines, as shown in Figure 1-3.

Figure 1-3. Three paper cutouts will make up the helicopter body.
Step 3On the larger piece of paper labeled with the three 1s and 2 and 3, fold on the dotted line just above the 1s, as shown in Figure 1-4.

Figure 1-4. Fold on the dotted line above the 1s.
- Step 4Insert a paper clip in the middle row of the paper (between rows 2 and 3) so that it clips on the flap created in step 3. Use a piece of clear tape to hold the paper clip in place, as shown in Figure 1-5.
- Step 5Fold row 2 to the right (along the dotted line), as shown in Figure 1-6.
Step 6Fold row 3 to the left (along the dotted line), turn sideways, and tape both ends closed to create the main body, as shown in Figure 1-7.
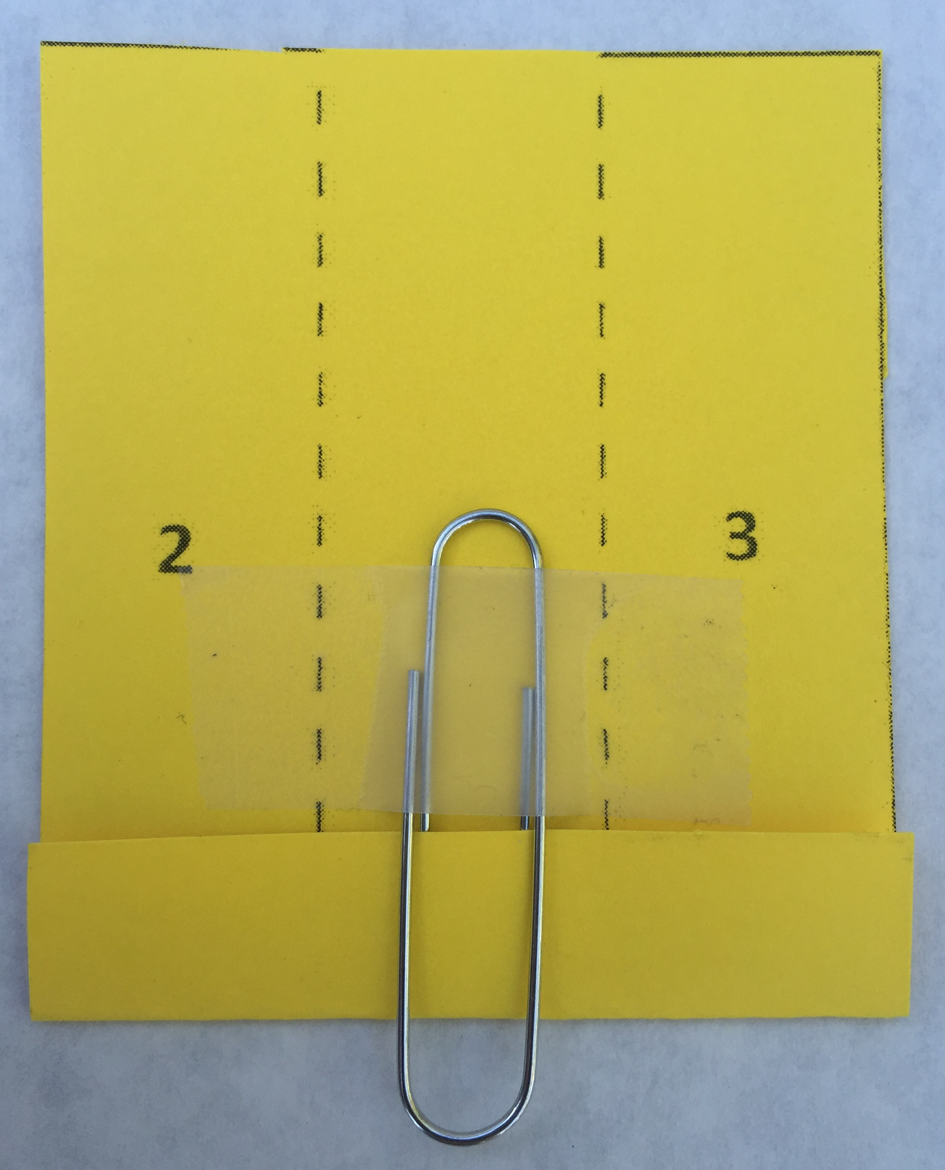
Figure 1-5. Tape a paper clip over the folded section.
Step 7Take the piece of cut paper with the numeral 4 on it and lightly bend it on the dotted line. Do not fold it completely. Tape this piece onto the main body you made in step 6 at a slight angle to the left, as shown in Figure 1-8.
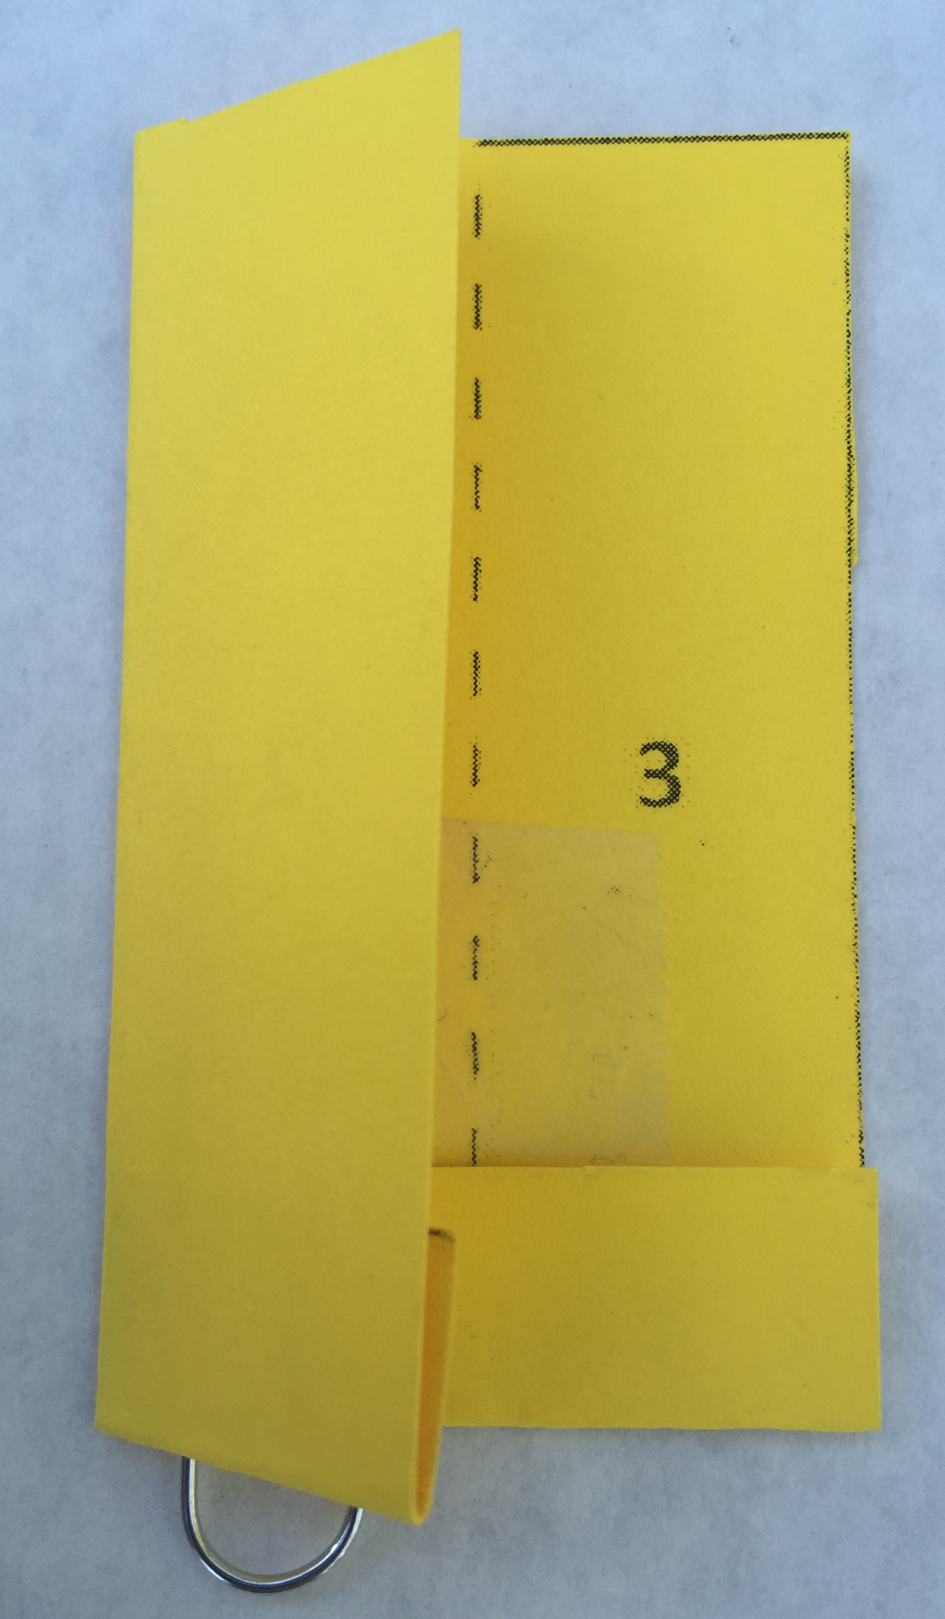
Figure 1-6. Fold on the dotted line to the right of the numeral 2.

Figure 1-7. Fold again on the dotted line to the right of the numeral 3.

Figure 1-8. Tape the main body to cutout 4.
- Step 8Flip the main body over. Take the piece of cut paper with the numeral 5 on it and lightly bend it on the dotted line. Do not fold completely. Tape this piece to the main body at a slight angle to the left, as shown in Figure 1-9.
- Step 9Bend blade 4 and blade 5 further down and place a piece of clear tape across the two blades so that they are perpendicular to the main body, as shown in Figure 1-10.
Step 10Thread the rubber band through the exposed part of the paper clip, as shown in Figure 1-11.
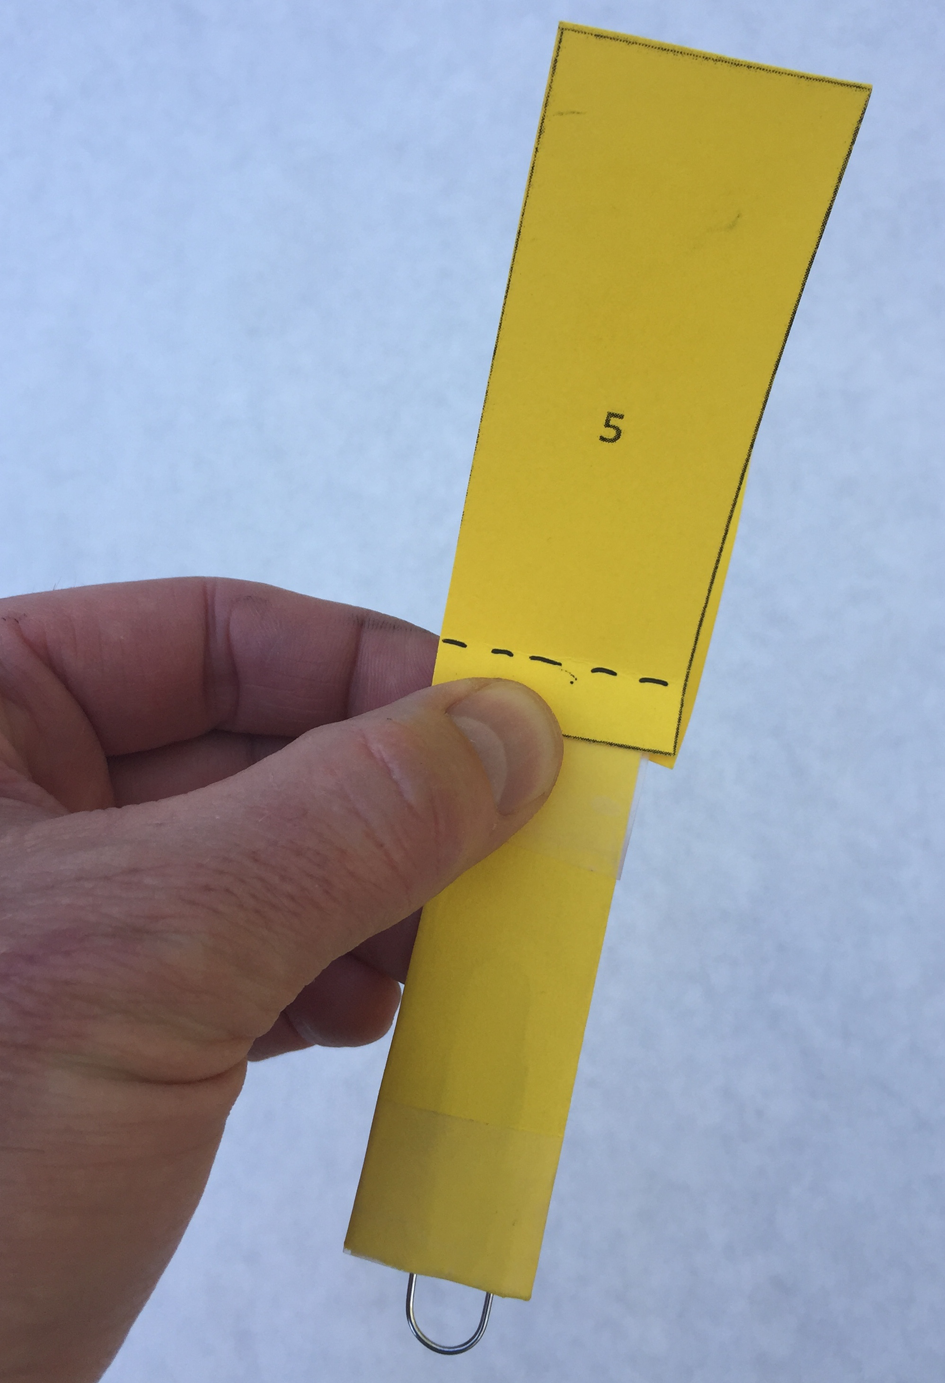
Figure 1-9. Flip the main body over and tape it to cutout 5.
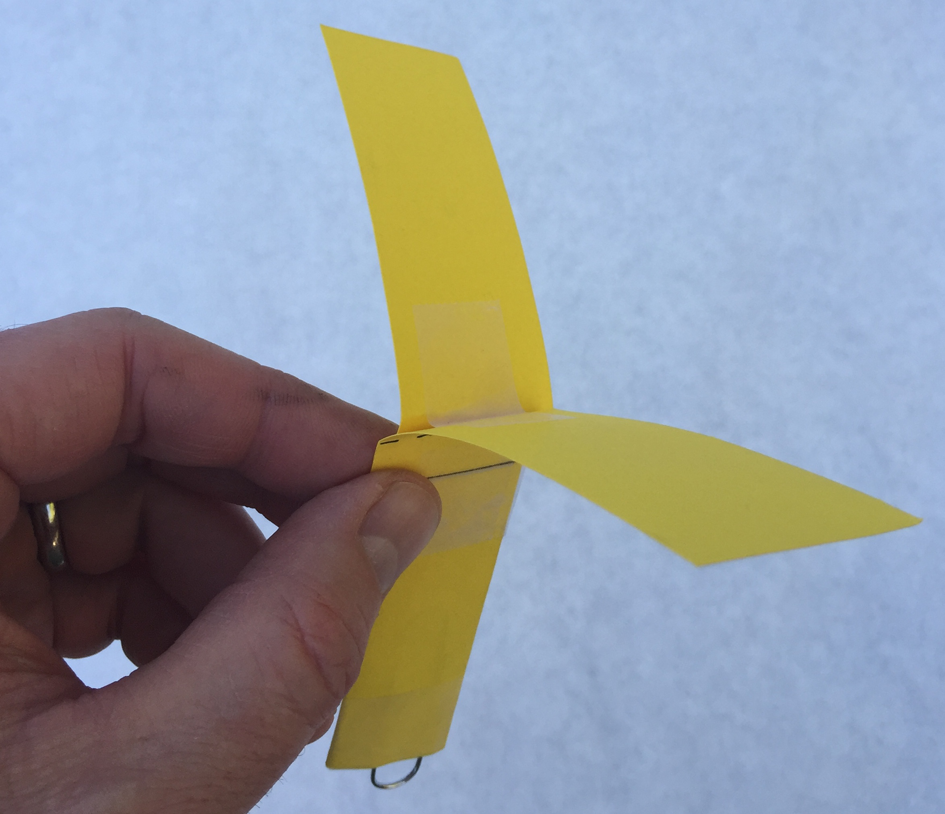
Figure 1-10. Fold down two blades (4 and 5) in opposite directions, and tape across the top.
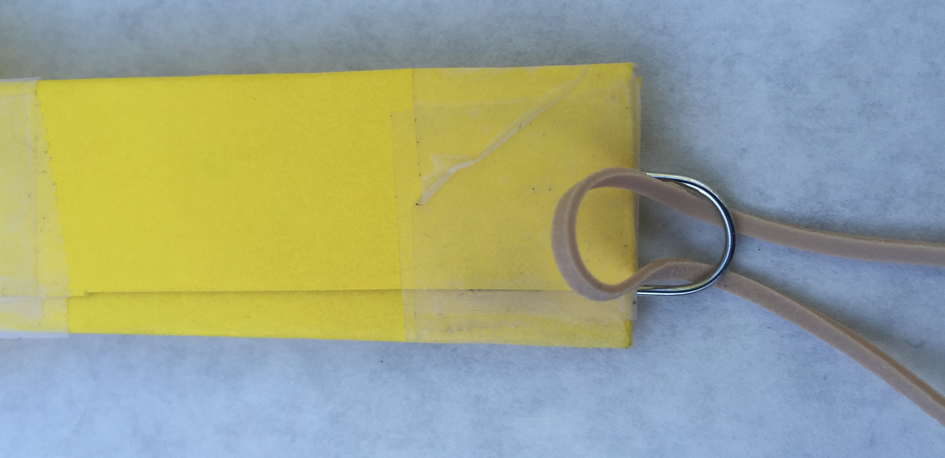
Figure 1-11. Insert rubber band through paper clip.
Step 11Loop one end of the rubber band through the other end and pull tight to secure the rubber band, as shown in Figure 1-12.
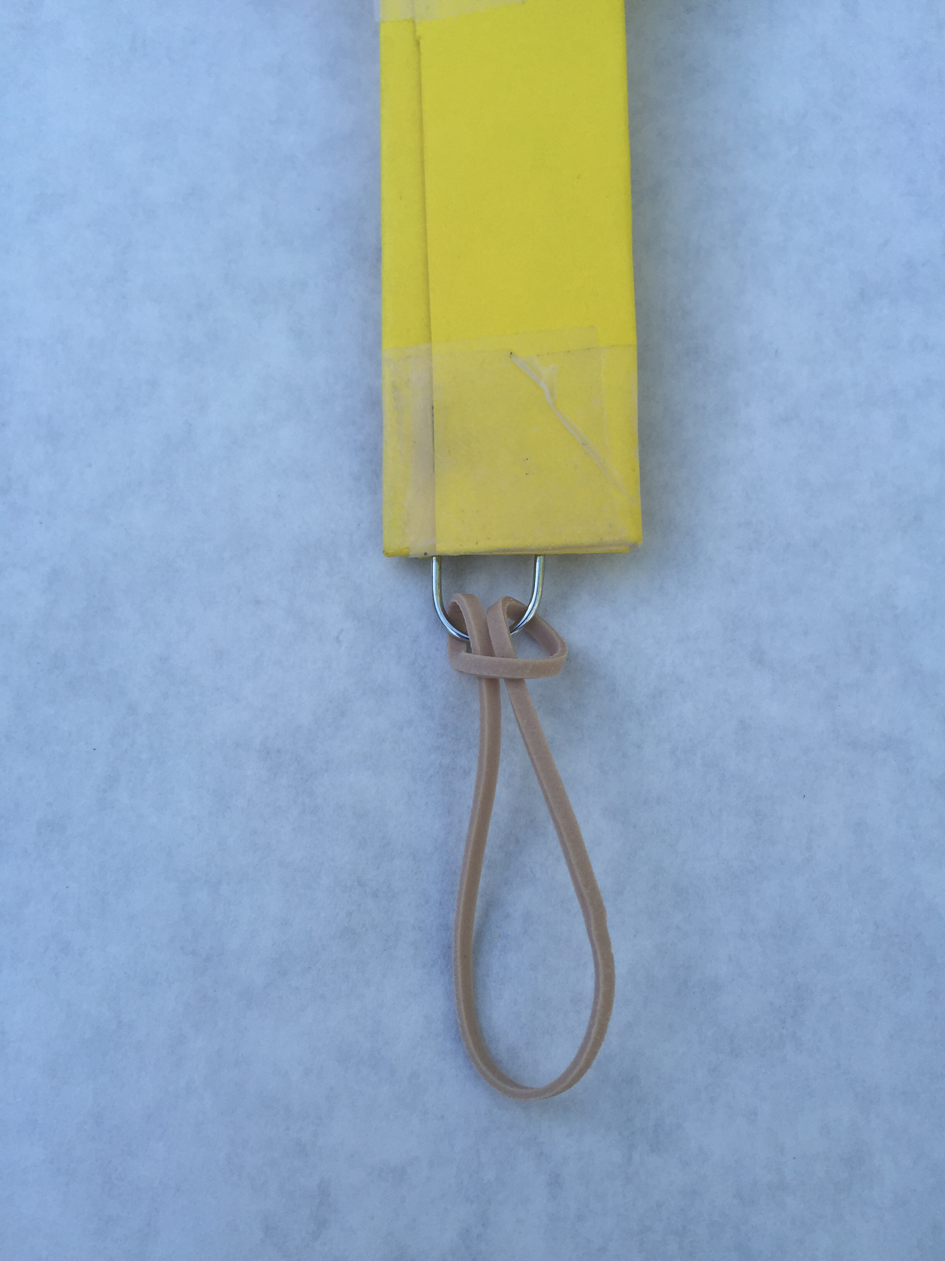
Figure 1-12. Pull one end of rubber band through other end.
Step 12Figure 1-13 shows the completed paper catapult helicopter.

Figure 1-13. The completed paper catapult helicopter.
Build the Helicopter Launcher
To make the helicopter fly, it needs a launcher.
- Step 1Insert a 6” length of dowel into a vise and cut a notch in one end using a coping saw, as shown in Figure 1-14.
Step 2Insert the end of the rubber band into the notch. Hold the dowel with one hand while holding the helicopter (with wings folded down against the main body) in the other. Hold the dowel up and pull down on the helicopter (toward your body), as shown in Figure 1-15.
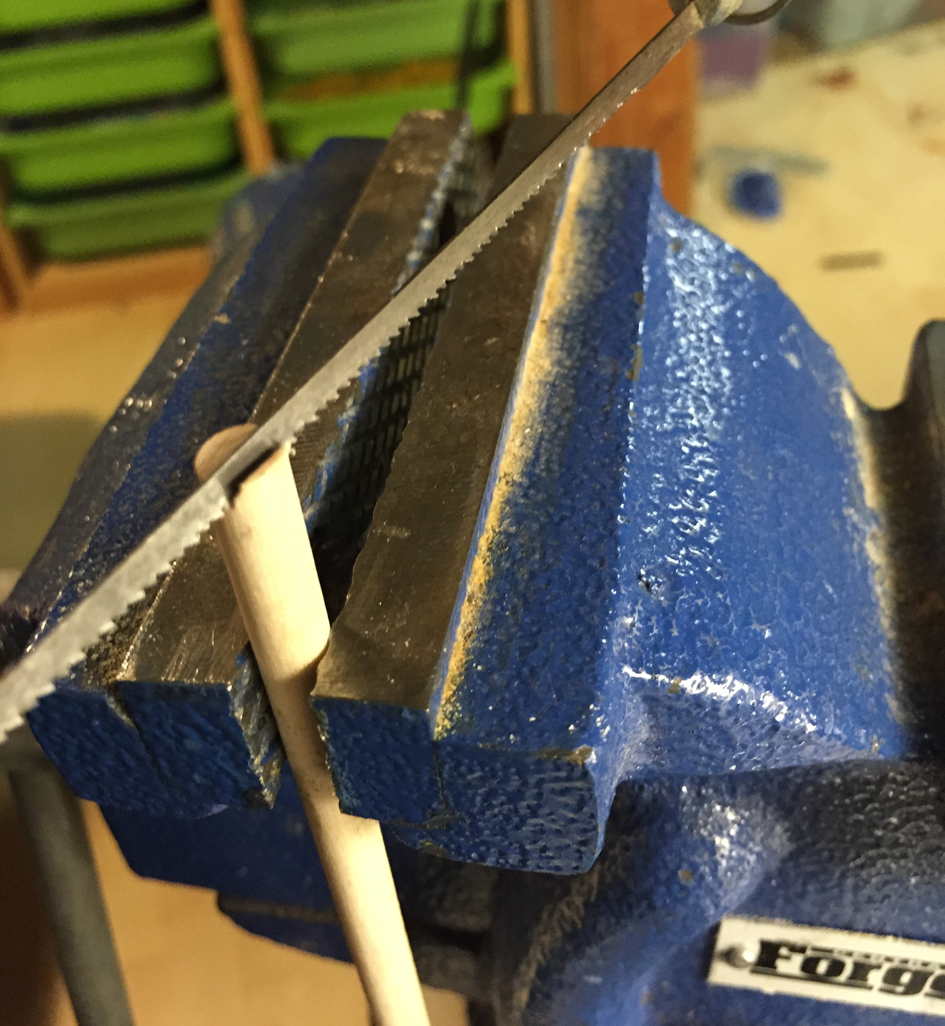
Figure 1-14. Hold dowel in a vise grip before cutting notch.
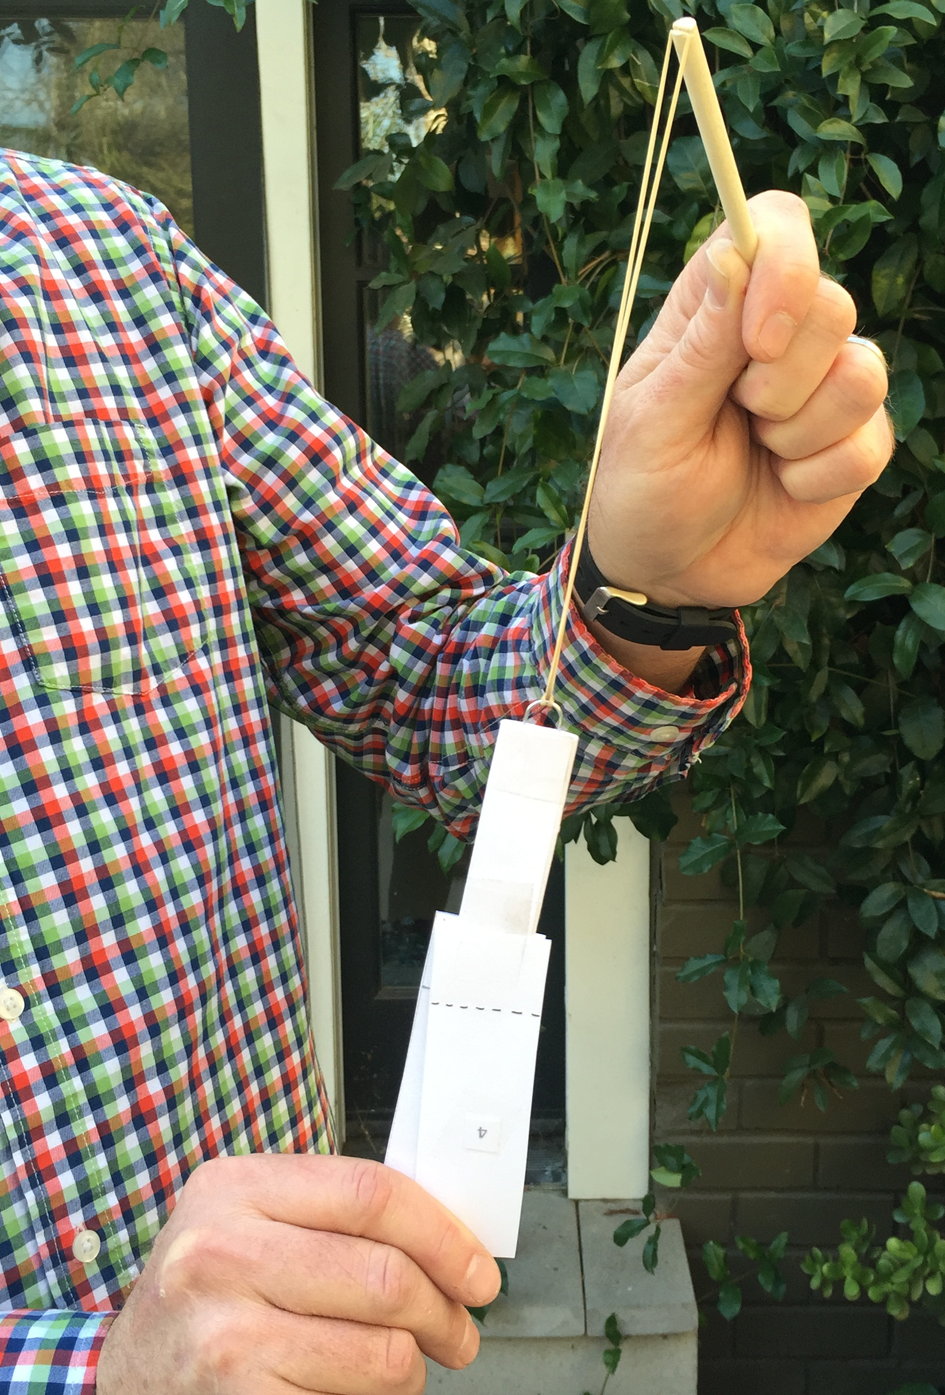
Figure 1-15. Point dowel toward the sky, insert rubber band, and pull down.
Step 3Release the helicopter and it should fly high into the sky before the blades open up. The blades will spin as the paper helicopter returns safely to the ground, as shown in Figure 1-16. If the blades dont’t fold out like they should, adjust the angle of blades 4 and 5 until you get great flights.
Figure 1-16. The blades open, and the helicopter spins as it returns to the ground.
Add an LED for Night Launch
Once you’re happy with your paper helicopter, there’s an easy upgrade that can be added to allow for night launches.
- Step 1Gather the LED and coin battery (and some clear tape), as shown in Figure 1-17.
Step 2Tape the longer “leg” of an LED to the positive side of the battery (look for the positive + on one side of the coin battery; the flip side is negative -) and wrap the tape around to complete the circuit, as shown in Figure 1-18.

Figure 1-17. An LED and a coin battery
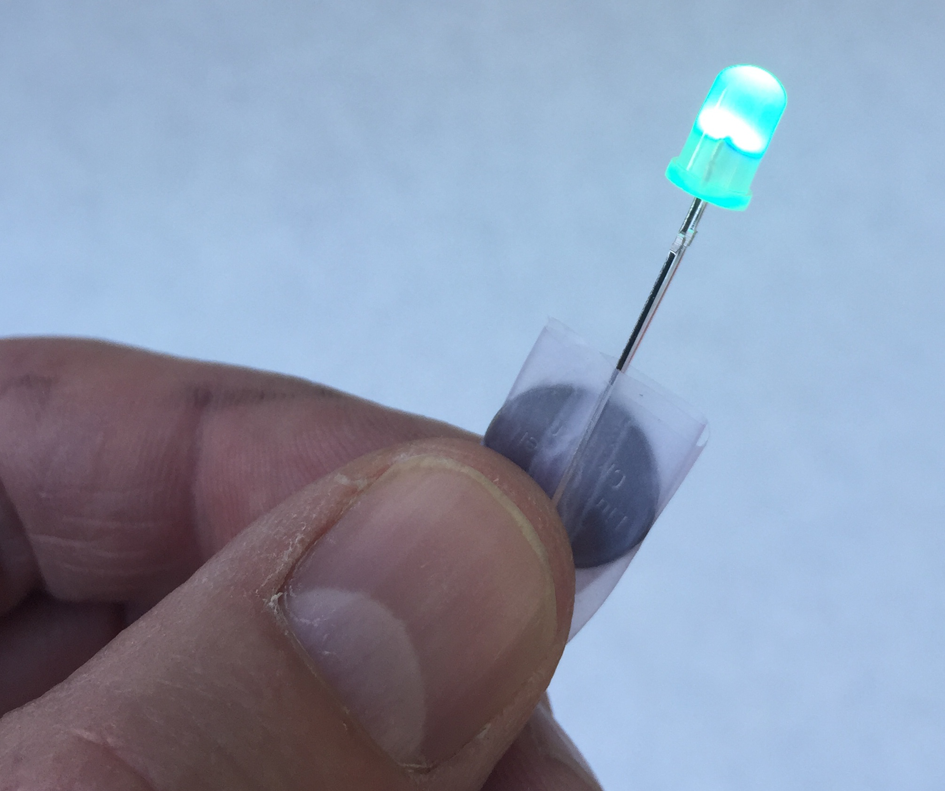
Figure 1-18. Light the LED by taping legs to the coin battery.
Step 3Tape the LED and battery to your helicopter, as shown in Figure 1-19.

Figure 1-19. LED and coin battery taped to the main body.
Pull-String Stick Helicopter
This pull-string stick copter is also a classic made from easy-to-find materials. The materials for this project are inexpensive; if you’re working with a group, just cut enough for everyone. After building, kids will have a blast sending these copters up into the sky at the local park or school yard. You can see an example of a completed pull-string copter in Figure 1-20.
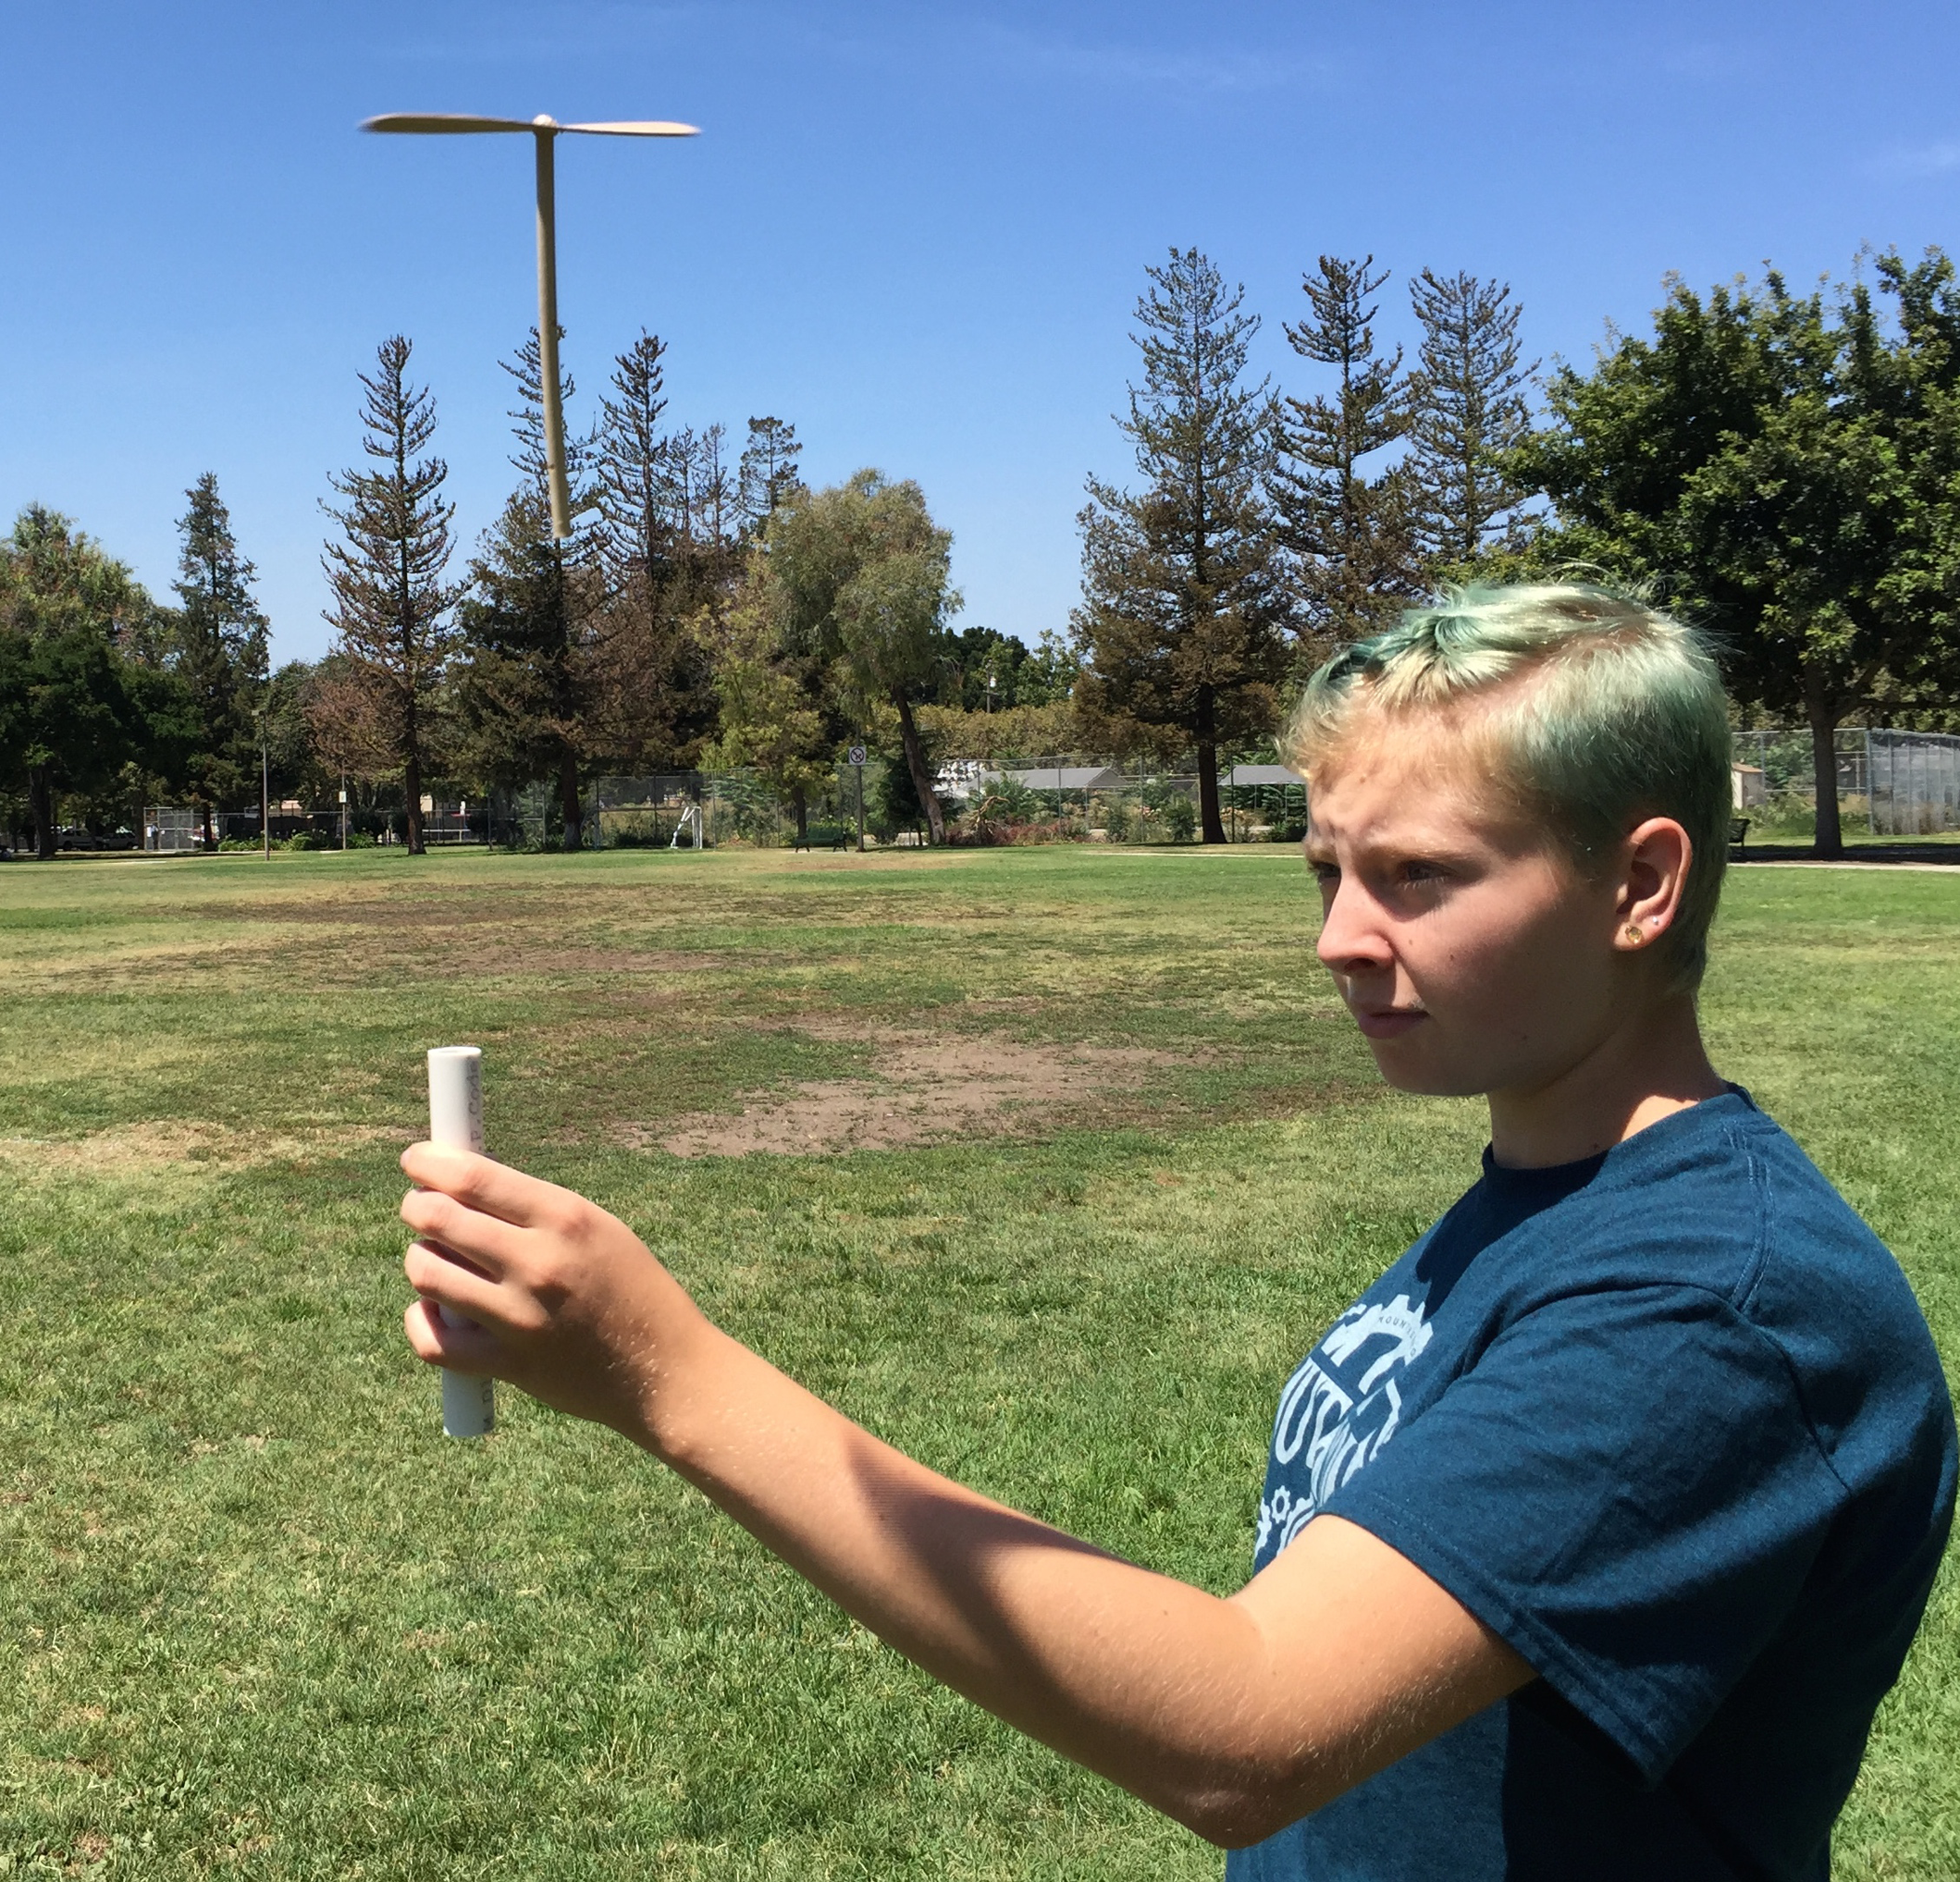
Figure 1-20. The finished pull-string stick helicopter lifting out of the launch tube!
Build the Pull-String Stick Helicopter
Step 1Gather the supplies shown in Figure 1-21.
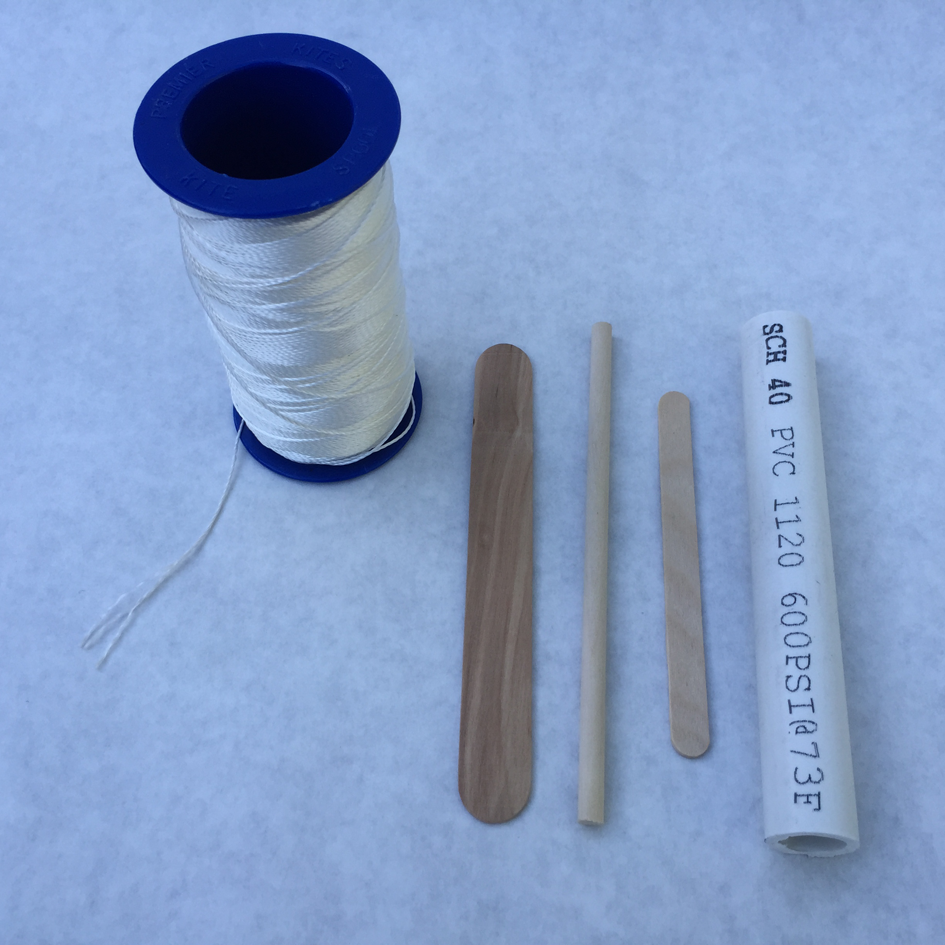
Figure 1-21. The supplies for the pull-string stick helicopter.
Step 2Mark a jumbo 6” craft stick in the middle (at 3”) with a permanent maker, as shown in Figure 1-22.
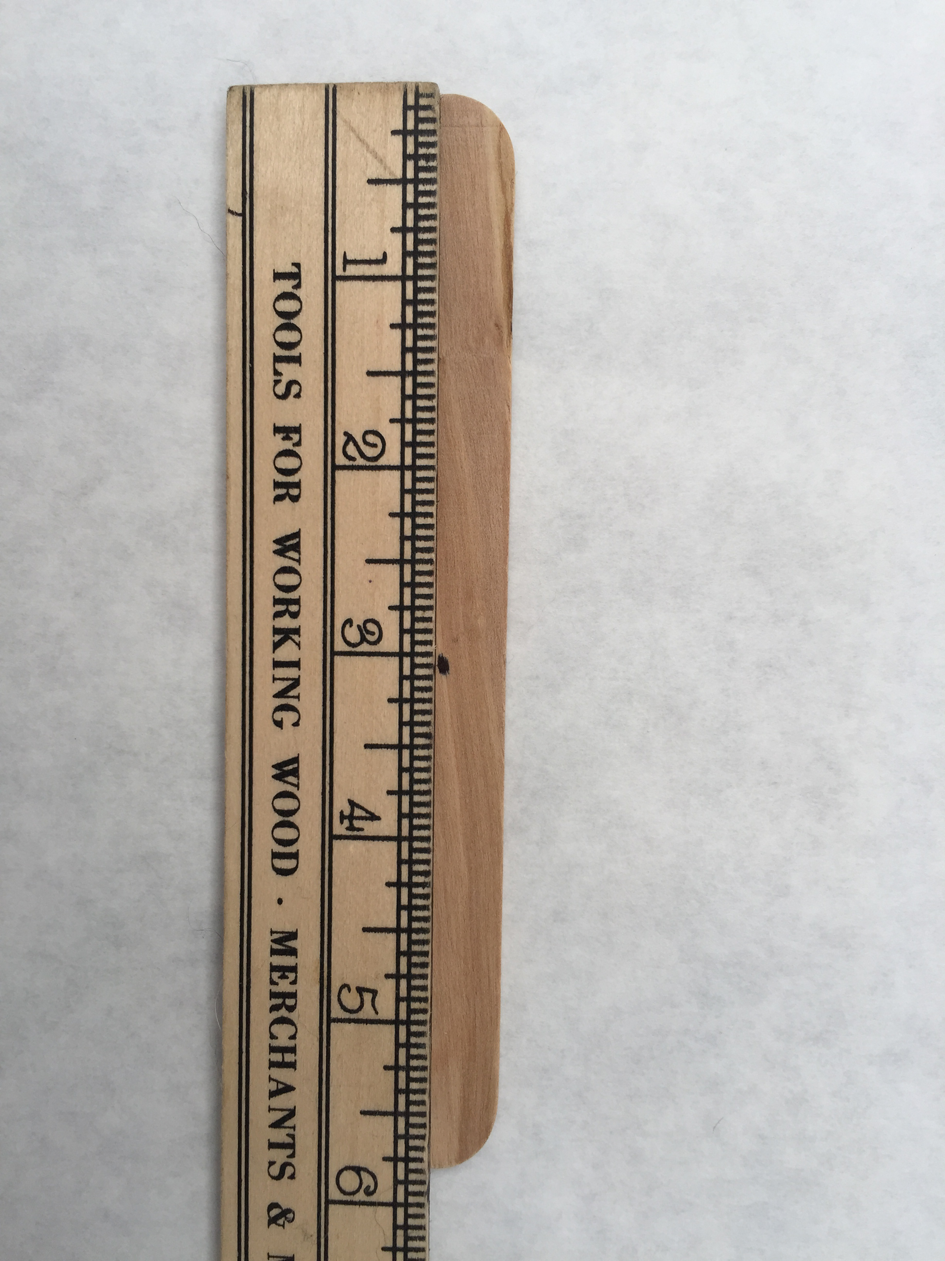
Figure 1-22. Make a mark in the middle of a craft stick.
Step 3Soak a craft stick in water for 15 minutes, as shown in Figure 1-23.
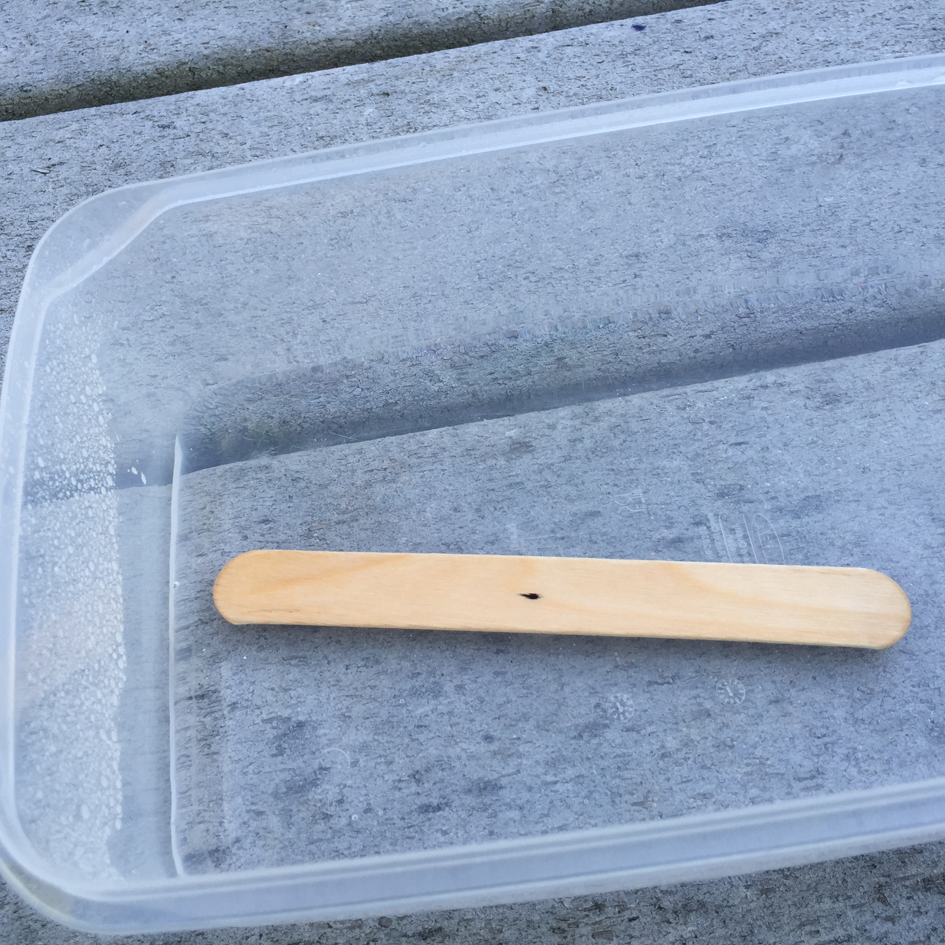
Figure 1-23. Soak the craft stick in water.
Step 4Place the soaked stick on a scrap of wood and carefully drill a 1/4” hole on the mark, as shown in Figure 1-24.
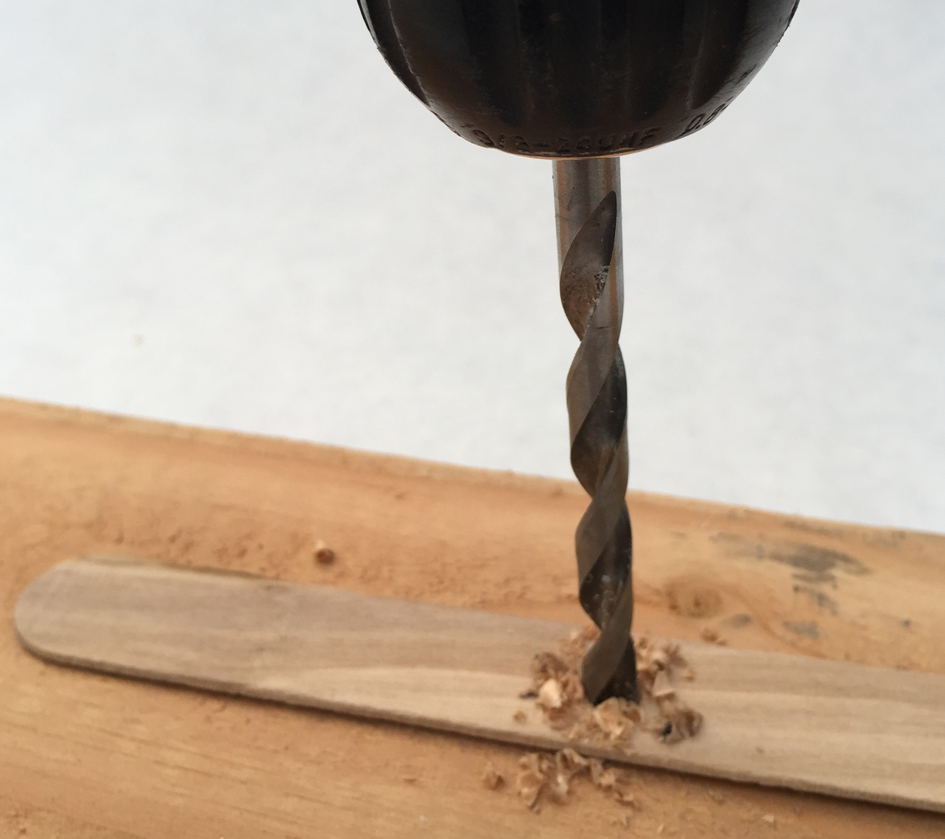
Figure 1-24. Drill a hole at the mark (middle of craft stick).
Step 5Now you’re going to shape your helicopter blade. You’ll need two people for this one. One person should twist the wet stick with the left side of the stick twisted up and the right twisted down. While the first person continues to hold the stick in the twisted position, the second person should use a hair dryer for a few minutes to dry the stick until it’s set, as seen in Figure 1-25.
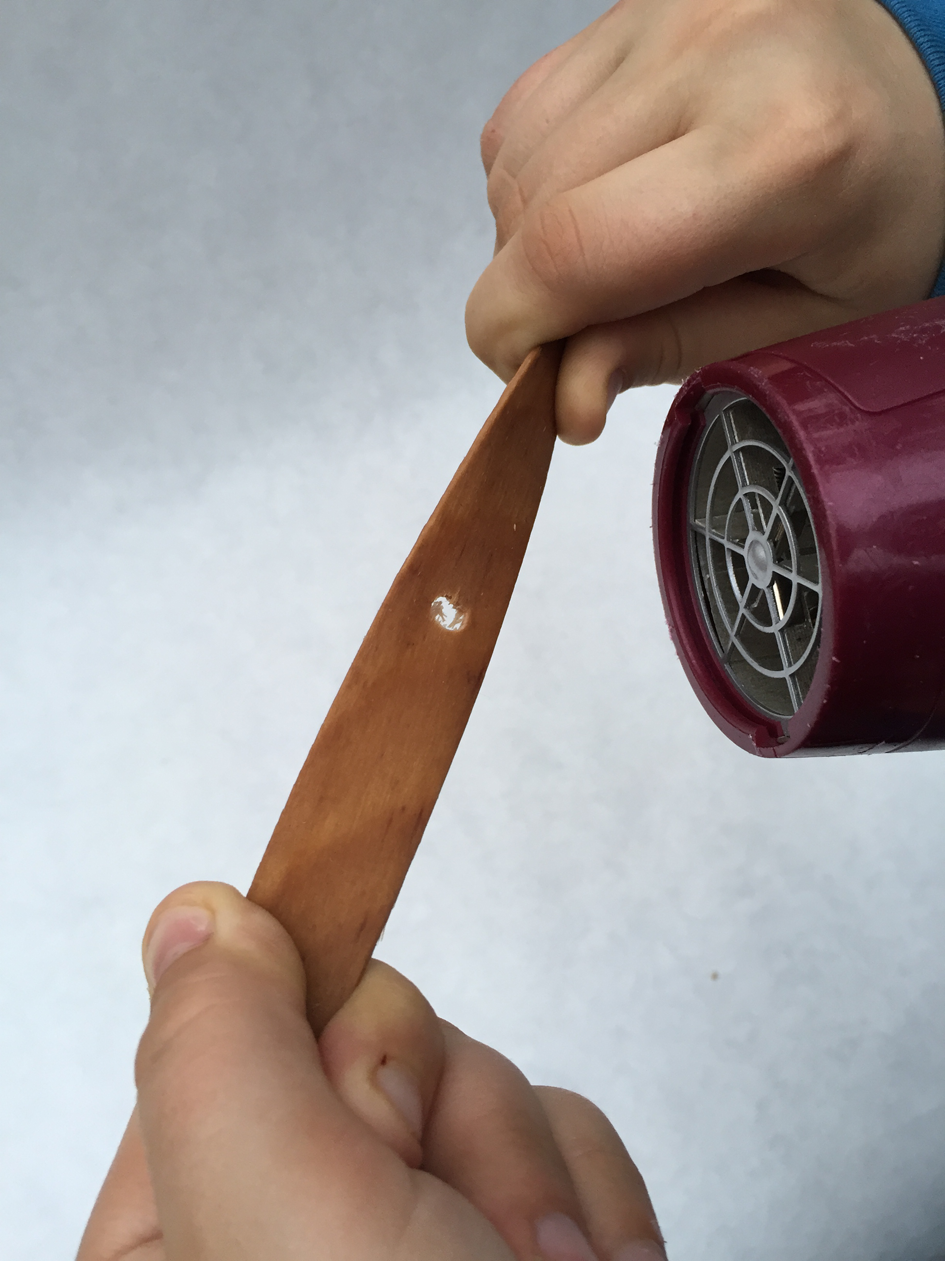
Figure 1-25. Use a hair dryer to dry the stick while twisting the ends.
Step 6Cut a 1/4” diameter dowel to 6” using a coping or hack saw. Hold dowel in vice while cutting, as shown in Figure 1-26.
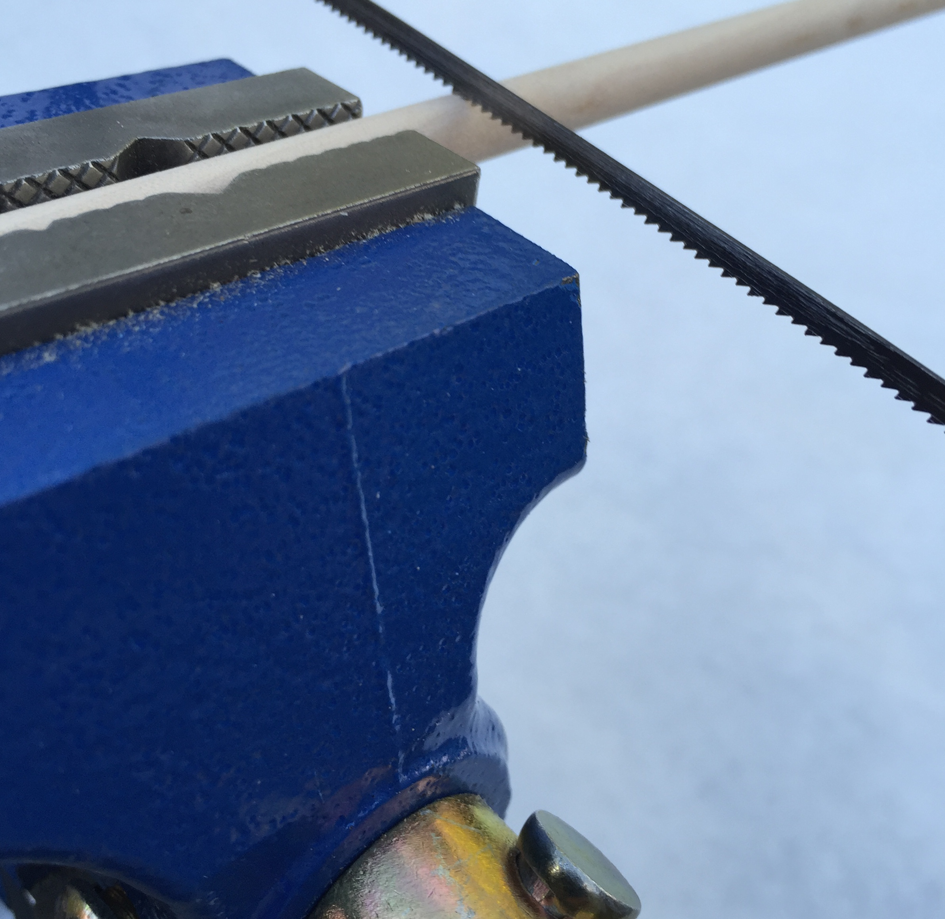
Figure 1-26. Use a saw to cut a dowel with a length of 6”.
Step 7From one end of the dowel (we’ll call it the top end), measure down 1” and carefully drill a 1/4” hole, as seen in Figure 1-27.
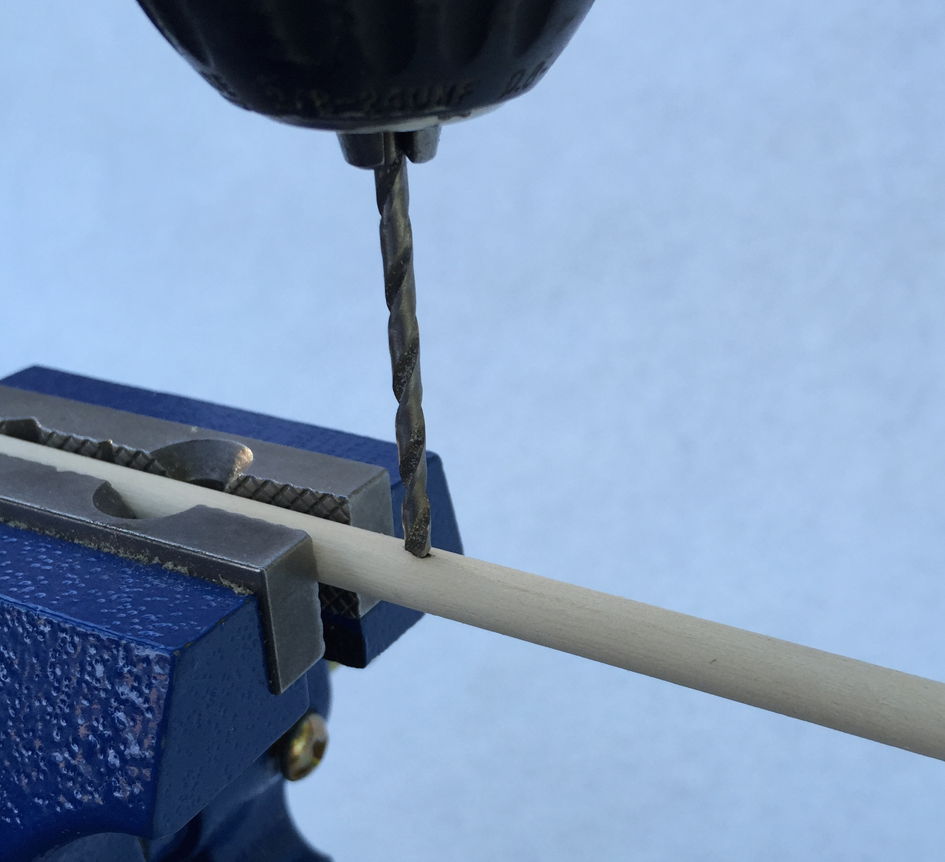
Figure 1-27. Drill a hole in the dowel.
Step 8Push the dowel through the hole in the craft stick and add hot glue on the top and bottom. You can see two different views of the helicopter in Figures 1-28 and 1-29.
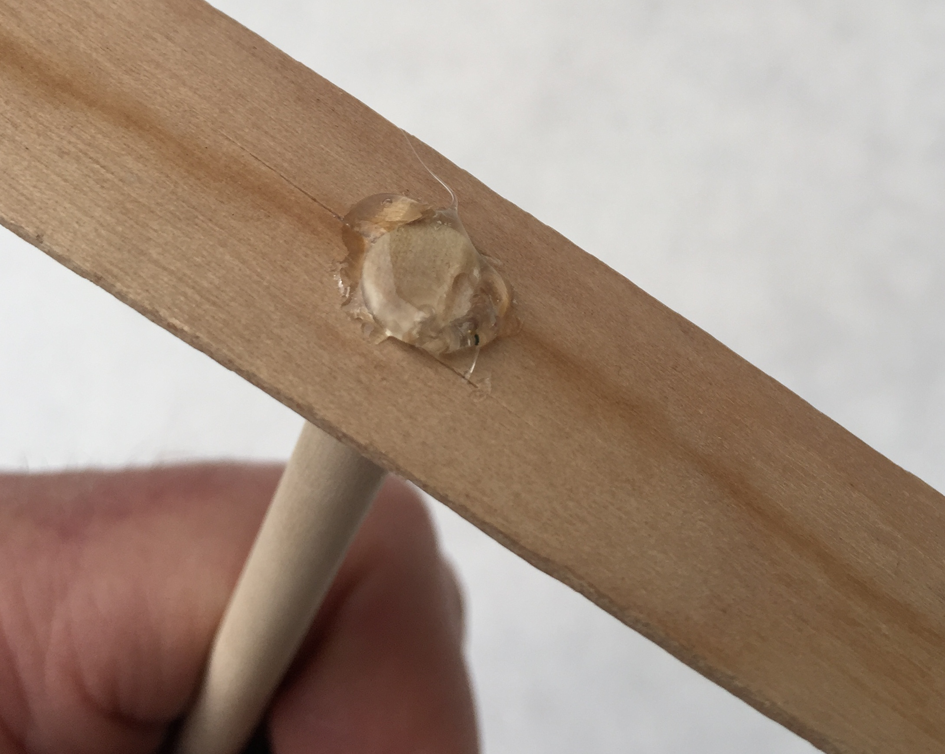
Figure 1-28. Top of craft stick with dowel secured with hot glue.
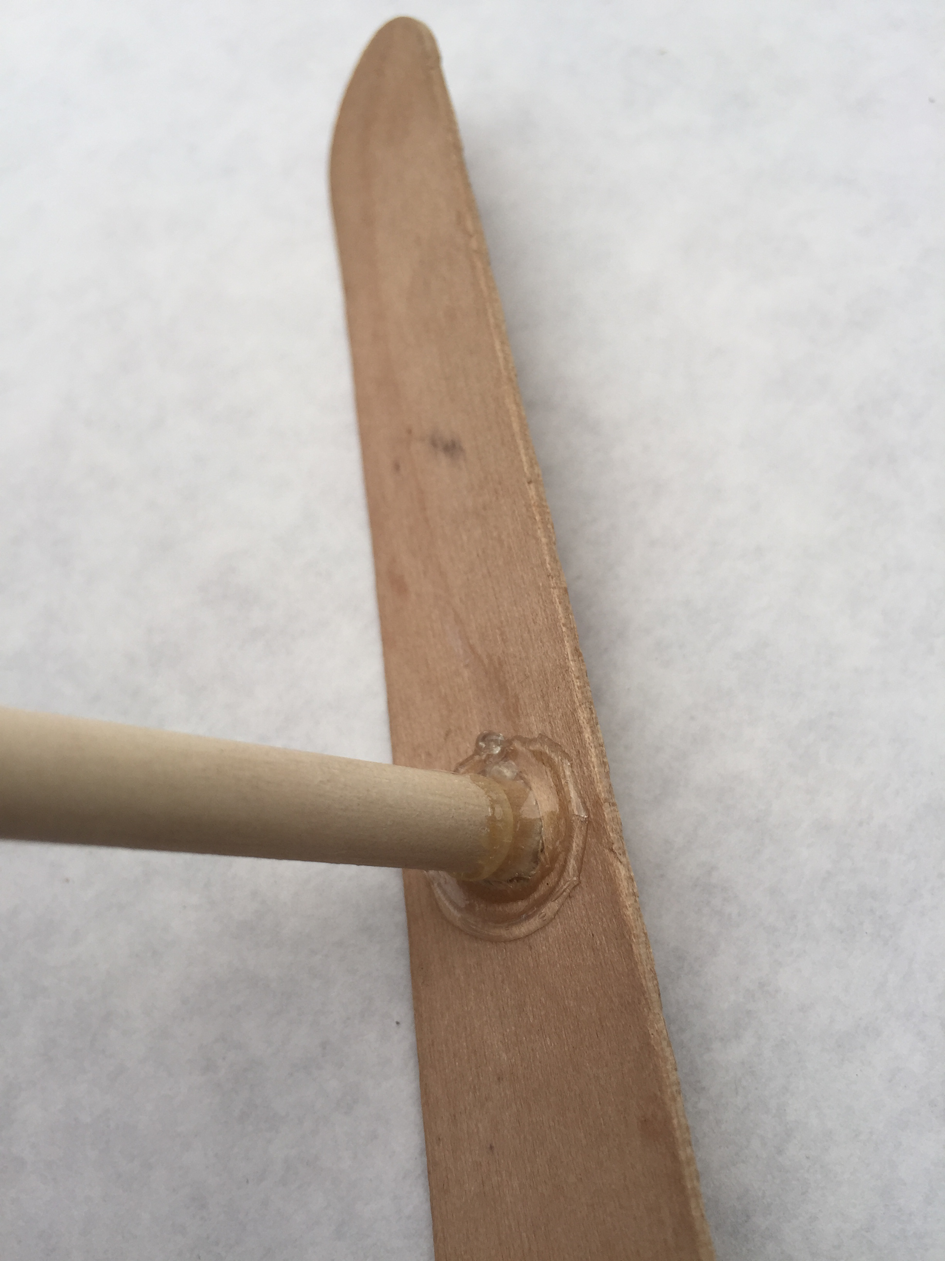
Figure 1-29. Underside of craft stick with dowel secured by hot glue.
Step 8Your stick helicopter is done; next, we’ll build the pull-cord mechanism.
Step 9With the PVC pipe held securely in a vice, and wearing a mask to protect against the fumes produced by cutting or drilling PVC, use your hacksaw to cut a 6” section (or use PVC cutters), as marked in Figure 1-30.

Figure 1-30. Mark the PVC for a 6” cut length.
Step 10Measure down 1” from one end of the pipe, as shown in Figure 1-31.
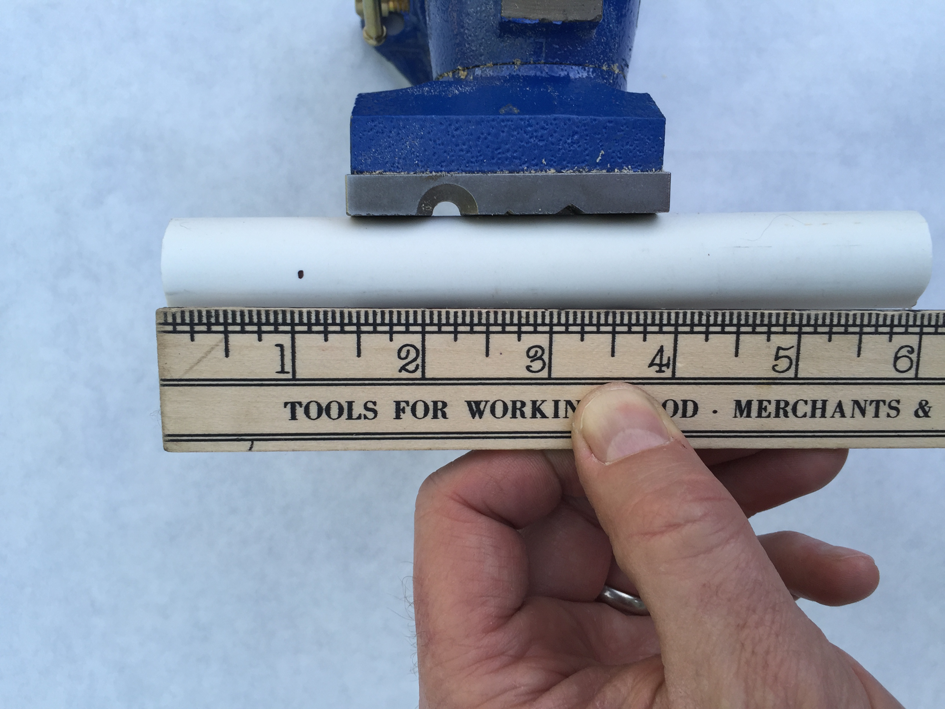
Figure 1-31. Mark 1” from one end of PVC.
Step 11Drill a 1/4” hole at the mark, as shown in Figure 1-32. Just drill through one side of the pipe.
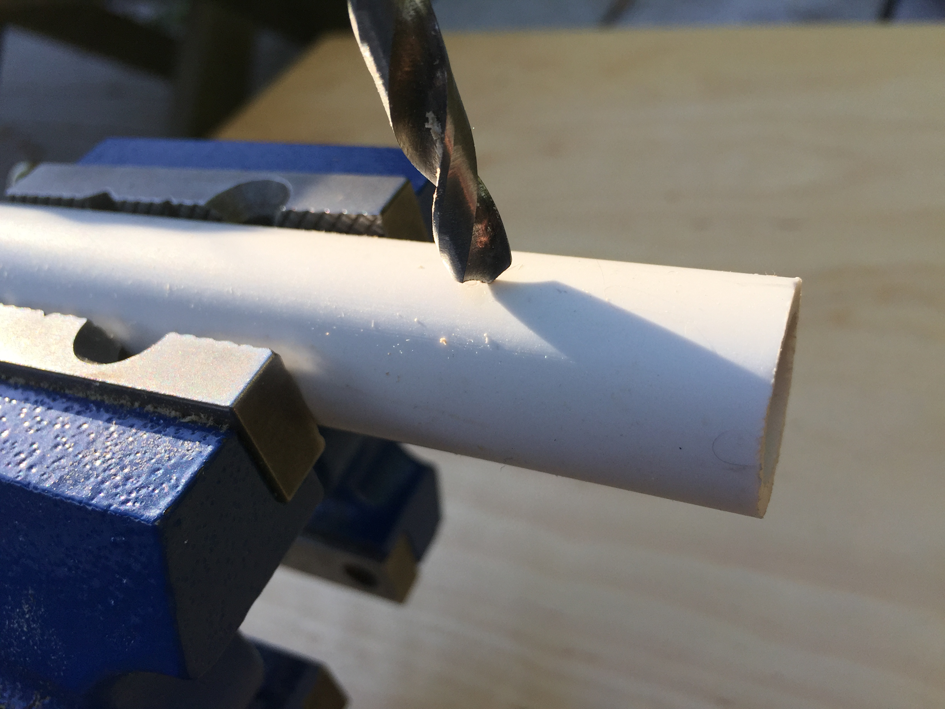
Figure 1-32. Drill a hole at the mark 1” from the end of the PVC.
Step 12Cut a 3’ piece of nylon string and burn the ends to keep it from unraveling, as shown in Figure 1-33.

Figure 1-33. Use a match to seal both ends of the nylon string.
Step 13Tie a stick scrap onto one end of the string, as shown in Figure 1-34. This will be the pull-handle.

Figure 1-34. Tie one end of string around the pull-handle.
Step 14Thread the string through the hole in the PVC pipe, then through the hole in the stick helicopter dowel, as shown in Figure 1-35. Drop the stick into the PVC and then wind the string around the dowel in the counterclockwise direction.

Figure 1-35. Thread the string into the pipe and out the top then through dowel in the copter.
Step 15While wearing safety glasses (to protect from rapidly moving blades), hold the PVC pipe firmly, as shown in Figure 1-36, raise it slightly above your head, and then give the cord a hefty pull. The copter should spin and rise out of the PVC pipe into the sky. If things don’t work exactly that way, you might need to wind in the other direction or wind in such a way that the string releases more smoothly.
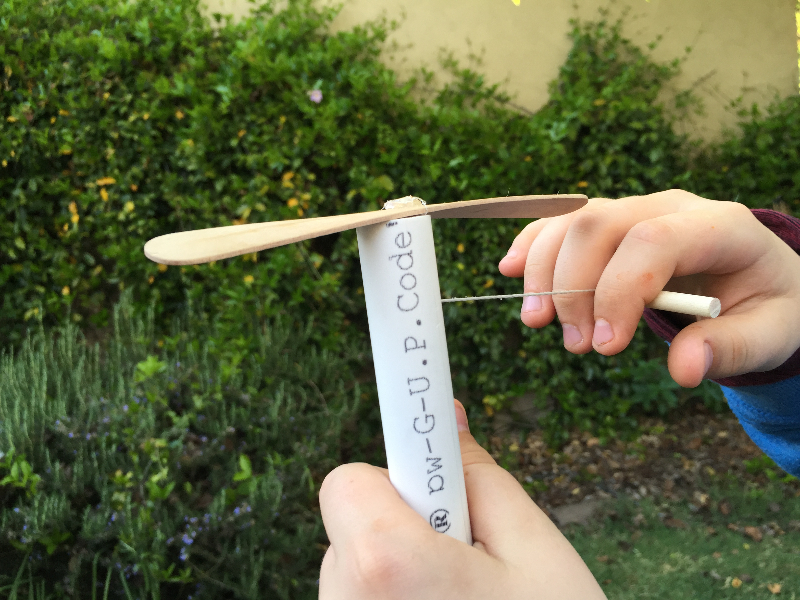
Figure 1-36. Hold the PVC pipe tight and give the string a firm pull!
Going Further
Below you’ll find a short list of resources that will help you and your students gain further knowledge of helicopters and of how to modify the projects in this chapter.
- The Rubber Band Helicopter by Workshop for Young Engineers
-
This project provides a lot of opportunity for hacking and trying new things with just a few materials and minimal cost.
- Build Your Own Quadcopter
-
Love how helicopters work? Make: has a great project build for a remote control quad copter. You can build it using hardware store parts and R/C equipment that you can buy online. After that, you can add some sophisticated, but easy-to-use autopilot and camera hardware. With quads, you’ll be jumping up significantly in price, but building your own can be hugely rewarding.
- Stain PVC Any Color You Like
-
Check out this Make: project to make your pull-cord launcher look really cool.