
Chapter 2. Rockets
Rockets are cool. There’s no getting around that.
Ever since he was a kid, Rick has loved rockets. Solid propellant Estes rockets were the only rockets really available at the time, and Rick and his friends used to head out to the Mojave Desert for multistage launches that sent their rockets into the sky to altitudes well over 2,000 feet. The rocket launches were amazing, but with launches costing a few bucks a pop, they soon burned a hole in Rick’s wallet.
Likewise, James also enjoyed launching rockets at a young age—the first rocket he built and launched on his own was a 15” tall rocket that was unfortunately lost on its fifth launch and never found again. Today, he teaches a summer camp where one of the week’s projects is building and launching rockets on the school’s baseball field. A portion of the camp’s fee helps cover the cost of the one-launch-only engines—without the fee, the rocket launch party would have to be canceled.
Wouldn’t it be great to be able to get the experience of launching rockets over and over again without having to spend money on disposable engines? With this project, we provide two rocket designs that use compressed air as propellant for free and clean launching every time! After the rockets are built, the only costs involved for each launch may be tired muscles from using a bicycle pump. They are also safe to use in the city (and in dry scrubland) because there is no combustion, so the rockets pose no fire hazard.

The first project we present in this chapter is a simple $5 launcher that sends rockets 30–40 feet into the air. It’s a good place to start, and very safe to use around young children. When you’re ready to put some rockets a bit higher in the air, move on to the high-pressure launcher project also found in this chapter.
You may want to get a conversation on rockets started, so let us offer some questions for thought and discussion before we dive into the projects:
- Who is considered the inventor of rockets?
- What pushes a rocket to leave the atmosphere?
- Air rockets get all their thrust at once, in a split second. How do other types of rockets get their thrust?
- Try launching a rocket without the fins. What happens? Why are fins so important? Try a rocket with one, two, three, or four fins. Any difference in performance?
- Wanna get some math on? Try some launch calculations at NASA’s “Air Rocket Launch Equations” page.
When working with anything involving projectiles, it’s a good idea to wear safety glasses. The high-pressure rockets can be especially dangerous if you’re not careful. Make sure the launch area is clear of people and pets that might get in the way of the rocket’s blast off.
Low-Pressure Rocket Launcher
This project has two parts. First, you’ll build a launcher, which is reusable and stays on the ground. Second, you’ll build a reusable rocket that slides onto the launcher. The rocket will be launched into the sky using a the simple action of stomping on the launcher; this forces air through a tube and into the rocket, thus propelling the rocket upward.
This first launcher uses a low-pressure rocket, because even though a stomp can have a lot of energy behind it, it’s still a one-time action that can only push a fixed amount of air into the rocket. One student might be able to get a few extra feet of altitude with a harder stomp than another student, but ultimately, most low-pressure rocket launches will result in the rocket going up 30–50 feet before coming back down. For this reason, launches are typically safe for smaller areas (e.g., a backyard or a playground) where the risk of losing the rocket is small.
For groups of 10 or more students, building additional launchers can help reduce the amount of waiting time to launch a rocket. Figure 2-1 shows the completed low-pressure launcher in action.

Figure 2-1. Awesome low-pressure rocket launcher in action!
Build the Low-Pressure Rocket Launcher
The following steps include photos that can be used by the instructor or student to verify a task before moving on to the next step.
Step 1Gather the supplies shown in Figure 2-2. You can find a complete list of the materials required for this project in “Tools and Supplies”.

Figure 2-2. The parts needed to build the low-pressure rocket launcher.
Step 2Cut the 8’ piece of PVC into the following lengths: 3’ (1x), 2’ (1x), 1’ (2x), 3” (1x). You can either use a hacksaw or a handy PVC cutter (Figure 2-3), available in the irrigation section of hardware stores for about $15. (If you use a hacksaw, wear a mask so that you don’t breathe in the PVC dust!)

Figure 2-3. A PVC cutter can cut through PVC quickly and cleanly
Step 3Connect the two tee fittings together with the 3” PVC tube, as shown in Figure 2-4.

Figure 2-4. Two PVC tee connectors joined with a single piece of PVC tube.
Step 4In the end of one of the 1’ long pieces, add some hot glue inside the pipe and push tightly wadded paper into the end. Cover the wad of paper with hot glue to create an airtight seal, as shown in Figure 2-5. Do this to the ends of both 1’ long pieces. (These two 1’ pieces will form the legs of the launcher.)

Figure 2-5. Stuff in a wad of paper and then seal it with hot glue.
Step 5Insert a plugged 1’ pipe into one of the tee connectors, as shown in Figure 2-6. Insert the other plugged 1’ pipe into the other tee connector.
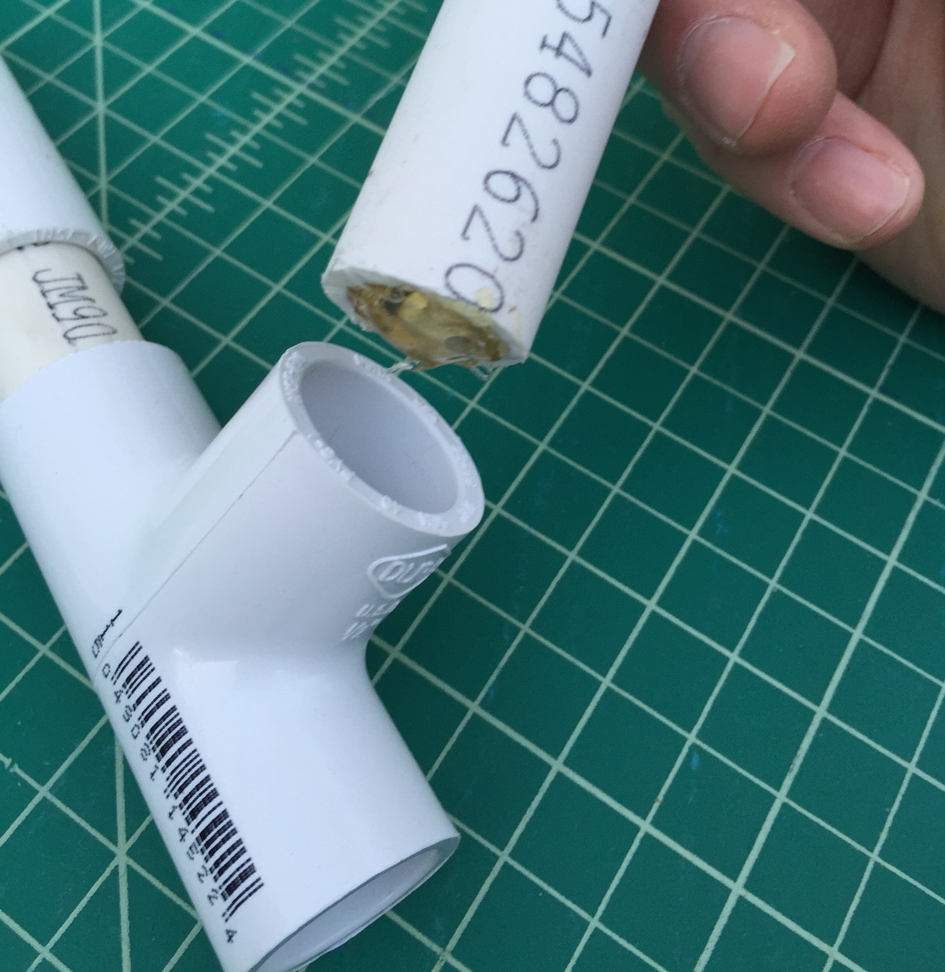
Figure 2-6. Insert a plugged end into a tee connector.
Step 6Put the gray PVC conduit 90 degree elbow into one of the tee connectors and insert the 3’ PVC tube into the end of the other tee connector, as shown in Figure 2-7.
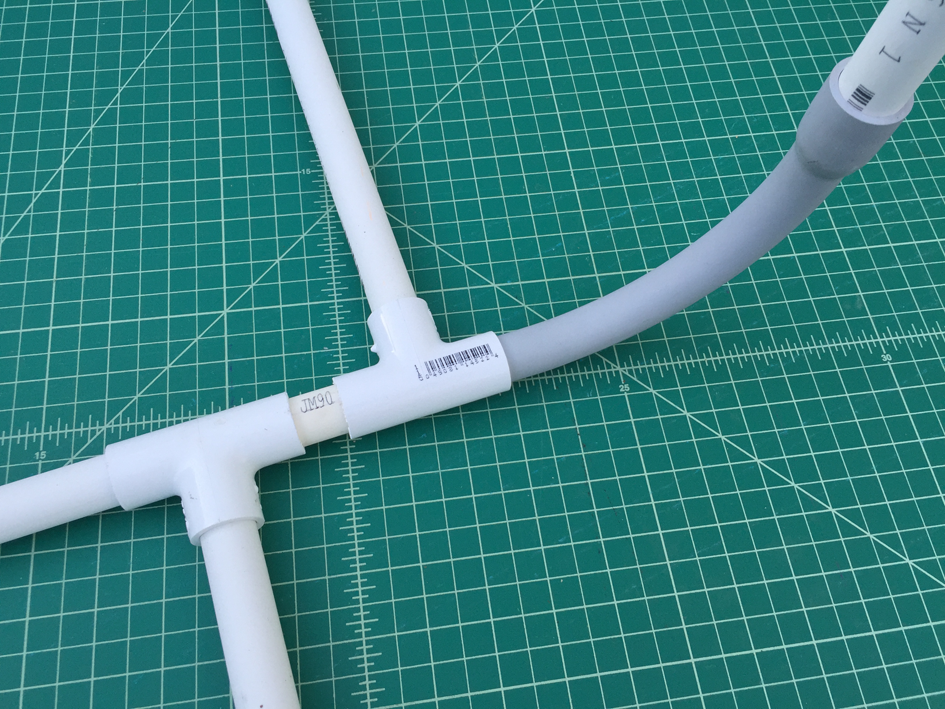
Figure 2-7. Connect the 3’ piece of PVC on one end of the stand and the 90 conduit elbow on the other.
- Step 7Take the 2’ long piece of PVC (this will be the vertical launch tube) and bevel one end using the concrete as a file. Angle the pipe at a 45 degree angle as you’re rubbing it on the cement. This beveled end will be the top of the launch tube and will help the rockets slide on easier. Place the launch tube in the 90 degree gray conduit with the bevel at the top. You can see this 2’ long piece inserted into the curved conduit in the upper-right corner of Figure 2-7.
Step 8Slip the mouth of the 2 liter bottle into the 3’ piece of PVC and seal with duct tape, as shown in Figure 2-8. The 2 liter bottle will be the pressure chamber. The completeed low-pressure launcher appears in Figure 2-9.

Figure 2-8. Seal the bottle and PVC with duct tape and now you’re done!

Figure 2-9. Completed low-pressure rocket launcher and paper rocket.
Build the Low-Pressure Paper Rocket
Step 1Collect all the materials shown in Figure 2-10: colorful paper (or white if you prefer), clear tape, plastic wrap, and a 12” piece of 1/2” PVC pipe, and pens for decorating.

Figure 2-10. The supplies needed to build a rocket.
Step 2Wrap the paper around the remaining scrap piece of 1/2” PVC pipe and tape along the seam, as shown in Figure 2-11. Make sure you don’t tape the paper to the pipe; the paper should slide off easily.

Figure 2-11. Roll the paper around the PVC and tape closed.
Step 3Push the paper to the top of the pipe so about 1/2” of the paper hangs over the PVC, then fold it down, as shown in Figure 2-12.
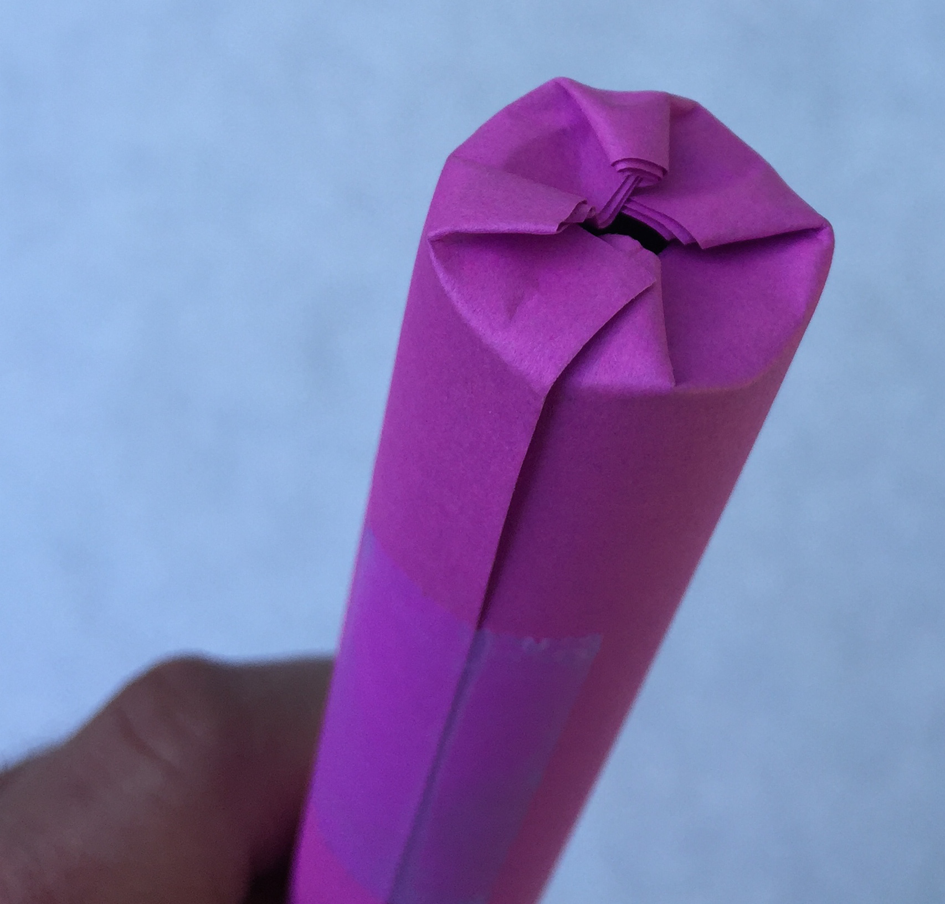
Figure 2-12. Fold down a bit of the paper over the end of the PVC.
- Step 4Crisscross two pieces of tape over the top to create a good seal. Wad up a small piece of plastic wrap and tape it securely to the top (using more tape), as shown in Figure 2-13. The plastic wrap makes a soft nose cone and also makes the rockets nose-heavy, so they’ll arc over at the height of their trajectory.
- Step 5Cut four paper fins, as shown in Figure 2-14.
Step 6Now we’ll create tabs to tape the fins to the rockets. Stack the fins and fold them about 1/2” up on the long side. Cut a slit and then fold back in opposite direction, as shown in Figure 2-15.
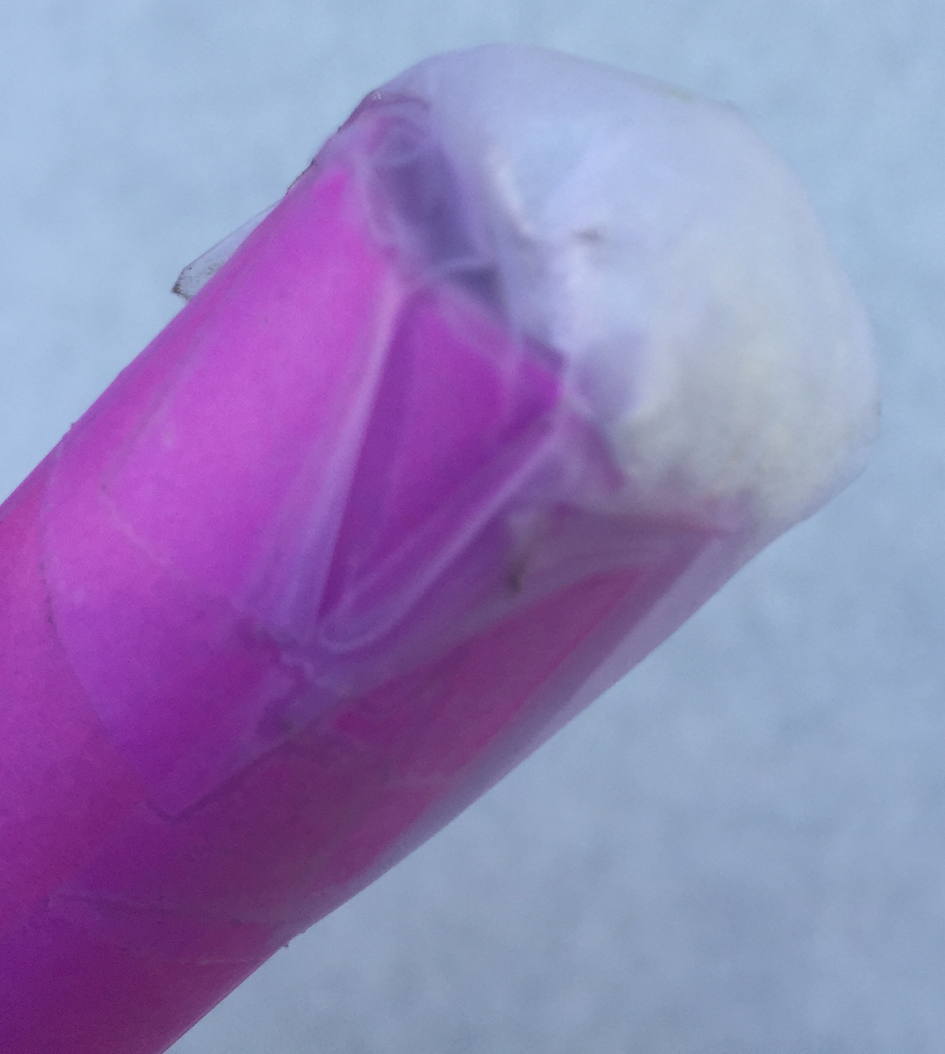
Figure 2-13. Tape a piece of wadded plastic to the top of the rocket.
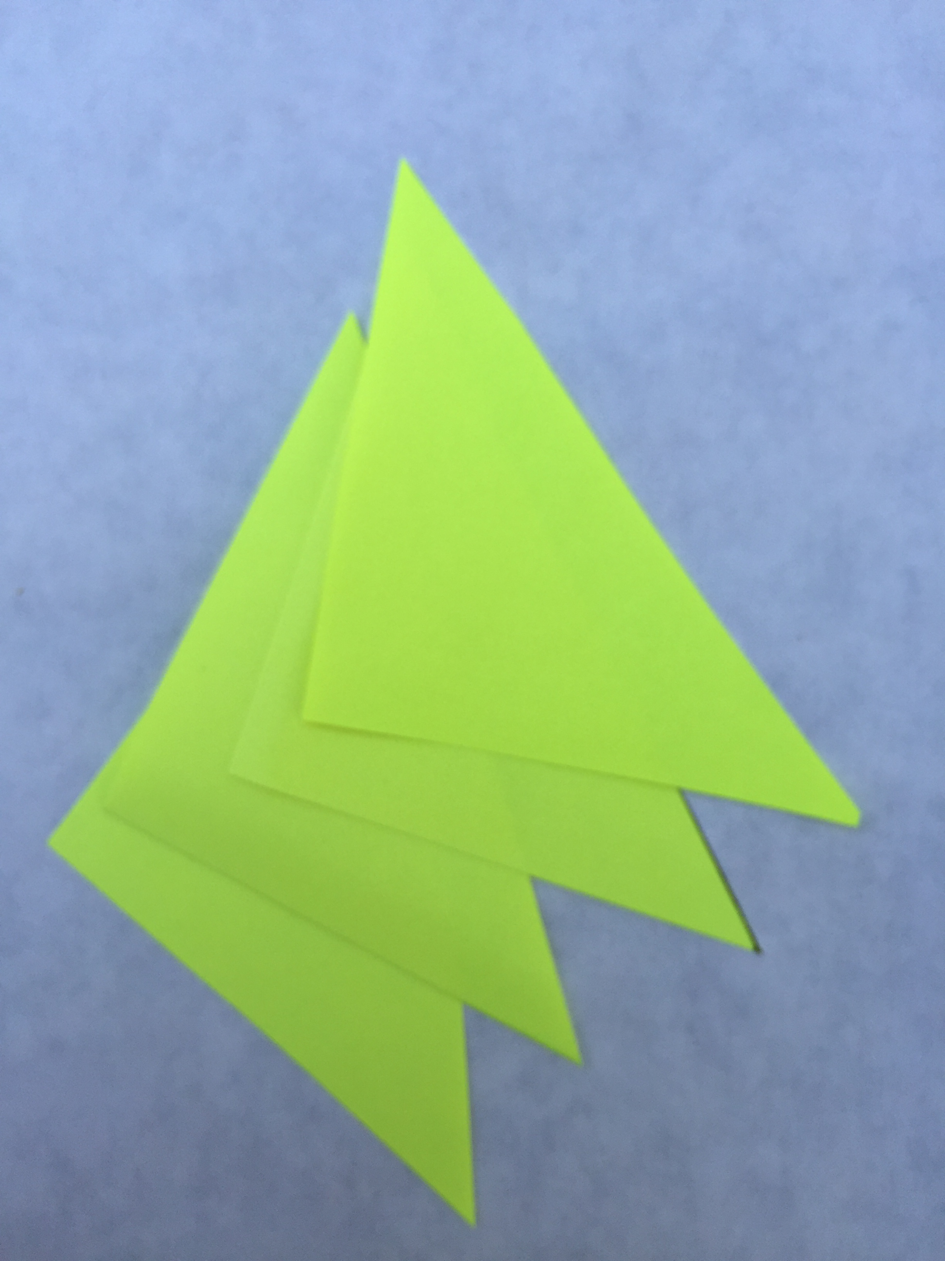
Figure 2-14. Cut four fins for your rocket.

Figure 2-15. Fold the fins along the long edge and cut a slit.
- Step 7Tape all four fins (three fins will work, too) evenly around the bottom of the rocket, as shown in Figure 2-16, and you’re ready to launch.
Step 8To launch, place the rocket on the launch tube.

Figure 2-16. The finished low-pressure rocket.
- Step 9Stomp in the middle of 2 liter bottle instead of on the ends. This will help the bottle last 150–200 launches.
- Step 10After each launch, if you are not able to just squeeze the bottle back into shape, have the person who just launched wrap their hand around the launch tube (to minimize germs) and blow in to reinflate the 2 liter bottle pressure chamber.
High-Pressure Rocket Launcher for Super High Flights!
A few years ago, Rick came across a rocket powered strictly with compressed air that went about as high as the smallest motor-powered rockets that you ignite.
He worked on his own design for a compressed air rocket launcher, and presented it in Make: Magazine (Volume 15). The rockets are made of paper and tape, and blast hundreds of feet in the air, fueled only be a few pumps on a bicycle pump. Since then, thousands of launchers have been built around the world.
With the help of a friend, he recently refined the design, and it’s been redeveloped as the project you’re about to read. It can be built in about 30 minutes using the kit available at the MakerShed or AirRocketWorks.com. While the launcher kit costs just over $100, the rockets can be made for just pennies. The parts for the launcher are difficult to find and can be expensive, so the kit is really a great deal, especially if you’ll be using it for a group of kids. The durable steel and wood industrial design will last for years of launching. We’ve used this same launcher at Maker Faires from New York to California (Figure 2-17), sometimes launching thousands of rockets over the course of a weekend.

Figure 2-17. High-pressure rocket launcher in action at the National Maker Faire in Washington, DC! (photo: Kevin Jarrett)
Build the High-Pressure Rocket Launcher
Step 1Gather the supplies shown in Figure 2-18. You can find a complete list of the materials required for this project in “Tools and Supplies”.

Figure 2-18. Compressed Air Rocket Launcher v2.1 kit (available at MakerShed.com or AirRocketWorks.com).
Step 2Assemble the launch valve. Pull out the four parts you see in Figure 2-19 from the Compressed Air Rocket Launcher v2.1 kit. For the air to flow directly into and out of the launcher, it’s important to assemble the launch valve in the correct direction. It’s also very important that there are are no leaks in the system. If there are air leaks, the launcher will not work correctly. Add pipe thread (Teflon) tape to all screw-in connections.

Figure 2-19. Parts placed in order for the launch valve
Step 3Start from the lefthand side of the image in Figure 2-19. Wrap plenty of Teflon tape around the 1/4” push-fit hose connection. You need to make sure to apply the tape in the direction you’ll be screwing it in, as shown in Figure 2-20. (You’ll turn it clockwise to tighten, so wrap the Teflon tape in a clockwise direction as well.)

Figure 2-20. Wrapping sealing tape (included in kit) on the 1/4” push-fit hose connector
Step 4Screw the push-fit connector into the “pressurize” side of the of the blue slide valve, hand tight, as shown in Figure 2-21. It’s the side of the slide valve that has the hex end.

Figure 2-21. Push-fit connector threaded hand-tight onto the hex (“pressurize”) end of the blue slide valve.
Step 5Add Teflon tape to the check valve and hand tighten onto the “launch” side of the slide valve, as shown in Figure 2-22.

Figure 2-22. Hand tighten the check valve, onto the “launch” side of the blue slide valve.
Step 6Add pipe thread tape to the 1/4” Schrader valve, as shown in Figure 2-23.

Figure 2-23. Brass Schrader valve.
Step 7Hand tighten the Schrader valve into the check valve as shown in Figure 2-24.

Figure 2-24. The brass Schrader valve screws into the check valve.
Step 8Clamp the 1/4” push-fit connector on the “pressurize” side of the slide valve in a vise. Use a rag to keep it from getting scratched. Use an adjustable wrench on the Schrader valve to tighten all connections, as shown in Figure 2-25.

Figure 2-25. Tighten all connections at once using an adjustable wrench.
Step 9Now you will build the pressure chamber. Locate the 1/2” steel pipe cap and 1/2” × 12” steel pipe nipple from the kit, shown in Figure 2-26.

Figure 2-26. 1/2” steel cap and pipe nipple for pressure chamber.
Step 10Put a generous amount of Teflon tape on one threaded end of the 12” pipe and thread the 1/2” cap on hand tight, as shown in Figure 2-27.

Figure 2-27. 1/2” cap hand tightened onto 12” pipe nipple.
Step 11Add Teflon tape to the other end of the 12” steel pipe and thread it into the “A” side of the QEV valve. The QEV is the piece marked A, R, and P shown in Figure 2-29. Use a rag to protect the 1/2” cap and hold the cap with a pair of pliers, as shown in Figure 2-28, and then tighten both connections with an adjustable wrench on the QEV side. (You can also clamp the pipe cap in a vise vertically and then tighten with the adjustable wrench.) Note: The QEV valve is made out of aluminum, so make sure you don’t strip the threads by over- tightening.

Figure 2-28. Tighten connections on the pressure chamber.
- Step 12Figure 2-29 shows the QEV “P” side where you will screw in the 1/2"-to-1/4” reducer first, followed by the second 1/4” push-fit hose connector. Wrap both the reducer and the push-fit hose connector with pipe sealing tape before making the connections. With your adjustable wrench on the push-fit connector, tighten both connections—but don’t over-tighten!
- Step 13Now locate the remaining parts from the kit, along with the assembled slide valve and pressure chamber, as shown in Figure 2-30.
Step 14Feed the 1/2” cap side of the pressure chamber through the keyhole in the small piece of the wood stand, as shown in Figure 2-31. Feed it about halfway through and then pop it into the notch, as shown in Figure 2-32.
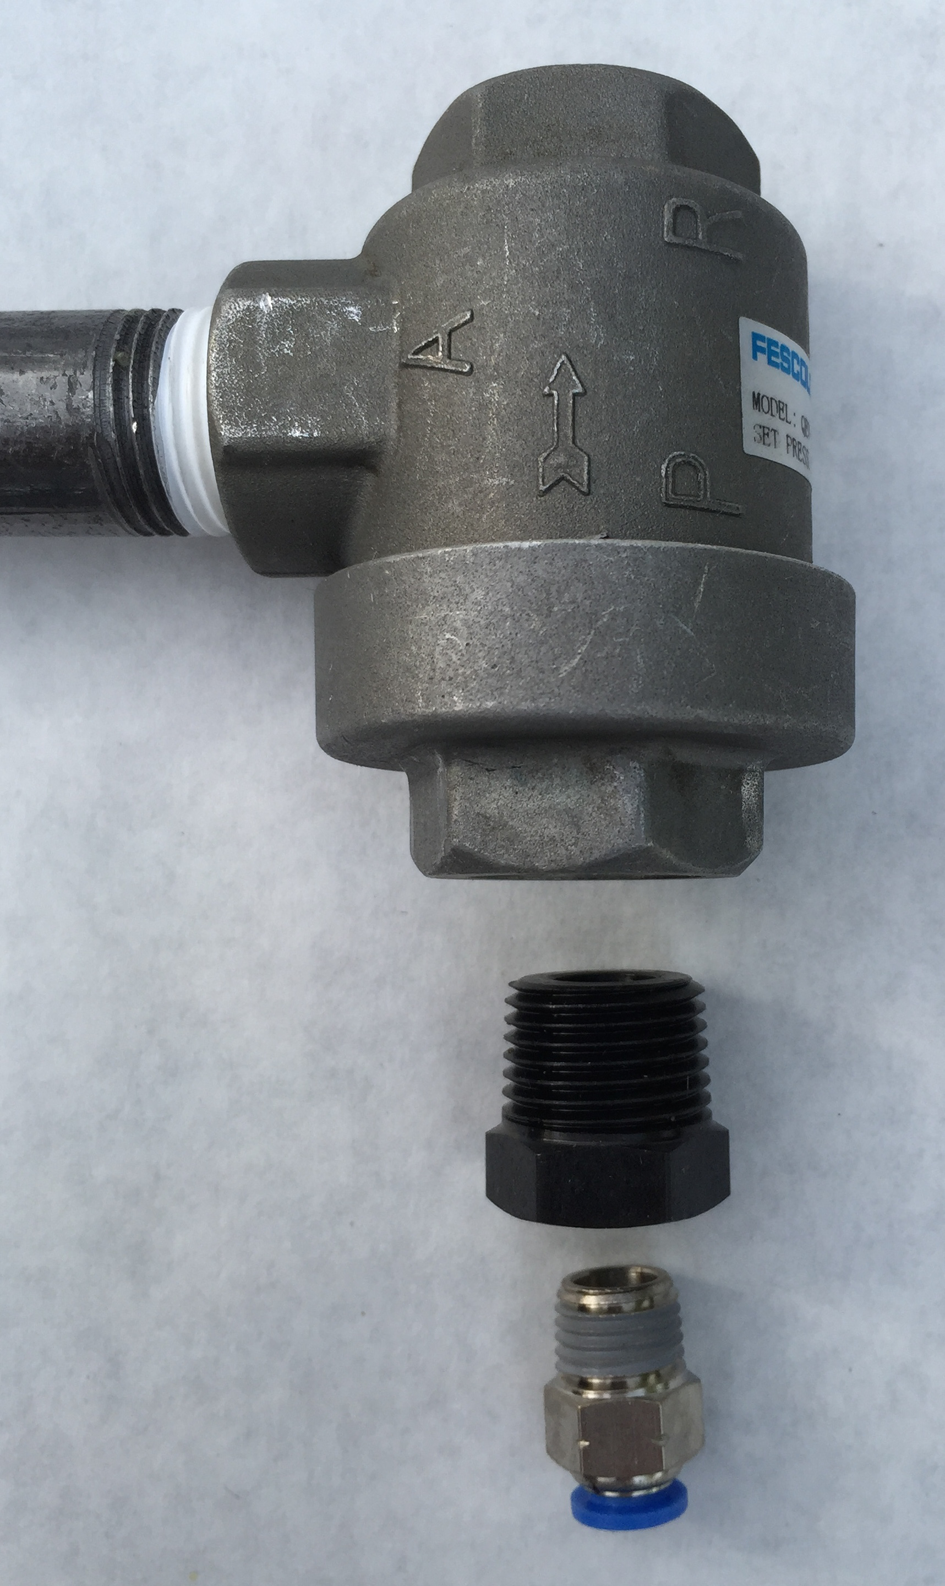
Figure 2-29. With sealing tape on all threads, tighten the connectors shown here to the P side of the QEV.

Figure 2-30. Locate the pieces shown here from the kit to complete the stand and finish the launcher.

Figure 2-31. Fit 1/2” cap on the pressure chamber into the keyhole in the small wood stand piece.
Step 15Now fit the small wood stand piece into the large piece, as shown in Figure 2-32. If you’re not sure if it’s facing correctly, look at the completed photo in Figure 2-39. The stand is designed to fit snugly. Make sure everything is in the right direction, and then pound the two pieces together with your hand. If more force is needed, use a rubber mallet and piece of scrap wood on top to keep from damaging the stand.

Figure 2-32. Fit stand together and pound gently with a rubber mallet to fit together (check Figure 2-39 for correct orientation).
- Step 16Once the stand is firmly together, slide the QEV down until it presses against the edge of the wood stand on the right side, as shown in Figure 2-33.
- Step 17Put the U-bolt through the two holes around the 1/2” pipe, as shown in Figure 2-34.
Step 18On the other side, slip the washers on and tighten down with the wing nuts. You can see this in Figure 2-35.

Figure 2-33. Slide QEV against the end of the wood stand.

Figure 2-34. Slip U-bolt around the steel pipe and through the holes in the wood stand.
Step 19Grab the red hose and insert one end firmly into the 1/4” push-fit connector on the slide valve launch assembly, as shown in Figure 2-36.

Figure 2-35. Slip washers on and tighten the wing nuts.

Figure 2-36. Push red air tube firmly into the push-fit connector in the slide valve.
Step 20Push the other end of the hose firmly into the “P” side of the QEV valve, as shown in Figure 2-37.
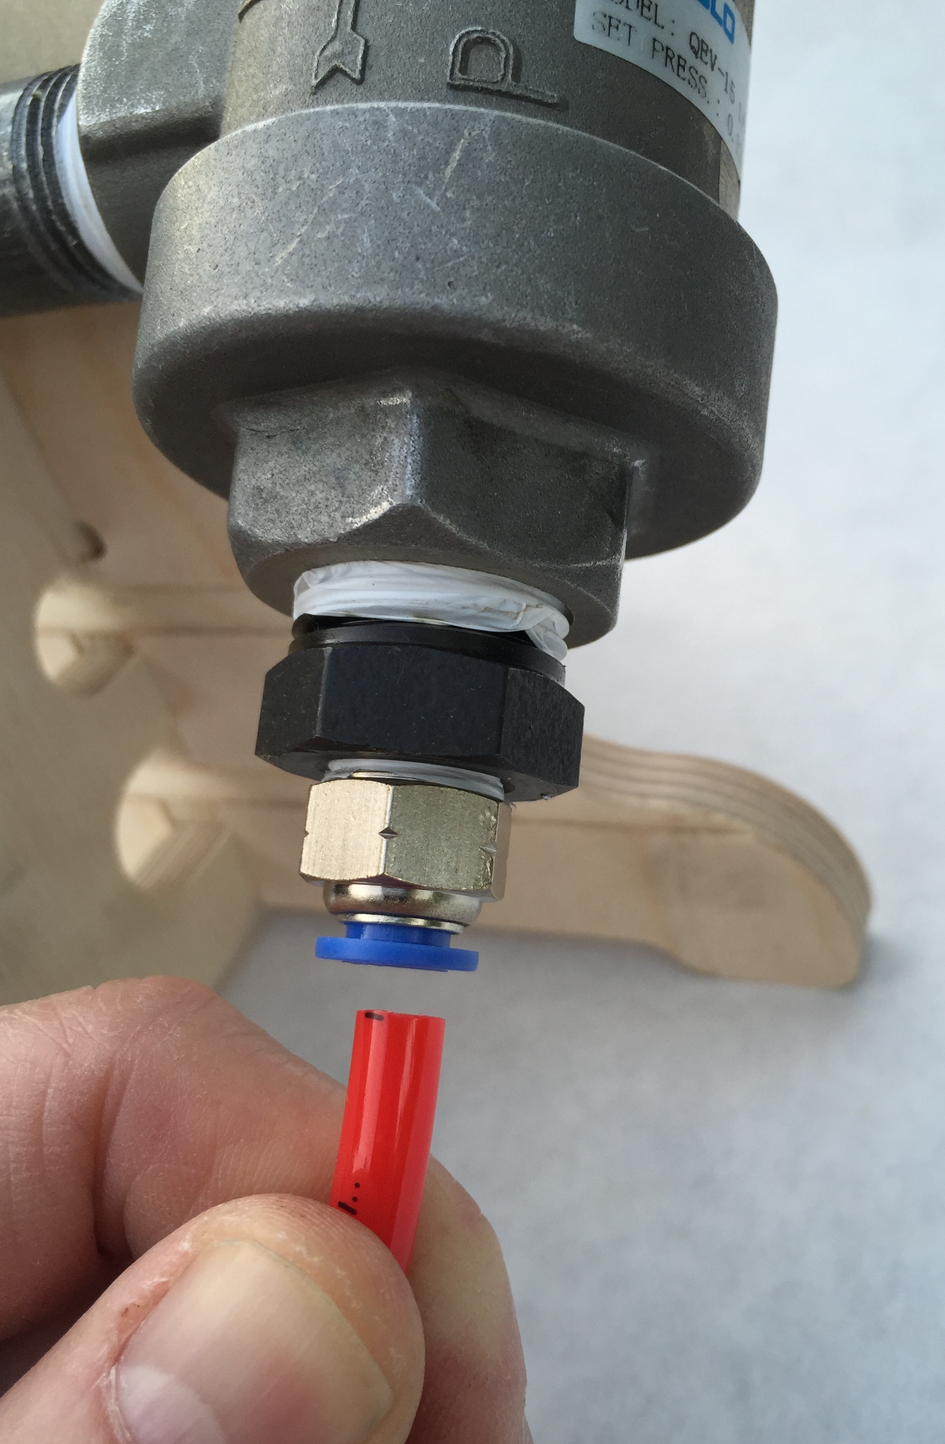
Figure 2-37. Push other end of air hose into the push-fit connector on the “P” side of the QEV.
Step 21Screw the 1/2” × 12” gray PVC tube onto the “R” side of the QEV. This is the only connector that does not require pipe seal tape, as it is not under pressure. You can see this in Figure 2-38.
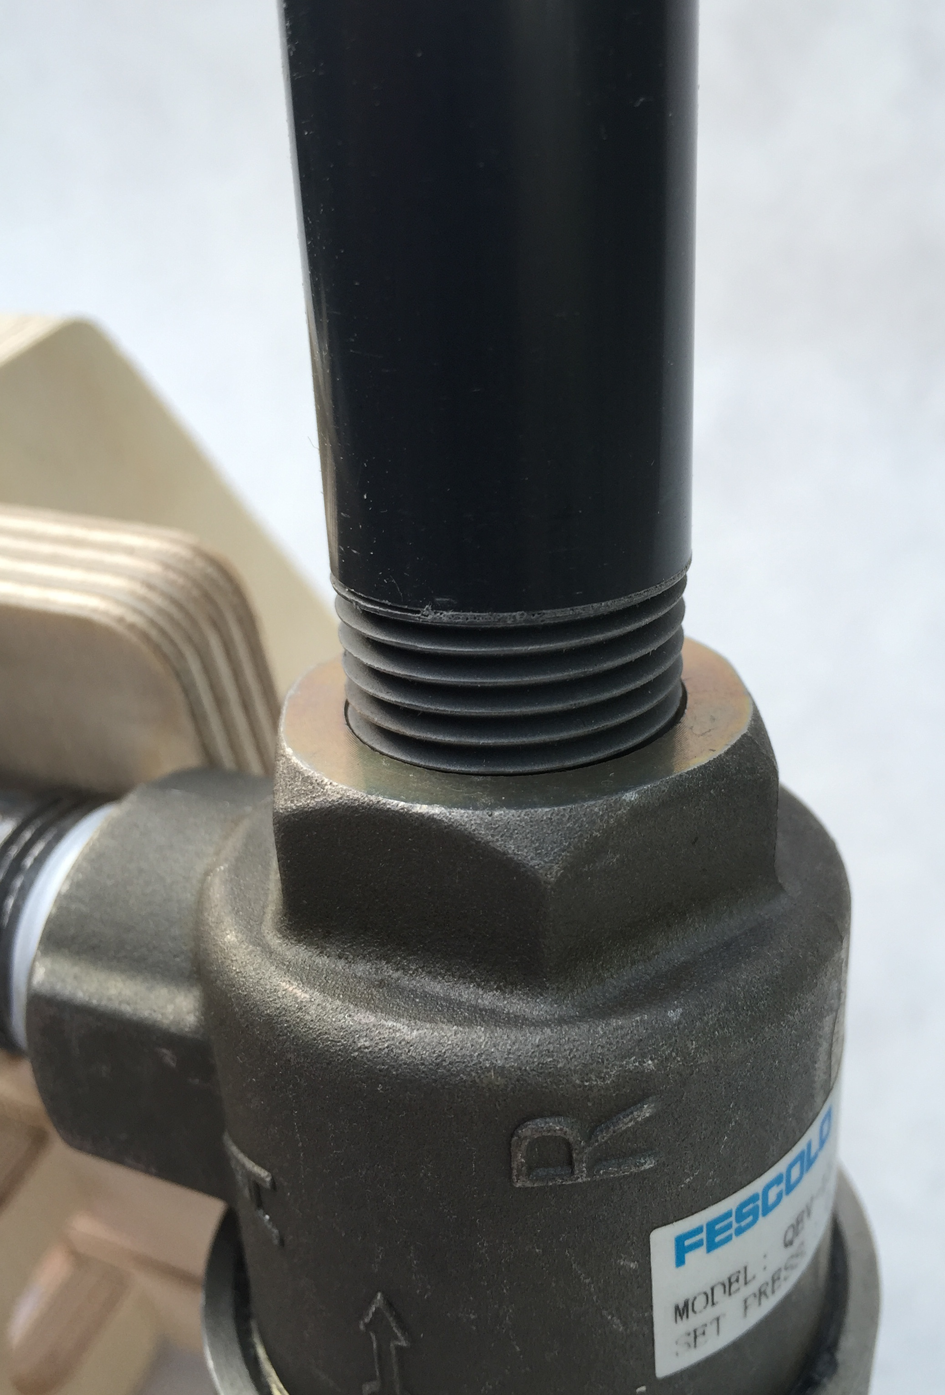
Figure 2-38. No pipe seal tape necessary.
Step 22Your launcher is now complete and should look like the one in Figure 2-39! In order to tilt the launch tube, just loosen the wing nut and pivot the pressure chamber, and then retighten.

Figure 2-39. Completed high-pressure rocket launcher.
Storing the High-Pressure Rocket Launcher
To store your launcher, unscrew the gray PVC launch tube, and insert it horizontally into the bottom hole of the wood stand. The middle hole is for the 3/8” launch tube which is used to launch other fun things. You can also cut two 4 1/2” pieces off the Velcro strip included in the kit. Secure both tubes with the long Velcro strap going through the slots in the launcher. Wrap the hose around the launch stand and secure with the remaining 2” piece of Velcro, as shown in Figure 2-40.

Figure 2-40. High-pressure launcher folded for storage.
Now that you have your launcher, it’s time to build a rocket (or two...or two dozen) that you can actually launch. Fortunately, the steps for making a rocket are super simple. Once you make a few, you’ll discover that you can make many rockets in a short amount of time. To make rocket assembly easier, there are directions for a handy rocket building stand in the “Rocket Stands” project. After building your rockets, skip to the “Launching Rockets!” section to see how to use your launcher.
Build the High-Pressure Rockets
- Step 1Gather the materials shown in Figure 2-41: the printed rocket template, the 1/2” × 12” grey PVC pipe, scissors, and 3/4” wide masking tape.
Step 2Cut out the body tube, pressure cap, nose cone, and three fins, as seen in Figure 2-42.
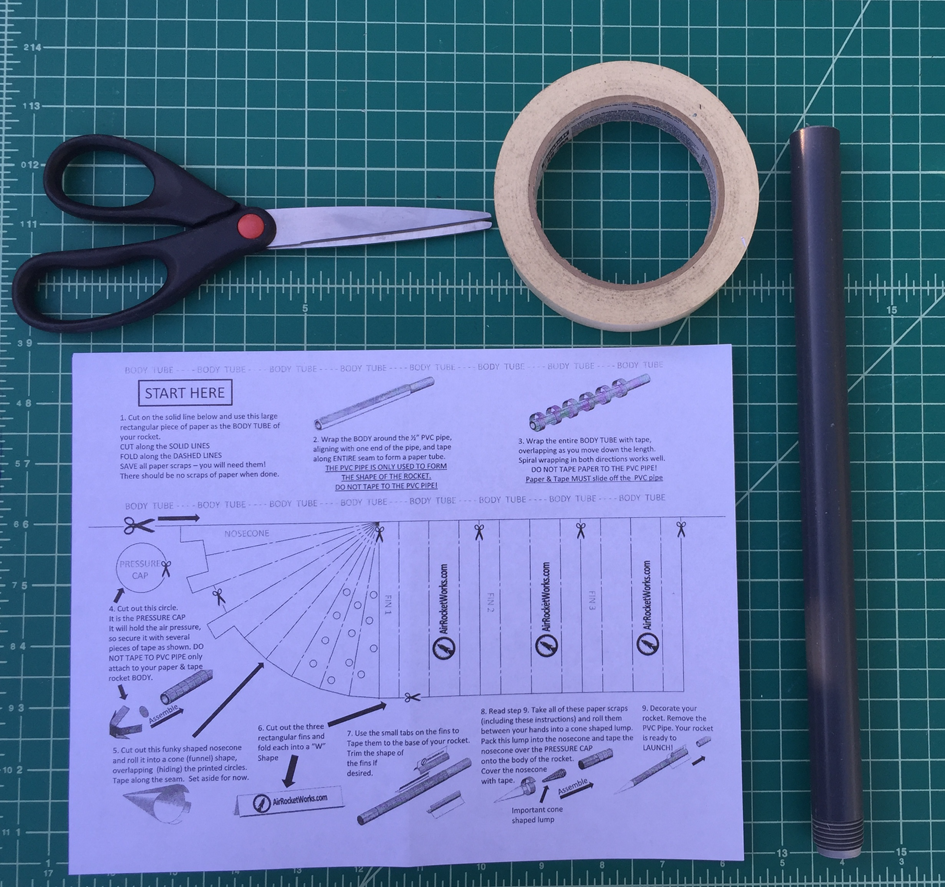
Figure 2-41. Materials and tools needed for the paper and tape rocket.

Figure 2-42. Rocket pieces cut out from template.
Step 3Wrap the body tube tightly around the gray PVC pipe and tape in the middle, top, and bottom, as shown in Figure 2-43. Do not tape the paper body tube to the PVC pipe: it should slide on and off the pipe easily. The PVC pipe is just used for building the rocket. While taping, make sure you keep things as smooth as possible for a sleek, aerodynamic rocket that will go really high!
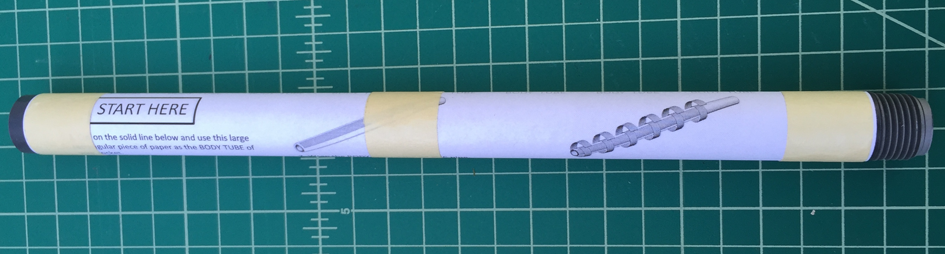
Figure 2-43. Body tube wrapped and taped around gray PVC build tube (do not tape the paper to the PVC pipe; it should slide off).
Step 4Now, working your way down the body tube, overlap strips of masking tape, as shown in Figure 2-44, making sure no paper is exposed (otherwise it may blow out during the launch).

Figure 2-44. Work your way down the body tube, overlapping tape along the way.
- Step 5Slide the body tube up to to the top of the PVC pipe and place the pressure cap on top, as shown in Figure 2-45.
Step 6Take two pieces of tape and crisscross them over the pressure cap and smooth down, as shown in Figure 2-46. This is where all the pressure at launch goes, so it’s important to get a tight, strong seal. Wrap one more piece of masking tape around the body tube at the top.

Figure 2-45. Place pressure cap on top of tube.

Figure 2-46. Crisscross tape over the top of the pressure cap.
Step 7Take the nose cone piece and pull it along the edge of a table to curl the paper in the direction you want. Overlap the nose cone into a cone shape over the dots on the template. Pack the nose cone tightly with scraps of paper using your scissors to push the paper down, as shown in Figure 2-47.

Figure 2-47. Stuff nose cone tightly with scraps of paper
Step 8Tape the nose cone over the pressure cap using the tabs to the top of sealed end of the body tube, as shown in Figure 2-48. Cover the entire nose cone in strips of tape.

Figure 2-48. Tape nose cone to the top of the body tube and then cover nose cone with strips of tape.
Step 9Fold the three fins along the center line, as shown in Figure 2-49.

Figure 2-49. It’s easier and more uniform to fold all three wings together.
Step 10Fold the left and right edges of the three fins back (in the opposite direction of the center line fold). These are tabs you’ll maybe use to tape the fins to your rocket. You’ll be left with three fins that look like the ones in Figure 2-50.

Figure 2-50. Three fins with tabs for taping to your rocket.
Step 11Use masking tape to evenly space the three fins around the bottom of the rocket. One piece of masking tape can hold the edge on two fins, as shown in Figure 2-51.

Figure 2-51. One piece of tape can secure the tabs on two fins.
- Step 12Once the fins are secure, use additional masking tape to completely cover the folded edges, as shown in Figure 2-52.
A finished rocket is shown in Figure 2-53.

Figure 2-52. Tape the fins all the way up and down so they don’t tear off at launch.
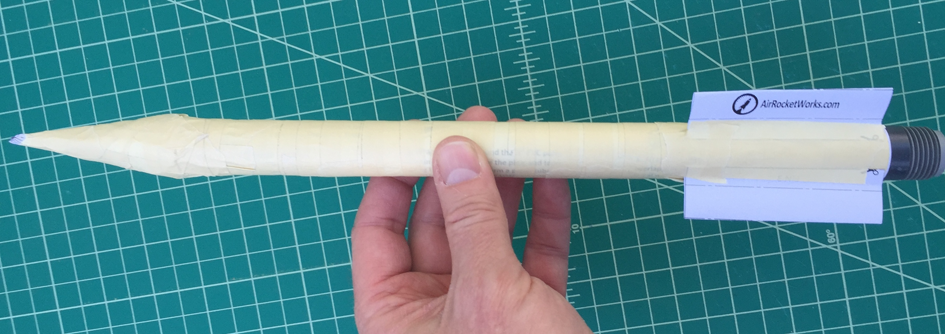
Figure 2-53. Rocket ready for launch!
Launching Rockets!
If you’re able, it’s best to place your launcher up on a table so the launch tube is above eye level. Always make sure everyone is clear of the launcher before launching. Having an adult in control of the launch valve is always a good idea.
- Step 1Make sure the slide valve is in the “pressurize” position (Figure 2-54). Connect your bicycle pump to the Schrader connector side of the slide valve (Figure 2-55). Make sure you have a good, airtight connection to the pump. A high-quality pump we recommend is the Lezyne Alloy Floor Pump.
Step 2Place your paper and tape rocket on the launcher (Figure 2-56).

Figure 2-54. Slide valve in the “pressurize” position.

Figure 2-55. Connect bike pump to the brass Schrader valve (right side of picture) securely; make sure there are no leaks.
- Step 3Using a pump with a pressure gauge, pump it up to about 50 psi like in Figure 2-57. It should only take about 2–3 pumps.
Step 4With everyone standing clear of the launcher, count down from 5 and then slide the valve back to the launch position, as shown in Figure 2-58. All the air should instantly be released from the pressure chamber and the rocket should fly nearly 250’ (almost out of sight), before falling back to earth.

Figure 2-57. Pump up to 50 psi and pressure should hold if there are no leaks in the system.
Step 5After launching, slide it back to the “pressurize” position only once. This keeps pressure in the line and helps the QEV reset itself. If the QEV does not reset, you may need to work the slide valve back and forth to reset the plastic diaphragm inside the QEV. You’ll hear a faint “click” when it resets. Further troubleshooting tips can be found at AirRocketWorks.com. It’s also possible to connect the launcher to an air compressor if you’re doing hundreds of launches like we do at Maker Faire. See AirRocketWorks.com for tips on how to do that as well.

Figure 2-58. Slide valve toward the “launch” position to fire the rocket!

Going Further
Experiment!
For both the low-pressure and high-pressure rockets, try building rockets out of different types of paper and tape. Make the fins different shapes and try a variety of materials. See how the changes affect the flight performance.
Several more things that can be launched with the high- and low-pressure launchers are found in Chapter 4. There are lots of opportunities to modify and experiment with parachutes, rocket gliders, and roto-recovery.
The rocket and launcher design are being continually improved. For the latest updates, go to AirRocketWorks.com.