
Chapter 10. Building and testing web applications
This chapter covers
- Groovy servlets and ServletCategory
- Groovlets
- Unit and integration testing of web apps
- The Groovy killer app, Grails
While Java on the desktop has its adherents, Java found a true home on the server side. Java’s growth and adoption in the early days neatly follow that of the web itself. It’s a rare Java developer who hasn’t at least worked on a web application.
In this chapter I’m going to look at modern web application development and where Groovy can make the process simpler and easier. Sometimes Groovy just simplifies the code. Other times it provides helpful testing tools, like Gradle and HTTPBuilder. Finally, there’s the most famous framework in the Groovy ecosystem, Grails. I’ll review them all and try to place them in the overall context of web applications.
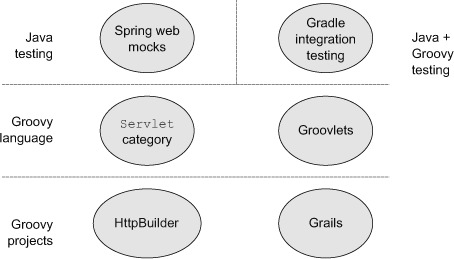
Figure 10.1 is a guide to the technologies discussed in this chapter.
Figure 10.1. Guide to the technologies in this chapter. Spring provides mock objects for testing that are also used in Grails. Using plugins and some configuration, Gradle builds can do integration testing of web applications. The ServletCategory class makes session, request, and other objects easier to use. Groovlets are a quick way to build simple applications. Finally, the HTTPBuilder project provides a programmatic web client, and Grails applications use Groovy DSLs and elegant metaprogramming to combine Spring and Hibernate in a standard convention-over-configuration framework.
10.1. Groovy servlets and ServletCategory
Groovy doesn’t add a lot to basic servlet development, but the standard library does provide a category class that illustrates what Groovy’s metaprogramming can do. The following listing shows a trivial servlet, HelloGroovyServlet.groovy, part of a web application implemented in Groovy.
Listing 10.1. A simple servlet implemented in Groovy
class HelloGroovyServlet extends HttpServlet {
    void doGet(HttpServletRequest req, HttpServletResponse resp)
        throws ServletException, IOException {
        resp.writer.print 'Hello from a Groovy Servlet!'
    }
}
Other than the normal Groovy simplifications (omitting the word public, lack of semicolons, use of writer rather than getWriter(), and the optional parentheses on print), this isn’t much different from a Java implementation. Use Groovy if you prefer the slightly shorter code, but really the choice of language is a matter of style.
What Groovy does provide is a category class to simplify the code even further. Category classes are an example of Groovy’s metaprogramming capabilities. They show how to add methods to existing classes in a specified block of code, unlike using the metaclass object to add them everywhere in your program. If you ever wanted to understand categories, ServletCategory is a great, extremely simple, useful example.
Categories
Use a Groovy category to add methods to existing classes when you only need those methods under specific circumstances. Category methods are only available in a use block.
Figure 10.2 shows a sample of the GroovyDocs for the groovy.servlet.Servlet-Category class.
Figure 10.2. The GroovyDocs for ServletCategory. Each method is static and is added to the class listed in the first argument.
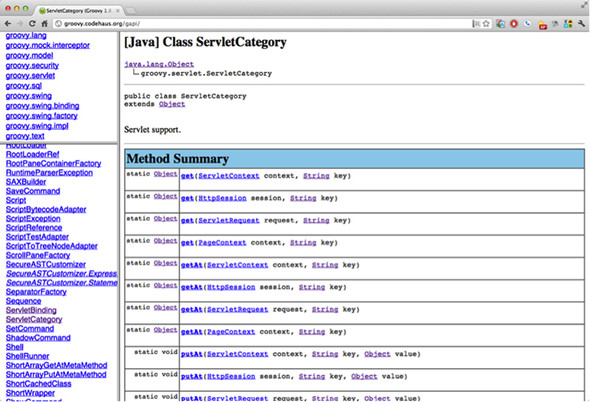
A Groovy category consists of static methods having one or more arguments. The first argument to the method is the class that receives the method. In Servlet-Category there are only four methods, with lots of overloads (see table 10.1).
Table 10.1. The ServletCategory methods for different scopes
|
Method Name |
First Argument |
|---|---|
| get(arg, String key) | ServletContext, HttpSession, ServletRequest, PageContext |
| getAt(arg, String key) | Same as above |
| putAt(arg, String key, Object value) | Same as above |
| set(arg, String key, Object value) | Same as above |
See a pattern? The job of this category is to make it easy to add attributes at page scope (PageContext), request scope (ServletRequest), session scope (HttpSession), and application scope (ServletContext). Remember that in Groovy all operators correspond to methods. In this case, the get and set methods correspond to the dot operator, and the getAt and putAt methods implement the array subscript operator. Before I show an example, take a look at a portion of the actual implementation class, groovy.servlet.ServletCategory, in the following listing, implemented in Java.
Listing 10.2. Methods for HttpSession from groovy.servlet.ServletCategory
public class ServletCategory {

    public static Object get(HttpSession session, String key) {
        return session.getAttribute(key);
    }
    ...
    public static Object getAt(HttpSession session, String key) {
        return session.getAttribute(key);
    }
    ...
    public static void set(HttpSession session,
        String key, Object value) {
        session.setAttribute(key, value);
    }
    ...
    public static void putAt(HttpSession session,
        String key, Object value) {
        session.setAttribute(key, value);
    }
}
The first interesting thing to note is that this class is written in Java (!), even though it’s being used in Groovy. When overloading operators, Groovy doesn’t care which language you use to implement the methods, only that you use the operators that delegate to the methods in Groovy. In this case, I don’t even plan to use the methods directly. Instead, I’m using the dot operator and/or the array subscript notation to invoke them implicitly.
The other important detail here is that all the methods are delegating to either the getAttribute or setAttribute method. The effect is that either the dot operator or the subscript operator can be used to add attributes to the page, request, session, or application scope.
ServletCategory
Whether you use ServletCategory or not, its combination of metaprogramming and operator overloading make it an excellent example of how Groovy helps Java.
Groovy 2.0 introduced an alternative syntax for defining categories. In the ServletCategory discussed in this section, the category class contains static methods whose first argument is the class being modified. In the new notation you can use annotations and instance methods instead.
As an example, consider formatting numbers as currency. The java.text.NumberFormat class has a method called getCurrencyInstance, which has both a no-arg method that formats for the current locale and an overloaded version that takes a java.util.Locale argument. The classic way to add an asCurrency method to Number that employs the currency formatter is
import java.text.NumberFormat

class CurrencyCategory {
    static String asCurrency(Number amount) {
        NumberFormat.currencyInstance.format(amount)
    }

    static String asCurrency(Number amount, Locale loc) {
        NumberFormat.getCurrencyInstance(loc).format(amount)
    }
}

use(CurrencyCategory) {
    def amount = 1234567.89012
    println amount.asCurrency()
    println amount.asCurrency(Locale.GERMANY)
    println amount.asCurrency(new Locale('hin','IN'))
}
The new way to implement a category uses the @Category annotation, which takes the class to be modified as an argument. Then instance methods are used inside the category, and the this reference refers to the object where the category is invoked. The analogous implementation for the currency category is
import java.text.NumberFormat

@Category(Number)
class AnnotationCurrencyCategory {
    String asCurrency() {
        NumberFormat.currencyInstance.format(this)
    }

    String asCurrency(Locale loc) {
        NumberFormat.getCurrencyInstance(loc).format(this)
    }
}

Number.mixin AnnotationCurrencyCategory
def amount = 1234567.89012
println amount.asCurrency()
println amount.asCurrency(Locale.GERMANY)
println amount.asCurrency(new Locale('hin','IN'))
Note also the use of the mixin method to add the category to the Number class.
Presumably, if the ServletCategory was being implemented now, it would use the annotation approach. The result is the same either way, of course.[1]
1 The book source code includes the two ways of doing the currency category as well as a test case.
An example will make this clear. The next listing shows a class called HelloName-Servlet, implemented in Groovy, which receives a name parameter and replies with the standard welcome.
Listing 10.3. The HelloNameServlet class, which uses the ServletCategory
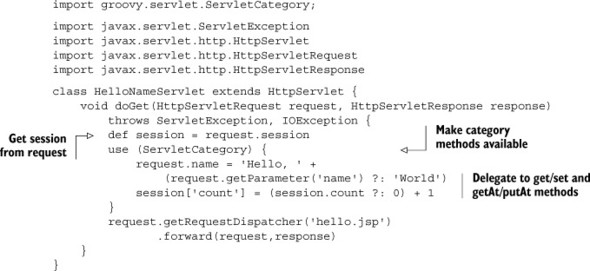
This class works with attributes in both the request and the session. After getting the session from the request (which is standard “property access means get method” style, not the category), the use block defines the region where the category is active. Inside the use block, a name attribute is added to the request using the dot notation, whose value is either supplied by the user in the form of a parameter, or consists of the default value World. Next, a count attribute is placed in the session; its value is either incremented from its existing value or set to 1 if it doesn’t already exist.
The test class, HelloNameServletTest, is shown in the next listing. It uses the Spring API mock objects to test the doGet method both with and without a supplied name.
Listing 10.4. The HelloNameServletTest class, which uses Spring’s mock objects
import static org.junit.Assert.*;

import org.junit.Test;
import org.springframework.mock.web.MockHttpServletRequest;

import org.springframework.mock.web.MockHttpServletResponse;
import org.springframework.mock.web.MockHttpSession;

class HelloNameServletTest {
    HelloNameServlet servlet = new HelloNameServlet()

    @Test
    void testDoGetWithNoName() {
        MockHttpServletRequest request = new MockHttpServletRequest()
        MockHttpServletResponse response = new MockHttpServletResponse()
        MockHttpSession session = new MockHttpSession()
        request.session = session
        servlet.doGet(request, response)
        assert 'hello.jsp' == response.forwardedUrl
        assert request.getAttribute("name") == 'Hello, World'
        assert session.getAttribute("count") == 1
    }

    @Test
    void testDoGetWithName() {
        MockHttpServletRequest request = new MockHttpServletRequest()
        MockHttpServletResponse response = new MockHttpServletResponse()
        MockHttpSession session = new MockHttpSession()
        request.session = session
        request.setParameter('name','Dolly')
        servlet.doGet(request, response)
        assert 'hello.jsp' == response.forwardedUrl
        assert request.getAttribute("name") == 'Hello, Dolly'
        assert session.getAttribute("count") == 1
    }
}
The ServletCategory isn’t needed in the tests, because I’m already using mock objects rather than the Servlet API classes. Note that the tests check both the request and session attributes and the forwarded URL from the doGet method. The Servlet-Category class is a simple example of how to use Groovy’s metaprogramming capabilities to simplify an API.
As a simple alternative to normal servlet development, Groovy provides groovlets.
10.2. Easy server-side development with groovlets
Groovlets are groovy scripts that are executed in response to HTTP requests. A built-in library class called groovy.servlet.GroovyServlet executes them. Like all Groovy scripts, they’re associated with a binding that holds many pre-instantiated variables.
To use a groovlet, first configure the GroovyServlet to receive mapped requests. A typical way of doing so is to add the following XML to the standard web application deployment descriptor, web.xml:
<servlet>
    <servlet-name>Groovy</servlet-name>
    <servlet-class>groovy.servlet.GroovyServlet</servlet-class>
</servlet>
<servlet-mapping>
    <servlet-name>Groovy</servlet-name>

    <url-pattern>*.groovy</url-pattern>
</servlet-mapping>
The GroovyServlet class is part of the standard Groovy library. Here it’s mapped to the URL pattern *.groovy, which means that any URL that ends in that pattern will be directed to this servlet. For example, the URL http://localhost/.../hello.groovy would match a script named hello.groovy in the root of the web application. Keep in mind that this is literally the source file, not the compiled class.
Groovlets
Groovlets are deployed as source code, not compiled.
When invoked, the GroovyServlet class finds the script whose name ends the URL, pre-instantiates a series of variables, creates an instance of the GroovyScriptEngine class, and executes the script. The actual script code can be placed in any accessible directory from the web application root, or in any subdirectory of /WEB-INF/groovy.
The key to the simplicity of groovlets is this already-configured infrastructure. With this in place a developer has a lot less work to do.
10.2.1. A “Hello, World!” groovlet
Because every technology needs a “Hello, World!” application, here’s a groovlet to greet the user. Assume that the GroovyServlet has already been configured, and add a file called hello.groovy in the root of a web application. In a standard Maven structure that would be src/main/webapp/hello.groovy. The contents of the groovlet are
name = params.name ?: 'World'
println "Hello, $name!"
It’s a simple groovlet, but it should still be tested. Integration-testing of web applications is discussed later in this chapter, but the syntax in the next listing uses the same mechanism for transmitting a GET request (use the Groovy JDK to convert a string to a URL and then call URL’s getText method) that was used in several earlier chapters.
Listing 10.5. HelloGroovletTest, an integration test for the hello groovlet
class HelloGroovletTest {
    int port = 8163

    @Test
    void testHelloGroovletWithNoName() {
        String response =
            "http://localhost:$port/HelloGroovlet/hello.groovy"
            .toURL().text
        assert 'Hello, World!' == response.trim()
    }

    @Test
    void testHelloGroovletWithName() {
        String response =
            "http://localhost:$port/HelloGroovlet/hello.groovy?name=Dolly"
            .toURL().text

        assert 'Hello, Dolly!' == response.trim()
    }
}
There’s nothing particularly surprising or unusual about this test, which is simple because the groovlet only responds to GET requests.
Unit tests are also doable, based on the fact that the GroovyServlet is executing the groovlet as a script with predefined variables. For example, the next listing shows a unit test for the groovlet that uses an instance of the GroovyShell class and the Binding class in a manner similar to that described in chapter 6 on testing.
Listing 10.6. A unit test for the groovlet using GroovyShell and Binding
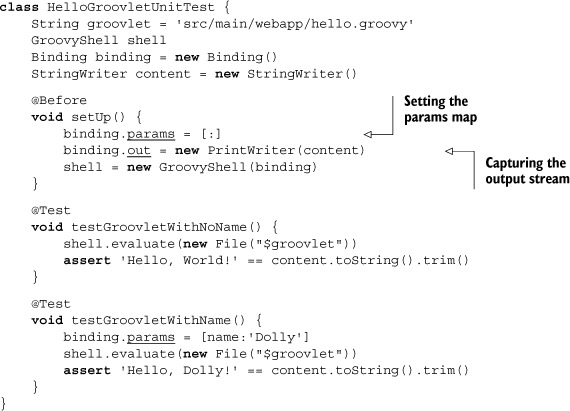
The interesting parts of this test are first that the groovlet expects a map of input parameters, so the test has to provide one, and that I need a way to capture the output stream from the groovlet, which is done through the out variable of the binding.
Recall from chapter 6 that Groovy also provides a subclass of GroovyTestCase, called GroovyShellTestCase, which is designed to test scripts like this. The following listing shows the same unit test using GroovyShellTestCase. Note that it’s noticeably simpler.
Listing 10.7. Using GroovyShellTestCase to simplify unit-testing groovlets
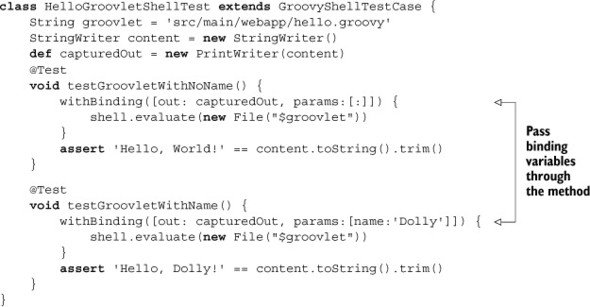
The GroovyShellTestCase class instantiates a GroovyShell internally and allows you to pass a map of binding parameters through the withBinding method.
10.2.2. Implicit variables in groovlets
The previous example shows that groovlets expect that all the request parameters are bundled into a map called params. Groovlets operate in an environment containing many implicit variables. Table 10.2 shows the complete list.
Table 10.2. Implicit variables available in groovlets
|
Variable |
Represents |
Notes |
|---|---|---|
| request | ServletRequest | |
| response | ServletResponse | |
| session | getSession(false) | May be null |
| context | ServletContext | |
| application | ServletContext (same as context) | |
| params | Map of request parameters | |
| headers | Map of request/response headers | |
| out | response.getWriter() | |
| sout | response.getOutputStream() | |
| html | new MarkupBuilder(out) |
The previous example used only the params variable. Now I’ll discuss a slightly more elaborate example, which was used in the Groovy Baseball application first presented in chapter 2.
The following listing shows the complete source.
Listing 10.8. The GameService groovlet from the Groovy Baseball application
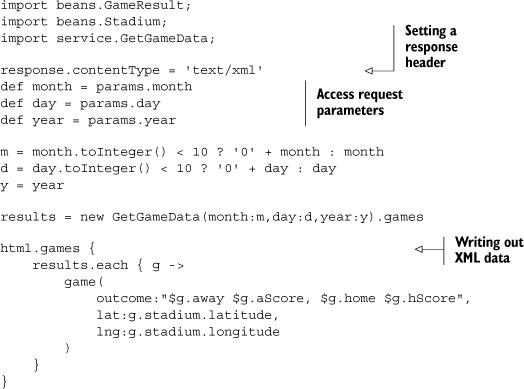
The goal of the GameService groovlet is to get the date provided by the user interface, invoke the getGames method in the GetGameData service, and provide the results to the user in XML form. The groovlet sets the contentType header in the response to XML, retrieves the input parameters representing the requested date, normalizes them to the proper form if necessary, calls the game service, and uses the built-in markup builder to write out the game results as a block of XML.
Using the markup builder to write out XML is helpful here. One of the problems faced by current web applications is that JavaScript code used in the user interface can’t parse the Java or Groovy objects produced by the server side. An intermediate format is needed that both sides can interpret and generate. There are only two realistic options for that: XML and JavaScript Object Notation (JSON). The recent trend has been to use JSON objects as much as possible, but the markup builder inside groovlets makes it easy to produce XML instead. The amount of XML generated by this application is minimal, so it’s not a problem to parse-in the user interface.
Producing XML
Use the html markup builder in groovlets to write out XML when needed, not to produce a web page in HTML.
This demonstration is simple, but that’s the point. Groovlets are a convenient way to receive input data, access back-end services, and produce responses or forward the user to a new destination. Because they have a built-in way to convert objects into XML (and it wouldn’t be hard to add a JsonBuilder to convert to JSON instead[2]), they’re ideal as a front-end for RESTful web services.
2 In fact, I helped do exactly that. That’s open source for you; if you get an idea, go do it.
- Groovlets are Groovy scripts executed by an embedded servlet.
- Groovlets contain implicit objects for request parameters, the HTTP session, and more.
- Groovlets use builders to generate formatted output.
Before demonstrating the Grails framework, let me now discuss the issue of testing web applications, both in isolation as unit tests and automated integration tests using Gradle.
10.3. Unit-and integration-testing web components
Chapter 6 discussed techniques for unit-testing Java and Groovy classes and demonstrated how Groovy’s mock capabilities provide a standard library of mocks and stubs to support unit tests. It’s easy to test individual classes and to run those tests automatically as part of a build process.
Testing is so important that most modern web frameworks consider testability a major design goal, so they try to make the individual components easy to test. For example, one of the major differences between the original Struts framework and the more modern Struts 2, Spring MVC, JSF, or any of a number of others is how their parts are designed with testing in mind. Despite this, testing of web components is far less pervasive than you might expect.
Still, unit-testing and integration-testing web applications is as important as testing anything else in the system, and doing so automatically is critical. Integration-testing a web application by making a tester manually enter data in forms and click links is an extremely expensive and error-prone mechanism. There has to be a better way, and fortunately Groovy helps a lot in that area.
To lay the foundation, however, I’ll begin with a library of mock classes that comes from one of the biggest Java libraries of them all, the Spring framework.
10.3.1. Unit-testing servlets with Spring
The Spring framework is one of the most popular open source libraries in the Java world. Chapter 7 on Groovy and Spring discusses it in some detail, but I want to use it here for two reasons: (1) Spring provides a great collection of mock objects for unit-testing web applications, and (2) Spring is one of the underlying technologies for Grails, so knowing more about how Spring works helps you use Grails more effectively.
To illustrate the challenge and highlight the dependencies that need to be mocked during testing, let me start with a simple servlet class, written in Java, called HelloServlet:
public class HelloServlet extends HttpServlet {
    protected void doGet(HttpServletRequest req, HttpServletResponse resp)
        throws ServletException, IOException {
        resp.getWriter().print("Hello, Servlet!");
    }
}
Servlets are all created by inheritance, normally by extending javax.servlet.http .HttpServlet. HttpServlet is an abstract class with no abstract methods. It receives HTTP requests and delegates them to a do method corresponding to each HTTP verb, like doGet, doPost, doPut, doTrace, or doOptions. Each of these methods takes two arguments, one of type HttpServletRequest and one of type HttpServletResponse.
The HelloServlet class overrides the doGet method to respond to HTTP GET requests. It uses the resp argument (an instance of HttpServletResponse) to get the associated output writer, which is used to print to the output stream.
Even in a class this simple, it’s apparent that unit testing is going to be a challenge. As a reminder of what unit testing is all about, let me say this:
Unit-Testing Web Components
The goal of unit-testing web applications is to run tests outside of a container. This requires mock objects for all the container-provided classes and services.
In this case I need objects representing the two arguments of type HttpServlet-Request and HttpServletResponse. In most cases I’ll also need objects representing HttpSession, ServletContext, and possibly more.
This is where the set of mock classes from the Spring framework helps. The Spring API includes a package called org.springframework.mock.web that, as described in the API, contains “a comprehensive set of Servlet API 2.5[3] mock objects, targeted at usage with Spring’s web MVC framework.” Fortunately they can be used with any web application, whether it’s based on Spring MVC or not.
3 The mock objects work for Servlet 3.0 as well, with some minor exceptions listed in the JavaDocs.
The next listing shows a JUnit test for the doGet method of my “Hello, World!” servlet.
Listing 10.9. HelloServletJavaTest: a servlet test class using mock objects
import static org.junit.Assert.*;

import org.junit.Test;
import org.springframework.mock.web.MockHttpServletRequest;
import org.springframework.mock.web.MockHttpServletResponse;

public class HelloServletJavaTest {
    @Test
    public void testDoGet() {
        HelloServlet servlet = new HelloServlet();
        MockHttpServletRequest req = new MockHttpServletRequest();
        MockHttpServletResponse resp = new MockHttpServletResponse();

        try {
            servlet.doGet(req, resp);
            assertEquals("Hello, Servlet!",
                resp.getContentAsString().trim());
        } catch (Exception e) {
            e.printStackTrace();
        }
    }
}
The try/catch blocks do their best to bury the essence in ceremony, but the intent is clear. The method instantiates the servlet and mock objects representing the servlet request and servlet response classes, and then it invokes the doGet method on the servlet with the mocks as arguments. The good part is that the MockHttpServletResponse class has a method called getContentAsString, which captures the data written to the output writer in the servlet so it can be compared to the expected answer.
Note that the mock classes are being used not as Spring beans in the traditional sense (as they are in chapter 7 on Spring), but simply as an available API.
Unit-testing servlets is that simple, as illustrated in figure 10.3. Instantiate the servlet, provide it with whatever mock objects it needs, invoke the proper do method, and check the results. This example showed getContentAsString; additional tests in this chapter will illustrate two other convenient methods: getForwardedUrl and getRedirectedUrl. With these classes and methods available, no deployment to a servlet container is required.
Figure 10.3. Servlet tests using Spring mocks. The Spring API provides mock classes for the request, response, and session, and captures outputs, forwards, and redirected URLs.

So far, however, I haven’t used Groovy at all. What does Groovy provide to make servlet development and testing easier? I’ll answer that in the next section.
Unit testing isn’t always enough, though. I’d like to prove that my application classes work in practice as well, so I want to do an integration test, too. That means I need a servlet container, some way to deploy my web application, and a way to trigger requests types other than simple GETs. That’s the subject of the next section.
10.3.2. Integration testing with Gradle
Gradle is a build tool implemented in Groovy, which was discussed extensively in chapter 5 on build processes. Gradle uses Groovy builder syntax to specify repositories, library dependencies, and build tasks. Executing a build using one of the normal plugins (like the Groovy plugin used throughout this book) downloads any needed dependencies, compiles and tests the code, and prepares a final report of the results. One of the advantages of working with Gradle is its large variety of available plugins. In this chapter I’m working with web applications, and Gradle understands their structure as well as regular Java or Groovy applications. All you need to do is include the war plugin, and everything works. Even better, Gradle also includes a jetty plugin, which is designed for testing web applications.
Simply add the following line to a Gradle build:
apply plugin:'war'
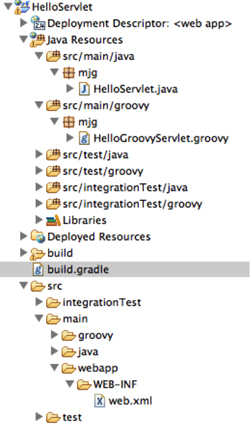
The project will then use the default Maven structure of a web application. That means the web directory src/main/webapp will hold any view layer files, like HTML, CSS, and JavaScript. That directory will also contain the WEB-INF subdirectory, which contains the web deployment descriptor, web.xml. The source structure can be mapped any way you want, but for this section I’ll stick with the default Maven approach.
Consider a web application that holds HelloServlet from the previous section. The project layout is shown in figure 10.4.
Figure 10.4. Web project layout. The integrationTest directories are discussed later in this chapter. The project has the standard Maven structure for a web application.
At this stage, the Gradle build file is very simple, as shown in the following listing.
Listing 10.10. Gradle build file for web application, using the war plugin

The listing includes the war plugin. As usual, dependencies come from Maven central. The dependent libraries include JUnit and the Spring API libraries used for unit-testing. The interesting feature is the providedCompile dependency. That tells Gradle that the servlet and JSP APIs are required during compilation but not at deployment, because the container will provide them.
The war plugin really shines when it’s combined with the jetty plugin. Jetty is a lightweight, open source servlet container hosted by the Eclipse foundation.[4] This makes it convenient for testing web applications, and Gradle includes a jetty plugin with the standard distribution.
4 See www.eclipse.org/jetty/ for details.
10.3.3. Automating Jetty in the Gradle build
To use Jetty in Gradle, you need to add the plugin dependency, but you also need to configure some settings:
apply plugin:'jetty'

httpPort = 8080
stopPort = 9451
stopKey = 'foo'
The httpPort variable is the port that Jetty will use for HTTP requests. Using 8080 is typical, because it’s the default port for both Tomcat and Jetty, but it’s certainly not required. The Jetty container will listen for shutdown requests on the stopPort, and the plugin will send the stopKey to Jetty when it’s time to shut down.
Adding the plugin and properties to the Gradle build enables three new tasks:
1. jettyRun, which starts the server and deploys the application
2. jettyRunWar, which creates a WAR file before deployment
3. jettyStop, which stops the server
That’s helpful, but I want to automate the process of deploying my application so that I can run an integration test without human intervention. To make that happen, I need the jettyRun and jettyRunWar tasks to run in “daemon” mode, which means that after starting, control will be returned to the build so it can continue with other tasks.
Therefore, I add the following line to the build:
[jettyRun, jettyRunWar]*.daemon = true
Remember that the spread-dot operator (*.) in Groovy here means to set the daemon property on each element of the collection. Without the star, the dot operator would try to set the property on the collection itself, which wouldn’t work.
The test itself can then be defined as a private method in the build file and called from inside a Gradle task, as follows:
task intTest(type: Test, dependsOn: jettyRun) << {
    callServlets()
    jettyStop.execute()
}

private void callServlet() {
    String response = "http://localhost:$httpPort/HelloServlet/hello"
        .toURL().text.trim()
    assert response == 'Hello, Servlet!'
}
The intTest task is defined using the left-shift operator (<<), which is an alias for adding a doLast closure. In other words, this defines the task but doesn’t execute it. Because the task depends on the jettyRun task, jettyRun will be called first if this task is invoked. The task calls the private callServlet method, which converts a String to a URL, accesses the site, and compares the response to the expected value. Once the method completes, the intTest task tells Jetty to shut down, and I’m finished.
I can invoke the intTest task directly from the command line, but I’d rather make it part of my normal build process. To do that, I notice that in the directed acyclic graph (DAG, see chapter 5) formed by the Gradle build file, the next task after the test task is completed is called check.
That sounded way more complicated than it actually was. All I needed to do was run Gradle with the –m flag to keep it from actually executing, which gives the following output:
prompt> gradle -m build
:compileJava SKIPPED
:processResources SKIPPED
:classes SKIPPED
:war SKIPPED
:assemble SKIPPED
:compileTestJava SKIPPED
:processTestResources SKIPPED
:testClasses SKIPPED
:test SKIPPED
:check SKIPPED
:build SKIPPED

BUILD SUCCESSFUL
As you can see, the check task occurs right after the test task completes, and the intTest task doesn’t execute at all unless I call for it. To put my task into the process, I set it as a dependency of the check task:
check.dependsOn intTest
Now if I run the same build task again, the integration test runs at the proper time:
prompt> gradle -m build
:compileJava SKIPPED
:processResources SKIPPED
:classes SKIPPED
:war SKIPPED

:assemble SKIPPED
:jettyRun SKIPPED
:compileTestJava SKIPPED
:processTestResources SKIPPED
:testClasses SKIPPED
:intTest SKIPPED
:test SKIPPED
:check SKIPPED
:build SKIPPED

BUILD SUCCESSFUL
Note that the jettyRun task is also triggered before the tests. Now everything works the way I want.
From one perspective, this is quite a feat of engineering. The class structure in Gradle makes it easy to define new tasks, I can make sure my task runs at the proper time, and I can even embed the test as Groovy code right in my build file.
The problem, of course, is that I can embed the test as Groovy code right in my build file. That works in this instance, but doing business logic (even testing) in a build file can’t be a good long-term solution. Test cases aren’t part of a build; a build calls them. Inside the build, they’re hard to maintain and not easily reusable.
10.3.4. Using an integration-test source tree
A good way to separate the testing infrastructure from the actual tests is to create a special source tree for it. That provides a convenient location for the tests, which will run automatically at the proper point in the build.
Gradle projects have a sourceSets property, which can be used to map source directories if they don’t fit the default Maven pattern. An example of this was given in chapter 5. Here I want to add an additional testing directory. For both the Java and Groovy plugins, simply defining a source set name generates the proper tasks.
In the current build I add a source set called integrationTest:
sourceSets {
    integrationTest
}
This causes Gradle to generate tasks called compileIntegrationTestJava, compileIntegrationTestGroovy, processIntegrationTestResources, and integrationTest-Classes. The directory tree now includes src/integrationTest/java, src/integrationTest/groovy, and src/integrationTest/resources.
For this source set I would like the compile and runtime dependencies to match their counterparts in the regular test directory:
dependencies {
    // ... Various libraries ...
    integrationTestCompile configurations.testCompile
    integrationTestRuntime configurations.testRuntime
}
As before, I’ll use the intTest task, but now I need to configure it to have the proper classpath and test directories. Here’s the new version of the task:
task intTest(type: Test, dependsOn: jettyRun) {
    testClassesDir = sourceSets.integrationTest.output.classesDir
    classpath = sourceSets.integrationTest.runtimeClasspath
    jettyStop.execute()
}
The testClassesDir property points to the compiled test sources. The classpath is set to the runtime classpath of the source set, which is simply the runtime classpath of the regular tests. I can now place integration tests into the src/integrationTest directory tree, and they’ll be executed at the proper time.
One final issue remains before presenting the integration tests. It’s easy to create an HTTP GET request: you convert the string URL to an instance of java.net.URL and then access its text property, as shown previously. It’s not as simple to create POST, PUT, and DELETE requests, however. These are discussed in some detail in chapter 8, but for now I’ll use a third-party open source library.
The HTTPBuilder library (http://groovy.codehaus.org/modules/http-builder/) is a Groovy wrapper around Apache’s HttpClient library. It uses Groovy to make it easy to execute HTTP requests and process the responses. To use it, I added the following dependency to my Gradle build file:
testCompile 'org.codehaus.groovy.modules.http-builder:http-builder:0.6'
With this addition, the following listing now shows a variety of integration tests. The test class includes tests both with the HTTPBuilder client and without.
Listing 10.11. ServletIntegrationTests.groovy: accessing deployed servlets

The listing demonstrates three different types of tests. The first shows a simple GET request without any library dependencies. The second uses the HTTPBuilder[5] library to execute a GET request, and the last does the same with a POST request. The detailed syntax comes from the library documentation.
5 HTTPBuilder includes a class called RESTClient, which is used extensively in the discussion of REST in chapter 9.
With this infrastructure in place, both unit and integration tests can be added to a standard project tree, and both can be executed with an embedded Jetty server using a plugin in the Gradle build.
Gradle Integration Tests
Using Gradle’s web and jetty plugins with an integration source tree, web applications can be tested in “live” mode during a normal build.
Geb (www.gebish.org) (pronounced “jeb,” with a soft g) is a Groovy testing tool based on Spock that allows tests to be written using a page-centric approach to web applications. Website interactions can be scripted in terms of page objects, rather than simple screen scraping. It uses a jQuery-like syntax along with Groovy semantics to do browser automation, using the WebDriver library under the hood.
The Geb project shows a lot of promise and has a growing number of adherents. It’s certainly worth considering as a functional testing tool, along with alternatives like Canoo WebTest (http://webtest.canoo.com) and the Selenium[6] (http://seleniumhq.org) JavaScript library. An entire chapter could be written covering those tools alone, but this book is arguably already long enough.
6 By the way, do you know why it’s called Selenium? When it was developed, there was a much-loathed product called Mercury Test Runner. As it happens, the element Selenium (Se) is the cure for Mercury (Hg) poisoning.
Because this an active area of development, I recommend the testing presentations at Slide Share by Paul King (for example, www.slideshare.net/paulk_asert/make-tests-groovy), one of the coauthors of Groovy in Action (Manning, 2007) and an outstanding developer, as a helpful reference.[7]
7 I’ll just say it here: everything Paul King says is right. Start with that assumption and you’ll be fine.
Groovy has other classes that support server-side configuration, like ServletBinding, which extends the regular script Binding class.
- Spring provides a library of mock objects for unit-testing web applications. The same library is built into Grails.
- The web and Jetty plugins in Gradle make it easy to build and deploy web applications. With some work, Gradle can do automatic integration testing.
Larger applications require more structure to be easily maintainable. The Java world is full of web frameworks, from Struts (both versions 1 and 2) to Tapestry to Wicket to JSF to Spring MVC and more. In the Groovy world, one particular framework is dominant, to the point of attracting developers to Groovy just so they can use this framework. That’s the definition of a killer app: an application so cool people will learn a new language just to use it. That framework, as most readers well know, is called Grails.
This is a book about using Java and Groovy together, so I won’t present a standard tutorial on how to get started with Grails. There are plenty of references for that available.[8] Instead, I’ll show a simple, but hopefully nontrivial, application, discuss some of the architectural choices made when creating Grails, and show how existing Java classes can be incorporated into a Grails application.
8 See especially the excellent Grails in Action, by Peter Ledbrook and Glen Smith (Manning, 2009).
10.4. Grails: the Groovy “killer app”
It’s hard to overstate the impact on the Java world made by the Ruby on Rails (RoR) comet that streaked across the Java sky back in 2005. Java web development at the time consisted of a series of layers composed of a wide mix of technologies, each with its own configuration files and dependencies. Just starting a new web application was a challenge.
Ruby on Rails, with its strong emphasis on the DRY (Don’t Repeat Yourself) principle and Convention over Configuration, demonstrated how much simpler life could be. While a lot of Java web developers embraced the RoR approach, not everyone was in a position to simply abandon the Java world. The big question was, how do we bring the rapid development principles from the RoR world into Java enterprise development?
I’ll address that in a moment, but first I want to discuss every web application ever created,[9] from the 30,000-foot level. Figure 10.5 shows the standard architecture.
9 True for most non-web applications as well. These layers are pretty universal.
Figure 10.5. The layered design of every Java web application ever made. Presentation layer classes, including controllers, go through transactional services to access persistent data.
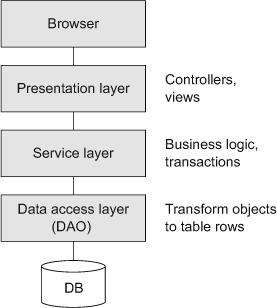
The user interface in the standard model is a browser, also known as a lightweight client, as opposed to a heavyweight (desktop) Java client. The browser presents views to the user, who occasionally submits information back to the server side. The information goes through controllers, which are classes that decide where to go, what business logic to invoke, and what view to use when the request has been processed.
A key principle of Java web application development is to keep the controllers thin, meaning minimal in the amount of actual processing that they do. Instead, the business logic is delegated to service classes. The services are needed also as transactional boundaries, because data access is handled through a set of classes in a data access layer. The data access classes follow the Data Access Object (DAO) design pattern, which encapsulates[10] a data source and transforms entities into database tables and back.
10 Encapsulates. Sigh. Can’t we just say “wraps”? Why does every term from OOP have to be so overly complicated? Why can’t we just “make” or “create” something, rather than “instantiate” it? And I get the whole “many forms” idea, but who thought the term “polymorphism” was exactly what we needed? Who talks like that (other than me, after all these years)?
While I’m on the subject, I need to show you one more figure that’s inevitable in the web application world. It’s the standard Model-View-Controller (MVC) architecture, illustrated in figure 10.6.
Figure 10.6. The Model-View-Controller (MVC) architecture, little changed since the days of Smalltalk. Views display model objects, which are created and configured by controllers.

The basic idea behind MVC is separation of concerns. Views display model objects, collect data from users, and submit it to controllers. Controllers create and configure model objects and forward them to the views. While the controllers and views are tightly coupled, the model objects are not tied to either. If anything in the system is reusable, it’s the model classes. By the way, noticeably absent from this architecture are the services from the previous figure, but the approach is an oversimplification anyway, so I choose not to worry about it.
Grails is typical of the MVC-based, layered architecture just described, with some interesting variations that are discussed in this section. Grails is notable for several reasons:
- Grails is built on top of existing, mature technologies. Grails combines a series of Groovy domain-specific languages (DSLs) on top of Spring and Hibernate.
- Grails is a complete stack framework (in much the same way as RoR) that combines open source solutions from the view layer to the persistence layer and everything in between.
- Grails has an interactive scripting capability that makes it easy to rapidly prototype applications.
- The design of Grails is based on a plugin system that makes it very easy to extend.[11]
11 At latest count, there are over 800 plugins available for Grails (of widely varying quality).
- Grails applications deploy on existing Java-based infrastructure.
Grails relies on the Spring framework for its internal infrastructure, so anything Spring can do, Grails can do, either directly or through a plugin. Persistence is managed through the Hibernate Object-Relational Mapping layer, which is powerful enough but can also be replaced for the modern family of NoSQL databases.
To show how Grails fits into the standard architecture, I’ll walk through the components of an example.
10.4.1. The quest for the holy Grails
Grails can be used to design arbitrarily complex web applications, but one of its sweet spots is to provide a web interface on a set of database tables. I’ll come back to that after showing the components, because it’s both a blessing and a curse.
Grails
The goal of this section is to demonstrate a portion of a small but nontrivial Grails application. Chapter 8 examines GORM in more detail. Chapter 9 on REST briefly talks about REST in Grails. Finally, chapter 7 on Spring talks about the underlying infrastructure.
Consider a web application with four domain classes: Quest, Task, Knight, and Castle.
Domain Classes
In Grails, instances of domain classes map to database table rows.
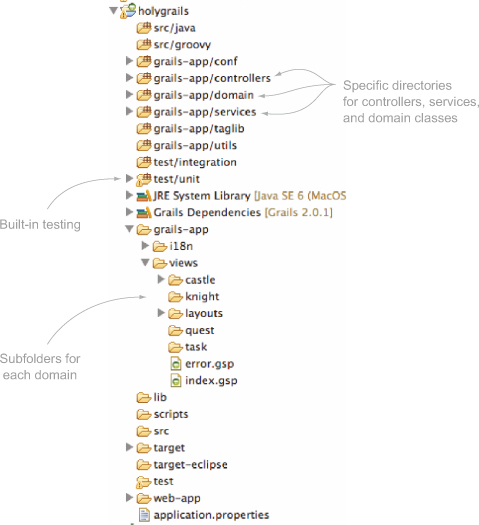
The Grails approach to convention over configuration means that there’s a specific directory for everything, as illustrated in figure 10.7. Domain classes have their own directory, as do controllers, services, and views. This makes it easy to understand a Grails application you haven’t written, because they all store their elements in the same place.
Figure 10.7. Standard layout for all Grails applications. Adherence to convention over configuration makes it easy to find the various components, from controllers to services to domain classes to views.
Grails domain classes are normally written in Groovy, though that’s not required. In the application shown in the next listing, a quest has a name and is associated with many tasks and knights.
Listing 10.12. The Quest domain class
class Quest {
    String name
    String toString() { name }
    static hasMany = [knights:Knight, tasks:Task]
    static constraints = {
        name blank:false
    }
}
The Quest has a name property and an override of toString to return it. The keyword hasMany is part of GORM, the Grails Object-Relational Mapping DSL, which programmatically configures Hibernate. Other ORM tools are available, but Hibernate is the default. The hasMany keyword implies a foreign key relationship between both the Knight and Task tables and the Quest table.
Domain classes also have constraints, which are enforced by Grails when creating new instances. For the Quest, the name field cannot be empty.
The Task class is shown in the next listing. Tasks have a name, a priority, a start and end date, and a completion marker.
Listing 10.13. Tasks belong to a Quest
class Task {
    String name
    int priority = 3
    Date startDate = new Date()
    Date endDate = new Date()
    boolean completed

    String toString() { name }

    static belongsTo = [quest:Quest]

    static constraints = {
        name blank:false
        priority range:1..5
        startDate()
        endDate validator: { value, task ->
            value >= task.startDate
        }
        completed()
    }
}
The constraints closure states that Tasks must have a name, a priority that falls between 1 and 5, and an end date that’s greater than or equal to the start date. The other notable part of this class is the belongsTo keyword, which implies a cascade delete relationship between quests and tasks. If a Quest is deleted, all its associated Tasks are removed from the database as well.
Knights are associated with both Quests and Castles, but not through a cascade delete. In fact, a Knight can be between Quests and not belong to a Castle, so both references are listed as nullable in the next listing.
Listing 10.14. The Knight class, which is associated with a Quest and a Castle
class Knight {
    String title = 'Sir'
    String name
    Quest quest
    Castle castle

    String toString() { "$title $name" }

    static constraints = {
        title inList: ['Sir','King','Lord','Squire']
        name blank: false
        quest nullable: true
        castle nullable: true
    }
}
The last domain class is Castle, which has a name, a city, a state, and a computed latitude/longitude pair, as shown in the following listing.
Listing 10.15. The Castle, which stores location information
class Castle {
    String name
    String city
    String state
    double latitude
    double longitude

    String toString() { "$name Castle" }

    static hasMany = [knights:Knight]

    static constraints = {
        name blank: false
        city blank: false
        state blank: false
        latitude min: -90d, max: 90d
        longitude()
    }
}
The hasMany variable in Castle indicates that the Knight table will have a foreign key to the Castle table.
In a trivial Grails demonstration, all the associated controllers would be scaffolded. In Grails, that means they have a single property, called scaffold, as shown:
class QuestController {
    static scaffold = Quest
}
The scaffold term tells Grails to dynamically (that is, at runtime) generate views to list, show, edit, update, and delete a quest. The code for each of those actions is produced at runtime, so it’s not visible here. Eventually, however, I need to customize the controllers and views, so I need to generate the static versions.
A portion of the Castle controller is shown in the next listing.
Listing 10.16. The static Castle controller class
class CastleController {
...
    def list(Integer max) {
        params.max = Math.min(max ?: 10, 100)
        [castleInstanceList: Castle.list(params),
         castleInstanceTotal: Castle.count()]
    }
...}
The list action checks to see if the params map already contains a key called max. If so it’s converted to an integer and reset to the minimum of the provided value and 100. If the parameter doesn’t exist, then 10 is used as the max. Starting in Grails 2.0, request parameters can be used as arguments to controller actions, and type conversions will be done automatically.
Controllers
Grails controllers contain methods called actions that map to URLs. They either forward to other resources, render outputs directly, or redirect to other URLs.
More important for the architecture discussion, however, is the map provided as the return value of the action. The map contains two keys, castleInstanceList and castleInstanceTotal. The former is associated with a list of 10 castles (or whatever the max parameter evaluates to), and the latter gives their total number. That’s fine, but it’s how those values are computed that’s truly interesting. Grails adds both a list method and a count method as static methods on the domain classes.
No Dao Classes
Instead of Data Access Objects, Grails uses Groovy metaprogramming to add static methods to the domain classes. This follows the Active Record[12] approach, which is unusual in Java frameworks but very popular in Ruby.
12 From Martin Fowler’s Patterns of Enterprise Application Architecture (Addison-Wesley Professional, 2002). See http://en.wikipedia.org/wiki/Active_record for a brief summary.
According to the standard architecture, a controller is supposed to access DAO classes through a service layer. In the static scaffolding there’s no service layer. That’s fine if the application really is little more than a web-driven database, but in general applications need more than that.
Services
Business logic in Grails should be placed in services, which are transactional, Spring-managed beans that can be automatically injected into other artifacts.
This application does contain a service. It’s the Geocoder, familiar from the Groovy Baseball application. In the next listing it operates on Castles.
Listing 10.17. The Geocoder, yet again, which works on Castles this time
class GeocoderService {

    String base = 'http://maps.googleapis.com/maps/api/geocode/xml?'

    def fillInLatLng(Castle castle) {
        String encodedAddress =
            [castle.city, castle.state].collect {
                URLEncoder.encode(it, 'UTF-8')
            }.join(',+')
        String qs =
            [address: encodedAddress, sensor: false].collect { k,v ->
                "$k=$v"
            }.join('&')

        def root = new XmlSlurper().parse("$base$qs")
        castle.latitude = root.result[0].geometry.location.lat.toDouble()
        castle.longitude = root.result[0].geometry.location.lng.toDouble()
    }
}
That much code certainly has to be tested.[13] Grails has had testing capabilities from the beginning, which were originally based on JUnit subclasses. Since version 2.0, Grails test cases use annotations (specifically, the @TestFor annotation) to control so-called mixin classes. The @TestFor annotation applied to a controller or service test automatically instantiates the test and assigns it to an attribute.
13 In pure test-driven development (TDD), the test would be written first. Then you watch it fail, implement the service, and watch the test eventually pass.
For example, the next listing shows the test for the GeocoderService class.
Listing 10.18. The unit test for the GeocoderService
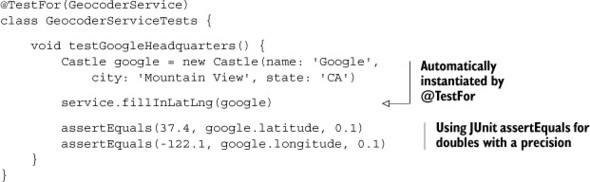
Test Cases
Grails generates a unit-test class for each artifact (domain class, controller, or service) that it produces. The default implementations fail on purpose to encourage you to implement them properly.
In a Grails application, services use Spring’s dependency injection. Here the Geocoder service is injected into CastleController to update the latitude and longitude before an instance is saved in a database. Injecting a service is done by declaring an attribute with the same name as the service with a lowercase first letter.[14] To illustrate, the following code is another section of the CastleController implementation.
14 In Spring parlance, this is “autowiring by name.”
Listing 10.19. Dependency injection of a service into a controller
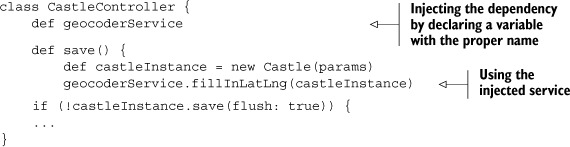
Services are injected by name (the term is autowiring in Spring) into the controller, so declaring a variable of the same name as the service using a lowercase first letter tells Grails to provide an instance of the service at that point. The service is used inside the save method to update the Castle before saving it.
Grails Services
Use Grails applications with the standard, layered architecture. Let controllers delegate to services, and let the transactional services work with the databases.
As noted earlier in this section, Grails has a rich set of available plugins. One that’s useful in this application is the Google Visualization plugin, which provides a custom library of GSP tags that generate JavaScript for Google Maps applications.
As with everything else, Grails manages plugin installations in a standard way. The file BuildConfig.groovy in the grails-app/conf folder has a section on plugins. Adding the proper statement to that file causes Grails to automatically download and install the plugin on its next application start.
Here’s the relevant section of the BuildConfig.groovy file:
plugins {
    runtime ":hibernate:$grailsVersion"
    runtime ":jquery:1.8.3"
    runtime ":resources:1.1.6"

    compile ":google-visualization:0.6.2"
    build ":tomcat:$grailsVersion"
}
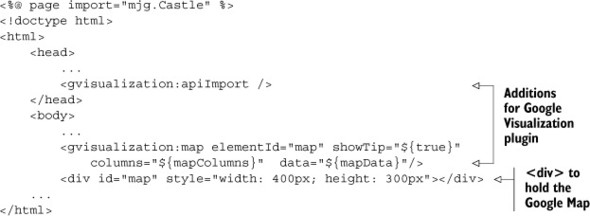
The documentation for the Google Visualization plugin says that to use it, add the tag <gvisualization:apiImport /> to the <head> section of the GSP where you want the map to appear. Then the plugin provides a <gvisualization:map /> tag to produce the map itself. The map tag uses columns and data attributes for the information for the map points, which I need to specify.
The Quest application provides a nice demonstration of the process involved. Suppose I want the map to appear on the list.gsp page associated with the castles. Grails maps the URL http://<host>:<port>/holygrails/castle/list to the list action in the CastleController class. The last expression in that action is a map (a Groovy one rather than a Google one), so Grails automatically adds the entries to the HTTP request and forwards to the list.gsp page.
The goal, therefore, is to add the information needed by the map to the proper controller action. As usual, the data should come from a service, and I already have the GeocoderService available. The next listing shows the additional methods.
Listing 10.20. Methods added to the GeocoderService to support the mapping plugin
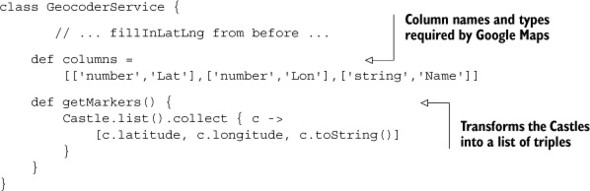
The list action in the CastleController is already returning a list of castles and the total count, which are used to display them in a table. I might as well use the same action to return the columns and data for the map.
The revised list action in CastleController looks like this:
def list() {
    params.max = Math.min(params.max ? params.int('max') : 10, 100)
    [castleInstanceList: Castle.list(params),
     castleInstanceTotal: Castle.count(),
     mapColumns:geocoderService.columns, mapData:geocoderService.markers]
}
The following listing shows the additions made to the view, list.gsp, in order to display a map of castles.
Listing 10.21. Modifications to list.gsp to display a Google Map of castles
The result is shown in figure 10.8, which displays the castles on a Google Map. The plugin generates the JavaScript required by the Google Maps API.
Figure 10.8. Displaying the castles on a Google Map. The Castle domain classes have their latitude and longitude coordinates set by the GeocoderService. The Google Visualization plugin generates the proper JavaScript to add them to a Google Map.

Grails is a large, powerful framework with lots of features, and the features it lacks are provided with plugins. If you spend any time with Groovy, it’s worth a look whenever you have to build web applications.
- Grails is a convention-over-configuration framework for producing web applications.
- Grails domain classes are managed by Hibernate and mapped to database tables.
- Grails services are Spring-managed beans that are autowired by name into other artifacts. They use Spring’s transaction management by default.
- The plugin design of the Grails architecture makes it easy to add additional capabilities.
Grails uses Spring and Hibernate under the hood, so it mixes Groovy-based domain-specific languages on top of major Java libraries.
10.5. Summary
This chapter examined ways Groovy helps with testing and building web applications. Unit tests are similar to their Java counterparts, but the Gradle build framework provides a great way to do integration testing of deployed applications.
The Groovy JDK includes classes like ServletCategory, which simplify the implementation of web components. Groovy also has a built-in web scripting engine called groovlets, which makes it easy to work with requests, responses, sessions, and input parameters in a web application.
Finally, this chapter includes a brief discussion of Grails, possibly the biggest Java/Groovy integration success story of them all.