Chapter 1
GETTING STARTED IN BIRD PHOTOGRAPHY
After its companion flies off, there is just one Horned Puffin remaining on the rock ledge just ahead of me. I take the chance to relax my shoulders and rest my eyes after a long stretch of staring through the viewfinder. Not for long though! Before I know it, another puffin is landing in a flurry of wings as it scrambles to gain a foothold. Reflexively, I aim the camera and press the shutter button with no time to frame carefully. Often, that might be a recipe for failure, but not this time: One perfect frame has both a dynamic wing position and the two puffins’ bills aligned as though they are about to kiss. Many factors contribute to a great bird image. Sometimes Nature adds the magic ingredient: Luck!

Figure 1.1: Wood Duck male.
Canon EOS 1D Mark III with 500mm f/4L IS USM lens, Gitzo tripod, Canon Speedlight 580 EXII, Better Beamer flash extender, 1/400 sec., f/5.6, ISO 1000. Cleveland, Ohio.
As a young photographer back in the distant past, when dinosaurs and film cameras ruled the earth, I attended a talk about what it takes to make great nature photographs. The speaker’s advice was deceptively simple and as relevant to bird photography as it was to nature photography in general. His four tips were: Be there, be prepared, be aware, and be lucky.
“Is that all? What about cameras and lenses and f-stops?” I hear you ask. Certainly, it’s important to have good equipment and a firm grasp of photographic techniques to get started in bird photography. That’s why every photo caption in this book includes the equipment and camera settings used.
But technical information alone gives you only a small fraction of the story. It doesn’t reveal, for example, the importance of timing in obtaining the image of the Wood Duck and its reflection in figure 1.1; how vital it was to be there during the one week in October when reflections of fall foliage would color the water so beautifully in this particular pond; how essential were the calm conditions of early morning to produce the bird’s reflection; and how important it was for me to wait until the bird’s head was turned slightly toward me before pressing the shutter button.
Behind every shot in this book is a whole suite of factors beyond the technical, which fall under the umbrella of field craft: the knowledge, skills, and preparedness that will empower you to create bird images that stand out from the crowd.
The four “Be’s” of bird photography cover all the elements of field craft and then some! That’s why it’s so important to explore these before anything else.
Be There
Remember that college course in which you earned a point toward your grade by simply showing up for class? The same applies to bird photography. Just being there—in the right place at the right time—goes a long way toward achieving success.
In the Right Place
Where can you find subjects? If you’re a birder, you likely already know some bird-rich spots in your local area. If not, join a bird club or an Audubon chapter, and attend field trips to learn where birds can be found in your region. Subscribe to local or regional online listservs for up-to-the-minute bird sightings. I find a lot of my local subjects through a local birding listserv. For instance, a report of Eastern Bluebirds feeding on juniper berries offered a fantastic opportunity that was only a twenty-minute drive from my home (figure 1.2). For bird sightings from farther afield as well as close to home, explore eBird, the real-time, online database of bird observations from North America and worldwide.
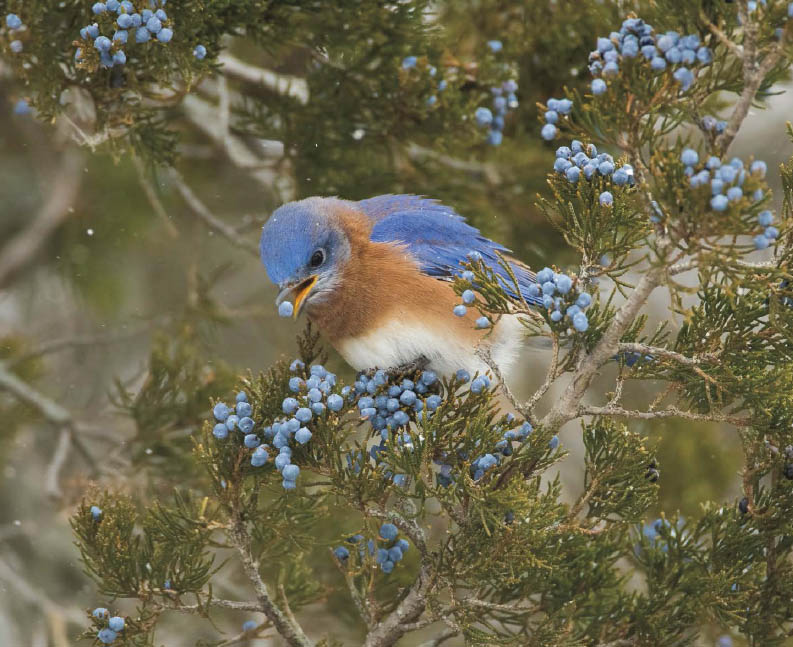
Figure 1.2: Eastern Bluebird male feeding on juniper berries in winter.
Canon EOS 7D Mark II with 500mm f/4L IS lens, 1.4X teleconverter, beanbag over vehicle window, 1/640 sec., f/5.6, ISO 1600. Aurora, New York.
Consider attending one of the numerous birding festivals held throughout North America. Festival field trips are a great way to learn where to find birds if you’re traveling to an unfamiliar region. Bird photography is now so popular that photography workshops are often on the schedule, too. The bimonthly magazine Bird Watching announces upcoming festivals in each issue, and the Cornell Lab of Ornithology’s All About Birds website maintains a list of birding festivals that is searchable by date and location.
Numerous professional bird photographers lead workshops or tours to bird-rich locations throughout North America and across the globe. Before choosing one, know what you’re getting. A photo workshop implies a certain amount of structured teaching, either in the classroom or the field; while a photo tour may include little or no formal teaching, with the leader acting more as a guide and shooting alongside clients.
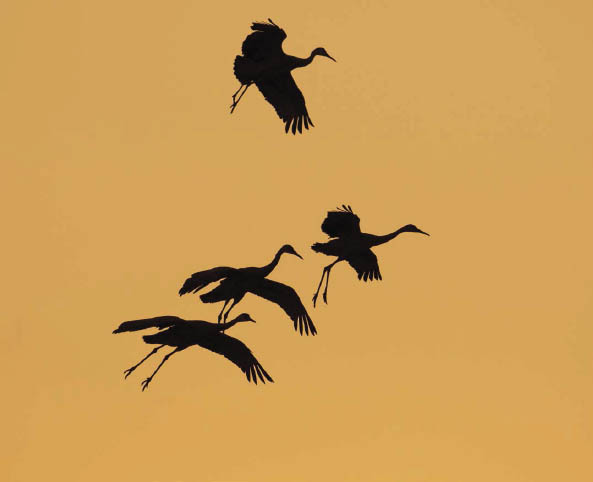
Figure 1.3: Greater Sandhill Cranes silhouetted against a sunset sky.
Canon EOS 7D Mark II with EF 500mm f/4/L IS II lens, Gitzo tripod, 1/2500 sec., f/5.6, ISO 640. Bosque Del Apache National Wildlife Refuge, New Mexico.
Peruse the image galleries of online forums such as NatureScapes.net or birdphotographers.net to discover where others go to shoot. Join in the discussions, and you’ll find that most other photographers are happy to share location information.
Visit one of the renowned bird photography hotspots mentioned in chapter 15, where you’ll find abundant and, often, quite approachable birds. At these tried-and-true spots, such as New Mexico’s famous Bosque Del Apache National Wildlife Refuge, you’ll have boundless opportunities to practice your skills (figure 1.3).

Figure 1.4: Bird photographers line up at sunrise to photograph the famous mass takeoffs of flocks of overwintering Snow Geese.
Bosque Del Apache National Wildlife Refuge, New Mexico.
Hotspots, workshops, and tours often mean you are shooting alongside others . . . sometimes many others (figure 1.4)! You may come away with similar-looking shots to everyone else’s. Still, you can experiment with creative techniques, and you have the chance to network with other photographers, learn about other good locations, and pick up useful tips.
For truly unique images, you might do better to find your own special hotspots close to home. (You’ll save money, too!) Explore local parks, beaches, lakes, ponds, nature sanctuaries, and wildlife refuges. Visit them regularly and be observant. Over time, you’ll discover where birds nest, feed, or gather to rest. The Red-tailed Hawks in figure 1.5, for instance, return each year to nest on the steep wall of a local gorge near my home. A much-traveled bridge over the gorge offers photographers and the general public a rare window into the hawks’ family life.
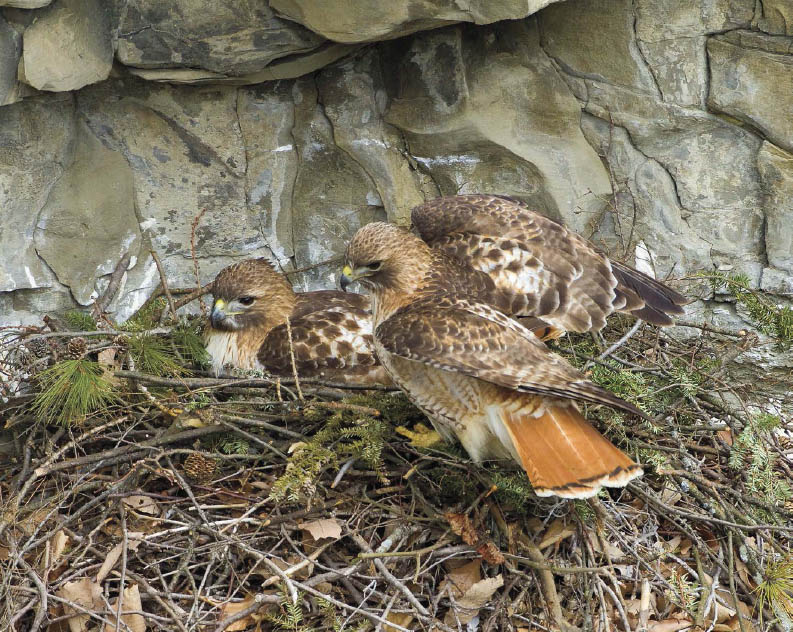
Figure 1.5: Red-tailed Hawk pair nesting on a rock ledge in a deep gorge.
Canon EOS 7D with 500mm f/4L IS USM lens, Gitzo tripod, 1/640 sec., f/5.6, ISO 640. Ithaca, New York.
At the Right Time
Being there at the right time—whether time of day or time of year—can mean the difference between success and failure.
Time of Day
The early bird catches the worm, and if your goal is to capture it doing so, be out with your camera early in the day. You’ll have the best light then, too. In general, diurnal birds tend to be most active and visible in the morning, even more so in spring when hormone levels are high. The dawn chorus of territorial songbirds, such as warblers (figure 1.6), thrushes, and tanagers, begins with the first glow of light in the sky. Prairie-Chickens (figure 1.7) and grouse start displaying on their leks (display grounds) at dawn, too. To avoid flushing your subjects and ruining the photo opportunity, set your alarm to rise early and be well hidden in place before they arrive.
Especially in hot weather, birds often rest in the middle of the day, but activity picks up again in late afternoon and evening. When they are feeding their young, birds are active all day long.
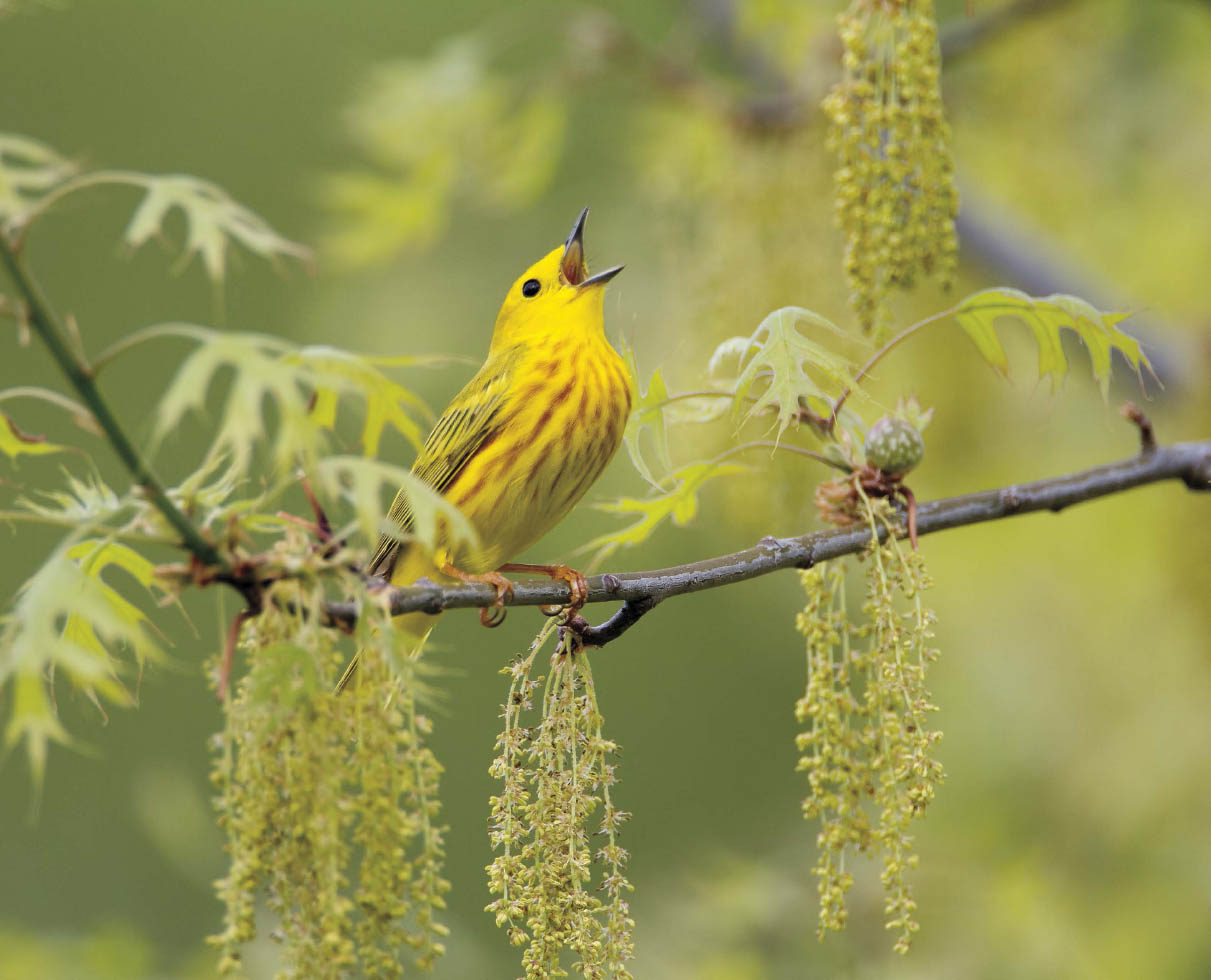
Figure 1.6: Yellow Warbler male singing.
Canon EOS 7D with 500mm f/4L IS USM lens, 1.4× converter, Gitzo tripod, 1/500 sec., f/5.6, ISO 500. Ithaca, New York.
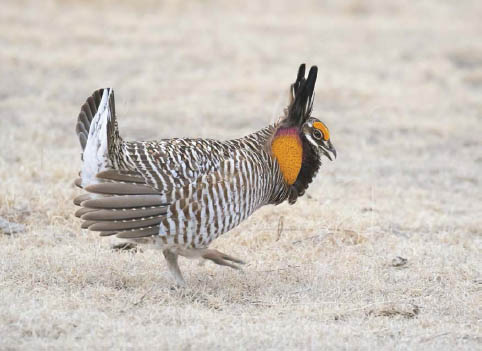
Figure 1.7: Greater Prairie-Chicken male. I needed to be in a blind at the lek well before dawn to capture the birds displaying.
Canon EOS 7D Mark II with EF 100–400 mm IS II lens (at 400mm), beanbag support, 1/125 sec., f/5.6, ISO 3200. McCook, Nebraska.

Figure 1.8: A pair of Clark’s Grebes performs the Weed Ceremony, in which they slowly circle, breast-to-breast, holding nesting material.
Canon EOS 7D Mark II with Tamron SP 150–600mm F/5–6.3 Di VC USD G2 lens, handheld from a boat, 1/1250 sec., f/6.3, ISO 1250. Escondido, California.
Diurnal patterns can vary widely for activities other than territoriality and nesting. The best strategy is to time your presence based on your own scouting observations or information from other people familiar with the location.
Time of Year
Much of North America is strongly seasonal, and the changing seasons usher in various stages of a bird’s annual life cycle. You can find birds at any time of year, of course, but if your goal is to photograph particular species in peak breeding plumage, or performing activities such as courtship or migration, knowing the right time of year is vital.
April in California finds pairs of Clark’s Grebes (figure 1.8) and Western Grebes performing their graceful Weed Ceremonies as they gear up for nesting. The month of March is peak time for hundreds of thousands of Lesser Sandhill Cranes to be passing through central Nebraska during spring migration (figure 1.9).
Latitude affects the timing of annual stages of the life cycle, particularly breeding, although weather has an important influence too. Black Skimmers nesting on the beaches of southwest Florida have newly hatched chicks in early June, but on New York’s Long Island, considerably farther north, skimmer chicks don’t emerge until early August.

Figure 1.9: Lesser Sandhill Cranes take flight at sunrise from their roost on the Platte River during spring migration.
Canon EOS 7D Mark II with EF 100–400 mm IS II lens (at 142mm), handheld, 1/640 sec., f/5.6, ISO 1250. The Crane Trust, Grand Island, Nebraska.
If you’re arranging travel to coincide with certain activities, it pays to research your subject and obtain current conditions at your destination before you leave home.
Being there at the right time is much easier if you shoot locally. Scouting out your local hotspots regularly throughout the year lets you plan ahead in anticipation of birds’ seasonal activities. For example, where I live in central New York, autumn sends certain year-round resident species, such as Blue Jays, into a frenzy of food hoarding for the coming winter (figure 1.10). In years with good acorn crops I can guarantee that, in October, jays will be flying to and from huge oak trees in a particular local park, carrying off acorns to stash on their territories.
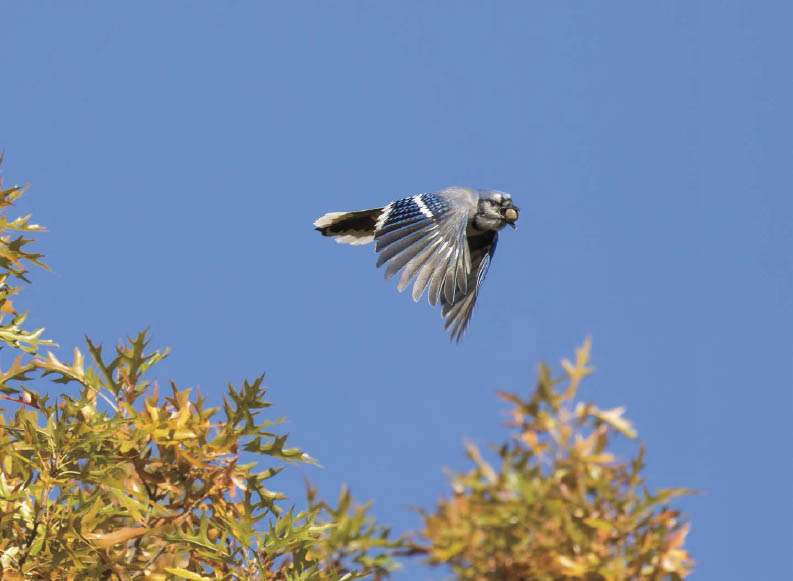
Figure 1.10: A Blue Jay carries off an acorn in October.
Canon EOS 7D Mark II with EF 100–400 mm IS II lens (at 400mm), handheld, 1/2000 sec., f/5.6, ISO 640. Ithaca, New York.
Timing is essential for short-lived opportunities. Seize the moment! In spring, I monitor the condition of the buds on crabapple trees in that same park. The beautiful blossoms attract throngs of songbirds such as Baltimore Orioles, Yellow Warblers, and Indigo Buntings (figure 1.11), as they feed on nectar or glean insect larvae. Once the trees burst into flower, I make sure to be there because peak bloom lasts just a few days—a rain shower or a windy day can knock all the petals down and then it’s all over until next year.
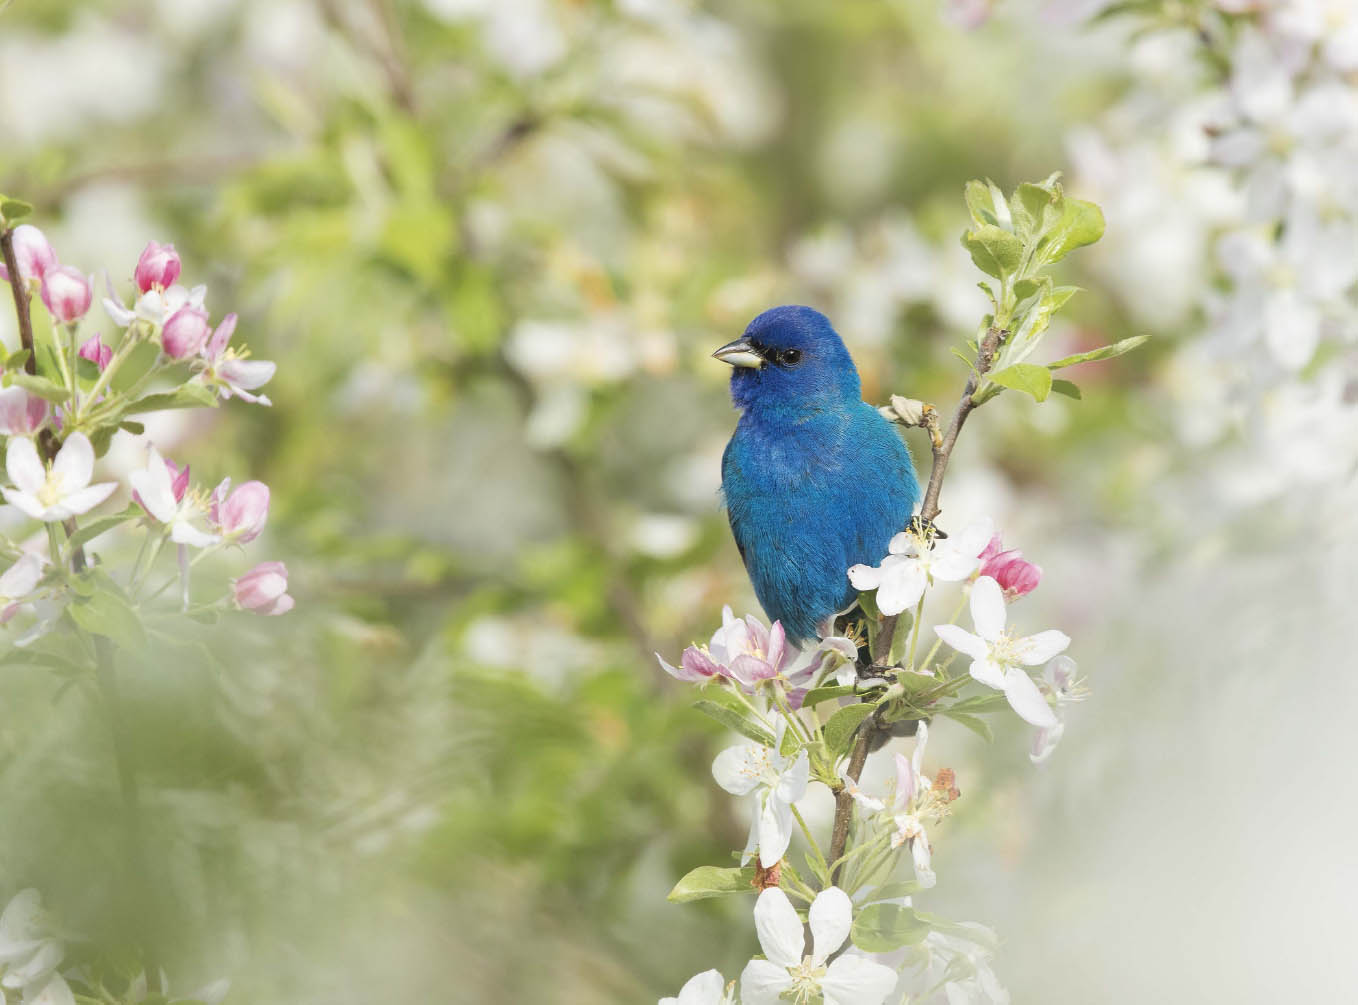
Figure 1.11: Indigo Bunting male amid crabapple blossoms.
Canon EOS 7D Mark II with EF 500mm f/4/L IS II lens, 1.4X III teleconverter, Gitzo tripod. 1/800 sec., f/9.0, ISO 640. Ithaca, New York.

Figure 1.12: Harlequin Duck male.
Canon EOS 1Ds Mark II with 500mm f/4L IS USM lens, 2X teleconverter, Gitzo tripod, 1/320 sec., f/16.0, ISO 320. Barnegat Inlet, New Jersey.
Give It Time
Bird photography is time consuming. Be ready to work at length to get that special shot. Call it patience or call it persistence, having the determination to put in the necessary field time is one of my greatest strengths. In a productive situation, I may spend several hours at a time working a subject, often returning day after day to the same area to try again until I am satisfied with my images.
My husband tells the story of once leaving me on a rocky jetty to photograph Harlequin Ducks (figure 1.12) on a bitterly cold afternoon. Two and a half hours later he returned to pick me up only to find I was in exactly the same position as when he left. He jokes that he thought I had frozen in place. It felt that way to me, too! The moral of this story is to be sure to move around once in a while and don’t forget to go home at the end of the day. Let figure 1.13 be a warning of the tragic fate that can befall a photographer who ignores this advice!
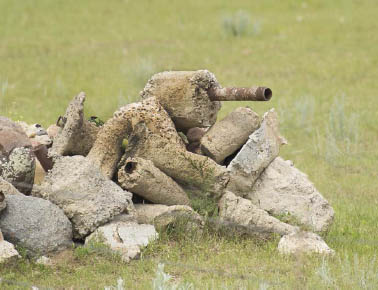
Figure 1.13: Spotted along a Montana roadside, a bird photographer who unfortunately sat still too long!
Be Prepared
Increase your chances of success by being well prepared before heading out into the field. Being prepared includes the following:
- Know your camera’s physical layout and functions
- Understand the fundamental concepts of photography
- Know bird biology and understand birds’ body language
- Have a plan or strategy
- Wear appropriate clothing and protective gear for weather and terrain
- Have strength, stamina, good concentration, and fast reflexes
First, Know Your Camera
Your first priority should be to familiarize yourself completely with your camera and lens. Study the user guide with the camera in your hand. Learn the functions of all the buttons and dials, and scroll through the various menus and displays. Modern cameras have a daunting array of adjustable functions, and it is good to know all the options, even if you eventually use only a subset of them.
Birds’ activity levels, weather, and light conditions can quickly change, requiring you to efficiently adjust settings to match the situation. Know your camera’s physical layout so you can change settings simply by touch. Don’t forget the controls on the lens, too.

Figure 1.14: Mute Swan pair.
Canon EOS 1Ds Mark II with 500mm f/4L IS USM lens, 1.4X teleconverter, beanbag over car window, 1/2500 sec., f/7.1, ISO 400. Montezuma National Wildlife Refuge, New York.
In particular, learn how to perform the following functions—we’ll be revisiting them throughout the rest of the book:
- Adjust shutter speed, aperture, and ISO
- Use the autofocus system
- Select exposure and drive modes
- Use the light metering system
- Adjust the lens’s image stabilization mode and focus range (if present)
Less vital, but still good to know, is how to access the camera’s Live View function, which displays the scene on the camera’s rear LCD screen. In certain circumstances, it can be easier to frame and set exposure using Live View than through the viewfinder.
Finally, for the highest quality images your camera is capable of producing, always shoot in RAW format rather than JPEG. (Note that many cameras have the option to shoot both formats at once.) RAW capture provides the maximum amount of digital information and gives you the most control over how your images will ultimately appear. Furthermore RAW enables you to correct certain exposure errors such as occurred in figure 1.14. The original capture was overexposed, but since it was in RAW format, I was able to recover some detail in the blown-out white areas and salvage the image. (I’ll share my workflow for this example in chapter 14.) If it had been shot as a JPEG, the result would have been far less satisfactory. To learn more about the benefits of RAW capture, see the special section at the end of this chapter.
Photography Fundamentals
You probably already know the basic concepts of photography, but if you are new to photography, now is the time to make sure you fully understand these fundamentals before you head out in search of birds. Find a basic photography book or online course. For a quick overview, see the special section at the end of this chapter.
Natural History Knowledge
One characteristic that top bird photographers share, which is reflected in the quality of their work, is a deep knowledge of birds and their lives. I can’t stress too much that an understanding of birds will improve the quality of your images.

Figure 1.15: White-tailed Kite hovers watching for prey. Noticing that the kite consistently hunted over a particular field allowed me to be in place to capture it in action.
Canon EOS 7D Mark II with EF 100–400 mm IS II lens (at 400mm), 1.4X III teleconverter, handheld, 1/2000 sec., f/8.0, ISO 640. Costa Mesa, California.
I’ve had a lifelong fascination with bird behavior, and I enjoy discovering what birds do by watching them myself, as well as by reading about them. I encourage you to do the same. If you will be photographing an unfamiliar species, researching it ahead of time will give you an edge, for instance by alerting you to any unique attributes that might be meaningful to try to photograph. By capturing the uniqueness of a species, you are portraying its very essence.
Learn about bird biology in general and your goal species in particular—life history, habitat, preferred foods, behavior, and anything that makes the species special. For North American birds, a wealth of information is available online from such websites as Cornell Lab of Ornithology’s All About Birds (free) or Birds of North America (subscription based), as well as from books and from talking to biologists, birders, and other photographers. Perhaps the best way to get to know birds, though, is through observation: Be a bird watcher as much as you are a photographer.
In addition to species-specific information, it helps to know your individual subjects. Monitor the day-to-day routines of the very individuals you’re hoping to photograph. Like humans, birds are creatures of habit—a Pileated Woodpecker visits a particularly resonant tree snag to perform territorial drumming, a Great Blue Heron can be found basking in the sun on the same log each morning, or a White-tailed Kite frequents a particular field to search for prey (figure 1.15). Based on predictable activities such as these, you can devise a photographic plan.
Develop a Plan
Sometimes I enjoy the freedom of wandering around with a lightweight camera combo and photographing whatever birds cross my path. I often do this when I’m scouting an area. But usually, my photo projects involve a certain amount of planning. That may be as simple as setting up a blind (see chapter 4) near a spot where I’ve noticed birds gathering regularly, and then being in place before they arrive. Or it may be complex and require critical timing, as did building a scaffolding tower to reach a Baltimore Oriole nest high in a tree (figure 1.16).

Figure 1.16: The author on a scaffold tower ready to photograph a Baltimore Oriole nest.
Ithaca, New York.
The first step was to evaluate the site, then rent and transport scaffolding. Next, I had to resort to bribery: securing my husband’s help by promising to buy him a shiny, new extension ladder. We delayed building the tower until late in incubation to minimize the risk of nest abandonment. We prepared a stable base by laying down planks on the muddy ground, and then we put up one tier of scaffolding at a time over a period of a week. The parent orioles became completely used to our presence. Once they began feeding their young (figure 1.17), I climbed up onto the tower platform each morning for two weeks to photograph at nest level, until the young orioles fledged.
When developing a plan for your own projects, make plenty of observations, get advice from other photographers or biologists if needed, and then consider the site characteristics and any previous experience you may have had with the goal species. Be prepared to adapt the plan as necessary.
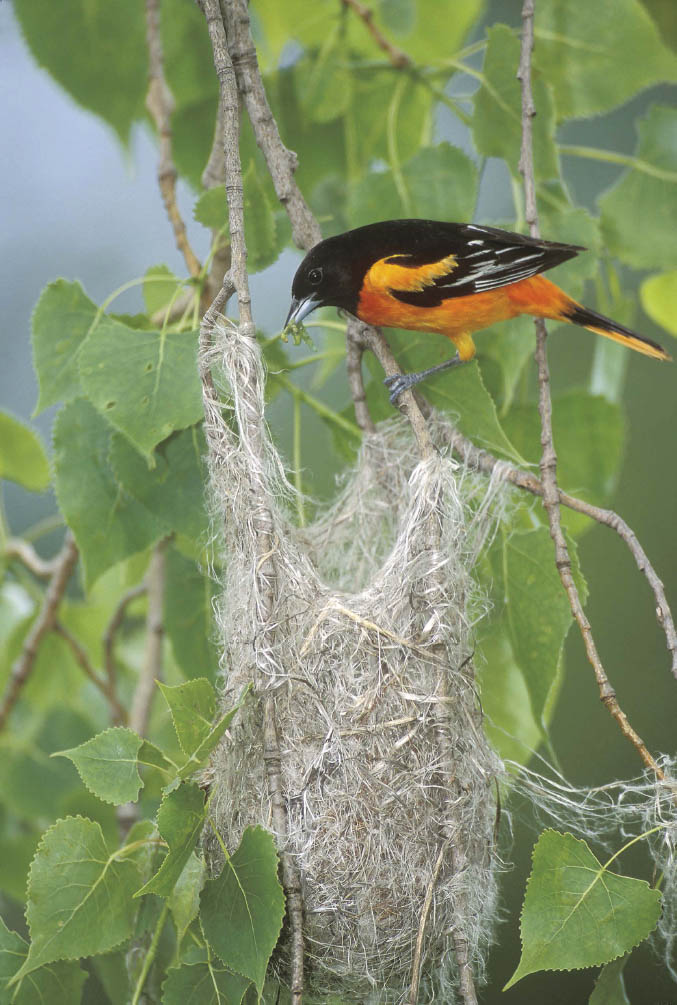
Figure 1.17: Baltimore Oriole male brings a caterpillar to feed young in the nest.
Nikon F5, Nikkor 500mm f/4 AF lens, fill-flash, Fuji Provia film. Camera settings not recorded. Ithaca, New York.
Be Prepared for Weather and Terrain
Being uncomfortable may distract you into missing an opportunity, so dress appropriately. For cold or wet conditions, it’s worth investing in high-quality winter wear, raingear, and waterproof footwear. Wear moisture-wicking clothing and a brimmed hat during hot weather. Consider protective gear too. Knee pads and long sleeves help prevent skin abrasion, if you expect to get down and dirty to shoot. Wear hip boots or chest waders for sloshing around a marsh or wading through water.
Keep in mind that weather affects birds’ activities too. In windy weather, flocks of shorebirds and terns hunker down on the beach or shelter behind land-forms. A warm autumn day may change fruit-eating waxwings into flycatchers, swooping high into the sky in pursuit of aerial insects. A cool, drizzly summer day forces high-flying swallows down out of the sky to swoop low over fields and lakes in search of aerial insect prey grounded by the weather. The better you know the behavior of your species under various weather conditions, the better you can predict what types of images might be possible.
Be Prepared Mentally and Physically
Be prepared both mentally and physically. Being observant, having good powers of concentration, and being able to react quickly are learned skills that you should cultivate through practice.
Try this exercise: Find a bird that is keeping fairly still, for instance loafing or preening, and observe it closely through your telephoto lens for two minutes without letting your attention wander. (Tip: You’ll find this easier and less tiring if your gear is on a tripod.) Train your reflexes by taking a shot each time the bird strikes a particularly elegant pose or does something dramatic or quirky (figure 1.18). Notice how the lighting changes on the bird’s face with each tilt of its head and how compelling it is to have eye contact. Watch the changing juxtaposition of bill and feathers while it preens. Notice how changes in its posture and plumage (crest raised or lowered, for instance) signal whether it is relaxed or alert.
Next time, practice this for five minutes, then ten, and keep increasing the time until good concentration and quick reactions become second nature. Soon you’ll be capturing some eye-catching shots. Observing birds closely is great fun plus it will improve your photography in numerous ways, including helping you anticipate action, something we’ll learn more about in chapter 8.
Finally, let’s consider strength. Camera gear can be heavy, especially to handhold. Serious bird photographers need to be physically strong and have stamina. It’s never too late to improve fitness and strength. To keep in shape, I regularly attend a fitness class that includes weight training.
Be Aware
Engage all your senses and get tuned in to what’s going on around you. Pay attention to wind and light direction, notice the condition of the sky, and then use that information to determine where to position yourself for the best opportunities.
Be aware of what the birds are doing too, of course. Watch carefully and notice repeated, predictable behaviors. Capturing birds in action relies in large part on being able to anticipate behavior. Open your ears to birds’ vocalizations, and try to determine the context in which they occur. Pay attention to alarm calls that may alert you that you’re too close to the subject.
Allow yourself time to explore your subject in depth and consider your options for capturing it. Open your eyes to habitat elements or natural patterns that could form appealing compositions. Being open to possibilities is essential for developing that all-important “artist’s eye.”
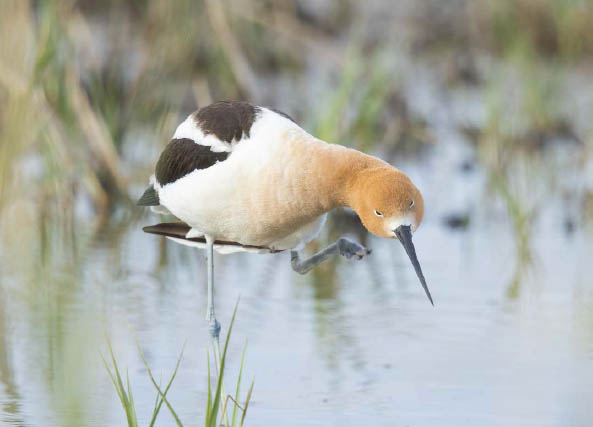
Figure 1.18: American Avocet scratching itself. Train your concentration and reflexes by closely watching the subject through your viewfinder and making an exposure each time the bird strikes a compelling pose.
Canon EOS 7D Mark II with EF 500mm f/4/L IS II lens, 1.4X III teleconverter, Gitzo tripod, 1/1000 sec., f/5.6, ISO 800. Bear River Migratory Bird Refuge, Utah.
While photographing Eared Grebes in Montana, I noticed they regularly swam through patches of pretty white flowers that were floating on the water’s surface. I moved to where I had a good view of the flowers and then spent several hours waiting for a grebe to arrive and form the perfect composition (figure 1.19).
Be aware for your own safety, too. Watch for slippery rocks, unstable cliff edges, hidden debris ready to trip you along an overgrown trail, or incoming tides that may flood your camera bag on the beach or, worse, cut off your return route to safety. Don’t get so engrossed in photography that you ignore danger signs. Once, while some companions and I were intent on photographing Atlantic Puffins from a high cliff top in Iceland, we suddenly heard heavy breathing behind us to find that we were about to be crowded off the cliffs by a herd of over-friendly Icelandic ponies!

Figure 1.19: Eared Grebe swimming amidst white water-buttercup flowers.
Canon EOS 7D Mark II with EF 500mm f/4/L IS II lens, 2X III teleconverter, Gitzo tripod, 1/1000 sec., f/11, ISO 500. Benton Lake National Wildlife Refuge, Montana.
Be Lucky
Be lucky? Easier said than done! But in fact, the more you shoot the luckier you’ll get. Time spent in the field—practicing photographic techniques, honing reflexes, and being persistent, observant, and open to opportunity—pays off, eventually. Armed with these skills, you’ll be primed to take advantage of the lucky opportunities Nature offers, and the result will be not simply a good shot but a great one.
I was once blessed with a fantastic opportunity while photographing Common Loons from a pontoon boat. The loons were so used to watercraft that they often swam under the boat in pursuit of fish. As luck would have it, a loon surfaced at very close range with an impressive fish and in perfect light (figure 1.20). Being aware and prepared factored into the picture as well. I’d noticed a telltale trail of bubbles appearing on the water’s surface indicating the loon’s approximate location underwater. By concentrating on them I was able to focus on the loon’s face the instant it broke the water’s surface and capture several images. Two gulps later the fish was gone!
Luck favors the prepared!
Now that we’ve explored the various elements of field craft, you have a choice: Read the next sections to learn why to shoot in RAW and give yourself a refresher of basic photography concepts. Or, skip right to chapter 2 where we delve into the nitty-gritty of choosing camera gear.
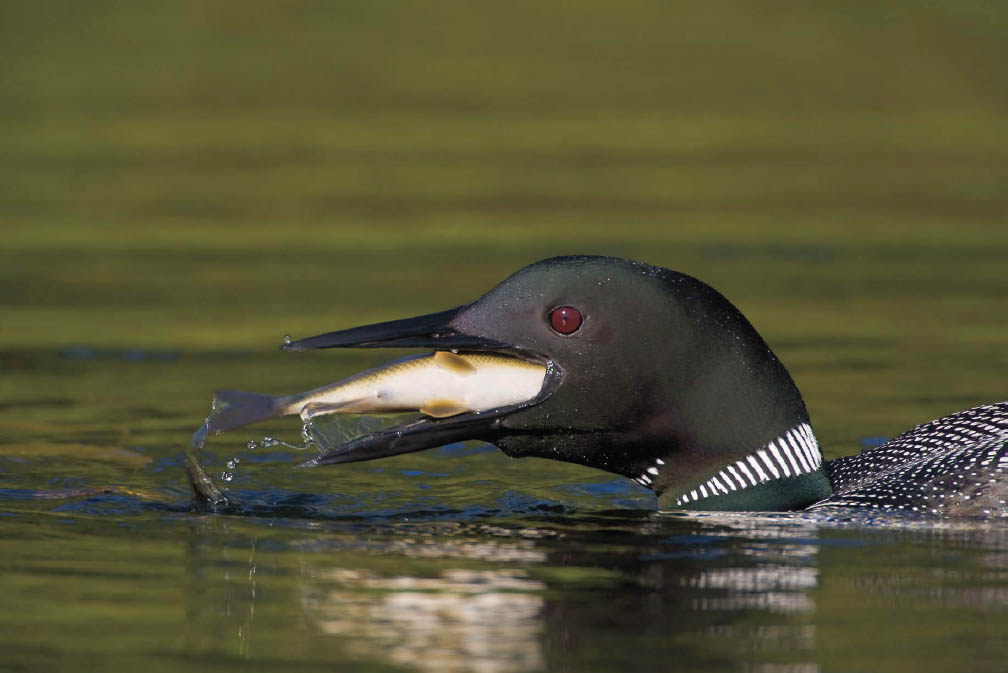
Figure 1.20: Common Loon about to swallow a fish.
Canon EOS 1Ds Mark II with 500mm f/4L IS USM lens, 2× teleconverter, Gitzo tripod, 1/800 sec., f/8, ISO 250. Northern Michigan.
RAW Power!
The term “RAW” refers to the camera’s native file format. Manufacturers signify their RAW formats with various filename extensions: Canon’s is .CR2, Nikon’s is .NEF, Sony’s is .ARW, and so on.
Serious photographers shoot in RAW mode rather than JPEG because RAW files contain the maximum amount of digital information obtained by the camera’s image sensor at the time of capture. RAW capture gives you the power to optimize, or develop, the image to your liking by modifying that data during image editing on the computer. With a RAW file, this process is nondestructive—none of the information is lost from the original file. You can re-edit the original RAW file as many times as you wish.
JPEG, on the other hand, is a compressed file format in which some information is immediately lost when the image is saved to the camera’s memory card. Any parameters that you have preset, for instance Picture Style, white balance, and, most important, exposure settings, are irreversibly applied when the photo is taken. Trying to correct exposure mistakes in a JPEG file during postprocessing invariably degrades the image. Using RAW, you can correct overexposure (within limits) and tweak other parameters without losing quality.
The downside is that RAW files are large and consume more memory space than JPEGs. Furthermore, RAW files must be converted to another file format (such as TIF or PSD) for use, whereas JPEGs are usable immediately. Many cameras offer the option of shooting both formats at once: a JPEG version for immediate use and a RAW version to optimize at your leisure.
The benefits of RAW capture will become clear when we cover basic image editing in chapter 14.
Basic Photography Concepts
If you’re new to photography, below is a brief review of the basic concepts and how they relate to camera functions and settings.
At its very essence, photography is all about light. By controlling the amount of light that reaches the camera’s sensor, you determine the correct exposure—the basis of a successful image. We’ll cover exposure in detail in chapter 6, but at this point, understand that three camera settings—shutter speed, aperture, and ISO—are used in combination to arrive at the correct exposure. This trio is sometimes referred to as the “exposure triangle.” The effect of these settings is reciprocal: Changing one of them requires an equal but opposite change in one or both of the others to achieve the same exposure.
Shutter speed is the amount of time in seconds or fractions thereof that the shutter remains open allowing light to reach the image sensor. 1/15 second is considered a “slow” shutter speed, while 1/1600 second is a “fast” shutter speed.
Aperture is the adjustable, circular opening in the lens through which light passes to reach the sensor. Aperture size is referred to by the terms f-stop or f-number. A smaller f-number signifies a larger diameter aperture (e.g. f/2.8), whereas a larger number signifies a smaller diameter aperture (e.g. f/16).
ISO value indicates the camera sensor’s sensitivity to light. Increasing the numerical value boosts the sensitivity, which is useful when shooting in low-light conditions.
In addition to their roles in exposure, shutter speed and aperture are viewed as creative settings because each can be changed to have important effects on how the subject appears in the final image. We’ll revisit them in various later chapters, but for now consider the following:
- Shutter Speed and Sharpness: Shutter speed’s main impact is on image sharpness (although other factors can affect sharpness as well). A fast shutter speed stops movement and the subject appears crisply focused. A slow shutter speed renders the subject blurred or “soft,” something that most bird photographers want to avoid (although blurring can be used for creative effect as you’ll discover).
- Aperture and Depth of Field: Aperture controls the image’s depth of field: The zone between the nearest and farthest areas of the subject that appears sharply focused. Shooting “wide open” refers to selecting the lens’s largest aperture (smallest f-stop), which results in a shallow depth of field. “Stopping down” the aperture refers to selecting a smaller diameter (larger f-stop), which increases the depth of field. By controlling the depth of field, your choice of f-stop influences how much of the main subject appears sharp. Depth of field can be used creatively: A shallow depth of field isolates the main subject from the background whereas a larger depth of field can bring attention to the surroundings or background elements as well, although lens focal length and subject distance are important factors, too.