Chapter 7: Virtual Machines: Installation, Configuration, and Life Cycle Management
In this chapter, we will discuss different ways of installing and configuring virtual machines (VMs)—from Command Prompt and/or a graphical user interface (GUI). We will delve deeper into some tools and utilities that we have already used (virt-manager, virt-install, oVirt) and build upon our knowledge gained from previous chapters. Then, we will have a lengthy discussion about VM migration, one of the most fundamental aspects of virtualization, as it's pretty much unimaginable to use virtualization without migration options. To be able to configure our environment for VM migration, we will also use topics discussed in Chapter 4, Libvirt Networking, and Chapter 5, Libvirt Storage, as there are pre-requisites that need to be met for VM migration to work.
In this chapter, we will cover the following topics:
- Creating a new VM using virt-manager, using virt commands
- Creating a new VM using oVirt
- Configuring your VM
- Adding and removing virtual hardware from your VM
- Migrating VMs
Creating a new VM using virt-manager
virt-manager (a GUI tool for managing VMs) and virt-install (a command-line utility for managing VMs) are two of the most commonly used utilities in Kernel-based VM (KVM) virtualization. By using them, we can do practically everything to our VMs—create, start, stop, delete, and much more. We already had a chance to work with these two utilities in previous chapters, but we need to take a more structured approach to the subject as they offer loads of additional options that we haven't have a chance to discuss yet. We'll also add some other utilities that are a part of the virt-* command stack that are very, very useful.
Let's start with virt-manager and its familiar GUI.
Using virt-manager
virt-manager is the go-to GUI utility to manage KVM VMs. It's very intuitive and easy to use, albeit lacking in functionality a bit, as we will describe a bit later. This is the main virt-manager window:

Figure 7.1 – Main virt-manager window
From this screenshot, we can already see that there are three VMs installed on this server. We can use the top-level menus (File, Edit, View, and Help) to further configure our KVM server and/or VMs, as well as to connect to other KVM hosts on the network, as you can see in the following screenshot:

Figure 7.2 – Connecting to other KVM hosts by using the Add Connection… option
After we select the Add Connection… option, we will be greeted by a wizard to connect to the external host, and we just need to punch in some basic information—the username (it has to be a user that has administrative rights) and hostname or Internet Protocol (IP) address of the remote server. Before we do that, we also need to configure Secure Shell (SSH) keys on our local machine and copy our key to that remote machine, as this is the default authentication method for virt-manager. The process is shown in the following screenshot:
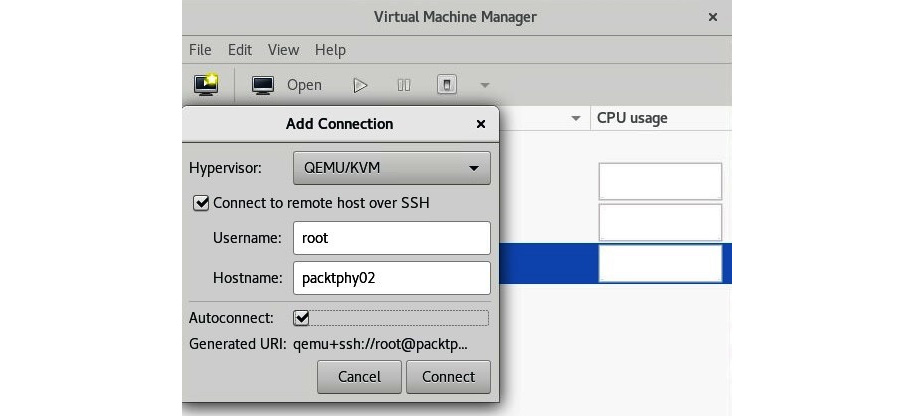
Figure 7.3 – Connecting to remote KVM host
At this point, you can start freely installing the VM on that remote KVM host, should you choose to do so, by right-clicking on the hostname and selecting New, as illustrated in the following screenshot:
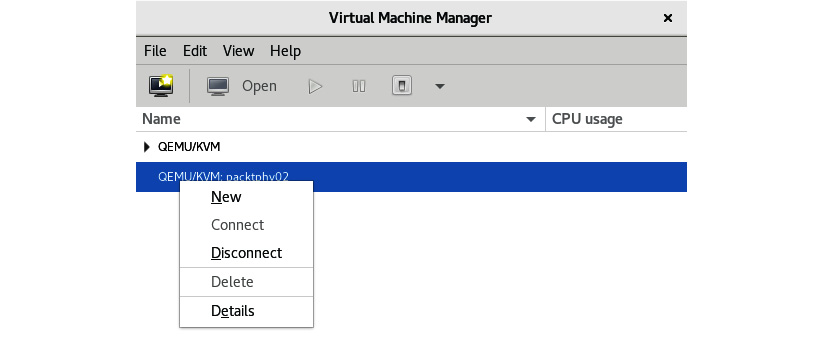
Figure 7.4 – Creating a new VM on a remote KVM host
As this wizard is the same as the wizard for installing VMs on your local server, we'll cover both of these scenarios in one go. The first step in the New VM wizard is selecting where you're installing your VM from. As you can see in the following screenshot, there are four available options:
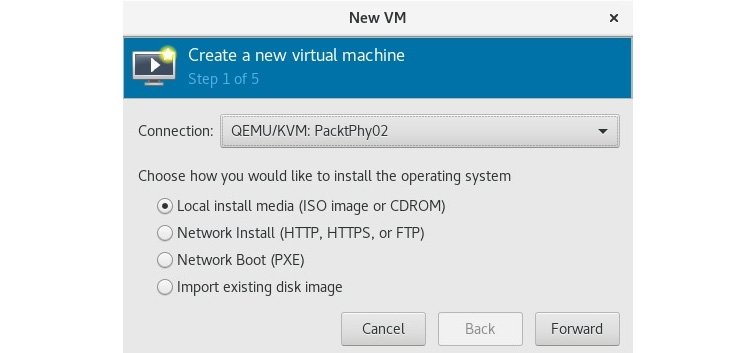
Figure 7.5 – Selecting boot media
The choices are as follows:
- If you already have an International Organization for Standardization (ISO) file available on your local machine (or as a physical device), select the first option.
- If you want to install from the network, select the second option.
- If you have a Preboot eXecution Environment (PXE) boot set up in your environment and you can boot your VM installation from the network, select the third option.
- If you have a VM disk and you just want to underlay that to a VM you're defining, select the fourth option.
Commonly, we're talking about network installations (second option) or PXE-booted network installations (third option), as these are the most popular use cases in production. The reason for this is very simple—there's absolutely no reason to waste local disk space on ISO files, which are quite big nowadays. For example, a CentOS 8 v1905 ISO file is roughly 8 gigabytes (GB) in size. If you need to be able to install multiple operating systems, or even multiple versions of these operating systems, you're better off with some sort of centralized storage space for ISO files only.
In VMware ESX integrated (ESXi)-based infrastructures, people often use ISO datastores or content libraries for this functionality. In Microsoft Hyper-V-based infrastructures, people usually have a Server Message Block (SMB) file share with ISO files needed for a VM installation. It would be quite pointless to have a copy of an operating system ISO per host, so some kind of a shared approach is much more convenient and is a good space-saving mechanism.
Let's say that we're installing a VM from a network (HyperText Transfer Protocol (HTTP), HyperText Transfer Protocol Secure (HTTPS), or File Transfer Protocol (FTP)). We're going to need a couple of things to proceed, as follows:
- A Uniform Resource Locator (URL) from which we can complete our installation—in our example, we are going to use http://mirror.linux.duke.edu/pub/centos. From this link choose the latest 8.x.x directory, and then go to BaseOS/x86_64/os.
- Obviously, a functional internet connection—as fast as possible, as we are going to download all the necessary installation packages from the preceding URL.
- Optionally, we can open the URL options triangle and use additional options for the kernel line—most commonly, kickstart options with something such as the following:
ks=http://kickstart_file_url/file.ks
So, let's type that in, as follows:

Figure 7.6 – URL and guest operating system selection
Note that we manually selected Red Hat Enterprise Linux 8.0 as the target guest operating system as virt-manager doesn't currently recognize CentOS 8 (1905) as the guest operating system from the URL that we specified. If the operating system had been on the list of currently recognized operating systems, we could've just selected the Automatically detect from installation media / source checkbox, which you sometimes need to re-check and uncheck a couple of times before it works.
After clicking on the Forward button, we're faced with memory and central processing unit (CPU) settings for this VM. Again, you can go in two different directions here, as follows:
- Select the bare minimum of resources (for example, 1 virtual CPU (vCPU) and 1 GB of memory), and then change that afterward if you need more CPU horsepower and/or more memory.
- Select a decent amount of resources (for example, 2 vCPU and 4 GB of memory) with a specific usage in mind. For example, if the intended use case for this VM is a file server, you won't get an awful lot of performance if you add 16 vCPUs and 64 GB of memory to it, but there might be other use cases in which this will be appropriate.
The next step is configuring the VM storage. There are two available options, as we can see in the following screenshot:

Figure 7.7 – Configuring VM storage
It's very important that you select a proper storage device for the VM, as you might have various problems in the future if you don't. For example, if you put your VM on the wrong storage device in a production environment, you'll have to migrate storage of that VM to another storage device, which is a tedious and time-consuming process that will have some nasty side effects if you have loads of VMs running on the source or destination storage device. For starters, it will seriously impact their performance. Then, if you have some dynamic workload management mechanism in your environment, it could trigger additional VM or VM storage movement in your infrastructure. Features such as VMware's Distributed Resource Scheduler (DRS)/Storage DRS, Hyper-V performance and resource optimization (with System Center Operations Manager (SCOM) integration), and oVirt/Red Hat Enterprise Virtualization cluster scheduling policies do things such as that. So, adopting the think twice, do once strategy might be the correct approach here.
If you select the first available option, Create a disk image for the virtual machine, virt-manager will create a VM hard disk in its default location—for Red Hat Enterprise Linux (RHEL) and CentOS, that's in the /var/lib/libvirt/images directory. Make sure that you have enough space for your VM hard disk. Let's say that we have 8 GB of space available in the /var/lib/libvirt/images directory and its underlying partition. If we leave everything as-is from the previous screenshot, we'd get an error message because we tried to create a 10 GB file on a local disk where only 8 GB is available.
After we click the Forward button again, we're at the final step of the VM creation process, where we can select the VM name (as it will appear in virt-manager), customize the configuration before the installation process, and select which virtual network the VM will use. We will cover the hardware customization of the VM a bit later in the chapter. After you click Finish, as shown in the following screenshot, your VM will be ready for deployment and—after we install the operating system—use:
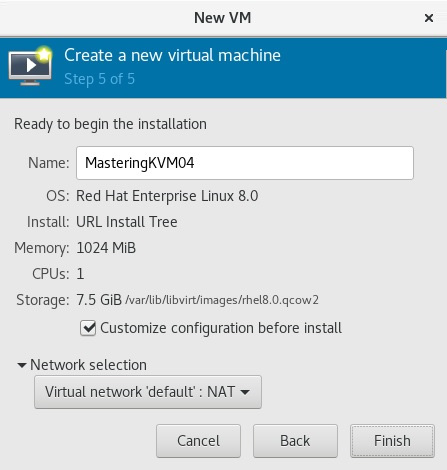
Figure 7.8 – Final virt-manager configuration step
Using virt-manager to create some VMs definitely wasn't a difficult task, but in real-life production environments, you won't necessarily find a GUI installed on a server. Therefore, our logical next task is to get to know command-line utilities to manage VMs—specifically, virt-* commands. Let's do that next.
Using virt-* commands
As previously mentioned, we need to learn some new commands to master the task of basic VM administration. For this specific purpose, we have stack of virt-* commands. Let's briefly go over some of the most important ones and learn how to use them.
virt-viewer
As we've already used the virt-install command heavily before (check out Chapter 3, Installing a Kernel-based Virtual Machine (KVM) Hypervisor, libvirt, and ovirt, where we installed quite a few VMs by using this command), we're going to cover the remaining commands.
Let's start with virt-viewer, as we've used this application before. Every time we double-click on a VM in virt-viewer, we open a VM console, and that happens to be virt-viewer in the background of this procedure. But if we wanted to use virt-viewer from a shell—as people often do—we need some more information about it. So, let's use a couple of examples.
First, let's connect to a local KVM called MasteringKVM01, which resides on the host that we're currently connected to as root , by running the following command:
# virt-viewer --connect qemu:///system MasteringKVM01
We could also connect to the VM in kiosk mode, which means that virt-viewer will close when we shut down the VM that we connect to. To do this, we would run the following command:
# virt-viewer --connect qemu:///system MasteringKVM01 --kiosk --kiosk-quit on-disconnect
If we need to connect to a remote host, we can also use virt-viewer, but we need a couple of additional options. The most common way to authenticate to a remote system is through SSH, so we can do the following:
# virt-viewer --connect qemu+ssh://username@remote-host/system VirtualMachineName
If we configured SSH keys and copied them to username@remote-host, this previous command wouldn't ask us for a password. But if we didn't, it is going to ask us for a password twice—to establish connection to the hypervisor and then to establish connection to the VM Virtual Network Computing (VNC) session.
virt-xml
The next command-line utility on our list is virt-xml. We can use it with virt-install command-line options to change the VM configuration. Let's start with a basic example—let's just enable the boot menu for the VM, as follows:
# virt-xml MasgteringKVM04 --edit --boot bootmenu=on
Then, let's add a thin-provisioned disk to the VM, in three steps— first, create the disk itself, and then attach it to the VM and check that everything worked properly. The output can be seen in the following screenshot:
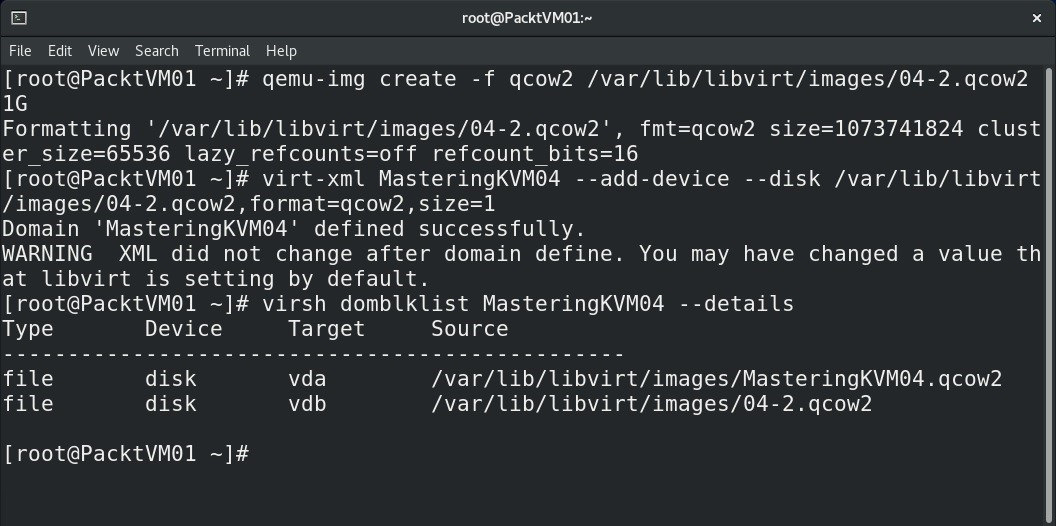
Figure 7.9 – Adding a thin-provision QEMU copy-on-write (qcow2) format virtual disk to a VM
As we can see, virt-xml is quite useful. By using it, we added another virtual disk to our VM, and that's one of the simplest things that it can do. We can use it to deploy any additional piece of VM hardware to an existing VM. We can also use it to edit a VM configuration, which is really handy in larger environments, especially when you have to script and automate such procedures.
virt-clone
Let's now check virt-clone by using a couple of examples. Let's say we just want a quick and easy way to clone an existing VM without any additional hassle. We can do the following:
# virt-clone --original VirtualMachineName --auto-clone
As a result, this will produce a VM named VirtualMachineName-clone that we can start using right away. Let's see this in action, as follows:
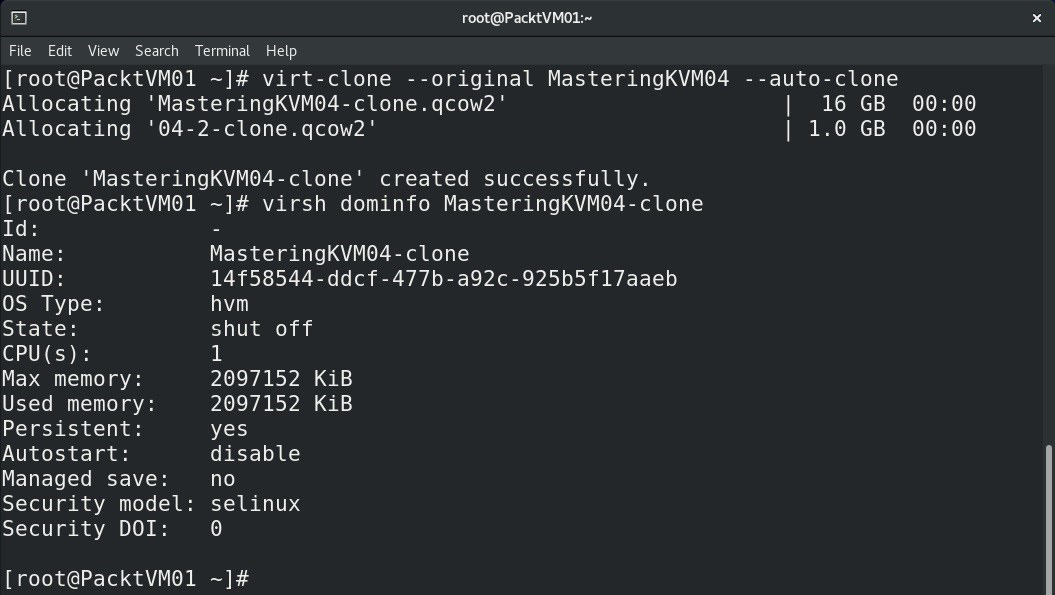
Figure 7.10 – Creating a VM clone with virt-clone
Let's see how this could be a bit more customized. By using virt-clone, we are going to create a VM named MasteringKVM05, by cloning a VM named MasteringKVM04, and we are going to customize virtual disk names as well, as illustrated in the following screenshot:

Figure 7.11 – Customized VM creation: customizing VM names and virtual hard disk filenames
There are situations in real life that require you to convert VMs from one virtualization technology to another. The bulk of that work is actually converting the VM disk format from one format to another. That's what virt-convert is all about. Let's learn how it does its job.
qemu-img
Let's now check how we will convert a virtual disk to another format, and how we will convert a VM configuration file from one virtualization method to another. We will use an empty VMware VM as a source and convert its vmdk virtual disk and .vmx file to a new format, as illustrated in the following screenshot:

Figure 7.12 – Converting VMware virtual disk to qcow2 format for KVM
If we are faced with projects that involve moving or converting VMs between these platforms, we need to make sure that we use these utilities as they are easy to use and understand and only require one thing—a bit of time. For example, if we have a 1 terabyte (TB) VMware virtual disk (VM Disk (VMDK) and flat VMDK file), it might take hours for that file to be converted to qcow2 format, so we have to be patient. Also, we need to be prepared to edit vmx configuration files from time to time as the conversion process from vmx to kvm format isn't 100% smooth, as we might expect it to be. During the course of this process, a new configuration file is created. The default directory for KVM VM configuration files is /etc/libvirt/qemu, and we can easily see Extensible Markup Language (XML) files in that directory—these are our KVM VM configuration files. Filenames represent VM names from the virsh list output.
There are also some new utilities in CentOS 8 that will make it easier for us to manage not only the local server but also VMs. The Cockpit web interface is one of those—it has the capability to do basic VM management on a KVM host. All we need to do is connect to it via a web browser, and we mentioned this web application in Chapter 3, Installing a Kernel-based VM (KVM) Hypervisor, libvirt, and ovirt, when discussing the deployment of oVirt appliances. So, let's familiarize ourselves with VM management by using Cockpit.
Creating a new VM using Cockpit
To use Cockpit for the management of our server and its VMs, we need to install and start Cockpit and its additional packages. Let's start with that, as follows:
yum -y install cockpit*
systemctl enable --now cockpit.socket
After this, we can start Firefox and point it to https://kvm-host:9090/, as this is the default port where Cockpit can be reached, and log in as root with the root password, which will give us the following user interface (UI):
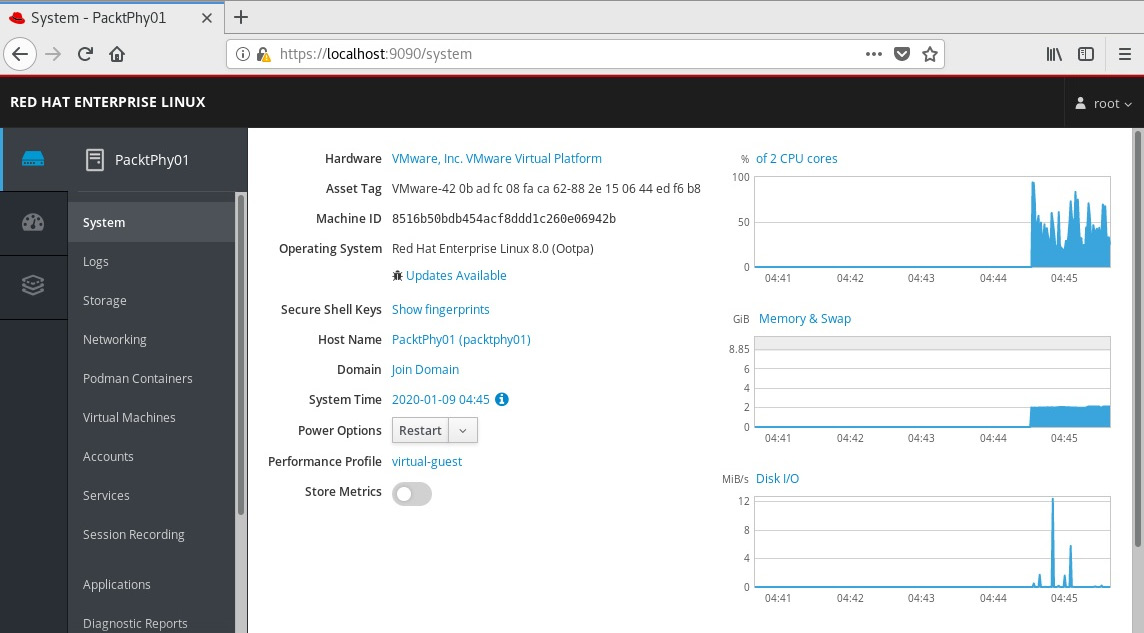
Figure 7.14 – Cockpit web console, which we can use to deploy VMs
In the previous step, when we installed cockpit*, we also installed cockpit-machines, which is a plugin for the Cockpit web console that enables us to manage libvirt VMs in the Cockpit web console. So, after we click on VMs, we can easily see all of our previously installed VMs, open their configuration, and install new VMs via a simple wizard, as illustrated in the following screenshot:
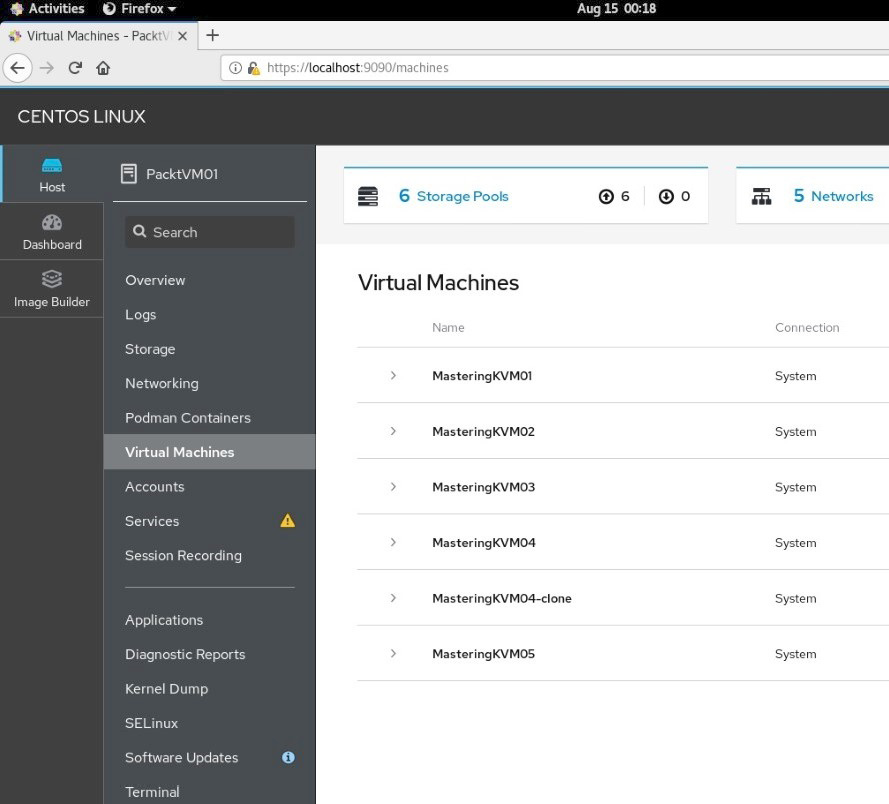
Figure 7.15 – Cockpit VM management
The wizard for VM installation is really simple—we just need to configure basic settings for our new VM and we can start installing, as follows:
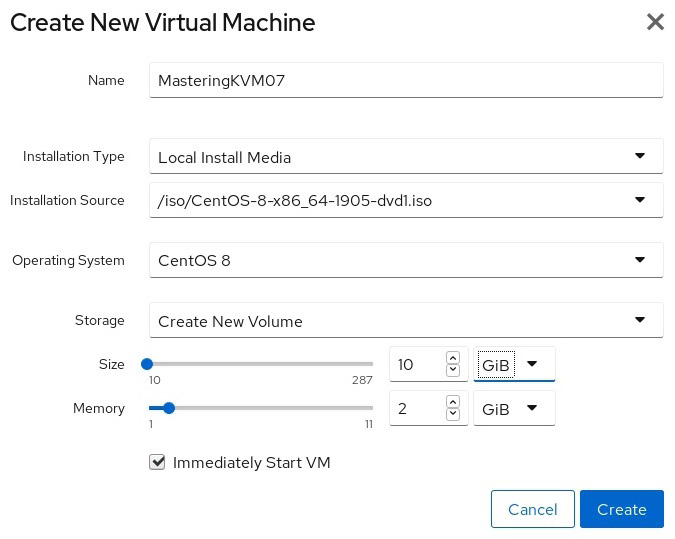
Figure 7.16 – Installing KVM VM from Cockpit web console
Now that we covered how we can install VMs locally—meaning without some sort of centralized management application—let's go back and check how we can install VMs via oVirt.
Creating a new VM using oVirt
If we added a host to oVirt, when we log in to it, we can go to Compute-VMs and start deploying VMs by using a simple wizard. So, after clicking on the New button in that menu, we can do just that, and we will be taken to the following screen:
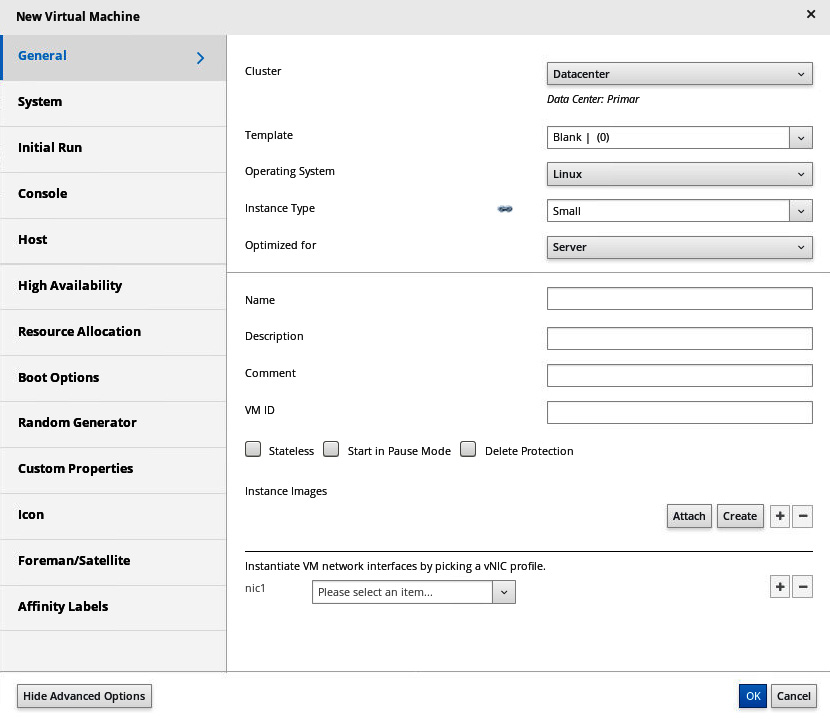
Figure 7.17 – New VM wizard in oVirt
Having in mind that oVirt is a centralized management solution for KVM hosts, we have loads of additional options when compared to local VM installation on a KVM host—we can select a cluster that will host this VM; we can use a template, configure the optimization and instance type, configure high availability (HA), resource allocation, boot options... basically, it's what we jokingly refer to as option paralysis, although it's for our own benefit, as centralized solutions will always be a bit different than any kind of local solution.
At a minimum, we will have to configure general VM properties—name, operating system, and VM network interface. Then, we will move to the System tab, where we will configure memory size and virtual CPU count, as illustrated in the following screenshot:

Figure 7.18 – Selecting VM configuration: virtual CPUs and memory
We will definitely want to configure boot options—attach a CD/ISO, add a virtual hard disk, and configure the boot order, as illustrated in the following screenshot:
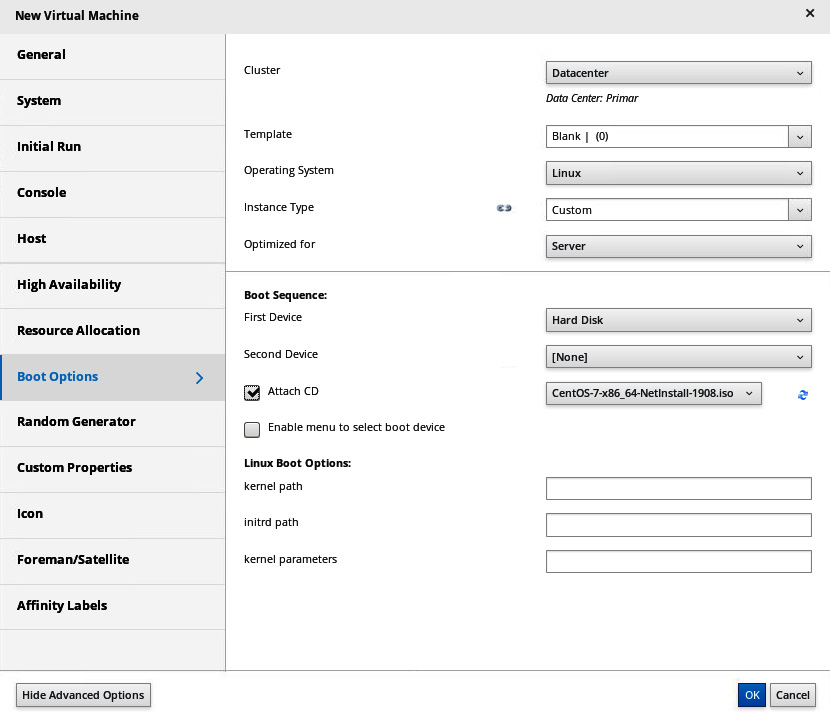
Figure 7.19 – Configuring VM boot options in oVirt
We can customize our VM post-installation by using sysprep or cloud-init, which we will discuss in Chapter 9, Customizing a VM with cloud-init.
Here's what the basic configuration in oVirt looks like:

Figure 7.20 – Installing KVM VM from oVirt: make sure that you select correct boot options
Realistically, if you're managing an environment that has more than two to three KVM hosts, you'll want to use some kind of centralized utility to manage them. oVirt is really good for that, so don't skip it.
Now that we have done the whole deployment procedure in a variety of different ways, it's time to think about the VM configuration. Keeping in mind that a VM is an object that has many important attributes—such as the number of virtual CPUs, amount of memory, virtual network cards, and so on—it's very important that we learn how to customize the VM settings. So, let's make that our next topic.
Configuring your VM
When we were using virt-manager, if you go all the way to the last step, there's an interesting option that you could've selected, which is the Customize configuration before install option. The same configuration window can be accessed if you check the VM configuration post-install. So, whichever way we go, we'll be faced with the full scale of configuration options for every VM hardware device that was assigned to the VM we just created, as can be seen in the following screenshot:
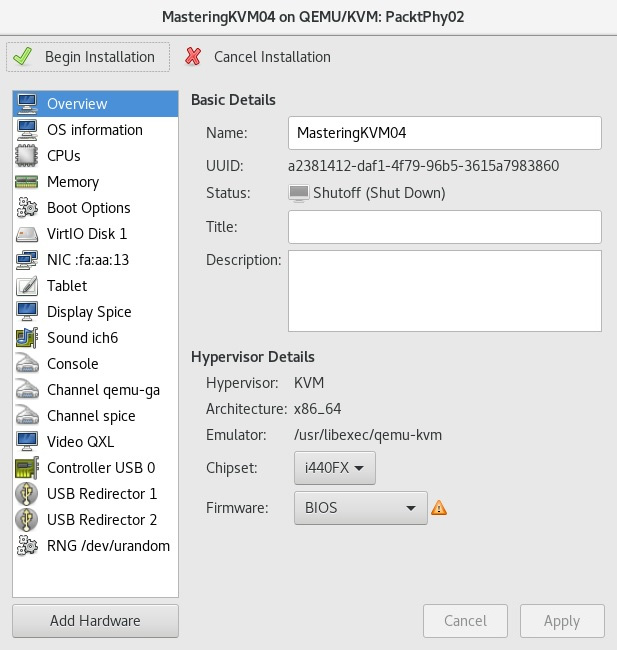
Figure 7.21 – VM configuration options
For example, if we click on the CPUs option on the left-hand side, you will see the number of available CPUs (current and maximum allocation), and we'll also see some pretty advanced options such as CPU topology (Sockets/Cores/Threads), which enables us to configure specific non-uniform memory access (NUMA) configuration options. Here's what that configuration window looks like:
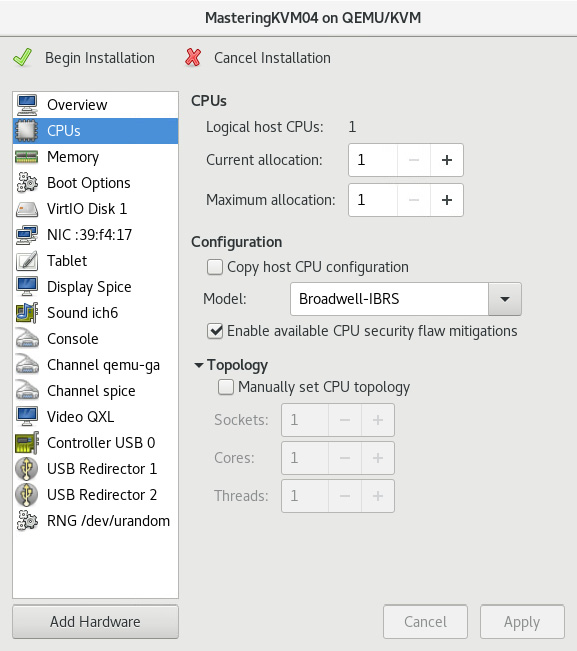
Figure 7.22 – VM CPU configuration
This is a very important part of VM configuration, especially if you're designing an environment that hosts loads of virtualized servers. Furthermore, it becomes even more important if virtualized servers host input/output (I/O)-intensive applications such as databases. If you want to learn more about this, you can check a link at the end of this chapter, in the Further reading section, as it will give you loads of additional information about VM design.
Then, if we open the Memory option, we can change memory allocation—again, in floating terms (current and maximum allocation). We'll discuss these options a bit later when we start working with virt-* commands. This is what a virt-manager Memory configuration option looks like:
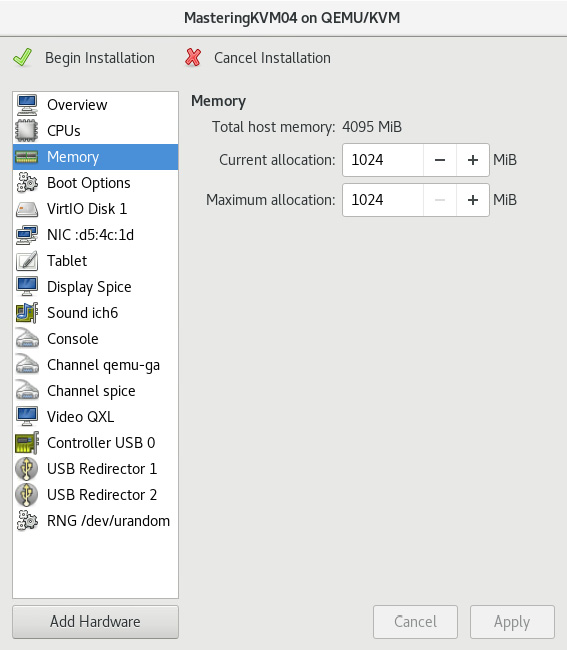
Figure 7.23 – VM memory configuration
One of the most important configuration option sets available in virt-manager is located in the Boot Options sub-menu, which is shown in the following screenshot:

Figure 7.24 – VM boot configuration options
There, you can do two very important things, as follows:
- Select this VM to be auto-started with the host
- Enable the boot menu and select a boot device and boot device priorities
In terms of configuration options, by far the most feature-rich configuration menu for virt-manager is the virtual storage menu—in our case, VirtIO Disk 1. If we click on that, we're going to get the following selection of configuration options:

Figure 7.25 – Configuring VM hard disk and storage controller options
Let's see what the significance of some of these configuration options is, as follows:
- Disk bus—There are usually five options here, VirtIO being the default (and the best) one. Just as with Vmware, ESXi, and Hyper-V, KVM has different virtual storage controllers available. For example, VMware has BusLogic, LSI Logic, Paravirtual, and other types of virtual storage controllers, while Hyper-V has the integrated drive electronics (IDE) and small computer system interface (SCSI) controllers. This option defines the storage controller that the VM is going to see inside its guest operating system.
- Storage format—There are two formats: qcow2 and raw (dd type format). The most common option is qcow2 as it offers the most flexibility for VM management—for example, it supports thin provisioning and snapshots.
- Cache mode—There are six types: writethrough, writeback, directsync, unsafe, none, and default. These modes explain how data gets written from an I/O that originated from the VM to the storage underlay below the VM. For example, if we're using writethrough, the I/O gets cached on the KVM host and is written through to the VM disk as well. On the other hand, if we're using none, there's no caching on the host (except for the disk writeback cache), and data gets written to the VM disk directly. Different modes have different pros and cons, but generally, none is the best option for VM management. You can read more about them in the Further reading section.
- IO mode—There are two modes: native and threads. Depending on this setting, the VM I/O will be either written via kernel asynchronous I/O or via pool of threads in the user space (which is the default value, as well). When working with qcow2 format, it's generally accepted that threads mode is better as qcow2 format first allocates sectors and then writes to them, which will hog vCPUs allocated to the VM and have direct influence on I/O performance.
- Discard mode—There are two available modes here, called ignore and unmap. If you select unmap, when you delete files from your VM (which translates to free space in your qcow2 VM disk file), the qcow2 VM disk file will shrink to reflect the newly freed capacity. Depending on which Linux distribution, kernel, and kernel patches you have applied and the Quick Emulator (QEMU) version, this function might only be available on a SCSI disk bus. It's supported for QEMU version 4.0+.
- Detect zeroes—There are three modes available: off, on, and unmap. If you select unmap, zero write will be translated as an unmapping operation (as explained in discard mode). If you set it to on, zero writes by the operating system will be translated to specific zero write commands.
During the lifespan of any given VM, there's a significant chance that we will reconfigure it. Whether that means adding or removing virtual hardware (of course, usually, it's adding), it's an important aspect of a VM's life cycle. So, let's learn how to manage that.
Adding and removing virtual hardware from your VM
By using the VM configuration screen, we can easily add additional hardware, or remove hardware as well. For example, if we click on the Add Hardware button in the bottom-left corner, we can easily add a device—let's say, a virtual network card. The following screenshot illustrates this process:
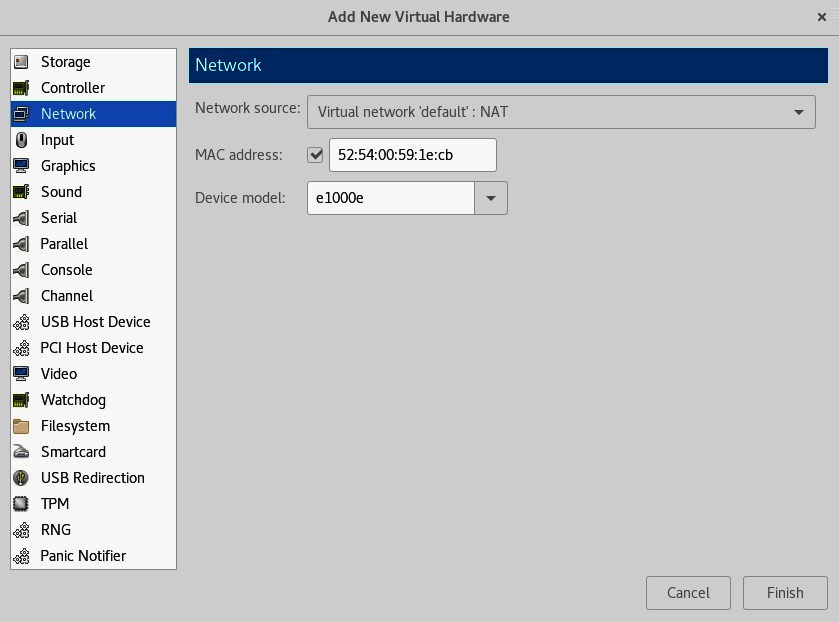
Figure 7.26 – After clicking on Add Hardware, we can select which virtual hardware device we want to add to our VM
On the other hand, if we select a virtual hardware device (for example, Sound ich6) and press the Remove button that will then appear, we can also remove this virtual hardware device, after confirming that we want to do so, as illustrated in the following screenshot:
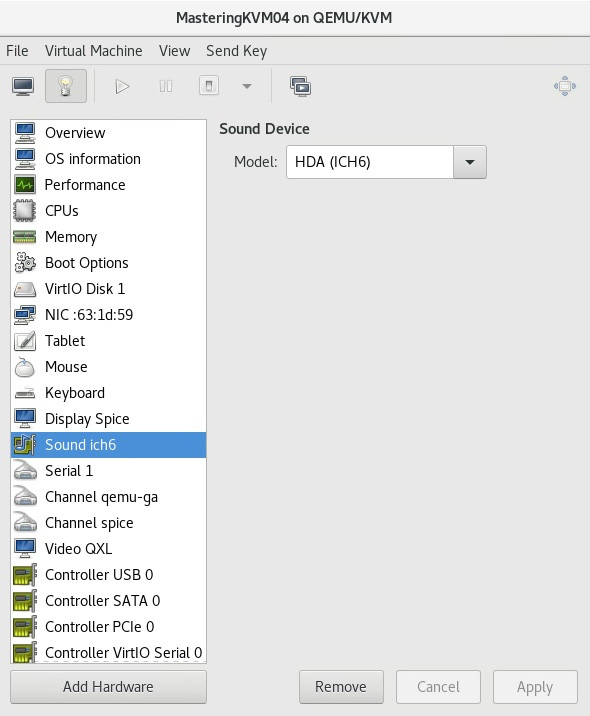
Figure 7.27 – Process for removing a VM hardware device: select it on the left-hand side and click Remove
As you can see, adding and removing VM hardware is as easy as one-two-three. We actually touched on the subject before, when we were working with virtual networking and storage (Chapter 4, Libvirt Networking), but there, we used shell commands and XML file definitions. Check out those examples if you want to learn more about that.
Virtualization is all about flexibility, and being able to place VMs on any given host in our environment is a huge part of that. Having that in mind, VM migration is one of the features in virtualization that can be used as a marketing poster for virtualization and its many advantages. What is VM migration all about? That's what we're going to learn next.
Migrating VMs
In simple terms, migration enables you to move your VM from one physical machine to another physical machine, with a very minimal downtime or no downtime. We can also move VM storage, which is a resource-hog type of operation that needs to be carefully planned and—if possible —executed after hours so that it doesn't affect other VMs' performance as much as it could.
There are various different types of migration, as follows:
- Offline (cold)
- Online (live)
- Suspended migration
There are also various different types of online migrations, depending on what you're moving, as follows:
- The compute part of the VM (moving the VM from one KVM host to another KVM host)
- The storage part of the VM (moving VM files from one storage pool to another storage pool)
- Both (moving the VM from host to host and storage pool to storage pool at the same time)
There are some differences in terms of which migration scenarios are supported if you're using just a plain KVM host versus oVirt or Red Hat Enterprise Virtualization. If you want to do a live storage migration, you can't do it on a KVM host directly, but you can easily do it if the VM is shut down. If you need a live storage migration, you will have to use oVirt or Red Hat Enterprise Virtualization.
We discussed single-root input-output virtualization (SR-IOV), Peripheral Component Interconnect (PCI) device passthrough, virtual graphics processing units (vGPUs), and similar concepts as well (in Chapter 2, KVM as a Virtualization Solution, and Chapter 4, Libvirt Networking). In CentOS 8, you can't live-migrate a VM that has either one of these options assigned to a running VM.
Whatever the use case is, we need to be aware of the fact that migration needs to be performed either as the root user or as a user that belongs to the libvirt user group (what Red Hat refers to as system versus user libvirt session).
There are different reasons why VM migration is a valuable tool to have in your arsenal. Some of these reasons are obvious; others, less so. Let's try to explain different use cases for VM migration and its benefits.
Benefits of VM migration
The most important benefits of VM live migration are listed as follows:
- Increased uptime and reduced downtime—A carefully designed virtualized environment will give you the maximum uptime for your application.
- Saving energy and going green—You can easily consolidate your VMs based on their load and usage to a smaller number of hypervisors during off hours. Once the VMs are migrated, you can power off the unused hypervisors.
- Easy hardware/software upgrade process by moving your VM between different hypervisors—Once you have the capability to move your VMs freely between different physical servers, the benefits are countless.
VM migration needs proper planning to be put in place. There are some basic requirements the migration looks for. Let's see them one by one.
The migration requirements for production environments are the following:
- The VM should be using a storage pool that is created on a shared storage.
- The name of the storage pool and the virtual disk's path should remain the same on both hypervisors (source and destination hypervisors).
Check out Chapter 4, Libvirt Networking, and Chapter 5, Libvirt Storage, to remind yourself how to create a storage pool using shared storage.
There are, as always, some rules that apply here. These are rather simple, so we need to learn them before starting migration processes. They are as follows:
- It is possible to do a live storage migration using a storage pool that is created on non-shared storage. You only need to maintain the same storage pool name and file location, but shared storage is still recommended in a production environment.
- If there is an unmanaged virtual disk attached to a VM that uses a Fiber Channel (FC), an Internet Small Computer Systems Interface (iSCSI), Logical Volume Manager (LVM), and so on, the same storage should be available on both hypervisors.
- The virtual networks used by the VMs should be available on both hypervisors.
- A bridge that is configured for a networking communication should be available on both the hypervisors.
- Migration may fail if the major versions of libvirt and qemu-kvm on the hypervisors are different, but you should be able to migrate the VMs running on a hypervisor that has a lower version of libvirt or qemu-kvm to a hypervisor that has higher versions of those packages, without any issues.
- The time on both the source and destination hypervisors should be synced. It is highly recommended that you sync the hypervisors using the same Network Time Protocol (NTP) or Precision Time Protocol (PTP) servers.
- It is important that the systems use a Domain Name System (DNS) server for name resolution. Adding the host details on /etc/hosts will not work. You should be able to resolve the hostnames using the host command.
There are some pre-requisites that we need to have in mind when planning our environment for VM migration. For the most part, these pre-requisites are mostly the same for all virtualization solutions. Let's discuss these pre-requisites and, in general, how to set up our environment for VM migration next.
Setting up the environment
Let's build the environment to do VM migration—both offline and live migrations. The following diagram depicts two standard KVM virtualization hosts running VMs with a shared storage:

Figure 7.28 – VMs on shared storage
We start this by setting up a shared storage. In this example, we are using Network File System (NFS) for the shared storage. We are going to use NFS because it is simple to set up, thus helping you to follow the migration examples easily. In actual production, it is recommended to use iSCSI-based or FC-based storage pools. NFS is not a good choice when the files are large and the VM performs heavy I/O operations. Gluster is a good alternative to NFS, and we would recommend that you try it. Gluster is well integrated in libvirt.
We're going to create a NFS share on CentOS 8 server. It's going to be hosted in /testvms directory, which we're going to export via NFS. The name of the server is nfs-01. (in our case, IP address of nfs-01 is 192.168.159.134)
- The first step is creating and exporting the /testvms directory from nfs-01 and turning off SELinux (check Chapter 5, Libvirt Storage, Ceph section to see how):
# mkdir /testvms
# echo '/testvms *(rw,sync,no_root_squash)' >> /etc/exports
- Then, allow the NFS service in the firewall by executing the following code:
# firewall-cmd --get-active-zones
public
interfaces: ens33
# firewall-cmd --zone=public --add-service=nfs
# firewall-cmd --zone=public --list-all
- Start the NFS service, as follows:
# systemctl start rpcbind nfs-server
# systemctl enable rpcbind nfs-server
# showmount -e
- Confirm that the share is accessible from your KVM hypervisors. In our case, it is PacktPhy01 and PacktPhy02. Run the following code:
# mount 192.168.159.134:/testvms /mnt
- If mounting fails, reconfigure the firewall on the NFS server and recheck the mount. This can be done by using the following commands:
firewall-cmd --permanent --zone=public --add-service=nfs
firewall-cmd --permanent --zone=public --add-service=mountd
firewall-cmd --permanent --zone=public --add-service=rpc-bind
firewall-cmd -- reload
- Unmount the volume once you have verified the NFS mount point from both hypervisors, as follows:
# umount /mnt
- On PacktPhy01 and PacktPhy02, create a storage pool named testvms, as follows:
# mkdir -p /var/lib/libvirt/images/testvms/
# virsh pool-define-as --name testvms --type netfs --source-host 192.168.159.134 --source-path /testvms --target /var/lib/libvirt/images/testvms/
# virsh pool-start testvms
# virsh pool-autostart testvms
The testvms storage pool is now created and started on two hypervisors.
In this next example, we are going to isolate the migration and VM traffic. It is highly recommended that you do this isolation in your production environment, especially if you do a lot of migrations, as it will offload that demanding process to a separate network interface, thus freeing other congested network interfaces. So, there are two main reasons for this, as follows:
- Network performance: The migration of a VM uses the full bandwidth of the network. If you use the same network for the VM traffic network and the migration network, the migration will choke that network, thus affecting the servicing capability of the VM. You can control the migration bandwidth, but it will increase the migration time.
Here is how we create the isolation:
PacktPhy01 -- ens36 (192.168.0.5) <--switch------> ens36 (192.168.0.6) -- PacktPhy02
ens37 -> br1 <-----switch------> ens37 -> br1
ens192 interfaces on PacktPhy01 and PacktPhy02 are used for migration as well as administrative tasks. They have an IP assigned and connected to a network switch. A br1 bridge is created using ens224 on both PacktPhy01 and PacktPhy02. br1 does not have an IP address assigned and is used exclusively for VM traffic (uplink for the switch that the VMs are connected to). It is also connected to a (physical) network switch.
- Security reasons: It is always recommended that you keep your management network and virtual network isolated for security reasons, as well. You don't want your users to mess with your management network, where you access your hypervisors and do the administration.
We will discuss three of the most important scenarios— offline migration, non-live migration (suspended), and live migration (online). Then, we will discuss storage migration as a separate scenario that requires additional planning and forethought.
Offline migration
As the name suggests, during offline migration, the state of the VM will be either shut down or suspended. The VM will be then resumed or started at the destination host. In this migration model, libvirt will just copy the VM's XML configuration file from the source to the destination KVM host. It also assumes that you have the same shared storage pool created and ready to use at the destination. As the first step in the migration process, you need to set up two-way passwordless SSH authentication on the participating KVM hypervisors. In our example, they are called PacktPhy01 and PacktPhy02.
For the following exercises, disable Security-Enhanced Linux (SELinux) temporarily.
In /etc/sysconfig/selinux, use your favorite editor to modify the following line of code:
SELINUX=enforcing
This needs to be modified as follows:
SELINUX=permissive
Also, in the command line, as root, we need to temporarily set SELinux mode to permissive, as follows:
# setenforce 0
On PacktPhy01, as root, run the following command:
# ssh-keygen
# ssh-copy-id root@PacktPhy02
On PacktPhy02, as root, run the following commands:
# ssh-keygen
# ssh-copy-id root@PacktPhy01
You should now be able to log in to both of these hypervisors as root without typing a password.
Let's do an offline migration of MasteringKVM01, which is already installed, from PacktPhy01 to PacktPhy02. The general format of the migration command looks similar to the following:
# virsh migrate migration-type options name-of-the-vm-destination-uri
On PacktPhy01, run the following code:
[PacktPhy01] # virsh migrate --offline --verbose –-persistent MasteringKVM01 qemu+ssh://PacktPhy02/system
Migration: [100 %]
On PacktPhy02, run the following code:
[PacktPhy02] # virsh list --all
# virsh list --all
Id Name State
----------------------------------------------------
- MasteringKVM01 shut off
[PacktPhy02] # virsh start MasteringKVM01
Domain MasteringKVM01 started
When a VM is on shared storage and you have some kind of issue with one of the hosts, you could also manually register a VM on another host. That means that you might end up in a situation where the same VM is registered on two hypervisors, after you repair the issue on your host that had an initial problem. It's something that happens when you're manually managing KVM hosts without a centralized management platform such as oVirt, which wouldn't allow such a scenario. So, what happens if you're in that kind of situation? Let's discuss this scenario.
What if I start the VM accidently on both the hypervisors?
Accidently starting the VM on both the hypervisors can be a sysadmin's nightmare. It can lead to VM filesystem corruption, especially when the filesystem inside the VM is not cluster-aware. Developers of libvirt thought about this and came up with a locking mechanism. In fact, they came up with two locking mechanisms. When enabled, these will prevent the VMs from starting at the same time on two hypervisors.
The two locking mechanisms are as follows:
- lockd: lockd makes use of the POSIX fcntl() advisory locking capability. It was started by the virtlockd daemon. It requires a shared filesystem (preferably NFS), accessible to all the hosts that share the same storage pool.
- sanlock: This is used by oVirt projects. It uses a disk paxos algorithm for maintaining continuously renewed leases.
For libvirt-only implementations, we prefer lockd over sanlock. It is best to use sanlock for oVirt.
Enabling lockd
For image-based storage pools that are POSIX-compliant, you can enable lockd easily by uncommenting the following command in /etc/libvirt/qemu.conf or on both hypervisors:
lock_manager = "lockd"
Now, enable and start the virtlockd service on both the hypervisors. Also, restart libvirtd on both the hypervisors, as follows:
# systemctl enable virtlockd; systemctl start virtlockd
# systemctl restart libvirtd
# systemctl status virtlockd
Start MasteringKVM01 on PacktPhy02, as follows:
[root@PacktPhy02] # virsh start MasteringKVM01
Domain MasteringKVM01 started
Start the same MasteringKVM01 VM on PacktPhy01, as follows:
[root@PacktPhy01] # virsh start MasteringKVM01
error: Failed to start domain MasteringKVM01
error: resource busy: Lockspace resource '/var/lib/libvirt/images/ testvms/MasteringKVM01.qcow2' is locked
Another method to enable lockd is to use a hash of the disk's file path. Locks are saved in a shared directory that is exported through NFS, or similar sharing, to the hypervisors. This is very useful when you have virtual disks that are created and attached using a multipath logical unit number (LUN). fcntl() cannot be used in such cases. We recommend that you use the methods detailed next to enable the locking.
On the NFS server, run the following code (make sure that you're not running any virtual machines from this NFS server first!):
mkdir /flockd
# echo "/flockd *(rw,no_root_squash)" >> /etc/exports
# systemctl restart nfs-server
# showmount -e
Export list for :
/flockd *
/testvms *
Add the following code to both the hypervisors in /etc/fstab and type in the rest of these commands:
# echo "192.168.159.134:/flockd /var/lib/libvirt/lockd/flockd nfs rsize=8192,wsize=8192,timeo=14,intr,sync" >> /etc/fstab
# mkdir -p /var/lib/libvirt/lockd/flockd
# mount -a
# echo 'file_lockspace_dir = "/var/lib/libvirt/lockd/flockd"' >> /etc/libvirt/qemu-lockd.conf
Reboot both hypervisors, and, once rebooted, verify that the libvirtd and virtlockd daemons started correctly on both the hypervisors, as follows:
[root@PacktPhy01 ~]# virsh start MasteringKVM01
Domain MasteringKVM01 started
[root@PacktPhy02 flockd]# ls
36b8377a5b0cc272a5b4e50929623191c027543c4facb1c6f3c35bacaa745 5ef
51e3ed692fdf92ad54c6f234f742bb00d4787912a8a674fb5550b1b826343 dd6
MasteringKVM01 has two virtual disks, one created from an NFS storage pool and the other created directly from a LUN. If we try to power it on the PacktPhy02 hypervisor host, MasteringKVM01 fails to start, as can be seen in the following code snippet:
[root@PacktPhy02 ~]# virsh start MasteringKVM01
error: Failed to start domain MasteringKVM01
error: resource busy: Lockspace resource '51e3ed692fdf92ad54c6f234f742bb00d4787912a8a674fb5550b1b82634 3dd6' is locked
When using LVM volumes that can be visible across multiple host systems, it is desirable to do the locking based on the universally unique identifier (UUID) associated with each volume, instead of their paths. Setting the following path causes libvirt to do UUID-based locking for LVM:
lvm_lockspace_dir = "/var/lib/libvirt/lockd/lvmvolumes"
When using SCSI volumes that can be visible across multiple host systems, it is desirable to do locking based on the UUID associated with each volume, instead of their paths. Setting the following path causes libvirt to do UUID-based locking for SCSI:
scsi_lockspace_dir = "/var/lib/libvirt/lockd/scsivolumes"
As with file_lockspace_dir, the preceding directories should also be shared with the hypervisors.
Important note
If you are not able to start VMs due to locking errors, just make sure that they are not running anywhere and then delete the lock files. Start the VM again. We deviated a little from migration for the lockd topic. Let's get back to migration.
Live or online migration
In this type of migration, the VM is migrated to the destination host while it's running on the source host. The process is invisible to the users who are using the VMs. They won't even know that the VM they are using has been transferred to another host while they are working on it. Live migration is one of the main features that have made virtualization so popular.
Migration implementation in KVM does not need any support from the VM. It means that you can live-migrate any VMs, irrespective of the operating system they are using. A unique feature of KVM live migration is that it is almost completely hardware-independent. You should ideally be able to live-migrate a VM running on a hypervisor that has an Advanced Micro Devices (AMD) processor to an Intel-based hypervisor.
We are not saying that this will work in 100% of the cases or that we in any way recommend having this type of mixed environment, but in most of the cases, it should be possible.
Before we start the process, let's go a little deeper to understand what happens under the hood. When we do a live migration, we are moving a live VM while users are accessing it. This means that users shouldn't feel any disruption in VM availability when you do a live migration.
Live migration is a five-stage, complex process, even though none of these processes are exposed to the sysadmins. libvirt will do the necessary work once the VM migration action is issued. The stages through which a VM migration goes are explained in the following list:
- Preparing the destination: When you initiate a live migration, the source libvirt (SLibvirt) will contact the destination libvirt (DLibvirt) with the details of the VM that is going to be transferred live. DLibvirt will pass this information to the underlying QEMU, with relevant options to enable live migration. QEMU will start the actual live migration process by starting the VM in pause mode and will start listening on a Transmission Control Protocol (TCP) port for VM data. Once the destination is ready, DLibvirt will inform SLibvirt, with the details of QEMU. By this time, QEMU, at the source, is ready to transfer the VM and connects to the destination TCP port.
- Transferring the VM: When we say transferring the VM, we are not transferring the whole VM; only the parts that are missing at the destination are transferred—for example, the memory and the state of the virtual devices (VM state). Other than the memory and the VM state, all other virtual hardware (virtual network, virtual disks, and virtual devices) is available at the destination itself. Here is how QEMU moves the memory to the destination:
a) The VM will continue running at the source, and the same VM is started in pause mode at the destination.
b) In one go, it will transfer all the memory used by the VM to the destination. The speed of transfer depends upon the network bandwidth. Suppose the VM is using 10 gibibytes (GiB); it will take the same time to transfer 10 GiB of data using the Secure Copy Protocol (SCP) to the destination. In default mode, it will make use of the full bandwidth. That is the reason we are separating the administration network from the VM traffic network.
c) Once the whole memory is at the destination, QEMU starts transferring the dirty pages (pages that are not yet written to the disk). If it is a busy VM, the number of dirty pages will be high and it will take time to move them. Remember, dirty pages will always be there and there is no state of zero dirty pages on a running VM. Hence, QEMU will stop transferring the dirty pages when it reaches a low threshold (50 or fewer pages).
QEMU will also consider other factors, such as iterations, the number of dirty pages generated, and so on. This can also be determined by migrate-setmaxdowntime, which is in milliseconds.
- Stopping the VM on the source host: Once the number of dirty pages reaches the said threshold, QEMU will stop the VM on the source host. It will also sync the virtual disks.
- Transferring the VM state: At this stage, QEMU will transfer the state of the VM's virtual devices and remaining dirty pages to the destination as quickly as possible. We cannot limit the bandwidth at this stage.
- Continuing the VM: At the destination, the VM will be resumed from the paused state. Virtual network interface controllers (NICs) become active, and the bridge will send out gratuitous Address Resolution Protocols (ARPs) to announce the change. After receiving the announcement from the bridge, the network switches will update their respective ARP cache and start forwarding the data for the VM to the new hypervisors.
Note that Steps 3, 4, and 5 will be completed in milliseconds. If some errors happen, QEMU will abort the migration and the VM will continue running on the source hypervisor. All through the migration process, libvirt services from both participating hypervisors will be monitoring the migration process.
Our VM called MasteringKVM01 is now running on PacktPhy01 safely, with lockd enabled. We are going to live-migrate MasteringKVM01 to PacktPhy02.
We need to open the necessary TCP ports used for migration. You only need to do that at the destination server, but it's a good practice to do this in your whole environment so that you don't have to micro-manage these configuration changes as you need them in the future, one by one. Basically, you have to open the ports on all the participating hypervisors by using the following firewall-cmd command for the default zone (in our case, the public zone):
# firewall-cmd --zone=public --add-port=49152-49216/tcp --permanent
Check the name resolution on both the servers, as follows:
[root@PacktPhy01 ~] # host PacktPhy01
PacktPhy01 has address 192.168.159.136
[root@PacktPhy01 ~] # host PacktPhy02
PacktPhy02 has address 192.168.159.135
[root@PacktPhy02 ~] # host PacktPhy01
PacktPhy01 has address 192.168.159.136
[root@PacktPhy02 ~] # host PacktPhy02
PacktPhy02 has address 192.168.159.135
Check and verify all the virtual disks attached are available at the destination, on the same path, with the same storage pool name. This is applicable to attached unmanaged (iSCSI and FC LUNs, and so on) virtual disks also.
Check and verify all the network bridges and virtual networks used by the VM available at the destination. After that, we can start the migration process by running the following code:
# virsh migrate --live MasteringKVM01 qemu+ssh://PacktPhy02/system --verbose --persistent
Migration: [100 %]
Our VM is using only 4,096 megabytes (MB) of memory, so all five stages completed in a couple of seconds. The --persistent option is optional, but we recommend adding this.
This is the output of ping during the migration process (10.10.48.24 is the IP address of MasteringKVM01):
# ping 10.10.48.24
PING 10.10.48.24 (10.10.48.24) 56(84) bytes of data.
64 bytes from 10.10.48.24: icmp_seq=12 ttl=64 time=0.338 ms
64 bytes from 10.10.48.24: icmp_seq=13 ttl=64 time=3.10 ms
64 bytes from 10.10.48.24: icmp_seq=14 ttl=64 time=0.574 ms
64 bytes from 10.10.48.24: icmp_seq=15 ttl=64 time=2.73 ms
64 bytes from 10.10.48.24: icmp_seq=16 ttl=64 time=0.612 ms
--- 10.10.48.24 ping statistics ---
17 packets transmitted, 17 received, 0% packet loss, time 16003ms
rtt min/avg/max/mdev = 0.338/0.828/3.101/0.777 ms
If you get the following error message, change cache to none on the virtual disk attached:
# virsh migrate --live MasteringKVM01 qemu+ssh://PacktPhy02/system --verbose
error: Unsafe migration: Migration may lead to data corruption if disks use cache != none
# virt-xml MasteringKVM01 --edit --disk target=vda,cache=none
target is the disk to change the cache. You can find the target name by running the following command:
virsh dumpxml MasteringKVM01
You can try a few more options while performing a live migration, as follows:
- --undefine domain: Option used to remove a KVM domain from a KVM host.
- --suspend domain: Suspends a KVM domain—that is, pauses a KVM domain until we unsuspend it.
- --compressed: When we do a VM migration, this option enables us to compress memory. That will mean a faster migration process, based on the –comp-methods parameter.
- --abort-on-error: If the migration process throws an error, it is automatically stopped. This is a safe default option as it will help in situations where any kind of corruption might happen during the migration process.
- --unsafe: Kind of like the polar opposite of the –abort-on-error option. This option forces migration at all costs, even in the case of error, data corruption, or any other unforeseen scenario. Be very careful with this option—don't use it often, or in any situation where you want to be 100% sure that VM data consistency is a key pre-requisite.
You can read more about these options in the RHEL 7—Virtualization Deployment and Administration guide (you can find the link in the Further reading section at the end of this chapter). Additionally, the virsh command also supports the following options:
- virsh migrate-setmaxdowntime <domain>: When migrating a VM, it's inevitable that, at times, a VM is going to be unavailable for a short period of time. This might happen—for example—because of the hand-off process, when we migrate a VM from one host to the other, and we're just coming to the point of state equilibrium (that is, when the source and destination host have the same VM content and are ready to remove the source VM from the source host inventory and make it run on the destination host). Basically, a small pause happens as the source VM gets paused and killed, and the destination host VM gets unpaused and continues. By using this command, the KVM stack is trying to estimate how long this stopped phase will last. It's a viable option, especially for VMs that are really busy and are therefore changing their memory content a lot while we're migrating them.
- virsh migrate-setspeed <domain> bandwidth: We can treat this as a quasi-Quality of Service (QoS) option. By using it, we can set the amount of bandwidth in MiB/s that we're giving to the migration process. This is a very good option to use if our network is busy (for example, if we have multiple virtual local area networks (VLANs) going across the same physical network and we have bandwidth limitations because of it. Lower numbers will slow the migration process.
- virsh migrate-getspeed <domain>: We can treat this as a get information option to the migrate-setspeed command, to check which settings we assigned to the virsh migrate-setspeed command.
As you can see, migration is a complex process from a technical standpoint, and has multiple different types and loads of additional configuration options that you can use for management purposes. That being said, it's still such an important capability of a virtualized environment that it's very difficult to imagine working without it.
Summary
In this chapter, we covered different ways of creating VMs and configuring VM hardware. We also covered VM migration in detail, and live and offline VM migration. In the next chapter, we will work with VM disks, VM templates, and snapshots. These concepts are very important to understand as they will make your life administering a virtualized environment a lot easier.
Questions
- Which command-line tools can we use to deploy VMs in libvirt?
- Which GUI tools can we use to deploy VMs in libvirt?
- When configuring our VMs, which configuration aspects should we be careful with?
- What's the difference between online and offline VM migration?
- What's the difference between VM migration and VM storage migration?
- How can we configure bandwidth for the migration process?
Further reading
Please refer to the following links for more information regarding what was covered in this chapter:
- Managing VMs with virt-manager: https://virt-manager.org/
- oVirt—Installing Linux VMs: https://www.ovirt.org/documentation/vmm-guide/chap-Installing_Linux_Virtual_Machines.html
- Cloning VMs: https://access.redhat.com/documentation/en-us/red_hat_enterprise_linux/8/html/configuring_and_managing_virtualization/cloning-virtual-machines_configuring-and-managing-virtualization
- Migrating VMs: https://access.redhat.com/documentation/en-us/red_hat_enterprise_linux/8/html/configuring_and_managing_virtualization/migrating-virtual-machines_configuring-and-managing-virtualization
- Caching: https://access.redhat.com/documentation/en-us/red_hat_enterprise_linux/7/html/virtualization_tuning_and_optimization_guide/sect-virtualization_tuning_optimization_guide-blockio-caching
- Influence of NUMA and memory locality on Microsoft SQL Server 2019 performance: https://www.daaam.info/Downloads/Pdfs/proceedings/proceedings_2019/049.pdf
- Virtualization deployment and administration guide: https://access.redhat.com/documentation/en-us/red_hat_enterprise_linux/7/html/virtualization_deployment_and_administration_guide/index