Chapter 2: KVM as a Virtualization Solution
In this chapter, we will discuss virtualization as a concept and its implementation via libvirt, Quick Emulator (QEMU), and KVM. Realistically, if we want to explain how virtualization works and why KVM virtualization is such a fundamental part of 21st-century IT, we must start by explaining the technical background of multi-core CPUs and virtualization; and that's impossible to do without delving deep into the theory of CPUs and OSes so that we can get to what we're really after – what hypervisors are and how virtualization actually works.
In this chapter, we will cover the following topics:
- Virtualization as a concept
- The internal workings of libvirt, QEMU, and KVM
- How all these communicate with each other to provide virtualization
Virtualization as a concept
Virtualization is a computing approach that decouples hardware from software. It provides a better, more efficient, and programmatic approach to resource splitting and sharing between various workloads – virtual machines running OSes, and applications on top of them.
If we were to compare traditional, physical computing of the past with virtualization, we can say that by virtualizing, we get the possibility to run multiple guest OSes (multiple virtual servers) on the same piece of hardware (same physical server). If we're using a type 1 hypervisor (explained in Chapter 1, Understanding Linux Virtualization), this means that the hypervisor is going to be in charge of letting the virtual servers access physical hardware. This is because there is more than one virtual server using the same hardware as the other virtual servers on the same physical server. This is usually supported by some kind of scheduling algorithm that's implemented programmatically in hypervisors so that we can get more efficiency from the same physical server.
Virtualized versus physical environments
Let's try to visualize these two approaches – physical and virtual. In a physical server, we're installing an OS right on top of the server hardware and running applications on top of that OS. The following diagram shows us how this approach works:

Figure 2.1 – Physical server
In a virtualized world, we're running a hypervisor (such as KVM), and virtual machines on top of that hypervisor. Inside these virtual machines, we're running the same OS and application, just like in the physical server. The virtualized approach is shown in the following diagram:

Figure 2.2 – Hypervisor and two virtual machines
There are still various scenarios in which the physical approach is going to be needed. For example, there are still thousands of applications on physical servers all over the world because these servers can't be virtualized. There are different reasons why they can't be virtualized. For example, the most common reason is actually the simplest reason – maybe these applications are being run on an OS that's not on the supported OS list by the virtualization software vendor. That can mean that you can't virtualize that OS/application combination because that OS doesn't support some virtualized hardware, most commonly a network or a storage adapter. The same general idea applies to the cloud as well – moving things to the cloud isn't always the best idea, as we will describe later in this book.
Why is virtualization so important?
A lot of applications that we run today don't scale up well (adding more CPU, memory, or other resources) – they just aren't programmed that way or can't be seriously parallelized. That means that if an application can't use all the resources at its disposal, a server is going to have a lot of slack space – and this time, we're not talking about disk slack space; we're actually referring to compute slack space, so slack space at the CPU and memory levels. This means that we're underutilizing the capabilities of the server that we paid for – with the intention for it to be used fully, not partially.
There are other reasons why efficiency and programmatic approaches are so important. The fact of the matter is that beyond their war of press releases in the 2003–2005 timeframe when it was all about the CPU frequency bragging rights (which equals CPU speed), Intel and AMD hit a wall in terms of the development of the single-core CPU as a concept. They just couldn't cram as many additional elements on the CPU (be it for execution or the cache) and/or bump the single core's speed without seriously compromising the way CPUs were being fed with electrical current. This meant that, at the end of the day, this approach compromised the reliability of the CPU and the whole system that it was running. If you want to learn more about that, we suggest that you look for articles about Intel's NetBurst architecture CPUs (for example, the Prescott core) and their younger brother, Pentium D (the Smithfield core), which was basically two Prescott cores glued together so that the end result was a dual-core CPU. A very, very hot dual-core CPU.
A couple of generations before that, there were other techniques that Intel and AMD tried and tested in terms of the let's have multiple execution units per system principle. For example, we had Intel Pentium Pro dual-socket systems and AMD Opteron dual- and quad-socket systems. We'll come back to these later in this book when we start discussing some very important aspects of virtualization (for example, Non-Unified Memory Access (NUMA)).
So, whichever way you look at it, when PC CPUs started getting multiple cores in 2005 (AMD being the first to the market with a server multi-core CPU, and Intel being the first to the market with a desktop multi-core CPU), it was the only rational way to go forward. These cores were smaller, more efficient (drawing less power), and were generally a better long-term approach. Of course, that meant that OSes and applications had to be reworked heavily if companies such as Microsoft and Oracle wanted to use their applications and reap the benefits of a multi-core server.
In conclusion, for PC-based servers, looking from the CPU perspective, switching to multi-core CPUs was an opportune moment to start working toward virtualization as the concept that we know and love today.
In parallel with these developments, CPUs got other additions – for example, additional CPU registers that can handle specific types of operations. A lot of people heard about instruction sets such as MMX, SSE, SSE2, SSE3, SSE4.x, AVX, AVX2, AES, and so on. These are all very important today as well because they give us a possibility of offloading certain instruction types to a specific CPU register. This means that these instructions don't have to be run on a CPU as a general serial device, which executes these tasks slower. Instead, these instructions can be sent to a specific CPU register that's specialized for these instructions. Think of it as having separate mini accelerators on a CPU die that could run some pieces of the software stack without hogging the general CPU pipeline. One of these additions was Virtual Machine Extensions (VMX) for Intel, or AMD Virtualization (AMD-V), both of which enable us to have full, hardware-based virtualization support for their respective platforms.
Hardware requirements for virtualization
After the introduction of software-based virtualization on PCs, a lot of development was made, both on the hardware and software sides. The end result – as we mentioned in the previous chapter – was a CPU that had an awful lot more features and power. This led to a big push toward hardware-assisted virtualization, which – on paper – looked like the faster and more advanced way to go. Just as an example, there were a whole bunch of CPUs that didn't support hardware-assisted virtualization in the 2003–2006 timeframe, such as the Intel Pentium 4, Pentium D, the initial AMD Athlons, Turions, Durons, and so on. It took both Intel and AMD until 2006 to have hardware-assisted virtualization as a feature that's more widely available on their respective CPUs. Furthermore, it took some time to have 64-bit CPUs, and there was little or no interest in running hardware-assisted virtualization on 32-bit architectures. The primary reason for this was the fact that you couldn't allocate more than 4 GB of memory, which severely limited the scope of using virtualization as a concept.
Keeping all of this in mind, these are the requirements that we have to comply with today so that we can run modern-day hypervisors with full hardware-assisted virtualization support:
- Second-Level Address Translation, Rapid Virtualization Indexing, Extended Page Tables (SLAT/RVI/EPT) support: This is the CPU technology that a hypervisor uses so that it can have a map of virtual-to-physical memory addresses. Virtual machines operate in a virtual memory space that can be scattered all over the physical memory, so by using an additional map such as SLAT/EPT, (implemented via an additional Translation Lookaside Buffer, or TLB), you're reducing latency for memory access. If we didn't have a technology like this, we'd have to have physical memory access to the computer memory's physical addresses, which would be messy, insecure, and latency-prone. To avoid any confusion, EPT is Intel's name for SLAT technology in their CPUs (AMD uses RVI terminology, while Intel uses EPT terminology).
- Intel VT or AMD-V support: If an Intel CPU has VT (or an AMD CPU has AMD-V), that means that it supports hardware virtualization extensions and full virtualization.
- Long mode support, which means that the CPU has 64-bit support. Without a 64-bit architecture, virtualization would be basically useless because you'd have only 4 GB of memory to give to virtual machines (which is a limitation of the 32-bit architecture). By using a 64-bit architecture, we can allocate much more memory (depending on the CPU that we're using), which means more opportunities to feed virtual machines with memory, without which the whole virtualization concept wouldn't make any sense in the 21st-century IT space.
- The possibility of having Input/Output Memory Management Unit (IOMMU) virtualization (such as AMD-Vi, Intel VT-d, and stage 2 tables on ARM), which means that we allow virtual machines to access peripheral hardware directly (graphics cards, storage controllers, network devices, and so on). This functionality must be enabled both on the CPU and motherboard chipset/firmware side.
- The possibility to do Single Root Input Output Virtualization (SR/IOV), which allows us to directly forward a PCI Express device (for example, an Ethernet port) to multiple virtual machines. The key aspect of SR-IOV is its ability to share one physical device with multiple virtual machines via functionality called Virtual Functions (VFs). This functionality requires hardware and driver support.
- The possibility to do PCI passthrough, which means we can take a PCI Express connected card (for example, a video card) connected to a server motherboard and present it to a virtual machine as if that card was directly connected to the virtual machine via functionality called Physical Functions (PFs). This means bypassing various hypervisor levels that the connection would ordinarily take place through.
- Trusted Platform Module (TPM) support, which is usually implemented as an additional motherboard chip. Using TPM can have a lot of advantages in terms of security because it can be used to provide cryptographic support (that is, to create, save, and secure the use of cryptographic keys). There was quite a bit of buzz in the Linux world around the use of TPM with KVM virtualization, which led to Intel's open sourcing of the TPM2 stack in the summer of 2018.
When discussing SR-IOV and PCI passthrough, make sure that you take note of the core functionalities, called PF and VF. These two keywords will make it easier to remember where (on a physical or virtual level) and how (directly or via a hypervisor) devices are forwarded to their respective virtual machines. These capabilities are very important for the enterprise space and quite a few specific scenarios. Just as an example, there's literally no way to have a virtual desktop infrastructure (VDI) solution with workstation-grade virtual machines that you can use to run AutoCAD and similar applications without these capabilities. This is because integrated graphics on CPUs are just too slow to do that properly. That's when you start adding GPUs to your servers – so that you can use a hypervisor to forward the whole GPU or parts of it to a virtual machine or multiple virtual machines.
In terms of system memory, there are also various subjects to consider. AMD started integrating memory controllers into CPUs in Athlon 64, which was years before Intel did that (Intel did that first with the Nehalem CPU core, which was introduced in 2008). Integrating a memory controller into a CPU meant that your system had less latency when CPU accessed memory for memory I/O operations. Before this, the memory controller was integrated into what was called a NorthBridge chip, which was a separate chip on a system motherboard that was in charge of all fast buses and memory. But that means additional latency, especially when you try to scale out that principle to multi-socket, multi-core CPUs. Also, with the introduction of Athlon 64 on Socket 939, AMD switched to a dual-channel memory architecture, which is now a familiar theme in the desktop and server market. Triple and quad-channel memory controllers are de facto standards in servers. Some of the latest Intel Xeon CPUs support six-channel memory controllers, and AMD EPYC CPUs support eight-channel memory controllers as well. This has huge implications for the overall memory bandwidth and latency, which – in turn – has huge implications for the speed of memory-sensitive applications, both on physical and virtual servers.
Why is this important? The more channels you have and the lower the latency is, the more bandwidth you have from CPU to memory. And that is very, very desirable for a lot of workloads in today's IT space (for example, databases).
Software requirements for virtualization
Now that we've covered the basic hardware aspects of virtualization, let's move on to the software aspect of virtualization. To do that, we must cover some jargon in computer science. That being said, let's start with something called protection rings. In computer science, various hierarchical protection domains/privileged rings exist. These are the mechanisms that protect data or faults based on the security that's enforced when accessing the resources in a computer system. These protection domains contribute to the security of a computer system. By imagining these protection rings as instruction zones, we can represent them via the following diagram:

Figure 2.3 – Protection rings (source: https://en.wikipedia.org/wiki/Protection_ring)
As shown in the preceding diagram, the protection rings are numbered from the most privileged to the least privileged. Ring 0 is the level with the most privilege and interacts directly with physical hardware, such as the CPU and memory. The resources, such as memory, I/O ports, and CPU instructions, are protected via these privileged rings. Rings 1 and 2 are mostly unused. Most general-purpose systems use only two rings, even if the hardware they run on provides more CPU modes than that. The two main CPU modes are the kernel mode and the user mode, which are also related to the way processes are executed. You can read more about it at this link: https://access.redhat.com/sites/default/files/attachments/processstates_20120831.pdf. From an OS's point of view, ring 0 is called the kernel mode/supervisor mode and ring 3 is the user mode. As you may have assumed, applications run in ring 3.
OSes such as Linux and Windows use supervisor/kernel and user mode. This mode can do almost nothing to the outside world without calling on the kernel or without its help due to its restricted access to memory, CPU, and I/O ports. The kernels can run in privileged mode, which means that they can run on ring 0. To perform specialized functions, the user-mode code (all the applications that run in ring 3) must perform a system call to the supervisor mode or even to the kernel space, where the trusted code of the OS will perform the needed task and return the execution back to the userspace. In short, the OS runs in ring 0 in a normal environment. It needs the most privileged level to do resource management and provide access to the hardware. The following diagram explains this:

Figure 2.4 – System call to supervisor mode
The rings above 0 run instructions in a processor mode called unprotected. The hypervisor/Virtual Machine Monitor (VMM) needs to access the memory, CPU, and I/O devices of the host. Since only the code running in ring 0 is allowed to perform these operations, it needs to run in the most privileged ring, which is ring 0, and has to be placed next to the kernel. Without specific hardware virtualization support, the hypervisor or VMM runs in ring 0; this basically blocks the virtual machine's OS in ring 0. So, the virtual machine's OS must reside in ring 1. An OS installed in a virtual machine is also expected to access all the resources as it's unaware of the virtualization layer; to achieve this, it has to run in ring 0, similar to the VMM. Due to the fact that only one kernel can run in ring 0 at a time, the guest OSes have to run in another ring with fewer privileges or have to be modified to run in user mode.
This has resulted in the introduction of a couple of virtualization methods called full virtualization and paravirtualization, which we mentioned earlier. Now, let's try to explain them in a more technical way.
Full virtualization
In full virtualization, privileged instructions are emulated to overcome the limitations that arise from the guest OS running in ring 1 and the VMM running in ring 0. Full virtualization was implemented in first-generation x86 VMMs. It relies on techniques such as binary translation to trap and virtualize the execution of certain sensitive and non-virtualizable instructions. This being said, in binary translation, some system calls are interpreted and dynamically rewritten. The following diagram depicts how the guest OS accesses the host computer hardware through ring 1 for privileged instructions and how unprivileged instructions are executed without the involvement of ring 1:

Figure 2.5 – Binary translation
With this approach, the critical instructions are discovered (statically or dynamically at runtime) and replaced with traps in the VMM that are to be emulated in software. A binary translation can incur a large performance overhead in comparison to a virtual machine running on natively virtualized architectures. This can be seen in the following diagram:

Figure 2.6 – Full virtualization
However, as shown in the preceding diagram, when we use full virtualization, we can use the unmodified guest OSes. This means that we don't have to alter the guest kernel so that it runs on a VMM. When the guest kernel executes privileged operations, the VMM provides the CPU emulation to handle and modify the protected CPU operations. However, as we mentioned earlier, this causes performance overhead compared to the other mode of virtualization, called paravirtualization.
Paravirtualization
In paravirtualization, the guest OS needs to be modified to allow those instructions to access ring 0. In other words, the OS needs to be modified to communicate between the VMM/hypervisor and the guest through the backend (hypercalls) path:

Figure 2.7 – Paravirtualization
Paravirtualization (https://en.wikipedia.org/wiki/Paravirtualization) is a technique in which the hypervisor provides an API, and the OS of the guest virtual machine calls that API, which requires host OS modifications. Privileged instruction calls are exchanged with the API functions provided by the VMM. In this case, the modified guest OS can run in ring 0.
As you can see, under this technique, the guest kernel is modified to run on the VMM. In other words, the guest kernel knows that it's been virtualized. The privileged instructions/operations that are supposed to run in ring 0 have been replaced with calls known as hypercalls, which talk to the VMM. These hypercalls invoke the VMM so that it performs the task on behalf of the guest kernel. Since the guest kernel can communicate directly with the VMM via hypercalls, this technique results in greater performance compared to full virtualization. However, this requires a specialized guest kernel that is aware of paravirtualization and comes with needed software support.
The concepts of paravirtualization and full virtualization used to be a common way to do virtualization but not in the best possible, manageable way. That's where hardware-assisted virtualization comes into play, as we will describe in the following section.
Hardware-assisted virtualization
Intel and AMD realized that full virtualization and paravirtualization are the major challenges of virtualization on the x86 architecture (since the scope of this book is limited to x86 architecture, we will mainly discuss the evolution of this architecture here) due to the performance overhead and complexity of designing and maintaining the solution. Intel and AMD independently created new processor extensions of the x86 architecture, called Intel VT-x and AMD-V, respectively. On the Itanium architecture, hardware-assisted virtualization is known as VT-i. Hardware-assisted virtualization is a platform virtualization method designed to efficiently use full virtualization with the hardware capabilities. Various vendors call this technology by different names, including accelerated virtualization, hardware virtual machine, and native virtualization.
For better support for virtualization, Intel and AMD introduced Virtualization Technology (VT) and Secure Virtual Machine (SVM), respectively, as extensions of the IA-32 instruction set. These extensions allow the VMM/hypervisor to run a guest OS that expects to run in kernel mode, in lower privileged rings. Hardware-assisted virtualization not only proposes new instructions but also introduces a new privileged access level, called ring -1, where the hypervisor/VMM can run. Hence, guest virtual machines can run in ring 0. With hardware-assisted virtualization, the OS has direct access to resources without any emulation or OS modification. The hypervisor or VMM can now run at the newly introduced privilege level, ring -1, with the guest OSes running on ring 0. Also, with hardware-assisted virtualization, the VMM/hypervisor is relaxed and needs to perform less work compared to the other techniques mentioned, which reduces the performance overhead. This capability to run directly in ring -1 can be described with the following diagram:

Figure 2.8 – Hardware-assisted virtualization
In simple terms, this virtualization-aware hardware provides us with support to build the VMM and also ensures the isolation of a guest OS. This helps us achieve better performance and avoid the complexity of designing a virtualization solution. Modern virtualization techniques make use of this feature to provide virtualization. One example is KVM, which we are going to discuss in detail throughout this book.
Now that we've covered the hardware and software aspects of virtualization, let's see how all of this applies to KVM as a virtualization technology.
The internal workings of libvirt, QEMU, and KVM
The interaction of libvirt, QEMU, and KVM is something that gives us the full virtualization capabilities that are covered in this book. They are the most important pieces in the Linux virtualization puzzle, as each has a role to play. Let's describe what they do and how they interact with each other.
libvirt
When working with KVM, you're most likely to first interface with its main Application Programming Interface (API), called libvirt (https://libvirt.org). But libvirt has other functionalities – it's also a daemon and a management tool for different hypervisors, some of which we mentioned earlier. One of the most common tools used to interface with libvirt is called virt-manager (http://virt-manager.org), a Gnome-based graphical utility that you can use to manage various aspects of your local and remote hypervisors, if you so choose. libvirt's CLI utility is called virsh. Keep in mind that you can manage remote hypervisors via libvirt, so you're not restricted to a local hypervisor only. That's why virt-manager has an additional parameter called --connect. libvirt is also part of various other KVM management tools, such as oVirt (http://www.ovirt.org), which we will discuss in the next chapter.
The goal of the libvirt library is to provide a common and stable layer for managing virtual machines running on a hypervisor. In short, as a management layer, it is responsible for providing the API that performs management tasks such as virtual machine provision, creation, modification, monitoring, control, migration, and so on. In Linux, you will have noticed that some of the processes are daemonized. The libvirt process is also daemonized, and it is called libvirtd. As with any other daemon process, libvirtd provides services to its clients upon request. Let's try to understand what exactly happens when a libvirt client such as virsh or virt-manager requests a service from libvirtd. Based on the connection URI (discussed in the following section) that's passed by the client, libvirtd opens a connection to the hypervisor. This is how the client's virsh or virt-manager asks libvirtd to start talking to the hypervisor. In the scope of this book, we are aiming to look at KVM virtualization technology. So, it would be better to think about it in terms of a QEMU/KVM hypervisor instead of discussing some other hypervisor communication from libvirtd. You may be a bit confused when you see QEMU/KVM as the underlying hypervisor name instead of either QEMU or KVM. But don't worry – all will become clear in due course. The connection between QEMU and KVM will be discussed in the following chapters. For now, just know that there is a hypervisor that uses both the QEMU and KVM technologies.
Connecting to a remote system via virsh
A simple command-line example of a virsh binary for a remote connection would be as follows:
virsh --connect qemu+ssh://[email protected]/system list ––all
Let's take a look at the source code now. We can get the libvirt source code from the libvirt Git repository:
[root@kvmsource]# yum -y install git-core
[root@kvmsource]# git clone git://libvirt.org/libvirt.git
Once you clone the repo, you can see the following hierarchy of files in the repo:

Figure 2.9 – QEMU source content, downloaded via Git
libvirt code is based on the C programming language; however, libvirt has language bindings in different languages, such as C#, Java, OCaml, Perl, PHP, Python, Ruby, and so on. For more details on these bindings, please refer to https://libvirt.org/bindings.html. The main (and few) directories in the source code are docs, daemon, src, and so on. The libvirt project is well documented and the documentation is available in the source code repo and also at http://libvirt.org.
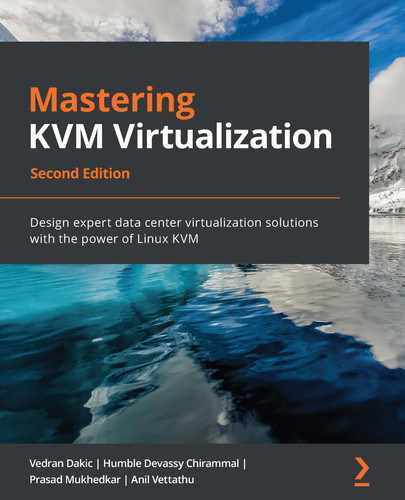
libvirt uses a driver-based architecture, which enables libvirt to communicate with various external hypervisors. This means that libvirt has internal drivers that are used to interface with other hypervisors and solutions, such as LXC, Xen, QEMU, VirtualBox, Microsoft Hyper-V, bhyve (BSD hypervisor), IBM PowerVM, OpenVZ (open Virtuozzo container-based solution), and others, as shown in the following diagram:
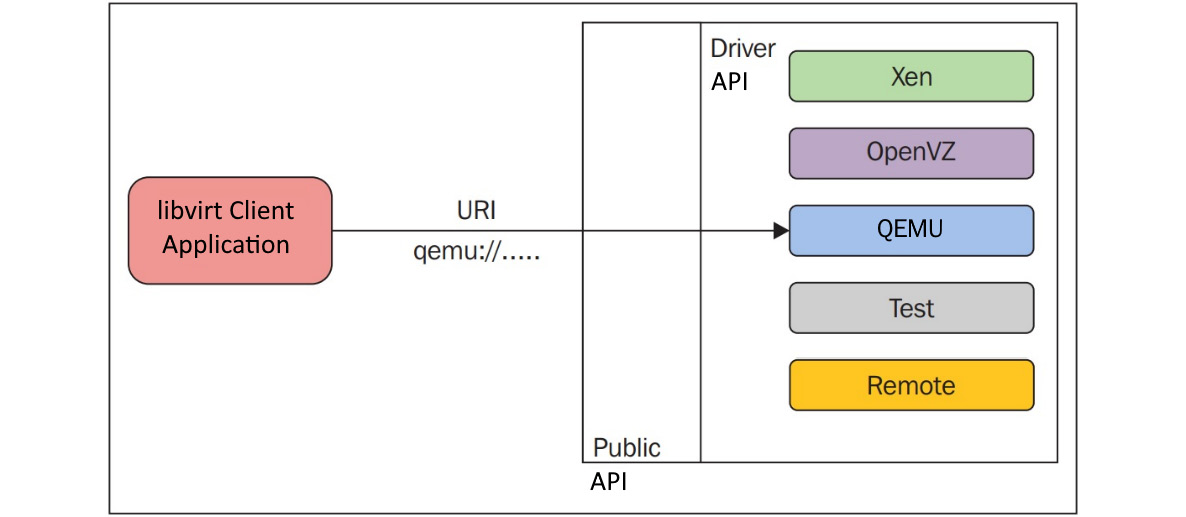
Figure 2.10 – Driver-based architecture
The ability to connect to various virtualization solutions gets us much more usability out of the virsh command. This might come in very handy in mixed environments, such as if you're connecting to both KVM and XEN hypervisors from the same system.
As in the preceding figure, there is a public API that is exposed to the outside world. Depending on the connection URI (for example, virsh --connect QEMU://xxxx/system) passed by the clients, when initializing the library, this public API uses internal drivers in the background. Yes, there are different categories of driver implementations in libvirt. For example, there are hypervisor, interface, network, nodeDevice, nwfilter, secret, storage, and so on. Refer to driver.h inside the libvirt source code to learn about the driver data structures and other functions associated with the different drivers.
Take the following example:
struct _virConnectDriver {
virHypervisorDriverPtr hypervisorDriver;
virInterfaceDriverPtr interfaceDriver;
virNetworkDriverPtr networkDriver;
virNodeDeviceDriverPtr nodeDeviceDriver;
virNWFilterDriverPtr nwfilterDriver;
virSecretDriverPtr secretDriver;
virStorageDriverPtr storageDriver;
};
The struct fields are self-explanatory and convey which type of driver is represented by each of the field members. As you might have assumed, one of the important or main drivers is the hypervisor driver, which is the driver implementation of different hypervisors supported by libvirt. The drivers are categorized as primary and secondary drivers. The hypervisor driver is an example of a primary driver. The following list gives us some idea about the hypervisors supported by libvirt. In other words, hypervisor-level driver implementations exist for the following hypervisors (check the README and the libvirt source code):
- bhyve: The BSD hypervisor
- esx/: VMware ESX and GSX support using vSphere API over SOAP
- hyperv/: Microsoft Hyper-V support using WinRM
- lxc/: Linux native containers
- openvz/: OpenVZ containers using CLI tools
- phyp/: IBM Power Hypervisor using CLI tools over SSH
- qemu/: QEMU/KVM using the QEMU CLI/monitor
- remote/: Generic libvirt native RPC client
- test/: A mock driver for testing
- uml/: User-mode Linux
- vbox/: VirtualBox using the native API
- vmware/: VMware Workstation and Player using the vmrun tool
- xen/: Xen using hypercalls, XenD SEXPR, and XenStore
- xenapi: Xen using libxenserver
Previously, we mentioned that there are secondary-level drivers as well. Not all, but some secondary drivers (see the following) are shared by several hypervisors. That said, currently, these secondary drivers are used by hypervisors such as the LXC, OpenVZ, QEMU, UML, and Xen drivers. The ESX, Hyper-V, Power Hypervisor, Remote, Test, and VirtualBox drivers all implement secondary drivers directly.
Examples of secondary-level drivers include the following:
- cpu/: CPU feature management
- interface/: Host network interface management
- network/: Virtual NAT networking
- nwfilter/: Network traffic filtering rules
- node_device/: Host device enumeration
- secret/: Secret management
- security/: Mandatory access control drivers
- storage/: Storage management drivers
libvirt is heavily involved in regular management operations, such as the creating and managing of virtual machines (guest domains). Additional secondary drivers are consumed to perform these operations, such as interface setup, firewall rules, storage management, and general provisioning of APIs. The following is from https://libvirt.org/api.html:
The following figure shows the five main objects exported by the API and the connections between them:
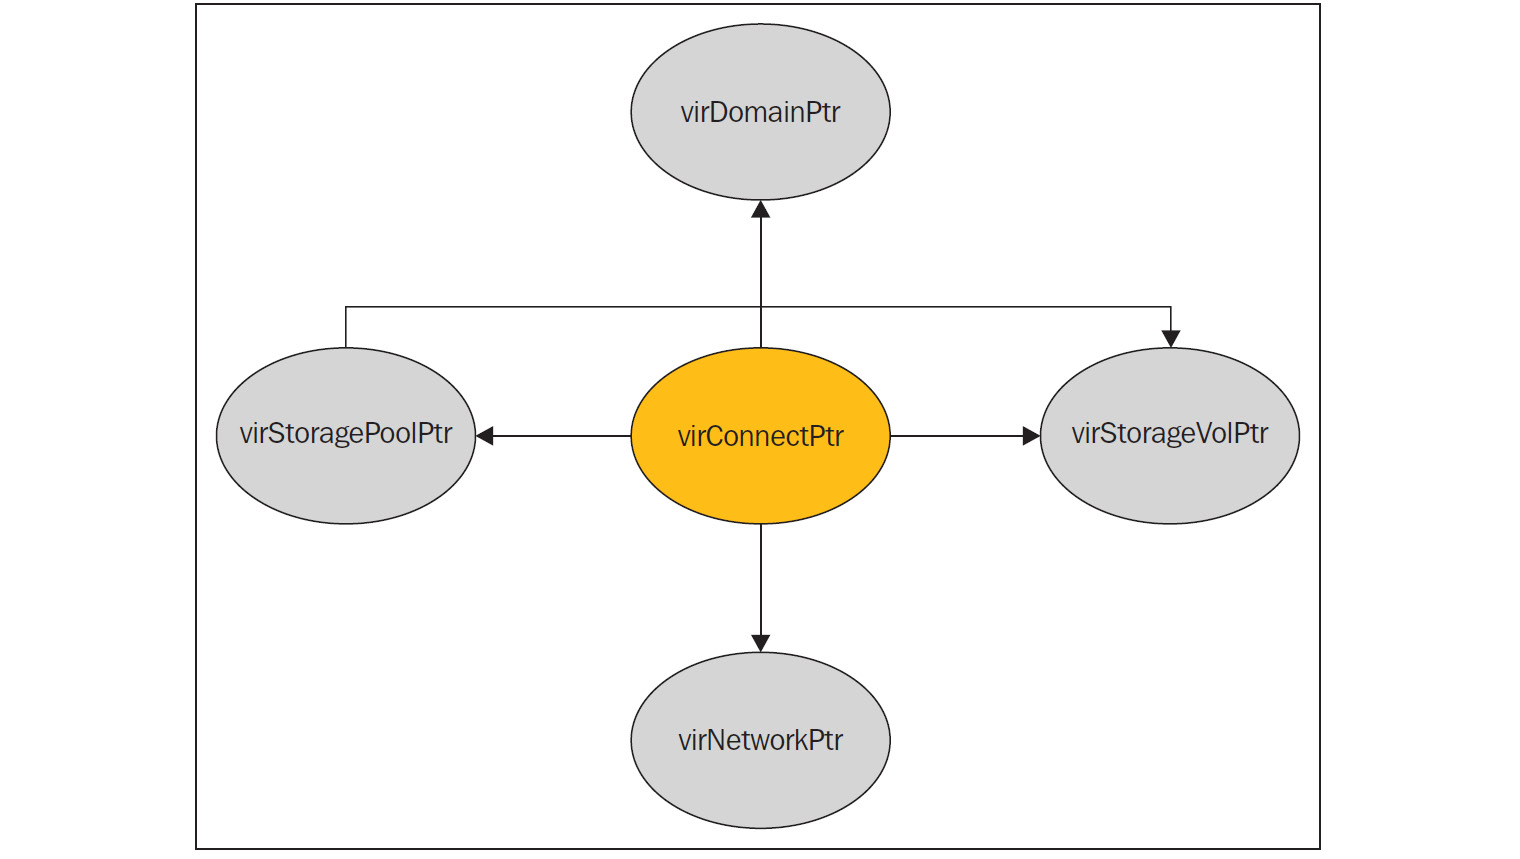
Figure 2.11 – Exported API objects and their communication
Let's give some details about the main objects available in the libvirt code. Most functions inside libvirt make use of these objects for their operations:
- virConnectPtr: As we discussed earlier, libvirt has to connect to a hypervisor and act. The connection to the hypervisor has been represented as this object. This object is one of the core objects in libvirt's API.
- virDomainPtr: Virtual machines or guest systems are generally referred to as domains in libvirt code. virDomainPtr represents an object to an active/defined domain/virtual machine.
- virStorageVolPtr: There are different storage volumes, exposed to the domains/guest systems. virStorageVolPtr generally represents one of the volumes.
- virStoragePoolPtr: The exported storage volumes are part of one of the storage pools. This object represents one of the storage pools.
- virNetworkPtr: In libvirt, we can define different networks. A single virtual network (active/defined status) is represented by the virNetworkPtr object.
You should now have some idea about the internal structure of libvirt implementations; this can be expanded further:
Figure 2.12 – libvirt source code
Our area of interest is QEMU/KVM. So, let's explore it further. Inside the src directory of the libvirt source code repository, there is a directory for QEMU hypervisor driver implementation code. Pay some attention to the source files, such as qemu_driver.c, which carries core driver methods for managing QEMU guests.
See the following example:
static virDrvOpenStatus qemuConnectOpen(virConnectPtr conn,
virConnectAuthPtr auth ATTRIBUTE_UNUSED,
unsigned int flags)
libvirt makes use of different driver codes to probe the underlying hypervisor/emulator. In the context of this book, the component of libvirt responsible for finding out the QEMU/KVM presence is the QEMU driver code. This driver probes for the qemu-kvm binary and the /dev/kvm device node to confirm that the KVM fully virtualized hardware-accelerated guests are available. If these are not available, the possibility of a QEMU emulator (without KVM) is verified with the presence of binaries such as qemu, qemu-system-x86_64, qemu-system-mips, qemu-system-microblaze, and so on.
The validation can be seen in qemu_capabilities.c:
from (qemu_capabilities.c)
static int virQEMUCapsInitGuest ( .., .. , virArch hostarch, virArch guestarch)
{
...
binary = virQEMUCapsFindBinaryForArch (hostarch, guestarch);
...
native_kvm = (hostarch == guestarch);
x86_32on64_kvm = (hostarch == VIR_ARCH_X86_64 && guestarch == VIR_ARCH_I686);
...
if (native_kvm || x86_32on64_kvm || arm_32on64_kvm || ppc64_kvm) {
const char *kvmbins[] = {
"/usr/libexec/qemu-kvm", /* RHEL */
"qemu-kvm", /* Fedora */
"kvm", /* Debian/Ubuntu */ …};
...
kvmbin = virFindFileInPath(kvmbins[i]);
...
virQEMUCapsInitGuestFromBinary (caps, binary, qemubinCaps, kvmbin, kvmbinCaps,guestarch);
...
}
Then, KVM enablement is performed as shown in the following code snippet:
int virQEMUCapsInitGuestFromBinary(..., *binary, qemubinCaps, *kvmbin, kvmbinCaps, guestarch)
{
……...
if (virFileExists("/dev/kvm") && (virQEMUCapsGet(qemubinCaps, QEMU_CAPS_KVM) ||
virQEMUCapsGet(qemubinCaps, QEMU_CAPS_ENABLE_KVM) || kvmbin))
haskvm = true;
Basically, libvirt's QEMU driver is looking for different binaries in different distributions and different paths – for example, qemu-kvm in RHEL/Fedora. Also, it finds a suitable QEMU binary based on the architecture combination of both host and guest. If both the QEMU binary and KVM are found, then KVM is fully virtualized and hardware-accelerated guests will be available. It's also libvirt's responsibility to form the entire command-line argument for the QEMU-KVM process. Finally, after forming the entire command-line (qemu_command.c) arguments and inputs, libvirt calls exec() to create a QEMU-KVM process:
util/vircommand.c
static int virExec(virCommandPtr cmd) {
…...
if (cmd->env)
execve(binary, cmd->args, cmd->env);
else
execv(binary, cmd->args);
In KVMland, there is a misconception that libvirt directly uses the device file (/dev/kvm) exposed by KVM kernel modules, and instructs KVM to do the virtualization via the different ioctl() function calls available with KVM. This is indeed a misconception! As mentioned earlier, libvirt spawns the QEMU-KVM process and QEMU talks to the KVM kernel modules. In short, QEMU talks to KVM via different ioctl() to the /dev/kvm device file exposed by the KVM kernel module. To create a virtual machine (for example, virsh create), all libvirt does is spawn a QEMU process, which in turn creates the virtual machine. Please note that a separate QEMU-KVM process is launched for each virtual machine by libvirtd. Properties of virtual machines (the number of CPUs, memory size, I/O device configuration, and so on) are defined in separate XML files that are located in the /etc/libvirt/qemu directory. These XML files contain all of the necessary settings that QEMU-KVM processes need to start running virtual machines. libvirt clients issue requests via the AF_UNIX socket /var/run/libvirt/libvirt-sock that libvirtd is listening on.
The next topic on our list is QEMU – what it is, how it works, and how it interacts with KVM.
QEMU
QEMU was written by Fabrice Bellard (creator of FFmpeg). It's a free piece of software and mainly licensed under GNU's General Public License (GPL). QEMU is a generic and open source machine emulator and virtualizer. When used as a machine emulator, QEMU can run OSes and programs made for one machine (such as an ARM board) on a different machine (such as your own PC).
By using dynamic translation, it achieves very good performance (see https://www.qemu.org/). Let me rephrase the preceding paragraph and give a more specific explanation. QEMU is actually a hosted hypervisor/VMM that performs hardware virtualization. Are you confused? If so, don't worry. You will get a better picture by the end of this chapter, especially when you go through each of the interrelated components and correlate the entire path used here to perform virtualization. QEMU can act as an emulator or virtualizer.
QEMU as an emulator
In the previous chapter, we discussed binary translation. When QEMU operates as an emulator, it is capable of running OSes/programs made for one machine type on a different machine type. How is this possible? It just uses binary translation methods. In this mode, QEMU emulates CPUs through dynamic binary translation techniques and provides a set of device models. Thus, it is enabled to run different unmodified guest OSes with different architectures. Binary translation is needed here because the guest code has to be executed in the host CPU. The binary translator that does this job is known as a Tiny Code Generator (TCG); it's a Just-In-Time (JIT) compiler. It transforms the binary code written for a given processor into another form of binary code (such as ARM in X86), as shown in the following diagram (TCG information from Wikipedia at https://en.wikipedia.org/wiki/QEMU#Tiny_Code_Generator):

Figure 2.13 – TCG in QEMU
By using this approach, QEMU can sacrifice a bit of execution speed for much broader compatibility. Keeping in mind that most environments nowadays are based around different OSes, this seems like a sensible trade-off.
QEMU as a virtualizer
This is the mode where QEMU executes the guest code directly on the host CPU, thus achieving native performance. For example, when working under Xen/KVM hypervisors, QEMU can operate in this mode. If KVM is the underlying hypervisor, QEMU can virtualize embedded guests such as Power PC, S390, x86, and so on. In short, QEMU is capable of running without KVM using the aforementioned binary translation method. This execution will be slower compared to the hardware-accelerated virtualization enabled by KVM. In any mode, either as a virtualizer or emulator, QEMU not only emulates the processor; it also emulates different peripherals, such as disks, networks, VGA, PCI, serial and parallel ports, USB, and so on. Apart from this I/O device emulation, when working with KVM, QEMU-KVM creates and initializes virtual machines. As shown in the following diagram, it also initializes different POSIX threads for each virtual CPU (vCPU) of a guest. It also provides a framework that's used to emulate the virtual machine's physical address space within the user-mode address space of QEMU-KVM:

Figure 2.14 – QEMU as a virtualizer
To execute the guest code in the physical CPU, QEMU makes use of POSIX threads. That being said, the guest vCPUs are executed in the host kernel as POSIX threads. This itself brings lots of advantages, as these are just some processes for the host kernel at a high-level view. From another angle, the user-space part of the KVM hypervisor is provided by QEMU. QEMU runs the guest code via the KVM kernel module. When working with KVM, QEMU also does I/O emulation, I/O device setup, live migration, and so on.
QEMU opens the device file (/dev/kvm) that's exposed by the KVM kernel module and executes ioctl() function calls on it. Please refer to the next section on KVM to find out more about these ioctl()function calls. To conclude, KVM makes use of QEMU to become a complete hypervisor. KVM is an accelerator or enabler of the hardware virtualization extensions (VMX or SVM) provided by the processor so that they're tightly coupled with the CPU architecture. Indirectly, this conveys that virtual systems must also use the same architecture to make use of hardware virtualization extensions/capabilities. Once it is enabled, it will definitely give better performance than other techniques, such as binary translation.
Our next step is to check how QEMU fits into the whole KVM story.
QEMU – KVM internals
Before we start looking into QEMU internals, let's clone the QEMU Git repository:
# git clone git://git.qemu-project.org/qemu.git
Once it's cloned, you can see a hierarchy of files inside the repo, as shown in the following screenshot:
Figure 2.15 – QEMU source code
Some important data structures and ioctl() function calls make up the QEMU userspace and KVM kernel space. Some of the important data structures are KVMState, CPU{X86}State, MachineState, and so on. Before we further explore the internals, I would like to point out that covering them in detail is beyond the scope of this book; however, I will give enough pointers to understand what is happening under the hood and give additional references for further explanation.
Data structures
In this section, we will discuss some of the important data structures of QEMU. The KVMState structure contains important file descriptors of virtual machine representation in QEMU. For example, it contains the virtual machine file descriptor, as shown in the following code:
struct KVMState ( kvm-all.c )
{ …..
int fd;
int vmfd;
int coalesced_mmio;
struct kvm_coalesced_mmio_ring *coalesced_mmio_ring; ….}
QEMU-KVM maintains a list of CPUX86State structures, one structure for each vCPU. The content of general-purpose registers (as well as RSP and RIP) is part of CPUX86State:
struct CPUState {
…..
int nr_cores;
int nr_threads;
…
int kvm_fd;
….
struct KVMState *kvm_state;
struct kvm_run *kvm_run
}
Also, CPUX86State looks into the standard registers for exception and interrupt handling:
typedef struct CPUX86State ( target/i386/cpu.h )
{
/* standard registers */
target_ulong regs[CPU_NB_REGS];
….
uint64_t system_time_msr;
uint64_t wall_clock_msr;
…….
/* exception/interrupt handling */
int error_code;
int exception_is_int;
…...
}
Various ioctl() function calls exist: kvm_ioctl(), kvm_vm_ioctl(), kvm_vcpu_ioctl(), kvm_device_ioctl(), and so on. For function definitions, please visit KVM-all.c inside the QEMU source code repo. These ioctl() function calls fundamentally map to the system KVM, virtual machine, and vCPU levels. These ioctl() function calls are analogous to the ioctl()function calls categorized by KVM. We will discuss this when we dig further into KVM internals. To get access to these ioctl() function calls exposed by the KVM kernel module, QEMU-KVM has to open /dev/kvm, and the resulting file descriptor is stored in KVMState->fd:
- kvm_ioctl(): These ioctl() function calls mainly execute on the KVMState->fd parameter, where KVMState->fd carries the file descriptor obtained by opening /dev/kvm – as in the following example:
kvm_ioctl(s, KVM_CHECK_EXTENSION, extension);
kvm_ioctl(s, KVM_CREATE_VM, type);
- kvm_vm_ioctl(): These ioctl() function calls mainly execute on the KVMState->vmfd parameter – as in the following example:
kvm_vm_ioctl(s, KVM_CREATE_VCPU, (void *)vcpu_id);
kvm_vm_ioctl(s, KVM_SET_USER_MEMORY_REGION, &mem);
- kvm_vcpu_ioctl(): These ioctl() function calls mainly execute on the CPUState->kvm_fd parameter, which is a vCPU file descriptor for KVM – as in the following example:
kvm_vcpu_ioctl(cpu, KVM_RUN, 0);
- kvm_device_ioctl(): These ioctl() function calls mainly execute on the device fd parameter – as in the following example:
kvm_device_ioctl(dev_fd, KVM_HAS_DEVICE_ATTR, &attribute) ? 0 : 1;
kvm-all.c is one of the important source files when considering QEMU KVM communication.
Now, let's move on and see how a virtual machine and vCPUs are created and initialized by QEMU in the context of KVM virtualization.
kvm_init() is the function that opens the KVM device file, as shown in the following code, and it also fills fd [1] and vmfd [2] of KVMState:
static int kvm_init(MachineState *ms)
{
…..
KVMState *s;
s = KVM_STATE(ms->accelerator);
…
s->vmfd = -1;
s->fd = qemu_open("/dev/kvm", O_RDWR); ----> [1]
..
do {
ret = kvm_ioctl(s, KVM_CREATE_VM, type); --->[2]
} while (ret == -EINTR);
s->vmfd = ret;
….
ret = kvm_arch_init(ms, s); ---> ( target-i386/kvm.c: )
.....
}
As you can see in the preceding code, the ioctl() function call with the KVM_CREATE_VM argument will return vmfd. Once QEMU has fd and vmfd, one more file descriptor has to be filled, which is just kvm_fd or vcpu fd. Let's see how this is filled by QEMU:
main() ->
-> cpu_init(cpu_model); [#define cpu_init(cpu_model) CPU(cpu_x86_init(cpu_model)) ]
->cpu_x86_create()
->qemu_init_vcpu
->qemu_kvm_start_vcpu()
->qemu_thread_create
->qemu_kvm_cpu_thread_fn()
-> kvm_init_vcpu(CPUState *cpu)
int kvm_init_vcpu(CPUState *cpu)
{
KVMState *s = kvm_state;
...
ret = kvm_vm_ioctl(s, KVM_CREATE_VCPU, (void *)kvm_arch_vcpu_id(cpu));
cpu->kvm_fd = ret; ---> [vCPU fd]
..
mmap_size = kvm_ioctl(s, KVM_GET_VCPU_MMAP_SIZE, 0);
cpu->kvm_run = mmap(NULL, mmap_size, PROT_READ | PROT_WRITE, MAP_SHARED, cpu->kvm_fd, 0); [3]
...
ret = kvm_arch_init_vcpu(cpu); [target-i386/kvm.c]
…..
}
Some of the memory pages are shared between the QEMU-KVM process and the KVM kernel modules. You can see such a mapping in the kvm_init_vcpu() function. That said, two host memory pages per vCPU make a channel for communication between the QEMU user-space process and the KVM kernel modules: kvm_run and pio_data. Also understand that, during the execution of these ioctl() function calls that return the preceding fds, the Linux kernel allocates a file structure and related anonymous nodes. We will discuss the kernel part later when discussing KVM.
We have seen that vCPUs are posix threads created by QEMU-KVM. To run guest code, these vCPU threads execute an ioctl() function call with KVM_RUN as its argument, as shown in the following code:
int kvm_cpu_exec(CPUState *cpu) {
struct kvm_run *run = cpu->kvm_run;
..
run_ret = kvm_vcpu_ioctl(cpu, KVM_RUN, 0);
...
}
The same function, kvm_cpu_exec(), also defines the actions that need to be taken when the control comes back to the QEMU-KVM userspace from KVM with VM exit. Even though we will discuss later on how KVM and QEMU communicate with each other to perform an operation on behalf of the guest, let me touch upon this here. KVM is an enabler of hardware extensions provided by vendors such as Intel and AMD with their virtualization extensions such as SVM and VMX. These extensions are used by KVM to directly execute the guest code on host CPUs. However, if there is an event – for example, as part of an operation, guest kernel code access hardware device register, which is emulated by the QEMU – then KVM has to exit back to QEMU and pass control. Then, QEMU can emulate the outcome of the operation. There are different exit reasons, as shown in the following code:
switch (run->exit_reason) {
case KVM_EXIT_IO:
DPRINTF("handle_io ");
case KVM_EXIT_MMIO:
DPRINTF("handle_mmio ");
case KVM_EXIT_IRQ_WINDOW_OPEN:
DPRINTF("irq_window_open ");
case KVM_EXIT_SHUTDOWN:
DPRINTF("shutdown ");
case KVM_EXIT_UNKNOWN:
...
case KVM_EXIT_INTERNAL_ERROR:
…
case KVM_EXIT_SYSTEM_EVENT:
switch (run->system_event.type) {
case KVM_SYSTEM_EVENT_SHUTDOWN:
case KVM_SYSTEM_EVENT_RESET:
case KVM_SYSTEM_EVENT_CRASH:
Now that we know about QEMU-KVM internals, let's discuss the threading models in QEMU.
Threading models in QEMU
QEMU-KVM is a multithreaded, event-driven (with a big lock) application. The important threads are as follows:
- Main thread
- Worker threads for the virtual disk I/O backend
- One thread for each vCPU
For each and every virtual machine, there is a QEMU process running in the host system. If the guest system is shut down, this process will be destroyed/exited. Apart from vCPU threads, there are dedicated I/O threads running a select (2) event loop to process I/O, such as network packets and disk I/O completion. I/O threads are also spawned by QEMU. In short, the situation will look like this:

Figure 2.16 – KVM guest
Before we discuss this further, there is always a question about the physical memory of guest systems: where is it located? Here is the deal: the guest RAM is assigned inside the QEMU process's virtual address space, as shown in the preceding figure. That said, the physical RAM of the guest is inside the QEMU process address space.
Important note
More details about threading can be fetched from the threading model at blog.vmsplice.net/2011/03/qemu-internals-overall-architecutre-and-html?m=1.
The event loop thread is also called iothread. Event loops are used for timers, file descriptor monitoring, and so on. main_loop_wait() is the QEMU main event loop thread. This main event loop thread is responsible for main loop services, including file descriptor callbacks, bottom halves, and timers (defined in qemu-timer.h). Bottom halves are similar to timers that execute immediately but have lower overhead, and scheduling them is wait-free, thread-safe, and signal-safe.
Before we leave the QEMU code base, I would like to point out that there are mainly two parts to device codes. For example, the directory block contains the host side of the block device code, and hw/block/ contains the code for device emulation.
KVM
There is a common kernel module called kvm.ko and also hardware-based kernel modules such as kvm-intel.ko (Intel-based systems) and kvm-amd.ko (AMD-based systems). Accordingly, KVM will load the kvm-intel.ko (if the vmx flag is present) or kvm-amd.ko (if the svm flag is present) modules. This turns the Linux kernel into a hypervisor, thus achieving virtualization.
KVM exposes a device file called /dev/kvm to applications so that they can make use of the ioctl() function calls system calls provided. QEMU makes use of this device file to talk with KVM and create, initialize, and manage the kernel-mode context of virtual machines.
Previously, we mentioned that the QEMU-KVM userspace hosts the virtual machine's physical address space within the user-mode address space of QEMU/KVM, which includes memory-mapped I/O. KVM helps us achieve that. There are more things that can be achieved with the help of KVM. The following are some examples:
- Emulation of certain I/O devices; for example, (via MMIO) the per-CPU local APIC and the system-wide IOAPIC.
- Emulation of certain privileged (R/W of system registers CR0, CR3, and CR4) instructions.
- The facilitation to run guest code via VMENTRY and handling intercepted events at VMEXIT.
- Injecting events, such as virtual interrupts and page faults, into the flow of the execution of the virtual machine and so on. This is also achieved with the help of KVM.
KVM is not a full hypervisor; however, with the help of QEMU and emulators (a slightly modified QEMU for I/O device emulation and BIOS), it can become one. KVM needs hardware virtualization-capable processors to operate. Using these capabilities, KVM turns the standard Linux kernel into a hypervisor. When KVM runs virtual machines, every virtual machine is a normal Linux process, which can obviously be scheduled to run on a CPU by the host kernel, as with any other process present in the host kernel. In Chapter 1, Understanding Linux Virtualization, we discussed different CPU modes of execution. As you may recall, there is mainly a user mode and a kernel/supervisor mode. KVM is a virtualization feature in the Linux kernel that lets a program such as QEMU safely execute guest code directly on the host CPU. This is only possible when the target architecture is supported by the host CPU.
However, KVM introduced one more mode called guest mode. In a nutshell, guest mode allows us to execute guest system code. It can either run the guest user or the kernel code. With the support of virtualization-aware hardware, KVM virtualizes the process states, memory management, and so on.
Virtualization from a CPU perspective
With its hardware virtualization capabilities, the processor manages the processor states by using Virtual Machine Control Structure (VMCS) and Virtual Machine Control Block (VMCB) for the host and guest OSes, and it also manages the I/O and interrupts on behalf of the virtualized OS. That being said, with the introduction of this type of hardware, tasks such as CPU instruction interception, register read/write support, memory management support (Extended Page Tables (EPTs) and Nested Paging Table (NPT)), interrupt handling support (APICv), IOMMU, and so on came into the picture. KVM uses the standard Linux scheduler, memory management, and other services. In short, what KVM does is help the userspace program make use of hardware virtualization capabilities. Here, you can treat QEMU as a userspace program as it's well integrated for different use cases. When I say hardware-accelerated virtualization, I am mainly referring to Intel VT-X and AMD-Vs SVM. Introducing virtualization technology processors brought about an extra instruction set called VMX.
With Intel's VT-X, the VMM runs in VMX root operation mode, while the guests (which are unmodified OSes) run in VMX non-root operation mode. This VMX brings additional virtualization-specific instructions to the CPU, such as VMPTRLD, VMPTRST, VMCLEAR, VMREAD, VMWRITE, VMCALL, VMLAUNCH, VMRESUME, VMXOFF, and VMXON. The virtualization mode (VMX) is turned on by VMXON and can be disabled by VMXOFF. To execute the guest code, we have to use VMLAUNCH/VMRESUME instructions and leave VMEXIT. But wait, leave what? It's a transition from non-root operation to root operation. Obviously, when we do this transition, some information needs to be saved so that it can be fetched later. Intel provides a structure to facilitate this transition called VMCS; it handles much of the virtualization management functionality. For example, in the case of VMEXIT, the exit reason will be recorded inside this structure. Now, how do we read or write from this structure? VMREAD and VMWRITE instructions are used to read or write to the respective fields.
Previously, we discussed SLAT/EPT/AMD-Vi. Without EPT, the hypervisor must exit the virtual machine to perform address translations, which reduces performance. As we noticed in Intel's virtualization-based processors' operating modes, AMD's SVM also has a couple of operating modes, which are nothing but host mode and guest mode. As you may have assumed, the hypervisor runs in host mode and the guests run in guest mode. Obviously, when in guest mode, some instructions can cause VMEXIT exceptions, which are handled in a manner that is specific to the way guest mode is entered. There should be an equivalent structure of VMCS here, and it is called VMCB; as discussed earlier, it contains the reason for VMEXIT. AMD added eight new instruction opcodes to support SVMs. For example, the VMRUN instruction starts the operation of a guest OS, the VMLOAD instruction loads the processor state from the VMCB, and the VMSAVE instruction saves the processor state to the VMCB. That's why AMD introduced nested paging, which is similar to EPT in Intel.
When we discussed hardware virtualization extensions, we touched upon VMCS and VMCB. These are important data structures when we think about hardware-accelerated virtualization. These control blocks especially help in VMEXIT scenarios. Not every operation can be allowed for guests; at the same time, it's also difficult if the hypervisor does everything on behalf of the guest. Virtual machine control structures, such as VMCS or VMCB, control this behavior. Some operations are allowed for guests, such as changing some bits in shadowed control registers, but others are not. This clearly provides fine-grained control over what guests are allowed to do and not do. VMCS control structures also provide control over interrupt delivery and exceptions. Previously, we said the exit reason of VMEXIT is recorded inside the VMCS; it also contains some data about it. For example, if write access to a control register caused the exit, information about the source and destination registers is recorded there.
Please take note of the VMCS or VMCB store guest configuration specifics, such as machine control bits and processor register settings. I suggest that you examine the structure definitions from the source. These data structures are also used by the hypervisor to define events to monitor while the guest is executing. These events can be intercepted. Note that these structures are in the host memory. At the time of using VMEXIT, the guest state is saved in VMCS. As mentioned earlier, the VMREAD instruction reads the specified field from the VMCS, while the VMWRITE instruction writes the specified field to the VMCS. Also, note that there is one VMCS or VMCB per vCPU. These control structures are part of the host memory. The vCPU state is recorded in these control structures.
KVM APIs
As mentioned earlier, there are three main types of ioctl() function calls. The kernel docs says the following (you can check it at https://www.kernel.org/doc/Documentation/virtual/kvm/api.txt):
To find out more about the ioctl() function calls exposed by KVM and the ioctl() function calls that belong to a particular group of fd, please refer to KVM.h.
See the following example:
/* ioctls for /dev/kvm fds: */
#define KVM_GET_API_VERSION _IO(KVMIO, 0x00)
#define KVM_CREATE_VM _IO(KVMIO, 0x01) /* returns a VM fd */
…..
/* ioctls for VM fds */
#define KVM_SET_MEMORY_REGION _IOW(KVMIO, 0x40, struct kvm_memory_region)
#define KVM_CREATE_VCPU _IO(KVMIO, 0x41)
…
/* ioctls for vcpu fds */
#define KVM_RUN _IO(KVMIO, 0x80)
#define KVM_GET_REGS _IOR(KVMIO, 0x81, struct kvm_regs)
#define KVM_SET_REGS _IOW(KVMIO, 0x82, struct kvm_regs)
Let's now discuss anonymous inodes and file structures.
Anonymous inodes and file structures
Previously, when we discussed QEMU, we said the Linux kernel allocates file structures and sets its f_ops and anonymous inodes. Let's look at the kvm_main.c file:
static struct file_operations kvm_chardev_ops = {
.unlocked_ioctl = kvm_dev_ioctl,
.llseek = noop_llseek,
KVM_COMPAT(kvm_dev_ioctl),
};
kvm_dev_ioctl ()
switch (ioctl) {
case KVM_GET_API_VERSION:
if (arg)
goto out;
r = KVM_API_VERSION;
break;
case KVM_CREATE_VM:
r = kvm_dev_ioctl_create_vm(arg);
break;
case KVM_CHECK_EXTENSION:
r = kvm_vm_ioctl_check_extension_generic(NULL, arg);
break;
case KVM_GET_VCPU_MMAP_SIZE:
. …..
}
Like kvm_chardev_fops, there are kvm_vm_fops and kvm_vcpu_fops:
static struct file_operations kvm_vm_fops = {
.release = kvm_vm_release,
.unlocked_ioctl = kvm_vm_ioctl,
…..
.llseek = noop_llseek,
};
static struct file_operations kvm_vcpu_fops = {
.release = kvm_vcpu_release,
.unlocked_ioctl = kvm_vcpu_ioctl,
….
.mmap = kvm_vcpu_mmap,
.llseek = noop_llseek,
};
An inode allocation may be seen as follows:
anon_inode_getfd(name, &kvm_vcpu_fops, vcpu, O_RDWR | O_CLOEXEC);
Let's have a look at the data structures now.
Data structures
From the perspective of the KVM kernel modules, each virtual machine is represented by a kvm structure:
include/linux/kvm_host.h :
struct kvm {
...
struct mm_struct *mm; /* userspace tied to this vm */
...
struct kvm_vcpu *vcpus[KVM_MAX_VCPUS];
....
struct kvm_io_bus __rcu *buses[KVM_NR_BUSES];
….
struct kvm_coalesced_mmio_ring *coalesced_mmio_ring;
…..
}
As you can see in the preceding code, the kvm structure contains an array of pointers to kvm_vcpu structures, which are the counterparts of the CPUX86State structures in the QEMU-KVM userspace. A kvm_vcpu structure consists of a common part and an x86 architecture-specific part, which includes the register content:
struct kvm_vcpu {
...
struct kvm *kvm;
int cpu;
…..
int vcpu_id;
…..
struct kvm_run *run;
…...
struct kvm_vcpu_arch arch;
…
}
The x86 architecture-specific part of the kvm_vcpu structure contains fields to which the guest register state can be saved after a virtual machine exit and from which the guest register state can be loaded before a virtual machine entry:
arch/x86/include/asm/kvm_host.h
struct kvm_vcpu_arch {
..
unsigned long regs[NR_VCPU_REGS];
unsigned long cr0;
unsigned long cr0_guest_owned_bits;
…..
struct kvm_lapic *apic; /* kernel irqchip context */
..
struct kvm_mmu mmu;
..
struct kvm_pio_request pio;
void *pio_data;
..
/* emulate context */
struct x86_emulate_ctxt emulate_ctxt;
...
int (*complete_userspace_io)(struct kvm_vcpu *vcpu);
….
}
As you can see in the preceding code, kvm_vcpu has an associated kvm_run structure used for the communication (with pio_data) between the QEMU userspace and the KVM kernel module, as mentioned earlier. For example, in the context of VMEXIT, to satisfy the emulation of virtual hardware access, KVM has to return to the QEMU userspace process; KVM stores the information in the kvm_run structure for QEMU to fetch it:
/include/uapi/linux/kvm.h:
/* for KVM_RUN, returned by mmap(vcpu_fd, offset=0) */
struct kvm_run {
/* in */
...
/* out */
...
/* in (pre_kvm_run), out (post_kvm_run) */
...
union {
/* KVM_EXIT_UNKNOWN */
...
/* KVM_EXIT_FAIL_ENTRY */
...
/* KVM_EXIT_EXCEPTION */
...
/* KVM_EXIT_IO */
struct {
#define KVM_EXIT_IO_IN 0
#define KVM_EXIT_IO_OUT 1
...
} io;
...
}
The kvm_run struct is an important data structure; as you can see in the preceding code, union contains many exit reasons, such as KVM_EXIT_FAIL_ENTRY, KVM_EXIT_IO, and so on.
When we discussed hardware virtualization extensions, we touched upon VMCS and VMCB. These are important data structures when we think about hardware-accelerated virtualization. These control blocks especially help in VMEXIT scenarios. Not every operation can be allowed for guests; at the same time, it's also difficult if the hypervisor does everything on behalf of the guest. Virtual machine control structures, such as VMCS or VMCB, control the behavior. Some operations are allowed for guests, such as changing some bits in shadowed control registers, but others are not. This clearly provides fine-grained control over what guests are allowed to do and not do. VMCS control structures also provide control over interrupt delivery and exceptions. Previously, we said the exit reason of VMEXIT is recorded inside the VMCS; it also contains some data about it. For example, if write access to a control register caused the exit, information about the source and destination registers is recorded there.
Let's look at some of the important data structures before we dive into the vCPU execution flow.
The Intel-specific implementation is in vmx.c and the AMD-specific implementation is in svm.c, depending on the hardware we have. As you can see, the following kvm_vcpu is part of vcpu_vmx. The kvm_vcpu structure is mainly categorized as a common part and an architecture-specific part. The common part contains the data that is common to all supported architectures and is architecture-specific – for example, the x86 architecture-specific (guest's saved general-purpose registers) part contains the data that is specific to a particular architecture. As discussed earlier, kvm_vCPUs, kvm_run, and pio_data are shared with the userspace.
The vcpu_vmx and vcpu_svm structures (mentioned next) have a kvm_vcpu structure, which consists of an x86-architecture-specific part (struct 'kvm_vcpu_arch') and a common part and also, it points to the vmcs and vmcb structures accordingly. Let's check the Intel (vmx) structure first:
vcpu_vmx structure
struct vcpu_vmx {
struct kvm_vcpu *vcpu;
...
struct loaded_vmcs vmcs01;
struct loaded_vmcs *loaded_vmcs;
….
}
Similarly, let's check the AMD (svm) structure next:
vcpu_svm structure
struct vcpu_svm {
struct kvm_vcpu *vcpu;
…
struct vmcb *vmcb;
….
}
The vcpu_vmx or vcpu_svm structures are allocated by the following code path:
kvm_arch_vcpu_create()
->kvm_x86_ops->vcpu_create
->vcpu_create() [.vcpu_create = svm_create_vcpu, .vcpu_create = vmx_create_vcpu,]
Please note that the VMCS or VMCB store guest configuration specifics such as machine control bits and processor register settings. I would suggest you examine the structure definitions from the source. These data structures are also used by the hypervisor to define events to monitor while the guest is executing. These events can be intercepted and these structures are in the host memory. At the time of VMEXIT, the guest state is saved in VMCS. As mentioned earlier, the VMREAD instruction reads a field from the VMCS, whereas the VMWRITE instruction writes the field to it. Also, note that there is one VMCS or VMCB per vCPU. These control structures are part of the host memory. The vCPU state is recorded in these control structures.
Execution flow of vCPU
Finally, we are into the vCPU execution flow, which helps us put everything together and understand what happens under the hood.
I hope you didn't forget that the QEMU creates a POSIX thread for a vCPU of the guest and ioctl(), which is responsible for running a CPU and has KVM_RUN arg (#define KVM_RUN _IO(KVMIO, 0x80)). The vCPU thread executes ioctl(.., KVM_RUN, ...) to run the guest code. As these are POSIX threads, the Linux kernel can schedule these threads as with any other process/thread in the system.
Let's see how it all works:
Qemu-kvm User Space:
kvm_init_vcpu ()
kvm_arch_init_vcpu()
qemu_init_vcpu()
qemu_kvm_start_vcpu()
qemu_kvm_cpu_thread_fn()
while (1) {
if (cpu_can_run(cpu)) {
r = kvm_cpu_exec(cpu);
}
}
kvm_cpu_exec (CPUState *cpu)
-> run_ret = kvm_vcpu_ioctl(cpu, KVM_RUN, 0);
According to the underlying architecture and hardware, different structures are initialized by the KVM kernel modules and one among them is vmx_x86_ops/svm_x86_ops (owned by either the kvm-intel or kvm-amd module). It defines different operations that need to be performed when the vCPU is in context. KVM makes use of the kvm_x86_ops vector to point either of these vectors according to the KVM module (kvm-intel or kvm-amd) loaded for the hardware. The run pointer defines the function that needs to be executed when the guest vCPU run is in action, and handle_exit defines the actions needed to be performed at the time of VMEXIT. Let's check the Intel (vmx) structure for that:
static struct kvm_x86_ops vmx_x86_ops = {
...
.vcpu_create = vmx_create_vcpu,
.run = vmx_vcpu_run,
.handle_exit = vmx_handle_exit,
…
}
Now, let's see the AMD (svm) structure for that:
static struct kvm_x86_ops svm_x86_ops = {
.vcpu_create = svm_create_vcpu,
.run = svm_vcpu_run,
.handle_exit = handle_exit,
..
}
The run pointer points to vmx_vcpu_run or svm_vcpu_run accordingly. The svm_vcpu_run or vmx_vcpu_run functions do the job of saving KVM host registers, loading guest OS registers, and SVM_VMLOAD instructions. We walked through the QEMU KVM userspace code execution at the time of vcpu run, once it enters the kernel via syscall. Then, following the file operations structures, it calls kvm_vcpu_ioctl(); this defines the action to be taken according to the ioctl() function call it defines:
static long kvm_vcpu_ioctl(struct file *file,
unsigned int ioctl, unsigned long arg) {
switch (ioctl) {
case KVM_RUN:
….
kvm_arch_vcpu_ioctl_run(vcpu, vcpu->run);
->vcpu_load
-> vmx_vcpu_load
->vcpu_run(vcpu);
->vcpu_enter_guest
->vmx_vcpu_run
….
}
We will go through vcpu_run() to understand how it reaches vmx_vcpu_run or svm_vcpu_run:
static int vcpu_run(struct kvm_vcpu *vcpu) {
….
for (;;) {
if (kvm_vcpu_running(vcpu)) {
r = vcpu_enter_guest(vcpu);
} else {
r = vcpu_block(kvm, vcpu);
}
Once it's in vcpu_enter_guest(), you can see some of the important calls happening when it enters guest mode in KVM:
static int vcpu_enter_guest(struct kvm_vcpu *vcpu) {
...
kvm_x86_ops.prepare_guest_switch(vcpu);
vcpu->mode = IN_GUEST_MODE;
__kvm_guest_enter();
kvm_x86_ops->run(vcpu);
[vmx_vcpu_run or svm_vcpu_run ]
vcpu->mode = OUTSIDE_GUEST_MODE;
kvm_guest_exit();
r = kvm_x86_ops->handle_exit(vcpu);
[vmx_handle_exit or handle_exit ]
…
}
You can see a high-level picture of VMENTRY and VMEXIT from the vcpu_enter_guest() function. That said, VMENTRY ([vmx_vcpu_run or svm_vcpu_run]) is just a guest OS executing in the CPU; different intercepted events can occur at this stage, causing VMEXIT. If this happens, any vmx_handle_exit or handle_exit function call will start looking into this exit cause. We have already discussed the reasons for VMEXIT in previous sections. Once there is VMEXIT, the exit reason is analyzed and action is taken accordingly.
vmx_handle_exit() is the function responsible for handling the exit reason:
static int vmx_handle_exit(struct kvm_vcpu *vcpu, , fastpath_t exit_fastpath)
{
….. }
static int (*const kvm_vmx_exit_handlers[])(struct kvm_vcpu *vcpu) = {
[EXIT_REASON_EXCEPTION_NMI] = handle_exception,
[EXIT_REASON_EXTERNAL_INTERRUPT] = handle_external_interrupt,
[EXIT_REASON_TRIPLE_FAULT] = handle_triple_fault,
[EXIT_REASON_IO_INSTRUCTION] = handle_io,
[EXIT_REASON_CR_ACCESS] = handle_cr,
[EXIT_REASON_VMCALL] = handle_vmcall,
[EXIT_REASON_VMCLEAR] = handle_vmclear,
[EXIT_REASON_VMLAUNCH] = handle_vmlaunch,
…
}
kvm_vmx_exit_handlers[] is the table of virtual machine exit handlers, indexed by exit reason. Similar to Intel, the svm code has handle_exit():
static int handle_exit(struct kvm_vcpu *vcpu, fastpath_t exit_fastpath)
{
struct vcpu_svm *svm = to_svm(vcpu);
struct kvm_run *kvm_run = vcpu->run;
u32 exit_code = svm->vmcb->control.exit_code;
….
return svm_exit_handlers[exit_code](svm);
}
handle_exit() has the svm_exit_handler array, as shown in the following section.
If needed, KVM has to fall back to the userspace (QEMU) to perform the emulation as some of the instructions have to be performed on the QEMU emulated devices. For example, to emulate I/O port access, the control goes to the userspace (QEMU):
kvm-all.c:
static int (*const svm_exit_handlers[])(struct vcpu_svm *svm) = {
[SVM_EXIT_READ_CR0] = cr_interception,
[SVM_EXIT_READ_CR3] = cr_interception,
[SVM_EXIT_READ_CR4] = cr_interception,
….
}
switch (run->exit_reason) {
case KVM_EXIT_IO:
DPRINTF("handle_io ");
/* Called outside BQL */
kvm_handle_io(run->io.port, attrs,
(uint8_t *)run + run->io.data_offset,
run->io.direction,
run->io.size,
run->io.count);
ret = 0;
break;
This chapter was a bit source code-heavy. Sometimes, digging in and checking the source code is just about the only way to understand how something works. Hopefully, this chapter managed to do just that.
Summary
In this chapter, we covered the inner workings of KVM and its main partners in Linux virtualization – libvirt and QEMU. We discussed various types of virtualization – binary translation, full, paravirtualization, and hardware-assisted virtualization. We checked a bit of kernel, QEMU, and libvirt source code to learn about their interaction from inside. This gave us the necessary technical know-how to understand the topics that will follow in this book – everything ranging from how to create virtual machines and virtual networks to scaling the virtualization idea to a cloud concept. Understanding these concepts will also make it much easier for you to understand the key goal of virtualization from an enterprise company's perspective – how to properly design a physical and virtual infrastructure, which will slowly but surely be introduced as a concept throughout this book. Now that we've covered the basics about how virtualization works, it's time to move on to a more practical subject – how to deploy the KVM hypervisor, management tools, and oVirt. We'll do this in the next chapter.
Questions
- What is paravirtualization?
- What is full virtualization?
- What is hardware-assisted virtualization?
- What is the primary goal of libvirt?
- What does KVM do? What about QEMU?
Further reading
Please refer to the following links for more information regarding what was covered in this chapter:
- Binary translation: https://pdfs.semanticscholar.org/d6a5/1a7e73f747b309ef5d44b98318065d5267cf.pdf
- Virtualization basics: http://dsc.soic.indiana.edu/publications/virtualization.pdf
- KVM: https://www.redhat.com/en/topics/virtualization/what-is-KVM
- QEMU: https://www.qemu.org/
- Understanding full virtualization, paravirtualization, and hardware assist: https://www.vmware.com/content/dam/digitalmarketing/vmware/en/pdf/techpaper/VMware_paravirtualization.pdf