Chapter 9: Securing Linux
Securing a Linux machine is usually a balancing act. The endgame is essentially protecting data from unwanted access. While there are many ways to achieve this goal, we should adopt the methods that yield maximum protection, along with the most efficient system administration. Gauging the attack and vulnerability surfaces, both internal and external, is always a good start. The rest of the work is building fences and putting on armor – not too high and not too heavy. The outer fence is a network firewall. Internally, at the system level, we build application security policies. This chapter introduces both, albeit the art of the balancing act is left to you.
In the first part of this chapter, we'll look at access control mechanisms and the related security modules – SELinux and AppArmor. In the second part, we will explore packet filtering frameworks and firewall solutions.
After completing this chapter, you will have become acquainted with the tools for designing and managing application security frameworks and firewalls – a first solid step to securing a Linux system.
Here's a brief overview of the topics that will be covered in this chapter:
- Understanding Linux security – an overview of the access control mechanisms available in the Linux kernel
- Introducing SELinux – an in-depth look at the Linux kernel security framework for managing access control policies
- Introducing AppArmor – a relatively new security module that controls application capabilities based on security profiles
- Working with firewalls – a comprehensive overview of firewall modules, including netfilter, iptables, nftables, firewalld, and ufw
Technical requirements
This chapter covers a relatively vast array of topics, some of which will be covered with extensive command-line operations. We recommend that you use both a CentOS and an Ubuntu platform with Terminal or SSH access. Direct console access to the systems is highly preferable due to the possibly disruptive way of altering firewall rules.
Understanding Linux security
One of the significant considerations for securing a computer system or network is the means for system administrators to control how users and processes can access various resources, such as files, devices, and interfaces, across systems. The Linux kernel provides a handful of such mechanisms, collectively referred to as Access Control Mechanisms (ACMs). We will describe them briefly next.
Discretionary Access Control
Discretionary Access Control (DAC) is the typical ACM related to filesystem objects, including files, directories, and devices. Such access is at the discretion of the object's owner when managing permissions. DAC controls the access to objects based on the identity of users and groups (subjects). Depending on a subject's access permissions, they could also pass permissions to other subjects – an administrator managing regular users, for example.
Access Control Lists
Access Control Lists (ACLs) provide control over which subjects (such as users and groups) have access to specific filesystem objects (such as files and directories).
Mandatory Access Control
Mandatory Access Control (MAC) provides different access control levels to subjects over the objects they own. Unlike DAC, where users have full control over the filesystem objects they own, MAC adds additional labels, or categories, to all filesystem objects. Consequently, subjects must have the appropriate access to these categories to interact with the objects labeled as such. MAC is enforced by Security-Enhanced Linux (SELinux) on RHEL/CentOS and AppArmor on Ubuntu/Debian.
Role-Based Access Control
Role-Based Access Control (RBAC) is an alternative to the permission-based access control of filesystem objects. Instead of permissions, a system administrator assigns roles that have access to a specific filesystem object. Roles could be based on some business or functional criteria and may have different access levels to objects.
In contrast to DAC or MAC, where subjects have access to objects based strictly on the permissions involved, the RBAC model represents a logical abstraction over MAC or DAC, as the subjects must be members of a specific group or role before interacting with objects.
Multi-Level Security
Multi-Level Security (MLS) is a specific MAC scheme where the subjects are processes and the objects are files, sockets, and other similar system resources.
Multi-Category Security
Multi-Category Security (MCS) is an improved version of SELinux that allows users to label files with categories. MCS reuses much of the MLS framework in SELinux.
Wrapping up our brief presentation of ACMs, we should note that we covered some of the internals of DAC and ACL in Chapter 4, Managing Users and Groups, in the Managing permissions section in particular. Next, we'll turn our attention to SELinux – a first-class citizen for MAC implementations.
Introducing SELinux
Security-Enhanced Linux (SELinux) is a security framework in the Linux kernel for managing the access control policies of system resources. It supports a combination of the MAC, RBAC, and MLS models that were described in the previous section. SELinux is a set of kernel-space security modules and user-space command-line utilities, and it provides a mechanism for system administrators to have control over who can access what on the system. SELinux is designed to also protect a system against possible misconfigurations and potentially compromised processes.
SELinux was introduced by the National Security Agency (NSA) as a collection of Linux Security Modules (LSMs) with kernel updates. SELinux was eventually released to the open source community in 2000 and into Linux starting with the 2.6 kernel series in 2003.
So, how does SELinux work? We'll look at this next.
Working with SELinux
SELinux uses security policies to define various access control levels for applications, processes, and files on a system. A security policy is a set of rules describing what can or cannot be accessed.
SELinux operates with subjects and objects. When a specific application or process (the subject) requests access to a file (the object), SELinux checks the required permissions involved in the request and enforces the related access control. The permissions for subjects and objects are stored in a lookup table known as the Access Vector Cache (AVC). The AVC is generated based on the SELinux policy database.
A typical SELinux policy consists of the following resources (files), each reflecting a specific aspect of the security policy:
- Type enforcement: The actions that have been granted or denied for the policy (such as, read or write to a file).
- Interface: The application interface the policy interacts with (such as logging).
- File contexts: The system resources associated with the policy (such as log files).
These policy files are compiled together using SELinux build tools to produce a specific security policy. The policy is loaded into the kernel, added to the SELinux policy database, and made active without a system reboot.
When creating SELinux policies, we usually test them in permissive mode first, where violations are logged but still allowed. When violations occur, the audit2allow utility in the SELinux toolset comes to the rescue. We use the log traces produced by audit2allow to create the additional rules required by the policy to account for legitimate access permissions. SELinux violations are logged in /var/log/messages and are prefixed with avc: denied.
The next section will describe the necessary steps for creating an SELinux security policy.
Creating an SELinux security policy
Let's assume that we have a daemon called packtd and that we need to secure it to access /var/log/messages. For illustration purposes, the daemon has a straightforward implementation: periodically open the /var/log/messages file for writing. Use your favorite text editor (such as nano) to add the following content (C code) to a file. Let's name the file packtd.c:
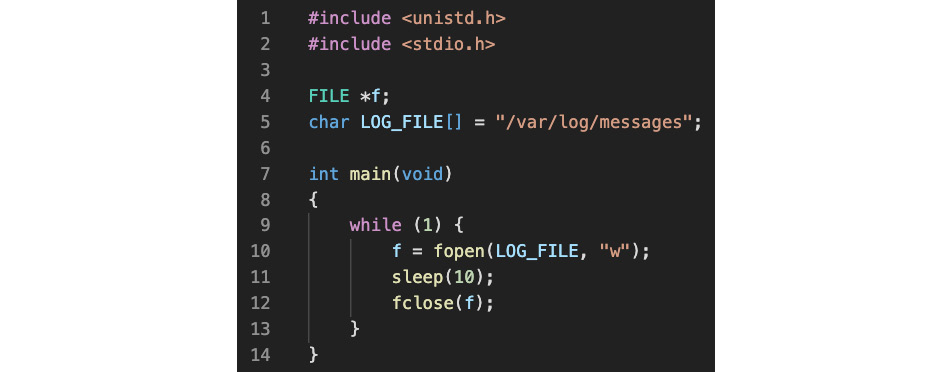
Figure 9.1 – A simple daemon periodically checking logs
Let's compile and build packtd.c to generate the related binary executable (packtd):
gcc -o packtd packtd.c
By default, RHEL/CentOS 8 comes with the gcc GNU compiler installed. Otherwise, you may install it with the following command:
sudo yum install gcc
We are ready to proceed with the steps for creating the packtd daemon and the required SELinux security policy:
- Install the daemon.
- Generate the policy files.
- Build the security policy.
- Verify and adjust the security policy.
Let's start with installing our packtd daemon.
Installing the daemon
First, we must create the systemd unit file for the packtd daemon. You may use your favorite text editor (such as nano) to create the related file. We will call this file packtd.service:

Figure 9.2 – The packtd daemon file
Copy the files we created to their respective locations:
sudo cp packtd /usr/local/bin/
sudo cp packtd.service /usr/lib/systemd/system/
At this point, we are ready to start our packtd daemon:
sudo systemctl start packtd
sudo systemctl status packtd
The status shows the following output:

Figure 9.3 – The status of the packtd daemon
Let's make sure the packtd daemon is not confined or restricted yet by SELinux:
ps -efZ | grep packtd | grep -v grep
The -Z option parameter of ps retrieves the SELinux context for processes. The output of the command is as follows:

Figure 9.4 – SELinux does not restrict the packtd daemon
The unconfined_service_t security attribute suggests that packtd is not restricted by SELinux. Indeed, if we tailed /var/log/messages, we could see the messages logged by packtd:
sudo tail -F /var/log/messages
Here's an excerpt from the output:

Figure 9.5 – The packtd daemon's logging unrestricted
Next, we will generate the security policy files for the packtd daemon.
Generating policy files
To build a security policy for packtd, we need to generate the related policy files. The SELinux tool for building security policies is sepolicy. Also, packaging the final security policy binary requires the rpm-build utility. These command-line utilities may not be available by default on your system, so you may have to install the related packages:
sudo yum install -y policycoreutils-devel rpm-build
The following command generates the policy files for packtd (no superuser privileges required):
sepolicy generate --init /usr/local/bin/packtd
The related output is as follows:

Figure 9.6 – Generating policy files with sepolicy
Next, we need to rebuild the system policy so that it includes the custom packtd policy module.
Building the security policy
We will use the packtd.sh build script we created in the previous step here. This command requires superuser privileges since it installs the newly created policy on the system:
sudo ./packtd.sh
The build takes a relatively short time to complete and yields the following output (excerpt):

Figure 9.7 – Building the security policy for packtd
Please note that the build script reinstates the default SELinux security context for packtd using the restorecon command (highlighted in the previous output). Now that we've built the security policy, we're ready to verify the related permissions.
Verifying the security policy
First, we need to restart the packtd daemon to account for the policy change:
sudo systemctl restart packtd
The packtd process should now reflect the new SELinux security context:
ps -efZ | grep packtd | grep -v grep
The output shows a new label (packtd_t) for our security context:

Figure 9.8 – The new security policy for packtd
Since SELinux now controls our packtd daemon, we should see the related audit traces in /var/log/messages, where SELinux logs the system's activity. Let's look at the audit logs for any permission issues. The following command fetches the most recent events for AVC message types using the ausearch utility:
sudo ausearch -m AVC -ts recent
We will immediately notice that packtd has no read/write access to /var/log/messages:
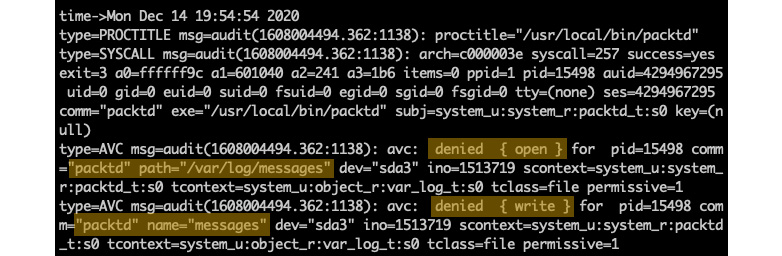
Figure 9.9 – No read/write access for packtd
To further inquire about the permissions needed by packtd, we will feed the output of ausearch into audit2allow, a tool for generating the required security policy stubs:
sudo ausearch -m AVC -ts recent | audit2allow -R
The output provides the code macro we're looking for:

Figure 9.10 – Querying the missing permissions for packtd
The -R (--reference) option of audit2allow invokes the stub generation task, which could sometimes yield inaccurate or incomplete results. In such cases, it may take a few iterations to update, rebuild, and verify the related security policies. Let's proceed with the required changes, as suggested previously. We'll edit the type enforcement file (packt.te) we generated previously and add the lines (copy/paste) exactly, as indicated by the output of audit2allow. After saving the file, we need to rebuild the security policy, restart the packtd daemon, and verify the audit logs. We're reiterating the last three steps in our overall procedure:
sudo ./packtd.sh
sudo systemctl restart packtd
sudo ausearch -m AVC -ts recent | audit2allow -R
This time, the SELinux audit should come out clean:

Figure 9.11 – No more permission issues for packtd
Sometimes, it may take a little while for ausearch to refresh its recent buffer. Alternatively, we can specify a starting timestamp to analyze from, such as after we've updated the security policy, using a relatively recent timestamp:
sudo ausearch --start 12/14/2020 '22:30:00' | audit2allow -R
At this point, we have a basic understanding of SELinux security policy internals. Next, we'll turn to some higher-level operations for managing and controlling SELinux in everyday administration tasks.
Understanding SELinux modes
SELinux is either enabled or disabled in a system. When enabled, it operates in either of the following modes:
- Enforcing: SELinux effectively monitors and controls security policies. In RHEL/CentOS, this mode is enabled by default.
- Permissive: Security policies are actively monitored without enforcing access control. Policy violations are logged in /var/log/messages.
When SELinux is disabled, security policies are neither monitored nor enforced.
The following command retrieves the current status of SELinux on the system:
sestatus
The output is as follows:

Figure 9.12 – Getting the current status of SELinux
When SELinux is enabled, the following command retrieves the current mode:
getenforce
In permissive mode, we get the following output:
Figure 9.13 – Getting the current mode of SELinux
To change from enforcing to permissive mode, we can run the following command:
sudo setenforce 0
The getenforce command will display Permissive in this case. To switch back into enforcing mode, we can run the following command:
sudo setenforce 1
The SELinux mode can also be set by editing the SELINUX value in /etc/selinux/config. The possible values are documented in the configuration file.
Important note
Manually editing the SELinux configuration file requires a system reboot for the changes to take effect.
With SELinux enabled, a system administrator may choose between the following SELinux policy levels by modifying the SELINUXTYPE value in /etc/selinux/config: targeted, minimum, and mls. The corresponding values are documented in the configuration file.
Important note
The default SELinux policy setting is targeted, and it's generally recommended not to change this setting, except for mls.
With the targeted policy in place, only processes that are specifically configured to use SELinux security policies run in a confined (or restricted) domain. Such processes usually include system daemons (such as dhcpd and sshd) and well-known server applications (such as Apache and PostgreSQL). All other (non-targeted) processes run unrestricted and are usually labeled with the unconfined_t domain type.
To completely disable SELinux, we can edit the /etc/selinux/config file using a text editor of our choice (such as sudo nano /etc/selinux/config) and make the following change:
SELINUX=disabled
Alternatively, we can run the following command to change the SELinux mode from enforcing to disabled:
sudo sed -i 's/SELINUX=enforcing/SELINUX=disabled/g' /etc/selinux/config
We can retrieve the current configuration with the following command:
cat /etc/selinux/config
With SELinux disabled, we get the following output:
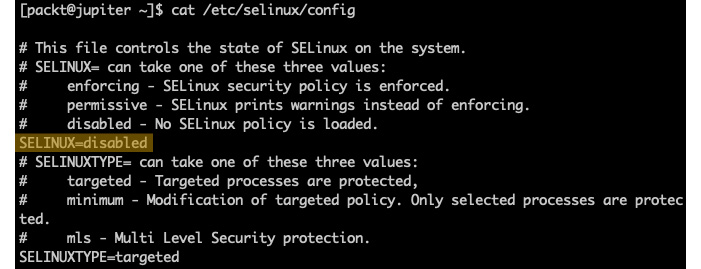
Figure 9.14 – Disabling SELinux
We need to reboot the system for the changes to take effect:
sudo systemctl reboot
Next, let's examine how access control decisions are made by introducing SELinux contexts.
Understanding SELinux contexts
With SELinux enabled, processes and files are labeled with a context containing additional SELinux-specific information, such as user, role, type, and level (optional). The context data serves for SELinux access control decisions.
SELinux adds the -Z option to the ls, ps, and other commands, thus displaying the security context of filesystem objects, processes, and more.
Let's create an arbitrary file and examine the related SELinux context:
touch afile
ls -Z afile
The output is as follows:

Figure 9.15 – Displaying the SELinux context of a file
The SELinux context has the following format – a sequence of four fields, separated by a colon (:):
USER:ROLE:TYPE:LEVEL
We will explain SELinux context fields.
SELinux user
The SELinux user is an identity known to the policy that's authorized for a specific set of roles and has a particular level that's designated by an MLS/MCS range (see the SELinux level section for more details). Every Linux user account is mapped to a corresponding SELinux user identity using an SELinux policy. This mechanism allows regular Linux users to inherit the policy restrictions associated with SELinux users.
A process owned by a Linux user receives the mapped SELinux user's identity to assume the corresponding SELinux roles and levels.
The following command displays a list of mappings between Linux accounts and their corresponding SELinux user identities. The command requires superuser privileges. Also, the semanage utility is available with the policycoreutils package, which you may need to install on your system:
sudo semanage login -l
The output may slightly differ from system to system:

Figure 9.16 – Displaying the SELinux user mappings
For more information on the semanage command-line utility, you may refer to the related system reference (man semanage, man semanage-login).
SELinux roles
SELinux roles are part of the RBAC security model, and they are essentially RBAC attributes. In the SELinux context hierarchy, users are authorized for roles, and roles are authorized for types or domains. In the SELinux context terminology, types refer to filesystem object types and domains refer to process types (see more in the SELinux type section).
Take Linux processes, for example. The SELinux role serves as an intermediary access layer between domains and SELinux users. An accessible role determines which domain (that is, processes) can be accessed through that role. Ultimately, this mechanism controls which object types can be accessed by the process, thus minimizing the surface for privilege escalation attacks.
SELinux type
The SELinux type is an attribute of SELinux type enforcement – a MAC security construct. For SELinux types, we refer to domains as process types and types as filesystem object types. SELinux security policies control how specific types can access each other – either with domain-to-type access or domain-to-domain interactions.
SELinux level
The SELinux level is an attribute of the MLS/MCS schema and an optional field in the SELinux context. A level usually refers to the security clearance of a subject's access control to an object. Levels of clearance include unclassified, confidential, secret, and top-secret and are expressed as a range. An MLS range represents a pair of levels, defined as low-high if the levels differ, or just low if the levels are identical. For example, a level of s0-s0 is the same as s0. Each level represents a sensitivity-category pair, with categories being optional. When a category is specified, the level is defined as sensitivity:category-set; otherwise, it's defined as sensitivity only.
We are now familiar with SELinux contexts. We'll see them in action, starting with the SELinux contexts for users, next.
SELinux contexts for users
The following command displays the SELinux context associated with the current user:
id -Z
In our case, the output is as follows:
Figure 9.17 – Displaying the current user's SELinux context
In RHEL/CentOS, Linux users are unconfined (unrestricted) by default, with the following context fields:
- unconfined_u: User identity
- unconfined_r: Role
- unconfined_t: Domain affinity
- s0-s0: MLS range (the equivalent of s0)
- c0.c1023: Category set, representing all categories (from c0 to c1023)
Next, we'll examine the SELinux context for processes.
SELinux context for processes
The following command displays the SELinux context for the current SSH processes:
ps -eZ | grep sshd
The command yields the following output:

Figure 9.18 – Displaying the SELinux context for SSH-related processes
From the output, we can infer that the top line refers to the sshd server process, which is running with the system_u user identity, system_r role, and sshd_t domain affinity. The second line refers to the current user's SSH session, hence the unconfined context. System daemons are usually associated with the system_u user and system_r role.
Before concluding this section on SELinux contexts, we'll examine the relatively common scenario of SELinux domain transitions, which is where a process in one domain accesses an object (or process) in a different domain.
SELinux domain transitions
Assuming an SELinux-secured process in one domain requests access to an object (or another process) in a different domain, SELinux domain transitions come into play. Unless there's a specific security policy allowing the related domain transition, SELinux would deny access.
An SELinux-protected process transitioning from one domain into another invokes the entrypoint type of the new domain. SELinux evaluates the related entrypoint permission and decides if the soliciting process can enter the new domain.
To illustrate a domain transition scenario, we will take the simple case of using the passwd utility when users change their password. The related operation involves the interaction between the passwd process and the /etc/shadow (and possibly /etc/gshadow) file(s). When the user enters (and reenters) the password, passwd would hash and store the user's password in /etc/shadow.
Let's examine the SELinux domain affinities involved:
ls -Z /usr/bin/passwd
ls -Z /etc/shadow
The corresponding output is as follows:

Figure 9.19 – Comparing the domain affinity context
The passwd utility is labeled with the passwd_exec_t type, while /etc/shadow is labeled with shadow_t. There must be a specific security policy chain that allows the related domain to transition from passwd_exec_t to shadow_t; otherwise, passwd will not work as expected.
Let's validate our assumption. We'll use the sesearch tool to query for our assumed security policy:
sudo sesearch -s passwd_t -t shadow_t -p write --allow
Here's a brief explanation of the preceding command:
- sesearch: Searches the SELinux policy database
- -s passwd_t: Finds policy rules with passwd_t as their source type or role
- -t shadow_t: Finds policy rules with shadow_t as their target type or role
- -p write: Finds policy rules with write permissions
- --allow: Finds policy rules that allow the queried permissions (specified with -p)
The output of the preceding command is as follows:

Figure 9.20 – Querying SELinux policies
Here, we can see the append create permissions, as we correctly assumed.
How did we pick the passwd_t source type instead of passwd_exec_t? By definition, the domain type corresponding to the executable file type, passwd_exec_t, is passwd_t. If we were not sure about who has write permissions to the shadow_t file types, we could have simply excluded the source type (-s passwd_t) in the sesearch query and parsed the output (for example, using grep passwd).
The use of the sesearch tool is very convenient when we're querying security policies. There are a handful of similar tools for troubleshooting or managing the SELinux configuration and policies. One of the most notable SELinux command-line utilities is semanage for managing SELinux policies. We'll examine it next.
Managing SELinux policies
SELinux provides several utilities for managing security policies and modules, some of which will be briefly described in the Troubleshooting SELinux issues section next. Examining each of these tools is beyond the scope of this chapter, but we'll take semanage for a quick spin, to reflect on some use cases involving security policy management.
The general syntax of the semanage command is as follows:
semanage TARGET [OPTIONS]
TARGET usually denotes a specific namespace for policy definitions (for example, login, user, port, fcontext, boolean, permissive, and so on). Let's look at a few examples to get an idea of how semanage works.
Enabling secure binding on custom ports
Let's assume we want to enable SELinux for a custom SSH port instead of the default 22. We can retrieve the current security records (labels) on the SSH port with the following command:
sudo semanage port -l | grep ssh
For a default configuration, we will get the following output:
Figure 9.21 – Querying the SELinux security label for the SSH port
If we want to enable SSH on a different port (such as 2222), first, we need to configure the related service (sshd) to listen on a different port. We won't go into those details here. Here, we need to enable the secure binding on the new port with the following command:
sudo semanage port -a -t ssh_port_t -p tcp 2222
Here's a brief explanation of the preceding command:
- -a (--add): Adds a new record (label) for the given type
- -t ssh_port_t: The SELinux type of the object
- -p tcp: The network protocol associated with the port
As a result of the previous command, the new security policy for the ssh_port_t type looks like this:

Figure 9.22 – Changing the SELinux security label for the SSH port
We could arguably delete the old security label (for port 22), but that won't really matter if we disable port 22. If we want to delete a port security record, we can do so with the following command:
sudo semanage port -d -p tcp 22
We used the -d (--delete) option to remove the related security label. To view the local customizations for our semanage port policies, we can invoke the -C (--locallist) option:
sudo semanage port -l -C
For more information on semanage port, you may refer to the related system reference (man semanage port). Next, we'll look at how to modify security permissions for specific server applications.
Modifying security permissions for targeted services
semanage uses the boolean namespace to toggle specific features of targeted services on and off. A targeted service is a daemon with built-in SELinux protection. In the following example, we want to enable FTP over HTTP connections. By default, this security feature of Apache (httpd) is turned off. Let's query the related httpd security policies:
sudo semanage boolean -l | grep httpd | grep ftp
We get the following output:

Figure 9.23 – Querying httpd policies related to FTP
As we can see, the related feature – httpd_enable_ftp_server – is turned off by default. The current and persisted states are currently off: (off, off). We can enable it with the following command:
sudo semanage boolean -m --on httpd_enable_ftp_server
To view the local customizations of the semanage boolean policies, we can invoke the -C (--locallist) option:
sudo semanage boolean -l -C
The new configuration now looks like this:

Figure 9.24 – Enabling the security policy for FTP over HTTP
In the preceding example, we used the -m (--modify) option with the semanage boolean command to toggle the httpd_enable_ftp_server feature.
For more information on semanage boolean, you may refer to the related system reference (man semanage boolean). Now, let's learn how to modify the security context of specific server applications.
Modifying security contexts for targeted services
In this example, we want to secure SSH keys stored in a custom location on the local system. Since we're targeting a filesystem-related security policy, we will use the fcontext (file context) namespace with semanage.
The following command queries the file context security settings for sshd:
sudo semanage fcontext -l | grep sshd
Here's a relevant excerpt from the output:

Figure 9.25 – The security context of SSH keys
The following command also adds the /etc/ssh/keys/ path to the secure locations associated with the sshd_key_t context type:
sudo semanage fcontext -a -t sshd_key_t '/etc/ssh/keys(/.*)?'
The '/etc/ssh/keys(/.*)?' regular expression matches any files in the /etc/ssh/keys/ directory, including subdirectories at any nested level. To view the local customizations of the semanage fcontext policies, we can invoke the -C (--locallist) option:
sudo semanage fcontext -l -C
We should see our new security context:

Figure 9.26 – The modified security context of our SSH keys
We should also initialize the filesystem security context of the /etc/ssh/keys directory (if we've already created it):
sudo restorecon -r /etc/ssh/keys
restorecon is an SELinux utility for restoring the default security context to a filesystem object. The -r (or -R) option specifies a recursive action on the related path.
For more information on semanage fcontext, you may refer to the related system reference (man semanage fcontext). Next, we'll look at enabling permissive mode for specific server applications.
Enabling permissive mode for targeted services
Earlier in this chapter, we created a custom daemon (packtd) with its security policy. See the related topic in the Creating an SELinux security policy section. When we worked on the packtd daemon and tested its functionality, initially, we had to deal with its SELinux policy violations. Eventually, we fixed the required security policy context and everything was fine. During the entire process, we were able to run and test with packtd without having the daemon shut down by SELinux due to non-compliance. Yet, our Linux system runs SELinux in enforcing mode (by default) and is not permissive. See the Understanding SELinux modes section for more information on enforcing and permissive modes.
How, then, is it possible that packtd ran unrestricted while violating security policies?
By default, SELinux is permissive to any untargeted type in the system. By untargeted, we mean a domain (type) that hasn't been forced into a restrictive (or confined) mode yet.
When we built the security policy for our packtd daemon, we let the related SELinux build tools generate the default type enforcement file (packt.te) and other resources for our domain. A quick look at the packt.te file shows that our packtd_t type is permissive:
cat packt.te
Here's the relevant excerpt from the file:

Figure 9.27 – The packtd_t domain is permissive
So, the packtd_t domain is permissive by nature. The only way to confine packtd is to remove the permissive line from the packtd.te file and rebuild the related security policy. We will leave that as an exercise to you. The case we wanted to make here was to present a possibly misbehaving – in our case, permissive – domain that we can catch by managing permissive types with the semanage permissive command.
To manage permissive mode for individual targets, we can use the semanage command with our permissive namespace. The following command lists all the domains (types) currently in permissive mode:
sudo semanage permissive -l
In our case, we have the built-in packtd_t domain, which is permissive:

Figure 9.28 – Displaying permissive types
In general, it is unlikely that a default SELinux configuration would have any permissive types.
We can use the semanage permissive command to temporarily place a restricted domain into permissive mode while testing or troubleshooting a specific functionality. For example, the following command sets the Apache (httpd) daemon in permissive mode:
sudo semanage permissive -a httpd_t
When we query for permissive types, we get the following result:
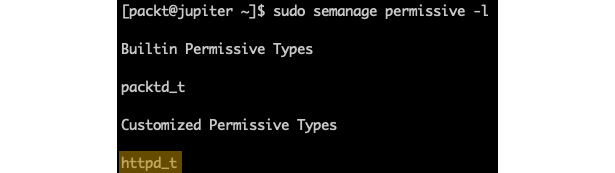
Figure 9.29 – Customized permissive types
Domains or types that are made permissive with the semanage permissive command will show up as Customized Permissive Types.
To revert the httpd_t domain to the confined (restricted) state, we can invoke the semanage permissive command with the -d (--delete) option:
sudo semanage permissive -d httpd_t
Note that we cannot confine built-in permissive types with the semanage command. As we mentioned previously, the packtd_t domain is permissive by nature and cannot be restricted.
Troubleshooting SELinux issues
Even during our relatively brief journey of exploring SELinux, we used a handful of tools and means to inspect some of the internal workings of security policies and the access control between the subjects (users and processes) and objects (files). SELinux problems usually come down to action being denied, either between specific subjects or between a subject and some objects. SELinux-related issues are not always obvious or easy to troubleshoot, but knowing about the tools that can help is already a good start for tackling these problems.
Here are some of these tools, briefly explained:
- /var/log/messages: The log file containing SELinux access control traces and policy violations
- audit2allow: Generates SELinux policy rules from the log traces corresponding to denied operations
- audit2why: Provides user-friendly translations of SELinux audit messages of policy violations
- ausearch: Queries /var/log/messages for policy violations
- ls -Z: Lists filesystem objects with their corresponding SELinux context
- ps -Z: Lists processes with their corresponding SELinux context
- restorecon: Restores the default SELinux context for filesystem objects
- seinfo: Provides general information about SELinux security policies
- semanage: Manages and provides insight into SELinux policies
- semodule: Manages SELinux policy modules
- sepolicy: Inspects SELinux policies
- sesearch: Queries the SELinux policy database
For most of these tools, there is a corresponding system reference (such as man sesearch) that provides detailed information about using the tool. Beyond these tools, you can also explore the vast documentation SELinux has to offer. Here's how.
Accessing SELinux documentation
SELinux has extensive documentation, available as an RHEL/CentOS installable package or online at https://access.redhat.com/documentation/en-us/red_hat_enterprise_linux/8/html/using_selinux/index (for RHEL/CentOS 8).
The following command installs the SELinux documentation on RHEL/CentOS 8 systems:
sudo yum install -y selinux-policy-doc.noarch
You can browse a particular SELinux topic with (for example) the following command:
man -k selinux | grep httpd
SELinux is among the most established and highly customizable security frameworks in the Linux kernel. However, its relatively vast domain and inherent complexity may appear overwhelming for many. Sometimes, even for seasoned system administrators, the choice of a Linux distribution could hang in the balance based on the underlying security module. SELinux is mostly available on RHEL/CentOS platforms. More recent revisions of the Linux kernel are now moving away from SELinux while adopting a relatively lighter and more efficient security framework. The rising star on the horizon is AppArmor.
Introducing AppArmor
AppArmor is an LSM based on the MAC model that confines applications to a limited set of resources. AppArmor uses an ACM based on security profiles that have been loaded into the kernel. Each profile contains a collection of rules for accessing various system resources. AppArmor can be configured to either enforce access control or just complain about access control violations.
AppArmor proactively protects applications and operating system resources from internal and external threats, including zero-day attacks, by preventing both known and unknown vulnerabilities from being exploited.
AppArmor has been built into the mainline Linux kernel since version 2.6.36 and is currently shipped with Ubuntu, Debian, OpenSUSE, and similar distributions.
In the following sections. we'll use an Ubuntu 20.04 environment to showcase a few practical examples with AppArmor. Most of the related command-line utilities will work the same on any platform with AppArmor installed.
Working with AppArmor
AppArmor command-line utilities usually require superuser privileges.
The following command checks the current status of AppArmor:
sudo aa-status
Here's an excerpt from the command's output:

Figure 9.30 – Getting the status of AppArmor
The aa-status (or apparmor_status) command provides a full list of the currently loaded AppArmor profiles (not shown in the preceding excerpt). We'll examine AppArmor profiles next.
Introducing AppArmor profiles
With AppArmor, processes are confined (or restricted) by profiles. AppArmor profiles are loaded upon system start and run either in enforce mode or complain mode. We'll explain these modes next.
Enforce mode
AppArmor prevents applications running in enforce mode from performing restricted actions. Access violations are signaled with log entries in syslog. Ubuntu, by default, loads the application profiles in enforce mode.
Complain mode
Applications running in complain mode can take restricted actions, while AppArmor creates a log entry for the related violation. complain mode is ideal for testing AppArmor profiles. Potential errors or access violations can be caught and fixed before switching the profiles to enforce mode.
With these introductory notes in mind, let's create a simple application with an AppArmor profile.
Creating a profile
In this section, we'll create a simple application guarded by AppArmor. We hope this exercise will help you get a sensible idea of the inner workings of AppArmor. Let's name this application appackt. We'll make it a simple script that creates a file, writes to it, and then deletes the file. The goal is to have AppArmor prevent our app from accessing any other paths in the local system. To try and make some sense of this, think of it as trivial log recycling.
Here's the appackt script, and please pardon the thrifty implementation:
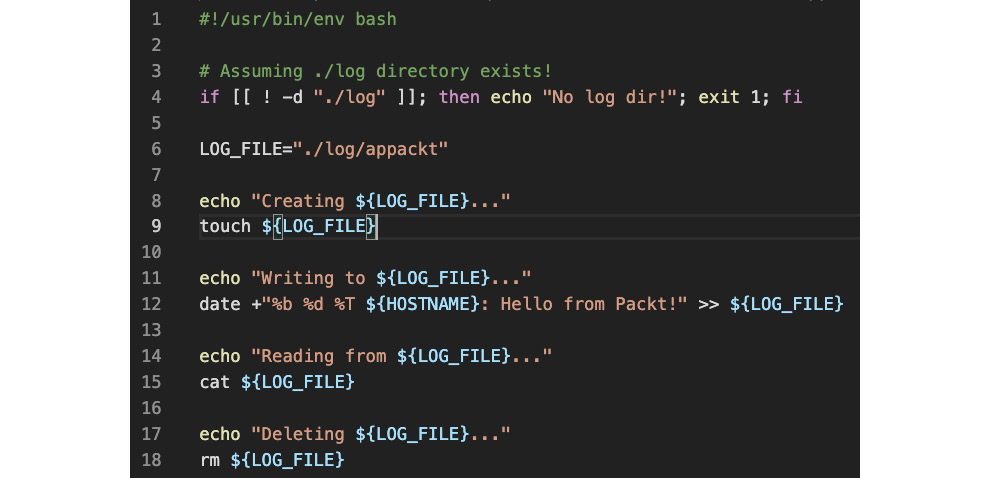
Figure 9.31 – The appackt script
We are assuming that the log directory already exists at the same location as the script:
mkdir ./log
Let's make the script executable and run it:
chmod a+x appackt
./appackt
The output is as follows:

Figure 9.32 – The output of the appackt script
Now, let's work on guarding and enforcing our script with AppArmor. Before we start, we need to install the apparmor-utils package – the AppArmor toolset:
sudo apt-get install -y apparmor-utils
We'll use a couple of tools to help create the profile:
- aa-genprof: Generates an AppArmor security profile
- aa-logprof: Updates an AppArmor security profile
We use aa-genprof to monitor our application at runtime and have AppArmor learn about it. In the process, we'll be prompted to acknowledge and choose the behavior that's required in specific circumstances.
Once the profile has been created, we'll use the aa-logprof utility to make further adjustments while testing in complain mode, should any violations occur.
Let's start with aa-genprof. We need two terminals: one for the aa-genprof monitoring session (in terminal 1) and the other for running our script (in terminal 2).
We will start with terminal 1 and run the following command:
sudo aa-genprof ./appackt
There is a first prompt waiting for us. Next, while the prompt in terminal 1 is waiting, we will switch to terminal 2 and run the following command:
./appackt
Now, we must go back to terminal 1 and answer the prompts sent by aa-genprof, as follows:
Prompt 1 – Waiting to scan
This prompt asks to scan the system log for AppArmor events in order to detect possible complaints (violations).
Answer: S (Scan):

Figure 9.33 – Prompt 1 – Waiting to scan with aa-genprof
Let's look at the next prompt.
Prompt 2 – Execute permissions for /usr/bin/bash
This prompt requests execute permissions for the process (/usr/bin/bash) running our app.
Answer: I (Inherit):

Figure 9.34 – Prompt 2 – Execute permissions for /usr/bin/bash
Let's look at the next prompt.
Prompt 3 – Read/write permissions to /dev/tty
This prompt requests read/write permissions for the app to control the terminal (/dev/tty).
Answer: A (Allow):

Figure 9.35 – Prompt 3 – Read/write permissions to /dev/tty
Now, let's look at the final prompt.
Prompt 4 – save changes
The prompt is asking to save or review the changes.
Answer: S (Save):
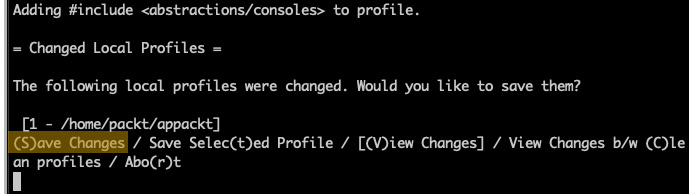
Figure 9.36 – Prompt 4 – Save changes
At this point, we have finished scanning with aa-genprof, and we can answer with F (Finish) to the last prompt. Our app (appackt) is now enforced by AppArmor in complain mode (by default). If we try to run our script, we'll get the following output:
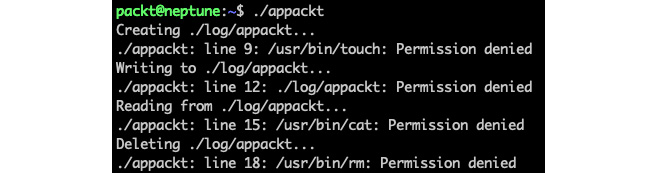
Figure 9.37 – The first run of appackt with AppArmor confined
As the output suggests, things are not quite right yet. This is where the aa-logprof tool comes to the rescue. For the rest of the steps, we only need one terminal window.
Let's run the aa-logprof command to further tune our appackt security profile:
sudo aa-logprof
We'll get several prompts again, similar to the previous ones, asking for further permissions needed by our script, namely for the touch, cat, and rm commands. The prompts alternate between Inherit and Allow answers, where appropriate. We won't go into the details here due to space. By now, you should have a general idea about these prompts and their meaning. It's always recommended, though, to ponder upon the permissions asked for and act accordingly.
We may have to run the aa-logprof command a couple of times because, with each iteration, new permissions will be discovered and addressed, depending on the child processes that are spawned by our script and so on. Eventually, the appackt script will run successfully.
During the iterative process described previously, we may end up with a few unknown or orphaned entries in the AppArmor database, which are artifacts of our previous attempts, to secure our application:

Figure 9.38 – Remnants of the iterative process
They will all be named according to the path of or our application (/home/packt/appackt). We can clean up these entries with the following command:
sudo aa-remove-unknown
We can now verify that our app is indeed guarded with AppArmor:
sudo aa-status
The relevant excerpt from the output is as follows:

Figure 9.39 – appackt in complain mode
Our application (/home/packt/appackt) is shown, as expected, in complain mode. The other two are system application-related and are not relevant for us.
Next, we need to validate that our app complies with the security policies enforced by AppArmor. Let's edit the appackt script and change the LOG_FILE path in line 6 to the following:
LOG_FILE="./logs/appackt"
We have changed the output directory from log to logs. Let's create the logs directory and run our app:
mkdir logs
./appackt
The preceding output suggests that appackt is attempting to access a path outside the permitted boundaries by AppArmor, thus validating our profile:

Figure 9.40 – appackt acting outside security boundaries
Let's revert the preceding changes and have the appackt script act normally. We are now ready to enforce our app by changing its profile mode with the following command:
sudo aa-enforce /home/packt/appackt
The output is as follows:
Figure 9.41 – Changing the appackt profile to enforce mode
We can verify that our application is indeed running in enforce mode with the following command:
sudo aa-status
The relevant output is as follows:

Figure 9.42 – appackt running in enforce mode
If we wanted to make further adjustments to our application and then test it with the related changes, we would have to change the profile mode to complain and then reiterate the steps described earlier in this section. The following command sets the application profile to complain mode:
sudo aa-complain /home/packt/appackt
AppArmor profiles are plain text files stored in the /etc/apparmor.d/ directory. Creating or modifying AppArmor profiles usually involves manually editing the corresponding files or the procedure described in this section using the aa-genprof and aa-logprof tools.
Next, let's look at how to disable or enable AppArmor application profiles.
Disabling and enabling profiles
Sometimes, we may want to disable a problematic application profile while working on a better version. Here's how we do this.
First, we need to locate the application profile we want to disable (for example, appackt). The related file is in the /etc/apparmor.d/ directory, and it's named according to its full path, with dots (.) instead of slashes (/). In our case, the file is /etc/apparmor.d/home.packt.appackt.
To disable the profile, we must run the following commands:
sudo ln -s /etc/apparmor.d/home.packt.appackt /etc/apparmor.d/disable/
sudo apparmor_parser -R /etc/apparmor.d/home.packt.appackt
If we run the aa-status command, we won't see our appackt profile anymore. The related profile is still present in the filesystem, at /etc/apparmor.d/disable/home.packt.appackt:

Figure 9.43 – The disabled appackt profile
In this situation, the appackt script is not enforced by any restrictions. To reenable the related security profile, we can run the following commands:
sudo rm /etc/apparmor.d/disable/home.packt.appackt
sudo apparmor_parser -r /etc/apparmor.d/home.packt.appackt
The appackt profile should now show up in the aa-status output as running in complain mode. We can bring it into enforce mode with the following:
sudo aa-enforce /home/packt/appackt
To disable or enable the profile, we used the apparmor_parser command, besides the related filesystem operations. This utility assists with loading (-r, --replace) or unloading (-R, --remove) security profiles to and from the kernel.
Deleting AppArmor security profiles is functionally equivalent to disabling them. We can also choose to remove the related file from the filesystem altogether. If we delete a profile without removing it from the kernel first (with apparmor_parser -R), we can use the aa-remove-unknown command to clean up orphaned entries.
Let's conclude our relatively brief study of AppArmor internals with some final thoughts.
Final considerations
Working with AppArmor is relatively easier than SELinux, especially when it comes to generating security policies or switching back and forth between permissive mode and non-permissive mode. SELinux can only toggle the permissive context for the entire system, while AppArmor does it at the application level. On the other hand, there might be no choice between the two, as some major Linux distributions either support one or the other. AppArmor is a prodigy of Debian, Ubuntu, and, recently, OpenSUSE, while SELinux runs on RHEL/CentOS. Theoretically, you can always try to port the related kernel modules across distros, but that's not a trivial task.
As a final note, we should reiterate that in the big picture of Linux security, SELinux and AppArmor are ACMs that act locally on a system, at the application level. When it comes to securing applications and computer systems from the outside world, firewalls come into play. We'll look at firewalls next.
Working with firewalls
Traditionally, a firewall is a network security device that's placed between two networks. It monitors the network traffic and controls access to these networks. Generally speaking, a firewall protects a local network from unwanted intrusion or attacks from the outside. But a firewall can also block unsolicited locally originated traffic targeting the public internet. Technically, a firewall allows or blocks incoming and outgoing network traffic based on specific security rules.
For example, a firewall can block all but a select set of inbound networking protocols (such as SSH and HTTP/HTTPS). It may also block all but approved hosts within the local network from establishing specific outbound connections, such as allowing outbound SMTP connections that originated exclusively from the local email servers.
The following diagram shows a simple firewall deployment regulating traffic between a local network and the internet:

Figure 9.44 – A simple firewall diagram
The outgoing security rules prevent bad actors, such as compromised computers and untrustworthy individuals, directing attacks to the public internet. The resulting protection benefits external networks, but it's ultimately essential for the organization as well. Thwarting hostile actions from the local network avoids them being flagged by Internet Service Providers (ISPs) for unruly internet traffic.
Configuring a firewall usually requires a default security policy acting at a global scope, and then configuring specific exceptions to this general rule, based on port numbers (protocols), IP addresses, and other criteria.
In the following sections, we'll explore various firewall implementations and firewall managers. First, let's take a brief look under the hood at how a firewall monitors and controls the network traffic by introducing the Linux firewall chain.
Understanding the firewall chain
At a high level, the TCP/IP stack in the Linux kernel usually performs the following workflows:
- Receives data from an application (process), serializes the data into network packets, and transmits the packets to a network destination, based on the respective IP address and port
- Receives data from the network, deserializes the network packets into application data, and delivers the application data to a process
Ideally, in these workflows, the Linux kernel shouldn't alter the network data in any specific way apart from shaping it due to TCP/IP protocols. However, with distributed and possibly insecure network environments, the data may need further scrutiny. The kernel should provide the necessary hooks to filter and alter the data packets further based on various criteria. This is where firewalls and other network security and intrusion detection tools come into play. They adapt to the kernel's TCP/IP packet filtering interface and perform the required monitoring and control of network packets. The blueprint of the Linux kernel's network packet filtering procedure is also known as the firewall or firewalling chain:

Figure 9.45– The Linux firewall chain
When the incoming data enters the firewall packet filtering chain, a routing decision is made, depending on the packet's destination. Based on that routing decision, the packet can follow either the INPUT chain (for localhost) or the FORWARD chain (for a remote host). These chains may alter the incoming data in various ways via the hooks that are implemented by network security tools or firewalls. By default, the kernel won't change the packets traversing the chains.
The INPUT chain ultimately feeds the packets into the local application process consuming the data. These local applications are usually user space processes, such as network clients (for example, web browsers, SSH, and email clients) or network servers (for example, web and email servers). They may also include kernel space processes, such as the kernel's Network File System (NFS).
Both the FORWARD chain and the local processes route the data packets into the OUTPUT chain before placing them on the network.
Any of the chains can filter packets based on specific criteria, such as the following:
- The source or destination IP address
- The source or destination port
- The network interface involved in the data transaction
Each chain has a set of security rules that are matched against the input packet. If a rule matches, the kernel routes the data packet to the target specified by the rule. Some predefined targets include the following:
- ACCEPT: Accepts the data packet for further processing
- REJECT: Rejects the data packet
- DROP: Ignores the data packet
- QUEUE: Passes the data packet to a user space process
- RETURN: Stops processing the data packet and passes the data back to the previous chain
For a full list of predefined targets, please refer to the iptables-extensions system reference (man iptables-extensions).
In the following sections, we'll explore some of the most common network security frameworks and tools based on the kernel's networking stack and firewall chain. We'll start with netfilter – the Linux kernel's packet filtering system. Next, we'll look at iptables – the traditional interface for configuring netfilter. iptables is a highly configurable and flexible firewall solution. Then, we'll briefly cover nftables, a tool that implements most of the complex functionality of iptables wraps it into a relatively easy-to-use command-line interface. Finally, we'll take a step away from the kernel's immediate proximity of packet filtering frameworks and look at firewall managers – firewalld (RHEL/CentOS) and ufw (Debian/Ubuntu) – two user-friendly frontends for configuring Linux firewalls on major Linux distros.
Let's start our journey with netfilter.
Introducing netfilter
netfilter is a packet filtering framework in the Linux kernel that provides highly customizable handlers (or hooks) to control networking-related operations. These operations include the following:
- Accepting or rejecting packets
- Packet routing and forwarding
- Network address and port translation (NAT/NAPT)
Applications that implement the netfilter framework use a set of callback functions built around hooks registered with kernel modules that manipulate the networking stack. These callback functions are further mapped to security rules and profiles, which control the behavior of every packet traversing the networking chain.
Firewall applications are first-class citizens of netfilter framework implementations. Consequently, a good understanding of the netfilter hooks will help Linux power users and administrators create reliable firewall rules and policies.
We'll have a brief look at these netfilter hooks next.
netfilter hooks
As packets traverse the various chains in the networking stack, netfilter triggers events for the kernel modules that are registered with the corresponding hooks. These events result in notifications in the module or packet filtering application (for example, the firewall) implementing the hooks. Next, the application takes control of the packet based on specific rules.
There are five netfilter hooks available for packet filtering applications. Each corresponds to a networking chain, as illustrated in Figure 9.44:
- NF_IP_PRE_ROUTING: Triggered by incoming traffic upon entering the network stack and before any routing decisions are made about where to send the packet
- NF_IP_LOCAL_IN: Triggered after routing an incoming packet when the packet has a localhost destination
- NF_IP_FORWARD: Triggered after routing an incoming packet when the packet has a remote host destination
- NF_IP_LOCAL_OUT: Triggered by locally initiated outbound traffic entering the network stack
- NF_IP_POST_ROUTING: Triggered by outgoing or forwarded traffic, immediately after routing it and just before it exits the network stack
Kernel modules or applications registered with netfilter hooks must provide a priority number to determine the order the modules are called in when the hook is triggered. This mechanism allows us to deterministically order multiple modules (or multiple instances of the same module) that have been registered with a specific hook. When a registered module is done processing a packet, it provides a decision to the netfilter framework about what should be done with the packet.
The netfilter framework's design and implementation is a community-driven collaborative project as part of the Free and Open-Source Software (FOSS) movement. For a good starting point to the netfilter project, you may refer to http://www.netfilter.org/.
One of the most well-known implementations of netfilter is iptables – a widely used firewall management tool that shares a direct interface with the netfilter packet filtering framework. A practical examination of iptables would further reveal the functional aspects of netfilter. Let's explore iptables next.
Working with iptables
iptables is a relatively low-level Linux firewall solution and command-line utility that uses netfilter chains to control network traffic. iptables operates with rules associated with chains. A rule defines the criteria for matching the packets traversing a specific chain. iptables uses tables to organize rules based on criteria or decision type. iptables defines the following tables:
- filter: The default table, which is used when we're deciding if packets should be allowed to traverse specific chains (INPUT, FORWARD, OUTPUT).
- nat: Used with packets that require a source or destination address/port translation. The table operates on the following chains: PREROUTING, INPUT, OUTPUT, and POSTROUTING.
- mangle: Used with specialized packet alterations involving IP headers (such as MSS = Maximum Segment Size or TTL = Time to Live). The table supports the following chains: PREROUTING, INPUT, FORWARD, OUTPUT, and POSTROUTING.
- raw: Used when we're disabling connection tracking (NOTRACK) on specific packets, mainly for stateless processing and performance optimization purposes. The table relates to the PREROUTING and OUTPUT chains.
- security: Used for MAC when packets are subject to SELinux policy constraints. The table interacts with the INPUT, FORWARD, and OUTPUT chains.
The following diagram summarizes the tables with the corresponding chains supported in iptables:

Figure 9.46 – Tables and chains in iptables
The chain traversal order of the packets in the kernel's networking stack is as follows:
- Incoming packets with localhost destination: PREROUTING | INPUT
- Incoming packets with remote host destination: PREROUTING | FORWARD | POSTROUTING
- Locally generated packets (by application processes): OUTPUT | POSTROUTING
Now that we're familiar with some introductory concepts, we can tackle a few practical examples to understand how iptables works.
The following examples use an RHEL/CentOS 8 system, but they should work on every major Linux distribution. Please note that starting with RHEL/CentOS 7, the default firewall management application is firewalld (discussed later in this chapter). If you want to use iptables, first, you need to disable firewalld:
sudo systemctl stop firewalld
sudo systemctl disable firewalld
sudo systemctl mask firewalld
Next, install the iptables-services package (on CentOS):
sudo yum install iptables-services
(On Ubuntu, you must install iptables with sudo apt-get install iptables).
Now, let's start configuring iptables.
Configuring iptables
The iptables command requires superuser privileges. First, let's check the current iptables configuration. The general syntax for retrieving the rules in a chain for a specific table is as follows:
sudo iptables -L [CHAIN] [-t TABLE]
The -L (--list) option lists the rules in a chain. The -t (--table) option specifies a table. The CHAIN and TABLE parameters are optional. If the CHAIN option is omitted, all chains and their related rules are considered within a table. When no TABLE option is specified, the filter table is assumed. Thus, the following command lists all the chains and rules for the filter table:
sudo iptables -L
On a system with a default firewall configuration, the output is as follows:

Figure 9.47 – Listing the current configuration in iptables
We can be more specific, for example, by listing all the INPUT rules for the nat table with the following command:
sudo iptables -L INPUT -t nat
The -t (--table) option parameter is only required when iptables operations target something other than the default filter table.
Important note
Unless the -t (--table) option parameter is specified, iptables assumes the filter table by default.
When you're designing firewall rules from a clean slate, the following steps are generally recommended:
- Flush any remnants in the current firewall configuration.
- Set up a default firewall policy.
- Create firewall rules, making sure the more specific (or restrictive) rules are placed first.
- Save the configuration.
Let's briefly look at each of the preceding steps by creating a sample firewall configuration using the filter table.
Step 1 – Flushing the existing configuration
The following commands flush the rules from the filter table's chains (INPUT, FORWARD, and OUTPUT):
sudo iptables -F INPUT
sudo iptables -F FORWARD
sudo iptables -F OUTPUT
The preceding commands yield no output unless there is an error or you invoke the iptables command with the -v (--verbose) option; for example:
sudo iptables -v -F INPUT
The output is as follows:
Figure 9.48 – Flushing the INPUT chain in iptables
Next, we'll set up the firewall's default policy.
Step 2 – Setting up a default firewall policy
By default, iptables allows all packets to pass through the networking (firewall) chain. A secure firewall configuration should use DROP as the default target for the relevant chains:
sudo iptables -P INPUT DROP
sudo iptables -P FORWARD DROP
sudo iptables -P OUTPUT DROP
The -P (--policy) option parameter sets the policy for a specific chain (such as INPUT) to the given target (for example, DROP). The DROP target makes the system gracefully ignore all packets.
At this point, if we were to save our firewall configuration, the system won't be accepting any incoming or outgoing packets. So, we should be careful not to inadvertently drop our access to the system if we used SSH or don't have direct console access.
Next, we'll set up the firewall rules.
Step 3 – Creating firewall rules
Let's create some example firewall rules, such as accepting SSH, DNS, and HTTPS connections.
The following commands enable SSH access from a local network (192.168.0.0/24):
sudo iptables -A INPUT -p tcp --dport 22 -m state
--state NEW,ESTABLISHED -s 192.168.0.0/24 -j ACCEPT
sudo iptables -A INPUT -p tcp --sport 22 -m state
--state ESTABLISHED -s 192.168.0.0/24 -j ACCEPT
Let's explain the parameters that were used in the previous code block:
- -A INPUT: Specifies the chain (for example, INPUT) to append the rule to
- -p tcp: The networking protocol (for example, tcp or udp) transporting the packets
- --dport 22: The destination port of the packets
- --sport 22: The source port of the packets
- -m state: The packet property we want to match (for example, state)
- --state NEW,ESTABLISHED: The state(s) of the packet to match
- -s 192.168.0.0/24: The source IP address/mask originating the packets
- -j ACCEPT: The target or what to do with the packets (such as ACCEPT, DROP, REJECT, and so on)
We used two commands to enable SSH access. The first allows incoming SSH traffic (--dport 22) for new and existing connections (-m state --state NEW,ESTABLISHED). The second command enables SSH response traffic (--sport 22) for existing connections (-m state –state ESTABLISHED).
Similarly, the following commands enable HTTPS traffic:
sudo iptables -A INPUT -p tcp --dport 443 -m state
--state NEW,ESTABLISHED -j ACCEPT
sudo iptables -A INPUT -p tcp --sport 443 -m state
--state ESTABLISHED,RELATED -j ACCEPT
To enable DNS traffic, we need to use the following commands:
sudo iptables -A INPUT -p udp --dport 53 -j ACCEPT
sudo iptables -A INPUT -p udp --sport 53 -j ACCEPT
For more information on the iptables option parameters, please refer to the following system reference manuals:
- iptables (man iptables)
- iptables-extensions (man iptables-extensions).
Now, we're ready to save the iptables configuration.
Step 4 – Saving the configuration
To save the current iptables configuration, we must run the following command:
sudo service iptables save
The output is as follows:

Figure 9.49 – Saving the iptables configuration
We can also dump the current configuration to a file (such as iptables.config) for later use with the following command:
sudo iptables-save -f iptables.config
The -f (--file) option parameter specifies the file to save (backup) the iptables configuration in. We can restore the saved iptables configuration later with the following command:
sudo iptables-restore ./iptables.config
Here, we can specify an arbitrary path to our iptables backup configuration file.
Exploring more complex rules and topics with iptables is beyond the scope of this chapter. The examples we've presented so far, accompanied by the theoretical introduction of iptables, should be a good start for everyone to explore more advanced configurations.
On the other hand, the use of iptables is generally discouraged, especially with the newly emerging firewall management tools and frameworks that have been shipped with the latest Linux distros, such as nftables, firewalld, and ufw. It is also somewhat accepted that iptables has performance and scalability problems.
Next, we'll look at nftables, a relatively new framework that was designed and developed by the Netfilter Project, built to replace iptables.
Introducing nftables
nftables is a successor of iptables. nftables is a firewall management framework that supports packet filtering, Network Address Translation (NAT), and various packet shaping operations. nftables offers notable improvements in terms of features, convenience, and performance over previous packet filtering tools, such as the following:
- Lookup tables instead of linear processing of rules.
- Rules are applied individually instead of them processing a complete ruleset.
- A unified framework for the IPv4 and IPv6 protocols.
- No protocol-specific extensions.
The functional principles behind nftables generally follow the design patterns presented in earlier sections about the firewall networking chains; that is, netfilter and iptables. Just like iptables, nftables uses tables to store chains. Each chain contains a set of rules for packet filtering actions.
nftables is the default packet filtering framework in Debian and RHEL/CentOS 8 Linux distributions, replacing the old iptables (and related) tools. The command-line interface for manipulating the nftables configuration is nft. Yet, some users prefer to use a more user-friendly frontend instead, such as firewalld. (firewalld recently added backend support for nftables.) RHEL/CentOS 8, for example, uses firewalld as its default firewall management solution.
In this section, we'll show a few examples of how to use nftables and the related command-line utilities to perform simple firewall configuration tasks. For this purpose, we'll take an RHEL/CentOS 8 distribution where we'll disable firewalld. Let's have a quick look at the preparatory steps required to run the examples in this section.
Prerequisites for our examples
If you have an RHEL/CentOS 7 system, nftables is not installed by default. You can install it with the following command:
sudo yum install -y nftables
The examples in this section use an RHEL/CentOS 8 distribution. To directly configure nftables, we need to disable firewalld and potentially iptables (if you ran the examples in the related section). The steps for disabling firewalld were shown at the beginning of the Configuring iptables section.
Also, if you have iptables enabled, you need to stop and disable the related service with the following commands:
sudo systemctl stop iptables
sudo systemctl disable iptables
Next, we need to enable and start nftables:
sudo systemctl enable nftables
sudo systemctl start nftables
We can check the status of nftables with the following command:
sudo systemctl status nftables
A running status of nftables should show active:

Figure 9.50 – Checking the status of nftables
At this point, we are ready to configure nftables. Let's work with a few examples.
Working with nftables
ntftables loads its configuration from /etc/sysconfig/nftables.conf. We can display the content of the configuration file with the following command:
sudo cat /etc/sysconfig/nftables.conf
A default nftables configuration has no active entries in nftables.conf, except for a few comments:
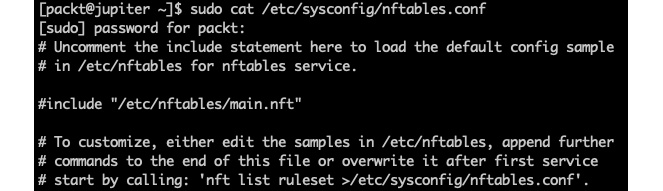
Figure 9.51 – The default nftables configuration file
As the comments suggest, to change the nftables configuration, we have a few options:
- Directly edit the nftables.conf file.
- Manually edit the /etc/nftables/main.nft configuration file, then uncomment the related line in nftables.conf.
- Use the nft command-line utility to edit the rules and then dump the current configuration into nftables.conf.
Regardless of the approach taken, we need to reload the updated configuration by restarting the nftables service. In this section, we'll use nft command-line examples to change the nftables configuration. Power users usually write nft configuration scripts, but it's best to learn the basic steps first.
The following command displays all the rules in the current configuration:
sudo nft list ruleset
Your system may already have some default rules set up. You may choose to do a backup of the related configuration (for example, /etc/sysconfig/nftables.conf and /etc/nftables/main.nft) before proceeding with the next steps.
The following command will flush any preexisting rules:
sudo nft flush ruleset
At this point, we have an empty configuration. Let's design a simple firewall that accepts SSH, HTTP, and HTTPS traffic, blocking anything else.
Accepting SSH, HTTP, and HTTPS traffic
First, we need to create a table and a chain. The following command creates a table named packt_table:
sudo nft add table inet packt_table
Next, we'll create a chain called packt_chain within packt_table:
sudo nft add chain inet packt_table packt_chain { type filter hook input priority 0 ; }
Now, we can start adding rules to packt_chain. Allow SSH, HTTP, and HTTPS access:
sudo nft add rule inet packt_table packt_chain tcp dport {ssh, http, https} accept
Let's also enable ICMP (ping):
sudo nft add rule inet packt_table packt_chain ip protocol icmp accept
Finally, we will reject everything else:
sudo nft add rule inet packt_table packt_chain reject with icmp type port-unreachable
Now, let's have a look at our new configuration:
sudo nft list ruleset
The output is as follows:

Figure 9.52 – A simple firewall configuration with nftables
The output suggests the following settings for our input chain (packt_chain):
- Allow TCP traffic on destination ports 22, 80, and 443 (tcp dport { 22, 80, 443 } accept).
- Allow ping requests (ip protocol icmp accept).
- Reject everything else (meta nfproto ipv4 reject).
Next, we will save the current configuration to /etc/nftables/packt.nft:
sudo nft list ruleset | sudo tee /etc/nftables/packt.nft
Finally, we will point the current nftables configuration to /etc/nftables/packt.nft in the /etc/sysconfig/nftables.conf file by adding the following line:
include "/etc/nftables/packt.nft"
We will use nano (or your editor of choice) to make this change:
sudo nano /etc/sysconfig/nftables.conf
The new nftables.conf now contains the reference to our packt.nft configuration:
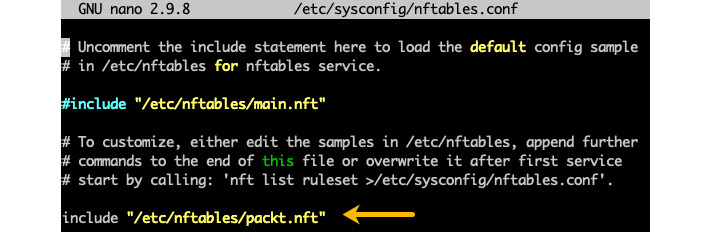
Figure 9.53 – Including the new configuration in nftables
The following command reloads the new nftables configuration:
sudo systemctl restart nftables
After this exercise, you can quickly write a script for configuring nftables using the output of the nft list ruleset command. As a matter of fact, we just did that with the /etc/nftables/packt.nft configuration file.
With that, we will conclude our examination of packet filtering frameworks and the related command-line utilities. They enable power users to have granular control over every functional aspect of the underlying network chains and rules. Yet, some Linux administrators may find the use of such tools overwhelming and turn to relatively simpler firewall management utilities instead.
Next, we'll look at a couple of native Linux firewall management tools that provide a more streamlined and user-friendly command-line interface for configuring and managing firewalls.
Using firewall managers
Firewall managers are command-line utilities with a relatively easy-to-use configuration interface of firewall security rules. Generally, these tools require superuser privileges, and they are a significant asset for Linux system administrators.
In the following sections, we'll present two of the most common firewall managers that are widely used across modern-day Linux distributions:
- firewalld: On RHEL/CentOS platforms
- ufw: On Ubuntu/Debian
Firewall managers are similar to other network security tools (such as iptables, netfilter, and nftables), with the main difference being that they offer a more streamlined user experience for firewall security. An essential benefit of using a firewall manager is the convenience of not having to restart network daemons when you're operating various security configuration changes.
Let's start with firewalld, the default firewall manager for RHEL/CentOS.
Using firewalld
firewalld is the default firewall management utility for a variety of Linux distributions, including the following:
- RHEL/CentOS 7 (and newer)
- OpenSUSE 15 (and newer)
- Fedora 18 (and newer)
On CentOS, if firewalld is not present, we can install it with the following command:
sudo yum install -y firewalld
We may also have to enable the firewalld daemon at startup with the following command:
sudo systemctl enable firewalld
Before proceeding, let's make sure firewalld is enabled:
systemctl status firewalld
The status should yield active (running), as shown in the following screenshot:
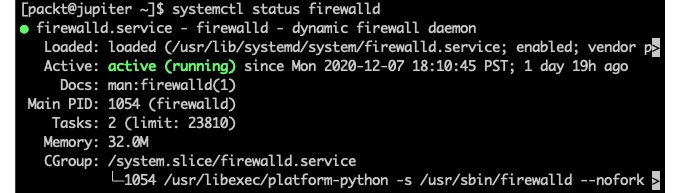
Figure 9.54 – Making sure firewalld is active
firewalld has a set of command-line utilities for different tasks:
- firewall-cmd: The primary command-line tool of firewalld
- firewall-offline-cmd: Used for configuring firewalld while it's offline (not running)
- firewall-config: A graphical user interface tool for configuring firewalld
- firewall-applet: A system-tray app for providing essential information about firewalld (such as running status, connections, and so on)
In this section, we will look at a few practical examples of using the firewall-cmd utility. For any of the other utilities, you may refer to the related system reference manual (such as man firewall-config) for more information.
firewalld (and firewalld-cmd, for that matter) operates with a few key concepts related to monitoring and controlling network packets: zones, rules, and targets.
Zones
Zones are the top organizational units of the firewalld configuration. A network packet monitored by firewalld belongs to a zone if it matches the network interface or IP address/netmask source associated with the zone. The following command lists the names of the predefined zones:
sudo firewall-cmd --get-zones
The command yields the following output:
Figure 9.55 – The predefined zones in firewalld
For detailed information about all the zones that have currently been configured, we can run the following command:
sudo firewall-cmd --list-all-zones
Here's an excerpt of the related output:

Figure 9.56 – Listing firewalld zones with details
The preceding output illustrates a couple of zones (trusted and work), each with its own attributes, some of which will be explained next. Zones associated with an interface and a source are known as active zones. The following command retrieves the active zones:
sudo firewall-cmd --get-active-zones
The output, in our case, is as follows:

Figure 9.57 – The firewalld active zones
Interfaces represent the network adapters that are attached to the localhost. Active interfaces are assigned to either the default zone or a user-defined zone. An interface cannot be assigned to multiple zones.
Sources are incoming IP addresses or address ranges, and they can also be assigned to zones. A single source or multiple overlapping IP address ranges cannot be assigned to more than one zone. Doing so would result in undefined behavior, as it would be unclear which rule takes precedence for the related zone.
By default, firewalld assigns all network interfaces to the public zone without associating any sources with it. Also, by default, public is the only active zone and thus the default zone. The following command displays the default zone:
sudo firewall-cmd --get-default-zone
The default output is as follows:
Figure 9.58 – Displaying the default zone in firewalld
Specifying a source for a zone is optional. Consequently, for every data packet, there will be a zone with a matching network interface. However, there won't necessarily be a zone with a matching source. This paradigm would play an essential role in the order in which the matching rules are evaluated. We'll discuss the related topic in the Rule precedence section. But first, let's get acquainted with the firewalld rules.
Rules
The rules or rich rules that are defined in the firewalld configuration represent the configuration settings for controlling the data packets associated with a specific zone. Usually, a rule would decide if the packet is accepted or rejected, based on some criteria.
For example, to block the use of ping (ICMP protocol) for the public zone, we can add the following rich rule:
sudo firewall-cmd --zone=public --add-rich-rule='rule protocol value="icmp" reject'
The related output is as follows:

Figure 9.59 – Disabling ICMP access with firewalld
We can retrieve the public zone information with the following command:
sudo firewall-cmd --info-zone=public
The rich rules attribute reflects the updated configuration:
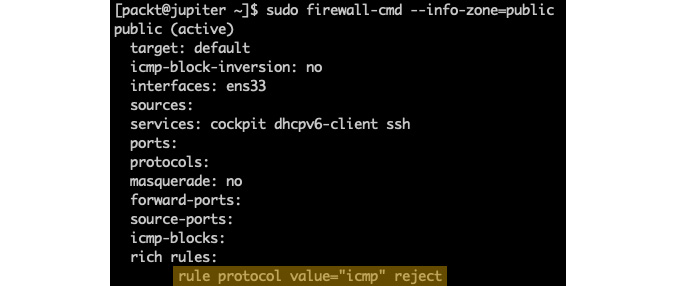
Figure 9.60 – Getting the public zone configuration with firewalld
At this point, our host won't respond anymore to ping (ICMP) requests. We can remove the rich rule we just added with the following command:
sudo firewall-cmd --zone=public --remove-rich-rule='rule protocol value="icmp" reject'
Alternatively, we can enable ICMP access with the following command:
sudo firewall-cmd --zone=public --add-rich-rule='rule protocol value="icmp" accept'
Please note that changes that are made without the --permanent option of the firewall-cmd utility are transient and won't persist after a system or firewalld restart.
When no rich rules are defined or matched for a zone, firewalld uses the zone's target to control the packet's behavior. Let's look at targets next.
Targets
When a packet matches a specific zone, firewalld controls the packet's behavior based on the corresponding zone's rich rules. If there are no rich rules defined, or none of the rich rules match the data packet, the packet's behavior is ultimately determined by the target associated with the zone. The possible target values are as follows:
- ACCEPT: Accepts the packet
- REJECT: Rejects the packet and responds with a reject reply
- DROP: Drops the packet without a reply
- default: Defers to the default behavior of firewalld
Zones, rules, and targets are the key configuration elements used by firewalld when analyzing and handling data packets. Packets are matched using zones and then acted upon using either the rules or targets. Due to the dual nature of zones – based on network interfaces and IP address/range sources – firewalld follows a specific order (or precedence) when calculating the matching criteria. We'll look at this next.
Rule precedence
Let's define the terminology first. We'll refer to the zones associated with interfaces as interface zones. The zones associates with sources are known as source zones. Since zones can have both interfaces and sources assigned to them, a zone can act as either an interface zone, a source zone, or both.
firewalld handles a data packet in the following order:
- Checks the corresponding source zone. There will be, at most, one such zone (since sources can only be associated with a single zone). If there is a match, the packet is handled according to the rules or target associated with the zone. Otherwise, data packet analysis follows as the next step.
- Checks the corresponding interface zone. Exactly one such zone would (always) exist. If we have a match, the packet is handled according to the zone's rules or target. Otherwise, the packet validation follows as the next step.
Let's assume the default target of firewalld – it accepts ICMP packets and rejects everything else.
The key takeaway from the preceding validation workflow is that source zones have precedence over interface zones. A typical design pattern for multi-zone firewalld configurations defines the following zones:
- Privileged source zone: Elevated system access from select IP addresses
- Restrictive interface zone: Limited access for everyone else
Let's explore some more potentially useful examples using the firewall-cmd utility.
The following command displays the services enabled in the firewall:
sudo firewall-cmd --list-services
With a default configuration, we get the following output:
Figure 9.61 – Displaying the enabled services in firewalld
The following command enables HTTPS access (port 443):
sudo firewall-cmd --zone=public --add-service=https
To add a user-defined service or port (for example, 8443), we can run the following command:
sudo firewall-cmd --zone=public --add-port=8443/tcp
The following command lists the open ports in the firewall:
sudo firewall-cmd --list-ports
In our case, the output is as follows:
Figure 9.62 – Displaying the enabled ports in firewalld
Invoking the firewall-cmd command without the --permanent option results in transient changes that won't persist after a system (or firewalld) restart. To reload the previously saved (permanent) configuration of firewalld, we can run the following command:
sudo firewall-cmd --reload
For more information on firewalld, refer to the related system reference (man firewalld) or https://www.firewalld.org.
Using ufw
The Uncomplicated Firewall (ufw) is the default firewall manager in Ubuntu. ufw provides a relatively simple management framework for iptables and netfilter and an easy-to-use command-line interface for manipulating the firewall.
Let's look at a few examples of using ufw. Please note that the ufw command-line utility needs superuser privileges. The following command reports the status of ufw:
sudo ufw status
By default, ufw is inactive (disabled):
Figure 9.63 – Displaying the current status of ufw
We can enable ufw with the following command:
sudo ufw enable
Always be careful when you enable the firewall or perform any changes that may affect your access to the system. By default, when enabled, ufw will block all incoming access except ping (ICMP) requests. If you're logged in with SSH, you may get the following prompt while trying to enable ufw:
Figure 9.64 – Enabling ufw could disrupt existing connections
To play it safe, you may want to abort the preceding operation by pressing n (No) and enabling SSH access in the firewall:
sudo ufw allow ssh
If SSH access is already enabled, the output suggests that the related security rule will not be added:

Figure 9.65 – Attempting to add an existing rule to ufw
At this point, you can safely enable ufw without fearing that your current or existing SSH connections will be dropped. Upon enabling ufw, we get the following output:

Figure 9.66 – Enabling ufw
To check on the detailed status of the firewall, you can run the following command:
sudo ufw status verbose
The following output suggests that SSH (22/tcp) and HTTP/HTTPS (80,443/tcp) access are enabled:
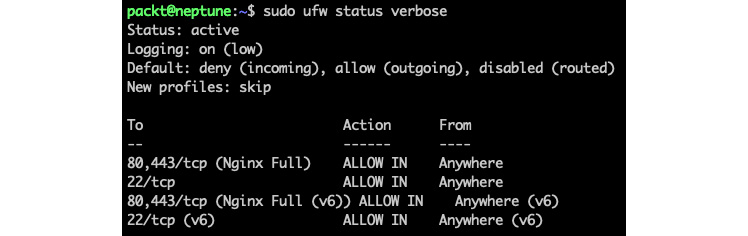
Figure 9.67 – The detailed status of ufw
As we can see, HTTP/HTTPS access is enabled via the Nginx Full application profile. This rule was automatically added to ufw by the Nginx installation. Please be aware that other client or server applications may also add such rules to ufw. It's always recommended to check your firewall settings to ensure that inadvertent access to the system is not allowed.
We can list the current application security profiles with the following command:
sudo ufw app list
In our case, the output is as follows:

Figure 9.68 – Listing application security profiles in ufw
To remove a specific service's access (such as HTTP), we can run the following command:
sudo ufw deny http
The output shows that a new rule has been added:

Figure 9.69 – Disabling HTTP access in ufw
A subsequent detailed status check would show that access to port 80/tcp has been denied. Yet, the resulting status is somewhat convoluted:
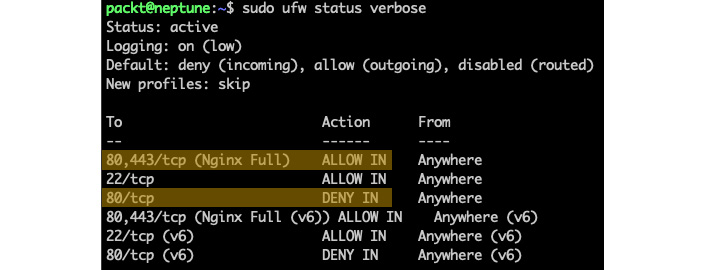
Figure 9.70 – Complex rules in ufw
We've only highlighted the IPv4 equivalents of the rules involving HTTP access. In our case, we have two rules controlling HTTP access:
80,443/tcp (Nginx Full) ALLOW IN Anywhere
80/tcp DENY IN Anywhere
By focusing only on HTTP, we can read that the first rule allows incoming access to HTTP from anywhere. The second rule denies incoming access to HTTP from anywhere. The resulting rule: HTTP is allowed from anywhere. Why? Because the first rule that matches the criteria wins. Subsequent rules that match the same criteria (that is, access to 80/tcp from anywhere) would be discarded.
Important note
Always put more specific (restrictive) rules first. As rules are being added or changed, you may need to delete old entries or rearrange their order to ensure that the rules are appropriately placed and evaluated.
In our case, we need to delete the Nginx Full rule. Keep in mind that this rule also enables HTTPS access (443/tcp), which we may want to keep. To reinstate the rules in the right order, let's get a numbered output of the rule list first:
sudo ufw status numbered
The output yields the following result:

Figure 9.71 – Numbered list of rules in ufw
The order of the rules is suggested by sequence numbers. We will remove the Nginx Full rule next, using the corresponding rule ID (1):
sudo ufw delete 1
We will get a prompt to approve this operation:

Figure 9.72 – Deleting a rule in ufw
The firewall's status is now as follows:
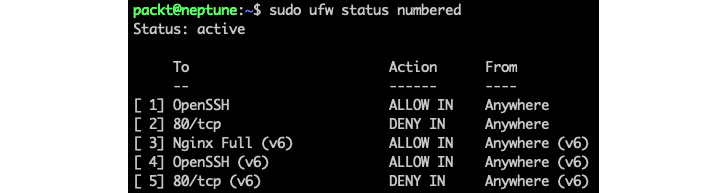
Figure 9.73 – The firewall's status after removing the Nginx Full application profile in ufw
Similarly, we delete the corresponding IPv6 profile, Nginx Full (v6), with the corresponding ID (3). Please be aware that the rule list has been reindexed upon the previous ufw delete operation:
sudo ufw delete 3
Now, it's safe to re-add the Nginx HTTPS profile to only enable HTTPS access (443/tcp):
sudo ufw allow 'Nginx HTTPS'
The final status now yields the following output:
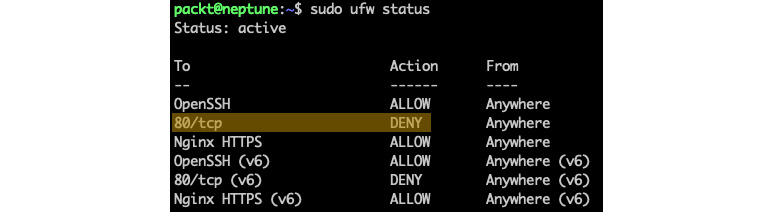
Figure 9.74 – More specific rules should go first in ufw
As we can see, the more specific (restrictive) rule (80/tcp DENY) goes first (highlighted only for IPv4). We could have even allowed the Nginx Full profile, which would have enabled HTTP access. Still, the corresponding rule (80/tcp ALLOW) would be placed after the more restrictive counterpart and thus discarded.
Alternatively, we could use the insert option to add a specific rule at a given position. For example, the following command places the 80/tcp DENY rule in the second position (as shown in the previous screenshot):
sudo ufw insert 2 deny http
Let's look at a few more examples of using ufw. The following command enables SSH access (port 22) for all protocols (any) from a specific source address range (192.168.0.0/24):
sudo ufw allow from 192.168.0.0/24 to any port 22
The following command enables ufw logging:
sudo ufw logging on
The corresponding log traces are usually in /var/log/syslog:
grep -i ufw /var/log/syslog
The following log trace indicates a failed attempt (UFW BLOCK) from a source address (SRC=172.16.191.1) to our destination address (DST=172.16.191.4), targeting the HTTP service on port 80 (DPT=80), using the TCP protocol (PROTO=TCP):

Figure 9.75 – Analyzing ufw logs
To disable ufw logging, run the following command:
sudo ufw logging off
The following command reverts ufw to the system's defaults:
sudo ufw reset
The preceding command results in removing all the rules and disabling ufw.
For more information about ufw, you may wish to explore the UFW Community Help at https://help.ubuntu.com/community/UFW or the related system reference (man ufw).
The use of firewall management tools such as ufw and firewalld may have more appeal to some Linux administrators, compared with lower-level packet filtering utilities (for example, netfilter, iptables, and nftables). One of the arguments for choosing one tool over the other, besides platform considerations, is related to scripting and automation capabilities. Some power users may consider the nft command-line utility the tool of choice for designing their firewall rules, due to the granular control provided by nftables. Other users may be inclined to use iptables, especially on older legacy platforms. In the end, it's a matter of choice or preference, as all of these tools are capable of configuring and managing a firewall to roughly the same extent.
Let's wrap up our chapter with some final considerations.
Summary
The relatively vast content of this chapter may appear overwhelming. A key takeaway should be the focus on the frameworks (modules). If we're discussing firewalls, we should look at packet filtering frameworks such as iptables, netfilter, and nftables. For access control, we have security modules such as SELinux and AppArmor. We covered some of the pros and cons of each. The pivoting choice, possibly deciding the Linux distro, is between AppArmor and SELinux. One is perhaps swifter than the other, with the related administration effort hanging in the balance. For example, choosing AppArmor would narrow down the major Linux distributions to Ubuntu, Debian, and OpenSUSE. The distro choice, in turn, would further dictate the available firewall management solutions, and so on.
Mastering the application security frameworks and firewall management tools will help you keep your systems safe with minimal effort. As with any typical Linux system administration task, there are many ways of securing your system. We hope that you will build upon the exploratory knowledge and tools presented in this chapter to make a balanced decision regarding keeping your systems secure.
The next chapter will add a further notch to the safety and protection of your system by introducing disaster recovery, diagnostics, and troubleshooting practices.
Questions
Here's a brief quiz about some of the essential concepts that were covered in this chapter:
- Enumerate at least a couple of ACMs that are used in Linux.
- Enumerate the fields of the SELinux security context.
- What is a domain in SELinux?
- Can you think of a significant difference between SELinux and AppArmor in terms of enforcing security policies?
- What is the AppArmor command-line utility for retrieving the current application profiles?
- How do we toggle an AppArmor application profile between the enforce and complain modes?
- How many chains can you think of in the Linux kernel networking stack?
- What is the default firewall management solution in RHEL/CentOS 8? How about Ubuntu?
- Can you think of a best practice for designing firewall rules?
- If you had to pick a packet filtering framework, which one would you choose? Why?
Further reading
Please refer to the following for more information about the topics that were covered in this chapter:
- Mastering Linux Security and Hardening – Second Edition, Donald A. Tevault, Packt Publishing
- Practical Linux Security Cookbook – Second Edition, Tajinder Kalsi, Packt Publishing
- Practical Linux Security (video), Tajinder Kalsi, Packt Publishing
- Linux Firewalls: Enhancing Security with nftables and Beyond – 4th Edition, Steve Suehring, Addison-Wesley Professional