
This is the final chapter in this book. We've discussed a lot of patterns, but in this final chapter I want us to discuss how these patterns can be applied.
I want us here to talk about the bigger picture about how our code fits together, and what the key takeaways are for us to write great code.
In addition to this, I would like to discuss where patterns are suited to our application in the development phase.
In this chapter, we'll cover the following points:
- The nature of an HTTP request
- RESTful API design
- Keep It Simple, Stupid
- Software development life cycle and engineering practices
- The importance of testing
- A light introduction to BDD
Many developers find HTTP requests are abstracted away from them; indeed, many PHP developers will never need to understand how an HTTP request actually works under the hood.
PHP developers often work with HTTP networks when developing. Indeed, PHP contains some core functions that are great when working with HTTP communication.
Let's take a look at an HTTP request at a high-level using a tool called curl. The curl is essentially a command-line tool that allows us to simulate network requests. It allows you to simulate the transfer of data using various protocols.
The curl projects produce both the libcurl and curl command line tool. Libcurl is a library that PHP supports, allowing you to connect and communicate over a list of protocols in PHP, providing your installation has it installed.
In this case, however, we will be using the command-line tool to simulate requests.
Let's start off by making a simple curl request to a given website, as follows:
curl https://junade.com
Depending on the site you query in the command you will notice that the Terminal output is blank:

What's going on here? In order to find out, we need to dig a little further.
You can use the -v argument in the curl command so we see a verbose output of what's going on:
curl -v http://junade.com
This output of this is substantially different:
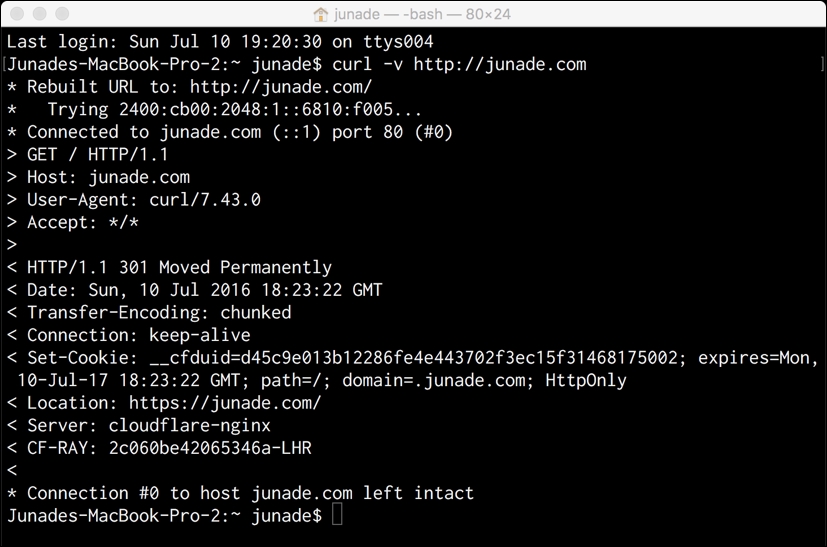
With this output we can see the headers that are sent and the headers that are received.
The block starting with asterisks * indicates the connection being established. We can see how curl has rebuilt the URL so it is correct (containing a forward slash at the end), then resolved the IP address of the server (in my case, an IPv6 address), and then finally established the connection to the web server:
* Rebuilt URL to: http://junade.com/
*   Trying 2400:cb00:2048:1::6810:f005...
* Connected to junade.com (::1) port 80 (#0)
The hostname is turned into an IP address by querying the DNS server; we'll go into more detail about this later on. But at this point, it is important to remember that, after this point, the connection to the server is established using an IP address.
If we were to get rid of the forward slash at the end, we can actually see that in the first line, rebuilding the URL will disappear, as it will already be in the correct format before we even make the request:

Next let's look at the succeeding lines the asterisks. We see the outbound headers in the greater than signs >.
These headers look like this:
> GET / HTTP/1.1
> Host: junade.com
> User-Agent: curl/7.43.0
> Accept: */*
>
So the first message we see is the request method GET, followed by the endpoint / and the protocol HTTP/1.1.
Next, we see the Host header, which tells us the domain name of the server and can also contain the TCP port number on which the server is listening, but this is often amended if the port is standard for the service requested. Why is this needed, though? Suppose a server contains many VirtualHosts; this is what actually allows the server to determine between VirtualHosts using the header. VirtualHosting essentially allows a server to host more than one domain name. In order to do this, we need this header; when a server sees a HTTP request coming in they won't see the header.
Remember when I said a connection is established using an IP address? This Host header is what allows us to send through that hostname variable indicating what an IP address is.
Next, we see the User-Agent header, indicating what browser the client is using; our User-Agent header in this request indicates we are sending our HTTP request using curl command. Remember not to trust any HTTP headers from the client, as they can be manipulated to contain whatever data a malicious adversary wants to put into them. They can contain everything from a fake browser identifier to a SQL injection.
Finally, the Accept header indicates the Content-Type headers that are acceptable for the response. Here, we see a wildcard acceptance, indicating we are happy to receive whatever the server is sending us. In other cases, we can use Accept: text/plain to indicate that we want to see plaintext, or Accept:application/json for JSON. We can even specify if we want to receive a JPG image by using Accept: image/jpg.
There are various parameters that can also be sent to over an Accept header; for example, we can request HTML using a UTF-8 charset with Accept: text/html; charset=UTF-8.
At a basic level, the syntax that is permissible in this header looks like this:
top-level type name / subtype name [ ; parameters ]
The server can indicate the content type being returned to the user using a Content-Type header in the response. So the server can send a header back to the end user as follows:
Content-Type: text/html; charset=utf-8
Moving onto the topic of the response, let's take a look at the response. These are prefixed with <:
< HTTP/1.1 301 Moved Permanently
< Date: Sun, 10 Jul 2016 18:23:22 GMT
< Transfer-Encoding: chunked
< Connection: keep-alive
< Set-Cookie: __cfduid=d45c9e013b12286fe4e443702f3ec15f31468175002; expires=Mon, 10-Jul-17 18:23:22 GMT; path=/; domain=.junade.com; HttpOnly
< Location: https://junade.com/
< Server: cloudflare-nginx
< CF-RAY: 2c060be42065346a-LHR
<
So the first thing we get in the response indicating the format and the status code. HTTP/1.1 indicates that we are receiving a HTTP/1.1 response, and a 301 Moved Permanently message indicates a permanent redirect. Accordingly, we also receive a Location: https://junade.com/ header, which tells us where to go next.
The Server header indicates the signature of the web server that is supplying our request. It could be Apache or Nginx; in this case, it's the modified version of Nginx that CloudFlare use for their network.
The Set-Cookie header is used to indicate what cookies the browser should set; the standard for this is in a document known as RFC 6265.
RFC stands for Request for Comments; there are a number of types of RFC. Standards Track RFCs are those intending to become Internet Standards (STDs), whereas Informational RFCs can be anything. There are a number of other types of RFC, such as Experimental, Best Current Practice, Historic, and even an Unknown RFC type for those where the status is unclear if they were to be published today.
The Transfer-Encoding header indicates the encoding used to transfer the entity to the user, which could be anything from chunked even to something such as gzip, which is a compressed entity.
Interestingly, the HTTP/2 protocol that was published in RFC 7540 in May 2015 actually allows header compression. Nowadays, we send more in header data than was originally transmitted when the HTTP/1 protocol was created (the original HTTP protocol didn't even contain a Host header!).
The Connection header provides control options for the connection. It allows the sender to specify the options that are desired for the current connection. Finally, the Date header indicates the date and time when the message was sent.
Consider this: can an HTTP request/response contain more than one of the same header of the name?
Yes, this is particularly useful in some headers, such as the Link header. This header is used to perform HTTP/2 Server Push; Server Push allows the server to push requests to the client before they are requested. One asset can be specified per header; therefore, multiple headers are needed to push multiple assets.
This is something we can do in PHP. Take the following header function call in PHP:
header("Link: <{$uri}>; rel=preload; as=image", false);
While the first argument is the string of the actual header we're sending, the second argument (false) states that we don't want to replace a previous header of the same, instead we want to send this one as well but not replace it. By setting this flag to true we instead state that we want to override the previous header; this is the default option if the flag isn't specified at all.
Finally, when the request is closed you will see a final asterisk indicating the connection was closed:
* Connection #0 to host junade.com left intact
Typically, this will become below the body if there is one. In this request, there wasn't one as it was merely a redirect.
I now make a curl request to where that Location header is pointing using the following command:
curl -v https://junade.com/
You will now notice that the connection close message came after the end of the HTML body:

Let's now try exploring a few HTTP methods. In REST APIs you will frequently use GET, POST, PUT, and DELETE; but first we'll start by exploring two others, HEAD and OPTIONS.
An HTTP OPTIONS request details which requests methods you can use on a given endpoint. It provides information about which communication options are available to that particular endpoint.
Let me demonstrate this. I'm going to be using a service called HTTPBin, which allows me to make requests to over curl to get some responses back from a real server.
Here's an OPTIONS request I'm making using curl:
curl -v -X OPTIONS https://httpbin.org/get
The -X option allows us to specify a particular HTTP request type instead of just defaulting to curl.
Let's see what this looks like once executed:
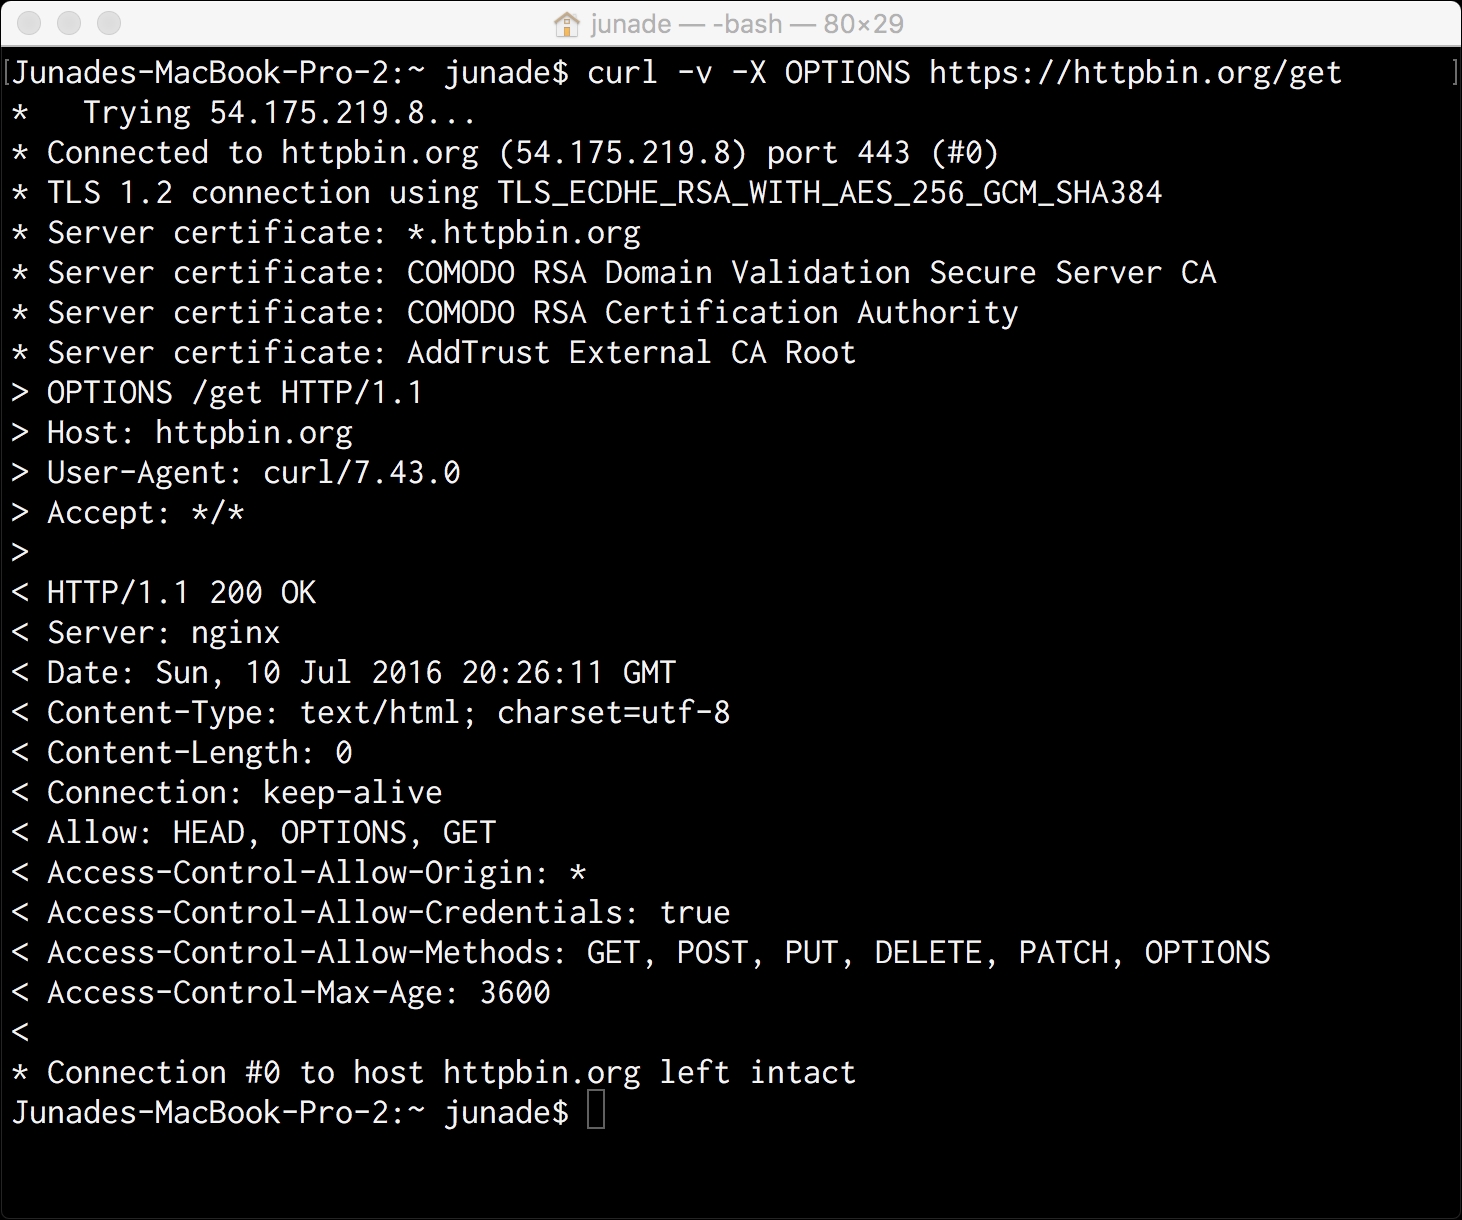
Firstly, you'll notice that, given the request is over HTTP, you will see some extra information in the asterisk; this information contains the TLS certificate information that is used to encrypt the connection.
Take a look at the following line:
TLS 1.2 connection using TLS_ECDHE_RSA_WITH_AES_256_GCM_SHA384
TLS 1.2 indicates the version of transport layer security we're dealing with; the second part, which states TLS_ECDHE_RSA_WITH_AES_256_GCM_SHA384, indicates the cipher suite for the connection.
The cipher suite starts by detailing that we're dealing with TLS. ECDHE_RSA indicates that the key exchange is done using elliptic curve Diffie-Hellman. The key exchange essentially allows the encryption keys to be transmitted securely. By using elliptic curve cryptography, a particular key can be shared, which can then be used to encrypt data later on. ECDHE_RSA means that we use elliptic curve Diffie-Hellman to share a key based on an RSA key that the server has gotten. There are a number of other key exchange algorithms; for example, ECDH_ECDSA uses Fixed ECDH with ECDSA-signed certificates.
The access-control prefixed headers are used for a mechanism called CORS, which essentially allows JavaScript to make cross-origin API requests; let's not worry about this here.
The header we do need to worry about with an OPTIONS request is the Allow header. This details what request methods we're allowed to submit back to that particular endpoint.
Therefore, this is the request we get when we query the /get endpoint:
< Allow: HEAD, OPTIONS, GET
Note that the endpoint I use here uses the /get endpoint. Instead, let's make another OPTIONS request to the /post endpoint using the following curl request:
curl -v -X OPTIONS https://httpbin.org/post
This is the response we get back:

You'll notice that the Allow header now contains POST and OPTIONS. Also note that the HEAD option has gone.
You'll soon find out that a HEAD request is very similar to a GET request except without a message body. It merely returns the headers of a HTTP request but not the body of a request. Thus, it allows you to get the meta information about an entity without needing to get the complete response.
Let's make a HEAD request to a /get endpoint:
curl -I -X HEAD https://httpbin.org/get
Instead of using the -v (verbose) option in this request, I'm using the -I option, which will merely get the HTTP header. This is well suited to making an HTTP request using the HEAD option:

As you can see, we get the type of the response in the Content-Type header. Alongside this, you'll get the length of the request in the Content-Length header. The length is measured in octets (8 bits); you might think that is is the same as a byte, but a byte is not necessarily 8 bits on all architectures.
There are a number of other headers that can be sent to express meta information. This may include standard headers or non-standard headers to express other information that you can't express in standardized RFC-backed headers.
HTTP ETags (entity tags) are a mechanism that provide cache validation. You can use them in the context of RESTful APIs for optimistic concurrency control; this basically allows multiple requests to complete without needing to interfere with each other. This is quite an advanced API concept, so I won't go into too much detail here.
Note that in both our HTTP HEAD and OPTIONS request we both got 200 OK header messages. A 200 status code indicates a successful HTTP request.
There are many different types of status code. They are categorized as follows:
- 1xx messages: Informational
- 2xx messages: Success
- 3xx messages: Redirect
- 4xx messages: Client Error
- 5xx messages: Server Error
An informational header could be a 101 response, which indicates the client is switching protocols and the server has agreed to do so. You probably won't encounter informational header messages if you're developing RESTful APIs; these are most likely things that will be sent by the web server, which is abstracted away from you as a developer.
Correct use of the other HTTP status codes is vital for correct development of a API, particularly one that is RESTful.
Success status codes aren't just limited to a 200 OK message; 201 Created indicates a request has been fulfilled that has created a new resource. This is particularly useful when a PUT request is made to create a new resource or using POST to create a subsidiary resource. 202 Accepted indicates a request has been accepted for processing but processing has not been completed, which is useful in a distributed system. 204 No Content indicates the server has processed the request and is not returning any information; a 205 Reset Content header does the same but asks the requester to reset their document view. These are just a few 200's messages; there are obviously many more.
Redirection messages include 301 Moved Permanently, which we showed in our first curl example, whereas 302 Found can be used for more temporary redirects. Again, there are other message codes.
Client error codes include the infamous 404 Not Found message when a resource cannot be found. Alongside this, we have 401 Unauthorized when authentication is required but not provided, 403 Forbidden is where a server refuses to respond to a request at all (for example, incorrect permissions). 405 Method Not Allowed allows us to deny requests on the basis of them being submitted using an invalid request method, which is, again, very useful for RESTful APIs. 405 Not Acceptable is a response where the server cannot generate a response in accordance with the Accept header sent to it. Again, there are numerous other 4xx HTTP codes.
Finally, Server Errors allow the server to indicate they failed to fulfill a request that was apparently valid. These messages included the 500 Internal Server Error, which is a generic error message given when an unexpected condition is encountered.
Let's now look at making a GET request. The curl, by default will make a GET request if we don't specify any data to send or a particular method:
curl -v https://httpbin.org/get
We can also specify that we want a GET request:
curl -v -X GET https://httpbin.org/get
The output of this is as follows:

Here, you can see we get the same headers as we did in the HEAD request, with the addition of a body; some JSON data of whatever resource we're trying to access.
There we get a 200 Success message, but let's make a HTTP request to an endpoint that doesn't exist so we can trigger a 404 message:

As you can see, we get a header stating 404 NOT FOUND instead of our usual 200 OK message.
HTTP 404 responses can also come without a body:

While GET requests merely show an existing resource, POST requests allow us to modify and update a resource. PUT requests instead allow us to create a new resource or override one, but specifically at a given endpoint.
What's the difference? PUT is idempotent, while POST is not idempotent. A PUT is like setting a variable, $x = 3. You can do it over and over again, but the output is the same, $x is 3.
POST is, instead, a lot like running $x++; it causes a change that is not idempotent, the same way as $x++ can't be repeated over and over to give the same exact variable. POST updates a resource, adds a subsidiary resource, or causes a change. PUT is instead used when you know the URL you want to create.
POST can be used to create when you know the URL of the factory that creates the resource for you.
So, for example, if the endpoint/user wants to generate a user account with a unique ID, we would use this:
POST /user
But if we wanted to create a user account at a particular endpoint, we would use PUT:
PUT /user/tom
Similarly, if we want to overwrite tom at the given endpoint, we can put another PUT request there:
PUT /user/tom
But suppose we don't know Tom's endpoint; instead, we just want to PUT to an endpoint with a user ID argument and some information will be updated:
POST /user
Hopefully that makes sense!
Now let's take a look at a givenHTTP POST request.
We can create a request using URL encoded data:
curl --data "user=tom&manager=bob" https://httpbin.org/post
Note that if we specify data but not a request type in curl it will default to POST.
If we execute this, you can see the Content-Type is x-www-form-urlencoded:

However, we can also submit JSON data to the endpoint if the API allows us to and accepts that format:
curl -H "Content-Type: application/json" -X POST -d '{"user":"tom","manager":"bob"}' https://httpbin.org/post
This provides the following output, noting the Content-Type is now JSON instead of x-www-form-urlencoded form it was before:

We can now make a HTTP request using PUT by sending the same data to the /put endpoint:
curl -H "Content-Type: application/json" -X PUT -d '{"user":"tom","manager":"bob"}' https://httpbin.org/put
Let's change the request type over to PUT:

Let's make the same request to a DELETE endpoint using the following curl request (in this example, we will submit data):
curl -H "Content-Type: application/json" -X DELETE -d '{"user":"tom"}' https://httpbin.org/delete
This has the following output:

In the real world, you might not necessarily need to submit back any information related to the fact we've just deleted a resource (that's what DELETE is for). Instead, we may simply want to submit a 204 No Content message. Typically, I would not pass a message back.
HTTP/2 at a high level maintains this request structure. Remember that most HTTP/2 implementations require TLS (h2) and most browsers do not support HTTP/2 over cleartext (h2c), even though it is de facto possible in the RFC standard. If using HTTP/2 you realistically need TLS encryption on the request.
Woo! That was a mouthful, but that is everything you will need to know about an HTTP request, at a very high level. We didn't go into network detail, but this understanding is necessary for API architecture.
Now that we have a good understanding of HTTP requests and the methods used in HTTP communication, we can move on to understanding what makes an API RESTful.