Chapter 13
Compliance Settings
Compliance Settings in Configuration Manager 2012 allow you to assess the compliance of client devices with regard to a number of configurations, such as whether the correct operating system version is installed and configured appropriately, whether all required applications are installed and configured correctly, whether optional applications are configured appropriately, and whether prohibited applications are installed on your clients. Additionally, you can check for compliance with software updates, security settings, and mobile devices. Configuration item settings for the Windows Management Instrumentation (WMI), registry, and script in ConfigMgr 2012 allow you to automatically remediate noncompliant settings when they are found.
Compliance Settings is the new name for ConfigMgr 2007 Desired Configuration Management (DCM). With the new name come changes to the UI by simplifying the process of creating compliance settings, which ensures that IT professionals can remediate those noncompliant settings.
In this chapter you will learn to
- Enable the client settings.
- Create configuration items.
- Define a configuration baseline.
Overview of Compliance Settings
Compliance settings are evaluated by defining a configuration baseline that contains the configuration items you want to monitor and rules that define the required compliance. This configuration data can be imported from http://pinpoint.microsoft.com in Microsoft System Center Configuration Manager configuration packs, defined as best practices by Microsoft and other vendors, defined within Configuration Manager, or defined externally and then imported into Configuration Manager.
After a configuration baseline is defined, it can be deployed to devices through collections and evaluated on a schedule. Client devices can have multiple configuration baselines assigned to them, which provide the administrator with a high level of control.
Client devices evaluate their compliance against each configuration baseline they are assigned and immediately report back the results to the site using state messages and status messages. If a client is not currently connected to the network but has downloaded the configuration items referenced in its assigned configuration baselines, the compliance information will be sent on reconnection.
You can monitor the results of the configuration baseline evaluation compliance from the Deployments node of the Monitoring workspace in the Configuration Manager console. You can also run a number of compliance settings reports to drill down into details, such as which devices are compliant or noncompliant and which element of the configuration baseline is causing a computer to be noncompliant. You can also view compliance evaluation results from Windows clients on the Configurations tab of Configuration Manager in the Windows Control Panel.
What’s New in Configuration Manager 2012?
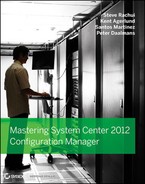
The following Compliance Settings features are new or have been changed since Configuration Manager 2007 (see Figure 13.1).
Figure 13.1 Compliance Settings home page
- Configuration Manager 2007 Desired Configuration Management is now called Compliance Settings in Configuration Manager 2012.
- The process of creating configuration baselines has been simplified.
- Settings can be reused for multiple configuration items.
- Remediation is supported for WMI, registry, and script settings that are noncompliant.
- The new monitoring features of Configuration Manager 2012 can be used to monitor compliance settings.
- Configuration baselines can be deployed to users and devices.
- Compliance Settings can be used to manage mobile devices in the enterprise.
- Unlike Configuration Manager 2007, Configuration Manager 2012 does not support uninterpreted configuration items.
An uninterpreted configuration item is one that is imported into Compliance Settings and that cannot be interpreted by the Configuration Manager console. Consequently this configuration item’s properties cannot be viewed or edited in the console. Before you import configuration packs or configuration baselines into Configuration Manager 2012, you must remove uninterpreted configuration items from Configuration Manager 2007.
What Can You Do with Compliance Settings?
The best answer is that with Compliance Settings you can automatically check the compliance of your Configuration Manager clients against standards that you choose. Those standards can be company policies regarding how a computer is configured, policies for compliance with regulations such as Sarbanes-Oxley (SOX), or best practices defined by a vendor or based on your internal IT department’s experience. They can be settings that a department manager has decided all the computers within the department must meet or a means to identify computers that need more memory as defined by the IT manager in charge of desktops.
Given that range of potential applications, the next question is, what settings can you check with Compliance Settings? This seems like an easy question to answer, but of course it isn’t. So, let’s explore what you can and cannot do with Compliance Settings. First, Compliance Settings cannot allow you to get an extra hour of sleep every day. However, it can help you create a baseline for your environment.
Let’s examine this from a different perspective, and then it will be clear what exactly you can and cannot check for using Compliance Settings.
Configuration Items
Configuration items (CIs) are the standards that you assemble to create a configuration baseline, which is then applied to Configuration Manager clients. You can choose from specific types of configuration items to create these checks:
- Application CIs
- Operating system CIs
- Software update CIs
- General CIs
These checks are keys to understanding the limits of what you can do with Compliance Settings. When you choose the type of configuration items using the wizard in the Configuration Manager console, it will determine what types of checks you are allowed to include as part of a CI. Table 13.1 summarizes the four CI types.
Table 13.1: Configuration item types
| Type | Definition | Example |
| Application | Used to check an application’s settings for compliance | Checking Microsoft Office Word for the latest Normal.dot file |
| Operating system | Used to check a particular operating system’s version or settings for compliance | Checking to ensure that Configuration Manager clients have the latest service pack for Microsoft Windows Vista installed |
| Software update | Used to check Configuration Manager clients for software update compliance | Checking the status of approved software updates on Configuration Manager clients |
| General | Used to check settings of objects that do not fall under the other categories | Checking the hosts file to ensure that spyware has not modified the file or that the system has the latest hosts file installed |
As you would expect, not all of these configuration item types offer the same properties. For example, the operating system type contains a property to check for the exact build of the operating system that is running on the Configuration Manager client being evaluated; this option is not available in the other configuration types. As mentioned earlier, a configuration baseline can (and almost always will) contain multiple configuration items of all configuration types. The properties available to each configuration item type are listed in Table 13.2.
Table 13.2: Properties of configuration item types
| Type | Available | Not Available |
| Application | General, Objects, Settings, Detection Method, Applicable, Security | Windows Version |
| Operating system | Windows Version, Objects, Settings, Security | Detection Method, Applicable |
| Software update | General, Security | Windows Version, Objects, Settings, Detection Method, Applicable |
| General | General, Objects, Settings, Applicable, Security | Windows Version, Detection Method |
The reason for restricting configuration item types to specific properties, instead of having a single type with all properties available, is to keep the configuration items as small as possible. Defining configuration items as specific types allows you to reuse them when you create configuration baselines. For example, you can create an operating system configuration item that checks for Microsoft Windows 7.
Additional objects and settings are available when you create this configuration item type. You can also check for the presence of a specific file and its attributes. You can run validation against an assembly that is present, and you can even check the string value of a registry key and report on noncompliance for any of these objects or settings, all within the same configuration item. But if you design your configuration items with the idea of being able to reuse them in multiple configuration baselines, they should be as lean and specific as possible. If you need the configuration item to validate something else for a particular scenario, you can simply create a child configuration item. This configuration item will inherit all the original settings of the configuration item and allow you to add additional validations, leaving the original configuration item intact and not affecting any of the configuration baselines that are using that configuration item.
Configuring Compliance Settings Client Settings
Configuring the Compliance Settings client settings is as easy as selecting True or False on the Enable Compliance Evaluation On Clients option and determining the appropriate schedule for clients to evaluate their compliance. This is located on the Administration workspace ![]() Client Settings
Client Settings ![]() Default Client Agent Settings. Then right-click and select Properties. This will open the properties window for the client settings (see Figure 13.2). By setting the Enable Compliance Evaluation On Clients option to True, you enable this option on the default settings. The default schedule for evaluation is set to a simple schedule of every seven days. You can adjust this schedule as necessary for your environment, including using a custom schedule that will allow you more control over when it runs, but the default schedule will typically be adequate for most environments. You can also modify the default client settings, create new custom client settings, or modify existing custom client settings. You create or modify custom client settings when you want to apply a group of client settings to specific collections on the client settings.
Default Client Agent Settings. Then right-click and select Properties. This will open the properties window for the client settings (see Figure 13.2). By setting the Enable Compliance Evaluation On Clients option to True, you enable this option on the default settings. The default schedule for evaluation is set to a simple schedule of every seven days. You can adjust this schedule as necessary for your environment, including using a custom schedule that will allow you more control over when it runs, but the default schedule will typically be adequate for most environments. You can also modify the default client settings, create new custom client settings, or modify existing custom client settings. You create or modify custom client settings when you want to apply a group of client settings to specific collections on the client settings.
Figure 13.2 The default client settings

Configuration items are pieces of the configuration baseline that, when assembled, will allow you to monitor configuration drift from what you have specified. To demonstrate the processes of creating configuration items and a configuration baseline, we’ll use a utility called Microsoft Calculator Plus, described in the accompanying sidebar. Because there are so many ways to configure this product and use it, we’ll demonstrate its use throughout this chapter so you can gain a better understanding of Compliance Settings. You can then take these examples and apply them to any product you choose.
Calculator Plus
This application is a mathematical calculator that allows you to complete many different types of conversions; it also includes all the mathematical functions offered in Microsoft Calculator. This is a very small application, which is why we selected it to use in this example.
To download this application, go to
http://www.microsoft.com/download/en/details.aspx?displaylang=en&id=21622
You will need to install this application on your ConfigMgr client.
Start by opening the Configuration Manager console, if necessary. From the Asset and Compliance workspace expand Compliance Settings, right-click Configuration Items, and click Create Configuration Item. You should be on the General page of the Create Configuration Item Wizard, as shown in Figure 13.3.
Figure 13.3 The Create Configuration Item Wizard - General page

To create a new configuration item, follow the instructions in the wizard. As part of this chapter you will be guided through the steps to create your first configuration item and apply this to any collection for evaluation. In this example we will validate that Microsoft Calculator Plus is installed. You could also use any of the applications used in Chapter 7, “Application Deployment.”
Name, Description, and Category
In the Create Configuration Item Wizard, you begin on the General tab. Fill in the Name and Description fields and then create a category before moving to the next tab.
1. In the Name field, type Microsoft Calculator Plus - Installed.
2. In the Description field, type This configuration item validates that the Microsoft Calculator is installed.
3. Then, still in the Description field, press Ctrl+Enter to simulate a carriage return and add something descriptive stating when and by whom this item was created or changed.
You could use your initials or the current date or a combination; it just needs to be something that will help you later know who created or changed the item and when, so that if anyone has a question about your configuration item, they know who to contact.
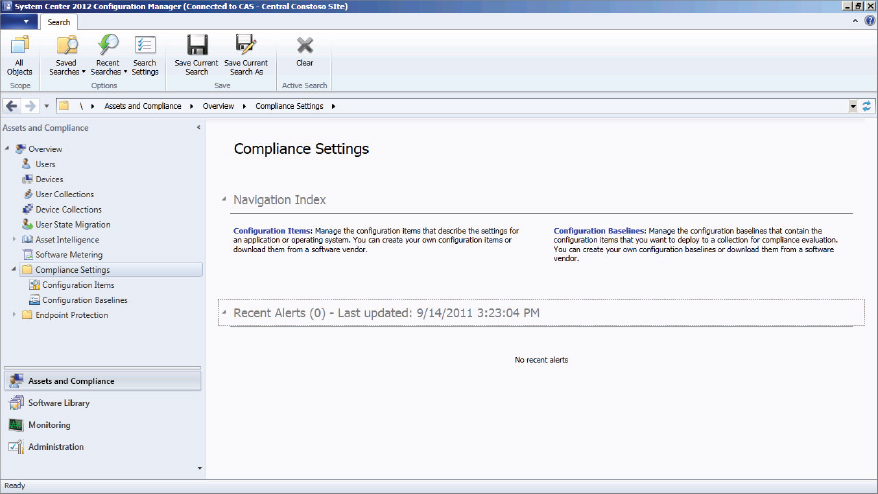
4. Click the Categories button to open the categories list.
The list is populated with a few default categories, and the top section allows you to add your own custom categories.
What Is a Good Category?
This will depend on your own administration style to a certain degree as well as the number of configuration items you will be creating. If you plan to check only Exchange servers for configuration drift, then you may not need any additional categories or just a few more. If you plan to check clients for application settings, Internet Explorer for configuration drift, different operating systems, files for the correct security settings, and so on, you would probably be wise to set up a standard for determining when new category types are needed and when you can use existing ones.
We have seen administrators who set up categories for every possible difference and others who set up none. If you are going to use the categories and build a large number of configuration items and baselines, then you should set up custom categories, but don’t go overboard. Remember that categories are used to sort and search, so if you have too many, you get little or no benefit; too few is the same as none. It’s best to use simple rules to create a standard: Does this configuration item fit into a category that exists already? Does that category generally and easily define this configuration item’s purpose? If the answer is no to either, then you probably need a new category.
For this example we are going to create a new category.
5. In the Add A New Category section, type Microsoft and click the Add button.
This should add it to the Administrative Available Categories section and select it.
6. Before you click OK, verify that your categories look like those in Figure 13.4.
Figure 13.4 The Create Configuration Item Wizard’s Manage Administrative Categories dialog box
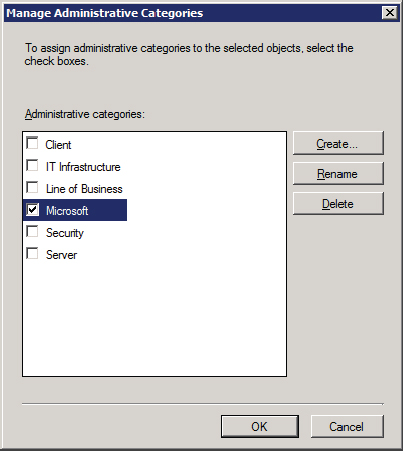
7. Click OK to return to the General tab in the Create Configuration Item Wizard, which should now contain the name, a description, and your newly created category.
8. Verify that your dialog looks the same as Figure 13.5, and then click Next.
Figure 13.5 Create Configuration Item Wizard - General page completed
Choosing a Detection Method
The next tab in the wizard is Detection Methods, which is unique to the Application configuration item type; it is not offered with the other types. The purpose of this tab is to specify the method used to verify that the application being checked for is installed on the client.
Three options are available:
- The first is Always Assume Application Is Installed.
This will skip any verification check, which sounds great; you’re essentially telling the system to check the application for just the settings you’re about to specify. But if you do this while using certain rules in creating your configuration baseline, you will run into problems.
Baseline Rules
Which baseline rules cause problems? You will need to decide which if any of the following are problematic:
- If these optional application configuration items are detected, they must be properly configured.
- These application configuration items must not be present.
- If another baseline is dependent on these configuration items, it may invalidate your dependency.
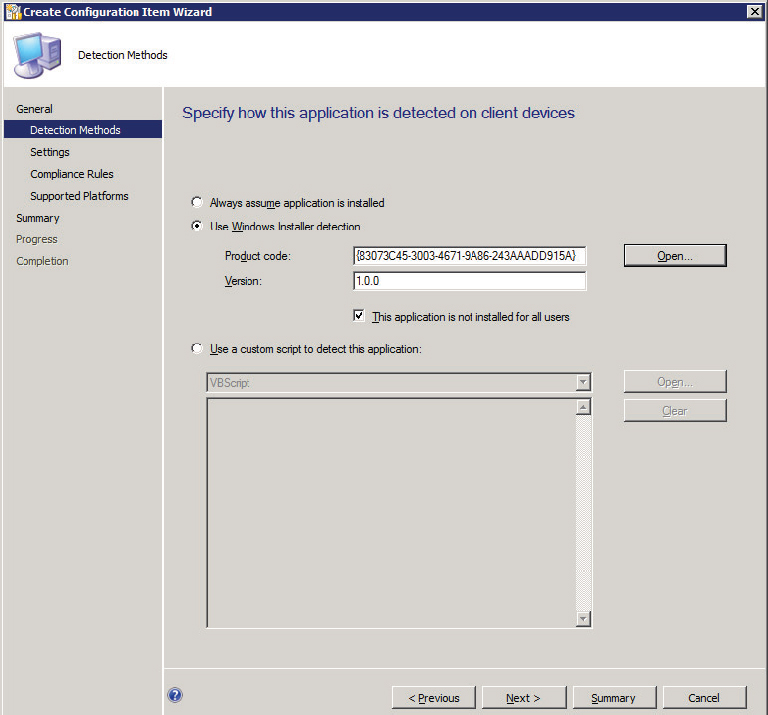
- The second option, Use Windows Installer Detection, is used to verify the product code the application vendor included with the MSI installer and the version.
- The final option is Use A Custom Script To Detect This Application; you can use VBScript, JScript, or PowerShell.
In the following procedure, you’ll use the second option:
1. Select the Use Windows Installer Detection radio button.
This will require you to have access to the installation files, but if you downloaded the Microsoft Calculator Plus application from the Microsoft Downloads site, you should already have this file. If not, please download it now.
2. Assuming you have the Microsoft Calculator Plus files downloaded and extracted, click the Open button on the Detection Methods page, and browse to the folder where you extracted the files.
3. Find and click the calcplus.msi file, and it will populate the Product Code and Version fields on the Detection Methods page.
If this application is installed on a per-user basis, you may also need to check the corresponding box for it to be properly detected. If it was installed for all users, that is not necessary.
4. Before moving on to the next step, creating and validating an object, verify that your wizard settings look similar to those in Figure 13.6. (Your product code and version number may be different.)
Figure 13.6 CI application Detection Methods page
5. If everything is in order, click Next to proceed to the Settings tab.
Creating and Validating a Setting
On the Settings page, you tell the Create Configuration Item Wizard what type of setting to look for and where that setting is found.
Creating a Setting
In the empty window there are four columns—Name, Setting Type, Inherited, and User Setting—and a New button.
1. Click New (see Figure 13.7); once clicked a Create Setting Window will show.
Figure 13.7 CI application Settings page

This opens the Create Setting window, shown in Figure 13.8. The General tab has several fields and drop-down menus. The red circles with exclamation points indicate that the blank fields require input before you can create the configuration item.
Figure 13.8 Create Setting dialog box
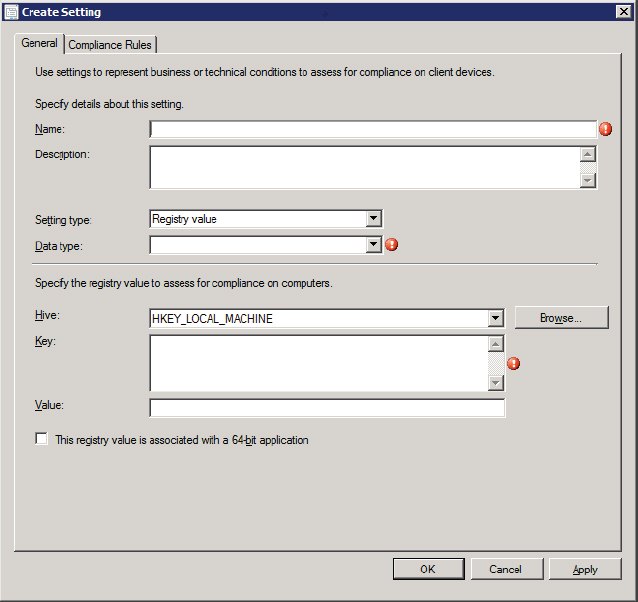
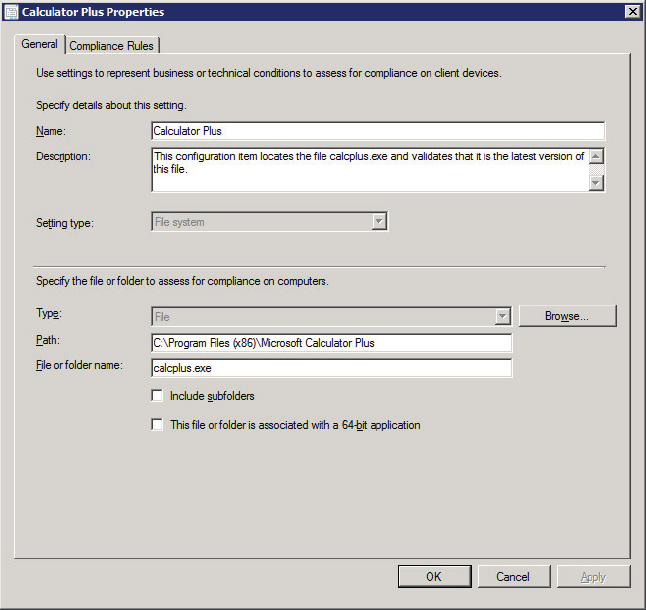
2. From the Setting Type Drop Down menu, select File System.
3. In the Path field, enter C:Program Files (x86)Microsoft Calculator Plus, and in the File Or Folder Name field, enter calcplus.exe.
Wildcards and Environment Variables with Compliance Settings
The use of wildcards is allowed and actually required for the Specify File or Folder to Assess for compliance on the computer Section in the path field. Path The ? and * characters are the permitted wildcards, but they should be considered and used carefully. Using wildcards can produce additional overhead when you’re trying to find a file or folder, because the search will work exactly as instructed. Specifying the Windows directory, for example, and then telling it to search all subdirectories is not ideal. You can also make use of environment variables such as %ProgramFiles% or %AllUsersProfile%. The result may be that you get more than one return result if the users all have the file or folder you are looking for in the search path.
4. In the Description field, enter This configuration item locates the file calcplus.exe and validates that it is the latest version of this file.
5. You can leave the Is This File Or Folder From A 64-Bit Application check box disable for Microsoft Calculator Plus.
64-Bit Applications and the Registry
Readers who have 64-bit applications should be aware of a possible issue with the registry and configuration baselines. Because of the registry reflector that mirrors certain registry keys for interpretability, it is possible that you could detect the presence of two registry keys with a single configuration baseline. If you are running 64-bit applications, you will need to check for this before deploying a configuration baseline containing a configuration item that involves checking for a registry key associated with a 64-bit application.
You have finished creating the object’s details by telling Compliance Settings what you are looking for and where you want it to look for it. The next step is to validate the setting by telling Compliance Settings the specifics of the setting to validate.
6. Before you click OK to move to the Compliance Rule tab, make sure your General page looks like the one in Figure 13.9.
Figure 13.9 General page of the Create Setting dialog box completed
Validating a Setting
Now that you have created your setting, you are going to tell Compliance Settings how you want this CI to validate the file.
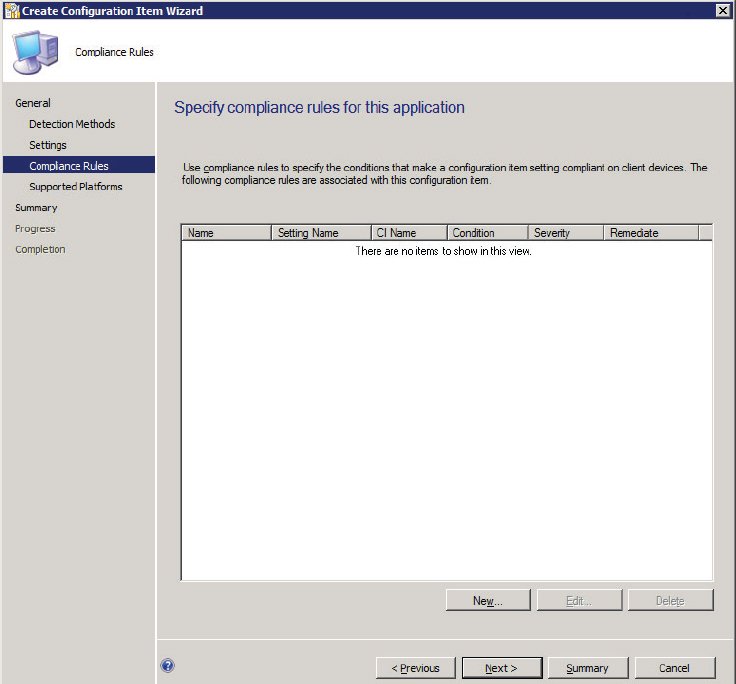
1. As you did when creating a new setting, click the New button, shown in Figure 13.10, to get started.
Figure 13.10 The Compliance Rules page’s New button
The top field of the Create Rule dialog box is the name of the compliance rule. This is a required field, and a value will be supplied by default.
2. Just remove _New_Rule from the end of the default text, resulting in a rule name of File_calcplus.exe_Date Modified.
3. In the Description text box, enter the following or something similar, but make sure you also put your initials and the date in the event someone else reviewing this rule has questions:
Validates that the calcplus.exe file in the Microsoft Calulcator Plus folder has the latest version of the file approved and distributed by IT. 9/16/2011
In the Create Rule dialog box, you tell Compliance Settings exactly how to validate this file. The Setting field on the lower part of the page is grayed out and unavailable because you have already selected the type of setting you are going to validate against. Next to that is a drop-down menu, where you have nine operators to choose from:
- Between
- Equals
- Greater Than
- Greater Than Or Equal To
- Less Than
- Less Than Or Equal To
- None Of
- Not Equals
- One Of
If you choose Between as the operator, you get the option to specify a range.
4. In this example, choose the Greater Than Or Equal To operator, and in The Following Values field, enter the current date and time to which you want the rule to be applied.
Obviously, because you are going to use this as a test, you should make a change to the file so that the modified date is not its original date, or input your validation date and time.
In the bottom section of the Create Rule dialog, you choose the level of noncompliance severity should this check fail on one of your Configuration Manager clients. There are four levels to choose from:
- Information—No Windows Event Message
- Information
- Warning
- Error
All four levels report back to Configuration Manager, but the first one does not write an event to the application event log in Windows as the other three do. This was made an option to prevent Compliance Settings rules from filling up the event logs on clients if a check comes back as invalid too many times. This might happen if, for example, you input the wrong validation data or if something out of your control occurs, such as an upgrade or service pack installation.
5. In this exercise, select Information if you don’t already have it selected, and then verify that your window looks like Figure 13.11 before clicking OK to continue.
Figure 13.11 The Compliance Rules Create Rule dialog box

6. Return to the Compliance Rules window, where in the formerly empty section you’ll now see the new compliance rule for this file.
You now have to tell Compliance Settings if you want it to report on a noncompliant event and, if so, the details of when and how it should report.
The Report A Non-Compliant Event When This Instance Count Fails check box should already be selected. This option turns on and off the reporting of a noncompliant client and allows you to set the severity of noncompliance as well as at what point it should report. Next to Instance Count Operator, you have the same drop-down menu selections as in the Create Rule, and these same nine options are available with other configuration item types.
7. You are going to use the Greater Than operator in this case. Leave Value and Severity at their defaults as well, which results in a compliance rule that will report when a compliance rule check fails at least once and will report as an Information severity.
In this example, we have left the Severity settings at their defaults. Later in this chapter, you will see how different severity levels combine with other settings during the reporting.
8. You have now created your first compliance item. After reviewing all information and verifying that it is correct, click Next to validate the supported operating systems.
This is the only object you are going to create in this first example, but we’ll cover other tabs and their options in the following examples or in later examples.
9. Because you are not going to make changes to this configuration item, you can click through to the end using the Next button at the bottom of the window.
Eventually you should reach the Summary tab, shown in Figure 13.12, which will give you a list of all the options and settings selected while creating this configuration item.
Figure 13.12 Application CI Summary page

10. Verify that these are as you expect them to be; if any are not, use the Previous button or the tabs to make any modifications.
11. Once you have checked to ensure that everything is in order, click the Next button or the Progress tab to start the process of building the configuration item.
After a short period, the progress indicator and window should disappear and you should see the Completion window, which says
Success: You have successfully completed the Create Configuration Item Wizard with the following settings
It also shows a list of the settings you chose. Verify again that everything is listed as expected. You can now click the Close button to complete the wizard and return to the Configuration Manager console.
Building a Configuration Baseline
You have built a configuration item to make your configuration baseline, which is what you assign to your clients to check for drift.
Briefly, you have a configuration item that validates that your Microsoft Calculator Plus application is installed and the file is the latest file you deployed. In order to deploy this compliance setting and rule, you need to create a baseline and apply this baseline to a specific collection to validate its compliance.
Configuration baselines in Configuration Manager 2012 contain predefined configuration items and optionally other configuration baselines. After a configuration baseline is created, you can deploy it to a collection so that devices in that collection will download the configuration baseline and assess their compliance with it.
Configuration baselines in Configuration Manager 2012 can contain specific revisions of configuration items or can be configured to always use the latest version of a configuration item.
Creating the Initial Baseline
As it does with most tasks, Configuration Manager provides a wizard to guide you in creating a configuration baseline.
1. In the ConfigMgr 2012 console choose the Asset and Compliance workspace ![]() Compliance Settings
Compliance Settings ![]() Configuration Baselines and right-click Create Configuration Baseline.
Configuration Baselines and right-click Create Configuration Baseline.
You should now see the Create Configuration Baseline Wizard, shown in Figure 13.13. Here you select the categories and input the name, description, and configuration data.
Figure 13.13 Create Configuration Baseline Wizard - Identification tab

2. Fill in the following details.
Name: Microsoft Calculator Plus - Check
Description: This configuration baseline validates the Microsoft Calculator Plus settings to make sure that there has been no configuration drift and that the latest copy of the calcplus.exe script has been distributed to the client
3. To select Microsoft as the category, click the Categories button to display a list. This section is a the bottom of the window.
The Configuration Data list displays all the configuration items or configuration baselines that are included in the configuration baseline.
4. Click Add to add a new configuration item or configuration baseline to the list. You can choose from the following:
Configuration items
Software updates
Configuration baselines
5. Once the Add Configuration Items window checks for available configuration items, choose Microsoft Calculator Plus - Installed.
6. Click Add, and then click OK.
7. Verify that your settings match those shown in Figure 13.13 and click OK.
You can now click the Close button and return to the Configuration Manager console where you will next assign your new configuration baseline to clients that will be evaluated for compliance.
Baseline Rules
The process of creating rules is similar to the way you build rules in Outlook. Or you can think of it as telling Compliance Settings a story or writing a recipe to build your baseline. The available rules include those that reference which operating system you want to check for; in this option you will be able to see all the different operating systems and service pack levels. If you have not built a configuration item to check for a specific operating system, when you click the link in the rule there will be no configuration items to choose from and nothing to put into this rule. Although our example doesn’t include them, Figure 13.14 illustrates the additional selections available when you have also created one or more CIs.
Figure 13.14 Add Configuration Items

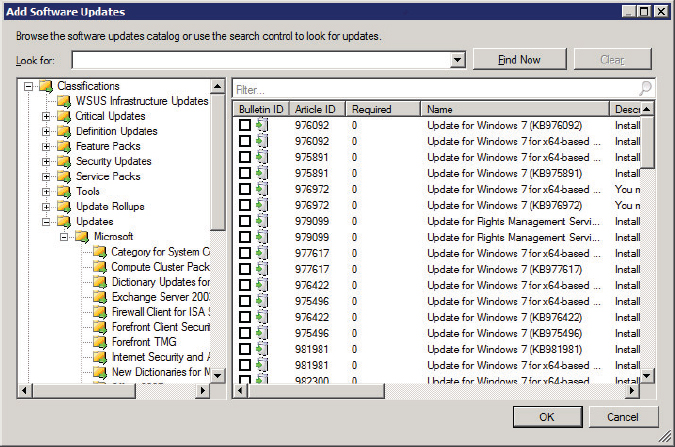
Another available rule is Checking For Software Updates. Earlier in the chapter we mentioned that you cannot create CIs for software updates in the same location as the other CI types and you must specify them when creating your configuration baseline; this is exactly where you would specify the software updates to check for. If you click the link in the software update rule, this option will show up on step 4 of Creating a Baseline. It will spawn a new window called Add Software Updates (see Figure 13.15) where you will see the same folder display as in the Configuration Manager console, and you will have all the updates that you set to download to your server available to choose from. It is important to understand that you will not see software updates that you may have already added to the baseline. You can see the software updates that are included in the configuration baseline by viewing its properties in the Configuration Manager console.
Figure 13.15 Add Software Updates window
Another rule that you can build is Configuration Baselines. This is how you would reuse other configuration baselines that you have created and thus save quite a few steps. Clicking this rule opens another window that lists the configuration baselines previously created and available to select, much like Figure 13.14.
We have saved the other three rules for last because they are all related to application CI types, differing in the way that they build the rules of your baseline:
- Applications And General CIs That Are Required And Must Be Properly Configured
- Optional Application CIs That If Detected Must Be Properly Configured
- Application CIs That Must Not Be Present
Let’s consider how each of these might be used when building a configuration baseline.
Applications And General CIs That Are Required And Must Be Properly Configured
This rule means that if you select an application CI, it will use the detection method specified to ensure that the application is installed. We used two different detection methods when we built the application CIs for Microsoft Calculator Plus:
- For the first one, we pointed it at the MSI file and got the version and GUID.
- For the last set of parent and child CIs, we told it to always assume the application was installed.
When we build an application CI and use the “always assume installed” detection method, we are simply skipping the detection method. Thus, there is no chance that the detection method will fail, and the next step in our application CI will do its check. Once a CI fails a check, the remainder of the CI checks to see if settings or objects are not validated against the client. The actual status returned can vary depending on these settings as well; if the detection method is specified and it fails, it will return Not Detected compliance.
You would use this to add general CIs to your list of rules but also for applications that you want to ensure are installed, or at least to detect that they are installed and that they are configured correctly. Going back to the CIs we created for Microsoft Calculator Plus, if we specified the CIs that detect if the latest calcplus.exe file is on the client, the CI for Microsoft Calculator Plus would first have to pass the detection method we specified, so if the version or GUID returned Noncompliant, then the rest of the CI validation would be skipped and we would get a status message indicating that the application was not detected.
If Optional Application CIs Are Detected They Must Be Properly Configured
The rule that if optional application CIs are detected, they must be properly configured means that if you make application CIs part of the baseline and they fail to be detected, then the validation checks that are part of that CI will be skipped; if the application is detected, it will then validate the objects or settings specified in the CI and report compliance or noncompliance. A typical use for this type of rule might be a situation in which you are not sure an application is installed on the client, but in the event that it is, you want to make sure that the application is configured correctly.
Selected Application CIs Must Not Be Present
The last application CI rule specifies that selected application CIs must not be present. This type of rule could be used to make sure that an application is not present on a system. For instance, if you are checking the configuration of Microsoft Calculator Plus 5.x, you might want to make sure that Microsoft Calculator Plus 4.x was properly removed. Assuming you had a baseline that you used to check the configuration of Microsoft Calculator Plus 4.x, you could select one of these rules and run it to validate that the application had been previously uninstalled.
Assigning the Configuration Baseline to Clients
Now that you have all the baselines configured, you need to assign them to the clients or all your hard work won’t be used. Assigning the configuration baselines to the clients will allow Configuration Manager to monitor the clients and ensure the baselines are met.
1. Back in the Configuration Manager console, you should still see the configuration baselines. If you highlight the newly created baseline, you will see its details at the bottom of your console.
2. To assign this configuration baseline to clients for validation, right-click the baseline and choose Deploy.
This will start the Deploy Configuration Baselines Wizard, shown in Figure 13.16.
Figure 13.16 Deploy Configuration Baselines Wizard

This should prepopulate the selected configuration baseline that you used to launch the wizard; as you can see, you can add or remove configuration baselines by clicking the Add or Remove button on the center.
3. At this time if you see the correct configuration baseline, select the baseline and click Add to move it to the list on the right.
4. In the Select The Collection For This Configuration Baseline Deployment section, indicate the collection you are going to assign this baseline to. Do that now by clicking the Browse button.
Be sure to select a collection that includes the clients where you have installed and configured the Microsoft Calculator Plus client.
5. After you have selected the appropriate collection, click OK to go back to the deployment baseline window.
Next you set the schedule. Here you set the compliance evaluation schedule, much as you do with a deployment. You can create a simple schedule such as Run Every 7 Days or create a custom schedule for more flexibility.
6. For the example, choose Custom Schedule and set it to reoccur every four hours; this ensures that the validation will run and return data so you can examine the reports.
7. After reviewing the settings, proceed to assigning the baseline by clicking OK.
Additional Configuration Baseline Options
Within the Configuration Manager console, some additional options are available when you view the configuration baseline folder. If you have the Actions pane visible, you should see the option Import Configuration Data. This option allows you to import a CAB file that could have been created by a vendor, using an external tool such as CP Studio 2008, or it could come from another Configuration Manager site. If you have a baseline currently selected, you should also see some additional options, including the ability to export configuration data. This will allow you to export your data so that you can import it to another site or edit it with an external tool.
You also have the ability to disable the baseline; if you select this option it will stop the clients from evaluating this baseline. Once a baseline is disabled, the option changes to allow you to reenable it from the same location on the Actions pane. You can also view the XML that defines this baseline by clicking the View XML Definition button. The Manage Categories option should be self-evident at this point; you can add or remove categories from the baseline using this button. Finally, there is an Add button, which allows you to add a new rule to the baseline. Going back to the Duplicate button, you can see how much of a timesaver these two buttons can be if used together.
Client Validation of Compliance Baseline Rules
Once you have deployed the compliance baseline to a collection, you should log on to a client and validate that this rule has been applied and what its current state is; this will help you to understand better if the rule has been applied correctly or not and if the compliance state is the desired one.
1. Log on to the Windows 7 client or any resource on the collection deployed.
2. Click Start ![]() Control Panel
Control Panel ![]() All Control Panel Items, and locate Configuration Manager.
All Control Panel Items, and locate Configuration Manager.
3. Choose Configuration Manager ![]() Properties
Properties ![]() Configurations.
Configurations.
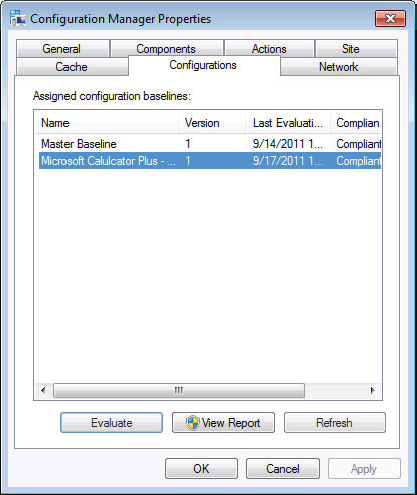
4. Select the Microsoft Calculator Plus baseline and click Evaluate.
As shown in Figure 13.17, the Compliance State field now shows Compliant.
Figure 13.17 Configuration Manager client configurations
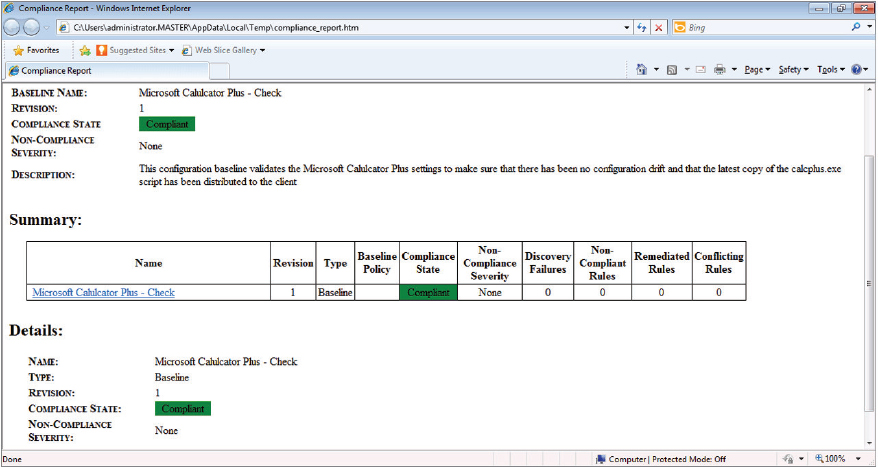
5. Now click View Report and wait for Internet Explorer to show the results. You can see the results in Figure 13.18.
Figure 13.18 Compliance Report
Once you have finished reviewing the compliance setting results, you can also look at the client log files to see more details about the compliance state; two of these log files are as follows:
dcmagent.log Provides high-level information about the evaluation of assigned configuration baselines and desired configuration management processes
ciagent.log Provides information about downloading, storing, and accessing assigned configuration baselines
Open these log files using CMTrace.exe and you will see more details. Now that you have been able to successful apply a configuration baseline, you may want to try this again using a production application for which you may need to confirm its compliance state.
Compliance Settings Alerts
As part of the new alert and notification system, once the compliance baseline is deployed you can decide if you need to get alerts when the compliance check falls below a specific percentage. To do this you must perform the following task:
1. Choose the Assets and Compliance workspace.
2. Expand Compliance Settings.
3. Select Configuration Baselines.
4. In the right section select Microsoft Calculator Plus - Check; right-click and select Properties.
5. Click the Deployment tab.
6. Select the deployed collection and click Edit.
7. Click Generate An Alert When Compliance Is Below The Specified Percentage After The Specific Date And Time, as shown in Figure 13.16.
8. Set Compliance Percentage to 95.
9. Click OK twice.
This will generate the alert configuration on the Monitoring workspace.
After a short period of time you should be able to run several of the reports included with Configuration Manager for compliance and setting management. These reports can be customized to suit your needs, or you can build your own reports if they don’t provide the level of detail you require. Reports are located in the Monitoring workspace ![]() Reporting
Reporting ![]() Reports, and on the search criteria look for Compliance And Settings Management. The current list of reports is as follows:
Reports, and on the search criteria look for Compliance And Settings Management. The current list of reports is as follows:
- Compliance history of a configuration baseline
- Compliance history of a configuration item
- Details of compliance rules of configuration items in a configuration baseline for an asset
- Details of conflicting rules of configuration items in a configuration baseline for an asset
- Details of errors of configuration items in a configuration baseline for an asset
- Details of non-compliance rules of configuration items in a configuration baseline for an asset
- Details of remediated rules of configuration items in a configuration baseline for an asset
- List of assets by compliance state for a configuration baseline
- List of assets by compliance state for a configuration item in a configuration baseline
- List of rules conflicting with a specified rule for an asset
- List of unknown assets for a configuration baseline
- Rules and errors summary of configuration items in a configuration baseline for an asset
- Summary compliance by configuration baseline
- Summary compliance by configuration items for a configuration baseline
- Summary compliance of a configuration baseline for a collection
In this section you will learn how to implement a configuration pack from the Security Compliance Manager tool. This tool has different baselines, and each of the baselines can be exported to ConfigMgr and later on imported as Compliance Settings data.
What Is Security Compliance Manager?
Microsoft Security Compliance Manager provides security configuration recommendations from Microsoft, centralized security baseline management features, a baseline portfolio, customization capabilities, and security baseline export flexibility to accelerate your organization’s ability to efficiently manage the security and compliance process for the most widely used Microsoft products.
To download this tool, go to
http://www.microsoft.com/download/en/details.aspx?displayLang=en&id=16776
To learn more about this tool, go to
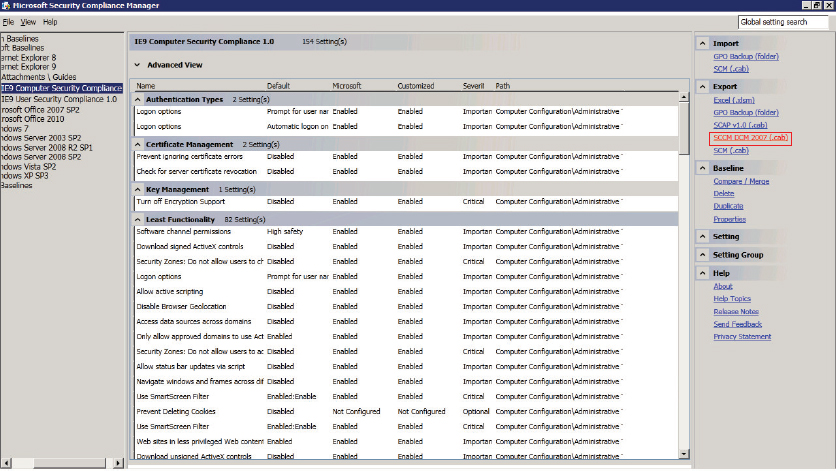
Figure 13.19 shows the Security Compliance Console focused on Internet Explorer 9 Computer Security Compliance. As an example, to import the Internet Explorer 9 configuration pack, perform the following procedure:
Figure 13.19 Security Compliance Manager
1. Download Security Compliance Manager from the Microsoft Download site.
2. Install Security Compliance Manager.
3. Confirm that the product has been installed and all the baselines have downloaded it.
4. Launch the Security Compliance Manager tool.
5. For the Microsoft baseline select Internet Explorer 9.
6. For Internet Explorer 9 select IE 9 Computer Security Compliance.
7. In the right section the Export option will be enabled; click SCCM DCM 2007 (.cab), as shown in Figure 13.20.
Figure 13.20 Import Configuration Data Wizard - Select Files page

The Export to SCCM DCM 2007 dialog box will open.
Note: Even though it says SCCM DCM 2007, this works great with ConfigMgr 2012. On the new version of Security Compliance Manager, this should be updated.
8. Save the .cab file to a known location.
9. Open the Configuration Manager console.
10. Choose the Assets and Compliance workspace.
11. In the navigation pane, expand Compliance Settings, and then click Configuration Items.
12. In the navigation pane, right-click Configuration Baselines.
13. Choose Import Configuration Data.
The Import Configuration Data Wizard will appear.
14. Click Add.
15. The Open dialog box will appear; locate the file saved in step 8 and click Open.
Your screen should look like the one in Figure 13.20. ← Changed this to correct Figure.
16. Click Next. The import will analyze the .cab file.
The Import Configuration Data Wizard Summary page will label one configuration baseline and six configuration items.
17. Click Next.
The Import Configuration Data Wizard will complete at this point. Your Confirmation screen should look like the one in Figure 13.21. You can close the wizard.
Figure 13.21 Import Configuration Data Wizard - Confirmation page

Now that you have imported the configuration data to Configuration Manager’s Compliance Settings, you can deploy this baseline to any collection and evaluate the current compliance state for Internet Explorer 9. This will also give you a better idea of how to use Compliance Settings and the configuration items.
Enable the client settings. Until the client settings are enabled for your Configuration Manager clients, your clients will not evaluate any of the configuration baselines. This is the first step in using Compliance Settings to validate client settings.
Master It Enable Compliance Settings for the Configuration Manager clients.
Create configuration items. Configuration items are the pieces that make up a configuration baseline. There are a number of different configuration item types in Configuration Manager, and depending on the type you choose to create, you are presented with certain options when creating your configuration item. The steps to create configuration items were covered in the first part of this chapter and they included several examples of how to create the different types of configuration items.
Master It Create a configuration item for an application that checks a registry string value.
Define a configuration baseline. This is where you take one or more of the CIs and put them into a package that the Configuration Manager client downloads and at the scheduled time validates by checking the CIs against the computer. The Configuration Manager client then reports the outcome of those checks back to Configuration Manager, where you can then run reports to see if your clients are within the specified configuration or not. These steps were covered in the last section of the chapter.
Master It Assemble a configuration baseline with one or more configuration items you have created.