
Chapter 14
Mobile Device Management
The power of the mobile device as a computing platform has grown significantly in recent years. The number of mobile devices is increasing all the time. The devices are a favorite among the user community and are definitely here to stay. Having a mechanism to manage these devices effectively is crucial to IT.
These devices are now a significant part of the computing landscape and are only accelerating in relevance. As a result, organizations of all sizes are tasked with finding the best way to handle these devices, allowing users the flexibility inherit with these devices while balancing the needs of corporate security and management when these devices are used in an enterprise setting.
A further challenge is the sheer number of device types and operating systems in use, including devices running the Windows Phone or upcoming Windows 8 operating systems (which are both really cool, and you should check them out), devices from Apple such as the iPhone or iPad, devices running the Android or BlackBerry platforms, and others. Each device type and operating system allows for different management capabilities—and these capabilities will continue to evolve over time. Being able to manage these devices consistently, regardless of the type of device, is important for organizations and is exactly what Configuration Manager 2012 is designed to do.
This chapter will detail the mobile device management options available in Configuration Manager 2012. In this chapter you will learn to
- Detail the differences between lite and depth management.
- Understand how to configure mobile device management.
- Understand the depth-management enrollment process.
What’s New in Mobile Device Management
The mobile devices world has changed at an amazing pace since the last full release of Configuration Manager, version 2007. A variety of device and operating system manufacturers are in the market, and the number of users with mobile devices has grown significantly. Mobile devices have become center stage for many users, and such devices are often the single computing device where users spend the bulk of their time. These devices often blur the lines between the individual user environment where music and photographs are important and the business environment used for apps, business email, and documents. Enterprises may choose to allow employees to use their own devices for business purposes, or there may be a requirement that IT procure and configure devices that will be used for business purposes. In either case, management of these devices is important to protect IT and corporate resources.
Configuration Manager 2012 has also changed in a significant way with the addition of support for non-Windows devices. There are two support models for devices in Configuration Manager 2012—lite management and depth management:
Lite Management Lite management is the mechanism used to manage Microsoft’s own Windows Phone 7/7.5 platform and is also the management mode that supports any other device capable of working with an Exchange Active Sync connection. This includes BlackBerry, iPhone, and Android. Lite management requires Exchange 2010 either on premise or in the cloud.
There is no client software installed on the device in a lite-management scenario. The management capabilities available are dependent on the capabilities of the device and what is offered via the Exchange ActiveSync connector available in Configuration Manager 2012.
Depth Management Depth management is available for traditional Windows phone platforms, Windows CE, Windows Mobile, and Nokia phones running Symbian. Depth management does install client software on the device and affords more capabilities than lite management alone.
Both will be discussed in detail later in the chapter. For now, it’s sufficient to know that lite management will allow any device capable of communicating with Exchange Server 2010 through ActiveSync to be managed.
Mobile Device Manager
It’s also worth mentioning that Configuration Manager 2012 is the mobile device management product going forward. Mobile Device Manager, a product specifically designed to handle management of mobile devices, is now restructured into the Configuration Manager 2012 product.
Requirements for Mobile Device Management
The requirements for mobile device management differ depending on whether devices are being managed using lite-management or depth-management options.
Lite Management
There are a few components required for lite management of mobile devices:
- A device capable of establishing an ActiveSync connection with an Exchange Server
- An Exchange 2010 Server providing ActiveSync services, either on premise or in the cloud.
- A properly configured ActiveSync connector in Configuration Manager 2012
Configuring Required Components
The first requirement is totally dependent on the capability of the device being used—a device is either able to communicate via an ActiveSync connection or it isn’t. Fortunately, most modern devices have this capability. The process of configuring the ActiveSync connection on a device may vary depending on the type of device in use. Thus, discussing specifics on how to configure the ActiveSync connection from a device perspective is beyond the scope of discussion for this chapter.
Configuring an Exchange 2010 Server to deliver ActiveSync services, the second requirement, is specifically an Exchange 2010 activity. There are no specific Configuration Manager requirements that need to be considered when setting up Exchange 2010 ActiveSync. Once ActiveSync is configured and working in an Exchange 2010 environment, Configuration Manager can be configured to make use of it. Discussion of how to enable ActiveSync for Exchange 2010 is beyond the scope of discussion for this chapter. Details on how to configure the Exchange 2010 ActiveSync component can be found with a quick Bing search. The following URLs are a good starting point to understand the setup requirements and process:
http://technet.microsoft.com/en-us/library/aa998357.aspx
http://technet.microsoft.com/en-us/library/bb124234.aspx
This leaves the third option for discussion—configuring the ActiveSync connector in Configuration Manager 2012. The ActiveSync connector option is configured from the Administration node of the console, as shown in Figure 14.1. In the console the connector is labeled Exchange Server Connectors. Note that the options available in the wizard are the only ones configurable for lite device management in Configuration Manager 2012. There may be other options for ActiveSync management available directly in Exchange beyond what are listed in the wizard.
Figure 14.1 Exchange Server Connectors location in the Configuration Manager console
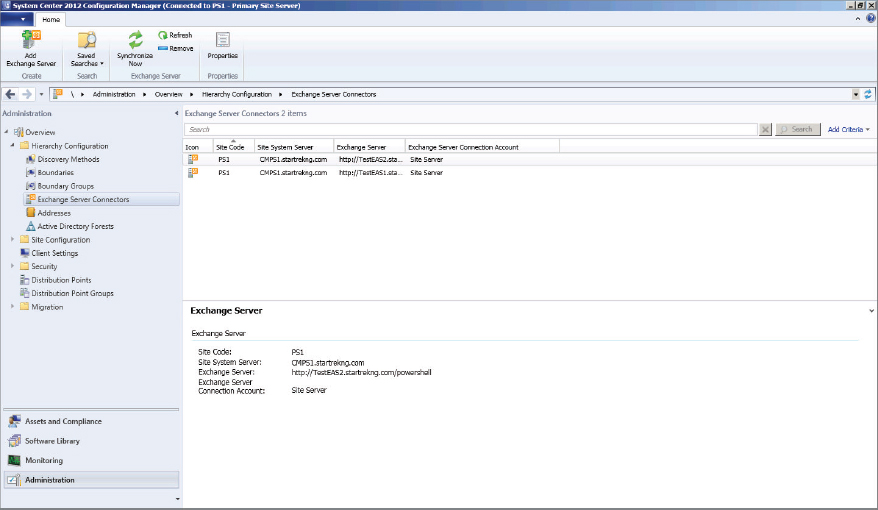
As shown, it’s possible to have multiple connectors configured per site depending on need.
You configure a connector by right-clicking Exchange Server Connectors and selecting Add Exchange Server. This will launch the General page of the Add Exchange Server Wizard, as shown in Figure 14.2.
Figure 14.2 Add Exchange Server Wizard—General page
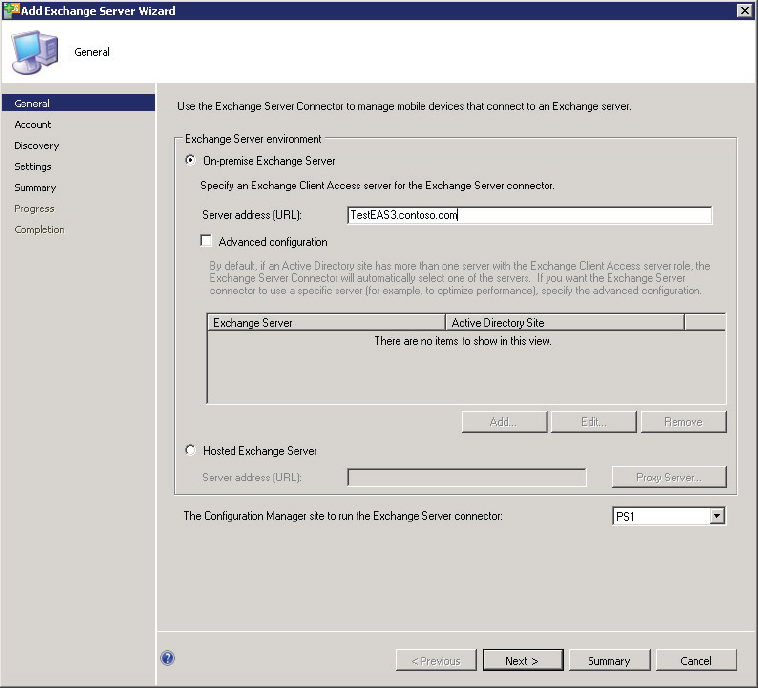
The first choice to make is whether the Exchange Server being configured is an On-premise Exchange Server or a Hosted Exchange Server. The connector works fine with either. In either case you must specify an FQDN for the Exchange Server. When you specify an On-premise Exchange Server, you can also specify Advanced Configuration options. Selecting the Advanced Configuration check box allows you to specify a specific Client Access Server (CAS) that should be used by the connector when more than a single CAS is available. If the advanced option is not specified, then Configuration Manager will simply choose a CAS to use based on information published in Active Directory.
The last option on the General page allows you to select which Configuration Manager site the connector should be associated with. Once the configurations on this page are complete, click Next to continue to the Account page, shown in Figure 14.3.
Figure 14.3 Add Exchange Server Wizard—Account page
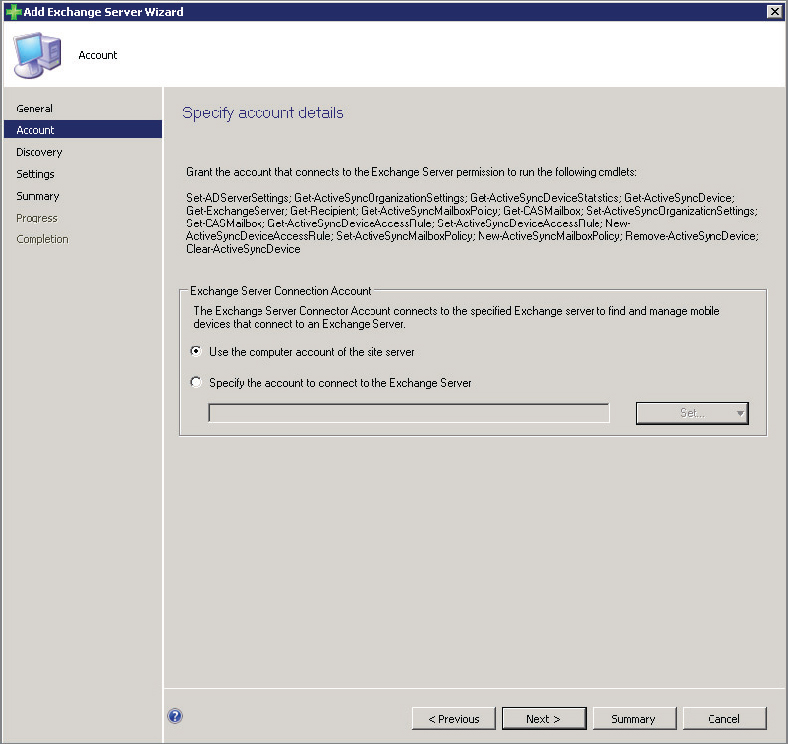
The Account page allows administers to configure whether the Exchange Server Connection Account should be configured to use the computer account of the site server or a specific account. Regardless of the configuration you choose here, ensure that the configured account has proper rights to access the Exchange Client Access Server(s) chosen. Once configurations on this page are complete, click Next to continue to the Discovery page, shown in Figure 14.4.
Figure 14.4 Add Exchange Server Wizard—Discovery page

The Discovery page allows administrators to determine how device discovery takes place in the environment.
Full Synchronization Schedule This option configures the schedule and frequency for full synchronization in the environment. Full synchronization gathers all properties for new and existing mobile devices. The default option is for full synchronization to run daily at midnight.
Delta Synchronization Interval This option configures the schedule and frequency for delta synchronization in the environment. Delta synchronization identifies new mobile devices and gathers limited changes for known mobile devices. The default option is for delta synchronization to run every four hours.
Full vs. Delta
Full versus delta synchronization is similar in concept to full versus delta discovery or full versus delta collection updates.
Ignore mobile devices that are inactive for more than (days). This option indicates that devices that have been inactive for the configured number of days, by default 180 days, should be ignored from further management attempts.
Find all mobile devices in the exchange organization; only find mobile devices in the following active directory containers. The choice you make for the first setting determines whether to attempt management of all mobile devices connecting with Exchange ActiveSync or only those belonging to a specific container. If you select to limit management, individual containers with mobile devices that should be managed must be configured.
Note that if settings are not specifically configured on this page, existing settings configured in Exchange ActiveSync will be persisted as noted by the Status column. If settings are configured through the connector, the Status column will change to indicate Configured by Configuration Manager. Once configurations on this page are complete, click Next to continue to the Settings page, shown in Figure 14.5.
Figure 14.5 Add Exchange Server Wizard—Settings page

The Settings page is where the action is! This page is the launch point for configuring all options that are available for lite management. The categories for configurable settings are General, Password, Email Management, Security, and Application. Further discussion on these categories follows. From this page, administrators are also able to choose whether to allow external mobile device management.
General Settings
Selecting to edit the General settings will reveal available choices for this category, as shown in Figure 14.6.
Figure 14.6 Add Exchange Server Wizard—Settings page—General Settings

Internet Sharing From Mobile Devices This option allows administers to either allow or prohibit Internet sharing on managed mobile devices.
Computer Synchronization This option allows administers to either allow or prohibit synchronization of the mobile device with computers.
Allow Mobile Devices That Cannot Be Provisioned This option allows administrators to either allow or prohibit mobile devices that cannot be provisioned from being visible in Configuration Manager.
Refresh Interval (Hours) This option allows administrators to specify a specific refresh interval, if desired.
Password Settings
Selecting to edit the Password settings will reveal available choices for this category, as shown in Figure 14.7.
Figure 14.7 Add Exchange Server Wizard—Settings page—Password Settings
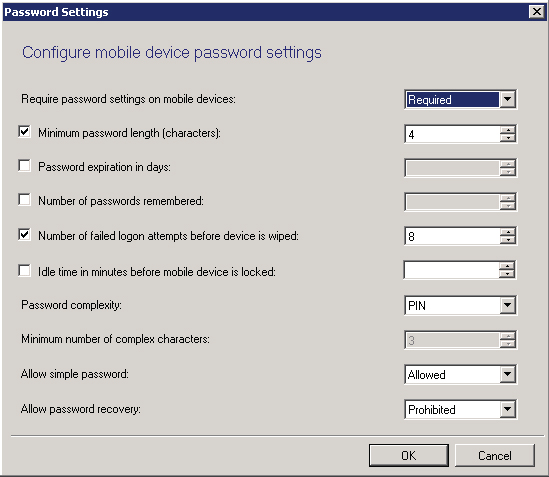
Require Password Settings On Mobile Devices This option allows administrators to decide whether or not to enforce password settings on the mobile device. If it’s set to Optional, additional settings on this page will not be configurable.
Minimum Password Length (Characters) This option allows administrators to specify a minimum password length for the mobile device. The default length is 4 characters with a maximum length of 16 characters.
Password Expiration In Days This option allows administrators to configure how frequently the configured password will expire and need to be reset.
Number Of Passwords Remembered This option allows administrators to configure how many passwords are stored, thus preventing reuse of the same password again and again.
Number Of Failed Logon Attempts Before Device Is Wiped This option allows administrators to specify the number of bad logon attempts before the device is wiped. The default is eight invalid password attempts allowed. After the configured number of failed password attempts, the device is wiped. This is a good option to use for ensuring device security, but with the result being a complete device wipe, you must carefully evaluate the final settings you choose for this option.
Idle Time In Minutes Before Mobile Device Is Locked This option allows administrators to specify the length of idle time allowed before the device will lock itself, requiring a password to regain access.
Password Complexity This option allows administrators to specify how complex the device password should be. The default option is to specify a PIN. The other option is to specify a strong password. If a strong password is selected, the option to specify a minimum number of complex characters becomes available. The default number of strong characters is three.
Allow Simple Password This option specifies whether simple passwords, such as 1234, are allowed on a device. The default option allows a simple password.
Allow Password Recovery This option allows administrators to configure whether it is possible to recover passwords on a device. The default option prohibits this action.
Email Management Settings
Selecting to edit the Email Management settings reveals available choices for this category, as shown in Figure 14.8.
Figure 14.8 Add Exchange Server Wizard—Settings page—Email Management Settings
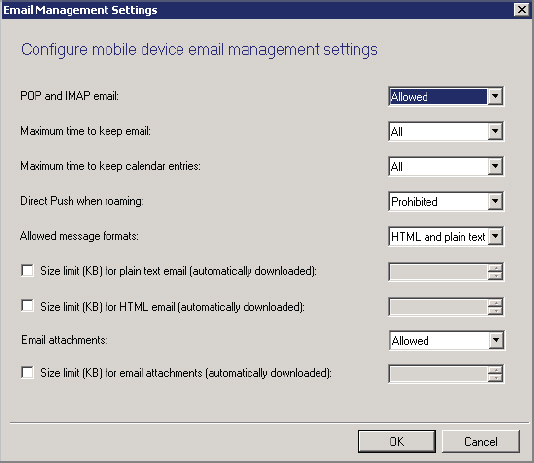
POP And IMAP Email This option allows administrators to specify whether both POP and IMAP email are allowed or prohibited. There is no option to specify that one or the other is available.
Maximum Time To Keep Email This option allows administrators to specify the length of time email will be retained on the device. The default option is All, which indicates that all email should be retained indefinitely. Other available options are One Day, Three Days, One Week, Two Weeks, and One Month.
Maximum Time To Keep Calendar Entries This option allows administrators to specify the length of time calendar entries should be retained on the device. The default option is All, which indicates that all calendar items should be retained indefinitely. Other available options are Two Weeks, One Month, Three Months, and Six Months.
Direct Push When Roaming This option allows administrators to determine whether email can be directly pushed while a device is in roaming status. The default option is Prohibited to help avoid additional expense in such situations.
Allowed Message Formats This option allows administrators to define what email formats are acceptable. The default option is HTML And Plain Text. The only other choice is Plain Text Only.
Size Limit (KB) For Plain Text Email (Automatically Downloaded) If specified, this option allows administrators to specify the maximum size for a plain text email that will be automatically downloaded to devices.
Size Limit (KB) For HTML Email (Automatically Downloaded) This option, not specified by default, allows administrators to specify the maximum size for an HTML-formatted email that will be automatically downloaded to devices.
Email Attachments This option allows administrators to specify whether email attachments are allowed on connected devices. The default option is Allowed.
Size Limit (KB) For Email Attachments (Automatically Downloaded) This option, not specified by default, allows administrators to specify the maximum size for an attachment that will be automatically downloaded to devices.
Security Settings
Selecting to edit the Security settings will reveal available choices for this category, shown in Figure 14.9.
Figure 14.9 Add Exchange Server Wizard—Settings page—Security Settings
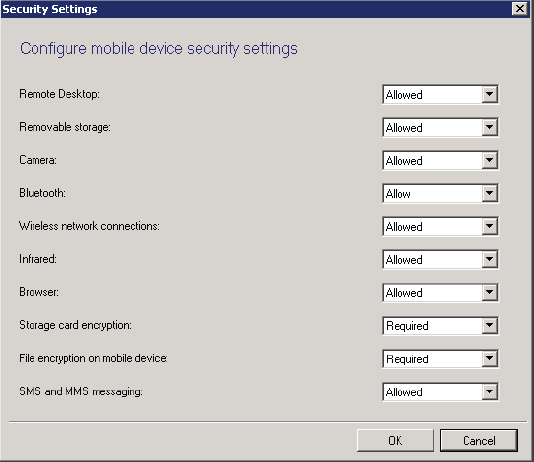
Remote Desktop This option allows administrators to specify whether Remote Desktop to the device is allowed.
Removable Storage This option allows administrators to specify whether removable storage is allowed on the device.
Camera This option allows administrators to specify whether the use of the camera is allowed on the device.
Bluetooth This option allows administrators to specify whether the use of Bluetooth is allowed on the device. An option is included in this setting to allow configuring hands-free operation only for Bluetooth.
Wireless Network Connections This option allows administrators to specify whether the use of wireless network connections is allowed on the device.
Infrared This option allows administrators to specify whether the use of infrared capabilities for a device is allowed.
Browser This option allows administrators to specify whether the use of a browser is permitted for a device.
Storage Card Encryption This option allows administrators to configure whether encryption of device storage cards is required or optional.
File Encryption On Mobile Devices This option allows administrators to configure whether file encryption on mobile devices is required or optional.
SMS And MMS Messaging This option allows administrators to configure whether messaging is allowed on devices.
Applications Settings
Selecting to edit the Applications settings will reveal available choices for this category, shown in Figure 14.10.
Figure 14.10 Add Exchange Server Wizard—Settings page—Application Settings
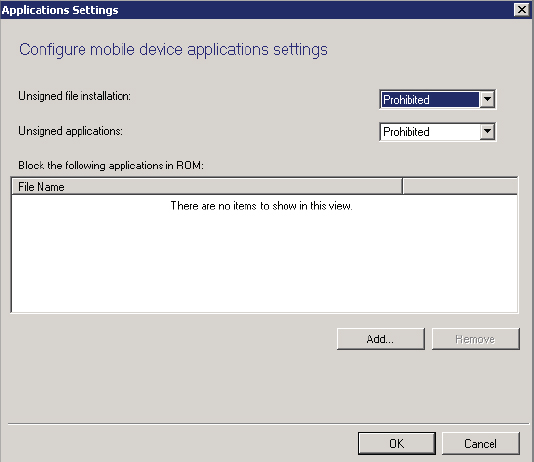
Unsigned File Installation This option allows administrators to specify whether installation of unsigned files is allowed on devices.
Unsigned Applications This option allows administrators to specify whether installation of unsigned applications is allowed on devices.
Block The Following Applications In ROM This option allows administrators to specify a list of applications that should be blocked from being installed on the device.
Results of Lite-Management Configuration
Once all settings are configured as required on these pages, click Next and continue through the wizard, verifying that all options chosen are appropriate on the Summary page. This action implements the settings as required on the Exchange Server and, from this point, devices connecting to Exchange through ActiveSync will receive and implement the configured settings, or at least the ones the device is capable of implementing.
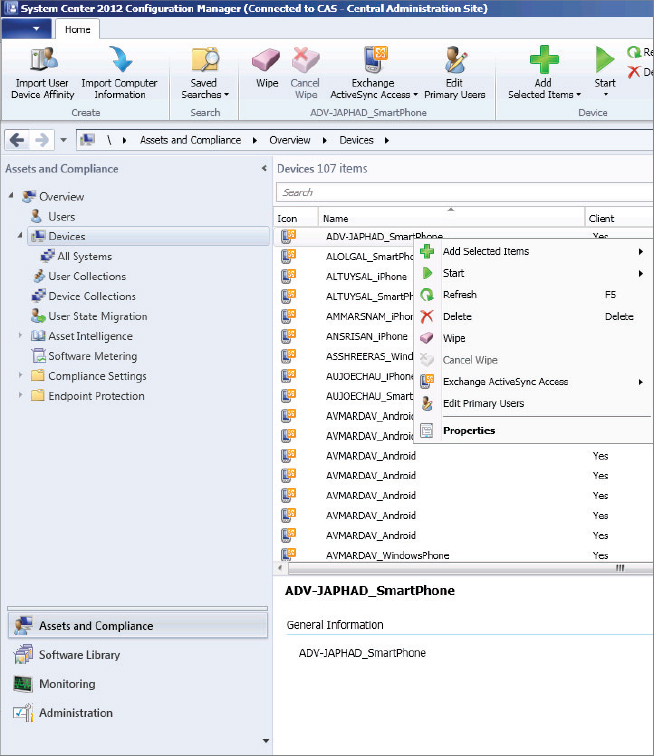
After a few devices have synchronized using the ActiveSync connector, they will be visible and available for management in the Devices collections, as shown in Figure 14.11.
Figure 14.11 Lite-managed devices

Now that devices are in collections, is it possible to do any management directly at this level? Mostly no. Remember, these devices are lite managed, which means almost all management is done through the ActiveSync connector. There are a couple of things that you can do, though. Right-clicking a lite-managed device will show the options available. Specifically there are options to wipe the device and also to decide whether to block the device. This is also the location to set the primary device user, to open Resource Explorer for the device to view hardware inventory that has been collected, and also to view device properties. These options are shown in Figure 14.12.
Figure 14.12 Device context menu options
Stuck with Lite Management
There are four major players in the mobile device landscape: Apple, Android, BlackBerry, and Windows Phone 7. None of these devices can be managed by depth management in Configuration Manager 2012, so for all practical purposes, lite management will be the most compelling form of management in most cases.
Depth Management
Several components are used for depth management of mobile devices. Some components are required and others optional but likely needed.
Required roles
- Enrollment proxy point site system role
- Enrollment service point site system role
- Management point configured for HTTPS communication
- Microsoft enterprise certification authority
Optional roles—depending on services being provided
- Distribution point configured for HTTPS communication
- Application Catalog web service point
We describe configuring both the required and optional roles in detail in the following sections and end with discussions of depth-management device enrollment and device-settings management.
Enrollment Proxy Point Site System Role
This site system role is used by devices during initial enrollment and client installation. This is also the site system role contacted to initially download the client for depth-managed devices.
This role is configured in the DMZ and must be configured with a web server certificate from the certification authority. Installing the enrollment proxy point site system role is straightforward; simply select the server that will host the role in the Administration ![]() Site Configuration
Site Configuration ![]() Servers and Site System Roles node of the console, choose to add a new site system role, and select Enrollment Proxy Point from the list. The only configurations needed for this role are shown in Figure 14.13.
Servers and Site System Roles node of the console, choose to add a new site system role, and select Enrollment Proxy Point from the list. The only configurations needed for this role are shown in Figure 14.13.
Figure 14.13 Enrollment proxy point site system role settings
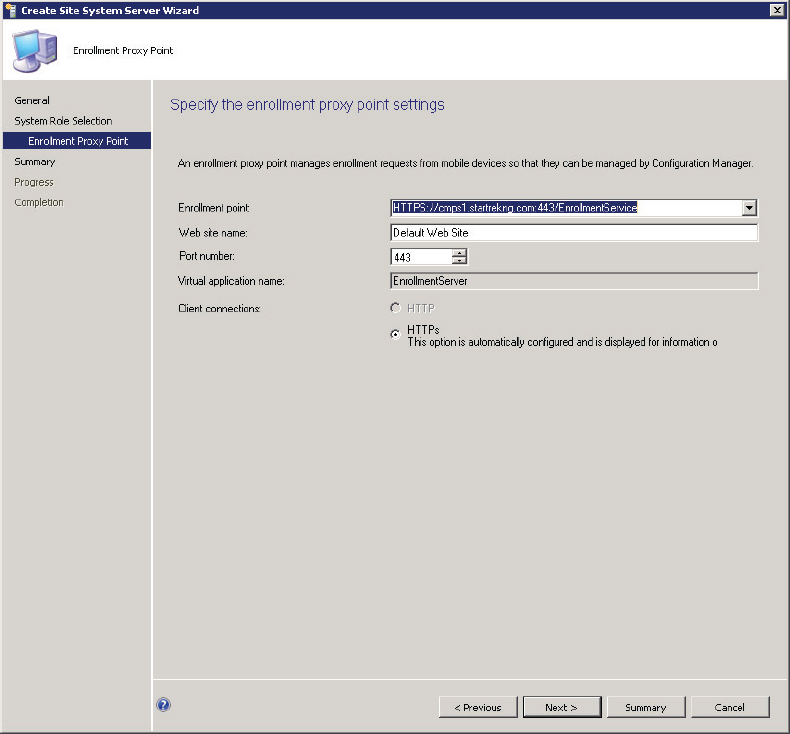
Enrollment Point This setting allows administrators to configure the URL for the enrollment point. Typically this should be left at the default value.
Web Site Name This setting allows administrators to configure the website where the enrollment proxy point should be installed. The default is to use the default website. Often, organizations will require a website other than the default website, particularly in the DMZ. If this is the case, specify which website should host the enrollment proxy point.
Port Number This setting allows administrators to specify the port that should be used to connect with the enrollment proxy point. Using port 443 is typical, but this is user configurable if needed.
The remaining options on this page, Virtual Application Name and Client Connections, are displayed but are not user configurable.
Enrollment Point Site System Role
This site system role resides on the internal network, receives information from the enrollment proxy point, and interacts with the primary site server, Active Directory, and the certification authority to orchestrate the device-provisioning process. The server hosting this role must be provisioned with a web server certificate from the internal certification authority.
Installing the enrollment point site system role is straightforward; simply select the server that will host the role in the Administration ![]() Site Configuration
Site Configuration ![]() Servers and Site System Roles node of the console, choose to add a new site system role, and select Enrollment Point from the list. The only configurations needed for this role are shown in Figure 14.14.
Servers and Site System Roles node of the console, choose to add a new site system role, and select Enrollment Point from the list. The only configurations needed for this role are shown in Figure 14.14.
Figure 14.14 Enrollment point site system role settings
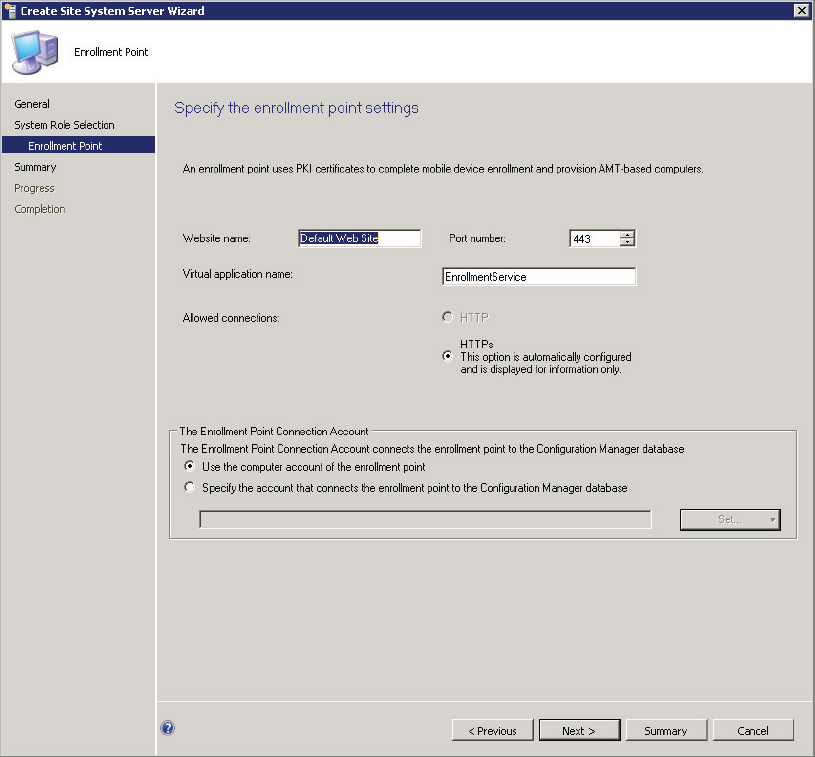
Website Name/Port Number This option allows administrators to configure the website name to be used for installing the enrollment point. The default is to use the default website. Some organizations disable the default website as a matter of policy. If this is the case in your organization, choose an appropriate alternative. The port number is also listed as an option and defaults to port 443. This setting will be unchanged in most environments but is user configurable if needed.
Virtual Application Name This option allows administrators to specify the virtual application name if different from the default.
The Enrollment Point Connection Account This option allows administrators to specify which account should be used to facilitate communication from the enrollment point to the primary site server. If the enrollment point is collocated on the primary site server, it is typical to allow the computer account to be used for communication. If the site system is remote, it’s possible to use the computer account of the remote site system, provided appropriate rights are granted on the primary site server. In the remote scenario it’s often easier to specify an account to use. One key deciding factor might be account password maintenance requirements. In the case of the computer account, the password is managed automatically. For user accounts, password management is manual.
The remaining option on this page, Allowed Connections, is displayed but is not user configurable.
Management Point
A management point is required for any primary site that will host clients. Managing devices also requires a management point configured to allow mobile devices to connect as well. Figure 14.15 shows the Properties page for the management point. You’ll need to adjust a couple of items if the management point will support device clients.
Figure 14.15 Management Point Properties page
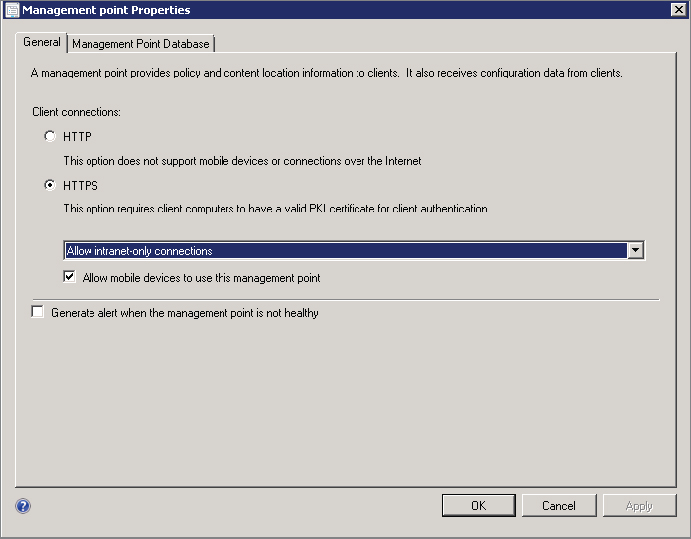
Management points purposed for device management must be configured for HTTPS communication and, accordingly, must have a web server certificate from the configured certification authority installed. Further, the check box Allow Mobile Devices To Use This Management Point must be selected.
When you decide on the placement and configuration of management points, you should consider the available configuration options:
HTTP Connected Computer Devices These devices are typically located on the internal network. A management point purposed to support this type of device cannot be also configured to support mobile devices unless all connected computers are reconfigured to use HTTPS communication and the management point configuration is updated accordingly.
HTTPS Connected Computer Devices Any management point can be configured to communicate with clients using HTTPS, whether the computer devices are on the internal or external network. In fact, using HTTPS communication is the most secure way to configure client/management point interaction. If a management point is configured in this way and mobile devices are also available that need to be managed, simply check the box to allow the management point to also serve mobile devices.
Microsoft Enterprise Certification Authority
Mobile devices require certificates to communicate and be approved in the environment. Certificates are a topic that seems to bring hesitation and uncertainty for many Configuration Manager administrators—often either because the topic of certificates isn’t familiar or the use of certificates might involve dependency on another operational team in the organization. Oftentimes it seems easier to just do it yourself than involve other teams! Don’t let either of these prevent you from using certificates—it’s really not difficult to do, and the added security and flexibility it brings is worth the time.
Discussing configuration of a certification authority is beyond the scope of this chapter—not to mention the fact that any discussion may or may not line up with specific organizational requirements. Documentation that walks through the process of deploying required certificates in a lab environment to afford testing of mobile device management is available at the following link:
http://technet.microsoft.com/en-us/library/gg682023.aspx
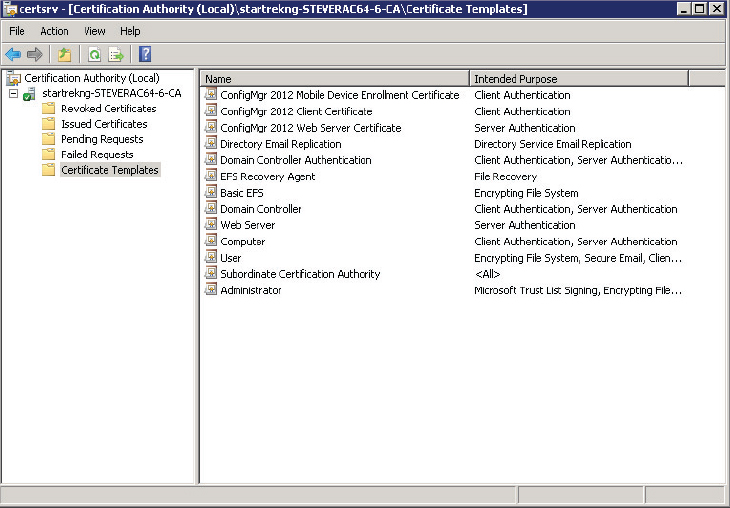
Figure 14.16 shows a screenshot of a certification authority configured to deploy the needed certificates for mobile device management.
Figure 14.16 Certification authority
Distribution Point
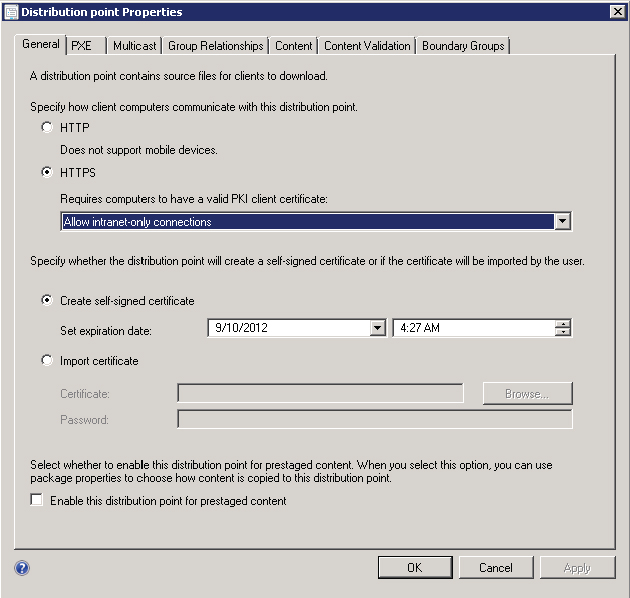
Distribution points purposed for device management must be configured for HTTPS communication and, accordingly, must have a web server certificate from the configured certification authority installed. Making distribution points available for access by mobile devices means placing the distribution point in the DMZ. Because of this requirement and the different content required by devices, distribution points for access by mobile devices may be kept separate from those accessed by computer devices. Figure 14.17 shows distribution point properties used to enable HTTPS communication.
Figure 14.17 Distribution Point Properties page
Application Catalog Web Service Point
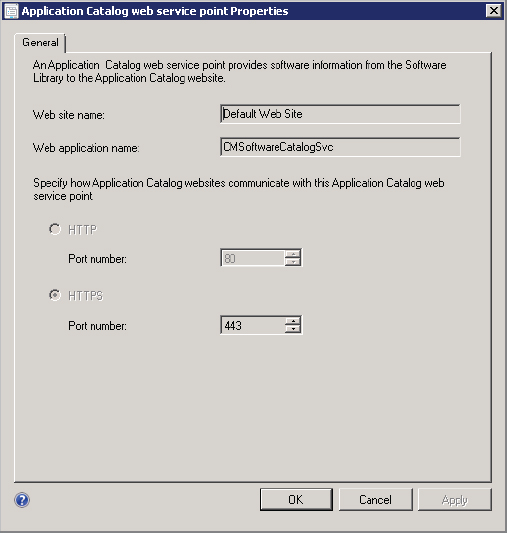
The Application Catalog web service point is an optional site system role for use by mobile devices but is required to provide the mobile device user with the ability to wipe their own device. Like other roles, configuring the Application Catalog point for use by mobile devices requires the use of HTTPS communication, which requires that a web server certificate from the local certification authority be configured. Figure 14.18 shows the HTTPS configuration option for the Application Catalog web service point.
Figure 14.18 Application Catalog Web Service Point Properties page
Depth-Management Device Enrollment
The enrollment process and provisioning process require action from both the device user and the ConfigMgr administrator. The administrator portion of the configuration must be in place prior to user involvement, so our discussion will focus there first.
Administrator Configuration
The administrator must decide which users are able to participate in device enrollment and provisioning. This is done through client settings configuration. The option to enable mobile device enrollment is a user setting that is available either by configuring the Default Client Agent Settings, which combine both default user and device settings for the site, or by choosing to configure a custom settings profile for users. The Default Client Agent Settings should be used when device enrollment should be enabled for all users, while the custom settings profile should be used where enrollments rights should be granted only to select users. The example will demonstrate the latter option:
1. To configure user-specific enrollment options, create custom user settings and enable enrollment, as shown in Figure 14.19.
Figure 14.19 Custom user settings to enable enrollment

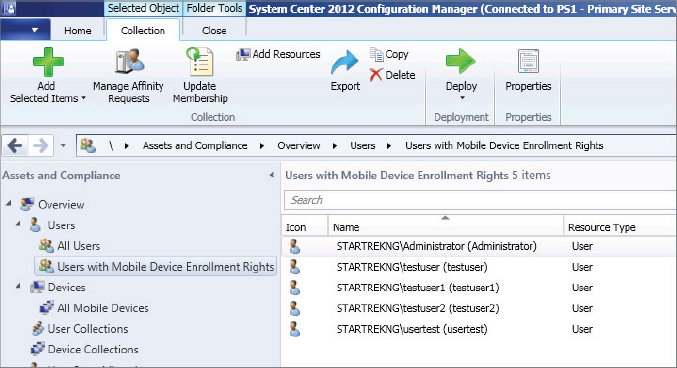
2. Configure a user collection that contains all users who should be granted the right of device enrollment.
This collection can consist of either individual users or groups of users. The example uses individual users, as shown in Figure 14.20.
Figure 14.20 Collection of users where device enrollment should be enabled
3. With both of these items created, it’s a matter of linking the two. Simply go back to the custom user settings and assign them to the collection just created, as shown in Figure 14.21.
Figure 14.21 Custom user settings assigned to device enrollment collection

Complete the assignment process by right-clicking the custom setting and selecting Assign. It is also possible to link custom settings to more than a single collection.
This configuration of appropriate site systems and appropriate client settings is all that is required in order to enroll and provision devices. There is more work for the administrator to do in terms of configuring settings that should be in place on the various devices, but we’ll cover that later.
User Configuration
Actions required from the device user’s perspective are straightforward. The actual enrollment process behind the scenes is a bit more involved.
The device user will need to do only two things: install some software and enter credentials.
You can obtain the Enterprise Enrollment software from the enrollment web proxy site system by directing the device’s web browser to the URL for this site system. The default URL is
https://<enrollmentwebproxyservername>/EnrollmentService
It’s also possible that the Enterprise Enrollment software could be made available through another means, such as an email link. Regardless of the mechanism used to deliver the Enterprise Enrollment software to the device, it must be installed. In the example scenario, we obtain the software by browsing to the enrollment web proxy site system. Figure 14.22 shows the user being prompted for what action to take when presented with the enrollment software.
Figure 14.22 User prompted for action regarding enrollment software

For the example, we save the software to the device before running it. This is shown in Figure 14.23 and Figure 14.24.
Figure 14.23 Select a location for the enrollment software
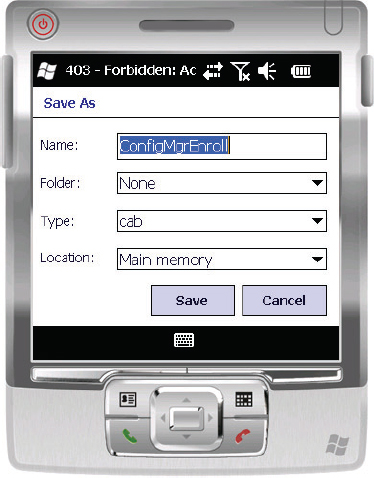
Figure 14.24 Enrollment software download in progress

Once you’ve downloaded the software, you can find it in the root folder when viewing File Explorer on the device. For the example, do the following:
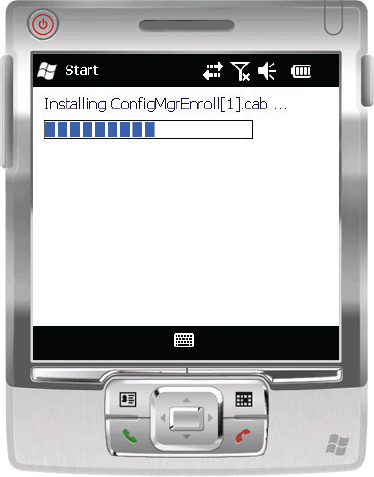
1. Locate the software and select it to begin the installation process. Figure 14.25 and Figure 14.26 show the process.
Figure 14.25 Enrollment software seen in File Explorer
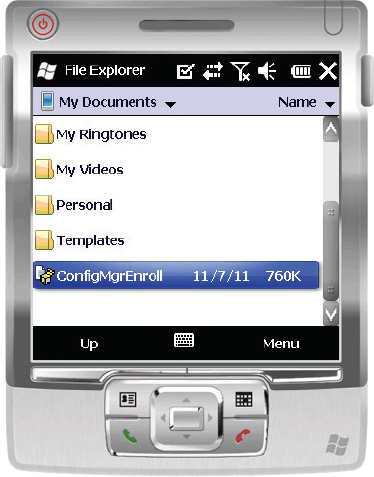
Figure 14.26 Enrollment software installing to the device
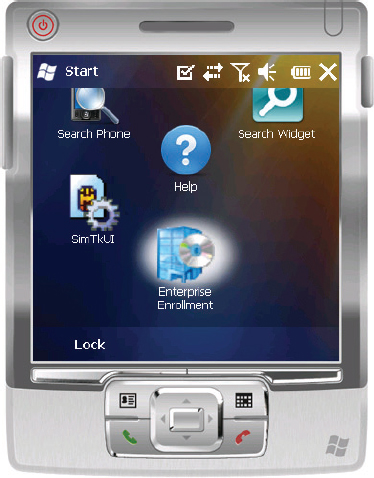
Once it is installed, the enrollment software should automatically launch. If it doesn’t, you can initiate it from the Start menu, as shown in Figure 14.27.
Figure 14.27 Enrollment software installed and available on the Start menu
2. Once it is launched, review the text and click Enroll, as shown in Figure 14.28.
Figure 14.28 Beginning the enrollment process

3. Figure 14.29 shows the credentials screen. Provide an email address, password, and server address.
Figure 14.29 Credentials screen of the enrollment wizard

By default the option Use The Default Enrollment Server is selected. In the example scenario, the default configuration was inaccurate. Once you’ve provided the details, click Next.
A Few Words about Email Lookup and User Accounts
The email address is used to look up the proper domain account. Once looked up, the actual account in domainuser format is used for verifying credentials. You can see this in the enrollment logs, discussed later.
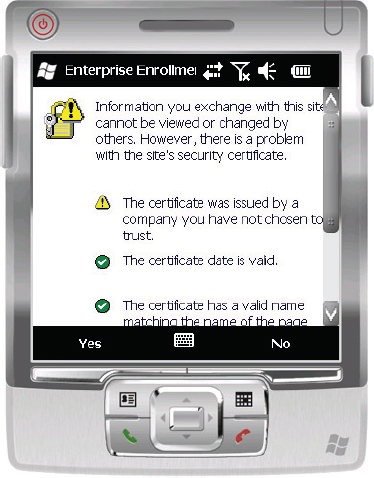
From here, it’s possible the user will see a warning screen regarding the site’s certificate.
4. If so, verify that the certificate is OK, and click Yes to continue. This is shown in Figure 14.30.
Figure 14.30 Enrollment certificate warning screen
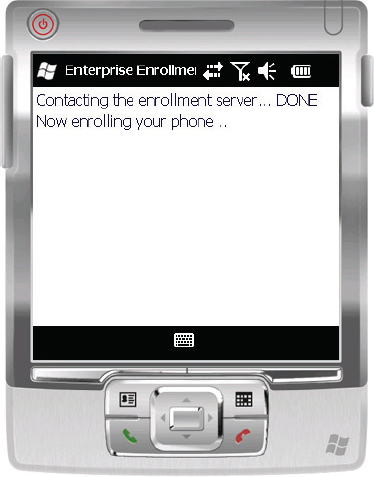
The enrollment process begins. To the device user, the process is fairly boring, as shown in Figure 14.31.
Figure 14.31 Enrollment in progress
In reality, there is a lot going on behind the scenes. In brief, the process is as follows:
1. The enrollment web proxy point takes the information supplied and passes it to the enrollment service point.
2. The enrollment service point forwards the information to the primary site for evaluation. This evaluation confirms the user has been granted rights to enroll their device in the site.
3. Assuming the user is approved, the enrollment service point will contact the enterprise certification authority to retrieve the needed certificate and send that back to the device through the enrollment web proxy point.
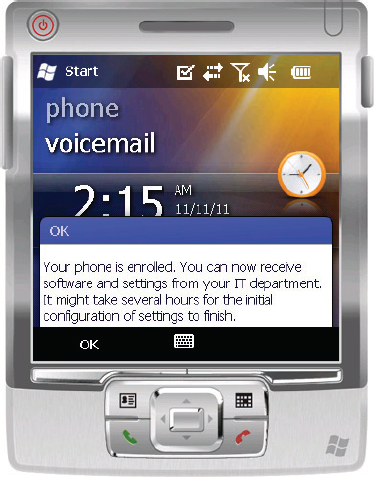
After this process completes, the device is enrolled and ready to be provisioned and managed. This is shown in Figure 14.32.
Figure 14.32 Enrollment process complete
Once the enrollment process is complete, there will be a delay before the device will be fully managed by the site—sometimes as long as eight hours. After this period the device should show up in the All Mobile Device collection as Active, as shown in Figure 14.33.
Figure 14.33 Device in Active status after enrollment and provisioning

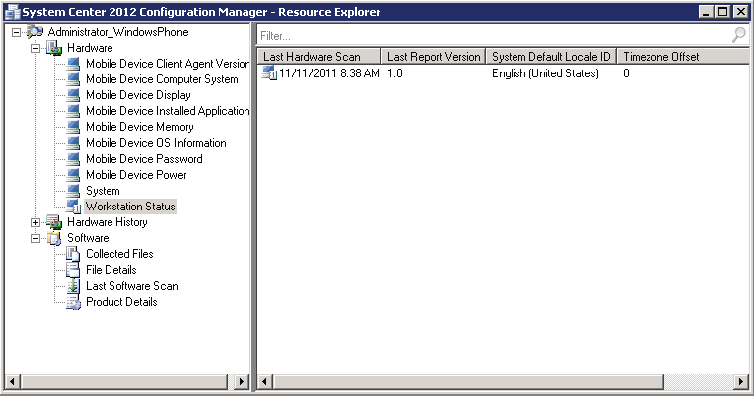
The device should also have inventory information associated with it. This is another sign that it is properly configured and is shown in Figure 14.34.
Figure 14.34 Device inventory
Previous versions of Configuration Manager separated device client settings from computer client settings. Configuration Manager 2012 unifies these settings so that, where applicable, the same values apply equally to all device types. Just remember that not all of the available settings are applicable to mobile devices. As an example, mobile devices are able to participate in hardware inventory as well as software distribution, but mobile devices do not submit software inventory. It is also possible to extend the hardware inventory for devices by modifying the SMS_DEF.MOF and Configuration.MOF files.
Device Settings Management
Settings management options are available for depth devices in addition to the standard client operations. You configure these settings through Compliance Settings. Configuring settings for mobile devices requires creating one or more configuration items and then delivering them to the mobile devices by associating them with configuration baselines, which are then assigned to a given collection. Since the number of configuration items and baselines needed will depend on individual configurations, the example will use a unified approach where a single configuration item and baseline are used for all devices:
1. Start configuring the configuration item by selecting Compliance Settings ![]() Configuration Items.
Configuration Items.
2. Right-click Configuration Items and select Create Configuration Item.
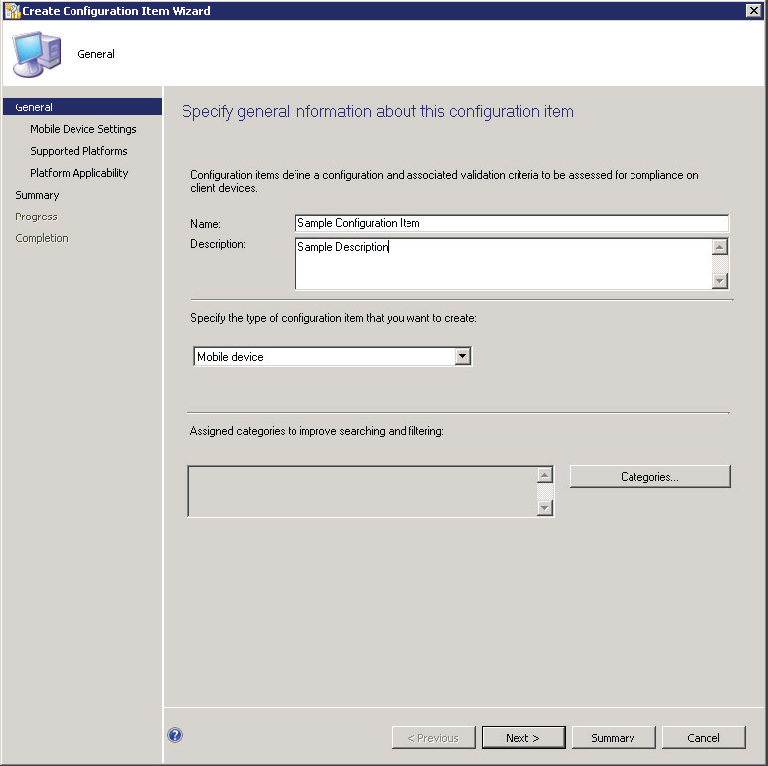
3. On the General page of the Create Configuration Item Wizard, shown in Figure 14.35, supply a Name and Description and then specify that the configuration item is targeted for a mobile device.
Figure 14.35 Create Configuration Item Wizard—General page
4. Optionally, select any categories that should be used for this configuration item. Click Next.
5. On the Mobile Device Settings page, determine which settings should be managed by this configuration item.
For the example, select all settings and choose to configure additional settings, as shown in Figure 14.36. This will allow you to review all potential settings that might be enforced on a device. Click Next.
Figure 14.36 Create Configuration Item Wizard—Mobile Device Settings page
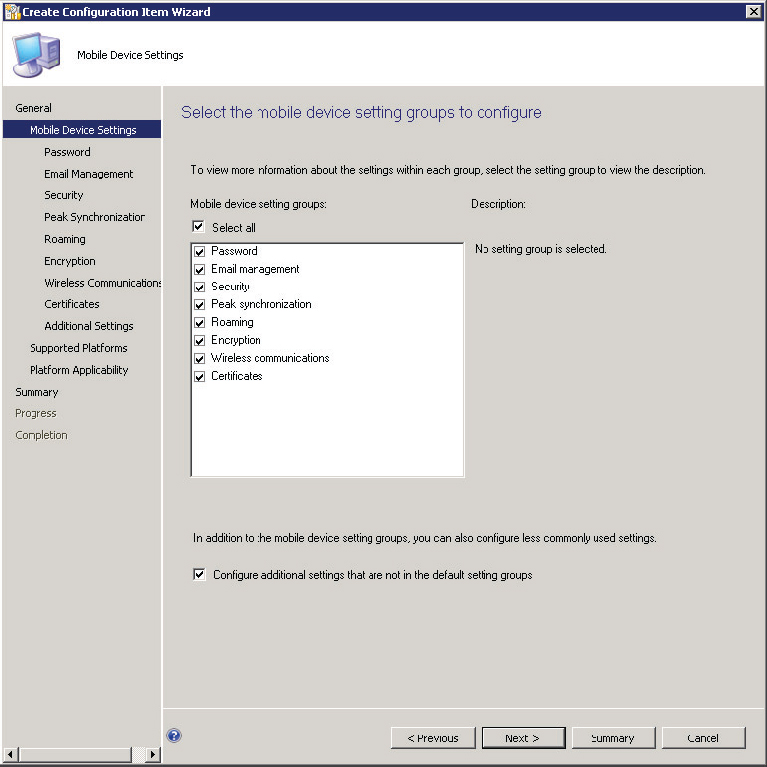
Settings vs. Device Capability
Not all devices are capable of implementing all settings. It’s fine to configure a setting in general, but the settings will be implemented only on capable devices.
6. After selecting the additional settings that will be defined by this configuration item, click Next.
7. Configure the appropriate device password options.
The password settings are shown in Figure 14.37. Password settings are not configured by default.
Figure 14.37 Create Configuration Item Wizard—Password page
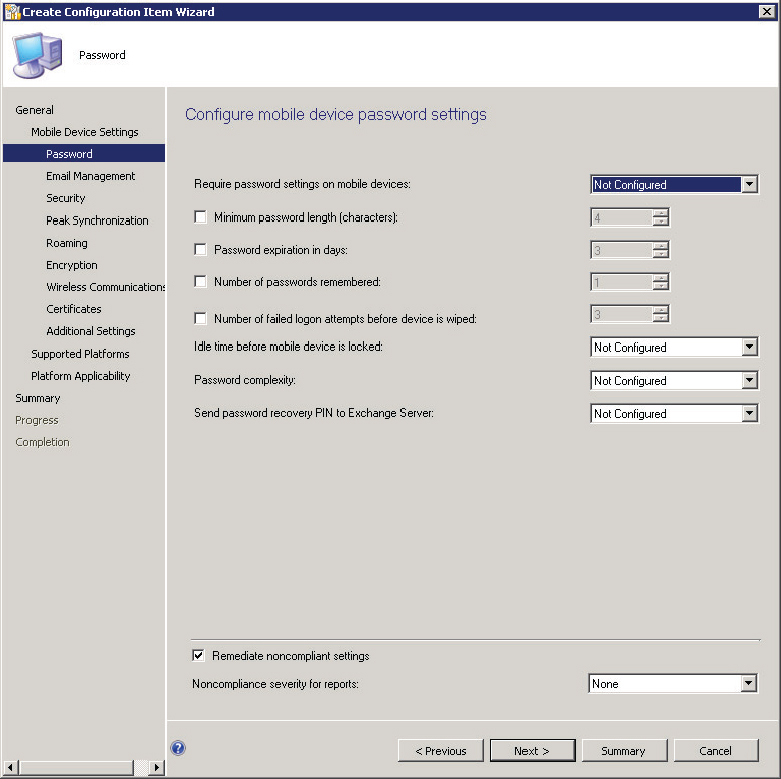
Require Password Settings On Mobile Devices This option allows administrators to determine whether password settings should be enforced. Assuming this option is enabled, a few specific password configurations are possible:
- Minimum Password Length (Characters): This option allows administrators to specify the minimum number of characters that should be supplied as part of the password.
- Password Expiration In Days: This option allows administrators to specify the number of days that are allowed to elapse before requiring a password change.
- Number Of Passwords Remembered: This option allows administrators to configure how many passwords are retained. This setting is useful to prevent the reuse of passwords.
- Number Of Failed Logon Attempts Before Device Is Wiped: This option allows administrators to specify how many incorrect passwords can be supplied before the device is automatically wiped.
Idle Time Before Mobile Device Is Locked This option, not enabled by default, allows administrators control over how long a device might be left unlocked when idle.
Password Complexity This option allows administrators to specify the required password complexity level, in this case allowing either a PIN or a strong password.
Send Password Recovery PIN To Exchange Server This option allows administrators to configure where the password recovery PIN is stored on the Exchange Server.
Device Compliance Remediation
If a device is not compliant with all required settings, it will be updated to the required state by default as a result of selecting Remediate Noncompliant Settings on the Password page. When device settings are remediated, it is possible to configure that a noncompliance indication should be logged in reports. This is disabled by default.
8. After all password options are configured, click Next.
9. Configure email options for the device in the Email Management settings, shown in Figure 14.38.
Figure 14.38 Create Configuration Item Wizard—Email Management page

PDP And IMAP Email This option allows administrators to define whether PDP and IMAP email are allowed. This is not an either/or setting; either both are allowed or both are prohibited.
Maximum Time To Keep Email This option allows administrators to specify how long email should be retained on the device.
Allowed Message Formats This option allows administrators to specify the format allowed for email, either plain text only or both plain text and HTML. If this option is configured, up to two additional options become available for configuration.
Maximum Size For Plain Text Email (Automatically Downloaded) This option allows administrators to define the size of a plain text email that is allowed to be automatically downloaded to the device. Incremental sizes are configurable up to allowing the entire email to be downloaded.
Maximum Size For HTML Email (Automatically Downloaded) This option allows administrators to define the size of an HTML email that is allowed to be automatically downloaded to the device. Incremental sizes are configurable up to allowing the entire email to be downloaded.
Maximum Size Of An Attachment (Automatically Downloaded) This option allows administrators to define the size of an attachment that is allowed to be automatically downloaded to the device. Incremental sizes are configurable up to allowing the entire email to be downloaded.
Calendar Synchronization This option allows administrators to specify whether calendar synchronization to the device is allowed.
10. After all email options are configured, click Next.
11. Configure the security options for the device. The security management settings are shown in Figure 14.39.
Figure 14.39 Create Configuration Item Wizard—Security page

Unsigned File Installation This option allows administrators to specify whether the installation of unsigned files is allowed or not allowed. If they are allowed, administrators then choose what parties are allowed this right. Available options are Mobile Operator, Manager, User Authenticated, IT Administrator, User Unauthenticated, and Trusted Provisioning Server.
Unsigned Applications This option allows administrators to specify whether the installation of unsigned applications is allowed or prohibited.
SMS And MMS Messaging This option allows administrators to configure whether SMS and MMS messaging are allowed or prohibited on the device.
Removable Storage This option allows administrators to configure whether removable storage is allowed or prohibited on the device.
Camera This option allows administrators to configure whether the camera is allowed or prohibited on the device.
Bluetooth This option allows administrators to configure whether Bluetooth is allowed or prohibited on the device.
12. After all security options are configured, click Next.
13. Configure the synchronization options for the device in the Peak Synchronization settings, shown in Figure 14.40.
Figure 14.40 Create Configuration Item Wizard—Peak Synchronization page
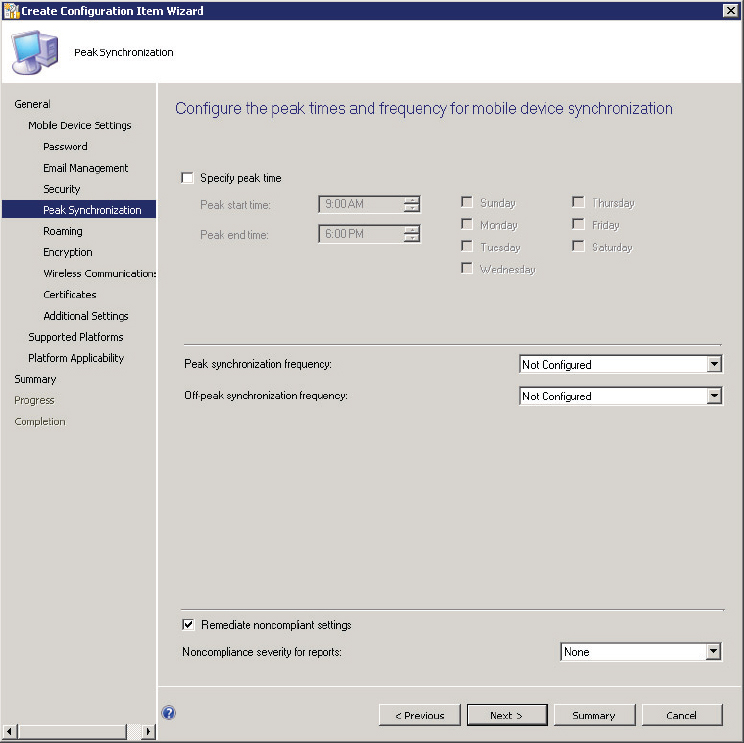
Specify Peak Time This option allows administrators to define the specific time considered to be peak on devices.
Peak Synchronization Frequency This option allows administrators to specify how often the device will synchronize during the defined peak time.
Off-Peak Synchronization Frequency This option allows administrators to specify how often the device will synchronize outside the defined peak time.
14. After all Peak Synchronization options are configured, click Next.
15. Configure the roaming options for the device in the Roaming settings, shown in Figure 14.41.
Figure 14.41 Create Configuration Item Wizard—Roaming page
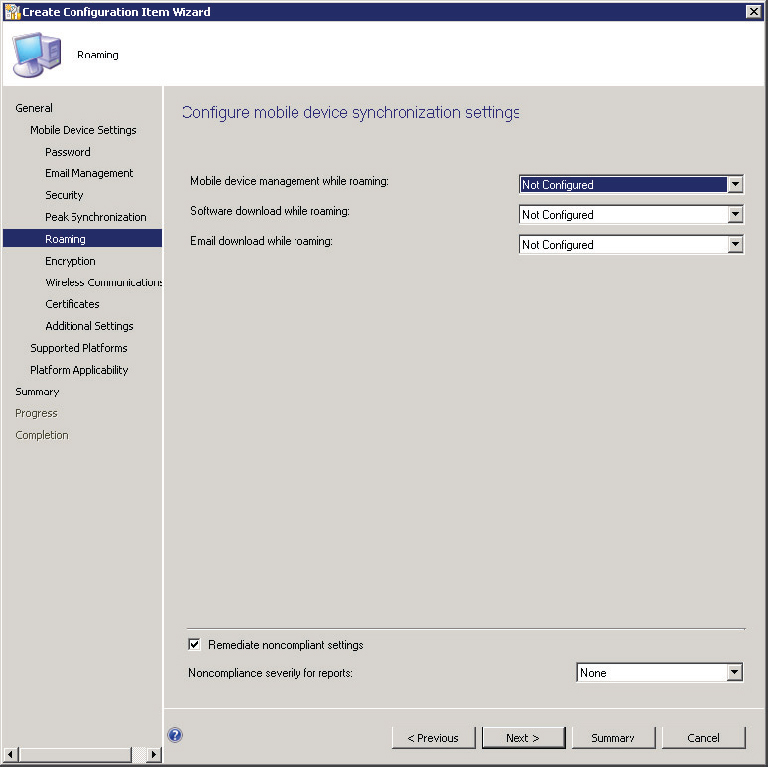
Mobile Device Management While Roaming This option allows administrators to configure whether a device should be actively managed when roaming.
Software Download While Roaming This option allows administrators to specify whether software downloads should be allowed when a device is roaming.
Email Download While Roaming This option allows administrators to control whether email is downloaded while a device is roaming.
16. After all the Roaming options are configured, click Next.
17. Configure the encryption options for devices in the Encryption settings, shown in Figure 14.42.
Figure 14.42 Create Configuration Item Wizard—Encryption page
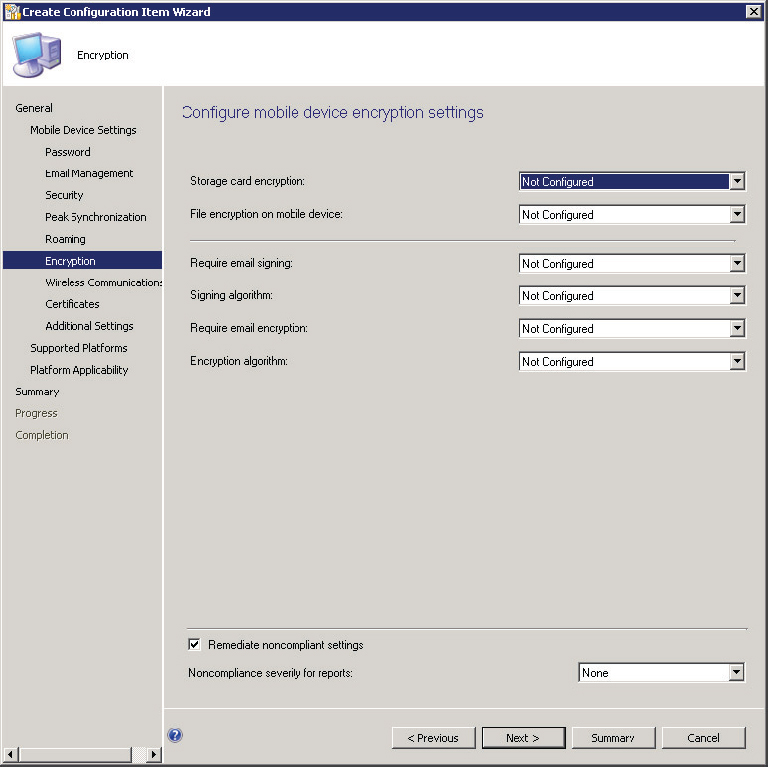
Storage Card Encryption This option allows administrators to specify whether encryption is on or off for a device’s storage card.
File Encryption On Mobile Device This option allows administrators to configure whether file encryption is on or off for a device.
Require Email Signing/Signing Algorithm This option allows administrators to specify whether email signing is enabled or disabled. If email signing is enabled, the Signing Algorithm option allows administrators to specify whether SHA, MD5, or the default signing algorithm should be used.
Require Email Encryption/Encryption Algorithm This option allows administrators to configure whether email encryption is on or off for a device. If email encryption is enabled, the Encryption Algorithm option allows administrators to specify which encryption algorithm should be used. Available choices are Triple DES, DES, RC2 128-bit, RC2 64-bit, RC2 40-bit, or the default algorithm.
18. After all Encryption options are configured, click Next.
19. Configure the wireless communication options for devices in the Wireless Communication settings, shown in Figure 14.43.
Figure 14.43 Create Configuration Item Wizard—Wireless Communications page

20. Configure whether wireless network connections are allowed or prohibited on the device.
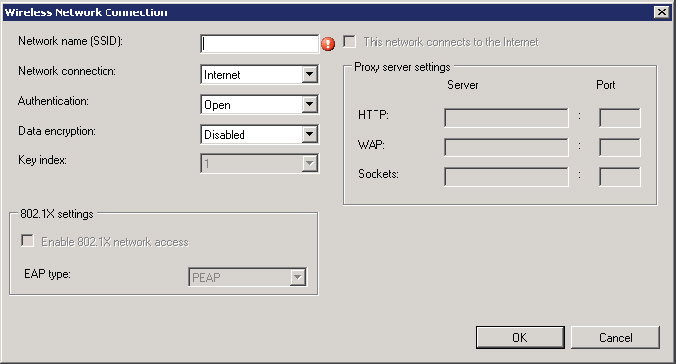
If they are allowed, administrators can click the Add button to specify one or more networks and associated network configuration. Available network configuration options include Proxy, 802.1X, Authentication, Data Encryption, and more. A blank Wireless Network Connection configuration page is shown in Figure 14.44.
Figure 14.44 Wireless Network Connection page
21. After all Wireless Network Connection options are configured, click Next.
22. Configure the certificate options for devices in the Certificates settings, shown in Figure 14.45.
Figure 14.45 Create Configuration Item Wizard—Certificates page
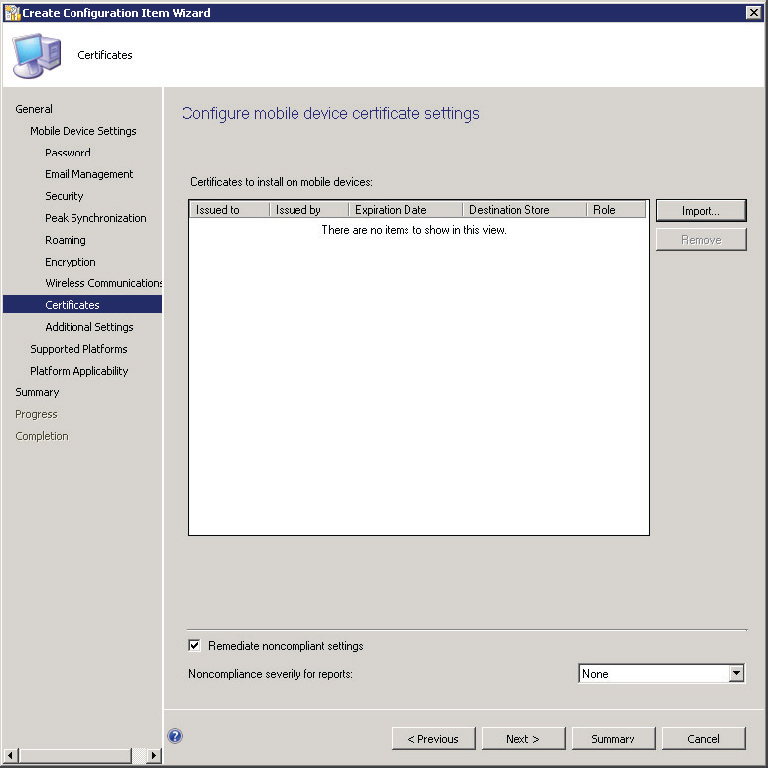
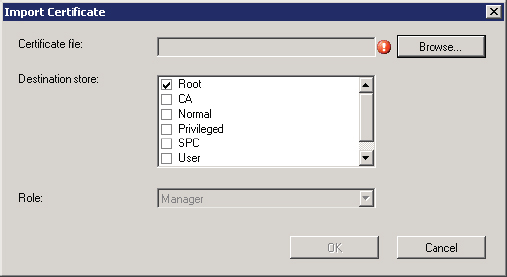
The Certificates To Install On Mobile Devices option allows administrators to specify certificates that should be installed on mobile devices. Clicking the Import button brings up the Import Certificate page, shown in Figure 14.46, which allows certificates to be imported from the filesystem and allows administrators to specify in which certificate store the certificate should be placed on the device.
Figure 14.46 Import Certificate page
23. After all Certificate options are configured, click Next.
24. Configure any additional settings, either predefined or custom for the device, in the Additional Settings page, shown in Figure 14.47.
Figure 14.47 Create Configuration Item Wizard—Additional Settings page
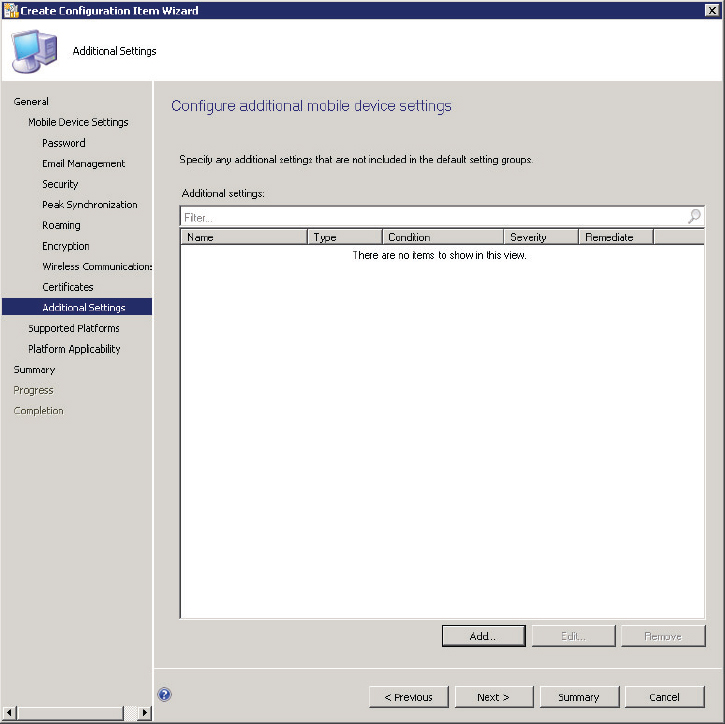
Clicking the Add button will display a list of all predefined additional settings that can be applied to a device, as shown in Figure 14.48.
Figure 14.48 Browse Settings page

The list will include items already discussed and additional ones that are available but less common. Specific supported platforms are also listed for each item. Selecting the Show Settings From All Mobile Device Configuration Items option will add even more settings to the list. If a specific configuration is possible but not in the list of options, you can create custom settings by clicking Create Setting. The setting type to be created can be either an OMA-URI or a registry value.
Adding a setting from the list requires clicking the setting and then clicking Select. This action opens the setting to allow you to review the setting values. In some cases, a value must be supplied for a given setting. Once the setting is configured properly, click OK. Figure 14.49 shows an example of the Rule For Desktop PIM Sync setting.
Figure 14.49 Rule For Desktop PIM Sync setting
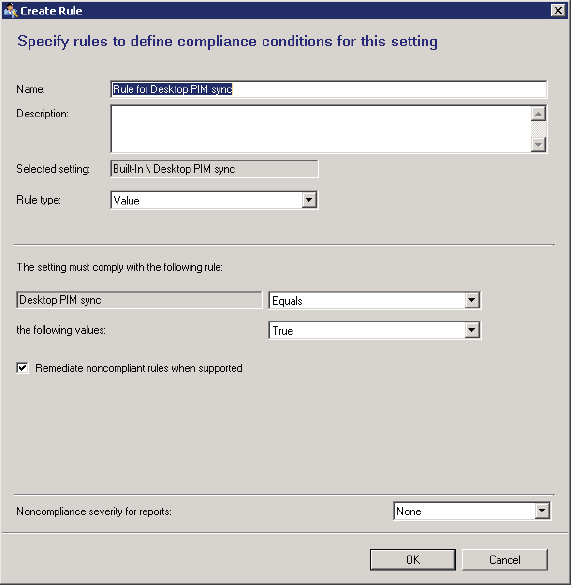
In the case of additional settings, the choice of whether to remediate or to report is specified individually. Using individual settings it would be possible to configure all settings options. When you specify individual settings, just ensure that there is no overlap between settings configured here and settings configured elsewhere.
25. Once any additional or custom settings are added to the Available Settings list, click Edit to review the settings. When you’ve complete your review, click Next.
The ability to review the details behind each setting exposes how each setting is implemented.
26. Specify which platforms should be targeted with the configurations just defined in the Supported Platforms page, shown in Figure 14.50, and click Next.
Figure 14.50 Create Configuration Item Wizard—Supported Platforms page

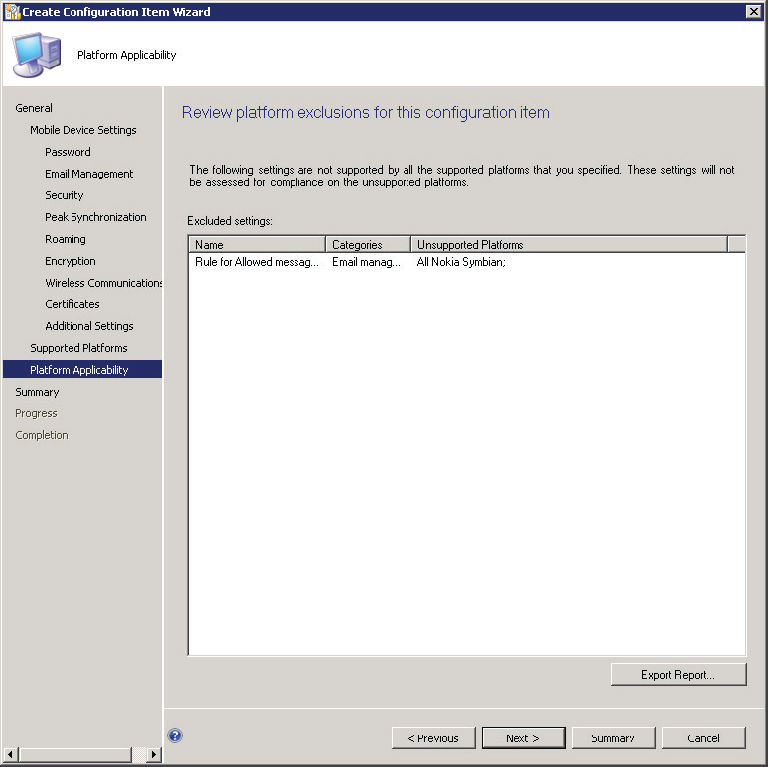
As already mentioned, not all settings apply to all device types. The Platform Applicability page of the wizard, shown in Figure 14.51, displays any settings that have been chosen but are not supported by a selected target platform. There is no configuration available here.
Figure 14.51 Create Configuration Item Wizard—Platform Applicability page
27. From here, simply complete the wizard to save the configuration item.
Defining the configuration item is not sufficient. Implementing the baseline requires attaching it to a baseline and assigning that baseline to a collection. This is a general task for compliance setting management and is discussed in Chapter 13, “Compliance Settings.”
The method of troubleshooting problems with mobile devices depends on the management mode chosen. For lite management, troubleshooting will be mostly focused on Exchange—both in terms of ensuring that the Exchange ActiveSync connector is running properly and ensuring that the ConfigMgr 2012 Exchange ActiveSync connector is properly configured and operational.
When it comes to depth management, there are a few more places to check when you run into problems. Depth-managed devices require enrollment before management can begin. The enrollment process is not difficult, but there are a number of moving parts that must be configured properly, not the least of which is certificates. When enrollment fails, it’s clear on the device that there was a problem, but it’s not always easy to collect diagnostic information from the device to understand why enrollment failed. Fortunately, there is excellent logging around the enrollment process to help. The EnrollmentService.log and EnrollmentWeb.log may contain errors that might occur as the enrollment process progresses. These logs are located in the SMS_CCM folder, under the EnrollmentServicelogs and EnrollmentProxyPointlogs folders, respectively.
The depth-managed mobile device client has similarities to the computer device client in that client health data is provided. Simply reviewing a device in the collections to ensure client health evaluations are current and successful, along with checking the Client Status data from the Monitoring node, is a good indicator of whether the client is behaving properly.
Detail the differences between lite and depth management. The various management options and settings available for mobile devices will vary depending on whether lite- or depth-management options are in place.
Master It List mobile device management capabilities for lite versus depth management.
Understand how to configure mobile device management. Properly configuring mobile device management requires addressing several potential scenarios. From a Configuration Manager 2012 perspective, though, the choice is simple: lite or depth management.
Master It List the items that need to be configured for both lite and depth management.
Understand the depth-management enrollment process. From the user perspective the enrollment process for depth management is straightforward. Behind the scenes, there are a number of moving parts. Each of these components is critical to the enrollment process.
Master It List the components required to enroll depth-managed devices.