
Chapter 3
Migrating to Configuration Manager 2012
In the past, an upgrade or migration of Systems Management Server (SMS) to Configuration Manager 2007 was not an easy process. You could migrate the SMS 2003 environment side-by-side manually or by using scripts, but at the end of the process you were not able to monitor the migration of your objects. Very often a greenfield (new) environment was created next to the old SMS infrastructure, and the objects that were needed in the new Configuration Manager 2007 infrastructure had to be re-created by hand.
For Configuration Manager 2012, Microsoft invested a lot of time in creating a good, solid migration scenario that is easily managed. The new feature, called migration, allows you to migrate your objects to the new Configuration Manager 2012 infrastructure. In addition, since Configuration Manager SP1, you can migrate objects not only from a Configuration Manager 2007 site but also from a source Configuration Manager 2012 R2 hierarchy.
The migration feature in Configuration Manager 2012 will assist you with the following goals:
- Migrating Configuration Manager 2007 objects
- Migrating Configuration Manager 2007 clients
- Migrating Configuration Manager 2012 (R2) objects
- Migrating Configuration Manager 2012 (R2) clients
- Minimizing WAN impact
- Flattening the Configuration Manager infrastructure by reducing the number of primary sites
- Maximizing the reusability of 64-bit–capable hardware
Besides the migration feature, you can wipe and load your Configuration Manager environment while, for instance, you are still using SMS 2003.
In this chapter, you will learn to
- Determine what you are able to migrate with the migration feature
- Discover which migration approach is supported
- Ascertain what kind of interoperability is supported during the migration
- Migrate packages and programs to the new application model
Introducing Migration
The migration feature and the migration concept bring with them some new terminology. In this section you will find out what's covered in the migration feature and where you can find it in Configuration Manager 2012.
Client Information Client information includes such items as the client globally unique identifier (GUID), the inventory, and the client status information. Every Configuration Manager 2012 client has an ID that is unique in the Configuration Manager 2012 environment.
Client Migration The process of upgrading the Configuration Manager client of the source hierarchy to the new Configuration Manager 2012 hierarchy is called client migration. This process can be initiated in different ways, but during the migration process the old Configuration Manager client will be uninstalled and the new Configuration Manager 2012 client will be installed.
Content The content consists of the package binaries and files. The source of these packages needs to be accessed via a UNC path. The UNC path must be available for the Configuration Manager 2012 site server.
Data Gathering One of the first steps in the migration process is that the Configuration Manager 2012 R2 hierarchy discovers all the objects in the source Configuration Manager environment. The source Configuration Manager environment can be based on the versions Configuration Manager 2007 and 2012. To be able to discover the objects, you need to configure a data-gathering process that is part of the migration feature.
This data gathering is an ongoing migration process that discovers all the objects or changes in the old infrastructure. During the migration period, this process is scheduled by default to run every four hours.
Migration Jobs Migration jobs are used to migrate specific objects from the source Configuration Manager hierarchy to the new infrastructure. Migration jobs can be scheduled for the future or started instantly.
Monitoring Migration While migrating assets from the source Configuration Manager to the target Configuration Manager, it is useful to be able to monitor the migration process. Monitoring your migrations can be done from the Configuration Manager 2012 console, specifically in the Administration workspace under Migration ![]() Migration Jobs. You will be able to see which migrations completed, which failed, and which are in progress or need to be completed.
Migration Jobs. You will be able to see which migrations completed, which failed, and which are in progress or need to be completed.
Objects Objects subject to migration include packages, applications, software update deployments, driver packages, OS images, configuration items, and the like within Configuration Manager.
Server Settings Server settings are the site role settings and site properties in the Configuration Manager hierarchy.
Shared Distribution Points Shared distribution points are distribution points that are active in the source Configuration Manager hierarchy. Enabling shared distribution points allows you to use the source Configuration Manager distribution points in the new Configuration Manager 2012 infrastructure. During the migration process, the Configuration Manager 2012 clients can receive the content from the shared distribution points. The shared distribution points are read only though; they are still managed by the source Configuration Manager hierarchy. After the shared distribution points are reassigned to the target hierarchy, they will be manageable by this Configuration Manager hierarchy.
Source Hierarchy The source hierarchy is the Configuration Manager 2007 or Configuration Manager 2012 R2 hierarchy from which you want to migrate objects to the Configuration Manager 2012 R2 infrastructure. The source hierarchy is always the topmost site of the source Configuration Manager hierarchy.
Source Sites Source sites are the sites in the source hierarchy that hold Configuration Manager data that you want to migrate to the target Configuration Manager site. You need to configure account settings per source site to be able to connect to each source site.
Migration Functionality in Configuration Manager 2012
Configuration Manager 2012 comes with a migration feature that allows you to migrate your objects from a source Configuration Manager site to a target Configuration Manager site. Migrating objects is done via migration jobs, but first you need to designate a source hierarchy to be able to gather information from the source hierarchy and to create migration jobs.
Source Hierarchy
When migrating a Configuration Manager 2007 or 2012 hierarchy to a new Configuration Manager 2012 R2 hierarchy, you need to specify a source hierarchy. You must use the topmost Configuration Manager primary site server as the source hierarchy, as shown in Figure 3.1.

During the creation process you need to supply a user account that has access to the SMS provider of the source site. This account needs read permission to all the objects in the source site—be sure to test the connection and the permissions. For SQL access you can use the same account, you can specify a different user, or you can use the local system account of the Configuration Manager 2012 central administration site or stand-alone site to connect to the source Configuration Manager site database. The user account needs read and execute permissions.
After you specify the source hierarchy, the data-gathering process may take several hours depending on how many objects are found in the source hierarchy.
Once the data-gathering process has finished discovering, it may have discovered other sites in the hierarchy. For those sites you will need to supply credentials with the right permissions per discovered site to be able to access the objects in the discovered sites in the hierarchy.
Data-Gathering Process
The initial data-gathering process can take a while depending on your source hierarchy. It will gather all information about the configured site, the object data, and information about other child sites in the hierarchy. It will also set up the connection between the source Configuration Manager site and the target Configuration Manager 2012 site. The data-gathering process must be complete before you can proceed with creating migration jobs or configuring credentials for other sites. Depending on the size of the source hierarchy, the data-gathering process can run from a couple of minutes to several hours. The more objects you have in the source hierarchy, the longer the data-gathering process will take.
The data-gathering process runs every 4 hours by default, but you can change this interval at the source hierarchy object to 1 hour, 2 hours, 4 hours, 8 hours, 12 hours, 18 hours, or 24 hours. The process runs periodically to keep the data accurate for the migration. The gathered information is stored in the Configuration Manager 2012 database for reporting purposes.
The data-gathering process can be stopped by using the Stop Gathering Data action on the ribbon of the Configuration Manager 2012 console. While gathering data you can check the migmctrl.log located in the Logs folder in the Configuration Manager 2012 installation path. The Logs folder can also be accessed via the %SMS_LOG_PATH% environment variable.
Migration Job Types
The migration of Configuration Manager objects from the source hierarchy is done by creating migration jobs. Configuration Manager 2012 supports three kinds of migration jobs, so you can choose how and when you want to migrate your assets. These three kinds of migration jobs are explained in the following sections.
COLLECTION MIGRATION
With the Collection Migration option you can migrate all the objects that are related to the collection, including all objects that are related to members of the collection. When you choose this option, you are able to exclude specific kinds of objects.
You are not able to migrate all Configuration Manager objects via the Collection Migration option since not all objects are related to collections. Collection Migration is available only when migrating from Configuration Manager 2007.
With Collection Migration, you can migrate the following related objects:
- Advertisements
- Software distribution packages
- Virtual application packages
- Software update deployments
- Software update deployment packages
- Operating system deployment boot images
- Operating system deployment images
- Operating system deployment operating system installers
- Task sequences
- Configuration baselines
- Configuration items
If you deselect one of these objects, then the object is placed in an exclusion list. The exclusion list can be managed from the administrative console and can be used as a reference when you want to migrate certain objects. Objects on the exclusion list are still available for migration in jobs that you create in the future. They will not be automatically selected when listed in the exclusion list.
OBJECT MIGRATION
With the object migration job type you are able to migrate individual objects or object types that you select. This way you can easily migrate your operating system deployment objects, for instance, to test your operating system deployment feature in Configuration Manager 2012.
With object migration, you can migrate the following object types:
- Collections (from Configuration Manager 2012 only)
- Deployments (from Configuration Manager 2012 only)
- Software distribution deployments
- Task sequence deployments
- Application deployments
- Software update deployments
- Software update list deployments
- Baseline deployments
- Boundaries
- Boundary groups (from Configuration Manager 2012 only)
- Global conditions (from Configuration Manager 2012 only)
- Software distribution packages
- Applications (from Configuration Manager 2012 only)
- Virtual application packages (from Configuration Manager 2007 only)
- App-V virtual environments (from Configuration Manager 2012 only)
- Software updates
- Deployments
- Deployment packages
- Deployment templates
- Software update lists
- Software update groups (from Configuration Manager 2012 only)
- Automatic deployment rules (from Configuration Manager 2012 only)
- Operating system deployment
- Boot images
- Driver packages
- Drivers
- Images
- Installer
- Task sequences
- Settings management
- Configuration baselines
- Configuration items
- Asset Intelligence
- Catalog
- Hardware requirements
- User-defined categorization list
- Software metering rules
- Saved searches (from Configuration Manager 2012 only)
OBJECTS MODIFIED AFTER MIGRATION
With the Objects Modified After Migration option you can re-migrate objects from the source Configuration Manager hierarchy that have been migrated before and that have been changed in some way at the source hierarchy. The wizard shows you only the objects that have been changed.
With the Objects Modified After Migration option, you can migrate the following object types:
- Boundaries
- Software distribution packages
- Software update deployment packages
- Software update deployment templates
- Software update lists
- Operating system deployment boot images
- Operating system deployment driver packages
- Operating system deployment drivers
- Operating system deployment images
- Operating system deployment operating system installers
- Task sequences
- Configuration baselines
- Configuration items
- Asset Intelligence Catalog
- Asset Intelligence hardware requirements
- Asset Intelligence software list
- Software metering rules
To successfully re-migrate virtual application packages, you first need to delete any virtual application packages from the target Configuration Manager 2012 infrastructure.
These objects are all described in detail in the following sections.
COLLECTIONS
Collections can be migrated, but there are a couple of things that you need to take into account when migrating collections to the new Configuration Manager 2012 infrastructure.
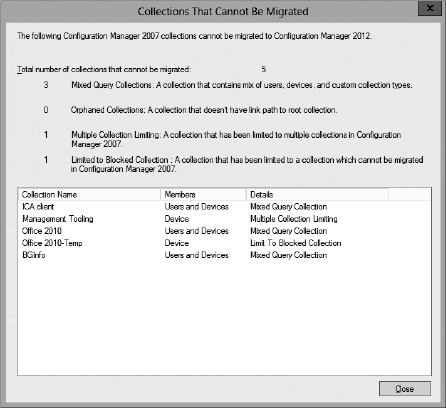
In the new Configuration Manager infrastructure, subcollections and linked collections no longer exist. Also collections with both users and devices are not supported and will not be migrated to Configuration Manager 2012. In Figure 3.2 the Collections That Cannot Be Migrated dialog box shows that mixed query collections, mixed collection hierarchies, or collections limited to multiple other collections in Configuration Manager 2007 cannot be migrated.
Some rules regarding the migration of collections apply:
- If you build a hierarchy of collections in Configuration Manager 2007, the related empty collections are migrated to folders. This way your collection organizational structure is preserved.
- Empty collections are migrated as folders (migrating only from Configuration Manager 2007).
- Direct membership collections are migrated as is and also when the direct membership is a Configuration Manager client in the source hierarchy that has not yet migrated to the new Configuration Manager 2012 site.
- Underlying collections with a mixed collection in the hierarchy cannot be migrated.
- To successfully migrate, a collection must contain either users/user groups or systems, but not both.
- Collections that are limited to multiple collections in Configuration Manager 2007 cannot be migrated.
- Collections that are limited to blocked collections in Configuration Manager cannot be migrated.
In Configuration Manager 2007 collections created in a central site were replicated down to the child sites. Collections created in a child site were replicated only within the site where the collection was created. This way the collections were limited to the child site. In Configuration Manager 2012 the collection definitions are globally replicated. The migration feature in Configuration Manager 2012 will assist you to prevent unintentionally increasing the scope of the migrated collections during the migration process. A dialog box like the one shown in Figure 3.3 will help you to limit the collection scope.
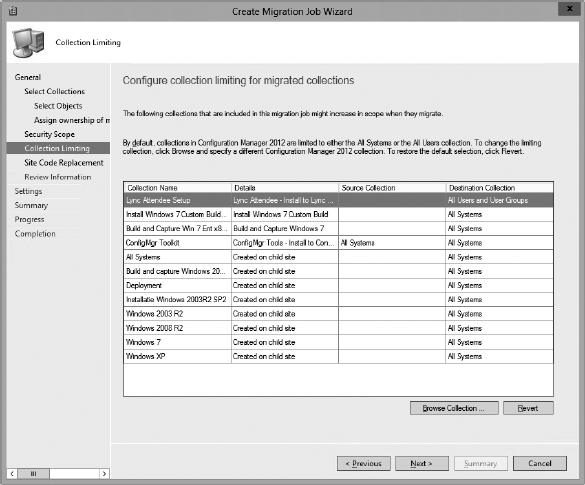
When using site codes in collection query definitions at your source Configuration Manager hierarchy, you will be assisted in replacing the site code during the migration of the collections. It is mandatory for the new Configuration Manager 2012 hierarchy to use new site codes. In Figure 3.4 you can see that site code PS7 is replaced with PS1. With the pull-down option you can choose whatever site code you want to replace.
With the collection migration job type, you will be assisted with the migration of the collections and the migration of the related Configuration Manager objects from the source hierarchy. The feature will preserve customer investments in collections and advertisements.

ADVERTISEMENTS AND DEPLOYMENTS
Advertisements are migrated and converted to deployments. The settings are preserved. During the collection migration job, you can automatically enable the deployment after the migration; by default the deployment is not enabled. Advertisements from Configuration Manager 2007 are migrated only if they are associated with a collection migration job and the Configuration Manager administrator has chosen to also migrate all the depended objects in addition to the collection itself. Deployments already deployed in Configuration Manager 2012 are migrated to the target Configuration Manager environment.
When an advertisement is migrated and converted, the deployment will not deploy the software again to computers or users where the software was already deployed in the source site. The reason for that is that the package IDs of the software packages and advertisements are preserved as part of the migration to the target Configuration Manager 2012 hierarchy. Since clients retain execution history, and it is tracked by the package ID, clients will not rerun a migrated package deployment after they have been migrated to the new hierarchy.
BOUNDARIES AND BOUNDARY GROUPS
While you are migrating boundaries from Configuration Manager 2007, boundary groups are automatically created by the migration process and are enabled only for content lookup. This way you will avoid boundary overlap in Active Directory, and it will prevent new Configuration Manager clients from getting assigned to the new Configuration Manager environment unexpectedly. When migrating from a Configuration Manager 2012 source hierarchy, you are able to migrate both the available boundaries and boundary groups.
When Distribution Point Sharing is enabled, boundaries associated with the distribution points in the source Configuration Manager hierarchy are migrated automatically.
GLOBAL CONDITIONS
Global conditions are available only in Configuration Manager 2012. Custom global conditions that you have created are the only global conditions that are able to migrate from the source Configuration Manager 2012 hierarchy to the target Configuration Manager 2012 hierarchy.
SOFTWARE DISTRIBUTION PACKAGES
Software distribution packages are migrated as is. During the migration from Configuration Manager 2007, packages are not converted to the new application model. To be able to migrate the classic packages (which are supported in Configuration Manager 2012) to the new application model, you need to use Application Conversion Manager once the package has been migrated to the target Configuration Manager 2012 hierarchy. This tool will help you to migrate the classic packages to the new application model. Application Conversion Manager is discussed further in this chapter.
The central administration site or primary site in a stand-alone scenario always needs access to the Configuration Manager UNC package source path to be able to distribute and deploy the package. For this reason you will need to replace all the local package source paths in Configuration Manager 2007 with UNC paths.
APPLICATIONS
Applications created in Configuration Manager 2012 are migrated with their deployment types, requirement rules, detection methods, deployments, dependencies, and all other configured settings. Like all objects with content, the source path needs to be a UNC path.
VIRTUAL APPLICATION PACKAGES
Virtual application packages are converted to the new application model. After the migration of the packages you will need to create a deployment. In Chapter 8, “Application Deployment,” you'll learn how to create deployments for your virtual applications.
To be able to use virtual applications in Configuration Manager 2012, you need to upgrade the App-V client to at least version 4.6 SP1 with the hotfix that is described in Knowledge Base article 2645225. The App-V client 4.6 SP2 is supported as well; however, App-V 5 and App-V 5.0 SP1 are supported only in Configuration Manager 2012 SP1 and R2.
When Distribution Point Sharing is enabled, the streaming of App-V packages is not supported.
APP-V VIRTUAL ENVIRONMENTS
App-V 5 has been supported since Configuration Manager 2012 SP1. A feature that comes with this support is the ability to create an App-V virtual environment, which creates a connection between two separate App-V applications. You can migrate those virtual environments to another R2 hierarchy.
SOFTWARE UPDATES
Software updates can be migrated with the three different migration jobs in Configuration Manager 2012. You must be sure that all the updates that are available within the source Configuration Manager site are also available in Configuration Manager 2012 and ensure that the software update point is configured. Making the same software updates available in Configuration Manager 2012 can be done as follows:
Use Export and Import of Software Updates Use the tool wsusutil.exe to export the software updates from a source Configuration Manager site server and to import the software updates in Configuration Manager 2012. This option is the most common option to use when migrating the software update source to Configuration Manager 2012.
To export and import software updates using wsusutil.exe, perform the following steps:
- Start the command line at the Configuration Manager 2007 Software Update site server, and go to
C:Program FilesUpdate ServicesTools
- Start the wsusutil.exe export:
WSUSUTIL.exe export .cm2k7updates.cab .import.log
- Check the log file, and copy the exported CAB file to the Configuration Manager 2012 Software Update site server.
- Start the command line at the Configuration Manager 2012 Software Update site server, and enter
C:Program FilesUpdate ServicesTools
- Start the wsusutil.exe import:
WSUSUTIL.exe import .cm2k7updates.cab .import.log
After the source is migrated, you may migrate the Configuration Manager 2007 objects to Configuration Manager 2012. For the conversion of the Software Update objects, the following rules apply:
- Update lists are converted to update groups.
- Software update deployments are migrated to deployments and update groups.
- While migrating from Configuration Manager 2012, software update groups can also be migrated.
- Automatic deployment rules can be migrated from a Configuration Manager 2012 site.
OPERATING SYSTEM DEPLOYMENT
The following operating system deployment–related objects in Configuration Manager are suitable to be migrated to Configuration Manager 2012:
Not all operating system deployment–related objects are supported for migration to Configuration Manager 2012:
- Migration of Microsoft Deployment Toolkit task sequences is not supported.
- The default Configuration Manager 2007 boot images are not migrated because the new Windows Assessment and Deployment Kit (ADK) that is supported in Configuration Manager 2012 supplies the version-matched boot images.
CUSTOMIZED BOOT IMAGES
Boot images that have been customized cannot be migrated. The migration process will replace the customizations made in the boot image with the default settings from Configuration Manager 2012 boot images. A new boot image ID is assigned to each boot image. The newly created boot image can be accessed only from Configuration Manager 2012 distribution points.
When migrating a boot image that has drivers embedded, be sure that the drivers remain available from the Configuration Manager 2007 source location. Configuration Manager 2012 must also be able to access the drivers from its specified source location.
Configuration Manager 2012 removes all the references to operating system client packages from the migrated task sequences. After the migration of the task sequence is finished, you can edit them in the Configuration Manager 2012 console to restore references to the local client installation packages in the target Configuration Manager 2012 hierarchy.
When migrating the operating system deployment functionality, you need to be sure that the dependent Configuration Manager 2012 site roles are installed and configured. The state migration point needs to be configured, and the distribution points must support PXE. You can read more about configuring operating system deployment in Chapter 10, “Operating System Deployment.”
SETTINGS MANAGEMENT
Configuration baselines and configuration items created by you as an administrator or created by an independent software vendor are supported for migration by the migration feature of Configuration Manager 2012.
When you need to re-migrate configuration items or baselines, any changes to the objects will be added as revisions of the objects.
Existing 2007 or 2012 configuration packs can also be added to 2012 through the import feature. The Configuration Manager 2012 import feature will automatically convert the 2007 schema to the 2012 schema. Keep in mind the following migration rules when migrating configuration baselines and configuration items:
- When migrating a configuration baseline, its assignment will not be migrated at the same time. You must migrate the configuration baseline assignment separately by using the collection migration job type.
- Configuration items in Configuration Manager 2007 might have rules that are not supported by Configuration Manager 2012. When you migrate configuration items that have unsupported rule operators, Configuration Manager 2012 will convert them to equivalent values.
- If the objects and settings of an imported configuration item are not visible in the Configuration Manager 2007 console, also known as incomplete or uninterpreted configuration items, they are not supported by Configuration Manager 2012. For this reason you are not able to migrate these configuration items.
ASSET INTELLIGENCE CUSTOMIZATIONS
You can migrate asset intelligence customizations made for classifications, labels, families, and hardware requirements to Configuration Manager 2012. This is done by using the Object Migration option in the migration feature.
When migrating Asset Intelligence customizations, always assign the Configuration Manager 2012 site that is the closest to the Configuration Manager 2007 site that owns the Asset Intelligence content because of WAN traffic that can occur during the migration. Gathered Asset Intelligence data is not migrated to Configuration Manager 2012.
SOFTWARE METERING RULES
Software metering rules can be migrated with the Object Migration option in the migration feature. All rules that are available in the source Configuration Manager hierarchy can be migrated.
After the migration all software metering rules are disabled by default.
SAVED SEARCHES
In the Configuration Manager 2012 administrative console saved searches can be migrated.
SEARCH AND ADMINISTRATIVE FOLDERS
Administrator-created folders for administrative duties are migrated if chosen while migrating collections or objects. Be sure to enable the Transfer The Organizational Folder Structure For Objects From The Source Hierarchy To The Destination Hierarchy option when migrating objects from Configuration Manager 2007 to Configuration Manager 2012. You can set this option in the process of creating a migration job and scheduling when the migration job is to run.
REPORTS
When you want to migrate reports, the only way to do so is to use SQL Reporting Services in Configuration Manager 2007 instead of the default web reporting of Configuration Manager 2007. With SQL Reporting Services you can export your custom reports (RDL files) from the old SQL Reporting Services and then import them into your new SQL environment in Configuration Manager 2012. Migrating reports in this manner is outside the scope of the built-in Configuration Manager migration tasks.
Objects Not Supported for Migration
Not all objects can be migrated by the migration feature from a source Configuration Manager hierarchy to Configuration Manager 2012. You can create workarounds for some objects, but for others you cannot. Table 3.1 shows whether workarounds are available for non-migratable objects.
TABLE 3.1: Workarounds for non-migratable objects
| OBJECT | WORKAROUND |
| Queries | Export the queries in Configuration Manager 2007 to a MOF file and import the MOF file into Configuration Manager 2012. |
| Security rights for the site and objects | No workaround available. |
| Configuration Manager 2007 reports from SQL Server Reporting Services | Export your reports from SQL Server Reporting Services and import them into the new SQL Server Reporting Services servicing the Configuration Manager 2012. |
| Configuration Manager 2007 web reports | No workaround available. |
| Client inventory and history data | No workaround available. |
| AMT client provisioning information | No workaround available. |
| Files in the client cache | No workaround available. |
PRESERVING YOUR CUSTOM SMS_DEF.MOF INVESTMENTS
The migration of hardware inventory is not supported, but you can import your custom SMS_DEF.MOF files into the new Configuration Manager 2012 infrastructure. Analyze and test the custom MOF edits before importing them into the production environment of Configuration Manager 2012, and ensure that there are no conflicting data types in Configuration Manager 2012. You will need to carefully select only those classes that you want to migrate, because many of the objects from the source hierarchy might already be defined at the target Configuration Manager hierarchy.
Distribution Point Sharing
In the process of migrating your Configuration Manager objects and clients in your source hierarchy to Configuration Manager 2012, you can use distribution point sharing. This feature allows Configuration Manager clients to retrieve content for migrated packages that are hosted on the Configuration Manager distribution points in your source hierarchy.
To do this, you will need to configure distribution point sharing on a site-by-site basis. This can be done while configuring the source hierarchy by enabling the Enable Distribution-Point Sharing For This Source Site option or by configuring the source hierarchy later by enabling the Configure option in the ribbon for the source hierarchy object.
After the data-gathering process is finished, you'll see all the distribution points, including branch distribution points and distribution point shares. Boot images and App-V applications are not supported on shared distribution points. You will need to migrate those objects in the standard manner and make them available on a Configuration Manager 2012 distribution point. As mentioned earlier, associated boundaries are migrated when you enable distribution point sharing.
A shared distribution point can be reassigned to another site without the need to reinstall the distribution point and redistribute the content.
INTEROPERABILITY WITH CONFIGURATION MANAGER 2007
The migration feature in Configuration Manager 2012 gives you a level of interoperability while migrating your Configuration Manager 2007 infrastructure. Since you have two Configuration Manager hierarchies to maintain, it's a good idea to look at some interoperability possibilities and scenarios.
Once you specify a source hierarchy for the new Configuration Manager 2012 hierarchy, by default every four hours a data-gathering process will run to collect all the information about the source hierarchy. During the migration period the source hierarchy is configured in Configuration Manager 2012, and your two Configuration Manager environments are connected to each other, providing a sort of interoperability. You can change the data-gathering frequency later if you want.
Re-migrate Updated Objects The migration process doesn't move objects to the Configuration Manager 2012 environment but instead copies and, if necessary, converts the objects to Configuration Manager 2012 standards. The original objects remain in Configuration Manager 2007 and can still be used and changed. If a change is made to an original object, the data-gathering process will detect the change, and you can re-migrate the updated object.
Distribution Point Sharing Enabling distribution point sharing allows you to share a distribution point that's available in a Configuration Manager 2007 site with Configuration Manager 2012. The migrated or new Configuration Manager 2012 clients are able to retrieve content from a shared distribution point.
Content As mentioned earlier, the file content storage location is not moved during the migration process. The source content also stays at the same location if this is a Configuration Manager 2007 site server. Be aware that you may need to migrate the source content also.
Planning a Migration
This section describes the steps required to prepare the migration from a source Configuration Manager hierarchy to Configuration Manager 2012. The newly designed Configuration Manager 2012 infrastructure must be in place. Consult Chapter 4, “Installation and Site Role Configuration,” for information on how to install and configure the Configuration Manager 2012 environment that you designed in Chapter 2, “Planning a Configuration Manager Infrastructure.”
As you define your project phases and the steps you need to take to migrate your Configuration Manager infrastructure to the new Configuration Manager 2012 infrastructure, you need to plan your migration.
Preparing Your Migration
Regardless of when you want to migrate to Configuration Manager 2012, you should prepare your source Configuration Manager infrastructure in advance to allow a smooth migration, as follows:
- Be sure that your new Configuration Manager 2012 infrastructure is in place.
- If a Configuration Manager 2007 infrastructure is in place, be sure it is at least using Service Pack 2.
- If a Configuration Manager 2012 infrastructure is in place, be sure it is at least using R2.
- Use UNC paths for the package source path. Avoid using local paths; always use UNC paths to a file share. A distributed file share can be very helpful while migrating objects from one site to another site.
- Avoid mixing users and devices in collection definitions; mixing users and devices is no longer supported.
- Avoid using collections with multiple query rules that limit different collections.
- Use different site codes in Configuration Manager 2012 than in the source Configuration Manager infrastructure; they must be unique.
Planning Your Migration Strategy
When you want to migrate a Configuration Manager infrastructure to a new Configuration Manager 2012 infrastructure, you will need to walk through a migration process that can take a long time depending on your source Configuration Manager infrastructure.
As we said in the introduction of this chapter, Configuration Manager 2012 supports side-by-side migration. This means that you need to build a new Configuration Manager 2012 infrastructure next to your current production Configuration Manager infrastructure. The best way is to define a project for your migration to the new infrastructure.
As noted in Chapter 1, “Overview of Service Management,” any well-planned migration leverages a well-thought-out project plan. This should be based on a solid foundation or methodology such as the Microsoft Operations Framework (MOF).
The initial steps in any project are a typical gap analysis. They fall into three basic categories; you must ask yourself the following:
- Where are we?
- Where do we want to be?
- How do we get there?
A thorough project plan should include some or all of the following phases as well as work tasks for each phase:
Phase 1: Define and capture phase
- Create a project plan.
- Document the current environment.
- Conduct an initial risk review.
- Create business test cases.
- Finalize the business proposal.
Phase 2: Build phase
- Conduct a planning workshop.
- Install a proof-of-concept lab.
- Conduct server and workstation testing.
- Procure hardware.
Phase 3: Test phase (pilot)
- Draft a communication plan for the following groups:
- Executive/management
- Project team
- Site (users)
- Build and deploy hardware and software.
- Implement change control for the pilot phase.
- Perform a pilot with the new environment.
Phase 4: Production deployment phase
- Implement change control for the production development phase.
- Deploy your new environment.
Phase 5: Review phase
- Conduct a lessons-learned workshop.
- Conduct a project-reflection session (party).
One fundamental part of a project plan that is commonly overlooked is the communication plan. This is generally used in two different ways: first, to inform users of what is changing on their desktops, but more important, as a communication vehicle to show the value that you bring to the business! Use this project to highlight the capabilities of Configuration Manager 2012 as well as the business value and insights of reporting, software updates, and software distribution. Don't be afraid to highlight the hard work of the migration team and the value that a project of this magnitude brings to the business.
Performing the Migration
Two main upgrade strategies are available to deploy Configuration Manager 2012 to an existing infrastructure:
Side-by-Side Migration A side-by-side migration creates a new Configuration Manager 2012 infrastructure that runs alongside the current Configuration Manager infrastructure. This migration allows clients to be managed 100 percent of the time while the migration is being conducted. The migration feature in Configuration Manager 2012 assists you with the migration of the Configuration Manager objects in your source infrastructure.
Wipe and Load The wipe-and-load approach is useful if the goal is to start over with change and configuration management. Thus, there will be zero data saved or migrated.
In this section, you'll learn about both types, as discussed previously.
Using the Side-by-Side Migration Strategy
In a side-by-side migration, an existing Configuration Manager 2007 implementation can function while client systems are moved from Configuration Manager 2007 to Configuration Manager 2012. This enables you to do the following:
- Use new hardware.
- Modify your existing hierarchy.
- Retain historical client data.
- Redesign the Configuration Manager hierarchy.
- Retain custom objects within Configuration Manager 2007.
Migrating to Configuration Manager 2012 can take a while, depending on the source and target Configuration Manager hierarchies. In this section the migration process is explained.
UNDERSTANDING THE MIGRATION PROCESS
After preparing the Configuration Manager infrastructure, as described in the “Planning a Migration” section of this chapter, you can proceed with the migration process. The migration process has several steps, depending on your source infrastructure. The following steps are part of the migration process:
Configure the Migration Feature You configure the migration feature by creating a source hierarchy in the Configuration Manager 2012 hierarchy. You need to connect the Configuration Manager 2012 infrastructure to the topmost site of the source Configuration Manager infrastructure.
You must also configure the gathering process. You need to configure the schedule and supply administrative access for the gathering process.
Once the gathering process is complete and other source sites have been discovered, you must configure credentials for each of the additional source sites.
Share Distribution Points Sharing distribution points allows you to postpone their migration. It also reduces network traffic when you enable this feature on remote locations. Shared distribution points can be reassigned to the target Configuration Manager site.
Create Migration Jobs Migration jobs are used to migrate objects from the source Configuration Manager hierarchy to Configuration Manager 2012. You can create one or more jobs, depending on your source Configuration Manager infrastructure.
When creating a migration job you can choose to exclude objects, assign content ownership, set the security scope, limit the collections, and change site codes in your query definitions.
The migration job does not migrate the content of your Configuration Manager objects. Configuration Manager 2012 will retrieve the content from the original source file location.
Migrating content can be started instantly but can also be scheduled to start later. When using a distributed file share as a content source, you do not need to migrate the content source location.
Monitor Migration Jobs In the process of migrating your source Configuration Manager objects to the Configuration Manager 2012 environment, it is a good plan to monitor the migration. When you select the migration job, you can monitor the migration by selecting objects in the job. Besides the in-console monitoring, Configuration Manager records migration actions in the migmctrl.log file located in the Logs (%SMS_LOG_PATH%) folder in the Configuration Manager 2012 installation path.
If a migration job fails and other jobs are still running, you should review the details in the migmctrl.log file as soon as possible. Migration actions are continually added to the file and overwrite the old details.
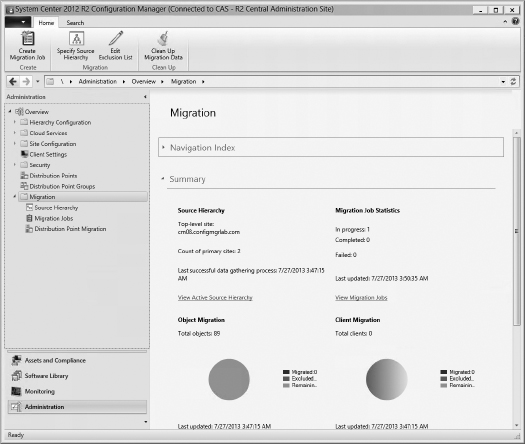
In the Configuration Manager console, you are able to monitor the migration by looking at the Migration dashboard, shown in Figure 3.5.
Report Migration Results With the reporting feature within Configuration Manager 2012 you can report information about the migration of the Configuration Manager 2007 objects to Configuration Manager 2012. The following reports are available in the Migration category:
- Clients in Exclusion List
- Dependency on a Configuration Manager Collection
- Migration Job Properties
- Migration Jobs
- Objects That Failed to Migrate
You will find more information about reporting in Chapter 13, “Reporting.”
Reassign Distribution Points When upgrading or reassigning distribution points you want to avoid having a large amount of data flowing through the WAN. For this reason, you can migrate distribution points in two ways: automatic and manual. Configuration Manager 2012 supports upgrading or reassigning the following distribution points:
- Branch distribution point
- Server share distribution point
- Standard distribution point
When you choose automatic migration, you need to enable distribution point sharing and reassign the distribution point from the Configuration Manager 2012 console. During the migration process, the distribution point is removed from the source Configuration Manager database, and the new Configuration Manager 2012 distribution point is installed on the server. If you're migrating from Configuration Manager 2007, the content of the distribution point is copied to the new content library of Configuration Manager 2012 after the installation. Be sure to have enough disk space available.
If there is a Configuration Manager 2007 secondary site available, the secondary site will automatically be uninstalled before the Configuration Manager 2012 distribution point is installed. The migration job will pause until the next data-gathering job to check if the secondary site is completely uninstalled.
One distribution point upgrade migration job is performed at a time, and other subsequent jobs are queued.
After upgrading the Configuration Manager 2007 distribution point, you need to manually delete the old content; be sure to test your deployments first.
START PREPARING NOW
You can prepare for distribution point upgrades by upgrading your branch distribution points to Windows 7 in a Configuration Manager 2007 environment. Windows XP is not supported. Use the Branch Distribution Point management task to migrate it from Windows XP to Windows 7 without having to redistribute the content. To find more information about the Branch Distribution Point management task, see the online documentation of Configuration Manager 2007.
Upgrade Configuration Manager 2007 Secondary Sites Upgrading secondary sites is possible only by uninstalling the Configuration Manager 2007 secondary site and then installing the new secondary site from the Configuration Manager 2012 console.
Migrate Clients The migration of the clients is done using the same methods as for deploying a new Configuration Manager 2012 client. The first step in the migration is to uninstall the old Configuration Manager client and install the Configuration Manager 2012 client. During this process, the Configuration Manager data—for instance, advertisement history and the GUID of the client—is preserved.
Upgrade the Administrative Console The administrative console can be installed on several servers and workplaces. To be able to manage the new Configuration Manager 2012 infrastructure, you also need to upgrade the administrative console to the Configuration Manager 2012 console.
Perform Post-Migration Tasks After migrating all the old Configuration Manager 2007 content, you must perform post-migration tasks. The first task is to stop the data-gathering process, clean up the migration data, and remove the source hierarchy. Then you need to remove the old Configuration Manager 2007 infrastructure from your environment.
The step-by-step details of these procedures are provided in the following sections.
CONFIGURING THE MIGRATION FEATURE
Configuring the migration feature can be done with the following steps. First, you will need to specify the source hierarchy:
- In the Configuration Manager console choose the Administration workspace.
- Expand Overview
 Migration in the Administration workspace, and choose Source Hierarchy.
 - Choose the Home tab of the ribbon and choose Specify Source Hierarchy.
- In the Specify Migration Source screen, select New Source Hierarchy at the Source Hierarchy.
- Specify the top-level Configuration Manager site server of your source Configuration Manager hierarchy by filling in the fully qualified domain name (FQDN) of the server.
- Specify the site access account for the SMS provider of the source site server. Verify the connection of an existing or new account before submitting.
The account needs read permissions to all source site objects.
- Specify the site access account for the SQL server of the source site server.
The Windows user account needs read and execute permissions to the site database. This can be the same account that has access to the SMS provider.
- If you want to share the distribution points in the source hierarchy, enable the option Enable Distribution Point Sharing For The Source Site Server.
- Click OK to save the configuration and to start the data-gathering process. You'll see the Data Gathering Status dialog box, as shown in Figure 3.6.

After the first data-gathering process has finished, all other primary sites in the hierarchy are discovered. In Figure 3.7 you see another primary site that has been discovered, but the data-gathering process has not run yet. The next step is to configure the credentials for the Configuration Manager 2007 source site to be able to gather the data.

- In the Configuration Manager console choose the Administration workspace.
- Expand Overview Migration in the Administration workspace, and choose Source Hierarchy.
- Select the site with the status Have Not Gathered Data.
- On the Home tab of the ribbon, select Configure in the Source Site section.
- Specify the site access account for the SMS provider of the source site server.
The account needs read permissions to all source site objects.
- Specify the site access account for the SQL Server of the source site server.
The Windows user account needs read and execute permissions to the site database. This can be the same account as the account that has access to the SMS provider.
- Optionally, if you want to share the distribution points in the source hierarchy, enable the option Enable Distribution Point Sharing For The Source Site Server.
- Click OK to save the configuration and to start the data-gathering process.
After configuring the credentials for the additional sites, the gathering process will start to gather all the objects in the Configuration Manager 2007 source site.
You can also configure the source hierarchy via native Configuration Manager 2012 PowerShell support:
- In the Configuration Manager console, access the PowerShell console via the blue pull-down menu, and select Connect Via Windows PowerShell.
- Type in the following PowerShell command; in this example the topmost primary site server is called cm08.configmgrlab.com and the user that is used to connect to the SQL and SMSProvider is the administrator account.
Set-CMMigrationSource -SourceSiteServerName “cm08.configmgrlab.com”
-SmsProviderAccount “configmgrlabadministrator” -SqlServerAccount
“configmgrlabadministrator” -EnableDistributionPointSharing $True
- After the command has completed, you will see that the sites have been discovered and that the first gathering process has been started.
ENABLING DISTRIBUTION POINT SHARING
The distribution points from a selected Configuration Manager site can be shared on a per-site basis in the Configuration Manager 2012 console:
- In the Configuration Manager console open the Administration workspace.
- Expand Overview Migration in the Administration workspace, and select Source Hierarchy.
- Select the site for which you want to enable distribution point sharing.
- Select the Home tab of the ribbon, and choose Configure.
- In the Source Site Credentials dialog box choose the Enable Distribution-Point Sharing For This Source Site option.
- Click OK.
After enabling distribution point sharing, the gathering process will start to gather all the objects and distribution point data in the Configuration Manager source site. Once the site servers are protected, the boundaries related to the site servers of the distribution points are migrated also.
CREATING MIGRATION JOBS
As mentioned earlier, you can create three different migration jobs. Depending on your purpose, you need to use one of the following three procedures. The three different migration jobs are designed to provide support for migrating collections with all the related objects and to provide support for migrating one or more objects or objects that are changed after being migrated.
Creating a Collection Migration Job
You can use a collection migration job to migrate the collections with objects that are associated with the specific collections. This job is available only when migrating from Configuration Manager 2007 to Configuration Manager 2012. To create a collection migration job, follow these steps:
- In the Configuration Manager console select the Administration workspace.
- Expand Overview Migration in the Administration workspace, and choose Migration Jobs.
- Select the Home tab of the ribbon, and choose Create Migration Job.
- Give the migration job a name and description.
- Select Collection Migration as the job type, and click Next.
- Select the collections that you want to migrate, as shown in Figure 3.8, and select Migrate Objects That Are Associated With The Specified Collections.
Another option instead of “pick and choose” is to search for the collection(s) that you want to migrate. This is done by clicking the Search button and searching for the collection based on the collection name, site code, collection ID, or status. You can review the collections that cannot be migrated by clicking the View Collections That Cannot Migrate button, also shown in Figure 3.8.
- After searching or selecting the collections, click Next.
- Review the objects that will be migrated, make changes if necessary, and click Next.
- Select the destination site that will be the owner of the objects, and click Next.
- Configure the security scope, and click Next.
- Limit the collections if needed, and click Next.
- Replace the site code, and click Next.
- Review the migration job information, optionally save it to a file, and click Next.
- Select the schedule, configure the conflict handling and additional settings for the migration job, and click Next.
- Confirm the settings on the Summary screen, and click Next.
- Click Close to monitor the migration of the collections and the related objects.

Creating an Object Migration Job
Object migration jobs are used for migrating one or more Configuration Manager objects to Configuration Manager 2012. This method is supported for both Configuration Manager 2007 and Configuration Manager 2012 source hierarchies. To create an object migration job, perform the following steps:
- In the Configuration Manager console select the Administration workspace.
- Expand Overview Migration in the Administration workspace, and choose Migration Jobs.
- Select the Home tab of the ribbon, and choose Create Migration Job.
- Give the migration job a name and description.
- Select Object Migration as the job type, and click Next.
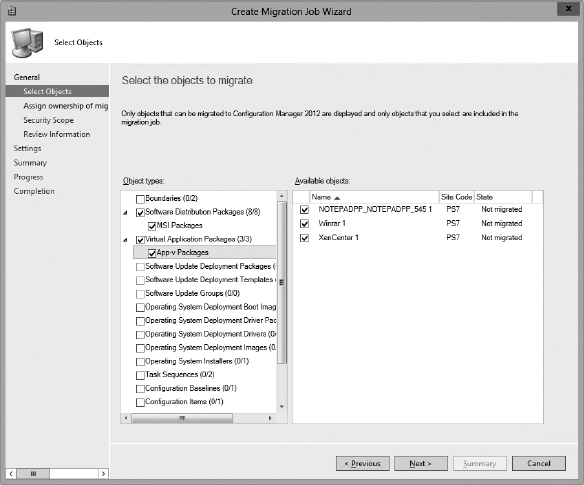
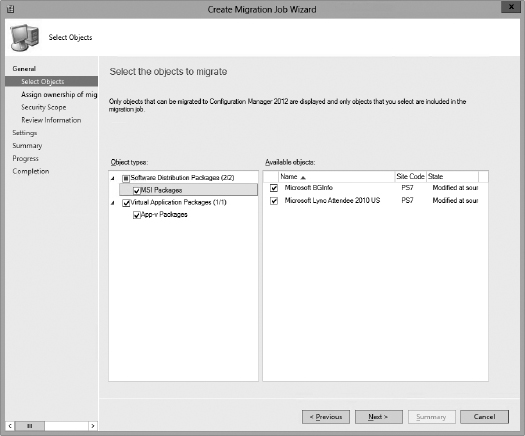
- Select the objects that you want to migrate, as shown in Figure 3.9.
- Click Next.
- Select the destination site that is going to be the owner of the objects, and click Next.
- Configure the security scope, and click Next.
- Review the migration job information, optionally save it to a file, and click Next.
- Select the schedule, configure the conflict handling and additional settings for the migration job, and click Next.
- Confirm the settings on the Summary screen, and click Next.
- Click Close to monitor the migration of the objects.
Creating an Object Modified After Migration Job
During a lengthy migration process, objects in the Configuration Manager 2007 infrastructure will change. With the objects modified after migration job, you can re-migrate the changed objects. Follow these steps to create an Object Modified After Migration job:
- In the Configuration Manager console open the Administration workspace.
- Expand Overview Migration in the Administration workspace, and choose Migration Jobs.
- Select the Home tab of the ribbon, and choose Create Migration Job.
- Give the migration job a name and description.
- Select Object Modified After Migration as the job type, and click Next.
- Select the objects that you want to re-migrate, as shown in Figure 3.10, and click Next.
- Select the destination site that will be the owner of the objects, and click Next.
- Configure the security scope, and click Next.
- Review the migration job information, optionally save it to a file, and click Next.
- Select the schedule, and click Next.
- Confirm the settings on the Summary screen, and click Next.
- Click Close to monitor the migration of the changed objects.
UPGRADING DISTRIBUTION POINTS
Migrating distribution points can be done in two ways:
- Automatically
- Manually
The procedures for both options are described in the following sections.
Migrating Distribution Points Automatically
Migrating a distribution point can be done automatically by removing the distribution point from the source database and adding it to the target database. It is supported only when no site roles other than a management point of a secondary site are active. You must remove the other roles such as software update points, PXE service points, or state migration points before proceeding. To be able to migrate the distribution point, you need to enable the site for distribution point sharing.
You can upgrade the distribution point by following this procedure:
- In the Configuration Manager console, choose the Administration workspace.
- Expand Overview Migration in the Administration workspace, and choose Source Hierarchy.
- Select the source site and choose the Shared Distribution Points tab in the information pane at the bottom of the console.
- Select the Configuration Manager distribution point that you want to migrate or reassign to the new Configuration Manager 2012 site.
- Select the Distribution Point tab of the ribbon, check to see if the distribution point is eligible for reassignment, and choose Reassign Distribution Point. If the distribution point is not eligible for reassignment, site roles other than those described earlier are active on the selected distribution point.
- In the Reassign Shared Distribution Point Wizard choose the site code where the distribution point must connect after upgrading. At this point, if the distribution point must be available from the Internet, configure it by filling in the FQDN for the site system for use on the Internet. Click Next.
- Configure the distribution point settings by choosing whether the setup must install and configure IIS, if it is required, and configure whether the distribution point can handle prestaged content. Click Next.
- Configure the drive settings for the distribution point that will be upgraded, and click Next.
- If you want to use the pull distribution point method to pull the content from another distribution point, you can enable this option. Otherwise, click Next.
- Configure PXE support if needed, and click Next to configure content validation for this distribution point. Click Next to proceed.
- Configure boundary group membership for the new Configuration Manager 2012 distribution point, and click Next.
- Be sure you have enough free space to proceed with the upgrade. Check to see if the required space meets the available space on your configured drives, as shown in Figure 3.11. When migrating a distribution point, the content located at the distribution point is copied and converted to the new content library. Click Next if you are sure that there is enough space available.
- Review the Summary screen, and click Next to process the upgrade.

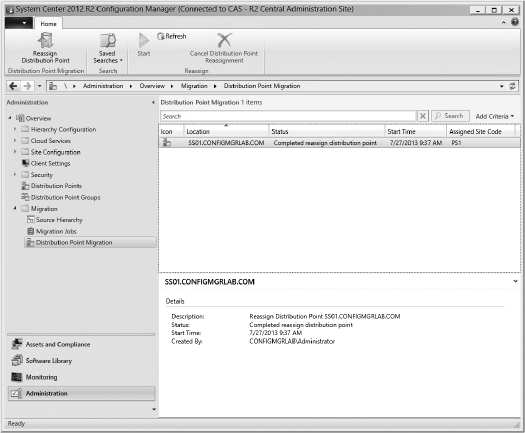
You can monitor the migration process in the migmctrl.log file in the Logs (%SMS_LOG_PATH%) folder in the Configuration Manager installation folder and in the Application log in the event viewer on the target server. Also, the target server contains a folder called ..SMS_DP$SMSLogs and a file called SMSDPPROV.LOG where you can find possible errors in the installation of the distribution point. You can also view the status in the Distribution Point Migration node, as shown in Figure 3.12. Refreshing the screen will update the status of the upgrade.
The content is copied and converted to the new content library with single-instance storage. Be sure to delete the old content from the old distribution point since the old content is not removed automatically.
Refer to Chapter 4 for more in-depth information about installing and configuring distribution points.
Migrating Distribution Points Manually
The manual migration of a Configuration Manager 2007 distribution point is done in two general steps:
- Uninstalling the current distribution point from the Configuration Manager 2007 environment
- Installing the distribution point with prestaged content in the new Configuration Manager 2012 environment
This scenario can be used for all distribution points, including branch distribution points, distribution point shares, and normal distribution points. For in-depth distribution point installation and configuration instructions, please consult Chapter 4.
To uninstall a distribution point from Configuration Manager 2007, follow these steps:
- In the Configuration Manager 2007 console, open the site under Site DatabaseSite Management<the site>Site Settings, expand Site Systems, and select the site system with the distribution point.
- Select ConfigMgr distribution point or distribution point share, and click Delete in the Actions area of the console.
To uninstall a distribution point from Configuration Manager 2012, follow these steps:
- In the Configuration Manager console open the Administration workspace.
- Expand Overview Site Configuration in the Administration workspace, and choose Servers and Site System Roles.
- Select the site server with the distribution point that you want to remove, select the Distribution Point role in the Site System Roles pane, and choose Remove Role in the Site Role tab of the ribbon.
- Click Yes to remove the distribution point.
To install a distribution point with prestaged content in Configuration Manager 2012, perform the following procedure:
- In the Configuration Manager console open the Administration workspace.
- Expand Overview Site Configuration in the Administration workspace, and choose Servers And Site System Roles.
- Select the Home tab of the ribbon, and choose Create Site System Server.
- Click Browse, and search for the server on which you want to install the distribution point.
- Select the site code in which you want to install the site server.
- Supply, if needed, the FQDN for use on the Internet.
- If the server is in a different Active Directory forest, select Require The Site Server To Initiate Connections To This System.
- Supply the site system installation account, and click Next.
- Configure the Proxy settings, and click Next.
- Select the Distribution Point option, and click Next.
- Select Install And Configure IIS If Required By Configuration Manager, supply a description, and configure how the client computers are allowed to communicate with the distribution point.
- Import, if necessary, the certificate, or choose the option Create Self-Signed Certificate.
- Enable the option Enable This Distribution Point For Prestaged Content, and click Next.
- Configure the Drive settings, and click Next.
- Click Next on the Pull Distribution Point page, since you are retrieving the content from a prestaged source.
- Configure PXE, and click Next.
- Configure Multicast, and click Next.
- Configure Content Validation, and click Next.
- Configure Boundary Groups, and click Next.
- Review the Summary screen, and click Next.
- Click Close.
Since the distribution point is enabled for prestaged content, you can now create prestaged content packages that you need to deploy on the new distribution point. Content that can be prestaged includes the following:
- Applications
- Packages
- Software deployment packages
- Driver packages
- Operating system images
- Operating system installers
- Boot images
- Task sequence—content referenced by the task sequence
Creating prestaged content packages can be done as follows:
- In the Configuration Manager console choose the Software Library workspace.
- Select a content package that needs to be prestaged, and save the PKGX files to an external disk.
The next step is to extract the created PKGX files to the remote distribution point:
- Open a command prompt in administrative mode on the server that serves as the new distribution point.
- Switch the command prompt to the directory where you find the ExtractContent.exe command-line utility at ..SMS_DP$smsTools.
- Copy the PKGX file you just created to a folder on the new server holding the distribution point role.
- Execute the following command, and you will receive results like those shown in Figure 3.13.

The extraction to the distribution point will be processed in the background. For troubleshooting purposes or to follow the process, you can monitor the PrestageContent.log file, which you can find in the temp folder of your user account.
UPGRADING SECONDARY SITES
Secondary sites need to be manually uninstalled from the Configuration Manager 2007 environment; there is no upgrade path for the scenario. While planning your Configuration Manager 2012 hierarchy, consider replacing a secondary site with just a distribution point. Chapter 2 describes when you can consider replacing a secondary site with a distribution point.
- Right-click the secondary site and click Delete.
- Click Next.
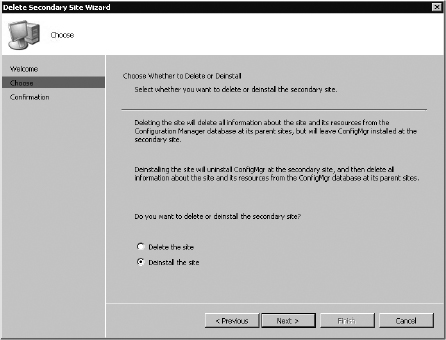
- Select Deinstall The Site, and click Next.
- Review the information about the secondary site to be deinstalled (Figure 3.14), and click Finish.
After the deletion process is finished, you can install the Configuration Manager 2012 secondary site server role.
MIGRATING CLIENTS
The Configuration Manager clients on the source hierarchy need to be migrated also; the process of client migration consists of uninstalling the Configuration Manager client on the devices in the source hierarchy and installing the new Configuration Manager 2012 client.
You can migrate the clients via the following methods:
- Client push installation
- Software distribution
- Group Policy
- Windows Software Update Services (WSUS)
- Manual installation
- Integration with operating system deployment
Chapter 6, “Client Installation,” offers more information about client installation. The installation of the Configuration Manager 2012 client will automatically uninstall the Configuration Manager 2007 client and install the Configuration Manager 2012 client.
Remember that only the following clients are supported for Configuration Manager 2012 R2:
- Windows XP SP2 (64-bit)
- Windows XP SP3 (32-bit)
- Windows XP Tablet PC SP3 (32-bit)
- Windows Server 2003 SP2 (Standard, Enterprise, Datacenter)
- Windows Server 2003 R2 SP2 (Standard, Enterprise, Datacenter)
- Windows Storage Server 2003 R2 SP2
- Windows Server 2003 Web Edition SP2 (32-bit)
- Windows Vista SP2 (Business Enterprise, Ultimate)
- Windows 7 RTM and SP1 (Professional, Enterprise, Ultimate)
- Windows 8 (Pro, Enterprise)
- Windows 8.1 (Pro, Enterprise)
- Windows Server 2008 SP2 (Standard, Enterprise, Datacenter)
- The Server Core installation of Windows Server 2008 SP2
- Windows Storage Server 2008 R2 (Workgroup, Standard, Enterprise)
- Windows Server 2008 R2 RTM and SP1 (64-bit)
- The Server Core installation of Windows Server 2008 R2
- Windows Server 2012 (Standard, Datacenter)
- The Server Core installation of Windows Server 2012
- Windows Server 2012 R2 (Standard, Datacenter)
- The Server Core installation of Windows Server 2012 R2
A requirement of all clients is the presence of .NET Framework 4.0. You must deploy this version before migrating to the new Configuration Manager 2012 client.
Using the Wipe-and-Load Strategy
The wipe-and-load strategy is the most basic and straightforward of any of the approaches. Generally speaking, this strategy is intended for environments in which the following apply:
- You still use SMS 2003 or Configuration Manager 2007 as a single-server solution.
- None of the existing data (that is, collections, inventories, packages, and so on) needs to be retained.
Although this approach may seem like the path of least resistance, there are a few pitfalls that you need to stay aware of:
Client Manageability If you take the wipe-and-load approach, the quickest way to accomplish it is to perform a software distribution to run the ccmclean.exe Microsoft Resource Kit utility for SMS 2003 or Configuration Manager 2007 on all SMS 2003 or Configuration Manager 2007 clients. This poses the potential problem that the clients will remain unmanaged until the server (current or new future hardware) is rebuilt and Configuration Manager 2012 is installed and configured properly. Depending on the environment, this might be a non-issue. You would need to perform a risk assessment to see if mission-critical application updates or zero-day exploit patches need to be deployed and to assess the potential impact on your enterprise. If the risk can be minimized or negated, then a wipe-and-load operation might be possible.
Implementation Timeframe Rebuilding a server and installing or configuring all the components that are required to support a Configuration Manager 2012 installation is no small task. Not to mention that if you have a strict change-control process, this might hinder your forward momentum significantly. All these factors equate to dollars—money spent rebuilding, installing, configuring, and testing a server that was already up and running in production.
The bottom line is this: Just because the wipe-and-load option appears to be the path of least resistance, don't be tempted. Weigh your options before coming to a decision that you might regret later.
Upgrading the Configuration Manager Console
As with the Configuration Manager 2012 site server itself, you must consider the upgrade of all the Configuration Manager administrative consoles to the new Configuration Manager 2012 administrative consoles. This potentially is an area for automation or an unattended installation routine.
Any of the setup functions (primary site, secondary site, or administrative console) can be scripted with an initialization file to answer key questions of a setup routine. In this scenario, we want to automate the administrative console setup for Configuration Manager 2012.
The following steps will enable you to perform an unattended installation of the Configuration Manager 2012 administrative console:
- Ensure that administrator workstations meet the minimum requirements for the Configuration Manager 2012 administrative console. In order to run the Installation Prerequisite Checker to verify the workstation, you can run prereqchk.exe /ADMINUI from the command line. You can find this file in the installation source on the DVD (SMSSetupBinx64).
- Advertise the setup of Configuration Manager 2012 with the following command, substituting the <msiexec /I SMSSETUPBINi386AdminConsole.msi /qn> text with the name and location of the file:
msiexec /I SMSSETUPBINi386AdminConsole.msi /qn
The unattended installation will not remove the old Configuration Manager 2007 console. You can remove the console by uninstalling it via the Programs And Features option in Control Panel.
The following steps enable you to perform a GUI installation of the Configuration Manager 2012 administrative console:
- Ensure that administrator workstations meet the minimum requirements for the Configuration Manager 2012 administrative console. In order to run the Installation Prerequisite Checker to verify the workstation, you can run prereqchk.exe /ADMINUI from the command line. You can find the file at the following folder on the System Center 2012 R2 Configuration Manager DVD: SMSSETUPBINx64.
- Insert the System Center 2012 R2 Configuration Manager DVD, browse to the SMSSETUPBINi386 folder, and double-click AdminConsole.msi.
The Configuration Manager Console Setup Wizard appears.
- Click Next.
- Supply the site server name, and click Next.
- Browse to the installation location, and click Next.
- Choose whether you want to join the Customer Experience Improvement Program (CEIP), and click Next.
- Click Install.
- Review any fatal errors, other errors, or warnings that are presented (although part of your homework was to run the Installation Prerequisite Checker and address all errors), or review ConfigMgrAdminUISetup.log and ConfigMgrPrereq.log on the root of the system drive to see which errors need to be addressed.
- Click Finish to start the newly installed Configuration Manager 2012 administrative console.
Post-Migration or Installation Considerations
Once you have performed the selected installation, it is imperative to maintain its health moving forward. The obvious choice for performance and availability monitoring is Microsoft System Center 2012 Operations Manager; for this you need to install the Configuration Manager 2012 Management Pack in Operations Manager 2012. More information about support for Operations Manager 2012 can be found in the book Mastering System Center 2012 Operations Manager.
- First, review the site status from within the System Status node in the Monitoring workspace in the Configuration Manager 2012 console.
- Review all of the site system roles to ensure that they are identified properly as well as the component status.
- If there are any critical or red components, right-click the targeted component and select Show Messages Error.
This produces all of the error status messages, which highlight the problems within the site.
You'll find more detailed troubleshooting coverage in Chapter 19, “Troubleshooting.”
Another area of concentration should be the site settings. With the new functionality and roles within Configuration Manager, a plethora of settings need to be set up and configured. A more detailed and in-depth view of site settings is provided in Chapter 4.
After you review the new environment, you need to clean up Configuration Manager 2012 by doing the following:
- Stop the data-gathering process.
- Clean up the migration data.
STOPPING THE DATA-GATHERING PROCESS
You stop the data-gathering process by following the next procedure. You need to first stop the data-gathering processes in all of the child sites in the source hierarchy:
- In the Configuration Manager console open the Administration workspace.
- Expand Overview Migration in the Administration workspace, and choose Source Hierarchy.
- Select the site with data gathering enabled.
- Select the Home tab of the ribbon, and choose Stop Gathering Data.
- Click Yes when the Stop Gathering Data dialog box appears.
- Repeat this for all sites in the hierarchy.
CLEANING UP MIGRATION DATA
The next step in the post-migration task is to clean up the migration data, as follows:
- In the Configuration Manager console choose the Administration workspace.
- Expand Overview Migration in the Administration workspace, and choose Source Hierarchy.
- Select the topmost source hierarchy site with data gathering disabled.
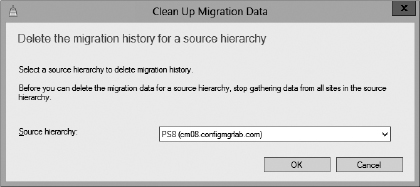
- Select the Home tab of the ribbon, and choose Clean Up Migration Data.
- Verify that you have the right source hierarchy, and click OK when the Clean Up Migration Data dialog box appears (Figure 3.15).
Migrating Packages to the New Application Model
When you migrate your packages to Configuration Manager 2012, the classic packages are migrated as is. Configuration Manager 2012 is built around the new application model, and to get all the features of the new application model you need to convert the package to an application. You can find more information about the new application model in Chapter 8.
After migrating the packages from the Configuration Manager 2007 environment to the Configuration Manager 2012 environment, you have a couple of options for what to do with the packages:
Do Nothing You can leave the package and program as they are, since some packages are best left in the classic packages and programs format, for instance, system maintenance tools like defrag and backup. System maintenance tools are often deployed to systems instead of users. System-based classic packages cannot be converted by Package Conversion Manager since it supports only classic packages.
Convert the Packages Manually You can manually convert packages and programs to the new application model. This option is not a best practice, and it can be time consuming.
Convert the Packages with Package Conversion Manager Package Conversion Manager will lead you through the process of converting packages to the new application model. The conversion process will move the data to the application model.
The best practice is to convert the packages with System Center Configuration Manager Package Conversion Manager; this way you are able to use all features of the application model of Configuration Manager 2012.
What Is Package Conversion Manager?
Package Conversion Manager helps you analyze packages and determines the readiness for the conversion of classic packages to the new application model (see Figure 3.16). After the analysis, Package Conversion Manager will convert the package to the new application model by building applications and deployment types, and it migrates machine collection queries to the application model by building global conditions and requirement rules. The converted global conditions and requirement rules are ANDed with the program requirements. This means that the global conditions and requirement rules are merged with the classic program requirements.
While you're in the migration process, the summarization screen of Package Conversion Manager helps you identify the progress of your migration.
Package Conversion Manager is fully integrated with the Configuration Manager 2012 console, but it must be installed separately.
Not all packages are suitable for migration with Package Conversion Manager; the Manager supports the migration of packages that are user facing, for instance, packages that users interact with, such as these:
- MSI-based applications
- App-V-based applications
- EXE-based applications

Applications that are not supported or not able to be migrated include the following:
- System maintenance tools like defrag or backup
- End-of-life packages
The Conversion Process
You will need to go through the process of converting the packages and programs to the new application model. The process consists of the following phases:
- Installing Package Conversion Manager
- Analyzing the packages
- Converting the packages
INSTALLING PACKAGE CONVERSION MANAGER
You need to install System Center 2012 Configuration Manager Package Conversion Manager 2.0 on the primary site. Package Conversion Manager is downloadable from the System Center website of Microsoft. Follow these steps to install Package Conversion Manager:
- Close the Configuration Manager console and double-click the executable (PCMSP1Setup-ENU.exe) that you have downloaded from the System Center website.
- Click Next in the Welcome screen, and accept the end-user license agreement before going further by clicking Next.
- Click Install.
- Click Finish after the installation is finished and restart the Configuration Manager console.
ANALYZING PACKAGES
Packages need to be analyzed before they can be converted to the new application model. Analysis of packages can done in four ways:
- You can analyze a single item.
- You can analyze in bulk by selecting additional packages.
- You can analyze during the conversion process automatically.
- You can schedule bulk analysis during nonpeak hours.
Although you can run the analysis today to see if the packages are compliant for conversion, you can migrate the packages at a later stage because while the conversion process is running, the packages will be reanalyzed.
CHANGING THE COLUMNS OF THE PACKAGES LIST
If you want to view the status of the packages in the packages list, you can add the appropriate columns to the packages list. This is done by right-clicking the columns and selecting the Readiness and Last Analyzed/Converted columns.
The analysis process can result in the following readiness states of the to-be-converted packages in the Package Conversion Dashboard, as shown in Figure 3.17.
Unknown Analysis has not been run for this application.
Automatic The package can be automatically converted to the application model. This is the best state to use for bulk migrations.
Manual There is not enough data available to convert the package automatically. The administrator needs to supply input for the conversion. You may need to supply information such as detection methods and the deployment type preference order through a wizard supplied by Package Conversion Manager. A package may need to be converter manually when one of the following conditions apply:
- Package contains multiple programs.
- Package is not a Microsoft Installer package (MSI).
- Package content is not available.
- Package contains dependencies.
Not Applicable The Package Conversion Manager tool is not able to do anything with the package in this state. You may need to modify the source package in order to convert the package to the new application model.

Converted The package has been converted to the application model. The application is manageable through the Configuration Manager 2012 console.
Error If there is an error reported, go to the package, select it, and view the summary to see the readiness issues. For instance, quote marks are not supported in the command line of the program.
If you need to convert the package, you need to be sure of the following:
- The content of the package is present.
- It is a software distribution package.
- It contains at least one program.
If one of these three must-haves is not present, then the application is not applicable. If the three are confirmed, you can migrate the application manually. You can use an automatic migration when the three must-haves are present and you have only one MSI per package available, the content is accessible, and there are no unconverted dependencies.
AUTOMATIC CONVERSION
Once you finish the conversion process, the application is ready for testing. The application is not fully ready for deployment yet because you still need to provide detection methods and configure the deployment type preference order.
All packages need to be analyzed before you can convert the packages and programs to the new application model. The option Convert Package is grayed out until the analyzing phase is finished.
To manually analyze packages, perform the following steps:
- In the Configuration Manager console open the Software Library workspace.
- Expand Overview Application Management Packages, and select one or more classic packages.
- Select the Home tab of the ribbon, and choose Analyze Package in the Package Conversion Manager section.
If you want to schedule the analyzer to analyze the packages off peak hours, you can schedule analyzing the classic packages by following the next steps:
- In the Configuration Manager console open the Software Library workspace.
- Expand Overview Application Management Package Conversion Manager.
- In the Package Conversion Dashboard click the Schedule link. Set the schedule by supplying a date and time before clicking OK.
In the notification area of the taskbar you will see an icon for the schedule; by clicking the icon you can cancel the schedule if necessary.
CONVERTING THE PACKAGE
When the package is analyzed and the readiness state changes from Unknown to Automatic or Manual, you can convert the packages and programs to the new application model. Packages that have an Automatic readiness state can be converted as follows:
- In the Configuration Manager console select the Software Library workspace.
- Expand Overview Application Management Packages, and select one or more classic packages that have an Automatic readiness state.
- Select the Home tab of the ribbon, and choose Convert Package in the Package Conversion Manager section.
- Review the programs and confirm the conversion of the selected packages into new application objects. Click OK.
After the conversion progress dialog box closes, you will see a dialog box with the results of the conversion.
- Click Close and review the converted packages in the Applications node of the Application Management workspace (Figure 3.18).

During the conversion process the package is reanalyzed to be sure that the latest information about the package and program is available. The readiness state of the classic package will be changed from Automatic to Converted.
To manually convert packages and programs, follow these steps:
- In the Configuration Manager console choose the Software Library workspace.
- Expand Overview Application Management Packages, and select one or more classic packages that have a Manual readiness state.
- Choose Fix And Convert in the Package Conversion Manager section of the Home tab of the ribbon.
- Review the items to fix in the Package Selection screen of the Package Conversion Wizard, and click Next.
- Review dependencies on unconverted packages and possible issues, and click Next.
- Review the deployment types associated with the new application, and fix possible issues.
In Figure 3.19, you see that there is an issue with the detection method. To fix this, select Deployment Type and then click Add to configure a detection method. In this case, an MSI product code is missing, so select Windows Installer as the Setting Type and browse to the MSI to retrieve its product. Click OK twice and check to see if the issue is fixed.
- Click Next to review the Requirements Selection screen and check the requirements to add to the selected deployment type; then click Next.
- Review the Summary screen and click Next. After the Package Conversion Wizard has completed successfully, click Close. You will find the converted package in the applications node where all the applications reside.
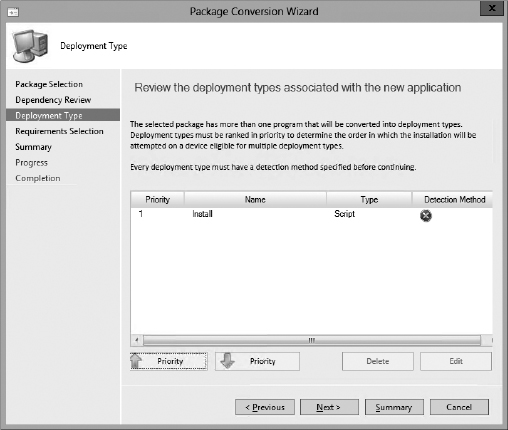
NOT APPLICABLE CLASSIC PACKAGES
When the readiness state of a classic package is shown as Not Applicable for a migration, you can find out why the package and programs are unable to be migrated by selecting the package and viewing the summary. As mentioned previously, there are several reasons why a package can be tagged Not Applicable.
CONVERTING PACKAGE DEPENDENCIES
Classic packages with an unconverted dependency will have a readiness state of Manual after the first analysis. The reason is that Package Conversion Manager cannot automatically convert a package that is a dependency. You will need to first convert any package that is a dependency before converting the classic package. For instance, if you have a classic package that depends on a classic package with the .NET Framework, you need to convert the .NET Framework classic package. If you then reanalyze the classic package with the .NET Framework dependency and there are no other issues, it will be available for conversion.
The Conversion Process Steps
The conversion process does a lot of work to convert and migrate all settings to the new application model. The conversion process converts information like package properties, program properties, and MSI information. Not only such things as application name, deployment type name, or detection method are converted, but also 28 optional properties of the packages and programs. Investments you made are preserved for the new application model.
Package Conversion Manager Best Practices
For the integration of Package Conversion Manager within Configuration Manager 2012, the following premigration and migration best practices are defined.
PREMIGRATION
You can prepare for the migration of the packages to the new application model by using the following best practices:
Utilize Platform Requirements In the package program set the platform that the program will run on. The settings are migrated as global conditions and requirements for the application.
Use the Universal Naming Convention (UNC) Path for Source Location This is required for migrating the package to an application. Otherwise, the new Configuration Manager 2012 site server cannot access the source content.
Use Only MSIs with One Unique Product Identification (PID) The MSIs need to have one unique PID. When creating your own MSI, include only one PID. Otherwise, the detection methods for installation of the applications won't work correctly.
CONVERSION PROCESS
For the conversion process the following best practices are defined:
Convert Any Depended Classic Packages First Always convert the dependent classic packages first before converting the classic packages that are dependent on them. Depended classic packages that have a readiness state of Automatic will optionally be converted automatically.
Concentrate on Your User-Centric Applications Since Configuration Manager 2012 is user centric, be sure to concentrate on your user-centric applications. Configuration Manager 2007 was designed for system targeting, so try to find the classic packages that can interact with the user and that can be converted with Package Conversion Manager.
Keep Track of Your Efforts Use the summarization to plan the conversion of the classic packages and to keep track of your conversion process. For instance, you can check to see what percentage has converted.
Once Converted, Check Requirements Once a package is converted, check the requirements of the application to make sure that they are sufficient for the new application model.
Monitoring Conversion
Besides the Package Conversion Dashboard, shown previously in Figure 3.17, you can monitor the conversion of your packages via other ways, as shown in Table 3.2.
TABLE 3.2: Package conversion monitoring features
| MONITORING FEATURE | DESCRIPTION |
| Package Conversion Dashboard | The dashboard shows the overall readiness/conversion state of all of your packages. This is the best way to monitor your package conversion process. |
| PCMTrace.log | This log file can be found in the temporary directory of the user. This log file consists of all information about the package conversions. |
| Packages node | Add the Readiness and the Last Analyzed/Converted columns to packages node view. |
| Packages properties | You can view the Package Conversion Manager status per package. Possible readiness issues are reported here. |
| Package Scan Report | From the Package Conversion Dashboard you can generate a report. This report is saved in the user's temp folder (%TEMP%) and is called PackageScanReport.XML, shown in Figure 3.20. |

Migrating Branch Offices with the Physical-to-Virtual Migration Toolkit
To achieve the Configuration Manager 2012 migration goals set in the beginning of this chapter, you will need the physical-to-virtual (P2V) Migration Toolkit to maximize the reusability of x64-bit hardware. This P2V Migration Toolkit can be used when you have a branch office with limited hardware availability to perform a side-by-side upgrade.
The P2V Migration Toolkit eliminates the need for a side-by-side migration of physical servers. It enables you to host the Configuration Manager 2007 site server and the Configuration Manager 2012 site server on the same machine using virtualization with Hyper-V. The P2V Migration Toolkit uses Configuration Manager operating system deployment to create a virtual instance of the Configuration Manager 2007 site server. It uses a virtualization task sequence so that the creation of the P2V virtual machine is simplified and automated.
Requirements
The P2V Migration Toolkit requires Hyper-V to be available on the Windows Server 2008 R2 server. For virtualization with Hyper-V the following are required:
- The server must have an x64 processor.
- The BIOS must support hardware-assisted virtualization and hardware data execution prevention. Virtual machines will not start unless these features are enabled.
The P2V Migration Toolkit requires that the Configuration Manager 2007 SP2 console be installed on the workstation or server where you want to start it from. Further requirements are as follows:
- Windows 7 or Windows Server 2008 R2
- Microsoft .NET Framework 4.0 or Microsoft .NET Framework 4.0 client profile
- Windows Automated Installation Kit for Windows 7
- Desktop Experience feature in Windows Server 2008 R2
The source server that needs to be virtualized has the operating system requirements shown in Table 3.3.

P2V Migration Scenario
The physical-to-virtual migration is primarily used for two types of scenarios:
- It can be used for branch offices that are part of your Configuration Manager 2007 hierarchy and where you have only one piece of hardware that can be reused for Configuration Manager 2012 and that can support Hyper-V.
- It can be used for a branch office with very slow WAN links that doesn't allow an over-the-wire migration because of costs; the global SQL replication over the WAN is too expensive.
After a P2V migration of an old server is finished, you can migrate Configuration Manager 2007 and Configuration Manager 2012 side by side.
The Task Sequence
The task sequence that is used for the P2V migration scenario consists of the following tasks, resulting in a virtual machine on a new Windows Server 2008 R2 operating system. (You'll learn more about task sequences and operating system deployment in Chapter 10.)
The task sequence tasks are as follows:
- Capture the selected physical disk partitions into virtual hard disks.
- Install Windows Server 2008 R2.
- Enable the Hyper-V role on the new Windows Server 2008 R2 server.
- Set up and configure the Windows Server operating system by doing the following:
- Install the Configuration Manager 2007 client to be able to connect the Configuration Manager 2007 site server.
- Join the domain.
- Add predefined local administrators.
- Prepare and compact virtual hard disks.
- Create the virtual machine, configure the network, and attach the virtual hard disks.
Steps for Using the Configuration Manager 2012 P2V Migration Toolkit
The P2V Migration Toolkit can be used in two different ways:
- Create a task sequence with stand-alone media.
- Create non-task-sequence bootable media.
This provides flexibility in the P2V migration approach.
CREATING A TASK SEQUENCE WITH STAND-ALONE MEDIA
Use this option when you want to automate the entire end-to-end process from operating system rebuild to virtual machine creation. To create the task sequence with stand-alone media, the following four broad steps are required:
- Create the task sequence.
- Create stand-alone media.
- Boot off the stand-alone media.
- Run the task sequence.
The first step is to create the task sequence itself:
- Start the P2V Migration Toolkit, and you will see the screen shown in Figure 3.21.
- Click Create A Task Sequence.
- Supply the site server name and site code, and click OK.
- When the Task Sequence Designer launches, supply the name for the task sequence in the Task Sequence Name field.
- Click Browse, select an existing 32-bit boot image, and click OK.
- Click Next.
- Click Browse, and select the Windows Server 2008 R2 image package, as shown in Figure 3.22.
- Provide the product key and license information, and click Next.
- Click Browse, and select Client Installation Package. Click Next.
- Select Create New Virtualization Tools Package, or select Use An Existing Virtualization Tools Package and click Browse to select the package. Click Next.
- If you need to create a new virtualization tools package, supply the package name, specify the deployment share, and select the distribution points where the package needs to be placed. Click Next.
- Select Software Packages That Need To Be Installed During The P2V Installation Process, and click Next.
- Review the Summary screen, and click Create.
- Click Close.
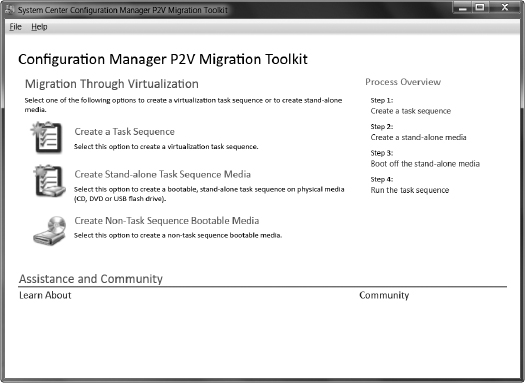

The next step in the process of virtualizing the Configuration Manager 2007 site server is to create stand-alone media. The stand-alone media can consist of a USB drive or a CD/DVD set.
To create a stand-alone USB flash drive, follow this procedure:
- Start the P2V Migration Toolkit.
- Select Create Stand-Alone Media.
- Supply the site server name and site code, and click OK.
- Select USB Flash Drive.
- Click Yes if you want to format the USB flash drive.
- Supply a password (optional), and click Next.
- Click Browse to select the task sequence you created earlier, and click Next.
- Select the distribution point(s), and click Next.
- Review the Summary screen, and click Create.
- If the wizard has completed successfully, click Close.
To create a stand-alone CD/DVD set, perform the following steps:
- Start the P2V Migration Toolkit.
- Select Create Stand-Alone Task Sequence Media.
- Supply the site server name and site code, and click OK.
- Select CD or DVD.
- Select the media size (650 MB, 4.7 GB, or 8.5 GB).
- Click Browse to browse to the file location, and supply a name for the ISO file.
- Supply a password (optional), and click Next.
- Click Browse to select the task sequence you created earlier, and click Next.
- Select the distribution point(s), as shown in Figure 3.23, and click Next.
- Review the Summary screen, and click Create.
- When the wizard has completed successfully, click Close.
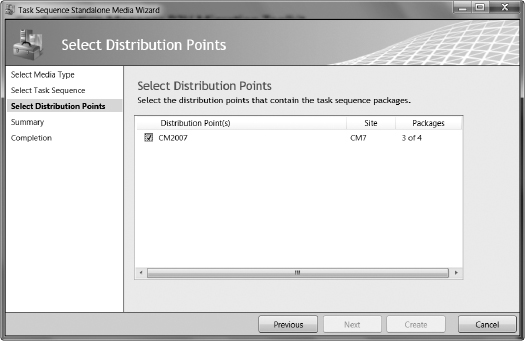
The final phase of the process is to run the task sequence. Do the following:
- Boot the branch office site server from either USB or CD/DVD.
- Configure IP settings and supply the password if necessary; then click Next.
- Click Next when the conformation is displayed after booting.
- Click Next on the Welcome page of the bootable device, as shown in Figure 3.24.
- Your system will be validated; if the system is okay, click Next.
- Supply the computer name, domain information, and an account that will have domain join rights. Click Next.
- Supply the password for the local administrator and a username that must be added to the Local Administrators group. Click Next.
- Select the target drive that needs to be captured and where the new operating system needs to be installed, and click Next.
- Select the drives to virtualize, and click Next.
- Supply a UNC path to a location where the new virtual hard disk (VHD) image can be saved.
- Supply the credentials of a user who will have permissions to save to the virtual hard drive.
- Click Next.
- Supply a new name for the virtual machine, the memory, the virtual network name, and the network that will be connected to the virtual machine. Click Next to continue.
- After reviewing the Summary screen, click Finish, and the process will start.

The task sequence will begin the physical-to-virtual process. Once that is complete, the operating system will be installed and the VHD files will be added to Hyper-V on the new operating system.
CREATING NON-TASK-SEQUENCE BOOTABLE MEDIA
Another option is to create non-task-sequence bootable media; this can also be a CD/DVD set or a USB flash drive. This procedure is just to create a virtual hard disk that can be used in Hyper-V. Non-task-sequence bootable media is created with the following procedures.
To create a stand-alone media USB flash drive, do the following:
- Start the P2V Migration Toolkit.
- Select Create Windows PE Boot Media. In the next screen of the WinPE Creator Wizard, select the boot image OS architecture type to target in order to create the bootable Windows PE image, and then click Next.
- Select USB Flash Drive, as shown in Figure 3.25 and click Next.
- Click Yes if you want to format the USB flash drive, and click Next.
- Review the Summary screen, and click Create.
- When the wizard has completed successfully, click Close.

To create a stand-alone media CD/DVD set, perform these steps:
- Start the P2V Migration Toolkit.
- Select Create Non-Task Sequence Bootable Media.
- Select CD or DVD, select the CD/DVD drive with an empty CD or DVD, and click Next.
- Review the Summary screen, and click Create.
- When the wizard has completed successfully, click Close.
After creating the stand-alone media USB device or DVD/CDs, you can boot the Configuration Manager 2007 site server from that media and start the following process:
- Boot the branch office site server from either USB or CD/DVD.
- Click Next on the Welcome page of the bootable device.
- Select the drives to virtualize, and click Next.
- Supply a local path to a location where the new virtual hard disk (vhd) image can be saved. This can be a USB disk. Click Next.
The file is created and copied to the defined location.
- Once the creation is complete, click Finish.
When it has finished, copy the VHD image to a Windows Server 2008 R2 server and configure a virtual machine in Hyper-V to use the VHD image.
![]()
MIGRATING TO CONFIGURATION MANAGER 2012
Sports Clothes United Inc. develops and sells sports clothing to retailers and their own shops all over the world. The head office is located in San Francisco. The company is growing so fast that they acquire a new company called Fit Clothes. Fit Clothes has their own Configuration Manager 2007 R3 SP2 environment.
You as a consultant or Configuration Manager administrator are asked to migrate the Fit Clothes Configuration Manager 2007 R2 SP2 environment to the new Configuration Manager 2012 infrastructure and deploy the corporate standard of Sports Clothes United.
MIGRATION SCOPE
The corporate IT department investigated the Configuration Manager 2007 R3 SP2 environment of Fit Clothes and came to the conclusion that only the classic packages, advertisements, and collections need to be migrated to the Configuration Manager 2012 environment of Sport Clothes United. After the classic packages are migrated, they must be converted to the new application model.
Your assignment is to migrate these assets.
MIGRATION APPROACH
Because the corporate IT department decided that the assets need to be migrated, you must use the migration feature of Configuration Manager 2012. You always need to test your migration approach in your test lab and define and crystallize your steps while testing your approach. The following steps should be used:
- Define the topmost source site as the source hierarchy.
- Configure credentials to be able to gather data from the source site(s).
- Use the collection migration to migrate your collections with the associated applications and advertisements.
- After successfully migrating the classic packages to Configuration Manager, analyze the packages to discover the readiness level for the new application model.
- Convert the classic packages with a readiness level of Automatic.
- Fix and convert the packages with a readiness level of Manual.
- Stop the data-gathering process, and clean up the migration data.
- Uninstall Configuration Manager 2007.
Once you have completed those steps, you will have migrated the required Configuration Manager 2007 assets to Configuration Manager 2012.
The Bottom Line
Determine what you are able to migrate with the migration feature. The new migration feature in Configuration Manager 2012 allows you to migrate the old Configuration Manager investments to Configuration Manager 2012 side by side. In earlier versions you were able to migrate the server in place or side by side by replicating data, but no real manageable migration feature was available.
Master It With the migration feature you cannot migrate things like the following:
- Queries
- Security rights for the site and objects
- Configuration Manager reports from SQL Server Reporting Services
- Configuration Manager 2007 web reports
- Client inventory and history data
- AMT client-provisioning information
- Files in the client cache
To keep it positive, identify what objects you are able to migrate with the migration feature of Configuration Manager 2012.
Discover which migration approach is supported. Configuration Manager 2012 provides migration features that can be used for your migration of Configuration Manager 2007 to Configuration Manager 2012.
Master It With the earlier upgrades or migrations of Configuration Manager in your mind, what migration approaches are supported when migrating from Configuration Manager 2007 to Configuration Manager 2012?
Ascertain what kind of interoperability is supported during the migration. Interoperability like that supported in earlier versions is no longer supported; nevertheless, the migration feature of Configuration Manager 2012 supports some kinds of interoperability during the migration process. Depending on the size of your Configuration Manager 2007 or Configuration Manager 2012 source hierarchy, the migration can take some time.
Master It Interoperability like you were used to in SMS 2003 and Configuration Manager 2007 is no longer supported. Give two examples of interoperability features in Configuration Manager 2012.
Migrate packages and programs to the new application model. The classic packages just migrated to Configuration Manager 2012 can be used and targeted to collections of users and computers, but Configuration Manager is built around a new application model that allows you to implement user-centricity in your Configuration Manager 2012 environment.
Master It Converting classic packages to the application model is not a feature of Configuration Manager, but with extra software it can be done from the Configuration Manager 2012 console in a couple of different ways. What is the name of the tool that you use to convert the classic packages, and what are the steps to convert a classic package?