
In this chapter, you'll use the Visual Basic Editor to edit the Word and Excel macros you recorded with the Macro Recorder in Chapter 1. In addition, you'll create a new macro in PowerPoint and see how to edit it. Even if you're working with an application that doesn't include the Macro Recorder (such as PowerPoint), you may still want to read through this chapter because it shows you how to use some of the key editing features of the Visual Basic Editor.
There are three reasons for working with macros in the Visual Basic Editor:
First, to fix any problems in the way a macro you recorded is executing. For example, if you made a misstep when recording the macro, the macro will keep performing that wrong instruction every time you run it unless you remove or change the instruction. (Alternatively, it's sometimes easier to just rerecord the macro.)
Second, to add further instructions to the macro to make it behave differently. This is a great way to get started learning VBA because by making relatively simple changes to a recorded macro, you can greatly increase its power and flexibility. In the process, you become familiar with the language.
Third, to create new macros by writing them in the Visual Basic Editor instead of recording them. You can write a new macro from scratch or paste in parts of an existing macro, as appropriate.
In this chapter you will learn to do the following:
Test a macro in the Visual Basic Editor
Set breakpoints and use comments
Edit the recorded Word macro
Edit the recorded Excel macro
Edit a new PowerPoint macro
If a macro fails when you try to run it from the host application, the quickest way to find out what's going wrong is to open the macro in the Visual Basic Editor, run it, and see where it fails:
In the host application, press Alt+F8 or choose Tools

Select the macro, and then click the Edit button. The host application opens an instance of the Visual Basic Editor and displays the macro for editing.
Start the macro running by pressing F5, choosing Run
If the macro encounters an error and crashes, VBA displays an error message box onscreen and selects (displays white letters on a blue background) the offending statement in the Code window. You can then edit the statement to fix the problem. Once you've done so, step through the macro as described in the next section.
To see exactly what a macro does (and what it does wrong), you can step through the macro—go through the macro, executing one command at a time—so that you can see the effect of each command. Stepping through a macro can be time consuming, but it's one of the best ways to identify problems and fix them. Usually debugging is a matter of finding out where in the code something goes wrong. And although you generally already know what goes wrong, you still need to figure out the location in your code of the problem; then you can figure out how the error happens.
To step through a macro, follow these steps:
Open the host application, and then open the macro for editing: press Alt+F8, select the macro, and then click the Edit button.
Sometimes it's helpful to arrange the Visual Basic Editor window and the host application's window so that you can see them both simultaneously. Either arrange the windows manually or use a Windows command to do so. For example, stack the windows by right-clicking in open space on the Windows taskbar and choosing Show Windows Stacked from the context menu. Alternatively, you can select Show Windows Side By Side. Note that if you have any other applications currently running, minimize them so they won't be included in your stack. (If you have two monitors, you can dedicate one to the editor and one to the application.) In Windows 7, the quickest way to display two windows is to drag one of them to the far left (drop it and it will snap to that location and resize so it takes up 50 percent of the screen). Drag the other window to the right.
Set up conditions the macro expects. Perhaps you need to position the insertion point in a suitable place in the application window for the macro's requirements. (For example, to run properly, a macro that applies a style to a paragraph can require the precondition that the blinking insertion point actually be in a paragraph.)
Click the Visual Basic Editor window to activate it, and then click somewhere in the macro code that you want to run to position the blinking insertion point within that macro. The location of the insertion cursor is how the editor decides which macro you want to work with.
Press F8 to step through the macro command by command. Each time you press F8, one line of your VBA code will be executed. The Visual Basic Editor highlights each command as it's executed, and you can watch the effect in the application window to catch errors.
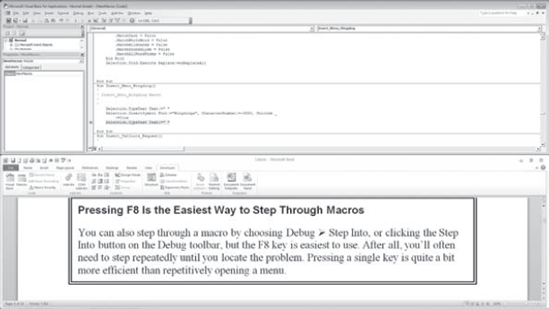
Pressing F8 Is the Easiest Way to Step Through Macros
You can also step through a macro by choosing Debug
Figure 3.2 provides an example of stepping through a macro recorded in Word. As you'll see, to catch what a macro is doing wrong, arrange the application window and the Visual Basic Editor window so that you can see them both. Then step through the macro by pressing the F8 key or using the Step Into command.
You'll learn about debugging macros in detail in Chapter 17, "Debugging Your Code and Handling Errors." However, let's briefly introduce two additional important techniques that can help you locate bugs in your macros: setting breakpoints and commenting out lines.
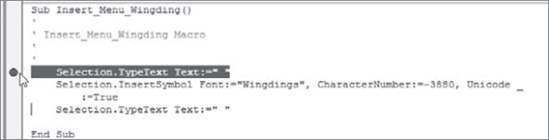
A breakpoint can be set on a line of code to tell VBA to stop executing the macro there. By using a breakpoint, you can run through known functional parts of a macro at full speed (press F5 to run) and then the editor automatically stops at the breakpoint. You put a breakpoint just before where you suspect a bug is located in the code. That way, you don't have to step through all your code. You can execute the macro at normal, rapid speed—but then halt near the suspicious location and begin pressing F8 to step through the code, executing it slowly, statement by statement, to closely observe the behaviors. You can set as many breakpoints as you wish.
To toggle a breakpoint on or off, right-click in a line of executable code (not a comment line, described in the following section) and choose Toggle
Like most programming languages, VBA lets you add comments to your code so that it's easier to understand. Comments can be invaluable both when you're creating code and when you're revisiting your own code long enough after you've written it to forget what it does—or, worse, trying to figure out what someone else's code does.
But there's another use for commenting. You can also comment out lines of code to prevent the Visual Basic Editor from executing them. This can be a useful technique for temporarily skipping over suspect lines of code without actually removing them from the macro. Then run the code and see what the difference is with the commented lines ignored. If the bug goes away, it's probably located within the lines that are commented out.
To comment out a line manually, type an apostrophe (') at the very beginning of the line. Alternatively, you can use Rem instead of the apostrophe. (Rem is short for remark, and comment lines are sometimes called remark lines.) To uncomment the line manually, just delete the apostrophe or Rem.
The Visual Basic Editor provides the Comment Block and Uncomment Block commands for commenting out multiple lines automatically. Select the lines of code (or click in the single line you want to affect), and then click the Comment Block button on the Edit toolbar to place an apostrophe at the beginning of each line; to uncomment a line or a group of selected lines, click the Uncomment Block button and the Visual Basic Editor removes an apostrophe from each line.
The Comment Block and Uncomment Block commands work only with apostrophes, not with Rem lines. If you prefer to use Rem, you must comment and uncomment lines manually. Few people, though, use Rem these days.
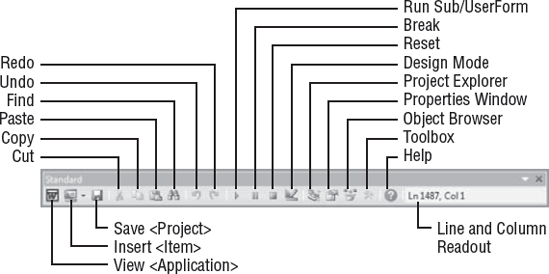
Once you've identified and fixed the problem with a macro, you probably won't want to step through the rest of the macro command by command. To run the rest of the macro and the rest of any macro that called it (triggered it), you can press the F5 key. Alternatively, you can click the Continue button on the Standard toolbar or the Debug toolbar (see Figure 3.4), or you can choose Run
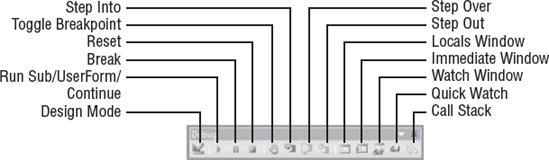
Figure 3.4. The Debug toolbar contains commands for running code, stepping into it and out of it, and displaying key windows for debugging.
To issue the Step Out command, press Ctrl+Shift+F8, click the Step Out button on the Debug toolbar, or choose Debug
Now, edit the Transpose_Word_Right macro that you recorded in Word in Chapter 1, and use it to build another macro. To begin, open the macro in the Visual Basic Editor:
Start Word if it's not already running, or activate it.
Press Alt+F8 or choose Tools
Select the
Transpose_Word_Rightmacro, and then click the Edit button.
In the Code window, you should see code similar to Listing 3.1, except for the line numbers, which I'm using here to identify the lines of code.
Example 3.1. The recorded transpose words macro
1.  Sub Transpose_Word_Right()
 2.  '
 3.  ' Transpose_Word_Right Macro
 4.  ' Transposes the current word with the word to its right. _
 5.  ' Created 5/5/10 by Rita Goetz
 6.  '
 7.      Selection.Extend
 8.      Selection.Extend
 9.      Selection.EscapeKey
10.      Selection.Cut
11.      Selection.MoveRight Unit:=wdWord, Count:=1
12.      Selection.PasteAndFormat (wdFormatOriginalFormatting)
13.      Selection.MoveLeft Unit:=wdWord, Count:=1
14.  End Sub
Here's what the macro does:
Line 1 starts the macro with the
Sub Transpose_Word_Right()statement, and line 14 ends the macro with theEnd Substatement. TheSubandEnd Sublines mark the beginning and end of the macro (as they do any subroutine).Lines 2 and 6 are blank comment lines the Macro Recorder inserts to make your macro easier to read. You can use any number of blank lines or blank comment lines in a macro to help separate statements into groups. (A blank line doesn't have to be commented out—it can just be blank—but the Macro Recorder has added commenting to these blank lines to make it clear what they are.)
Lines 3 through 5 are comment lines that contain the name of the macro and its description. The Macro Recorder entered these lines from the information you typed into the Record Macro dialog box.
Line 7 records the first keystroke of the F8 key, which starts Extend mode—a way of selecting text in a Word document.
Line 8 records the second keystroke of the F8 key, which continues Extend mode and thereby selects the current word.
Line 9 records the keystroke of the Esc key, which cancels Extend mode.
Line 10 records the Cut command, which cuts the selection (in this case, the selected word) to the Clipboard.
Line 11 records the Ctrl+→ command, which moves the insertion point one word to the right.
Line 12 records the Paste command, which pastes the selection into the document at the current position of the insertion point. Whatever formatting was originally applied to the selection is retained (rather than applying the formatting in effect at the new location).
Line 13 records the Ctrl+← command, which moves the insertion point one word to the left.
Try stepping through this macro in Break mode using the Step Into command:
Arrange your screen so you can see both the active Word window and the Visual Basic Editor window (for example, by right-clicking the taskbar and choosing Show Windows Stacked from the context menu).
Click in the Visual Basic Editor, and then click to place the blinking insertion point at the start (on the
Sub) of theTranspose_Word_Rightmacro in the Code window.Press F8 to step through the code one active line at a time. You'll notice that VBA skips the blank lines and the comment lines because they're supposed to be ignored. VBA highlights the current statement each time you press F8, and you see the actions taking place in the Word window.
The Visual Basic Editor leaves Break mode when it reaches the end of the macro (in this case, when you press F8 to execute the End Sub statement in line 14). The editor returns to Design mode. You can also exit Break mode at any time by clicking the Reset button (blue square) on the Standard or the Debug toolbar or by choosing Run
If the macro works fine when you step through it, you may also want to run it from the Visual Basic Editor. Just press F5. In Break mode, F5 executes the macro from the current instruction (where the insertion cursor is located).
At this point we'll modify the macro. We'll create a Transpose_Word_Left macro by making minor adjustments to the Transpose_Word_Right macro. Follow these steps.
In the Code window, select all the code for the
Transpose_Word_Rightmacro, from theSub Transpose_Word_Right()line to theEnd Subline. You can select three ways: by dragging with the mouse, by holding down Shift and using the arrow keys to extend the selection, or by positioning the insertion point at one end of the macro and then Shift+clicking the other end.Copy the code by issuing a Copy command (for example, by right-clicking and choosing Copy from the context menu or by pressing Ctrl+C or Ctrl+Insert).
Click the with mouse to move the insertion point to the line below the
End Substatement for theTranspose_Word_Rightmacro in the Code window.Paste the code by issuing a Paste command (by right-clicking and choosing Paste from the context menu or by pressing Ctrl+V or Shift+Insert). The Visual Basic Editor automatically enters a horizontal line between the
End Substatement for theTranspose_Word_Rightmacro and the new macro you've pasted.Change the name of the second
Transpose_Word_Rightmacro toTranspose_Word_Leftby editing theSubline:Sub Transpose_Word_Left()
Edit the comment lines at the beginning of the macro accordingly—for example:
'Transpose_Word_
LeftMacro 'Transposes the current word with the word to itsleft. _ 'Created 5/5/10 by Rita GoetzNow all you need to do is replace the
MoveRightmethod with theMoveLeftmethod. This will move the insertion point one word to the left instead of one word to the right. While you could do that by typing the correction or by using Cut and Paste to replace theSelection.MoveRightline with the commented-outSelection.MoveLeftline, try using the List Properties/Methods feature instead. Just for practice, follow these steps:Click to place the insertion point in the word
MoveRight.Click the List Properties/Methods button on the Edit toolbar to display the list of properties and methods. It's the first button on the far left. Or just press Ctrl+J. (If the Edit toolbar isn't visible, right-click one of the existing toolbars and choose Edit from the context menu.)
Double-click the
MoveLeftmethod in the list to make it replace theMoveRightmethod in the code line.
Now that you no longer need it, delete the line
Selection.MoveLeft Unit:=wdWord, Count:=1from the end of the macro.
You should end up with a macro that looks like Listing 3.2.
Example 3.2. The edited transpose words macro
Sub Transpose_Word_Left()
'
' Transpose_Word_Left Macro
' Transposes the current word with the word to its left. _
' ' Created 5/5/10 by Rita Goetz
'
    Selection.Extend
    Selection.Extend
    Selection.EscapeKey
    Selection.Cut
    Selection.MoveLeft Unit:=wdWord, Count:=1
    Selection.PasteAndFormat (wdFormatOriginalFormatting)
End Sub
Try stepping through this macro to make sure it works. If it does, you're ready to save it—and perhaps to create a Quick Access Toolbar button, or keyboard shortcut, for it in Word if you plan to use it in your writing.
In this section, you'll edit the Excel macro that you recorded in Chapter 1. This time, you won't create a new macro—instead, you'll add to the existing one.
Before you can edit the Excel macro, you'll need to unhide the Personal Macro Workbook if it's currently hidden:
Open the View tab on the Ribbon.
If the Unhide button is gray (disabled) in the Window group, then no workbooks are hidden, including
PERSONAL. You can skip the following steps. However, if the Unhide button is black (enabled), click it to display the Unhide dialog box.Select
PERSONAL.XLSMorPERSONAL.XLSBand click the OK button. If you stored the macro from Chapter 1 in another workbook, open that workbook before trying to proceed. To hide the Personal Macro Workbook again after editing the macro, click the Hide button on the Ribbon while the Personal Macro Workbook is active.
Now take the following steps to open the macro you recorded in Chapter 1 for viewing and editing:
Press Alt+F8 to display the Macros dialog box.
Select the macro named
New_Workbook_with_Months. (If you gave the macro a different name, select that name instead.)Click the Edit button to display the macro for editing in the Visual Basic Editor. Listing 3.3 shows code similar to what you should be seeing.
Example 3.3. New workbook with months added macro
1.  Sub New_Workbook_with_Months()
2.  '
3.  ' New_Workbook_with_Months Macro
4.  ' Creates a new workbook with the months filled in for a year. Recorded 5/5/10
5.  '
6.  '
7.     Workbooks.Add
8.     Range("A1").Select
9.     ActiveCell.FormulaR1C1 = "Jan-2011"
10.    Range("B1").Select
11.    ActiveCell.FormulaR1C1 = "Feb-2011"
12.    Range("A1:B1").Select
13.    Selection.AutoFill Destination:=Range("A1:L1"), Type:=xlFillDefault
14.    Range("A1:L1").Select
15.    ActiveWorkbook.SaveAs Filename:= _
"C:UsersRichardAppDataRoamingMicrosoftExcelXLSTART	emp.xlsx", _
   FileFormat:=xlOpenXMLWorkbook, CreateBackup:=False
16. End Sub
Here's what happens in the macro in Listing 3.3:
Line 1 starts the macro with the
Sub New_Workbook_with_Months()statement, and line 16 ends the macro with theEnd Substatement.Lines 2, 5, and 6 are comment lines that the Macro Recorder automatically adds. (The comment line in line 6 seems superfluous. It's there because Excel allows you to enter two lines in the Description text box in the Record Macro dialog box, but this macro uses only one line. Delete any blank or comment lines you wish. They'll have no effect on the behavior of the macro, though removing them could make it less readable in the editor. It's your call.)
Line 3 is a comment line that gives the macro's name and describes it as a macro, and line 4 contains the description from the Record Macro dialog box.
Line 7 creates a new blank workbook by using the
Addmethod on theWorkbookscollection object. (A collection object, or more concisely a collection, is an object that contains objects of a given type. For example, a worksheet will contain aPivotTablescollection of all the PivotTables on that worksheet.)Line 8 selects the
RangeobjectA1, making cell A1 active.Line 9 enters
Jan-2011in the active cell. Notice that the Macro Recorder has stored the parsed date value rather than the text that you typed in (January 2011). Also, keep in mind that the date displayed in the cell may be in a different format than MMM.Line 10 selects the
Rangeobject B1, making cell B1 active, and line 11 entersFeb-2011in that cell.Line 12 selects the range A1:B1.
Line 13 performs a default AutoFill operation on the range A1:L1, and line 14 selects that range. Note how the Macro Recorder has recorded two separate actions, although in the Excel interface you performed only one action.
Line 15 saves the workbook under the name and folder given. Note that the Macro Recorder has automatically broken this long statement onto four lines by using the continuation character, an underscore preceded by a space. You can break lines of code anywhere between keywords to make the lines of code a comfortable length for working within the editor. Again, lines broken with an underscore at the end have no effect on macro execution. They're merely formatting issues, so it's your call.
Now extend the macro by following these steps:
Select lines 8 through 13.
Copy these lines by pressing Ctrl+C or right-clicking in the selection and choosing Copy from the context menu.
Click at the start of line 14 to move the insertion point there.
Paste the copied lines by pressing Ctrl+V and choosing Edit
If necessary, press the Enter key to move the line
Range("A1:L1").Selectdown one line. (Press Enter if this code is red, indicating that it should be moved down one line rather than appended to line 13's code.)
Your new macro should look like Listing 3.4.
Example 3.4. New extended version
1.  Sub New_Workbook_with_Months()
2.  '
3.  ' New_Workbook_with_Months Macro
4.  ' Creates a new workbook with the months filled in for a year. Recorded 5 / 5 / 10
5.  '
6.  '
7.     Workbooks.Add
8.     Range("A1").Select
9.     ActiveCell.FormulaR1C1 = "Jan-2011"
10.    Range("B1").Select
11. ActiveCell.FormulaR1C1 = "Feb-2011"
12. Range("A1:B1").Select
13. Selection.AutoFill Destination:=Range("A1:L1"), Type:=xlFillDefault
14. Range("A1").Select
15. ActiveCell.FormulaR1C1 = "Jan-2011"
16. Range("B1").Select
17. ActiveCell.FormulaR1C1 = "Feb-2011"
18. Range("A1:B1").Select
19. Selection.AutoFill Destination:=Range("A1:L1"), Type:=xlFillDefault
20. Range("A1:L1").Select
21. ActiveWorkbook.SaveAs Filename:= _
"C:UsersRichardAppDataRoamingMicrosoftExcelXLSTART emp.xlsx", _
FileFormat:=xlOpenXMLWorkbook, CreateBackup:=False
22. End SubNow, change the macro by taking the following steps:
Delete line 6. It's not doing any good, and it's taking up space in the Code window.
Delete line 20. It's not necessary for what the macro does—you don't need the macro to select the range because the AutoFill instruction in line 13 is enough to perform the AutoFill operation without selecting the range.
Change line 14 to select cell A2 instead of cell A1:
Range("A2").SelectChange line 15 so that it enters the value
100instead ofJan-2008:ActiveCell.FormulaR1C1 = 100
Change line 16 to select cell B2 instead of cell B1:
Range("B2").SelectChange line 17 so that it enters the value
200instead ofFeb-2008:ActiveCell.FormulaR1C1 = 200
Change line 18 so that it selects the range A2:B2:
Range("A2:B2").SelectChange line 19 so that it performs the AutoFill operation on the range A2:L2:
Selection.AutoFill Destination:=Range("A2:L2"), Type:=xlFillDefaultBreak line 13 with a space, underscore, and carriage return before the Type argument, as shown here. Indent the second line by one tab.
Selection.AutoFill Destination:=Range("A1:L1"), _
    Type:=xlFillDefault
Similarly, break line 19 with a space, underscore, carriage return, and tab before the
Typeargument.Click the Save button or choose File
The macro should now read like Listing 3.5.
Example 3.5. Streamlined macro
1.  Sub New_Workbook_with_Months()
2.  '
3.  ' New_Workbook_with_Months Macro
4.  ' Creates a new workbook with the months filled in for a year. Recorded 5 / 5 / 10
5.  '
6.     Workbooks.Add
7.     Range("A1").Select
8.     ActiveCell.FormulaR1C1 = "Jan-2011"
9.     Range("B1").Select
10.    ActiveCell.FormulaR1C1 = "Feb-2011"
11.    Range("A1:B1").Select
12.    Selection.AutoFill Destination:=Range("A1:L1"), _
          Type:=xlFillDefault
13.    Range("A2").Select
14.    ActiveCell.FormulaR1C1 = 100
15.    Range("B2").Select
16.    ActiveCell.FormulaR1C1 = 200
17.    Range("A2:B2").Select
18.    Selection.AutoFill Destination:=Range("A2:L2"), _
          Type:=xlFillDefault
19.    ActiveWorkbook.SaveAs Filename:= _
"C:UsersRichardAppDataRoamingMicrosoftExcelXLSTART	emp.xlsx", _
          FileFormat:=xlOpenXMLWorkbook, CreateBackup:=False
20. End Sub
Now step through the macro and watch what happens: it creates the new workbook as before and enters the months, but then it enters the values 100 through 1200 in the second row of cells. At the end, it attempts to save the workbook as before. However, an error message or dialog box warns that a previous workbook exists by this name (unless you've already deleted it). Later you'll see how to handle this type of error so the macro doesn't halt or confuse the user with odd error messages or dialog boxes.
In this section, you'll edit a PowerPoint macro. PowerPoint no longer includes a macro recorder, so you'll either have to type in the code for the following example or, better, just copy and paste it from this book's website at http://www.sybex.com/go/masteringvba2010.
Start by opening the PowerPoint Visual Basic Editor:
Open PowerPoint, and in the new, blank presentation that's displayed, add a shape by clicking the Insert tab on the Ribbon, then clicking the Shapes icon in the Illustrations section.
Click a rectangle shape of your choice. This will be object 1 in the Shapes collection, so we can refer to it in the code like this:
ActiveWindow.Selection.SlideRange.Shapes(1).Select
Open the PowerPoint Visual Basic Editor by pressing Alt+F11.
Create a new, empty module by choosing Insert
Type in (or paste) the code shown in Listing 3.6.
Example 3.6. Add a slide in PowerPoint
1.  Sub Add_Slide_and_Format_Placeholder()
 2.  '
 3.  ' Sample macro that adds a slide, formats its placeholder,
     ' and adds text to it. Recorded 12/4/08 by Rodney Converse.
          4.  '
 5.      ActiveWindow.View.GotoSlide Index:= _
             ActivePresentation.Slides.Add(Index:=2, _
             Layout:=ppLayoutText).SlideIndex
 6.      ActiveWindow.Selection.SlideRange.Layout = ppLayoutTitle
 7.      ActiveWindow.Selection.SlideRange.Shapes(1).Select
 8.      With ActiveWindow.Selection.ShapeRange
 9.          .IncrementLeft -6#
10.          .IncrementTop -125.75
11.      End With
12.      ActiveWindow.Selection.ShapeRange.ScaleHeight 1.56, msoFalse, _
             msoScaleFromTopLeft
13.      ActiveWindow.Selection.SlideRange.Shapes(1).Select
14.      ActiveWindow.Selection.ShapeRange.TextFrame.TextRange.Select
15.      ActiveWindow.Selection.ShapeRange.TextFrame.TextRange.Characters _
             (Start:=1, Length:=0).Select
16.      With ActiveWindow.Selection.TextRange
17.          .Text = "The quick brown dog jumped over a lazy fox"
18.          With .Font
19.              .Name = "Arial"
20.              .Size = 44
21. .Bold = msoFalse
22. .Italic = msoFalse
23. .Underline = msoFalse
24. .Shadow = msoFalse
25. .Emboss = msoFalse
26. .BaselineOffset = 0
27. .AutoRotateNumbers = msoFalse
28. .Color.SchemeColor = ppTitle
29. End With
30. End With
31. ActiveWindow.Selection.ShapeRange.TextFrame.TextRange.Characters _
(Start:=1, Length:=42).Select
32. With ActiveWindow.Selection.TextRange.Font
33. .Name = "Impact"
34. .Size = 54
35. .Bold = msoFalse
36. .Italic = msoFalse
37. .Underline = msoFalse
38. .Shadow = msoFalse
39. .Emboss = msoFalse
40. .BaselineOffset = 0
41. .AutoRotateNumbers = msoFalse
42. .Color.SchemeColor = ppTitle
43. End With
44. End SubHere's what happens in the macro:
Line 1 starts the macro, and line 44 ends it.
Lines 2 and 4 are blank comment lines used to set off the description of the macro, which appears in line 3.
Line 5 adds the slide to the presentation. This statement is a little complicated, but don't worry about it too much just yet. For now, note two things: First, the statement uses the
Addmethod with theSlidescollection object to add a slide to the collection (in other words, to create a new slide in this case). This is similar to the way the Excel macro explored earlier in this chapter used theAddmethod to add a workbook to itsWorkbookscollection. Second, the layout of the slide isppLayoutText, the VBA constant for the Text slide layout that PowerPoint uses for a default new slide.Line 6 applies the Title layout (
ppLayoutTitle) that you chose when recording the macro. (If you chose a different slide layout, you'll see a different constant thanppLayoutTitle.)Line 7 selects the first shape in the
Shapescollection on the active slide. (For the moment, don't worry about how you get to the active slide.)Lines 8 to 11 are a
Withblock. This block begins with aWithstatement that specifies properties or behaviors (methods) for the shape that has been selected (ActiveWindow.Selection.ShapeRange). AWithstatement is a way of simplifying object references, and everything between theWithstatement and theEnd Withstatement refers to the objects that theWithstatement first mentions. In this case, line 9 uses theIncrementLeftmethod with a negative value to move the shape to the left, and line 10 uses theIncrementTopmethod with a negative value to move the shape up the slide.Line 13 selects the first shape in the
Shapescollection, and line 14 selects theTextRangeobject in theTextFrameobject in the shape. When you're working interactively, PowerPoint makes this selection process seamless: You click in a shape displaying the legend "Click to add title" (or whatever), and PowerPoint selects the text range in the text frame in the shape—but all you see is that the text in the shape becomes selected. In VBA, you have to go through a couple of unseen layers in the object model before getting to the text.When you select the placeholder text, PowerPoint gets rid of it. The same thing happens when you select the placeholder text via VBA. So line 15 makes a new selection at the beginning of the first character in the text range. The
Lengthof the selection is0, meaning that the selection is collapsed to an insertion point rather than containing any characters. Line 16 starts aWithstatement that continues until line 30. TheWith ActiveWindow.Selection.TextRangestatement in line 16 lets line 17 reference theTextproperty of theTextRangeobject in theSelectionobject in theActiveWindowobject much more simply (instead ofActiveWindow.Selection.TextRange.Text), and it lets line 18 reference theFontproperty of theTextRangeobject in theSelectionobject in theActiveWindowobject easily (instead ofActiveWindow.Selection.TextRange.Font).Line 17 sets the
Textproperty of theActiveWindow.Selection.TextRangeobject to the text typed.Line 18 then begins a nested
Withstatement that sets the properties of theFontobject for theTextRangeobject. Line 19 sets theNameproperty of theFontobject toArial; line 20 sets theSizeproperty of theFontobject to44; line 21 sets theBoldproperty of theFontobject tomsoFalse, the Microsoft Office (mso) constant forFalse; and so on. These statements are not necessary to our purposes in this macro. But they're harmless so you can leave them in your code, or if you wish, delete this entireWithblock (as we'll do shortly). Line 29 ends the nestedWithstatement.Line 31 uses the
Selectmethod to select characters 1 through 42 in the text range. This is the same as pressing the Ctrl+Shift+Home key combination. Because this statement specifies the characters to select, you'll need to change it if you change the text that this macro inserts. (If you run the statement on a text range that has fewer than 42 characters, it will return an error. If you run it on a text range that has more than 42 characters, it will select only the first 42 characters in the text range—not what you want.)Line 32 begins another
Withstatement that works with theFontobject of theTextRangeobject. ThisWithstatement imitates what happens if the user opens and modifies the Font dialog box.Line 43 ends the
Withstatement, and line 44 ends the macro.
You can edit this macro by slimming it down a little and changing the text it inserts:
Delete the unnecessary
Withstatement in lines 18 through 29.Delete line 30.
Change lines 16 and 17 into a single statement without
With:ActiveWindow.Selection.TextRange.Text = _ "The quick brown dog jumped over a lazy fox"Now change the text that the new line 16 inserts. Type text of your choice between the double quotation marks.
Change line 31 to use the
Selectmethod on the text range rather than specifying which characters to select. DeleteCharacters(Start:=1, Length:=42)to leave this statement:ActiveWindow.Selection.ShapeRange.TextFrame.TextRange.Select
By specifying a range rather than a particular character count, you avoid the problem discussed earlier of having to count characters any time you change the message. Specifying a character count is called hard-coding and it's to be avoided whenever possible. If there's a way—as there is here with the
TextRangeproperty—let the computer figure out the count rather than specifying it in your code.Click the Save button on the Standard toolbar or choose File
You should now have code that reads like Listing 3.7.
Example 3.7. The macro slimmed down and modified
1.   Sub Add_Slide_and_Format_Placeholder()
 2.  '
 3.  ' Sample macro that adds a slide, formats its placeholder, and adds text
     ' to it.        Recorded 12/4/08 by Rodney Converse.
       Recorded 12/4/08 by Rodney Converse.
 4.  '
 5.      ActiveWindow.View.GotoSlide Index:= _
             ActivePresentation.Slides.Add(Index:=2, _
             Layout:=ppLayoutText).SlideIndex
 6.      ActiveWindow.Selection.SlideRange.Layout = ppLayoutTitle
 7.      ActiveWindow.Selection.SlideRange.Shapes("Rectangle 4").Select
 8.      With ActiveWindow.Selection.ShapeRange
 9.          .IncrementLeft -6#
10.          .IncrementTop -125.75
11.      End With
12.      ActiveWindow.Selection.ShapeRange.ScaleHeight 1.56, msoFalse, _
             msoScaleFromTopLeft
13.      ActiveWindow.Selection.SlideRange.Shapes("Rectangle 4").Select
14.      ActiveWindow.Selection.ShapeRange.TextFrame.TextRange.Select
15.      ActiveWindow.Selection.ShapeRange.TextFrame.TextRange.Characters _
             (Start:=1, Length:=0).Select
16.      ActiveWindow.Selection.TextRange.Text = "Welcome to Acme Industries"
17.      ActiveWindow.Selection.ShapeRange.TextFrame.TextRange.Select
18.      With ActiveWindow.Selection.TextRange.Font
19.          .Name = "Impact"
20.          .Size = 54
21.          .Bold = msoFalse
22.          .Italic = msoFalse
23.          .Underline = msoFalse
24.          .Shadow = msoFalse
25.          .Emboss = msoFalse
26.          .BaselineOffset = 0
27.          .AutoRotateNumbers = msoFalse
28.          .Color.SchemeColor = ppTitle
29.      End With
30.  End Sub
Now step through the changed macro and make sure it works as you expect it to.
When you finish working with this macro, choose File
When Should You Use the Macro Recorder?
As you've seen so far in this book, you can create VBA code two ways. First, you can use the Macro Recorder (in the two applications—Word and Excel—that provide one) to record a series of actions when working interactively in the application. Or, second, you can type VBA statements into the Code window in the Visual Basic Editor. You're probably wondering when you should record a macro and when you should create code from scratch. Writing a procedure is more difficult and more advanced than recording a procedure—so should you always record if a recorder is available?
Using the Macro Recorder has advantages and disadvantages. The advantages are as follows:
The Macro Recorder creates usable code every time (provided you run the macro under suitable conditions).
It is quick and easy to use.
It can help you discover which VBA objects, methods, and properties correspond to which part of an application's interface.
And here are the disadvantages:
Code created in the Macro Recorder may contain unnecessary statements because the Macro Recorder records everything you do in the application—including all the options in every built-in dialog box you use when recording the macro. For example, if you start the Macro Recorder from Word, choose Tools
Code created by the Macro Recorder can work only in the active document rather than using other documents because whichever document you're working with interactively automatically becomes the active document. Later in this book, you'll learn how to use objects in the applications' object models to work with documents other than the active document. Working with other documents can have advantages; for example, you can make your code run faster or hide the manipulations you're performing from the user.
The Macro Recorder can create VBA code for only some of the actions you perform in the host application. For example, if you want to display a dialog box or a user form in the course of a procedure, you need to write the appropriate statement manually—you can't record it. The subset of VBA actions available through the Macro Recorder is similar to the set of actions you can take in the host application when working interactively, so you can get a lot done with it. Still, you'll find it's limited compared to the full range of actions you can perform through VBA.
However expert you become with VBA, consider the Macro Recorder a useful tool for creating either rough-and-ready macros or the basis of more complex procedures. You'll often find it makes sense to have the Macro Recorder handle as much of the strain of creating a procedure as possible. If you can save time by using the Macro Recorder to quickly identify the VBA object or property that you need, then do so.
In addition, the Macro Recorder can show you how to write some code that you can't figure out how to write on your own. The Recorder always gets the syntax right.
- Test a macro in the Visual Basic Editor
When you need to modify or debug a macro, the Visual Basic Editor is your best friend. It's filled with tools to make your job easier.
- Master It
Open a macro; then step through it to see if anything goes wrong.
- Set breakpoints and use comments
Setting breakpoints allows you to press F5 to execute a macro but forces the editor to enter Break mode when execution reaches the line where the breakpoint resides. Comments help you understand the purpose of code—they describe it, but are ignored during execution of the macro's code. "Commenting out" a line of code allows you to temporarily render it inactive to see what effect this has during execution. This is sometimes a good way to see if that line is causing the bug you're tracking down.
- Master It
Set a breakpoint in, and add a comment to, a macro.
- Edit a recorded macro
Make some changes to a Word macro.
- Master It
With the Visual Basic Editor open, choose a macro and modify it.