
In this chapter, you'll learn the easiest way to get started with Visual Basic for Applications (VBA): recording simple macros using the built-in Macro Recorder in the Office applications and then running macros to repeat the actions they contain.
By recording macros, you can automate straightforward but tediously repetitive tasks and speed up your regular work. You can also use the Macro Recorder to create VBA code that performs the actions you need and then edit the code to customize it—adding flexibility and power. In fact, VBA is a real powerhouse if you know how to use it. This book shows you how to tap into that power.
In this chapter you will learn to do the following:
Record a macro
Assign a macro to a button or keyboard shortcut
Run a macro
Delete a macro
Visual Basic for Applications is a programming language created by Microsoft that can be built into applications. You use VBA to automate operations in applications that support it. All the main Office applications—Word, Excel, Outlook, Access, and PowerPoint—support VBA, so you can automate operations through most Office applications.
The phrase automate operations in applications is perhaps a bit abstract. VBA allows you to streamline many tasks, avoid burdensome repetition, and improve your efficiency. Here are some examples:
You can record a macro that automatically carries out a series of actions that you frequently perform. For example, you might need to insert a picture in a Word document, format it to give it the right size and layout, and then add a caption under it, using the appropriate text style. Or you might regularly need to insert an Excel chart on a PowerPoint slide, format it, and add descriptive text.
You can write code that performs actions a certain number of times and that makes decisions depending on the situation in which it is running. For example, you could write code that takes a series of actions on every presentation that's open in PowerPoint.
You can have your macros interact with the user by displaying forms, or custom dialog boxes, that enable the user to make choices and specify settings while the macro is running. For example, you might display a set of formatting options—showing captioned controls such as check boxes and option buttons—that the user can select. Then when the user closes the dialog box, your macro takes appropriate actions based on the user's input.
You can take actions via VBA that you can't do (or do easily) by directly manipulating the user interface. For example, when you're working interactively in most applications, you're limited to working with the active file—the active document in Word, the active workbook in Excel, and so on. By using VBA, you can manipulate files that aren't active.
You can make one application manipulate another application. For example, you can make Word place a table from a Word document into an Excel worksheet.
VBA is based on Visual Basic, a programming language derived from BASIC. BASIC stands for Beginner's All-Purpose Symbolic Instruction Code. BASIC is designed to be user-friendly, because it employs recognizable English words (or quasi-recognizable variations on them) rather than abstruse and incomprehensible programming terms. In addition to its English-like diction, BASIC's designers endeavored to keep its punctuation and syntax as simple and familiar as possible.
Visual Basic is visual in that it offers efficient shortcuts such as drag-and-drop programming techniques and many graphical elements.
Visual Basic for Applications consists of Visual Basic implementations that share a common core of objects and commands but also include application-specific objects and language elements. The set of objects available in each application differs because no two applications share the same features and commands.
For example, some VBA objects available in Word are not available in Excel (and vice versa), because some of Word's features are not appropriate in Excel.
However, the large set of primary commands, fundamental structure, and core programming techniques of VBA in Word and VBA in Excel are the same. So you'll find that it's often quite easy to translate your knowledge of VBA in Word to VBA in Excel (or indeed in any VBA-enabled application).
For example, you'd use the Save method (a method is essentially a command) to save a file in Excel VBA, Word VBA, or PowerPoint VBA. What differs is the object involved. In Excel VBA, the command would be ActiveWorkbook.Save, whereas in Word VBA it would be ActiveDocument.Save and in PowerPoint it would be ActivePresentation.Save.
VBA always works with a host application (such as Access or Word). With the exception of some stand-alone programs that are usually best created with Visual Studio Tools for Office, a host application always needs to be open for VBA to run. This means that you can't build stand-alone applications with VBA the way you can with Visual Basic .NET or VSTO. If you wish, you can hide the host application from the user so that all they see is the interface (typically user forms) that you give to your VBA procedures. By doing this, you can create the illusion of a stand-alone application. Whether you need to employ this technique will depend on the type of programming you do.
A macro is a sequence of commands you or a user can repeat at will. You can repeat the actions by using a single command to run the macro. In some applications, you can also set a macro to run itself automatically. For instance, you might create a macro in Word to automate basic formatting tasks on a type of document you regularly receive incorrectly formatted. You could run the macro either manually or automatically upon opening a document of that type.
A macro is a type of subroutine (sometimes also called a subprocedure). Generally, people tend to use the shorter, more informal terms sub, procedure, or routine. In the Visual Basic Editor, each of your macros starts with the word Sub.
A macro is sometimes thought to consist of recorded code rather than written code, but most people use the word in its wider sense, so it can include written code as well. For example, if you record a macro and then edit it to make it more efficient, or to add commands to make it take further actions, most people still consider it a macro.
In an Office application that supports the VBA Macro Recorder (such as Word or Excel), you can create macros in two ways:
Turn on the Macro Recorder and just perform the sequence of actions you want the macro to perform. Clicks, typing, dragging, dropping—whatever you do is recorded.
Open the Visual Basic Editor and type the VBA commands into it.
There's also a useful hybrid approach that combines recording with editing. First record the sequence of actions, and then later, in the Visual Basic Editor, you can view and edit your macro. You could delete any unneeded commands. Or type in new commands. Or use the editor's Toolbox feature to drag and drop user-interface elements (such as message boxes and dialog boxes) into your macro so users can make decisions and choose options for how to run it.
Once you've created a macro, you specify how you want the user to trigger it. In most applications, you can assign a macro to the Quick Access Toolbar or to a shortcut key combination. This makes it very easy to run the macro by merely clicking a button icon or pressing the shortcut key (such as Alt+R). You can also optionally assign one of these ways of launching a macro when you first record the macro, via a dialog box that automatically appears when you begin a recording. You'll see how all this works shortly. It's simple.
The easiest way to create VBA code is to record a macro using the Macro Recorder, but only Word and Excel include a Macro Recorder.
You switch on the Macro Recorder, optionally assign a trigger that will later run the macro (a toolbar button or a shortcut key combination), perform the actions you want in the macro, and then switch off the Macro Recorder. As you perform the actions, the Macro Recorder translates them into commands—code—in the VBA programming language.
Once you finish recording the macro, you can view the code in the Visual Basic Editor and change it if you wish. If the code works perfectly as you recorded it, you never have to look at it—you can just run the macro at any time by clicking the toolbar button or key combination you assigned to the macro.
A slower, rarely used way to run a macro is to click the Developer tab in the Ribbon. To use this feature, follow these steps:
Click the Macros icon.
Click the name of the macro in a displayed list.
Finally, click the Run button.
By the way, you can also run a macro from within the Visual Basic Editor by pressing F5. This is how you test macros while you're editing them.
In the following sections, you'll look at the stages involved in recording a macro. The process is easy, but you need to be familiar with some background if you haven't recorded macros before. After the general explanations, you'll record example macros in Word and Excel. (Later in the book you'll examine and modify those macros, after you learn how to use the Visual Basic Editor.)
Before you even start the Macro Recorder, it's sometimes a good idea to do a little planning. Think about what you will do in the macro. In most cases, you can just record a macro and not worry about the context. You can just record it with a document open and some text visible. But in some situations you need to ensure that a special context is set up before starting the recording. For example, you might want to create a macro in Word that does some kind of editing, such as italicizing and underlining a word. To do this, you'll want to first have the blinking "insertion" cursor on a word that's not italicized or underlined. You don't want to record the actions of moving the insertion cursor to a particular word.
Instead, your macro is intended to just italicize and underline whatever word is currently under the blinking cursor. Nevertheless, most simple macros can be recorded without any special planning. Just record whatever you want the macro to do.
Some macros perform any necessary setup themselves. The setup will be part of the macro. In these cases, you should make sure the application is in the state that the macro expects before you start recording the macro. For example, if, to do its job, a macro needs a blank active workbook in Excel, the macro itself should create that blank workbook rather than using whichever workbook happens to be active at the time. This saves a step when the macro runs.
Start the Macro Recorder by opening the Developer tab on the Ribbon and then clicking the Record Macro button. You can also click the Macro Record button on the status bar at the bottom of the application. (With this approach, you don't have to open the Developer tab. Just click the button on the status bar.)
As soon as you start the Macro Recorder, the Record Macro dialog box opens. You see a default macro name (Macro1, Macro2, and so on) that you can accept or change. There's also an optional description to fill in if you wish.
To stop the Macro Recorder, you can click the Stop Recording button in the Developer tab. You can alternatively stop the recording by clicking the blue button that appears on the status bar during recording. Once the Recorder is stopped, the blue button is replaced with an icon that you can click to start recording a new macro. In Word for the Mac, click the REC indicator rather than double-clicking it.
The appearance of the Record Macro dialog box varies somewhat from one application to another because the dialog box must offer suitable options to accommodate the varying capabilities particular to each application. In each case, you get to name the macro and add a description of it. In most cases, you can also specify where to save the macro—for example, for global use (making the macro available to all Word documents), store it in the file named normal.dotm. If it is merely to be used in the currently active document, choose to store it in a file with the document's name and the .dotm filename extension. An ordinary Word template has a .dotx filename extension, but macros are stored in a file with the filename extension .dotm.
Other applications differ somewhat in how the dialog works when you begin recording a macro. For example, Excel allows you to store macros in the current workbook or in a new workbook. In addition, you can store it for use with all Excel workbooks in the Personal Macro Workbook. That's the equivalent of Word's Normal.dotm file, and Excel's Personal Macro workbook is saved in a file named Personal.xlsb.
The Record Macro dialog box also lets you specify a way of running the macro. Word displays buttons you can click to either open a dialog for entering a shortcut key combination or open the Word Options dialog where you can create a button for this macro that will appear on the Quick Access Toolbar. Excel limits you to Ctrl+ shortcut key combinations as a way of launching macros, so there is no button to display a full keyboard shortcut dialog like the one in Word. Excel has only a small textbox where you can enter the key that will be paired with Ctrl as the shortcut.
Most of the Microsoft applications that host VBA have the Developer tab from which you control macro recording, launch the Visual Basic Editor, and otherwise manage macros. Access, however, groups several of its macro-related tools in a Database Tools tab (which is visible by default) and also has a Macro option on its Create tab.
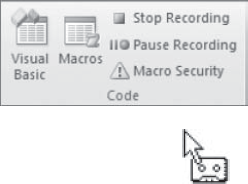
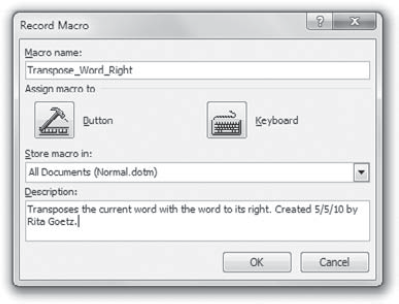
Figure 1.1 shows the Record Macro dialog box for Word with a custom name and description entered. Figure 1.2 shows Word's version of the Developer tab on the Ribbon.
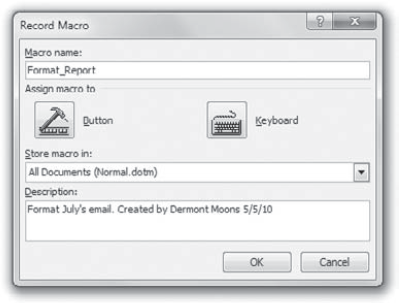
Figure 1.1. In the Record Macro dialog box, enter a name for the macro you're about to record. Type a concise but helpful description in the Description box. This is the Record Macro dialog box for Word.

Here's what the primary Visual Basic features on the Developer tab (or Access's Database Tools tab) do:
- Run Macro button
Access alone has this Ribbon button. It displays a Run Macro dialog box, in which you can choose the macro to run. Many aspects of VBA in Access are unique only to Access, and Chapter 5, "Understanding the Access Object Model and Key Objects," covers this topic in depth.
- Record Macro button
- Macro Security button
Displays the Trust Center macro settings dialog. You'll examine this in detail in Chapter 6, "Securing Your Code with VBA's Security Features." This button allows you to specify whether and how you want macros enabled.
- Visual Basic button
Starts or switches to the Visual Basic Editor. You'll begin working in the Visual Basic Editor in Chapter 7, "Getting Started with the Visual Basic Editor" (and you'll spend most of the rest of the book employing it).
- Macros button
Opens the classic Macros dialog from which you can run, step into (start the Visual Basic Editor in step mode, more about this in Chapter 8, "Editing Recorded Macros"), edit, create, delete, or open the macro project organizer dialog. (Not all of these options are available in all applications. For example, PowerPoint has no organizer.) Word and Excel have a similar Macros button in the View tab. This button has the ability to open the Macros dialog but can also start recording a macro.
- Add-Ins
This is where you can access templates, styles, and specialized code libraries.
- Controls
A set of controls buttons that, when clicked, insert user interface components—such as a drop-down listbox—into a document.
- Design Mode button
Toggles Design mode, which, when active, allows you to add or edit controls. When turned off, you're in regular mode where the user can interact normally with controls. In regular mode, controls can accept information from the user.
- Properties button
This button is only enabled if you're in design mode. It allows you to edit the properties of the document (such as removing personal information).
- XML buttons
This section of the Developer tab is explored in Chapter 9 to Chapter 10. XML has become an industry standard for storing and transmitting data.
Next, enter a name for the new macro in the Macro Name text box in the Record Macro dialog box. The name must comply with the following conventions:
It must start with a letter; after that, it can contain both letters and numbers.
It can be up to 80 characters long.
It can contain underscores, which are useful for separating words, such as File_Save.
It cannot contain spaces, punctuation, or special characters, such as ! or *.
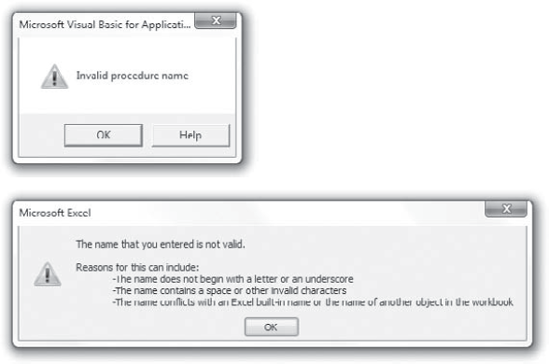
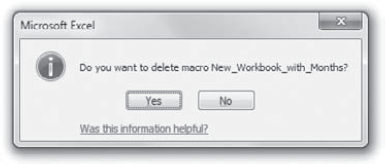
Word and Excel, the two Office applications that permit macro recording, raise objections to invalid macro names when you click the OK button to start recording the macro. If you enter an invalid macro name in the Record Macro dialog box, these applications let you know—in their own way—when you click the OK button. Word displays a brief, unhelpful dialog box titled Microsoft Visual Basic, while Excel identifies itself correctly and gives helpful info. Figure 1.3 shows how these applications respond to an invalid macro name once it's entered.
Type a description for the macro in the Description text box. This description is to help you (and anyone you share the macro with) identify the macro and understand when to use it. If the macro runs successfully only under particular conditions, you can note them briefly in the Description text box. For example, if the user must make a selection in the document before running the macro in Word, mention that.
You now need to choose where to store the macro. Your choices with Word and Excel are as follows:
- Word
Recall that in Word, if you want to restrict availability of the macro to just the current template (
.dotmfile) or document (.docmfile), choose that template or document from the Store Macro In drop-down list in the Record Macro dialog box shown in Figure 1.1. If you want the macro to be available no matter which template you're working in, make sure the default setting—All Documents (Normal.dotm)—appears in the Store Macro In combo box. (If you're not clear on what Word's templates are and what they do, see the sidebar "Understanding Word's Normal.dotm, Templates, and Documents" later in this chapter)- Excel
In Excel, you can choose to store the macro in This Workbook (the active workbook), a new workbook, or Personal Macro Workbook. The Personal Macro Workbook is a special workbook named
PERSONAL.XLSB. Excel creates this Personal Macro Workbook the first time you choose to store a macro in the Personal Macro Workbook. By keeping your macros and other customizations in the Personal Macro Workbook, you can make them available to any of your procedures. Recall that the Personal Macro Workbook is similar to Word's global macros storage file namedNormal.dotm. If you choose New Workbook, Excel creates a new workbook for you and creates the macro in it.
Word and Excel automatically store recorded macros in a default location in the specified document, template, workbook, or presentation:
- Word
Word stores each recorded macro in a module named
NewMacrosin the selected template or document, so you'll always know where to find a macro after you've recorded it. This can be a bit confusing because there can be multiple NewMacros folders visible in the Project Explorer pane in the Visual Basic Editor. (This happens because there can be more than one project open—such as several documents open simultaneously, each with its own NewMacros folder holding the macros embedded within each document.) Think of NewMacros as merely a holding area for macros—until you move them to another module with a more descriptive name. (Of course, if you only create a handful of macros, you don't need to go to the trouble of creating various special modules to subdivide them into categories. You can just leave everything in a NewMacros module.)If a NewMacros module doesn't yet exist, the Macro Recorder creates it. Because it receives each macro recorded into its document or template, a
NewMacrosmodule can soon grow large if you record many macros. TheNewMacrosmodule in the default global template,Normal.dotm, is especially likely to grow bloated, because it receives each macro you record unless you specify another document or template prior to recording. Some people like to clear out theNewMacrosmodule frequently, putting recorded macros you want to keep into other modules and disposing of any useless recorded macros. I don't have that any macros, so I find no problem simply leaving them within the NewMacros module.- Excel
Excel stores each recorded macro for any given session in a new module named
Modulen, wherenis the lowest unused number in ascending sequence (Module1, Module2, and so on). Any macros you create in the next session go into a new module with the next available number. If you record macros frequently with Excel, you'll most likely need to consolidate the macros you want to keep so that they're not scattered in many modules like this.
At this point, after you've named the macro, typed a description, and chosen where to store it, it's time to choose how to trigger the macro. Which way do you want to run the macro: via a shortcut key or the Quick Access Toolbar button? Good typists generally prefer shortcut keys, but buttons provide at least a visual hint of the macro's purpose, and hovering your mouse on the button also displays the name of the macro.
Shortcut keys and buttons are handy for people who record a moderate number of macros and don't organize them in complex ways--moving them from one module to another. If you create a great number of macros and feel the need to move them into other modules, assigning a shortcut key or button prior to recording becomes less useful. This is because moving a macro from one module to another disconnects any way you've assigned for running the macro.
This limitation means that it makes sense to assign a way of running a macro—prior to recording—only if you're planning to use the macro in its recorded form (as opposed to, say, using part of it to create another macro) and from its default location. If you plan to move the macro or rename it, don't assign a way of running it now. Instead, wait until the macro is in its final form and location, and then assign the means of running it. See "Assigning a Way of Running the Macro," later in this chapter, for details.
Personally, I don't have more than a couple dozen macros that I use all the time, so I avoid the complications described in the previous paragraph and the sidebar. Instead, I just add shortcut keys when I first create the macro and leave them all in a single version of Normal.dotm. However, if you face more complicated situations—such as managing macros for a company—you might want to manage your macros with modules.
To assign a way to run the macro, follow the instructions in the next sections.
You don't have to assign a button or keyboard shortcut prior to recording a macro. You can do it later, or at any time. In Word, Access, Excel, and other Office 2010 applications, you use the Options dialog box to assign a button on the Quick Access toolbar to a macro. PowerPoint and Access do not permit you to assign keyboard shortcuts to macros, but for applications that do permit this—such as Word and Excel—you use the Customize Keyboard dialog box to assign a shortcut key to a macro. Excel limits you to Ctrl+ or Ctrl+Shift key combinations.
Here's how to use the Word Options dialog box to assign a macro to a button on the Quick Access toolbar:
Right-click anywhere on the Quick Access Toolbar (it's the set of icons in the upper-left corner, above the Ribbon) and a menu will appear.
Click Customize Quick Access Toolbar on the menu. The Word Options dialog box appears.
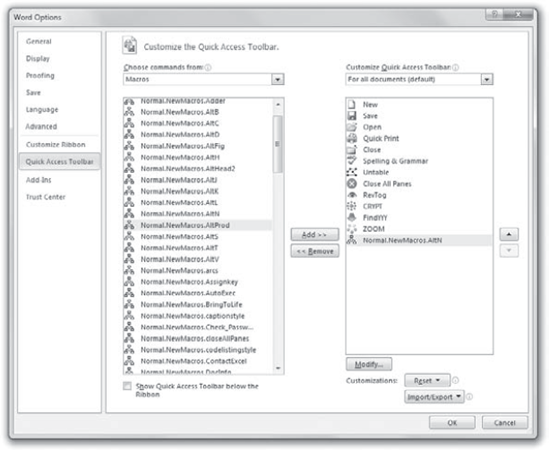
In the Choose Commands From drop-down list, select Macros.
Click a macro's name to select it in the list.
Click the Add button to insert this macro's name in the Customize Quick Access Toolbar list, as shown in Figure 1.4.
Word adds a button to the toolbar for the macro, giving it the macro's fully qualified name (its location plus its name), such as
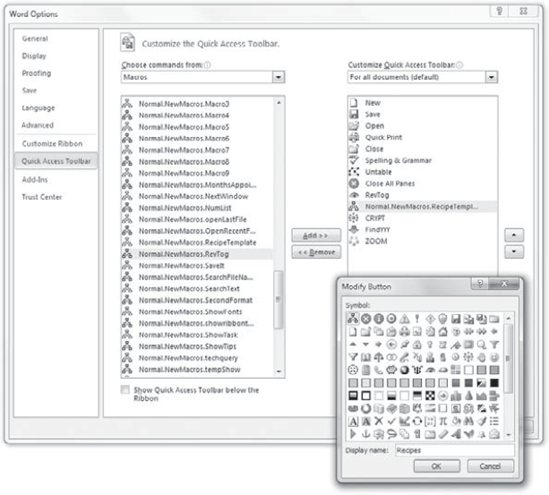
Normal.NewMacros.CreateDailyReport. This name consists of the name of the template or document in which the macro is stored, the name of the module that contains the macro, and the macro's name, respectively. You don't need all this information displayed when you hover your mouse pointer over the button.So rename the button or menu item: Click the Modify button at the bottom of the Customize Quick Access Toolbar list (see Figure 1.5). Whatever macro is highlighted (currently selected) in the list of toolbar items will be the one you're modifying.
While you're modifying the macro's name, you might also want to choose a different button icon that visually cues you about the macro's purpose. To do that, just double-click whatever icon you want to use, then click OK.
To assign the macro to a keyboard combination, follow these steps:
Right-click the Ribbon and choose Customize The Ribbon from the menu that appears. This opens the Word Options dialog.
Click the Customize button next to Keyboard Shortcuts in the bottom left of the Word Options dialog box.
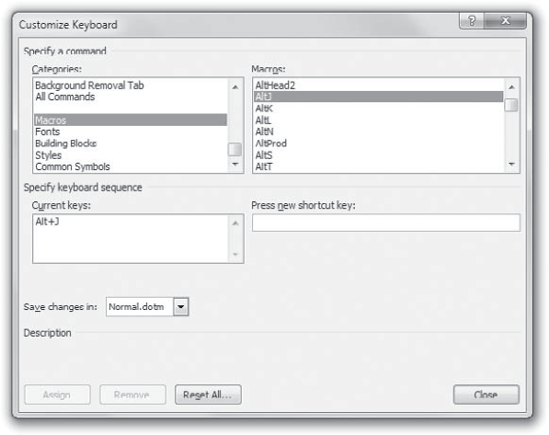
Scroll down the Categories list box until you see Macros, then click Macros to select it.
Click to select the name of the macro you want to assign a shortcut key combination to.
Check the Current Keys list box to see if a key combination is already assigned. If it is, you can press the Backspace key to clear the key combination if you wish, or you can employ multiple key combinations to launch the macro.
In the Press New Shortcut Key field, type the key combination you want to use to trigger the macro (see Figure 1.6).
Check to see if this key combination is already used for another purpose. If so, you can reassign it, or you can choose a different combination by pressing the backspace key in the Press New Shortcut Key field
Be sure to click the Assign button when you're finished. Just closing this dialog does not assign the key combination.
A key combination in Word can be any of the following:
Alt plus either a function key or a regular key not used as a menu access key
Ctrl plus a function key or a regular key
Shift plus a function key
Ctrl+Alt, Ctrl+Shift, Alt+Shift, or even Ctrl+Alt+Shift plus a regular key or function key. Pressing Ctrl+Alt+Shift and another key tends to be too awkward for practical use.
When you're recording a macro, Excel only allows you to assign a Ctrl shortcut key, not a button, to run it. If you want to assign a Quick Access Toolbar button to the macro, you need to do so after recording the macro (using the Customize feature as described shortly).
To assign a Ctrl shortcut key to run the macro you're recording, follow these steps:
Start recording the macro, then press the key in the Shortcut Key text box. (Press the Shift key if you want to include Shift in the shortcut key.)
In the Store Macro In drop-down list, specify where you want the Macro Recorder to store the macro. Your choices are as follows:
This Workbook stores the macro in the active workbook. This option is useful for macros that belong to a particular workbook and do not need to be used elsewhere.
New Workbook causes Excel to create a new workbook for you and store the macro in it. This option is useful for experimental macros that you'll need to edit before unleashing them on actual work.
Personal Macro Workbook stores the macro in the Personal Macro Workbook, a special workbook named
PERSONAL.XLSB. By keeping your macros and other customizations in the Personal Macro Workbook, you can make them available to any of your procedures—in that way, the Personal Macro Workbook is similar to Word'sNormal.dotm. If the Personal Macro Workbook does not exist yet, the Macro Recorder creates it automatically.
Click the OK button to start recording the macro.
PowerPoint does not let you record macros, but you can assign a way to run macros written in the Visual Basic Editor, as discussed in the section "Assigning a Way of Running the Macro" later in the chapter.
Outlook doesn't let you record macros, and by default macros are disabled. To enable macros in Outlook, click the Developer tab on the Ribbon, then click the Macro Security icon (it's on the left in the Code section of the Ribbon). The Trust Center dialog box opens. Click the Notification For All Macros option or the Enable All Macros option. To see how to assign a way to run macros, see the section "Assigning a Way of Running the Macro" later in the chapter.
When you close the Record Macro dialog box, the Macro Recorder begins recording the macro. The Macro Recorder displays the Stop Recording button in the status bar at the bottom of the screen (and a Stop Recording button in the Developer tab on the Ribbon).
Now you should perform the sequence of actions you want to record. What exactly you can do varies from application to application, but in general, you can use the mouse to select items, make choices in dialog boxes, and select defined items in documents (such as cells in spreadsheets). You'll find a number of things that you can't do with the mouse, such as select items within a document window in Word. To select items in a Word document window, you have to use the keyboard (Shift+arrow keys, for example). You can select cells with the mouse in Excel during recording.
In Word, if you need to perform any actions that you don't want recorded, pause the Macro Recorder by clicking the Pause Recording button on the Ribbon. The button changes to Resume Recording. Click the button again to start recording back up.
To stop recording, click the Stop Recording button (or Stop Recorder, depending on the application), or click the Stop Recording button on the status bar.
The Macro Recorder has now recorded your macro and assigned it to a key combination or button, if you made that choice.
To run a macro you've recorded, you can use three methods:
If you assigned a quick access toolbar button, use that.
If you specified a shortcut key combination macro, use it.
A less convenient approach is to press Alt+F8 to display the Macros dialog box, select the macro, and then click the Run button. (Alternatively, you could double-click the macro name in the list box.)
The macro runs, performing the actions in the sequence in which you recorded them. For example, suppose you create a macro in Excel that selects cell A2 in the current worksheet, boldfaces that cell, enters the text Yearly Sales, selects cell B2, and enters the number 100000 in it. The Macro Recorder recognizes and saves those five actions. VBA then performs all five actions, step-by-step, each time you run the macro. Albeit quite rapidly.
Some applications (such as Word) let you undo most actions executed via VBA after the macro stops running (by pressing Ctrl+Z or clicking the Undo button on the Quick Access Toolbar, undoing one command at a time); other applications do not.
In this section, you'll record a sample macro in Word that you can work with later in the book. This macro selects the current word, cuts it, moves the insertion point one word to the right, and pastes the word back in. This is a straightforward sequence of actions that you'll later view and edit in the Visual Basic Editor.
Follow these steps to record the macro:
Create a new document by pressing Ctrl+N.
Start the Macro Recorder by clicking the Developer tab on the Ribbon, then clicking the Record Macro button. Or click the Macro Record button on the status bar at the bottom of the application. (With this approach, you don't have to open the Developer tab. Just click the button on the status bar.)
In the Macro Name text box, enter
Transpose_Word_Right.In the Store Macro In drop-down list, make sure All Documents (Normal.dotm) is selected, unless you want to assign the macro to a different template. (This example assumes that the macro is in
Normal.dotmand that you'll take care of any consequences if you've put it elsewhere.)In the Description box, enter a description for the macro (see Figure 1.7). Be fairly explicit and enter a description such as Transposes the current word with the word to its right. Created 12/1/7 by Rita Goetz.
Assign a method of running the macro, as described in the previous section, if you want to. Create a toolbar button or assign a keyboard shortcut. (The method or methods you choose is strictly a matter of personal preference.) If you'll need to move the macro to a different module (or a different template or document) later, don't assign a method of running the macro at this point.
Click the OK button to dismiss the Word Options dialog box or the Customize Keyboard dialog box (or just click the OK button to dismiss the Record Macro dialog box if you chose not to assign a way of running the macro). Now you're ready to record the macro. The Stop Recording button appears on the Ribbon and on the status bar, and the mouse pointer has a cassette-tape icon attached to it.
As a quick demonstration of how you can pause recording, click the Pause Recording button on the Ribbon. The cassette-tape icon disappears from the mouse pointer, and the Pause Recording button changes into a Resume Recorder button. Enter a line of text in the document: The quick brown dog jumped over a lazy fox. Position the insertion point anywhere in the word quick, and then click the Resume Recorder button on the Ribbon to reactivate the macro recorder.
Record the actions for the macro as follows:
Use Word's extend selection feature to select the word quick by pressing the F8 key twice.
Press the Esc key to cancel Extend mode.
Press Shift+Delete or Ctrl+X to cut the selected word to the Clipboard.
The insertion point is now at the beginning of the word brown. Press Ctrl+right arrow to move the insertion point right by one word so that it's at the beginning of the word dog.
Press Shift+Insert or Ctrl+V to paste in the cut word from the Clipboard.
Press Ctrl+left arrow to move the insertion point one word to the left. This restores the cursor to its original position.
Click the Stop Recording button on the Ribbon or status bar. Your sentence now reads, "The brown quick dog jumped over the lazy fox."
You can now run this macro by using the toolbar button or keyboard shortcut that you assigned (if you chose to assign one). Alternatively, click the Macros button in the Developer tab and run the macro from the Macros dialog box. Try positioning the insertion point in the word brown and running the macro to restore the words in the sentence to their original order.
At this point, Word has stored the macro in Normal.dot. If you don't save macros until you exit Word (or until an automated backup takes place), Word doesn't, by default, prompt you to save them then. It just does so automatically. But it's best to click the Save button in the File tab to store Normal now. That way, if Word or Windows crashes, you are sure to avoid losing the macro.
In the following sections, you'll record a sample Excel macro. This macro creates a new workbook, enters a sequence of months into it, and then saves it. You'll work with this macro in Chapter 3.
If you haven't already created a Personal Macro Workbook in Excel, you'll need to create one before you can create this procedure. Follow these steps:
Click the Developer tab in the Ribbon, then click the Record Macro button on the Ribbon or status bar to display the Record Macro dialog box.
Accept the default name for the macro because you'll be deleting it momentarily.
In the Store Macro In drop-down list, choose Personal Macro Workbook.
Click the OK button to close the Record Macro dialog box and start recording the macro.
Type a single character in whichever cell is active, and press the Enter key.
Click the Stop Recording button on the Ribbon or status bar to stop recording the macro.
Click the Unhide button on the View tab to display the Unhide dialog box. Select PERSONAL.XLSB and click the OK button.
Click the Developer tab in the Ribbon, then click the Macros button on the Ribbon to display the Macros dialog box.
Select the macro you recorded and click the Delete button to delete it. Click the Yes button in the confirmation message box.
You now have caused Excel to generate a Personal Macro Workbook that you can use from now on to hold your global macros.
To create this macro, start Excel and follow these steps:
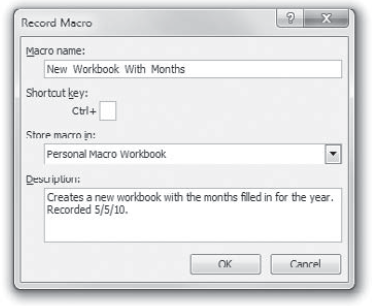
Click the Developer tab in the Ribbon, then click the Record Macro button on the Ribbon or status bar to display the Record Macro dialog box. This displays the Record Macro dialog box, shown in Figure 1.8, with information entered.
Enter the name for the macro in the Macro Name text box:
New_Workbook_with_Months.In the Shortcut Key text box, enter a shortcut key if you want to. (Remember that you can always change the shortcut key later, so you're not forced to enter one at this point.)
In the Store Macro In drop-down list, choose whether to store the macro in your Personal Macro Workbook, in a new workbook, or in this active workbook. As discussed a little earlier in this chapter, storing the macro in the Personal Macro Workbook gives you the most flexibility because it is Excel's global macro container. For this example, don't store the macro in the active workbook because you're going to delete the active workbook almost immediately. Instead, store it in your Personal Macro Workbook.
Type a description for the macro in the Description text box.
Click the OK button to dismiss the Record Macro dialog box and start recording the macro.
Click the File tab on the Ribbon and click New to display the available templates for a new workbook.
Double-click the Blank workbook icon. Excel creates a new workbook and selects the first sheet on it.
Click cell A1 to select it. (It may already be selected; click it anyway because you need to record this click instruction.)
Enter January 2011 and press the right arrow key to select cell B1. Excel automatically changes the date to your default date format. That's fine.
Enter February 2011 and press the left arrow key to select cell A1 again.
Drag from cell A1 to cell B1 so that the two cells are selected.
Drag the fill handle from cell B1 to cell L1 so that Excel's AutoFill feature enters the months March 2011 through December 2011 in the cells. (The fill handle is the small black dot in the lower-right corner of the selection frame. You'll know you're on it when the cursor changes from a white to a black cross.)
Click the File tab on the Ribbon, then click the Save As option to display the Save As dialog box. Save the workbook in a convenient folder (for example, the My Documents folder) under a name such as
Sample Workbook.xlsx.Click the Stop Recording button on the Ribbon or status bar to stop recording the macro.
Close the sample workbook, and use Windows Explorer to navigate to the new .xlsx file you just saved, and delete the file. Then run the macro and watch what happens. (If you don't delete the workbook, Excel prompts you to decide whether to overwrite it when in step 14 it tries to save the new workbook using the same name as the existing workbook.)
If you didn't assign a way of running the macro when you recorded it, you can assign a way of running it as described here.
To assign a macro to the Quick Access toolbar, follow these steps:
Right-click anywhere on the Quick Access Toolbar (it's the set of icons in the upper-left corner, above the Ribbon). A menu appears.
Click Customize Quick Access Toolbar on the menu. The Word Options dialog box appears.
In the Choose Commands From drop-down list, select Macros.
Click the name of the macro you want to assign a button to.
Click the Add button to copy the macro name into the list of buttons on the right.
Click the Modify button if you want to assign a different icon or modify the button's name.
Click OK to close the dialog.
The section "Assigning a Way to Run the Macro," earlier in this chapter, explained how to do this in Word. PowerPoint and Access do not let you assign a macro to a key combination. Excel uses a slightly different approach than Word, limiting you to Ctrl and Shift combinations, as described earlier in this chapter in the section "Assigning a Way to Run a Macro in Excel."
To delete a macro you no longer need, follow these steps:
Press Alt+F8 to display the Macros dialog box.
Choose the macro in the Macro Name list box.
Click the Delete button.
In the warning message box that appears, click the Yes button. Figure 1.9 shows Excel's variation of this warning message box.
Click the Close button or the Cancel button to close the Macros dialog box.
Organizing Macros in Word with the Organizer Dialog Box
Most VBA-enabled applications require you to use the Visual Basic Editor (which is discussed in the next chapter) to move code modules, user forms, and other code items from one file to another file. (A code module is a virtual container used for storing macros. A user form is a custom dialog box displayed to the user for input.) But Word provides a useful tool called the Organizer dialog box that you can use to copy, move, rename, and delete code modules, user forms, and other code items directly in the Word interface without opening the Visual Basic Editor.
To use the Organizer dialog box, follow these steps:
In Word, press Alt+F8.
Click the Organizer button to display the Organizer dialog box, and click the Macro Project Items tab if the Macro Project Items page (shown here) isn't automatically displayed.
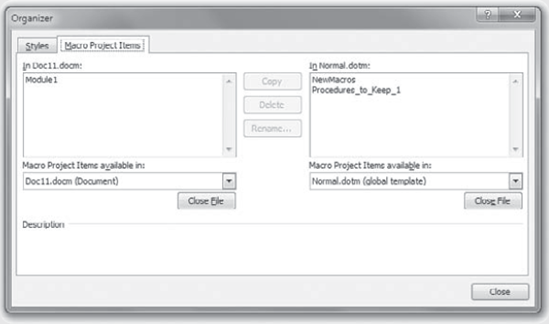
Look at the two documents or templates listed in the readouts above the two list boxes. Usually, the left list box shows the active document, and the right shows
Normal.dotm. Change these so that one list box shows the document or template that contains the code you want to copy or move and the other list box shows the destination document or template. (If you want only to delete or rename code items, you need only make the Organizer dialog box list only the document or template that contains the items.) To change the document or template listed, click the Close File button underneath the list box on the corresponding side. The Close File button changes to an Open File button. Click this button to display the Open dialog box, navigate to and select the document or template you want, and then click the Open button. The Open dialog will automatically default to displaying the Templates folder.You can then delete, rename, copy, and move macro project items. The following list details how to do this:
To delete one or more macro project items from a template, choose the item or items from either panel of the Organizer dialog box and click the Delete button. Click the Yes button in the confirmation message box. Any copies of the items in other templates are unaffected.
To rename a macro project item, select it from either panel and click the Rename button to open the Rename dialog box. Enter the new name and click the OK button. Any copies of the same item in other templates are unaffected.
To copy one or more macro project items from one template to another, open the templates in the Organizer dialog box. Select the item or items to copy in either panel of the dialog box (the arrows on the Copy button change direction to point to the other panel). Then click the Copy button. If the recipient template contains a macro project item of the same name as one you're copying, Word displays a warning message box telling you that it can't copy the item. If you still want to copy the item, rename either the item you're copying or the item with the same name in the destination template, and then perform the copy operation.
To move a macro project item from one template to another, copy it as described in the previous paragraph, and then delete the macro project item from the source template.
Once you've deleted, renamed, copied, or moved macro project items, click the Close button to close the Organizer dialog box. If Word prompts you to save any changes to affected documents or templates that aren't open in your Word session, click the Yes button.
- Record a macro
The easiest way to create a macro is to simply record it. Whatever you type or click—all your behaviors—are translated into VBA automatically and saved as a macro.
- Master It
Turn on the macro recorder in Word and create a macro that moves the insertion cursor up three lines. Then turn off the macro recorder and view the code in the Visual Basic Editor.
- Assign a macro to a button or keyboard shortcut
You can trigger a macro using two convenient methods: clicking a button in the Quick Access Toolbar or using a keyboard shortcut. You are responsible for assigning a macro to one or both of these methods.
- Master It
Assign an existing macro to a new Quick Access Toolbar button.
- Run a macro
Macros are most efficiently triggered either by clicking a button on the Quick Access Toolbar or by pressing a shortcut key combination such as Alt+n or Ctrl+Alt+f. When you begin recording a macro, the Record Macro dialog has buttons that allow you to assign the new macro to a shortcut key or toolbar button. However, if you are using the Visual Basic Editor, you can run a macro by simply pressing F5.
- Master It
Execute a macro from within the Visual Basic Editor.
- Delete a macro
It's useful to keep your collection of macros current and manageable. If you no longer need a macro, remove it. Macros can be directly deleted from the Visual Basic Editor or by clicking the Delete button in the Macros dialog (opened by pressing Alt+F8).
- Master It
Temporarily remove a macro, then restore it, using the Visual Basic Editor.