
Chapter 15
Creating Complex Forms
While simple dialog boxes tend to be static, more complex dialog boxes can be dynamic: They can change when the user clicks certain elements in them. Such changes can include the following:
- The application changes the information in the dialog box to reflect choices that the user has made. For example, if a user selects a particular check box, the application may hide or disable the other check boxes. This will happen because the options offered by the other check boxes cannot be simultaneously chosen along with the first check box.
- The dialog box displays a hidden section of secondary, less frequently used, options when the user clicks a button in the primary area of the dialog box.
- The application uses the dialog box to keep track of a procedure and to guide the user to the next step by displaying appropriate instructions and by activating relevant controls. In this chapter, you'll look at an example of this technique.
Let's start by investigating how to create dynamic forms. Such dialog boxes require a little more work than static dialog boxes, but they're a great way both to present information and to allow the user to make choices. (Note that the terms form and dialog box can be used interchangeably, though dialog boxes tend to be smaller and simpler than forms.)
From dynamic dialog boxes you'll move on to multipage dialog boxes, which you use to present more information or options to the user than the eye and mind can comfortably encompass at once.
You'll then look at how to create a modeless dialog box (one that users can leave onscreen while they continue to work in their application, similar to the way Word's Research pane displays results from the thesaurus, though you can continue to edit the document).
The chapter ends by showing you how to work with the many events supported by the UserForm object and the controls you use on it. By using events, you can monitor what the user does and take action accordingly, or even prevent the user from doing something that doesn't seem like a good idea.
Creating and Working with Complex Dialog Boxes
You should avoid using a complex dialog box when a simple one will do the trick, and potentially will be easier for users to work with. If all a macro needs is a pair of check boxes and a group of option buttons, there's no need to employ multiple pages of dynamically updating controls. But there are times you will want to create complex dialog boxes (like the examples given at the beginning of this chapter) to provide users with the flexibility your procedures might demand.
Updating a Dialog Box to Reflect the User's Choices
You'll find it relatively easy to change a form to reflect the options the user chooses. Your primary tool for doing this is the Click event, to which most controls placed on a form react and to which you can code in the Code window that's “behind” (associated with) your form.
When you double-click a control on a form, the Code window for that form opens and a default Sub procedure is displayed. This procedure is associated with the clicked control. The procedure is automatically named after the control and the control's default event. If you double-click a command button, for example, the Code window opens with this button's default Click event:
Private Sub CommandButton1_Click()End Sub
Whatever code you put into this procedure will be executed when the user clicks this particular command button.
Some controls have different default events than Click. You'll learn about the Change event as you work with complex dialog boxes, and you'll see the full slew of other events in the second half of the chapter.
Listing 15.1 in the next section shows you an example of code that updates a dialog box should the user click a button captioned More.
Revealing a Hidden Part of a Form
Hiding part of a complex form is a great way to simplify the user's interaction with the dialog box. Consider the Find And Replace dialog box in Word: When you first see it (by pressing Ctrl+H, or by clicking the Replace icon in the Editing section of the Ribbon's Home tab), you're shown only the part of the dialog box (see the top box in Figure 15.1) for the most common type of search and replace—just the target and the replacement, along with the option to replace them one by one or en masse.
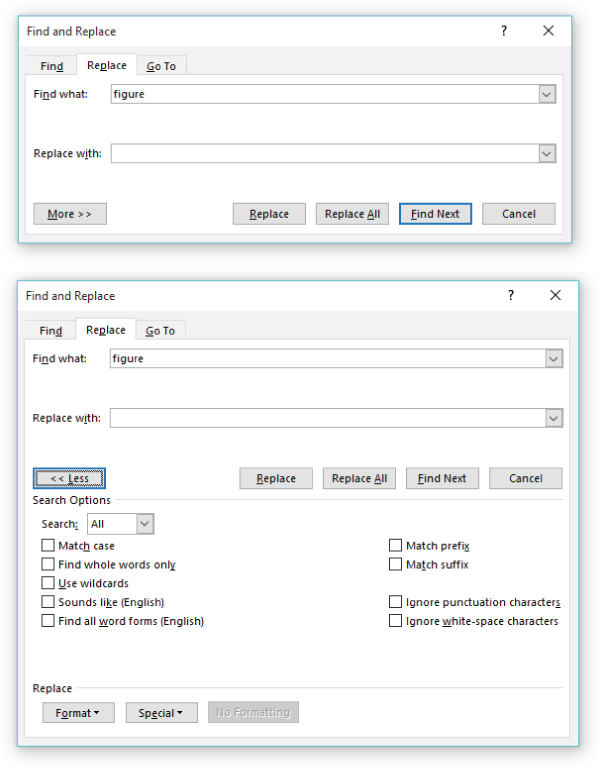
Figure 15.1 Word's Find And Replace dialog box hides some of its options (top) until you click the More button to display its lower half (bottom).
But, should you need less common or more advanced options that the abbreviated version of the Find And Replace dialog box doesn't display by default, you can click the More button. It reveals the bottom part of the dialog box, as shown at the bottom in Figure 15.1. Here are found more rarely used options, such as matching prefix or case.
You may want to take a similar approach with your own dialog boxes, hiding a subset of actions that most users won't need most of the time. To do so, you can use two techniques, either separately or in tandem:
- Set the
Visibleproperty toFalseto hide controls that are located in a displayed part of the dialog box. Set theVisibleproperty toTruewhen you want to display these controls (after the user presses a More button or some such trigger). - Increase the height or width (or both) of the dialog box to reveal an area containing further controls. The Find And Replace dialog shown in Figure 15.1 uses the technique of increasing the
Heightproperty of the box.
As a simple example of the latter technique, consider the dialog box shown in Figure 15.2. When you display the dialog box, only the top part is visible; when you click the More button, the bottom part is displayed. Listing 15.1 contains the code behind the dialog box that makes all this happen.
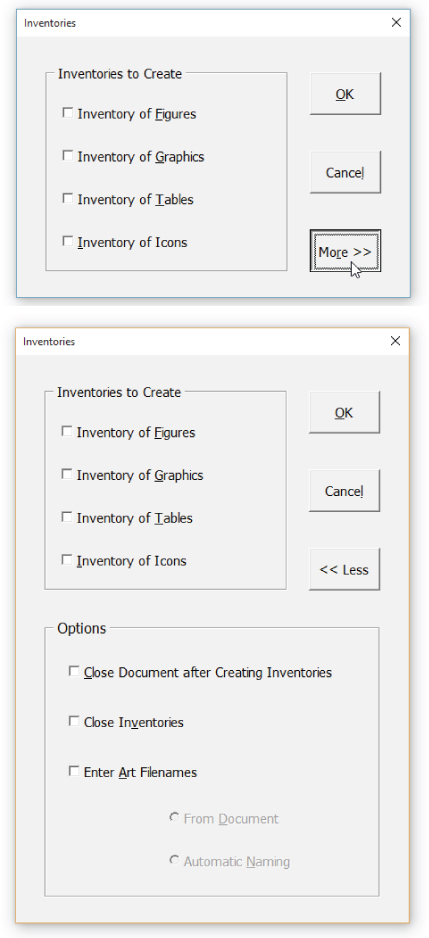
Figure 15.2 The top part of this Inventories form offers the most frequently used options. Clicking the More button reveals the rest of the dialog box (shown on the bottom), which contains less-often-used controls.
Listing 15.1 contains five short procedures that control the behavior of the dialog box:
UserForm_InitializeInitializes the dialog box before it's displayed.cmdMore_ClickRuns when thecmdMorebutton is chosen. This button bears the caption More when only the top half of the dialog box is displayed, and the caption Less when the full dialog box is displayed.chkArtNames_ClickRuns when the Enter Art Filenames check box is chosen.cmdOK_ClickRuns when the OK button is chosen.cmdCancel_ClickRuns when the Cancel button is chosen.
Here's what happens in the code.
- The
UserForm_Initializeprocedure sets theHeightproperty of thefrmInventoriesuser form to120, which is enough to display only the top part of the dialog box. (To find the appropriate height for your dialog box, drag it to the height that looks right and note theHeightproperty in the Properties window.)This procedure is necessary only if the user form is set to its full height at design time. By setting the user form to a height of 120 at design time, you could avoid having to use a
UserForm_Initializeprocedure. However, for a user form that has three or more different sizes—or for a user form with two different sizes, one of which needs to be chosen at runtime depending on environmental conditions—you'll need to use aUserForm_Initializeprocedure. - The
cmdMore_Clickprocedure starts by checking in line 6 whether theCaptionproperty of thecmdMorecommand button is < <Less. If so, that means that the whole dialog box is displayed. Line 7 then sets theCaptionproperty of thecmdMorecommand button toMore > >, the button that will be used to display the bottom part of the dialog box again if necessary. Line 8 sets theAcceleratorproperty of thecmdMorecommand button toM(to make the M in More the accelerator key for the button). Line 9 sets theHeightproperty offrmInventoriesto120, which is the depth required to show only the top part of the dialog - If the condition in line 6 is
False, execution shifts from line 6 to theElsestatement in line 10. This must mean that theCaptionproperty of thecmdMorebutton is already set toMore > >, so the dialog box is displayed in its smaller version and theMore > >button is being clicked to expand the dialog box again. - Line 11 sets the
Heightproperty of the user form to249, thus displaying the lower part of the dialog box. - Line 12 changes the
Captionproperty of thecmdMorecommand button to< < Less. Line 13 sets theAcceleratorproperty of thecmdMorecommand button toL. - Line 14 enables the
fraOptionsframe (identified as Options in the dialog box and disabled in the user form, as are theoptFromDocumentoption button and theoptAutoNamesoption button), making it and the controls it contains available to the user. Line 16 ends thecmdMore_Clickprocedure. - The
chkArtNames_Clickprocedure (lines 18 to 29) runs when the Enter Art Filenames check box is clicked. This procedure enables and disables the option buttons below it, as appropriate.- Line 19 checks to see if the
chkArtNamescheck box is selected. If it is, the statements in lines 20 through 22 run. - Line 20 sets the
Enabledproperty of theoptFrom Documentoption button (identified as From Document in the dialog box) toTrue, thus making it available. - Line 21 selects this option button as the default choice.
- Line 22 enables
optAutoNames, the option button identified as Automatic Naming in the dialog box.
- Line 19 checks to see if the
- If the
chkArtNamescheck box isn't selected, execution shifts to theElsestatement in line 23, which directs execution to line 24. This line sets theEnabledproperty of theoptFromDocumentoption button toFalse, disabling it. - Line 25 then deselects this option button (whether it's selected or not).
- Line 26 disables the
optAutoNamesoption button. - Line 27 deselects it (again, whether it's selected or not).
- The
End Ifstatement in line 28 ends thisIfstatement, and line 29 ends this procedure. - The
cmdOK_Clickprocedure in lines 31 to 35 shows the beginning of the procedure that runs once the OK button is clicked.- Line 32 hides the Inventories dialog box, and line 33 unloads it from memory.
- Line 34 contains a comment indicating that the instructions for creating the inventories appear here.
- The
cmdCancel_Clickprocedure contains only anEndstatement to end execution of the procedure if the user chooses the Cancel button.
Tracking a Procedure in a Form
The next level of complexity in working with forms is using them to track the different stages of a procedure and to guide the user about how to continue.
Take a look at the Create New Employee Web Page dialog box shown in Figure 15.3. This dialog guides the user through a four-stage procedure to create a web page for a new employee. The first step is to identify the employee deserving of this honor by using either the drop-down list or the Select Other Employee command button in the step 1 frame. The second step is to enter suitable introductory, critical, or laudatory text about the employee. The third step is to select the most (or perhaps least!) flattering photo of the employee to include in the web page. The fourth step is to save the web page to a folder on the company's intranet.
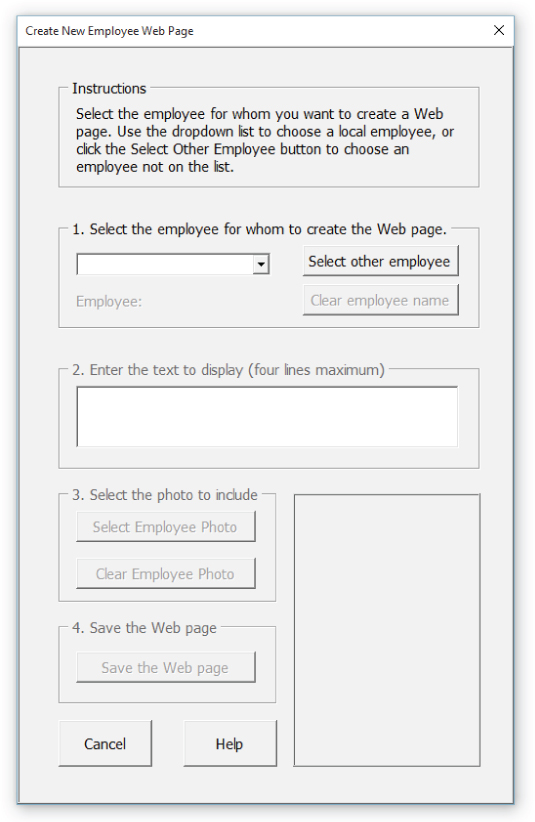
Figure 15.3 The Create New Employee Web Page form provides users with instructions that are dynamically updated as they work their way through the procedure.
When the user first displays the Create New Employee Web Page dialog box, they will see the version of the dialog box shown in Figure 15.3, with steps 2, 3, and 4 disabled and instructions for step 1 shown in the Instructions box at the top.
When the user follows the instructions and selects the employee by using either the combo box drop-down list or the Select Other Employee command button, the code attached to the combo box drop-down list or the command button enables the step 2 frame, making its text box available to the user, as shown in Figure 15.4.
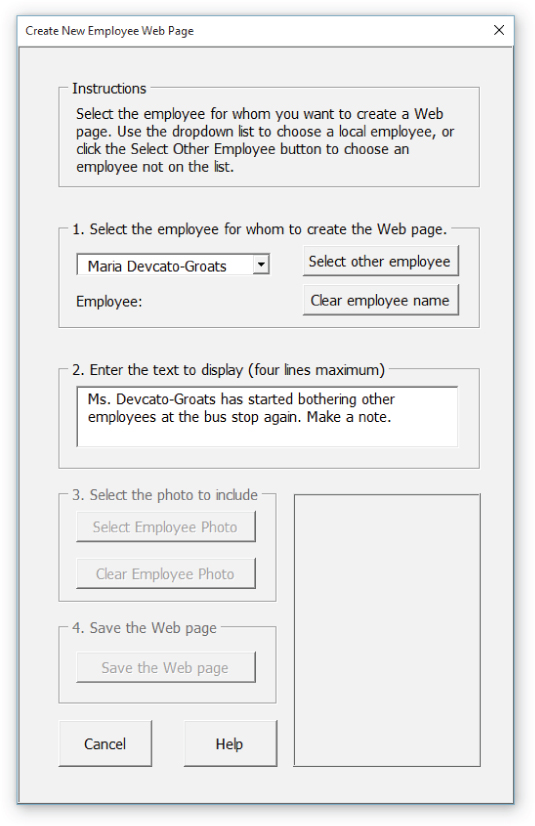
Figure 15.4 The second stage of the Create New Employee Web Page dialog box. Notice the changes from the first stage: the use of the step 1 combo box drop-down list has enabled the step 2 frame.
Here is the code for the Change event of the cmbSelectEmployee combo box. The code for the Click event of the cmdSelectOtherEmployee command button is similar, although a little more complex.
Private Sub cmbSelectEmployee_Change()lblEmployeeName = cmbSelectEmployee.TextfraStep2.Enabled = TruelblInstructions = "Enter text in the Step 2 text box. " & _"For example, you might include brief biographical " & _"information on the employee, details of their position, " & _"or your hopes for their contribution to the company."cmdClearEmployeeName.Enabled = TrueEnd Sub
These are the changes that occur when the user completes step 1 of the dialog box:
- The text of the label in the Instructions box at the top of the dialog box is changed to contain information about step 2 of the procedure.
- The name of the employee selected by the user is listed above the Employee label in the step 1 frame.
- The frame for step 2 is enabled (the text box it contains is enabled along with the frame).
Using Multipage Dialog Boxes and TabStrip Controls
VBA has a MultiPage control, with which you can create multipage dialog boxes. There's also a TabStrip control, with which you can create dialog boxes driven by TabStrips (similar to the tabs on the Office applications' Ribbon). You've almost certainly used multipage dialog boxes (if you're not sure what they are, press Ctrl+D in Word to open the Font dialog box and see an example). You can access any page (one at a time) by clicking the tab at the top of the page. Each page contains a different set of controls and can have a different layout appropriate to the page's purpose.
Multipage dialog boxes are great for packing a lot of information into a single form without having it take up the whole screen with a bewildering embarrassment of riches. You'll need to divide the information into discrete sets of related information to fit it onto the pages. Each page can (and should) have a different layout of controls that govern the behavior of discrete items. The pages are normally separate in theme or purpose. Again, the Font dialog boxes in the Office applications have a Font tab and an Advanced tab. Look at the Tools ➢ Options dialog box in the VBA Editor for another example.
A dialog box that uses a TabStrip differs from a multipage dialog box in that it contains a TabStrip control containing multiple tabs but not multiple pages. To the user, it looks as if different pages are being displayed, but the actual layout of the controls in the dialog box doesn't change. No matter which tab on the TabStrip is selected, the set of controls remains the same, although the data displayed in the controls does change. This approach is useful for displaying records from a database. The tabs merely switch to a different record.
TabStrips are useful when you need to display consistent sets of information, such as the records you might need to maintain on your company's customers. Each customer record has the same set of fields (analogous to the columns in a database): an account number, a name (perhaps several), an address, phone numbers, email addresses, URLs, an order history, an account balance, and so on. Therefore, you can use the same set of controls (text boxes and labels, for example) to display the information for each record. The TabStrip control governs which customer's set of information is displayed in them. Because few databases have a small and fixed number of records, you'll need to populate the TabStrip on the fly (during execution) with tabs and captions, but it works fine.
Table 14.7 in Chapter 14, “Creating Simple Custom Dialog Boxes,” explains the properties unique to the TabStrip control and MultiPage control.
USING MULTIPAGE DIALOG BOXES
To create a multipage dialog box, click the MultiPage icon in the Toolbox, and then click in the user form where you want the control to appear. The VBA Editor places a two-page MultiPage control with tabs that have the labels Page 1 and Page 2. You can then move and size the control as usual. In typical usage, you'll want to create a MultiPage control that's only a little smaller than the user form it inhabits (like most of the multipage dialog boxes you'll see in Windows applications).
Once you've created a MultiPage control, you work with a page on it by right-clicking its tab and using the resulting context menu:
- To add a page, right-click the label and choose New Page from the context menu. VBA will add a new page of the default size and will name it
Pagen, where n is the next number after the current number of pages (even if the other pages have names other thanPage1,Page2, and so on). - To rename a page in a MultiPage control, right-click the label and choose Rename from the context menu. In the Rename dialog box (see Figure 15.5), enter the caption (the label text) for the page in the Caption text box, the accelerator key in the Accelerator Key text box, and any control-tip text (the tip users see when they move the mouse pointer over the tab for the page) in the Control Tip Text text box. Click the OK button to close the Rename dialog box.
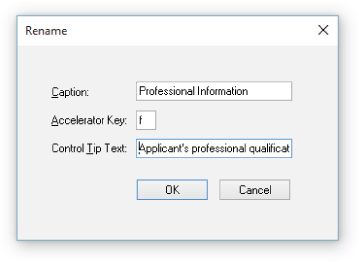
Figure 15.5 Use the Rename dialog box to set the caption, accelerator key, and control-tip text for a page. - To delete a page from a MultiPage control, right-click the label and choose Delete Page from the context menu. The VBA Editor will remove the page without prompting for confirmation.
- To move a page to a different place in the MultiPage control, right-click the label and choose Move from the context menu to display the Page Order dialog box (see Figure 15.6). In the Page Order list box, select the page or pages that you want to move (Shift+click to select multiple contiguous pages, Ctrl+click to select multiple, noncontiguous pages), and then use the Move Up and Move Down buttons to rearrange the page or pages as desired. When you've finished, click the OK button to close the Page Order dialog box.
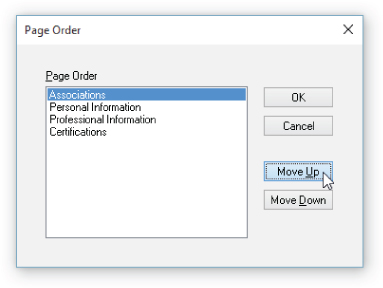
Figure 15.6 Use the Move Up and Move Down buttons in the Page Order dialog box to change the order of pages in a MultiPage control. - To specify which page of a multipage dialog box to display by default, use the
Valueproperty of the MultiPage control. You can set this property either at design time or at runtime. For example, you could use an initialization procedure such as the one shown here to display the third page (identified by the value2, because the page numbering starts at 0) of a dialog box with a MultiPage control calledMyMultiat runtime:Sub UserForm_Initialize()MyMulti.Value = 2End Sub
Once you've created a multipage dialog box, you can populate its pages with controls using the techniques you learned in Chapter 14. Each control must have a unique name in the entire form (not just within the page on which it appears).
When designing a multipage dialog box, keep the following issues in mind:
- What's the best way to divide the information or options in the dialog box? What belongs on which page? Which information or options will the user expect to find grouped together?
- Which controls should appear on each page? Most dialog boxes need at least a pair of command buttons—such as OK and Cancel (or End or Close)—available from each page to allow users to dismiss the dialog box from whichever page they happen to end up on. In rare instances, you may want to force users to return to a particular page in order to close a dialog box. In these cases, make sure each page that doesn't contain a command button to dismiss the dialog box tells the users where they will find such a command button.
- For settings, do you need to have an Apply button (as well as an OK button) to apply the changes on a particular page without closing the dialog box?
Because each control in a multipage form has a unique name, when returning information from a multipage dialog box you need specify only the relevant object—you don't need to specify which page it's on.
Figure 15.7 shows an example of a multipage dialog box. The first page contains the customer's personal contact information; the second, the customer's professional information; the third, the associations the customer belongs to; and the fourth, the certifications the customer holds.
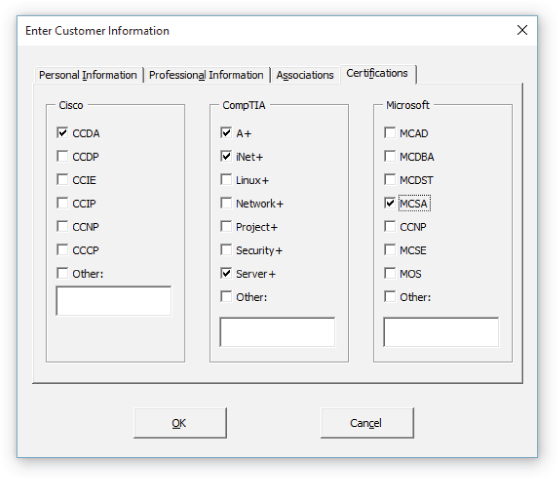
Figure 15.7 By using multiple pages in a dialog box, you can achieve a clean and uncluttered look that's also easily navigable.
Most of the properties of the MultiPage control are straightforward, but a few deserve special mention:
- The
Styleproperty offersfmStyleTabs(the default setting, showing tabs for navigating between the pages),fmStyleButtons(which gives each page a rectangular button, with the button for the current page appearing pushed in), orfmStyleNone(which provides no means of navigating between the pages and no indication of the borders of the multipage dialog box).fmStyleNonecan be useful for creating user forms that have two or more alternative layouts of which the user will only ever need to see one at a time.By including one set of controls on one page of the multipage dialog box and another set of controls on another page, you can present two seemingly different dialog boxes by doing nothing more than changing which page of the MultiPage control is displayed. For example, you can use this technique to create a “wizard” that guides users through a multistep process. Just add a Next button that they click to move to each subsequent step.
- The
TabOrientationproperty controls where the tabs (or buttons) for the pages appear on the control. Your choices arefmTabOrientationTop(the default setting, placing the tabs at the top of the control),fmTabOrientationBottom,fmTabOrientationLeft, andfmTabOrientationRight.Experiment with the effects that the bottom, left, and right orientations offer, but unless they provide significant advantages over the more normal top orientation, use them sparingly—if at all. Users won't thank you for deviating from the traditional, familiar interface unnecessarily.
- The
MultiRowproperty controls whether a MultiPage control has one row of tabs for its pages (False) or multiple rows (True). When you haveMultiRowset toTrue, the VBA Editor adds the second or subsequent rows of tabs when you run out of space on the first or current row.
The MultiPage control doesn't have to take up the whole dialog box—in fact, most dialog boxes keep the key command buttons such as OK and Cancel outside the multipage area so that they're available to the user no matter which page the user is on.
That said, it is usually a good idea to make a MultiPage control the dominant part of a dialog box. In a complex and busy dialog box, a small MultiPage control can appear to be little more than a group box, and the users may miss the tabs, particularly if they're just skimming the controls looking for a particular option.
USING THE TABSTRIP CONTROL
Forms that use a TabStrip are substantially different from multipage dialog boxes. A TabStrip control can be used not to rearrange other controls, but to just change the data that appears in them as the user moves from one set of data to another. In other words, the layout of the controls remains static. Only the values displayed in the controls change from page to page on the strip.
For instance, you might use a dialog box driven by a TabStrip to view and update the records in a data source such as a Word table, an Excel spreadsheet, or an Access database. This next example uses an Excel workbook in which information is stored on a number of worksheets. Figure 15.8 shows the DataSurfer dialog box, which is driven by a TabStrip.
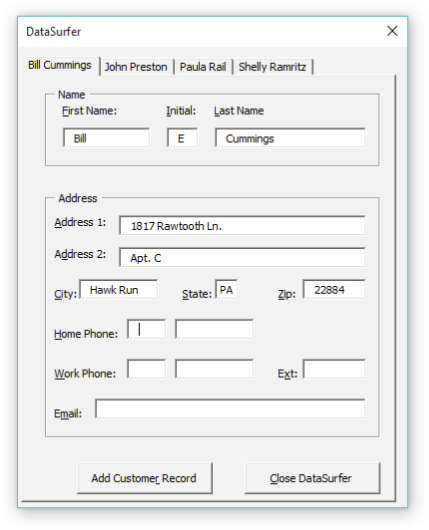
Figure 15.8 Using a TabStrip control to create a multitab dialog box. The TabStrip is used to control which set of information is displayed in the other controls in the dialog box.
The actual strip of tabs in a TabStrip control can appear above, below, or beside the controls that it contains. Above is the conventional—and default—position, just as it is in real-world recipe-card boxes and file drawers. But vertical and bottom tabs have shown up in eccentric Windows applications from time to time. As with the MultiPage control, use the TabOrientation property of the TabStrip control to specify whether the TabStrip should appear at the top, bottom, left, or right of its control. But be sure to have a pretty good reason if you're departing from convention. The top position is expected and makes the most sense.
The TabStrip can contain zero, one, or more tabs. For most purposes, there's little point in having only one tab on a TabStrip, and even less in having no tab at all. But if you dynamically populate the TabStrip with tabs in your procedures (as you're about to do in this next example) and create one tab for each record found, you may run into situations with only one record and, thus, a dialog box with only one tab—or even a TabStrip without any tabs at all.
Click the TabStrip button on the Toolbox, click in the user form to place the TabStrip, and then drag it to an appropriate size. Bear in mind that a TabStrip is only a visual display for the user's benefit. Unlike the MultiPage control, you establish the logical connection between the TabStrip and the other controls through code. You can then add, rename, move, and delete tabs in the same way as you can pages in a MultiPage control.
If you haven't placed the other controls for the dialog box, do so now.
Once everything's in place, you write the code that will enable the TabStrip to display the contents of the other controls. Listing 15.2 shows the code for the TabStrip in the DataSurfer dialog box. This TabStrip is named tabSurfer, and the code works with its Change event—the event procedure that fires (is triggered and executes its code) when the user clicks a new tab on the strip.
After specifying the worksheet, the code in Listing 15.2 essentially repeats itself for each of the text boxes that appear in the DataSurfer dialog box. This dialog box works with a data source implemented as Excel spreadsheets in the active workbook.
Each worksheet in the workbook holds one customer's record, with the name of the customer appearing on the worksheet's tab and the customer's data appearing in the second column: the first name in the first cell of the second column, the middle initial in the second cell, the last name in the third cell, and so on for the address, phone numbers (both home and work), and email address. So, to get at any piece of information, you need to know the sheet of the record in question and the appropriate cell in the second column.
Here's how the code works:
- Line 1 declares the procedure
tabSurfer_Change, which executes automatically whenever theChangeevent of thetabSurferTabStrip fires. TheChangeevent fires each time the user clicks a new tab, so you use this event to control the information displayed in the text boxes. - The
Changeevent also fires when a tab is added to (or removed from) the TabStrip. Because the DataSurfer user form uses theInitializeevent procedure to populate the TabStrip with tabs (one per worksheet in the workbook), you do need to prevent theChangeevent procedure from running unnecessarily during the initialization phase of your program. So, the user form declares a private Boolean variable namedblnInitializingthat theInitializeprocedure sets toTruewhile it's running and toFalsejust before it ends. - Line 2 of the
Changeevent procedure checks to make sure thatblnInitializingisFalse. If it's not, theInitializeprocedure has fired the event, and theChangeprocedure does not need to load the information into the cells—so execution continues at line 21, just before the end of the procedure. But once theInitializeprocedure has finished running,blnInitializingwill be set toFalse, and theChangeevent procedure will run each time the user changes tabs in the TabStrip. - Line 3 begins a
Withstatement that works with the appropriate worksheet in the active workbook:ActiveWorkbook.Sheets(tabSurfer.Value + 1). TheValueproperty of thetabSurferTabStrip tells us which tab in the TabStrip is selected. Because the first tab in the TabStrip is numbered 0 and the first worksheet in the workbook is numbered 1, you need to add 1 to theValueof the TabStrip to even the numbers. - Line 4 is a comment. Line 5 uses the
Activatemethod to activate the worksheet in question. - Lines 6 through 19 then set the
Textproperty of each text box in the user form to the contents of the corresponding cell in the second column on the worksheet. For example, line 6 sets theTextproperty of thetxtFirstNametext box (which appears under the First Name label in the dialog box) to the contents of the first cell in the second column:.Cells(1, 2).Text. - Line 20 ends the
Withstatement, line 21 ends theIfstatement, and line 22 ends the procedure.
USING PICTURES IN FORMS
VBA includes extensive graphics capabilities that allow you to make your forms look pretty much any way you want them to. This book doesn't go into design aesthetics in any detail, but there's much you can do to make your forms attractive. You can fiddle with Format ➢ Order to pile controls on top of each other. Controls like the command button have their own Picture properties, as do forms themselves. Take a look at Figure 15.9. It shows an image control displaying a photo, a background texture (loaded into the form's Picture property), and a command button that blends into the background (because its BackStyle property is set to Transparent).
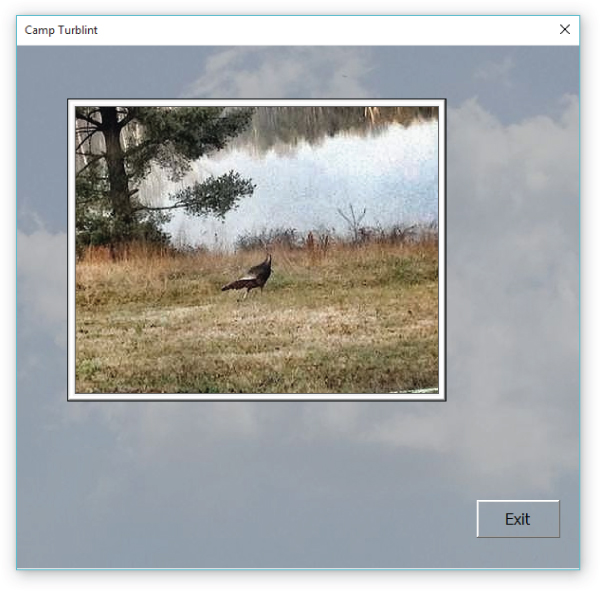
Figure 15.9 VBA includes extensive graphics features—you can make your forms look any way you want them to.
To use an Image control, click the Image button in the Toolbox, and then click in the user form where you want the Image control to appear. Once you've placed the Image control, you can size and move the picture just as you would any other control.
To choose the picture that will appear in the Image control, select the Picture property in the Properties window and click the ellipsis button that then appears to the right of the entry. The VBA Editor displays the Load Picture dialog box. Select the picture file and choose the Open button. The Picture property in the Properties window registers the type of picture you selected—such as Bitmap—but not its filename, and the picture appears in the Image control so that you can see if it's an appropriate size.
Once you've chosen the picture, you have various options for positioning it and formatting it:
- If necessary, set the alignment of the picture by using the
PictureAlignmentproperty. (If the picture fully fills the Image control—neither overlapping it nor leaving parts of it empty—you may not need to set the alignment for it.) Table 15.1 shows the constants and values for thePictureAlignmentproperty.TABLE 15.1: Constants and values for the PictureAlignment property
CONSTANT VALUE PICTURE ALIGNMENT IN IMAGE CONTROL fmPictureAlignmentTopLeft0Top left fmPictureAlignmentTopRight1Top right fmPictureAlignmentCenter2Centered fmPictureAlignmentBottomLeft3Bottom left fmPictureAlignmentBottomRight4Bottom right - If necessary, clip, stretch, or zoom the picture by using the
PictureSizeModeproperty:fmPictureSizeModeClip(0) clips the picture to fit the Image control.FmPictureSizeModeStretch(1) stretches or squeezes the picture so that it fits the Image control (this option often makes for strange effects). AndfmPictureSizeModeZoom(2) enlarges or reduces the picture so that its nearest dimension exactly fits the width or height of the Image control without changing the picture's proportions (this option usually leaves an unfilled gap on the other side). - If you need to tile the image to take up the remaining space in the control, set the
PictureTilingproperty toTrue. This option is rarely used with database work. - If you need to adjust the position of the picture relative to its caption, set the
PicturePositionproperty of the check box, command button, label, option button, or toggle button in question. Table 15.2 shows the constants and values forPicturePosition.TABLE 15.2: Constants and values for the PicturePosition property CONSTANT VALUE PICTURE POSITION CAPTION ALIGNMENT fmPicturePositionLeftTop0Left of the caption With top of picture fmPicturePositionLeftCenter1Left of the caption Centered on picture fmPicturePositionLeftBottom2Left of the caption With bottom of picture fmPicturePositionRightTop3Right of the caption With top of picture fmPicturePositionRightCenter4Right of the caption Centered on picture fmPicturePositionRightBottom5Right of the caption With bottom of picture fmPicturePositionAboveLeft6Above the caption With left edge of picture fmPicturePositionAboveCenter7Above the caption Centered below picture (the default setting) fmPicturePositionAboveRight8Above the caption With right edge of picture fmPicturePositionBelowLeft9Below the caption With left edge of picture fmPicturePositionBelowCenter10Below the caption Centered above picture fmPicturePositionBelowRight11Below the caption With right edge of picture fmPicturePositionCenter12In center of control Centered horizontally and vertically on top of picture
Once you've placed, sized, and formatted a picture, there are various possibilities for what you can do with it, such as using a picture's Click event to trigger an action. For example, you could display two graphics illustrating a choice of two formats for a document. Then users could click the appropriate picture to signal their choice.
Creating a Modeless Dialog Box
We're using VBA version 7.1, and ever since version 6 the language has offered the programmer an option to create a modeless dialog box—one that users can leave onscreen while they continue to work in their application. In other words, with a modal dialog box, users must click the dialog's OK or Cancel button or otherwise dismiss the box before they can regain the ability to interact with their application. Put another way, a modal dialog box retains the focus until dismissed. (Whatever you type on the keyboard goes into the object with the current focus.)
You're doubtless familiar with modeless dialog boxes from working with Office. For example, the Find And Replace dialog box in Access, Word, and Excel is modeless, as is the Replace dialog box in PowerPoint.
Modeless controls allow you to click the host application to transfer the focus back to the host's window. For example, you can continue typing in a Word document, even while the Find And Replace dialog box remains visible.
Creating a modeless dialog box is as simple as setting the ShowModal property of the user form to False from its default setting of True.
There are various situations where you might want to use a modeless dialog box rather than a modal one. As a simple example, you might create a procedure and dialog box in Word that collects information from users for a memo or a report. By making the dialog box modeless, you could allow users to copy information from an open document (or open other documents and gather information from them) and paste it into the dialog box—saving users from having to copy the information before invoking the dialog box and allowing them to copy multiple separate items easily. Likewise, you could create a modeless user form (perhaps shaped like a toolbar) that users could keep onscreen and use to automatically enter text into predefined sections of three or four other documents without losing their place in the current document.
You can also use modeless dialog boxes to display complex sets of interrelated user forms in which the user needs to copy and paste information from one user form to another, or at least to access different areas of two or more displayed user forms at the same time. Displaying multiple forms at once can be confusing to the user, but you may sometimes find it necessary.
Most of the time, you'll probably want to use modal dialog boxes in your VBA procedures. With modal dialog boxes, users must deal with the dialog box before they can continue to work in the application, and there's no risk that they'll end up with multiple dialog boxes scattered around the screen in assorted states of disuse.
Specifying a Form's Location Onscreen
By default, VBA centers a dialog box on the middle of the application window as much as possible, which is the normal behavior for Windows applications. If you want to position a form elsewhere on the screen (for example, to avoid obscuring important data onscreen), set the StartUpPosition property for the user form. Table 15.3 explains the settings you can use.
TABLE 15.3: StartUpPosition property settings
| PROPERTY | VALUE | EFFECT |
Manual |
0 |
Displays the user form in the upper-left corner of the Windows Desktop. |
CenterOwner |
1 |
Centers the user form horizontally and vertically in the owner application—the application to which the user form belongs. |
CenterScreen |
2 |
Centers the user form horizontally and vertically on the Desktop. In a multimonitor arrangement, this value centers the user form on the monitor containing the active window. |
WindowsDefault |
3 |
Displays the user form in the default position for Windows dialog boxes. |
Using Events to Control Forms
This section discusses the events built into VBA for use with forms and with individual controls to give the programmer fine control over how user forms look and behave.
So far in this chapter, you've used three of the most useful events:
- You used the
Initializeevent to add items to list boxes just before a form is loaded and to adjust the number of tabs on a TabStrip. - You used the
Clickevent to take action when the user clicks a particular control in a user form. So far you've been usingClickmostly for command buttons, but you can use it for just about any control—including the user form itself. - You used the
Changeevent to control what happens when the user changes the tab displayed on a TabStrip.
Table 15.4 lists the events that VBA supports and the objects and controls with which each can be used.
TABLE 15.4: Events that VBA supports and the objects and controls associated with them
| EVENT | OCCURS | APPLIES TO THESE CONTROLS AND OBJECTS |
Activate |
When the user form becomes the active window | UserForm |
Deactivate |
When the user form ceases to be the active window | UserForm |
AddControl |
When a control is added at runtime | Frame, MultiPage, UserForm |
AfterUpdate |
After the user has changed data in a control | CheckBox, ComboBox, CommandButton, Frame, Image, Label, ListBox, MultiPage, OptionButton, ScrollBar, SpinButton, TabStrip, TextBox, ToggleButton, UserForm |
BeforeDragOver |
When the user is performing a drag-and-drop operation | CheckBox, ComboBox, CommandButton, Frame, Image, Label, ListBox, MultiPage, OptionButton, ScrollBar, SpinButton, TabStrip, TextBox, ToggleButton, UserForm |
BeforeDropOrPaste |
When the user is about to release a dragged item or about to paste an item | CheckBox, ComboBox, CommandButton, Frame, Image, Label, ListBox, MultiPage, OptionButton, ScrollBar, SpinButton, TabStrip, TextBox, ToggleButton, UserForm |
BeforeUpdate |
When the user has changed data in the control before the new data appears in the control | CheckBox, ComboBox, ListBox, OptionButton, ScrollBar, SpinButton, TextBox, ToggleButton |
Change |
When the Value property of a control changes |
CheckBox, ComboBox, ListBox, MultiPage, OptionButton, ScrollBar, SpinButton, TabStrip, TextBox, ToggleButton |
Click |
When the user clicks a control or object with the left mouse button | CheckBox, ComboBox, CommandButton, Frame, Image, Label, ListBox, MultiPage, OptionButton, TabStrip, ToggleButton, UserForm |
DblClick |
When the user double-clicks a control or object with the left mouse button | CheckBox, ComboBox, CommandButton, Frame, Image, Label, ListBox, MultiPage, OptionButton, TabStrip, TextBox, ToggleButton, UserForm |
DropButtonClick |
When the user displays or hides a drop-down list | ComboBox, TextBox |
Enter |
Just before one control on a user form receives the focus from another control | CheckBox, ComboBox, CommandButton, Frame, ListBox, MultiPage, OptionButton, ScrollBar, SpinButton, TabStrip, TextBox, ToggleButton |
Exit |
Just before one control on a user form loses the focus to another control | CheckBox, ComboBox, CommandButton, Frame, ListBox, MultiPage, OptionButton, ScrollBar, SpinButton, TabStrip, TextBox, ToggleButton |
Error |
When a control or object encounters an error | CheckBox, ComboBox, CommandButton, Frame, Image, Label, ListBox, MultiPage, OptionButton, ScrollBar, SpinButton, TabStrip, TextBox, ToggleButton, UserForm |
Initialize |
After a user form is loaded but before it's displayed | UserForm |
KeyDown |
When the user presses a key on the keyboard | CheckBox, ComboBox, CommandButton, Frame, ListBox, MultiPage, OptionButton, ScrollBar, SpinButton, TabStrip, TextBox, ToggleButton, UserForm |
KeyUp |
When the user releases a key they've pressed on the keyboard | CheckBox, ComboBox, CommandButton, Frame, ListBox, MultiPage, OptionButton, ScrollBar, SpinButton, TabStrip, TextBox, ToggleButton, UserForm |
KeyPress |
When the user presses an ANSI key on the keyboard | CheckBox, ComboBox, CommandButton, Frame, ListBox, MultiPage, OptionButton, ScrollBar, SpinButton, TabStrip, TextBox, ToggleButton, UserForm |
Layout |
When the size of a frame, multipage, or user form changes | Frame, MultiPage, UserForm |
MouseDown |
When the user presses the left mouse button | CheckBox, ComboBox, CommandButton, Frame, Image, Label, ListBox, MultiPage, OptionButton, ScrollBar, SpinButton, TabStrip, TextBox, ToggleButton, UserForm |
MouseUp |
When the user releases the left mouse button (after pressing it) | CheckBox, ComboBox, CommandButton, Frame, Image, Label, ListBox, MultiPage, OptionButton, ScrollBar, SpinButton, TabStrip, TextBox, ToggleButton, UserForm |
MouseMove |
When the user moves the mouse | CheckBox, ComboBox, CommandButton, Frame, Image, Label, ListBox, MultiPage, OptionButton, TabStrip, TextBox, ToggleButton, UserForm |
QueryClose |
When a user form is about to close | UserForm |
RemoveControl |
When a control is deleted | Frame, MultiPage, UserForm |
Resize |
When a user form is resized | UserForm |
Scroll |
When the user moves the scroll box | Frame, MultiPage, ScrollBar, UserForm |
SpinDown |
When the user clicks the Down button on a SpinButton control | SpinButton |
SpinUp |
When the user clicks the Up button on a SpinButton control | SpinButton |
Terminate |
When a user form has been unloaded from memory | UserForm |
Zoom |
When the Zoom property of the control or user form changes |
Frame, MultiPage, UserForm |
The ByVal keyword is used to pass arguments between procedures. When used with forms, it can return ReturnBoolean, ReturnEffect, ReturnInteger, and ReturnString objects.
As you can see, VBA's events fall into several categories, which are discussed in the following sections in descending order of usefulness:
- Events that apply only to the
UserFormobject - Events that apply to the
UserFormobject and other container objects (such as the Frame control and the MultiPage control) - Events that apply to many or most of the controls, sometimes including the
UserFormobject as well - Events that apply only to a few controls
Events Unique to the UserForm Object
This section discusses the events that are unique to the UserForm object. These are the Initialize, QueryClose, Activate, Deactivate, Resize, and Terminate events.
INITIALIZE EVENT
An Initialize event occurs when the user form is loaded but before it appears onscreen.
VBA's syntax for the Initialize event is as follows, where userform is a valid UserForm object:
Private Sub userform_Initialize()
Typical uses for the Initialize event include retrieving information—from a database, a set of worksheets, or whatever—that the user form or application needs. Then assigning information to the controls on the user form (especially ListBox and ComboBox controls, to which you often need to add the information at runtime rather than at design time).
Depending on the style and complexity of your user forms, you may also want to use the Initialize event to resize the user form, resize controls on the user form, display or hide particular controls—and in general make sure the user form is as closely suited as possible to the user's needs before displaying it.
QUERYCLOSE EVENT
The QueryClose event applies to the UserForm object only. This event fires just before the user form closes.
The syntax for the QueryClose event is as follows:
Private Sub UserForm_QueryClose(Cancel As Integer, CloseMode As Integer)
Here, Cancel is an integer, typically 0 (zero). A nonzero value prevents the QueryClose event from firing and stops the user form (and the application) from closing.
CloseMode is a value or a constant giving the cause of the QueryClose event. Table 15.5 shows the values and constants for CloseMode.
TABLE 15.5: Values and constants for the CloseMode argument
| CONSTANT | VALUE | CAUSE OF THE QUERYCLOSE EVENT |
vbFormControlMenu |
0 |
The user has closed the user form by clicking its Close button or by invoking the Close command from the user form's control menu (for example, by right-clicking the title bar of the user form and choosing Close from the context menu). |
vbFormCode |
1 |
An Unload statement in code has closed the user form. |
vbAppWindows |
2 |
Windows is closing down and is closing the user form. |
vbAppTaskManager |
3 |
The Task Manager is closing the application and, thus, is also closing the user form. |
At first glance, QueryClose may appear to have few uses beyond double-checking that users really want to close a user form that they're attempting to close. Say that you have established that users had entered a lot of data in a form they were about to close. You might want to check that they hadn't clicked the user form's Close button or Cancel button by mistake, as illustrated in the following code fragment for Word:
Private Sub UserForm_QueryClose(Cancel As Integer, _CloseMode As Integer)'make sure the user wants to close the user form'if they have entered information in itSelect Case CloseModeCase 0'user has clicked the close button or invoked an Unload statement'if text box contains more than 5 characters, ask to save itIf Len(txtDescription.Text) > 5 ThenIf MsgBox("The Description text box contains " & _"a significant amount of text." & vbCr & _"Do you want to save this text?", vbYesNo + _vbQuestion, "Close Form") <> 0 ThenDocuments.AddSelection.TypeText txtDescription.TextActiveDocument.SaveAs _"c: empTemporary Description.docm"MsgBox "The contents of the Description text " & _"box have been saved in " & _"c: empTemporary Description.docm.", _vbOKOnly + vbInformation, _"Form Information Saved"End IfEnd If
However, QueryClose comes into its own when the whole application, rather than just the user form, is closing. If the user form is modeless, users may not be aware that it's still open and that they're about to lose data they've typed into it or options they've selected in it.
Sometimes you may be able to use QueryClose to save information from a user form when the application has stopped responding and is being closed by Windows or the Task Manager. Be warned that QueryClose's record isn't perfect on this—the code sometimes won't run.
To stop an application from closing, set the Cancel property of the QueryClose event to True.
ACTIVATE EVENT
The Activate event fires when the user form becomes the active window. Typically, this means the event fires when the user form is displayed, occurring just after the Initialize event if the user form is loaded by a Show statement rather than a Load statement.
Note that if the user form is loaded by using a Load statement before being displayed with the Show statement, the Initialize event fires after the Load statement. The Activate event, firing after the Show statement, fires later.
However, the Activate event also fires when the user form is reactivated after first having been deactivated. For example, if you create a modeless user form with an Activate event procedure, the code is executed each time the user reactivates the user form after having deactivated it (for example, by working in the application window). Likewise, if you display one user form from another and then close the second user form, returning the focus to the first user form and reactivating it, the Activate event fires again.
The syntax for the Activate event is as follows:
Private Sub UserForm_Activate()
DEACTIVATE EVENT
The Deactivate event fires when the user form loses the focus after having been the active window, but it doesn't fire when the user form is hidden or unloaded. For example, if you display a user form that contains a Deactivate event procedure and then close the user form, the Deactivate event doesn't fire. However, if you display one user form from another, the Deactivate event for the first user form fires as the focus is transferred to the second user form. With modeless user forms, the Deactivate event is triggered each time the user leaves one user form by clicking on another.
The syntax for the Deactivate event is as follows:
Private Sub UserForm_Deactivate()
See the previous sidebar for details on a bug in using the Deactivate and Activate events in immediate succession.
RESIZE EVENT
The Resize event fires when a user form is resized either manually by the user or programmatically by you.
The syntax for the Resize event is as follows:
Private Sub UserForm_Resize()
The main use for the Resize event is to move, resize, display, or hide controls to respond to a resized form. For example, you might resize a text box so that it occupies most of the width of the user form it resides on (see Figure 15.10) by using code such as that shown in Listing 15.3.
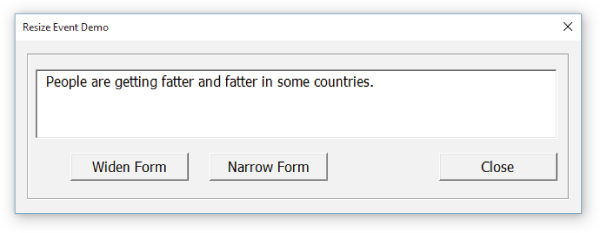
Figure 15.10 You can use the Resize event of a user form to resize or reposition the controls it contains.
The code works like this:
- Listing 15.3 contains four short procedures: one for the
Clickevent of thecmdWidenFormcommand button, one for theClickevent of thecmdNarrowFormcommand button, one for theClickevent of thecmdClosecommand button, and one for theResizeevent of the user form. - The
cmdWidenForm_Clickprocedure shown in lines 1 through 9 increases the width of the user form by 50 points (1 point is 1/72 inch) when the user clicks the Widen Form button, as long as theWidthproperty of the user form is less than 451 points. - Line 5 enables the
cmdNarrowFormcommand button if it isn't already enabled. (ThecmdNarrowFormcommand button is disabled when the user form is displayed at its original narrow width.) - Line 6 disables the
cmdWidenFormcommand button if theWidthproperty of the user form is more than 451 points. - The
cmdNarrowForm_Clickprocedure shown in lines 11 through 19 narrows the user form by 50 points as long as theWidthof the user form is greater than 240 points (its original width), reenabling thecmdWidenFormbutton if it's disabled and disabling thecmdNarrowFormbutton if theWidthof the user form is less than 270 points. - The
cmdClose_Clickprocedure shown in lines 21 through 23 simply unloads the user form. TheMekeyword always refers to the current form, the form in which theMecommand is located. So it's easy to understand that the codeUnload Mesimply tells the form to close itself. - The
UserForm_Resizeevent procedure in lines 25 through 27 sets theWidthproperty oftxt1, the text box in the user form, to 30 points less than theWidthof the user form. If you step through the code (repeatedly pressing F8) in the user form, you'll notice that theResizeevent fires when the size of the user form changes.For example, when line 4 of the
cmdWidenForm_Clickprocedure is executed, execution branches to theResizeevent procedure in line 25, and this procedure is executed before the code in line 5.
TERMINATE EVENT
The Terminate event fires when the user form has been unloaded—or, more precisely, when all references to an instance of the user form have been removed from memory or have gone out of scope.
The syntax for the Terminate event is as follows:
Private Sub UserForm_Terminate()
Events That Apply to Both UserForms and Container Controls
This section discusses the events that apply to the UserForm object and to the container controls—the MultiPage control and the Frame control. Container controls can have other controls placed inside of them. (The Scroll event applies to the ScrollBar control as well as to MultiPage, Frame, and UserForm.) These events are Scroll, Zoom, Resize, Layout, AddControl, and RemoveControl.
SCROLL EVENT
The Scroll event applies to the Frame control, the MultiPage control, the ScrollBar control, and the UserForm object. This event occurs when the user moves the scroll box (the thumb) on a scroll bar on a frame, MultiPage control, scroll bar, or user form.
The syntax for the Scroll event varies for the three controls and the UserForm object. The syntax for the Scroll event with the UserForm object is as follows:
Private Sub UserForm_Scroll(ByVal ActionX As MSForms.fmScrollAction, ByVal ActionYAs MSForms.fmScrollAction, ByVal RequestDx As Single, ByVal RequestDy As Single,ByVal ActualDx As MSForms.ReturnSingle, ByVal ActualDy As MSForms.ReturnSingle)The syntax for the
Scrollevent with the ScrollBar control is as follows:Private Sub scrollbar_Scroll()The syntax for the
Scrollevent with the MultiPage control is as follows:Private Sub multipage_Scroll(index As Long, ActionX As fmScrollAction, ActionY AsfmScrollAction, ByVal RequestDx As Single, ByVal RequestDy As Single, ByValActualDx As MSForms.ReturnSingle, ByVal ActualDy As MSForms.ReturnSingle)The syntax for the
Scrollevent with the Frame control is as follows:Private Sub frame_Scroll(ActionX As fmScrollAction, ActionY As fmScrollAction,ByVal RequestDx As Single, ByVal RequestDy As Single, ByVal ActualDx As MSForms.Return Single, ByVal ActualDy As MSForms.ReturnSingle)In these last three syntax statements,
scrollbaris a validScrollBarobject,multipageis a validMultiPageobject, andframeis a validFrameobject.Here are the arguments for the
Scrollevent:
IndexA required argument specifying the page of theMultiPagewith which the event procedure is to be associated.ActionXandActionYRequired arguments determining the user's horizontal and vertical actions (respectively), as shown in Table 15.6.TABLE 15.6: ActionX and ActionY constants and values for the Scroll event
CONSTANT VALUE SCROLL BOX MOVEMENT fmScrollActionNoChange0There was no change or movement. fmScrollActionLineUp1The user moved the scroll box a short way upward on a vertical scroll bar (equivalent to pressing the ↑ key) or a short way to the left on a horizontal scroll bar (equivalent to pressing the ← key). fmScrollActionLineDown2The user moved the scroll box a short way downward on a vertical scroll bar (equivalent to pressing the ↓ key) or a short way to the right on a horizontal scroll bar (equivalent to pressing the → key). fmScrollActionPageUp3The user moved the scroll box up one page on a vertical scroll bar (equivalent to pressing the Page Up key) or one page to the left on a horizontal scroll bar (also equivalent to pressing the Page Up key). fmScrollActionPageDown4The user moved the scroll box down one page on a vertical scroll bar (equivalent to pressing the Page Down key) or one page to the right on a horizontal scroll bar (also equivalent to pressing the Page Down key). fmScrollActionBegin5The user moved the scroll box to the top of a vertical scroll bar or to the left end of a horizontal scroll bar. fmScrollActionEnd6The user moved the scroll box to the bottom of a vertical scroll bar or to the right end of a horizontal scroll bar. fmScrollAction PropertyChange8The user moved the scroll box, changing the value of either the ScrollTopproperty or theScrollLeftproperty.fmScrollActionControl Request9The scroll action was requested by a control in the container in question. fmScrollActionFocusRequest10The user moved the focus to a different control. This movement scrolls the user form if necessary so that the selected control is fully displayed in the available area. -
RequestDxThe distance to move the scroll box horizontally, specified in points. RequestDyThe distance to move the scroll box vertically, specified in points.ActualDxThe distance the scroll box moved horizontally, measured in points.ActualDyThe distance the scroll box moved vertically, measured in points.
ZOOM EVENT
Changing the Zoom property is like using a magnifying glass. The form's controls all grow larger if the Zoom value is greater than 100, and they grow smaller if the value is less than 100. However, the form itself doesn't change size. To change the size of the form, you must adjust its Height and Width properties.
The Zoom event fires when the Zoom property of the object changes at runtime. The Zoom property can be changed either automatically through code or by the user's manipulating—dragging a scroll bar's thumb, for example—a control that changes the property because you've written code that responds this way.
The Zoom property uses this syntax for the control and the UserForm object:
Private Sub object_Zoom(Percent As Integer)
Here, object is a Frame control or a UserForm object. Percent is an Integer argument used to specify the percentage (from 10 percent to 400 percent) the user form is to be zoomed to. By default, user forms and controls are displayed at 100 percent zoom—full size.
The Zoom property uses this syntax for the MultiPage control:
Private Sub multipage_Zoom(ByVal Index As Long, Percent As Integer)
Index is the index (name or number) of the Page object in the MultiPage control with which the Zoom event procedure is associated.
Zooming a user form zooms all the controls that are on it. For example, say a user form named frmEventsDemo includes a combo box named cmbZoom that offers a selection of zoom percentages. When the user selects an item in the combo box, the Change event for cmbZoom applies the combo box's Value property to the Zoom property of the user form, zooming it to the percentage selected. Zooming the user form triggers the Zoom event, whose procedure in this example sets the Width and Height of the user form to new values suited to the new zoom percentage:
Private Sub cmbZoom_Change()'change the size of the controls:frmEventsDemo.Zoom = cmbZoom.ValueEnd SubPrivate Sub UserForm_Zoom(Percent As Integer)' change the size of the form itself:frmEventsDemo.Width = 300 * cmbZoom.Value / 100frmEventsDemo.Height = 350 * cmbZoom.Value / 100End Sub
LAYOUT EVENT
A Layout event is triggered when the size of the frame, MultiPage control, or user form is changed, either by the user or programmatically (automatically by an autosized control's becoming resized).
By default, the Layout event automatically calculates the new position for any control that has been moved and repaints the screen accordingly. However, you can also use the Layout event for your own purposes if you need to.
The syntax for the Layout event with a Frame control or a UserForm object is as follows:
Private Sub object_Layout()
Here, object is a Frame control or a UserForm object.
The syntax for using the Layout event with a MultiPage control is as follows:
Private Sub multipage_Layout(index As Long)
Here, multipage is a MultiPage control and index is the Page object in the MultiPage control.
ADDCONTROL EVENT
The AddControl event is triggered when a control is added programmatically to a Frame control, a MultiPage control, or the user form at runtime. It isn't triggered when you add a control manually at design time. The event isn't triggered when the user form is initialized unless the Initialize event adds a control to the user form.
The syntax for the AddControl event varies depending on the object or control. The syntax for the UserForm object and the Frame control is as follows:
Private Sub object_AddControl(ByVal Control As MSForms.Control)
Here, object is a UserForm object or Frame control, and Control is the control that's being added.
The syntax for the MultiPage control is as follows:
Private Sub multipage_AddControl(ByVal Index As Long, ByVal Control As MSForms.Control)
Here, Index is the index number or name of the Page object that will receive the control.
For example, the following cmdAddControl_Click procedure adds three option buttons (opt1, opt2, and opt3, respectively) to the frame fraOptions and sets properties for the first option button. (A comment indicates where the code would go on to set properties for the second and third option buttons.) The fraOptions_AddControl event procedure displays a message box giving the number of controls the frame now contains. Because the cmdAddControl_Click procedure adds three controls, the AddControl event fires three times, and the fraOptions_AddControl procedure runs three times:
Private Sub cmdAddControl_click()Dim opt1 As OptionButtonDim opt2 As OptionButtonDim opt3 As OptionButtonSet opt1 = fraOptions.Controls.Add("Forms.OptionButton.1")Set opt2 = fraOptions.Controls.Add("Forms.OptionButton.1")Set opt3 = fraOptions.Controls.Add("Forms.OptionButton.1")With opt1.Left = 10.Top = 10.Name = "optDomestic".Caption = "Domestic".AutoSize = True.Accelerator = "D"End With'set properties for opt2 and opt3 hereEnd SubPrivate Sub fraOptions_AddControl(ByVal Control As MSForms.Control)MsgBox "The frame now contains " & _fraOptions.Controls.Count & " controls."End Sub
REMOVECONTROL EVENT
The RemoveControl event fires when a control is deleted from a frame control, a MultiPage control, or a user form, either programmatically or manually at runtime. (To remove a control manually, the user would typically use a control built into the user form for that purpose. There has to be some programming here—users can't simply delete controls all by themselves.)
The syntax for the RemoveControl event is as follows for all controls but the MultiPage control:
Private Sub object_RemoveControl(ByVal Control As MSForms.Control)
Here, object is a valid object, and Control is a valid control.
The syntax for the RemoveControl event is as follows for the MultiPage control:
Private Sub multipage_RemoveControl(ByVal Index As Long, ByVal Control AsMSForms.Control)
Here, multipage is a valid MultiPage object. For a MultiPage control, Index specifies the Page object in the MultiPage control that contains the control to be deleted.
Events That Apply to Many or Most Controls
This section discusses the events that apply to many or most controls. Some of these events apply to the UserForm object as well. These events are Click; Change; Enter and Exit; BeforeUpdate and AfterUpdate; KeyDown, KeyUp, and KeyPress; MouseDown, MouseUp, and MouseMove; BeforeDragOver; BeforeDropOrPaste; DblClick; and Error.
CLICK EVENT
The most common event of all in VBA, the Click event services the CheckBox, ComboBox, CommandButton, Frame, Image, Label, ListBox, MultiPage, OptionButton, TabStrip, and ToggleButton controls. It is not available to the TextBox, ScrollBar, or SpinButton controls, but it is a member of the UserForm object.
A Click event occurs when the user clicks a control with the left mouse button, or when the user selects a value for a control that has more than one possible value. For most controls, this means that the event fires every time the user clicks the control. But there are a few exceptions:
- Clicking a disabled control fires the
Clickevent of the user form (as if the user were clicking the user form through the control). - The
Clickevent of an OptionButton control fires when the user clicks the option button to select it. If the option button is already selected, clicking it has no effect. (On the other hand, theClickevent of a CheckBox control fires each time the user clicks the check box—either to select it or to clear it.) - The
Clickevent of a ListBox control or ComboBox control fires when the user clicks to select an item from the list (not when the user clicks on the drop-down arrow or in the undropped portion of the combo box). If the user clicks an already-selected item, theClickevent doesn't fire again. - The
Clickevent of a ToggleButton control occurs whenever the toggle button is clicked and when itsValueproperty is changed. This means that it isn't a good idea to use theClickevent of the ToggleButton control to toggle itsValue. - The
Clickevent of a selected CommandButton control fires when you press the spacebar. - The
Clickevent of the default command button (the button with itsDefaultproperty set toTrue) fires when the user presses Enter with no other command button selected. - The
Clickevent of the command button with itsCancelproperty set toTruefires when the user presses Esc. TheClickevent for a control with an accelerator key set also fires when the user presses the accelerator key.
For all controls except the TabStrip control and the MultiPage control, the Click event needs no arguments, as follows:
Private Sub object_Click()
For a TabStrip control or a MultiPage control, your code must react to the Index argument, a required Long (data type) argument that VBA passes to indicate the affected tab or page of the control:
Private Sub object_Click(ByVal Index As Long)
Here, object is a valid MultiPage control or TabStrip control.
CHANGE EVENT
The Change event applies to the CheckBox, ComboBox, ListBox, MultiPage, OptionButton, ScrollBar, SpinButton, TabStrip, TextBox, and ToggleButton controls. This event fires when the Value property of a control changes. This change can occur either through an action of the user's (such as typing text into a text box, selecting an option button, selecting or clearing a check box, clicking a toggle button, or changing the page displayed on a MultiPage control) or through an action taken programmatically at runtime.
Bear in mind that when the Change event is fired by an action of the user's, that action may also trigger a Click event. (Even when this happens, Change is regarded as a better way of determining the new Value of the control than Click—although for many purposes, Click will work satisfactorily as well.) Changing the Value property of a control manually at design time doesn't fire a Change event.
The syntax for the Change event is as follows:
Private Sub object_Change()
The Change event is useful for updating other controls after the user changes a control. For example, if the user enters the name for a new report into a text box (here, txtReportName), you could use the Change event to automatically insert into another text box (here called txtFileName) the name of the file in which to save the report:
Private Sub txtReportName_Change()txtFileName.Text = txtReportName.Text & ".txt"End Sub
ENTER AND EXIT EVENTS
The Enter and Exit events apply to CheckBox, ComboBox, CommandButton, Frame, ListBox, MultiPage, OptionButton, ScrollBar, SpinButton, TabStrip, TextBox, and ToggleButton controls.
The Enter event fires when the focus is moved from one control on a user form to another control. The event fires just before the second control receives the focus.
Like the Enter event, the Exit event fires when the focus is moved from one control on a user form to another control. However, the Exit event fires just before the first event loses the focus.
The syntax for the Enter event is as follows:
Private Sub object_Enter()
The syntax for the Exit event is a little more complex:
Private Sub object_Exit(ByVal Cancel As MSForms.ReturnBoolean)
Here, Cancel is a required argument specifying event status. The default setting is False, which specifies that the control involved should handle the event and that the focus will pass to the next control. A setting of True specifies that the application handle the event, which keeps the focus on the current control.
By using the Enter and Exit events, you can track the user's progress through the controls on a user form.
The Exit event is useful for checking to see if the user has made an appropriate selection in the control or has entered a suitable value. For example, you could check the user's entry in the control and, if you find it inappropriate, display a message box alerting the user to the problem and then return the focus to the control so that the user can try again.
BEFOREUPDATE EVENT
The BeforeUpdate event applies to the CheckBox, ComboBox, ListBox, OptionButton, ScrollBar, SpinButton, TextBox, and ToggleButton controls. This event occurs as the value or data in the specified control is changed. You can use the event to evaluate the change and decide whether to implement it.
The syntax for the BeforeUpdate event is as follows:
Private Sub object_BeforeUpdate(ByVal Cancel As MSForms.ReturnBoolean)
Here, object is a valid object, and Cancel is a required argument indicating the status of the event. The default setting of False makes the control handle the event. True prevents the update from being executed and makes the application handle the event.
Here's the sequence in which events fire as you move focus to a control, update it, and move on:
- The
Enterevent for the control fires when you move the focus to the control. - The
BeforeUpdateevent for the control fires after you've entered the information for the update (for example, after you've pressed a key in a text box) but before the update is executed. By settingCanceltoTrue, you can prevent the update from taking place. (If you don't setCanceltoTrue, the update occurs and theAfterUpdateevent can't prevent it from occurring.) - The
AfterUpdateevent for the control fires after you've entered the information in the control and the update has been executed. If you set theCancelargument forBeforeUpdatetoTrue, theAfterUpdateevent doesn't fire. - The
Exitevent for the control fires when you move from this control to another control. (After theExitevent fires for the control you've left, theEnterevent fires for the control to which you have moved the focus.)
AFTERUPDATE EVENT
The AfterUpdate event applies to the CheckBox, ComboBox, ListBox, OptionButton, ScrollBar, SpinButton, TextBox, and ToggleButton controls. This event fires after the user changes information in a control and after that update has been executed.
The syntax for the AfterUpdate event is the same for all the controls and objects it applies to:
Private Sub object_AfterUpdate()
KEYDOWN AND KEYUP EVENTS
The KeyDown event and KeyUp event work with the CheckBox, ComboBox, CommandButton, Frame, ListBox, MultiPage, OptionButton, ScrollBar, SpinButton, TabStrip, TextBox, and ToggleButton controls and to the UserForm object. These events are not available to the Image and Label controls.
The KeyDown event fires when the user presses a key on the keyboard. The KeyUp event fires when the user releases the key. The KeyDown and KeyUp events also occur when a key is sent to the user form or control programmatically by using the SendKeys statement. These events don't occur when the user presses Enter when the user form contains a CommandButton control with its Default property set to True, nor when the user presses Esc when the user form contains a CommandButton control with its Cancel property set to True.
When the keystroke moves the focus to another control, the KeyDown event fires for the original control, while the KeyPress and KeyDown events fire for the control to which the focus is moved.
The KeyPress event fires after the KeyDown event and before the KeyUp event.
The syntax for the KeyDown event is as follows:
Private Sub object_KeyDown(ByVal KeyCode As MSForms.ReturnInteger, ByVal Shift AsInteger)
The syntax for the KeyUp event is as follows:
Private Sub object_KeyUp(ByVal KeyCode As MSForms.ReturnInteger, ByVal Shift AsInteger)
Here, object is an object name and is required. KeyCode is a required Integer argument specifying the key code of the key pressed. For example, the key code for the letter t is 84. The key code isn't an ANSI value—it's a special number that identifies the key on the keyboard.
Shift is a required argument specifying whether the Shift, Ctrl, or Alt key was pressed. Use the constants or values shown in Table 15.7.
TABLE 15.7: Shift constants and values
| CONSTANT | VALUE | DESCRIPTION |
fmShiftMask |
1 |
Shift key pressed |
fmCtrlMask |
2 |
Ctrl key pressed |
fmAltMask |
4 |
Alt key pressed |
KEYPRESS EVENT
The KeyPress event is a member of the CheckBox, ComboBox, CommandButton, Frame, ListBox, MultiPage, OptionButton, ScrollBar, SpinButton, TabStrip, TextBox, and ToggleButton controls. It also is a member of the UserForm object. The Label control has no KeyPress event.
The KeyPress event fires when the user presses a printable character, Ctrl plus an alphabetic character, Ctrl plus a special character (symbols), the Esc key, or the Backspace key while the control or object in question has the focus. Pressing the Tab key, the Enter key, or an arrow key doesn't cause the KeyPress event to fire, nor does a keystroke that moves the focus to another control from the current control.
Technically, only ANSI keys fire the KeyPress event. The Delete key isn't an ANSI key, so pressing the Delete key to delete, say, text in a text box doesn't fire the KeyPress event. But deleting the same text in the same text box using the Backspace key does because Backspace is an ANSI key.
The KeyPress event fires after the KeyDown event and before the KeyUp event. It also fires when you use SendKeys to send keystrokes to a user form programmatically.
The syntax for the KeyPress event is as follows:
Private Sub object_KeyPress(ByVal KeyAscii As MSForms.ReturnInteger)
Here, object is a required argument specifying a valid object, and KeyAscii is a required Integer argument specifying an ANSI key code. To get the ANSI key code, use the Asc function. For example, Asc("t") returns the ANSI key code for the letter t (the code is 116).
By default, the KeyPress event processes the code for the key pressed—what you press is what you get. For example, if you press the t key, you get a t; if you press the Delete key, you get a Delete action; and so on. By using a KeyPress event procedure, you can perform checks such as filtering out all nonnumeric keys when the user must enter a numeric value.
MOUSEDOWN EVENT AND MOUSEUP EVENT
The MouseDown and MouseUp events apply to the CheckBox, ComboBox, CommandButton, Frame, Image, Label, ListBox, MultiPage, OptionButton, ScrollBar, SpinButton, TabStrip, TextBox, and ToggleButton controls and to the UserForm object. The MouseDown event fires when the user presses a button on the mouse, and a MouseUp event occurs when the user releases that button. A Click event fires after a MouseUp event occurs.
The syntax for the MouseDown and MouseUp events is as follows for all controls except for MultiPage and TabStrip:
Private Sub object_MouseDown(ByVal Button As Integer, ByVal Shift As Integer,ByVal X As Single, ByVal Y As Single)Private Sub object_MouseUp(ByVal Button As Integer, ByVal Shift As Integer,ByVal X As Single, ByVal Y As Single)
The syntax for the MouseDown and MouseUp events with the MultiPage and TabStrip controls adds an Index argument to specify the index of the page or the tab involved:
Private Sub object_MouseUp(ByVal Index As Long, ByVal Button As Integer, ByValShift As Integer, ByVal X As Single, ByVal Y As Single)Private Sub object_MouseDown(ByVal Index As Long, ByVal Button As Integer, ByValShift As Integer, ByVal X As Single, ByVal Y As Single)
Here, object is a valid object for the statement.
Index returns –1 if the user clicks outside the page or tab area of the control but still within the control (for example, to the right of the rightmost tab in a top-tab TabStrip).
Button is a required Integer argument specifying the mouse button that triggered the event. Table 15.8 lists the possible values for Button.
TABLE 15.8: Button values and constants
| CONSTANT | VALUE | DESCRIPTION |
fmButtonLeft |
1 |
Left (primary) |
fmButtonRight |
2 |
Right (non-primary) |
fmButtonMiddle |
4 |
Middle |
Shift is a required argument specifying whether the Shift, Ctrl, or Alt key was pressed. Table 15.9 lists the values for Shift.
TABLE 15.9: Shift values
| VALUE | KEY OR KEYS PRESSED |
1 |
Shift |
2 |
Ctrl |
3 |
Shift+Ctrl |
4 |
Alt |
5 |
Alt+Shift |
6 |
Alt+Ctrl |
7 |
Alt+Shift+Ctrl |
You can also detect a single key by using the key masks listed in Table 15.7.
X is a required Single argument specifying the horizontal position in points from the left edge of the user form, frame, or page. Y is a required Single argument specifying the vertical position in points from the top edge of the user form, frame, or page.
MOUSEMOVE EVENT
The MouseMove event is available to the CheckBox, ComboBox, CommandButton, Frame, Image, Label, ListBox, MultiPage, OptionButton, TabStrip, TextBox, and ToggleButton controls and to the UserForm object. This event fires when the user moves the mouse pointer over the control or object in question.
The syntax for the MouseMove event is different for the MultiPage control and the TabStrip control than for the other controls and for the UserForm object. The syntax for the other controls is as follows:
Private Sub object_MouseMove(ByVal Button As Integer, ByVal Shift As Integer,ByVal X As Single, ByVal Y As Single)
The syntax for the MultiPage control and the TabStrip control is as follows:
Private Sub object_MouseMove(ByVal Index As Long, ByVal Button As Integer,ByVal Shift As Integer, ByVal X As Single, ByVal Y As Single)
Here, object is a required argument specifying a valid object.
For the MultiPage and TabStrip controls, Index is a required argument that returns the index of the Page object in the MultiPage control or the Tab object in the TabStrip control associated with the event procedure.
Button is a required Integer argument that returns which mouse button (if any) the user is pressing. Table 15.10 lists the values for Button.
TABLE 15.10: Button values
| VALUE | BUTTON PRESSED |
0 |
No button |
1 |
Left |
2 |
Right |
3 |
Left and right |
4 |
Middle |
5 |
Left and middle |
6 |
Middle and right |
7 |
Left, middle, and right |
Shift is a required Integer argument that returns a value indicating whether the user is pressing the Shift, Alt, and/or Ctrl keys. Refer back to Table 15.9 for the list of Shift values.
X is a required Single argument that returns a value specifying the horizontal position in points from the left edge of the user form, frame, or page. Y is a required Single argument specifying the vertical position in points from the top edge of the user form, frame, or page.
As with the MouseDown and MouseUp events, you can also detect a single key by using the key masks listed in Table 15.7.
Like most windows in the Windows operating system, user forms largely experience life as a nonstop sequence of various mouse events. MouseMove events monitor where the mouse pointer is on the screen and which control has captured it. MouseMove events fire even if you use the keyboard to move a user form from under the mouse pointer because the mouse pointer ends up in a different place in relation to the user form even though it hasn't moved in the conventional sense.
One use for the MouseMove event is to display appropriate text or an image for a control at which the user is pointing. For example, suppose a user form provides a list of available products, with each product's title appearing in a label. When the user positions the mouse pointer over a title in the label, you could use the MouseMove event to load a picture of the product into an Image control and a short description into another label. Moving the mouse pointer onto an object without clicking it has become known as hovering. It is common in websites and some applications to respond to hovering by displaying a tip identifying the object hovered on. If you hover your mouse on an Office application's Ribbon, for example, a tooltip pops out.
BEFOREDRAGOVER EVENT
The BeforeDragOver event applies to the UserForm object itself and to the following controls: CheckBox, ComboBox, CommandButton, Frame, Image, Label, ListBox, MultiPage, OptionButton, ScrollBar, SpinButton, TabStrip, TextBox, and ToggleButton. A BeforeDragOver event is triggered when the user is performing a drag-and-drop operation.
The syntax for the BeforeDragOver event depends on the object or control in question. The basic syntax for the UserForm object and all controls except the Frame, TabStrip, and MultiPage is as follows, where object is a valid UserForm or control:
Private Sub object_BeforeDragOver(ByVal Cancel As MSForms.ReturnBoolean, ByValControl As MSForms.Control, ByVal Data As MSForms.DataObject, ByVal X As Single,ByVal Y As Single, ByVal State As MSForms.fmDragState, ByVal Effect As MSForms.ReturnEffect, ByVal Shift As Integer)
The syntax for the BeforeDragOver event with the Frame control is as follows, where frame is a valid Frame control:
Private Sub frame_BeforeDragOver(ByVal Cancel As MSForms.ReturnBoolean, ByValControl As MSForms.Control, ByVal Data As MSForms.DataObject, ByVal X As Single,ByVal Y As Single, ByVal State As MSForms.fmDragState, ByVal Effect As MSForms.ReturnEffect, ByVal Shift As Integer)
The syntax for the BeforeDragOver event with the MultiPage control is as follows, where multipage is a valid MultiPage control:
Private Sub multipage_BeforeDragOver(ByVal Index As Long, ByVal Cancel As MSForms.ReturnBoolean, ByVal Control As MSForms.Control, ByVal Data As MSForms.DataObject, ByVal X As Single, ByVal Y As Single, ByVal State As MSForms.fmDragState, ByVal Effect As MSForms.ReturnEffect, ByVal Shift As Integer)
The syntax for the BeforeDragOver event with the TabStrip control is as follows, where tabstrip is a valid TabStrip control:
Private Sub tabstrip_BeforeDragOver(ByVal Index As Long, ByVal Cancel As MSForms .ReturnBoolean, ByVal Data As MSForms.DataObject, ByVal X As Single, ByVal Y AsSingle, ByVal DragState As MSForms.fmDragState, ByVal Effect As MSForms .ReturnEffect, ByVal Shift As Integer)
These are the different parts of the statements:
Indexis the index of thePageobject in a MultiPage control (or theTabobject in a TabStrip control) that is affected by the drag-and-drop.Cancelis a required argument giving the status of theBeforeDragOverevent. The default setting isFalse, which makes the control handle the event. A setting ofTruemakes the application handle the event.Controlis a required argument specifying the control that is being dragged over.Datais a required argument specifying the data being dragged.Xis a required argument specifying the horizontal distance in points from the left edge of the control.Yis a required argument specifying the vertical distance in points from the top of the control.DragStateis a required argument specifying where the mouse pointer is in relation to a target (a location at which the data can be dropped). Table 15.11 lists the constants and values forDragState.TABLE 15.11: DragState constants and values CONSTANT VALUE POSITION OF MOUSE POINTER fmDragStateEnter0Within range of a target fmDragStateLeave1Outside the range of a target fmDragStateOver2At a new position, but remains within range of the same target Effectis a required argument specifying the operations the source of the drop is to support, as listed in Table 15.12.TABLE 15.12: Effect constants and values CONSTANT VALUE DROP EFFECT fmDropEffectNone0Doesn't copy or move the source to the target fmDropEffectCopy1Copies the source to the target fmDropEffectMove2Moves the source to the target fmDropEffectCopyOrMove3Copies or moves the source to the target Shiftis a required argument specifying whether the Shift, Ctrl, or Alt key is held down during the drag-and-drop operation, as listed in Table 15.7.
You use the BeforeDragOver event to control drag-and-drop actions that the user performs. Use the DragState argument to make sure that the mouse pointer is within range of a target.
BEFOREDROPORPASTE EVENT
The BeforeDropOrPaste event applies to the CheckBox, ComboBox, CommandButton, Frame, Image, Label, ListBox, MultiPage, OptionButton, ScrollBar, SpinButton, TabStrip, TextBox, and ToggleButton controls and to the UserForm object.
A BeforeDropOrPaste event fires just before the user drops or pastes data onto an object.
The syntax for the BeforeDropOrPaste event is different for the MultiPage and TabStrip controls than for the UserForm object and for the other controls. The basic syntax is as follows:
Private Sub object_BeforeDropOrPaste(ByVal Cancel As MSForms.ReturnBoolean, ByValControl As MSForms.Control, ByVal Action As MSForms.fmAction, ByVal Data AsMSForms.DataObject, ByVal X As Single, ByVal Y As Single, ByVal Effect AsMSForms.ReturnEffect, ByVal Shift As Integer)
The syntax for the MultiPage control is as follows, where multipage is a valid MultiPage control:
Private Sub multipage_BeforeDropOrPaste(ByVal Index As Long, ByVal Cancel AsMSForms.ReturnBoolean, ByVal Control As MSForms.Control, ByVal Action As MSForms.fmAction, ByVal Data As MSForms.DataObject, ByVal X As Single, ByVal Y AsSingle, ByVal Effect As MSForms.ReturnEffect, ByVal Shift As Integer)
The syntax for the TabStrip control is as follows, where tabstrip is a valid TabStrip control:
Private Sub tabstrip_BeforeDropOrPaste(ByVal Index As Long, ByVal Cancel AsMSForms.ReturnBoolean, ByVal Action As MSForms.fmAction, ByVal Data As MSForms.DataObject, ByVal X As Single, ByVal Y As Single, ByVal Effect As MSForms.ReturnEffect, ByVal Shift As Integer)
Here are the parts of the syntax:
objectis a required object specifying a valid object.- For the MultiPage control,
Indexis a required argument specifying thePageobject involved. Cancelis a required argument giving the status of the event. The default setting ofFalsemakes the control handle the event;Truemakes the application handle the event.Controlis a required argument specifying the target control.Actionis a required argument specifying the result of the drag-and-drop operation. Table 15.13 shows the constants and values forAction.TABLE 15.13: Action constants and values CONSTANT VALUE ACTION TAKEN fmActionPaste2Pastes the object into the target. fmActionDragDrop3The user has dragged the object from its source and dropped it on the target. Datais a required argument specifying the data (contained in aDataObject) being dragged and dropped.Xis a required argument specifying the horizontal distance in points from the left edge of the control for the drop.Yis a required argument specifying the vertical distance in points from the top of the control.Effectis a required argument specifying whether the drag-and-drop operation copies the data or moves it, as listed in Table 15.12.Shiftis a required argument specifying whether the user has pressed the Shift, Ctrl, and/or Alt keys, as listed in Table 15.7.
The BeforeDropOrPaste event fires when a data object is transferred to a MultiPage or TabStrip control and just before the drop or paste operation occurs on other controls.
DBLCLICK EVENT
The DblClick event works with the CheckBox, ComboBox, CommandButton, Frame, Image, Label, ListBox, MultiPage, OptionButton, TabStrip, TextBox, and ToggleButton controls, as well as the UserForm object.
A DblClick event occurs when the user double-clicks a control or object with the left mouse button. The double-click must be fast enough to register as a double-click in Windows (this speed is controlled by the setting on the Buttons tab in the Mouse Properties dialog box in Control Panel) and occurs after the MouseDown event, the MouseUp event, and the Click event (for controls that support the Click event).
The DblClick event has a different syntax for the MultiPage and TabStrip controls than for the other controls or for the user form.
For the MultiPage and TabStrip controls, the syntax is as follows:
Private Sub object_DblClick(ByVal Index As Long, ByVal Cancel As MSForms.ReturnBoolean)
The syntax for the DblClick event for other controls is as follows:
Private Sub object_DblClick(ByVal Cancel As MSForms.ReturnBoolean)
Here, object is a required argument specifying a valid object. For the MultiPage control and the TabStrip control, Index is a required argument specifying the Page object within a MultiPage control or the Tab object within a TabStrip control to be associated with the event procedure.
Cancel is a required argument specifying the status of the event. The default setting of False causes the control to handle the event; True causes the application to handle the event instead and causes the control to ignore the second click.
In controls that support both the Click event and the DblClick event, the Click event occurs before the DblClick event. If you take an interface action (such as displaying a message box) with the Click event procedure, it blocks the DblClick event procedure from running. In the following example, the DblClick event procedure doesn't run:
Private Sub CommandButton1_Click()MsgBox "Click event"End SubPrivate Sub CommandButton1_DblClick _(ByVal Cancel As MSForms.ReturnBoolean)MsgBox "Double-click event"End Sub
However, you can execute non-interface statements in the Click event procedure without blocking the DblClick event procedure. The following example declares a private String variable named strMessage in the declarations portion of the code sheet for the user form. The Click event procedure for the CommandButton1 command button assigns text to strMessage. The DblClick event procedure assigns more text to strMess and then displays a message box containing strMessage so that you can see that both events have fired. Don't step into this code by pressing F8 in the VBA Editor—instead, press F5 to run it, or it won't work:
Private strMess As StringPrivate Sub CommandButton1_Click()strMess = "Click event" & vbCrEnd SubPrivate Sub CommandButton1_DblClick _(ByVal Cancel As MSForms.ReturnBoolean)strMessage = strMessage & "Double-click event"MsgBox strMessageEnd Sub
For most controls you won't want to use both a Click event procedure and a DblClick event procedure—you'll choose one or the other as appropriate to the control's purpose.
ERROR EVENT
The Error event applies to the CheckBox, ComboBox, CommandButton, Frame, Image, Label, ListBox, MultiPage, OptionButton, ScrollBar, SpinButton, TabStrip, TextBox, and ToggleButton controls. It also applies to the UserForm object. The Error event fires when a control encounters an error and is unable to return information about the error to the program that called the control. We will explore error handling in depth in Chapter 17, “Debugging Your Code and Handling Errors.”
The syntax for the Error event for the UserForm object and for all controls except the MultiPage control is as follows:
Private Sub object_Error(ByVal Number As Integer, ByVal Description As MSForms.ReturnString, ByVal SCode As Long, ByVal Source As String, ByVal HelpFile AsString, ByVal HelpContext As Long, ByVal CancelDisplay As MSForms.ReturnBoolean)
The syntax for the Error event for the MultiPage control is as follows, where multipage is a valid MultiPage control:
Private Sub multipage_Error(ByVal Index As Long, ByVal Number As Integer, ByValDescription As MSForms.ReturnString, ByVal SCode As Long, ByVal Source As String,ByVal HelpFile As String, ByVal HelpContext As Long, ByVal CancelDisplay AsMSForms.ReturnBoolean)
These are the components of the syntax:
objectis the name of a valid object.- For a MultiPage control,
Indexis the index of thePageobject in the MultiPage control associated with the event. Numberis a required argument that returns the value used by the control to identify the error.Descriptionis a required String argument describing the error.SCodeis a required argument giving the OLE (Object Linking and Embedding) status code for the error.Sourceis a required String argument containing the string identifying the control involved.HelpFileis a required String argument containing the full path to the Help file that contains theDescription.HelpContextis a required Long argument containing the context ID for theDescriptionwithin the Help file.CancelDisplayis a required Boolean argument that controls whether VBA displays the error message in a message box.
Events That Apply Only to a Few Controls
This section discusses the three events that apply only to one or two controls. The first of the three is the DropButtonClick event, which applies only to the ComboBox and TextBox controls. The second and third are the SpinUp and SpinDown events, which apply only to the SpinButton control.
DROPBUTTONCLICK EVENT
The DropButtonClick event fires when the user displays or hides a drop-down list on a ComboBox by clicking the drop-down button or by pressing the F4 key when the ComboBox has the focus (is selected). DropButtonClick also fires when the user presses the F4 key with a TextBox control selected, though this manifestation of the event is arcane enough to be singularly useless. It also fires when the DropDown method is executed in VBA to display the drop-down list, and it fires again when the DropDown method is executed again to hide the drop-down list.
The syntax for the DropButtonClick event is as follows:
Private Sub object_DropButtonClick( )
Here, object is a valid ComboBox or TextBox control.
One use for the DropButtonClick event is to add items to a ComboBox control rather than adding them at load time via the Initialize event. By adding these items only on demand (I'm assuming the user might not use the ComboBox control at all or might type information into its text-box area), you can cut down on load time for the user form. You can also load the ComboBox with data relevant to the other choices the user has made in the dialog box, allowing for more targeted information than you could have provided by loading the ComboBox with the Initialize event.
SPINDOWN AND SPINUP EVENTS
The SpinDown and SpinUp events apply only to the SpinButton control. SpinDown and SpinUp are used to control what happens when the user clicks either the down-arrow button and up-arrow button, respectively, of a vertical SpinButton control or the right-arrow button and left-arrow button, respectively, of a horizontal SpinButton control. The SpinDown event fires when the user clicks the down-arrow or right-arrow button, and the SpinUp event fires when the user clicks the up-arrow or left-arrow button.
The syntax for the SpinUp event and the SpinDown event is as follows:
Private Sub spinbutton_SpinDown()Private Sub spinbutton_SpinUp()
Here, spinbutton is a SpinButton control.
By default, the SpinDown event decreases and the SpinUp event increases the Value property of the SpinButton by the SmallChange increment.
The Bottom Line
- Understand what a complex dialog box is. Simple dialog boxes tend to be static, but complex dialog boxes are dynamic—they change during execution in response to clicks or other interaction from the user.
- Master It Describe two types of dynamic behavior typical of complex dialog boxes.
- Reveal and hide parts of a dialog box. Dialog boxes need not display everything at once. Word's Find And Replace dialog box illustrates how useful it can be to display an abbreviated dialog box containing the most common tasks and expand the box to reveal less-popular options if the user needs access to them.
- Master It Name the two most common techniques you can use to display additional options in a dialog box.
- Create multipage dialog boxes. VBA includes the MultiPage control, which enables you to create multipage dialog boxes. Word's Font dialog box is an example of one. You can access any page (one at a time) by clicking its tab at the top of the page.
- Master It How does the TabStrip control differ from the MultiPage control? What are the typical uses for each?
- Create modeless dialog boxes. A modeless dialog box can be left visible onscreen while the user continues to work in an application. For example, the Find And Replace dialog box in Access, Word, and Excel is modeless, as is the Replace dialog box in PowerPoint. A modal dialog box, by contrast, must be closed by users before they can continue to interact with the application.
- Master It How do you make a user form modeless?
- Work with form events. Events are actions that happen to controls (or the form itself) while a program is executing. By using events, you can monitor what the user does and take action accordingly or even prevent the user from doing something that doesn't seem like a good idea.
- Master It Name two of the three most commonly used events in VBA programming.