
In the previous chapter, we quickly touched on how we can extend capabilities of Zoho CRM by integrating it with other Zoho apps. For instance, by integrating CRM with Zoho Campaigns you can use the power of a robust email marketing tool to engage with your prospects and your customers.
The previous chapter was solely focused on marketing and integrating with apps that can boost your marketing efforts. Similarly, you can connect Zoho CRM to other apps in Zoho suite and extend its capabilities in different areas, such as finance, project management, and document management.
Easy integration and single sign-on (log in once and use all Zoho apps with the same account) is arguably one of the differentiating factors of the Zoho suite, thanks to a collection of interoperating business apps.
In this chapter, we will have a quick look at other Zoho apps that can improve your productivity and make your life easier by connecting to Zoho CRM. I won’t be getting into details about any of these apps and assume that you (or people in your team) either have a basic idea of how each of these apps works, or you are planning to learn more about them. Otherwise integrating them with Zoho CRM will be pointless.
Note
Zoho CRM also integrates with a myriad of third-party apps and services, including Google Apps, Microsoft Office, MailChimp, and SurveyMoneky (see the full list here: https://www.zoho.com/crm/integration/ ). The focus of this chapter is integrating with Zoho apps. We will quickly touch on third-party integrations in the next chapter.
All the Zoho Integrations
Zoho CRM can easily integrate with these Zoho apps:
Zoho Mail – to bring emails into CRM and stay in touch with clients and prospects more effectively;
Zoho Campaigns – to plan and execute successful email campaigns directly from CRM and generate detailed analytics;
Zoho Reports – to generate sophisticated enterprise-level business reports and analytics;
Zoho Survey – to run surveys and link results directly to CRM;
Zoho SalesIQ – to bring the valuable data from your website visits and visitor interactions into CRM;
Zoho Projects – to manage all your projects from the comfort of the CRM;
Zoho Desk – to provide better support to your customers inside CRM;
Zoho Writer – to improve productivity features of CRM, such as mail merge;
Zoho Finance Suite– to stay on top of your accounting by connecting bookkeeping and accounting apps to CRM;
Zoho Creator – to dramatically extend capabilities of CRM by creating fully customized and integrated business applications; and
Zoho Motivator – to turn selling into engaging and rewarding games for your sales force.
One key point to keep in mind is that these integrations are between CRM and other Zoho apps that each offer limited free service and different tiers of paid services, each unlocking a different set of features. You may need to pay extra for each integrating app to keep certain features available beyond the (often 15-day trial period).
Now let’s have closer at these integrations. We have already looked at Zoho Campaigns and Survey in Chapter 5. Here, we will have a closer look at integration with Zoho Mail, Projects, Invoice, Books, and Creator. You can explore other apps and integration as you wish.
Note
Your Zoho account must have an Administrator level account for you to be able to configure integrations.
Integrating with Zoho Mail
In Chapter 3, you have configured email for CRM and enabled Sales Inbox. That was actually your first integration of an external service, that is, email with CRM. By doing so, CRM and your email account are connected to each other and exchange information to give you a better idea about your day-to-day business.
For instance, the moment you connect your (work) email address to CRM, the email history of your contacts will appear in their corresponding contact detail page. You can send emails directly from the contact page and they will appear in your sent items as if they were sent from your email client (e.g., Zoho Mail, Outlook, Apple Mail).
Note
Regardless of the email service you are using, be it Zoho, Gmail, Outlook, or others, Zoho Mail is the email client (or, email app) that manages your email account from Zoho or other services. So, if you have an @zoho.com, @gmail.com, or @yourcompany.com email address, you configure Zoho Mail to be your email app and that is what actually integrates with Zoho CRM.
Sharing Emails with Other CRM Users
There is one more feature that you can use to enable emails in the CRM, which is the ability to share all or some of your emails with other CRM users. Depending on your business process and internal policies, you have the option of letting other users see your email correspondence with your leads and contacts.
For example, sometimes your superior officer may need to see past communications without asking you to be bothered with forwarding messages to them. They can simply take a peek at your emails directly.
Now, this may sound creepy, or even unnecessary, but there are scenarios where this feature comes in handy. Obviously, other email messages in your inbox that have nothing to do with leads or contact in the CRM will not be shared with others even if email sharing is on for your account. Phew!
By default, email sharing is off, which means all your email correspondence is only visible to you. An administrator or the users themselves can change this setting.
There are three types of email sharing available:
Complete: all the emails of the sharing user will be accessible to the users specified,
Custom: sharing user will decide which email to share with whom, and
Private: no emails will be shared: default state.
Follow these steps to adjust the email sharing settings:
In Zoho CRM Open the Setup page, then click Email Settings under Generic section.
On the Email Settings page, open the Email Sharing tab. Under Email Sharing Permissions there is a list of all users with their email sharing status in front of them, Private for the CEO and User’s Choice for the rest (Figure 6-1).
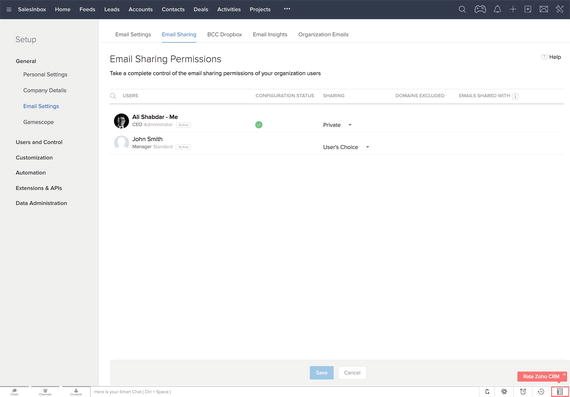
Figure 6-1. Email Sharing tab in the Email Settings page
Click on the status of the CEO (you) and select Custom from the drop-down list. Notice the value Emails Shared With column in the list column changes to All (Figure 6-2). This essentially means that this user’s emails are now shared with everybody, which is not optimal and needs to be limited.
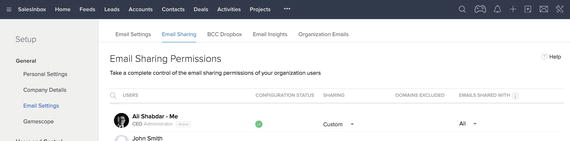
Figure 6-2. Changing email sharing settings for a user.
Click on the value All in the list. The Email Sharing Setting dialog box for the user opens (Figure 6-3). A series of selected check boxes will be listed showing the hierarchy of roles in your organization down to the users.
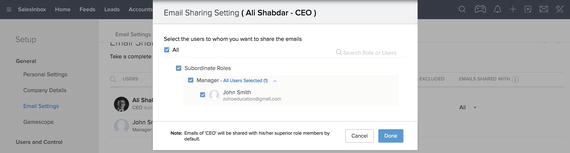
Figure 6-3. Selecting email sharing permissions from existing roles and users
Uncheck All, so all check boxes are unchecked. Then select which roles or users you want to permissions to. Click Done to proceed.
Emails Shard With value is now changed to a more limited and certain number of roles and users (Figure 6-4).
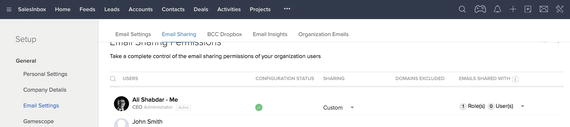
Figure 6-4. Custom email sharing applied
Reference
Review details of email sharing permission in the official documentations: https://www.zoho.com/crm/help/zoho-mail/email-sharing.html .
Integrating with Zoho Projects
Projects are commonplace in most businesses and managing projects often needs a dedicated tool. Simpler projects, such as renovating the office flooring, can be easily managed with a to do list app, or an Excel sheet, but as projects grow, the number of tasks, interdependencies, priorities, project team, and stakeholders will grow too. In such case, starting off with a reliable project management app is a prudent move.
For those of us who use Zoho CRM, the good news is that you can use Zoho Projects alongside CRM and integrate them to make things easier for your team and your client.
In an ideal scenario, you start with a lead in the CRM, convert it into a deal, and take it through the pipeline until you close a deal.
Suppose you are a service provider, say a web design agency that uses Zoho CRM for sales force automation. When you win a deal, it means a new project kicks off with all the bells and whistles. You can easily create a project from within CRM, assign team members, track billable hours, monitor project performance, and stay in touch with the client, all from the same place.
By default, CRM adds a link to projects portal in the top menu bar. To set up the integration, follow these steps:
In Zoho CRM, open the Projects page and then click on the Get Started button (Figure 6-5). Alternatively, you can open Setup ➤ Extensions & APIs ➤ Zoho ➤ Zoho Projects (Figure 6-6).
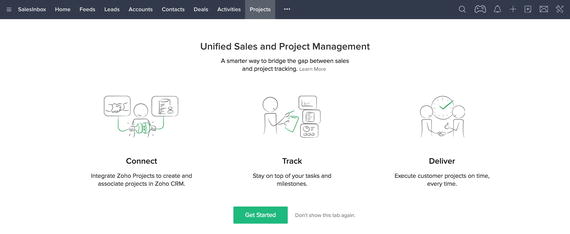
Figure 6-5. Setting up CRM and Project intregation directly from the Projects page
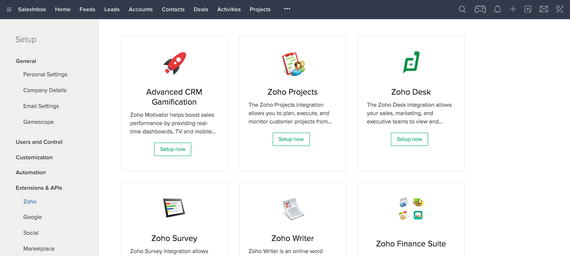
Figure 6-6. Setting up CRM and Project intregation from the Setup page
If this is your first time using Zoho Projects, you may get a warning message: “Client Mapping: No client account found to match.” Ignore this and proceed.
In the Zoho Projects Integration page (Figure 6-7), select Create New Portal to continue.
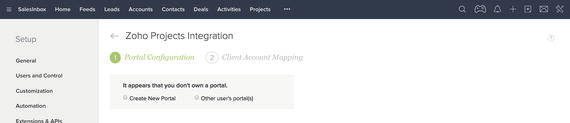
Figure 6-7. Setting up Zoho Projects for the first time
In the Portal Configuration step (Figure 6-8), type in a Portal Name. This name needs to be a single word with no space and special characters in it. Click Create to continue.
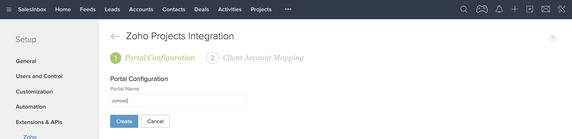
Figure 6-8. Setting a portal name for Zoho Projects
Next, under Choose Portal, select the portal you created in the previous step from the drop-down list (Figure 6-9).
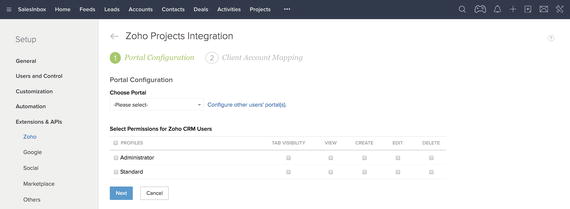
Figure 6-9. Selecting the newly created Projects portal to be integrated with CRM
We will have to give permission to CRM users to access Projects. There are five different permissions to grant to users: to see Projects tab (page) in the CRM, view projects, create projects, edit projects, and delete projects. Grant Administrators access permission to all these by ticking the corresponding check marks. Then grant only Tab Visibility and View to Standard users (Figure 6-10).
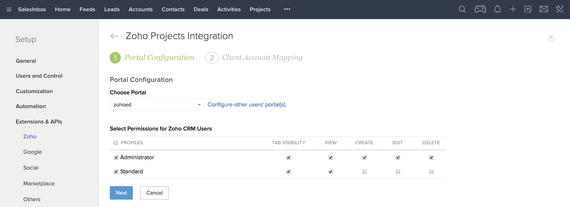
Figure 6-10. Granting permissions to CRM users to access different aspects of Projects
Click Next to finish the integration. Then review the settings and permissions and edit them if necessary by clicking on the Edit Configuration link (Figure 6-11).
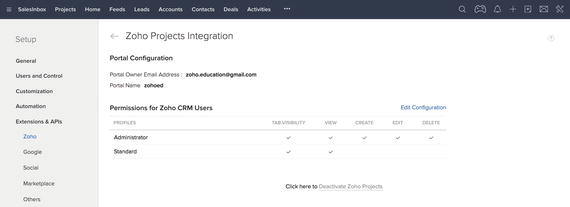
Figure 6-11. Reviweing the intregation settings after a sucessful connection
To test the integration open the Projects page in the CRM. You will be welcomed by a warning page (Figure 6-12) saying that you are yet to create a project. Click on the New Project button, if you wish to continue with Zoho Projects at this point.
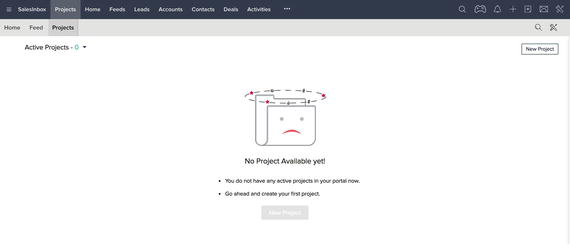
Figure 6-12. Oops, no projects yet
Reference
If you get stuck somewhere, feel free to refer to the official documentation at https://www.zoho.com/crm/help/zoho-projects/activate-zoho-projects-integration.html .
Integrating with Zoho Finance Suite
Arguably, CRM (any flavor) and financial software (accounting, bookkeeping, etc.) are two of the most important information systems (or software) any organization can have in their arsenal.
So, it is safe to say that in most cases, if not all, having them work together under one roof would sound like a very good idea. Fortunately, if you are a Zoho user, you can integrate Zoho CRM and Zoho Finance Suite (Books, Invoice, Expense, Subscriptions) and have them work together.
Follow these steps to integrate Zoho CRM and Zoho Finance Suite:
In Zoho CRM open Setup ➤ Extensions & APIs ➤ Zoho ➤ Zoho Finance Suite. Then click on the Get Started button in the integration page (Figure 6-13).
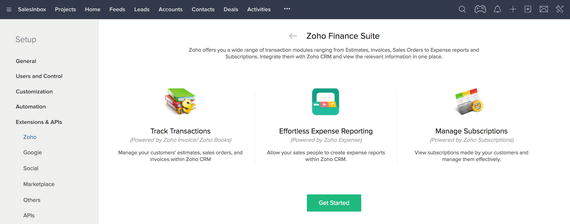
Figure 6-13.
In the next page (Figure 6-14), select the Finance Suite apps that you want to integrate with CRM and then click Next to continue.
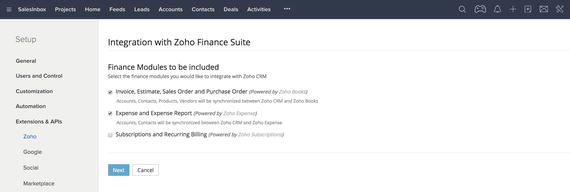
Figure 6-14. Selecting Finance Suite apps to integrate with CRM
The page expands. Enter organizational details of your company similar to Figure 6-15. This information will be used by the Finance Suite apps selected in the previous step to create an organization. Click Next when you are done.
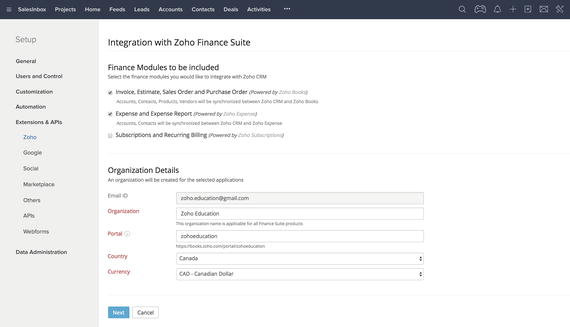
Figure 6-15. Entering organizational details
The page expands again asking you whom (in CRM) you would like to have financial transactions with (Figure 6-16). Select Accounts & their Contacts, so Finance Suite apps features get enabled for both Accounts and Contacts.
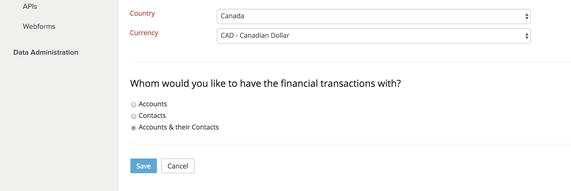
Figure 6-16. Indicating which CRM modules to work with financial transactions
Click Save to finish the integration. Details of the integration will be shown (Figure 6-17). As long as the integration is active Accounts and their Contacts, Vendors, and Products information will be synced between CRM and enable Finance Suite apps.
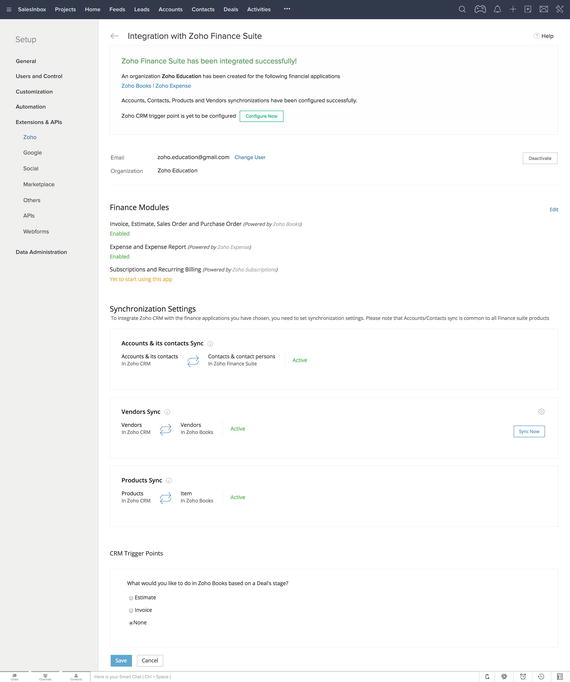
Figure 6-17. Integrations details after a succesful connection between CRM and Finance Suite
Hover the mouse curse over Accounts & its contacts Sync box (Figure 6-18). Then click on the settings icon (gear) to configure the sync.
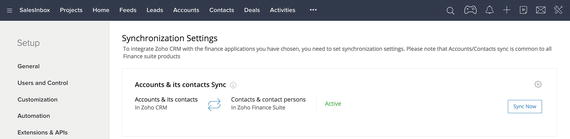
Figure 6-18. Changing sync settings
In the sync settings page (Figure 6-19), review syncing modules, overwrite rules, and field-mappings between CRM and Finance Suite. For now, leave the values untouched and go back to the integration summary page.
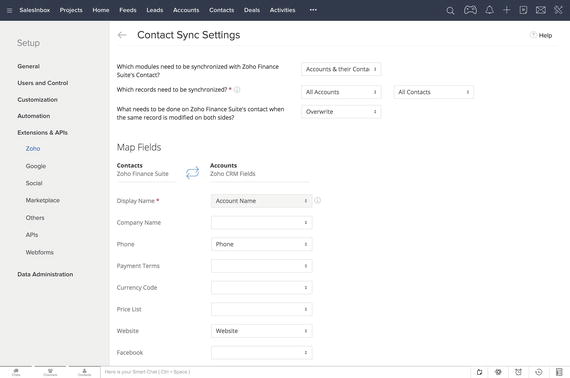
Figure 6-19. Sync settings page
In the integration page, scroll down to CRM Trigger Points. Here you can tell Zoho Books (the accounting app in the Finance Suite) what to do depending on the stage a CRM deal is in.
Click on Estimate (Figure 6-20) to review the available options. For instance, you can set up Zoho Books to create an estimate automatically when a deal is in the “Quote/Proposal” stage.
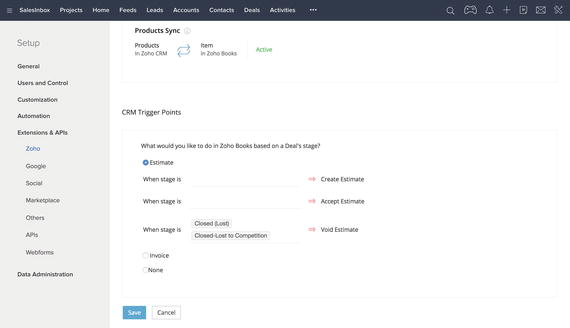
Figure 6-20. Configuring Zoho Books trigger point from CRM
Select Invoice (Figure 6-21). This option is simpler and has no staged settings. If you click the third option, None, then CRM won’t trigger any action in Books. Leave this at Invoice and click Save to apply the changes.
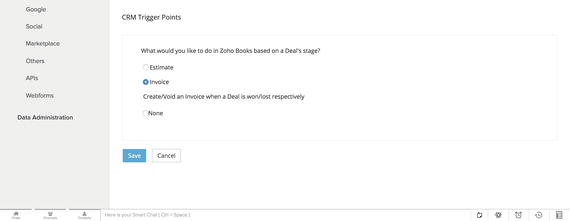
Figure 6-21. Setting a new invoice be created (or voided) in Zoho Books when a Deal stage is set to won (or lost)
You can always come back and fine-tune the sync settings between CRM and the Finance Suite.
Reference
If you get stuck somewhere, feel free to refer to the official documentation at https://www.zoho.com/crm/help/zoho-finance-suite/ .
Integrating with Zoho Creator
Zoho Creator is a powerful and easy-to-use business application creation platform. You can create simple or complex applications on the cloud: something as simple as a contact manager, a mini CRM, a complete real estate management system, or virtually any app that deals with business process and data.
Zoho CRM is quite customizable. Armed with features such as automation workflows, custom modules, and webforms, it can meet the requirements of most businesses. But as your business grows, your business requirements grow more complex as well.
In such a case, you can create customized apps with Zoho Creator and integrate them to be accessed from within the CRM. Creator apps also exchange data with CRM, meaning each can use information from the other one.
Also, you might be already using Zoho Creator and now you want to connect one or more Creator apps to CRM to extend its capabilities.
In a real-life example, a few years ago I had a client who had a team of telemarketers working for his company. These telemarketers, would open CRM, call leads and read through a sales script to pursue the person on the phone to buy their products. The sales script needed to be “smart” meaning it should have adapted itself to a person’s feedback, showing only questions that were in line with the answers to the previous question. There should also be a way for the telemarketers to take note while on the phone.
After evaluating the requirements and considering available resources, constraints, and user experience factors, I decided to make Creator app and embed it into CRM. It worked perfectly and the client was very happy. Implementing a similar solution purely in CRM would have proved impossible. Creator, with minimal development work, improved the process dramatically.
Shameless promotion
In parallel to this book, I have written another one exclusively about Zoho Creator called Zoho Creator: Build Cloud-Based Business Applications from the Ground Up (Apress, 2017). I encourage you to read it and learn more about Zoho Creator if you are serious about creating high-quality cloud-based apps for SMEs with no or little programming background and minimal time and effort.
All said, you should make sure you are not reinventing the wheel and what you are trying to accomplish in Zoho Creator is not possible or is much harder to accomplish with CRM alone.
To enable Zoho Creator integration with Zoho CRM, follow these steps:
Open Setup ➤ Extensions & APIs ➤ Zoho ➤ Build Custom App (Powered by Zoho Creator).
In the Build Custom Apps page (Figure 6-22), click on the Enable Custom Apps button.
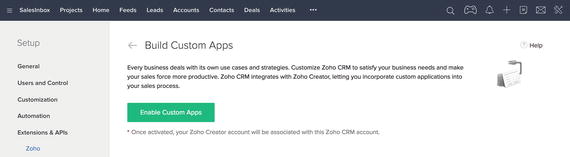
Figure 6-22. Enabling Zoho Creator integration
A success message will appear indicating the integration was complete (Figure 6-23).
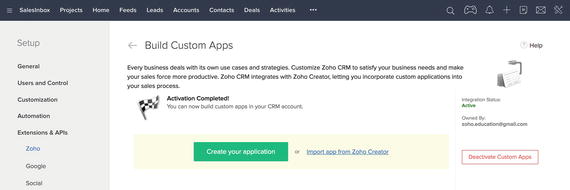
Figure 6-23. Integration was successful
Here, there are two options to choose from:
to create a new Creator application, or
to import an exiting one from Creator.
Clicking on the Import from Zoho Creator link will open the Import App dialog box, listing existing apps in your CRM account (Figure 6-24).
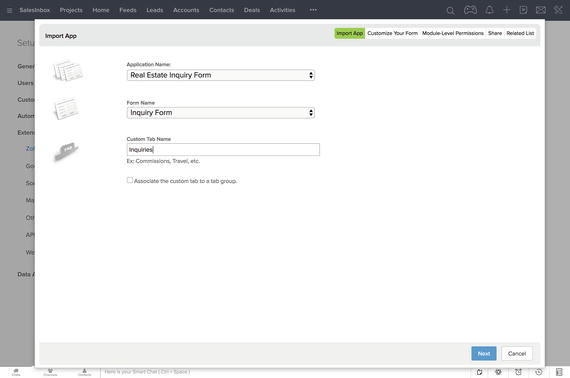
Figure 6-24. Importing an existing Creator app to CRM
On the other hand, clicking on the Create Your Application button will open the Create Custom App dialog box (Figure 6-25) where you can build a Creator app from scratch and then import it into CRM.
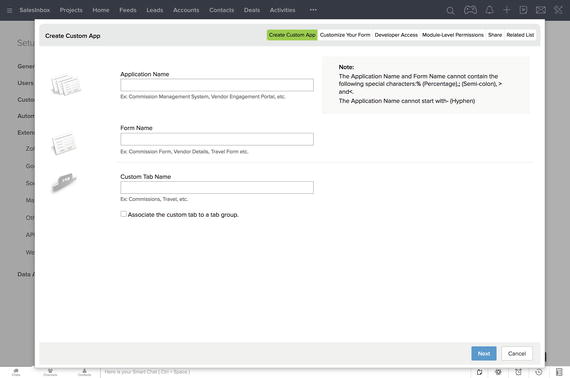
Figure 6-25. Creating a new Creator app from within CRM
Reference
If you want to learn about more advanced settings or you get stuck somewhere, feel free to refer to the official documentation at https://www.zoho.com/crm/help/custom-apps/ .
Summary
This chapter was all about extending Zoho CRM capabilities by integrating it with other Zoho apps. You learned how to integrate some of these apps: Projects, Finance Suite, and Creator, which based on experience, I can say that will improve your productivity dramatically when coupled with CRM.
In the next chapter, we will go even further and learn how to take CRM to the next level by connecting it to the external world, but before that we will go into detail about some of the most advanced features of CRM available in Professional and Enterprise editions.