
If you are making your Internet connection available for other people to use, you may want to redirect users to a login page to control access. Even if you don't want to require authentication, you may still want to redirect users to a page containing your terms of service. This is common in cases where you are allowing wireless access to your network: for example, you run a business that gives customers free wireless Internet access. In such cases, you can utilize pfSense's captive portal service. Captive portal can be used to redirect wireless users to a login page, and it can also be used for wired users. Earlier versions of pfSense were limited to use of one interface on your firewall, but the current version allows you to enable captive portal on multiple interfaces.
To get started implementing a captive portal on your network, navigate to Services | Captive Portal. This page displays a table with all of the defined captive portal zones. There is a green +Add button below and to the right of the table; pressing this button allows you to add a zone.
When you add a zone, you are initially directed to the Add Zone page. Here you are required to enter Zone Name, which can only contain letters, digits, and underscores. You can also enter a brief (non-parsed) description in the Description field. Enter this information and press the Continue button.
Now we will be directed to the Configuration page, where we are presented with a warning which contains the following information:
- Make sure to enable the DHCP server on the captive portal interface
- Make sure the maximum DHCP lease time is longer than the captive portal hard timeout
- Make sure the DNS Forwarder or DNS Resolver is enabled, or DNS lookups will not work for unauthenticated clients
To begin configuration, check the Enable Captive Portal checkbox. Once this box is checked, the other options will appear on the page. The first option is the Interfaces drop-down box, in which you select the interface on which captive portal will be enabled. In most scenarios where you are setting up a captive portal, you probably want to have a separate interface or interfaces for captive portal users. The next option is Maximum concurrent connections. This controls not how many users can be logged into the captive portal, but rather how many concurrent connections are allowed per IP address.
The next two settings are Idle Timeout (Minutes) and Hard Timeout (Minutes). Idle Timeout (Minutes) controls how long it is before an idle client is disconnected, while Hard Timeout (Minutes) controls how long it is before a client is disconnected even if they are active. Both settings are optional and leaving them blank disables them.
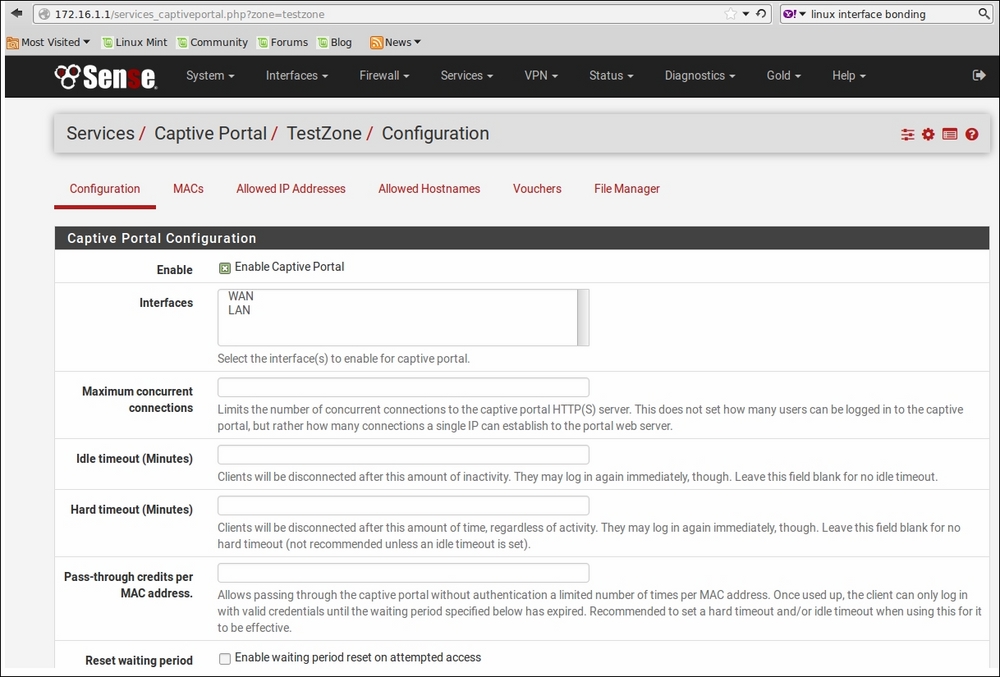
The Configuration tab on the captive portal configuration page.
The next setting is the Pass-through credits per MAC address. edit box. Entering a number here allows a client to pass through the captive portal this number of times without being directed to the captive portal page. Once this number is exceeded, the user is directed to the captive portal login page again. As the name implies, this is done on a per-MAC address basis.
The Reset waiting period checkbox, if checked, will result in the waiting period on login attempts being imposed on clients whose pass-through credits have been exhausted. If not checked, such users will be allowed to login again immediately. The Logout popup window checkbox, if checked, will display a pop-up logout page when the users initially pass through the captive portal. This can be used to allow users to explicitly log out, but it also can be used if you want to display a page informing the user that they have successfully passed through the captive portal.
There are three options covering URL redirects. You can specify a URL on another server by entering it in the Pre-authentication redirect URL edit box. After accessing this page, the user will be redirected to the login page. Normally, after login, the user will be able to access the URL they tried to access before logging in, but if you set After authentication Redirection URL, you can redirect them to a different page. If you want users whose MAC addresses were blocked to be informed so, you can set the Blocked MAC address redirect URL.
If you check the Disable MAC filtering checkbox, then the captive portal will not check to confirm that a user's MAC address remains the same during their session. This can be helpful in cases where pfSense cannot confirm the user's MAC address (for example, in cases where the user is separated from the pfSense system by several routers). The downside of this option is that when MAC filtering is disabled, RADIUS MAC authentication is not possible.
The Enable Pass-through MAC automatic additions option, if checked, will result in a MAC passthrough entry being added for every user who successfully authenticates (or in cases where authentication is not required, every user who successfully passes through the captive portal). Users of the authenticated MAC address will not have to log in again, unless the MAC passthrough entry is removed from the table on the MAC tab.
The Enable Pass-through MAC automatic addition with username option takes effect only if it is checked and the Enable Pass-through MAC automatic additions option is also checked. If both are checked, the username used during authentication will be saved.
The Enable per-user bandwidth restriction option, if checked, allows you to restrict each user who logs in to a specified bandwidth. If you enable this option, you need to specify a Default download and Default upload in the next two edit boxes. RADIUS can override these default settings.
The next section of the page is called Authentication. There are three options for authentication: No Authentication, Local User Manager/Vouchers, and Radius Authentication. If you choose No Authentication, users on interfaces on which the captive portal service is active will be directed to a captive portal page, but no login will be required.
If you choose Local User Manager/Vouchers, then authentication will take place either through the pfSense User Manager, or via voucher authentication. If you want to utilize the user manager, navigate to Services | User Manager. You will then need to add as many users as you need to for captive portal access. It might also be a good idea to set up a separate group for captive portal users, and you can do that by clicking on the Groups tab. Once there, you can click on the +Add button on the right side of the page below the table to add a group. There is a single section on this page titled Group Properties, and in this section, you need to enter a Group Name. You can also enter a description in the Description field. In the Group membership listboxes, you can add other groups to which you want members of the new group to belong. Once you are done, press the Save button.
We still haven't assigned captive portal privileges to the newly created group, so once you are redirected to the table, find the group in the table and, under the Actions column, click on the Edit group icon (the pencil). Once again, the Group Properties section is there, but underneath it is a section called Assigned Privileges where, as you probably guessed, you can assign privileges to the group. Clicking on the Add button will enable you to add privileges. This will load a page with a listbox with many options; for this group we want to select User – Services: Captive Portal login. Select this and click on the Save button at the bottom of the page. This will take you back to the previous page, so you need to click on the Save button on that page, which will return you to the main Groups page. We have created a group with captive portal login privileges.

Creating a group with captive portal login privileges.
Now you need to go back to the Users tab and add users to the group that you created in the previous step by pressing the +Add button, adding information for each user, pressing the Save button, and repeating the process for as many users as you need to add. At a minimum, you need to enter a username and password for each user, and make the user a member of the new group. There are also options to create a user certificate, add an SSH key (so the user can connect to pfSense via SSH without entering a username/password combination), and a field for an IPsec pre-shared key.
Now that we have created some captive portal user accounts, we can return to the Captive Portal configuration. Note that below the radio buttons where we select the authentication mention, if Local User Manager/Vouchers is selected, there is an Allow only users with "Captive Portal login" privilege set checkbox. Although this checkbox is selected by default, when we click on the Local User Manager/Vouchers radio button, we can uncheck it, thus eliminating the need to create a group with this privilege added to it.
You can also use vouchers for authentication, and this is done by clicking on the Vouchers tab under Captive Portal. This page has two sections: Voucher Rolls, which shows any existing vouchers, and Create, Generate and Activate Rolls with Vouchers. The Enable checkbox, when checked, begins the process of creating vouchers.

Creating voucher rolls for a captive portal.
The next two fields are for the Voucher Public Key and the Voucher Private Key, as shown in the preceding screenshot. Here, you should paste an RSA public key and RSA private key (64 bits or smaller). The next field is Character set; this defines the characters contained in the generated tickets. You can probably keep the default value. The # of Roll bits field reserves a range in each voucher to store the roll number to which it belongs. The # of Ticket bits field reserves a range in each voucher to store the ticket number to which it belongs. Finally, the # of Checksum bits field reserves a range in each voucher to store a checksum over the roll number and ticket number. The sum of roll, ticket, and checksum bits must be one less bit than the RSA public/private key.
The Magic number field defines a magic number to be stored in each voucher, which is only stored if there are bits left over in the roll, ticket, and checksum bits. The Invalid voucher message and Expired voucher message fields define messages to display when the voucher is invalid and expired, respectively.
The Voucher Database Synchronization section of the page allows you to enter the master voucher database ID, sync port, and username/password combination. If this node is the master voucher database node, or if it will be the only node using vouchers, you can leave these fields blank. Press the Save button at the bottom of the page when you are done.
When the Voucher page reloads, there will be a new section at the top of the page called Voucher Rolls. You can generate new voucher rolls by pressing the +Add button below the table on the right side. There are fields for the Roll # (the number found on top of the generated vouchers), the Minutes per ticket (the time in minutes a user is allowed access), and Count (the number of vouchers generated). There is also a Comment field where you can enter a non-parsed comment. When you have filled out these fields, press the Save button.
When you return to the main
Voucher page, the newly created voucher roll will be listed in the table at the top. Under the Action column, you can click on the Export vouchers icon (the sheet) to download the voucher roll as a .csv file. The file contains a series of vouchers that can be used for captive portal authentication. In order to accept captive portal login via vouchers, your portal login page must include the following field:
<input name="auth_voucher" type="text">
The third authentication option is RADIUS Authentication. RADIUS, or Remote Authentication Dial-In User Service, provides a means of centralized authentication, authorization, and accounting for network users. To use RADIUS to authenticate captive portal users, you must have a RADIUS server. It is beyond the scope of this book to explain how to configure a RADIUS server, but we will cover some of the more important RADIUS options on the Captive Portal Configuration page.
pfSense supports several protocols for sending and receiving data from the RADIUS server. Password Authentication Protocol (PAP), Challenge Handshake Authentication Protocol (CHAP), MS-CHAPv1, and MS-CHAPv2 are all supported. You can supply a Primary Authentication Source and Secondary Authentication Source, each of these having a Primary RADIUS Server and Secondary RADIUS Server. You can supply an IP address, port, and shared secret for each. Entering an IP address for each RADIUS server used is required. If the RADIUS port field is left blank, pfSense will use the default RADIUS port. Entering RADIUS shared secret is not required, but is recommended.
One of the authentication options under RADIUS Options is the Reauthenticate connected users every minute checkbox. If this option is enabled, pfSense will send Access-Requests to RADIUS for each user every minute. If an Access-Reject is received for any user on one of these requests, the user is disconnected from the captive portal immediately. There is also an option called RADIUS MAC Authentication. Checking this box will cause RADIUS to try to authenticate captive portal users by sending their MAC address as the username and the MAC authentication secret, specified in the next edit box, as the password.
The last two sections of the page are HTTPS Options and HTML Page Contents. HTTPS Options initially has a single option: the Enable HTTPS login checkbox, which when checked, will cause the captive portal username and password, over an HTTPS connection, to take advantage of the SSL encryption such a connection provides. If this box is checked you must provide the HTTPS server name and the SSL Certificate. The server name should match the Common Name (CN) in your certificate.
By default, when HTTPS login is enabled, clients can connect to the captive portal via HTTPS. You can prevent this by checking the Disable HTTPS Forwards checkbox, in which case attempts to connect to port 443 sites will not be forwarded to the captive portal. Users will then have to attempt a connection to port 80 to get forwarded to the captive portal.
The final section, HTML Page Contents, is where you can upload the captive portal pages. A minimal knowledge of HTML or PHP is required to create these pages, and if you don't want to create your own, you should be able to find sample captive portal pages that you can use (some may require some slight modification for your needs). The pages you can upload are the Portal page contents (the actual captive portal login page), Auth error page contents (the page to display when an authentication error occurs), and Logout page contents (the page to display on authentication success when the logout popup is enabled, and which may or may not contain an option to log out of the captive portal). When you have uploaded these pages, you will be done with configuration of this captive portal zone, and you can press the Save button at the bottom of the page.
There are several other options on other tabs worth mentioning. The MACs tab allows you to control access to the captive portal based on MAC addresses. Clicking the +Add button on this page allows you to add a MAC address. Once you do this, you will be at the Edit MAC Address Rules page. Here you can specify a MAC address (the button to the right of this option allows you to copy your MAC). The Action drop-down box allows you to choose what to do with traffic from this MAC address (the options are Pass and Block). You can also specify Bandwidth up and Bandwidth down limitations for the MAC address (in Kbit/s), as well as a non-parsed description in the Description field.
The Allowed IP Addresses tab allows you to control captive portal access by IP address. Clicking on the +Add button on this page takes you to the Edit Captive Portal IP Rule page. At a minimum, you must enter the IP address and the CIDR of the address. You can also specify the direction of the access. From allows access from the client IP through the captive portal. To allows access from all the clients behind the portal to the IP. The Both option allows traffic in both directions. As with MAC addresses, you can specify Bandwidth up and Bandwidth down for the specified IP address.
The Allowed Hostnames tab allows you to control captive portal access based on hostname. Again, the +Add button on this tab allows you to add entries. You need to enter a hostname in the Hostname field, and, as with Allowed IP Addresses, you can control the direction of the access, as well as Bandwidth up and Bandwidth down. You may also enter a non-parsed description in the Description field.
The File Manager tab, as the name implies, allows you to upload files. Any files you upload via this tab with the filename prefix of captiveportal- will be made available in the root directory of the captive portal server. This is useful if you have files which you want to reference in your portal page (for example, a company logo). In addition, you can upload PHP files for execution. The total size limit for all files uploaded via this tab is 1 MB. To add a file, click on the +Add button, which is below the Installed Files table and to the right. This loads a separate page where you can upload the file. Click on the Browse button to launch a file dialog box, select a file, click on the Open button in the file dialog box, and then click on the Upload button.
pfSense's captive portal service has many options, which means that there are many more things that can go wrong with captive portal access. We can divide these issues into two general categories:
- Authentication issues (client cannot authenticate, even with seemingly valid credentials)
- Client can establish a captive portal connection, but some other aspect of the service is not working (for example, DNS is not functioning, websites are blocked, and so on)
We will first consider authentication issues. The authentication options are Local User Manager/Vouchers and RADIUS Authentication. If you are using the local user manager, you should confirm that you have created the user accounts correctly and, if Allow only users/groups with "Captive portal login" privilege set is checked, you should confirm that the users have this privilege. You can, of course, disable this option and see if the users can connect to troubleshoot the issue. If you are using vouchers to authenticate, you should confirm that your captive portal login page has <input name="auth_voucher" type="text"> for entering the voucher.
One possible issue that might arise is that you are trying to use MAC addresses for authentication, but the captive portal service cannot confirm that the MAC address is correct. This could happen if there is a router between the captive portal client and pfSense, and this issue could occur both in cases where a RADIUS server is being used for authentication, and without a RADIUS server. For troubleshooting, you might try allowing users access by IP address and see if this works. If it does, there's a good chance pfSense is unable to confirm the MAC address.
One other possibility is that the user is trying to access the captive portal page through HTTPS, but your captive portal zone is only configured for HTTP access. In this case, the solution is for the user to try again with HTTP at the beginning of the URL.
One problem that has been reported is that sometimes, when using captive portal on a VLAN, the captive portal page will not load. This apparently happens when the parent interface of the VLAN is also being used as a separate interface on pfSense. To prevent this problem, when a parent interface is partitioned into VLANs (VLAN1, VLAN2, and so on), the parent interface (for example, OPT1) should not be used separately; only the VLANs should be used.
If a RADIUS server is being used for authentication, then the problem could be either a client or server issue. The RADIUS server may be misconfigured, or it may be down entirely. If you have confirmed that the RADIUS server is functioning properly, the problem may be an incorrect configuration of pfSense. The log files can be helpful in further pinpointing the exact problem. Navigate to Status | System Logs and click on the Captive Portal Auth tab. If pfSense cannot connect to the RADIUS server at all, you should check the IP address/port settings for the RADIUS servers, as well as the shared secret.
The second category of issues is when the user is able to pass through the captive portal, but there are other issues. For example, the user may be having DNS issues. Once again, a good indication that a problem is related to DNS is when you can ping the IP address of a site, but you cannot ping the hostname. DNS is likely not functioning if pinging a valid hostname (for example, google.com) returns the following result:
ping: unknown host google.com
If you are running the command prompt under Windows, the response might look like this:
Ping request could not find host google.com. Please check the name and try again.
If it looks like DNS resolution is the problem, you should check to make sure either DNS Forwarder or DNS Resolver is running, but not both. If you have confirmed that one of these is running and you are still having problems, the issue may be a DNS server that is down or is not configured properly.
If the user cannot access certain websites, the problem may be that the firewall or proxy server has blocked access to the site. You should navigate to Firewall | Rules and check to see if there are any rules for the captive portal interface that might block access. Proxy servers usually have the capability of blocking websites, so if you are running one, you will want to check the settings for the proxy server. We will cover both firewall rules and proxy servers in greater depth in future chapters.