
11 Retouch Menu
Waterfall in the Wilderness © 2019 John Miner (D850fan)
Retouching allows you to modify your images in-camera. If you like to do digital photography but don’t particularly like to adjust images on a computer, these functions are for you! Obviously, the camera’s Monitor is not large enough to allow you to make heavily creative changes to an image—as you could do within Nikon Capture NX-D, Lightroom, or Photoshop—but it’s surprising what you can accomplish with the Retouch Menu.

Figure 11.0: The Retouch Menu
The Retouch Menu is the sixth menu down the menu selection bar, just below the Setup Menu (figure 11.0). Its icon resembles a palette and paintbrush. If there aren’t any images on either of the camera’s memory cards, the Retouch Menu is grayed out and unavailable, for obvious reasons. No images, no retouching! The following is a list of each Retouch Menu function and what it does:
- NEF (RAW) processing: You can create highly specialized JPEG images from your NEF (RAW) files without using your computer.
- Trim: This feature creates a trimmed (cropped) copy of a selected photograph. You can crop the image according to several aspect ratios, including 1:1, 3:2, 4:3, 5:4, and 16:9.
- Resize: You can take a full-size image and convert it into a smaller size. This is useful if you would like to send an image via email or if you need a smaller image for other reasons.
- D-Lighting: This feature opens up detail in the shadows and tends to protect highlight details from blowing out. This is similar to the Photo Shooting Menu > Active D-Lighting function, but it’s applied after the image is taken.
- Red-eye correction: This removes the unwanted red-eye effect caused by light from a flash reflecting back from the eyes of your subjects.
- Straighten: You can straighten an image with crooked horizons by rotating it in camera. The camera will trim (crop) the edges of the image to create a normal image perspective without the tilt.
- Distortion control: You can remove barrel and pincushion distortion that affects the edges of the image. You can cause the camera to make automatic adjustments or you can do it manually. The camera automatically trims (crops) the edges of the image after adjustment.
- Perspective control: This is a useful control that helps correct perspective distortion in an image. It’s useful for pictures of things like buildings, which sometimes look as though they’re falling over backward when shot with a wide-angle lens. The camera automatically crops the edges of the image to allow the distortion to be removed.
- Image overlay: This creates a new image by overlaying two existing NEF (RAW) files. Basically, you can combine two RAW images to create special effects—such as adding an image of the moon into a separate landscape picture.
- Trim movie: You can shorten a movie by cropping out a small section from a large movie file.
- Side-by-side comparison: You can compare a retouched image—created via the Retouch Menu—with the original image. The images are presented side by side so you can see before and after effects. This function is not available from the main Retouch Menu. You’ll find it on the Playback Retouch Menu only, which you access by pressing the i button when a picture is displayed on the Monitor.
Retouched Image File Numbering
When you use Retouch Menu items, the Z6 does not overwrite your original file. It always creates a JPEG file with the next available image number. The retouched image will be numbered as the last image on the memory card. If you have 100 images on your card and you are retouching image number DSC_0047, the new JPEG image will be numbered DSC_0101 (it will be the 101st image).
Accessing the Retouch Functions—Two Methods
There are two methods for accessing the Retouch Menu, as follows:
- Use the main Retouch Menu (figure 11.0) to choose an image to work with.
- Open the Playback Retouch Menu (figure 11.1) by displaying an image on the Monitor in Playback mode, and then pressing the i button and selecting Retouch from the menu that is displayed.
The two methods work basically the same, except the Playback Retouch Menu leaves out the step of choosing the image (since there is already an image on the screen), and it has fewer retouch selections. The most comprehensive retouch selections are available directly under the Retouch Menu.
Since both the Playback Retouch Menu and regular Retouch Menu methods have the same functions, we’ll discuss them as if you were using the main Retouch Menu. However, in case you decide to use the Playback method, let’s discuss it briefly.

Figure 11.1: Playback Retouch Menu
Limitations on Previously Retouched Images
Sometimes there are limitations imposed when you are working on an image that has already been retouched or for other reasons. You may not be able to retouch a previously retouched image with another Retouch Menu function.
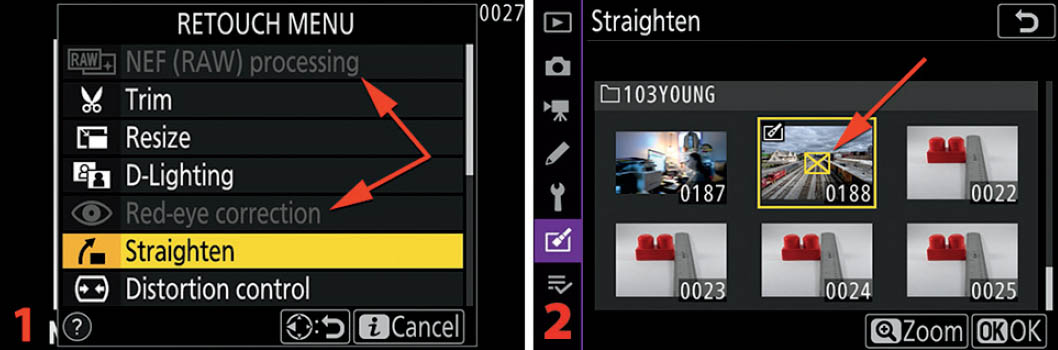
Figure 11.2: Cannot be retouched
When using the Playback Retouch Menu, certain menu items will be grayed out because they cannot be applied to an already retouched image. In figure 11.2, image 1, NEF (RAW) processing is grayed out because the selected image is a JPEG image, not a NEF (RAW) file; and Red-eye correction is grayed out because no flash was used when the picture was taken.
If you use the main Retouch Menu, any images that are overlaid with a box containing a yellow X cannot be retouched again with the current retouch function (figure 11.2, image 2).
Now let’s consider each of the available Retouch Menu functions.
NEF (RAW) Processing
NEF (RAW) processing is a function that allows you to convert a RAW image into a new, separate JPEG picture inside the camera, without modifying the original RAW file. If you normally shoot in RAW but need a JPEG quickly, this is a great function.
The Nikon Z6 allows you to batch process groups of RAW files without using a computer. You can process individual RAW files or RAW files by specific dates.
There is quite a comprehensive catalog of things you can do to an image during NEF (RAW) processing. A RAW file is not yet an image, so the camera settings you used when you took the picture are not permanently applied. In effect, when you use NEF (RAW) processing, you are applying camera settings to the JPEG image after the fact, and you can change the settings you used when you originally took the picture.
Following is a list of post-shooting adjustments you can make with NEF (RAW) processing and basic explanations of each function. Keep in mind that, although the following functions discuss conversion of a single RAW file into a single JPEG file, the more powerful NEF (RAW) processing capability of the Z6 extends to batch-processing groups of files.
I’ve also included page number references for where you can find more detailed explanations of each function, when appropriate:
- EXE: This simply means execute. When you select this and press the OK button, all your new settings will be applied to a new JPEG, and the JPEG file will be saved to the memory card with a separate file name.
- Image quality (page 175): With NEF (RAW) processing, you are converting a RAW file to a JPEG file, so the camera gives you a choice of FINE
 , NORM, BASIC, FINE, NORM, or BASIC. The starred versions have less compression and somewhat greater quality. These are equivalent to the Photo Shooting Menu > Image quality settings called JPEG fine, JPEG normal, JPEG basic, JPEG fine, JPEG normal, and JPEG basic.
 - Image size (page 180): This lets you select how large the JPEG file will be. Your choices are L, M, or S, which are equivalent to the Large (45.4 megapixels), Medium (25.6 megapixels), and Small (11.4 megapixels) Photo Shooting Menu > Image size settings.
- White balance (page 197): This lets you change the White balance of the image after you have already taken the image. You can select from a series of symbols that represent various types of White balance color temperatures. As you scroll up or down in the list of symbols, notice that the name of the corresponding White balance type appears just above the small picture on the Monitor. You can see the effect of each setting as it is applied.
- Exposure compensation (page 44): This function allows you to brighten or darken the image by applying −/+ Exposure compensation to it. You can apply compensation up to 2 EV in either direction (–2.0 to +2.0 EV).
- Picture control (page 200): With this setting you can apply a different Picture Control than the one with which you took the image. The camera offers a small camera symbol labeled Original, which represents the original Picture Control you used to take the image, plus abbreviations for each Nikon Picture Control (A, SD, NL, VI, MC, PT, LS, or FL), 20 Creative Picture Controls (01–20), and any Custom Picture Controls you might have created with the designations of C-1, C-2, C-3, etc. You will see a change in the picture on the Monitor as you select each Picture Control.
- High ISO NR (page 227): You can change the amount of High ISO noise reduction applied to the image. The camera offers you the Original High ISO NR setting you used to take the image, along with H, N, L, and Off settings, which are equivalent to the Photo Shooting Menu > High ISO NR settings called High, Normal, Low, and Off.
- Color space (page 221): You can change which Color space is applied to the image. You can choose from the camera’s two Color space settings, sRGB or Adobe RGB. Adobe RGB is abbreviated as AdobeRGB in this setting. This is equivalent to the Photo Shooting Menu > Color space setting.
- Vignette control (page 230): This allows you to reduce the light falloff on the corners and edges of the frame, common when using a full-frame sensor with certain lenses. You have five choices: Original, High (H), Normal (N), Low (L), and Off.
- Active D-Lighting (page 223): This lets you manage the level of contrast in the image by brightening the shadows and protecting the highlights. You have five choices: Original, High 2 (H2), High 1 (H1), High (H), Normal (N), Low (L), and Off. This function is similar to the Photo Shooting Menu > Active D-Lighting function, except it is applied after you have taken the image.
- Diffraction compensation (page 231): When you are using a small aperture (e.g., f/11, f/16), the light can hit the edges of the aperture blades as it flows through the small aperture opening. The causes the light to change its path slightly and can lead to less sharpness in the image. This light deflection is called diffraction. The camera attempts to compensate for diffraction at small apertures, leading to the amazingly sharp images for which Z-cameras are well known. You can leave Diffraction compensation set to Original, or choose On or Off.
Now let’s examine the three methods you can use to choose images for conversion: Select image(s), Select date, and Select all images. All three of these methods serve as an entry point to the same NEF (RAW) processing system—they simply offer you a choice as to how you feed images into the conversion system.
Select Image(s)
Select image(s) allows you to choose one or several images from thumbnail screens by placing check marks on each image you want to convert from RAW to JPEG.

Figure 11.3A: Using Select image(s) to choose images for NEF (RAW) processing
Use the following steps to select individual images to feed into the RAW to JPEG conversion system:
- 1. Highlight NEF (RAW) processing on the Retouch Menu and scroll to the right (figure 11.3A, image 1).
- 2. Choose Select image(s) from the NEF (RAW) processing menu and scroll to the right (figure 11.3A, image 2).
- 3. Select one or more images for RAW to JPEG conversion by highlighting an image thumbnail and tapping the Zoom out (Set) control on the bottom of the screen or pressing the physical Zoom out button. A small check mark will appear in the upper-right corner of the image(s) you select for conversion (figure 11.3A, image 3). If you need to examine the image more closely before selecting it, press the Zoom in button or tap the Zoom control at the bottom of the screen. When you have scrolled around the thumbnail screen(s) and selected all the images you want to convert, press or touch OK to enter the NEF (RAW) processing system. Only the first image selected will show in the NEF (RAW) conversion screens, but all of the selected images will be converted from RAW to JPEG and saved under new file names. The original RAW files remain untouched.
Select Date
Select date allows you to select all RAW images taken on certain dates for batch-processing into JPEG files. The camera offers you a list of dates and you can choose one or several dates. All RAW images on the chosen date(s) will be converted to JPEG with the settings you choose from the main NEF (RAW) conversion screens.

Figure 11.3B: Using Select date to choose images for NEF (RAW) processing
Use the following steps to select images for RAW to JPEG conversion according to date:
- 1. Highlight NEF (RAW) processing on the Retouch Menu and scroll to the right (figure 11.3B, image 1).
- 2. Choose Select date from the NEF (RAW) processing menu and scroll to the right (figure 11.3B, image 2).
- 3. Place a check mark next to one or more dates by tapping the date(s) with your fingertip, or by highlighting a date and scrolling to the right with the Multi selector pad (figure 11.3B, image 3). You can examine the images from a certain date by highlighting the date and tapping the Zoom out (Confirm) control or by pressing the Zoom out button. Press or touch OK to enter the NEF (RAW) processing system with your date(s) selected. All RAW files shot on the selected date(s) will be converted to JPEG files and saved under new file names, leaving the original RAW files unchanged. A thumbnail of the first image in the batch will show in the NEF (RAW) conversion screens during conversion.
Select All Images
Select all images allows you to select all RAW images found on a particular memory card (in all folders) for batch-processing into JPEG files. All RAW images on the card will be converted to JPEG with the settings you choose from the main NEF (RAW) conversion screens.

Figure 11.3C: Using Select all images to choose images for NEF (RAW) processing
Use the following steps to select all images on a particular memory card to feed into the RAW to JPEG conversion system:
- 1. Highlight NEF (RAW) processing on the Retouch Menu and scroll to the right (figure 11.3C, image 1).
- 2. Choose Select all images from the NEF (RAW) processing menu and scroll to the right (figure 11.3C, image 2).
- 3. The camera will immediately enter the NEF (RAW) processing system with all RAW images on that card selected (figure 11.3C, image 3). The RAW images will be batch-converted to JPEG files and saved under new file names, leaving the original RAW files unchanged. A thumbnail of the first image in the batch will show in the NEF (RAW) conversion screens during conversion. (Note: The Z6 obeys the Playback Menu > Playback folder (page 141) and Photo Shooting Menu > Storage folder (page 168) settings as to which NEF (RAW) images are chosen for conversion when Select all images is used.)
Now let’s examine the actual NEF (RAW) processing system and see how you can use original camera settings during RAW to JPEG conversion or change settings on individual files or an entire batch of files, before converting them to JPEG.
Using the NEF (RAW) Processing System
You will need to have first selected and configured one of the three previously discussed methods (Select image(s), Select date, or Select all images) for sending RAW files to the NEF (RAW) processing system. Once you have selected the RAW image(s) you want to process into JPEG files, the NEF (RAW) Processing system will open.
All screens in this section are continuations of one of the three previously discussed methods for feeding images into the conversion system. There are up to nine adjustments you can make to your images before the final RAW to JPEG conversion. Use the following steps:

Figure 11.3D: NEF (RAW) processing – Image quality
- 4. Figure 11.3D, image 1, begins where figure 11.3A, 11.3B, or 11.3C ends. Choose the Image quality selection (see setting name above picture) from the NEF (RAW) processing system menu and scroll to the right. (Note: You will not use the first item (EXE) in the menu until the end of the configuration process, unless you want to use only the original camera settings for each converted image. If so, skip the rest of the steps in this section, select EXE, and press the OK button to start the conversion process immediately—using original image settings. If you intend to change any setting for all converted images, use this and the following steps to make changes to the conversion settings. Then you will select EXE last and start the conversion after making image configuration changes that apply to all images being converted from RAW to JPEG.)
- 5. Select one of the Image quality settings—FINE
 , FINE, NORM, NORM, BASIC, or BASIC—from the Image quality menu (figure 11.3D, image 2). FINE gives you the best possible quality in a JPEG image. You can cancel the operation by tapping Cancel or by pressing the Playback button. You can also zoom in to check the image quality by tapping Zoom or by pressing the Zoom in button. Press the OK button or tap the Image quality option to save the setting and return to the main NEF (RAW) processing configuration screen.

Figure 11.3E: NEF (RAW) processing – Image size
- 6. Highlight the Image size selection on the NEF (RAW) processing menu and scroll to the right (figure 11.3E, image 1).
- 7. Select one of the Image size settings from the Image size menu (figure 11.3B, image 2):
- L – Large (8256×5504; 45.4 MP)
- M – Medium (6192×4128; 25.6 MP)
- S – Small (4128×2752; 11.4 MP)
When you’ve selected a setting, press the OK button or tap the option with your fingertip to return to the main NEF (RAW) processing configuration screen.

Figure 11.3F: NEF (RAW) Processing – White balance
- 8. Highlight the White balance position on the NEF (RAW) processing menu and scroll to the right (figure 11.3F, image 1).
- 9. Select one of the White balance settings for your new JPEG(s) (figure 11.3F, image 2). You can choose from Original (small camera icon), Auto (A0–A2), Natural light auto (A), Direct sunlight, Cloudy, Shade, Incandescent, Fluorescent, Flash, Choose color temperature (K), or Preset manual (PRE). After highlighting the one you want to use, press or touch OK to choose the selected White balance value for all the images in the conversion. Original is selected in figure 11.3F, image 2. Please review the chapter titled White Balance (page 107) for detailed information on each of these selections. The Auto, Fluorescent, K, and PRE settings have an additional screen with choices you must select. We won’t consider how to select each individual White balance setting because they work basically the same. However, because Auto, Fluorescent, K, and PRE are different and have extra screens, we will examine each of those settings individually.

Figure 11.3G: NEF (RAW) processing – Auto White balance
- a. Auto: Highlight the White balance position and scroll to the right (figure 11.3G, image 1). Select the Auto menu position and scroll to the right (figure 11.3G, image 2). Choose one of the three Auto types (figure 11.3G, image 3): A0 Keep white (reduce warm colors), A1 Keep overall atmosphere, or A2 Keep warm lighting colors (somewhat warmer pictures). If you don’t want to fine-tune the selected White balance, press or touch OK to lock it in. To fine-tune the White balance, scroll to the right with the Multi selector pad to move to the fine-tuning screen, where you can adjust the color tint of the image by moving the black dot in the color box (figure 11.3G, image 4). Press or touch OK to save the setting or press the Playback button to cancel.

Figure 11.3H: NEF (RAW) processing – Fluorescent White balance
- b. Fluorescent: Highlight the White balance position and scroll to the right (figure 11.3H, image 1). Choose Fluorescent and scroll to the right (figure 11.3H, image 2). There are seven choices in the menu, with names (above the picture) like Sodium-vapor lamps, Warm-white fluorescent, Cool-white fluorescent, etc. Each choice has a number assigned to it. Figure 11.3H, image 3, shows Cool-white fluorescent, which is number 4 on the list. If you don’t want to fine-tune the selected White balance, press or touch OK to lock it in. To fine-tune the White balance, scroll to the right with the Multi selector pad to move to the fine-tuning screen, where you can adjust the color tint of the image by moving the black dot in the color box (figure 11.3H, image 4). Press or touch OK to save the setting or press the Playback button to cancel.

Figure 11.3I: NEF (RAW) processing – Choose color temp. (K) White balance
- c. Choose color temp. (K): Highlight the White balance position and scroll to the right (figure 11.3I, image 1). Scroll down to near the bottom of the menu and select the K setting, then scroll to the right (figure 11.3I, image 2). You can now choose a color temperature from the list shown in figure 11.3I, image 3. Remember that color temperatures change how the image color looks by warming it (reddish) or cooling it (bluish). The list ranges from 2500K (cool) to 10000K (warm). After selecting a K value (e.g., 5000K) you can scroll to the right and use the fine-tuning screen to modify the color’s base, if you’d like (figure 11.3I, image 4). If not, press or touch OK to save the setting or press the Playback button to cancel. (Note: Camera White balance works backward from the “black body radiation” formula we learned in school because it is an additive process, adding colors [not radiating colors] that are needed to balance the color in the image.)
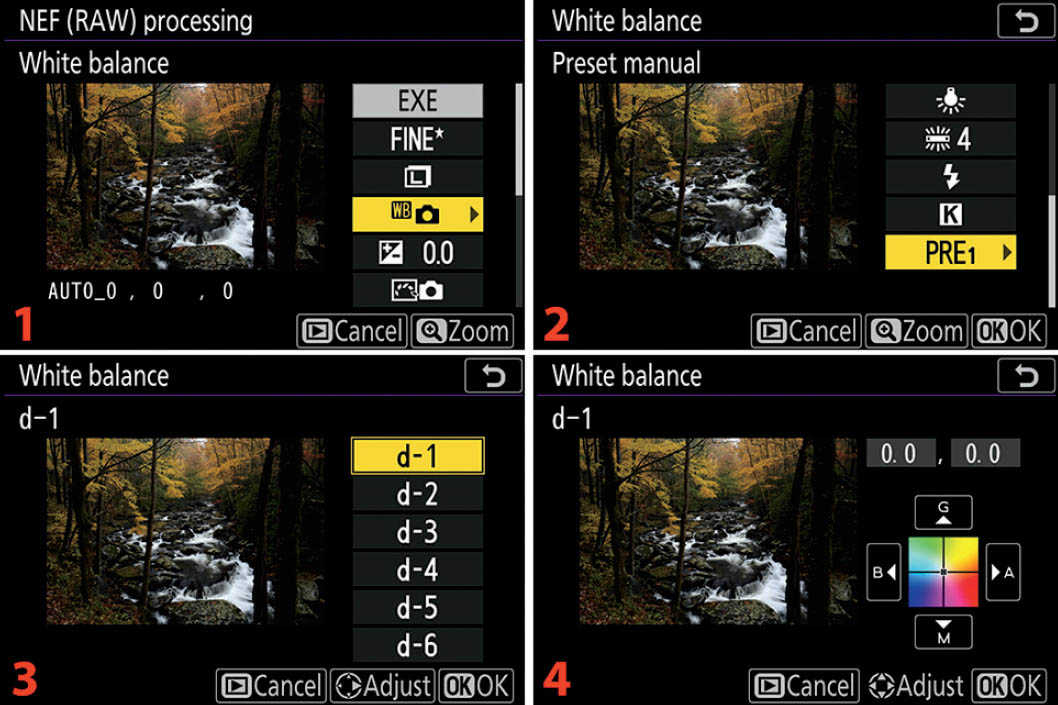
Figure 11.3J: NEF (RAW) processing – PRE White balance
- d. Preset manual (PRE): Highlight the White balance position and scroll to the right (figure 11.3J, image 1). Scroll down to the last item on the menu and select the PRE setting (figure 11.3J, image 2). With this setting you can choose an already-saved White balance that you previously obtained while letting the camera measure the ambient light reflected from a gray or white card (the PRE method). See the chapter titled White Balance (page 120) for information on creating and storing ambient light (PRE) readings. Scroll to the right with the PRE setting highlighted, and on the next screen you can choose from up to six previous PRE readings that are stored in memory locations d–1 to d–6 (figure 11.3J, image 3). As you scroll through the list of PRE settings, you’ll be able to see the color temperature of the image change. If you do not want to fine-tune the White balance setting, select the setting you want to use and press or touch OK to return to the main NEF (RAW) processing configuration screen. If you do want to fine-tune the White balance, scroll to the right with your choice of PRE value selected (e.g., d–1). On the following screen, you can fine-tune the colors of the individual PRE White balance by using the settings shown in figure 11.3J, image 4. You’ll see your fine-tuning adjustment change the color temperature of the image. Press or touch OK to save the setting, or press the Playback button to cancel.
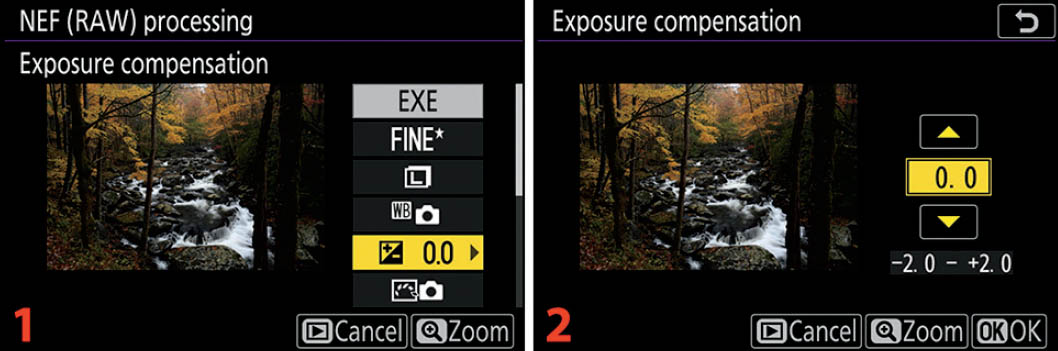
Figure 11.3K: NEF (RAW) processing – Exposure compensation
- 10. Highlight the Exposure compensation selection and scroll to the right (figure 11.3K, image 1).
- 11. Now you have an opportunity to lighten or darken the image by selecting an Exposure compensation value of up to −/+ 2.0 EV steps (figure 11.3K, image 2). Scroll up to add exposure and down to reduce exposure (or tap the yellow up/down pointers). When your image looks just right, press or touch OK to save the setting and return to the main NEF (RAW) processing configuration screen. You can cancel the operation with the Playback button.
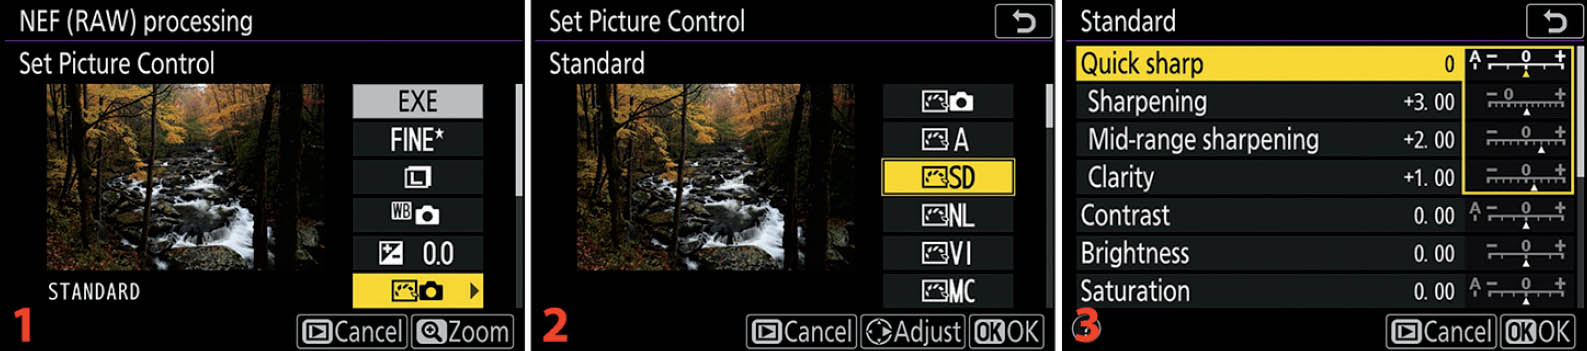
Figure 11.3L: NEF (RAW) processing – Set Picture Control
- 12. Highlight the Set Picture Control selection and scroll to the right (figure 11.3L, image 1).
- 13. You can apply a Nikon Picture Control or one of your own Custom Picture Controls, if you have created any (figure 11.3L, image 2). Choose the Picture Control you want to use from the following choices: Original (camera icon), Auto (A), Standard (SD), Neutral (NL), Vivid (VI), Monochrome (NC), Portrait (PT), Landscape (LS), Flat (FL), one of 20 Creative Picture Controls (01–20), or any of your custom controls (C–1 to C–9) that appear farther down the list than this screen shot shows (figure 11.3L, image 2). If you do not want to fine-tune the selected Picture Control, press or touch OK to lock it in, and skip step 11. If you do want to fine-tune any of the Picture Controls other than Original, highlight the control and scroll to the right.
- 14. Scroll up or down to select the settings you want to change (e.g., Sharpening, Clarity, Contrast) and then scroll left or right (−/+) to modify the selected setting (figure 11.3L, image 3). If you make a mistake and want to start over, press the Playback button or tap Cancel. The Monochrome (MC) Picture Control not only lets you adjust things like Sharpening, Contrast, and Brightness in the fine-tuning screen, but it also gives you toning (tint) controls like the Photo Shooting Menu > Set Picture Control function (page 200). When the image looks just right, press or touch OK to save the setting and return to the main NEF (RAW) processing configuration screen. You can cancel the operation with the Playback button.

Figure 11.3M: NEF (RAW) processing – High ISO NR
- 15. Highlight the High ISO NR selection and scroll to the right (figure 11.3M, image 1).
- 16. If the image needs high ISO noise reduction, you can apply it now. You have a choice of five settings: Original (camera icon), High (H), Normal (N), Low (L), or Off (figure 11.3M, image 2). Choose one and press or touch OK to save the setting and return to the main NEF (RAW) processing configuration screen. You can cancel the operation with the Playback button.

Figure 11.3N: NEF (RAW) processing – Color space
- 17. Highlight the Color space selection and scroll to the right (figure 11.3N, image 1).
- 18. The Color space function lets you choose one of the camera’s two color space settings, sRGB or AdobeRGB (figure 11.3N, image 2). Choose one and press or touch OK to save the setting and return to the main NEF (RAW) processing configuration screen. You can cancel the operation with the Playback button. As a comparative test, why not look carefully at your picture while you switch back and forth between sRGB and AdobeRGB? You will find that AdobeRGB has a smoother look, if not quite as saturated, due to additional color range, when your subject actually has a good range of colors. AdobeRGB has a wider color gamut and is best for commercial printing, whereas sRGB may do better with computer and Internet display and home printing on basic inkjet printers.
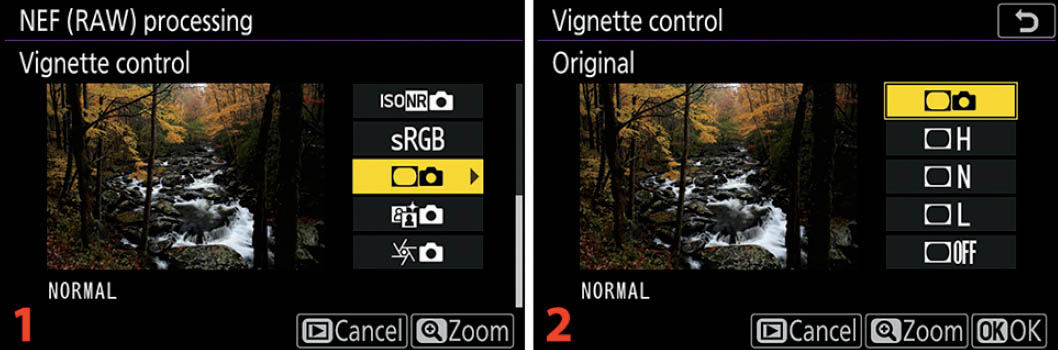
Figure 11.3O: NEF (RAW) processing – Vignette control
- 19. Highlight the Vignette control selection and scroll to the right (figure 11.3O, image 1).
- 20. Vignette control lets you choose a level for edge and corner light falloff correction (figure 11.3O, image 2), as is sometimes needed on an imaging sensor with certain lenses. You have a choice of five settings: Original (camera icon), High (H), Normal (N), Low (L), or Off. Choose one and press or touch OK to save the setting and return to the main NEF (RAW) processing configuration screen. You can cancel the operation with the Playback button.

Figure 11.3P: NEF (RAW) processing – Active D-Lighting
- 21. Highlight the Active D-Lighting selection and scroll to the right (figure 11.3P, image 1).
- 22. Active D-Lighting is very similar to the Shooting Menu > Active D-Lighting setting in that it restores shadow detail and protects highlights in your images. Normal Active D-Lighting is applied at the time the image is taken; however, this version of Active D-Lighting is applied after the fact. Otherwise, they are basically the same thing. You can select from Original (camera icon), Extra High 2 (H2), Extra High 1 (H1), High (H), Normal (N), Low (L), or Off (figure 11.3P, image 2). Press or touch OK to set the Active D-Lighting level or press the Playback button to cancel.

Figure 11.3Q: NEF (RAW) processing – Diffraction compensation
- 23. Highlight the Diffraction compensation selection and scroll to the right (figure 11.3Q, image 1).
- 24. Choose Original, On, or Off. This setting will help reduce diffraction in your image. Choosing Original lets you keep the Diffraction compensation setting you originally used when you first took the picture. Just in case you failed to use Diffraction compensation originally, you can use it now by selecting On. If you do not want to use Diffraction compensation, choose Off. Press or touch OK to lock in the value. Press the Playback button to cancel.

Figure 11.3R: NEF (RAW) processing – EXE, processing a single image
- 25. When you are finished with the configuration of the NEF (RAW) processing system for a single image, and you are ready to convert the image, scroll up to the EXE (execute) selection and press the OK button or tap EXE (figure 11.3R, image 1). Figure 11.3R shows the screens the camera displays when you are converting a single image (see upcoming figure 11.3S for the batch conversion of multiple images).
- 26. An hourglass symbol will appear on the screen while the conversion of a single file is taking place (figure 11.3R, image 2, red arrow).
- 27. An Image saved screen will appear briefly (figure 11.3R, image 3), indicating that the new JPEG has been saved on the memory card with a new file name.
- 28. The converted image will be displayed on the Monitor (figure 11.3R, image 4). You can cancel the operation with the Playback button. The retouch icon will appear in the top-left area of the new JPEG picture, as seen in image 4 (red arrow). Next, let’s see how the camera screens are more complex when a batch conversion takes place (figure 11.3S). If you are processing a single image, you will not see the following screens.

Figure 11.3S: NEF (RAW) processing – EXE, processing multiple images
- 29. When you are finished with the configuration of the NEF (RAW) processing system for multiple images, and you are ready to batch-convert the images, scroll up to the EXE (execute) selection and press the OK button or tap EXE (figure 11.3S, image 1).
- 30. Since you are processing more than one image, the camera asks you to validate the fact that you are doing a batch RAW-to-JPEG conversion of multiple images. Figure 11.3S, image 2, asks you Apply NEF (RAW) processing to all selected images?, and then shows you the number of images in the batch conversion (e.g., 5 images). Highlight Yes and press the OK button or tap Yes.
- 31. The camera will now show you a progress screen that informs you of how the conversion process is proceeding. The example screens in figure 11.3S, images 3 and 4, show the progress bar as the conversion progresses. If you are converting many images, the process will take a while.
- 32. When the conversion is done, the camera informs you with a screen that says: Processing complete. Number of images processed 5 images (or whatever number of images you selected for conversion). Press or touch OK (Done) to finish the conversion (figure 11.3S, image 5).
- 33. The final image in the batch will be displayed on the Monitor (figure 11.3S, image 6). You can scroll through the converted images by swiping with your fingertip on the Monitor or by scrolling with the Multi selector pad.
This is a nice way to create specialized JPEG images from NEF (RAW) files without using a computer. How much longer will it be until our cameras come with keyboard, monitor, and mouse ports? They are powerful graphics-processing computers after all!
Settings Recommendation: NEF (RAW) processing is a complex, multistep process because you’re doing a major conversion from NEF (RAW) to JPEG in-camera, without using your computer. You’re in complete control of each level of the conversion and can even replace the camera settings you originally used when you took the picture.
If you want to simply convert the image without going through all these steps, just choose the EXE selection first and press the OK button. That will convert the image(s) immediately with the “Original” camera settings you used to take the picture.
Trim
The Trim function allows you to crop an image in-camera, change its aspect ratio, and save the file as a new image. Your original image is not modified. This is a useful function if you need to remove distracting elements from the background.
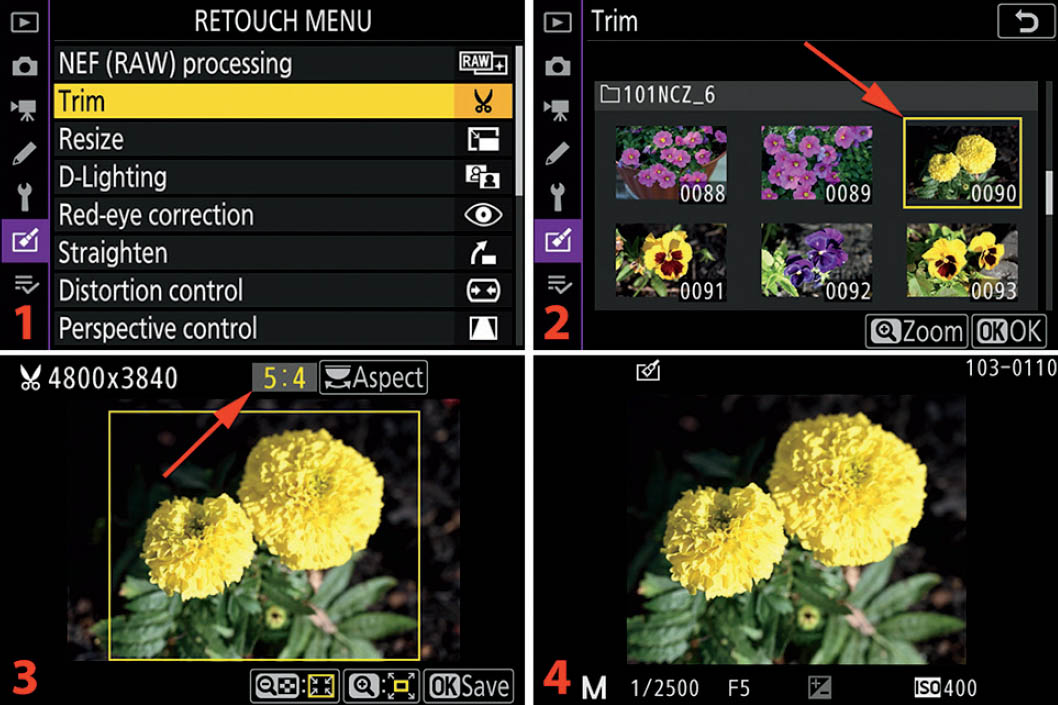
Figure 11.4: Trim function
Use the following steps to Trim an image in-camera:
- 1. Select the Trim function from the Retouch Menu and scroll to the right (figure 11.4, image 1).
- 2. Select the image you want to modify from the thumbnail screen and press or touch OK to open it (figure 11.4, image 2).
- 3. You’ll see a screen that has an area of the image outlined in yellow (figure 11.4, image 3). Use the checkered Zoom out button to make the size of the yellow crop outline smaller or the Zoom in button to enlarge the outline (or use the on-screen zoom touch controls at the bottom of the screen). Use the Multi selector pad to move the yellow selection rectangle in any direction (or drag it with your finger) within the frame until you find the best crop. Select the aspect ratio of the cropped image by rotating the rear Main command dial or by tapping the Aspect touch control. Your choices are 3:2, 4:3, 5:4, 1:1 (square), or 16:9. Figure 11.4, image 3 (red arrow), shows that the 5:4 aspect ratio is selected. The pixel ratio of the new image will show in the top left corner of the screen (e.g., 4800×3840). When you have the cropped area correctly sized and the aspect ratio set, press or touch OK (Save) to save the image with a new file name (figure 11.4, image 4).
Settings Recommendation: This is a very useful function for cropping images without a computer. The fact that you have multiple aspect ratios available is just icing on the cake. The Z6 has some useful aspect ratios, including a square (1:1) and an HD format (16:9).
Resize
The Resize function allows you to convert an image from a full-size 24.5M (6048×4024) picture to a smaller one, with four available megapixel sizes. This function seems to be designed so you can create images that can easily be emailed or used on a website or blog. There are two selections:
- Select image: This selection allows you to choose one or more images for in-camera resizing.
- Choose size: You can choose from four image sizes (M = megapixels):
3.5 M or 2304×1536
2.5 M or 1920×1280
1.1 M or 1280×856
0.6 M or 960×640
Unless you want to use the default size of 2.5 M, you should choose the size of the image before you select the image to resize. Let’s examine how to do it in that order.
Choose Size
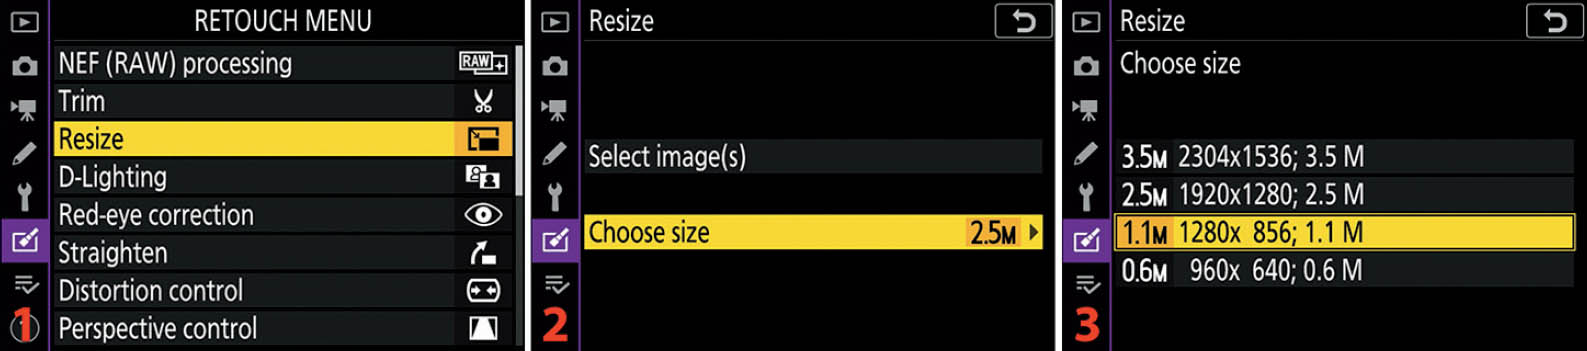
Figure 11.5A: Resize – Choose size
Use the following steps to choose a size for image reduction:
- 1. Choose Resize from the Retouch Menu and scroll to the right (figure 11.5A, image 1).
- 2. Select Choose size and scroll to the right (figure 11.5A, image 2).
- 3. You will see four sizes, from 3.5 M to 0.6 M (figure 11.5A, image 3). These are the actual megapixel sizes the image(s) will become after you save them. The old, full-size image is not affected. A resized copy of the old image will be created, with a new image file number. Select a size and press the OK button or tap the option to select it.
Now let’s see how to select one or more images for resizing.
Select Image(s)

Figure 11.5B: Resize – Select image
- 1. Choose Resize from the Retouch Menu and scroll to the right (figure 11.5B, image 1).
- 2. Highlight Select image(s) and scroll to the right (figure 11.5B, image 2). You’ll see six image thumbnails. Use the Multi selector pad to scroll around in this group of thumbnails and press the OK button to select an image you want to resize—or touch an image thumbnail and tap the Set touch control. You can select as many images as you’d like, and each of them will be resized. A tiny resize symbol will appear in the top-right corner of each thumbnail you select (figure 11.5B, image 3, red arrow).
- 3. When you have selected the images, press or touch OK. A screen will appear with a message asking, Create resized copy? (figure 11.5B, image 4). Select Yes and press the OK button or tap Yes to create the resized images. An hourglass will be displayed on the Monitor while the images are resized, and then an Image saved message will briefly appear (figure 11.5B, image 5). The last image in the group of resized images will appear on the Monitor (figure 11.5B, image 6). The resized images will look just like the originals except they’ll each have a retouch icon in the top-left area of the image and they will have the new smaller size.
Settings Recommendation: I use this function when I’m in the field and want to make a small image to send via email. The full-size JPEG file is too large to send through some email systems. It’s nice to have a way to reduce image size without having to find a computer. Please notice that this function does not reduce the image size by cropping, like the Trim function we studied earlier. Instead, it simply reduces the image size in the same aspect ratio as the original, except it has fewer megapixels.
D-Lighting
D-Lighting allows you to reduce the shadows in an image and maybe even rein in the highlights a bit, lowering the overall image contrast. It works like Active D-Lighting except that it is applied to the image after it is taken.
Remember that Retouch Menu effects are applied to a copy of the image, so your original picture is safe and untouched. In figure 11.6, you can see that I retouched a snapshot of my daughter and grandson, which was about one stop underexposed. I used High D-Lighting and brought out the shadow detail.

Figure 11.6: D-Lighting
Use the following steps to apply D-Lighting to an image:
- 1. Select D-Lighting from the Retouch Menu and scroll to the right (figure 11.6, image 1).
- 2. Choose the image you want to modify and press or touch OK (figure 11.6, image 2).
- 3. Select the level of D-Lighting you want to apply to the chosen image by moving the small yellow pointer left or right (figure 11.6, image 3, red arrow). You’ll choose from low (Lo), medium (middle position on slider), and high (Hi) D-Lighting. The small picture on the left is the picture before adjustment and the picture on the right is the picture after adjustment. When the image on the right looks the way you want it to, press or touch OK (Save) to save the new file. I selected the Hi setting to bring out shadow detail in the mildly underexposed image of my daughter and tiny grandson.
- 4. The Z6 will display a brief Image saved notice between screens 3 and 4, and then display the new file on the Monitor. The retouched image will have a small palette-and-paintbrush icon to show that it has been retouched (figure 11.6, image 4, red arrow). The original image is still available for future retouching.
Settings Recommendation: There is no one setting that is correct for all images. I might use the middle setting between Lo and Hi to see if an image needs more or less D-Lighting, and then change to Hi or Lo if needed. Remember that any amount of D-Lighting has the potential to introduce noise in the darker areas of the image, so the less D-Lighting you use, the better.
Red-Eye Correction
Red-eye correction attempts to change bright-red pupils—caused by flash exposure reflection—back to their normal dark color. Red-eye makes a person look like one of those aliens with glowing eyes from a science fiction show.
If you’ve used flash to create a picture, the Red-eye correction function will work on the image if it can detect any red eye. If it can’t detect red-eye in the image, you will briefly see a screen that says Unable to detect red-eye in selected image.
The camera will not let you select an image that was not taken with flash. Each image not taken with flash will have a box with a yellow X, signifying that the image cannot be selected for this function.

Figure 11.7: Red-eye correction
Use the following steps to execute the Red-eye correction function:
- 1. Select Red-eye correction from the Retouch Menu and scroll to the right (figure 11.7, image 1).
- 2. Choose the image you want to modify and touch or press OK (figure 11.7, image 2).
- 3. You’ll see an hourglass on the Monitor while the camera detects and removes red eye, which may take several seconds, and then a screen appears that allows you to examine the results (figure 11.7, image 3). Press the Zoom in button or tap the Zoom control to enlarge the image and see how well the function worked. Press or touch OK (Save) to save the retouched image with a new file number, or press the Playback button to cancel.
- 4. The camera will then present you with the retouched image, which is marked with the retouch icon (figure 11.7, image 4, red arrow).
Settings Recommendation: I’ve found that the Red-eye correction function works pretty well as long as the subject is fairly large in the frame. I have tried Red-eye correction on smaller subjects, such as in larger groups of people, and sometimes it works and other times it doesn’t. When the subject is smaller, the eyes are much smaller, too. The camera may struggle to find red eye in very tiny subjects. I would rate this function as quite helpful, but not always completely effective. It’s a good function to have for quick red-eye correction on critical images you need to use immediately.
Straighten
Straighten is another excellent and useful function. Often, I’ll be shooting a landscape or ocean view handheld, and in my excitement I’ll forget to level the horizon. Or maybe I am doing some architectural photography and I accidentally let a building or doorway lean a bit to the side. With Straighten I can adjust the image to level before anyone else sees it.
You can rotate an image up to 5 degrees clockwise or counterclockwise, using the Multi selector pad to scroll right or left along a graduated scale line. Each increment on the line is equal to about 0.25 degrees. As you rotate the image, the camera will automatically trim the edges so that the picture looks normal. Of course, this means you are throwing away some of the image and making it smaller. However, it’s better for the image to be a little smaller and have a nice level horizon or straight lines, don’t you think?
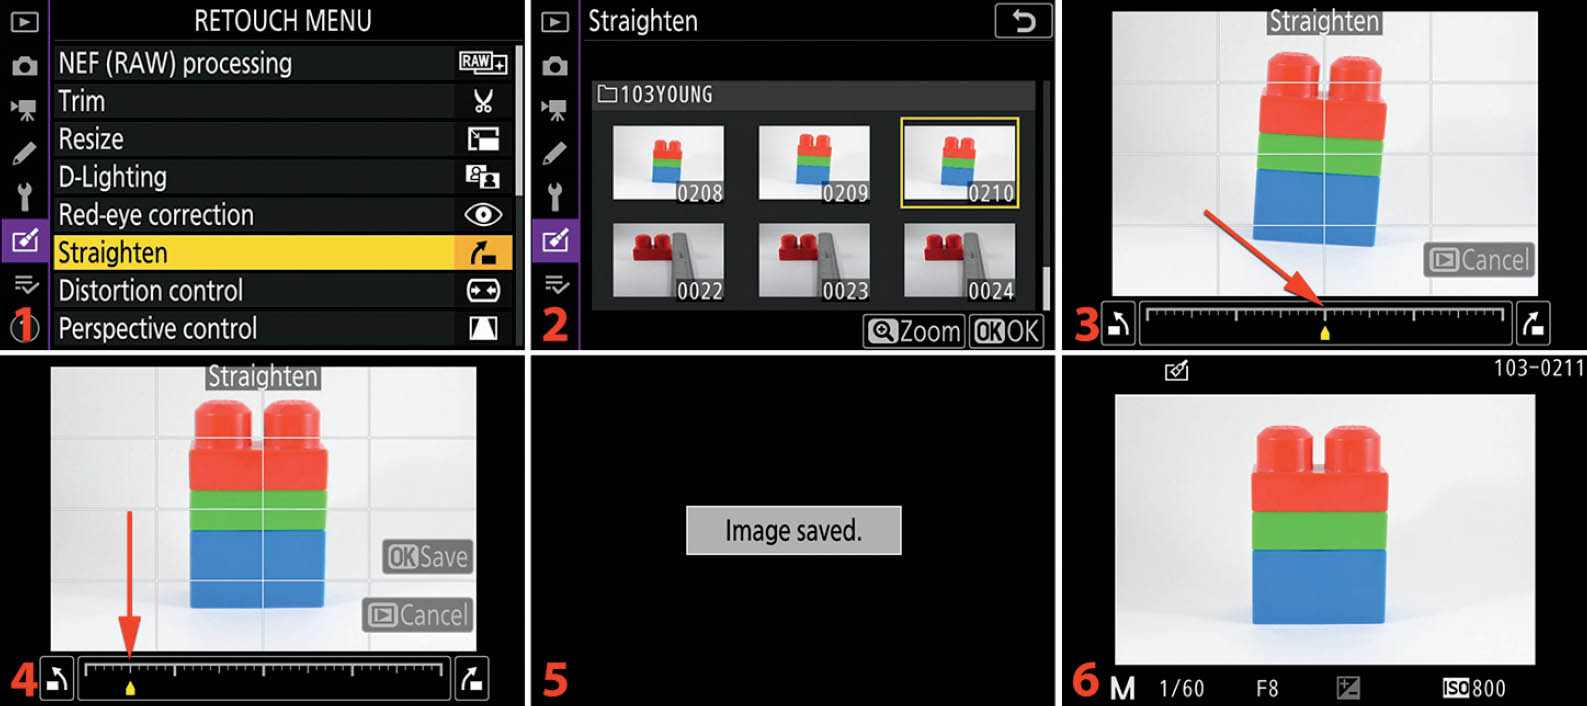
Figure 11.8: Straighten an image
Here are the steps to straighten an image:
- 1. Select Straighten from the Retouch Menu and scroll to the right (figure 11.8, image 1).
- 2. You’ll see thumbnails of the images on your memory card(s). Use the Multi selector pad to scroll to the one you want to straighten—or tap an image thumbnail—and then press or touch OK to select it (figure 11.8, image 2).
- 3. Now, rotate the image to the left (counterclockwise) or right (clockwise) in 0.25 degree increments by scrolling left or right with the Multi selector pad, by sliding the yellow pointer with your finger, or by tapping the little arrow controls at either end of scale (figure 11.8, screens 3 and 4, red arrows).
- 4. When you are happy with the new image, press or touch OK (Save) to save it, and a screen that says Image saved will appear briefly (figure 11.8, image 5). Or you can press the Playback button to cancel.
- 5. The newly straightened image will appear on the Monitor (figure 11.8, image 6).
Settings Recommendation: This is a handy function to level an image—as long as it is not tilted more than 5 degrees—without using a computer. Some of us tend to tilt our cameras just a little when we take pictures. Use this function to save embarrassment later.
Distortion Control
The Distortion control function is a companion to the Straighten function. Whereas the Straighten function is concerned with leveling the image left to right, the Distortion control function is concerned with barrel and pincushion distortion. Barrel distortion causes the edges and center of a subject to bow outward, like a barrel. Pincushion distortion is the opposite: the edges and center bow inward, like an hourglass.
Using this control will remove some of the edge of the image as distortion compensation takes place. There are two settings in the Distortion control function: Auto and Manual. Let’s consider both.
Auto Distortion Control
This setting asks the camera to automatically correct pincushion and barrel distortion in individually selected images you took with certain Nikkor lenses. You can also fine-tune the camera’s distortion adjustment.
If you took the image with Photo Shooting Menu > Auto distortion control enabled, you cannot later use the fine-tuning tools provided with this Auto Distortion control. Images that cannot be fine-tuned will have a yellow box with an X in the middle of the thumbnail.
Select Auto when you want the camera to automatically make distortion corrections. Then you can fine-tune the adjustments yourself if you think the new image needs it (and the camera will allow it).

Figure 11.9A: Auto Distortion control
Following are the steps to let the camera automatically adjust for distortion and then fine-tune the Auto Distortion choice the camera made:
- 1. Follow the screen flow shown in figure 11.9A, images 1 and 2 (Distortion control > Auto), until you arrive at the third screen in the series.
- 2. Next you’ll see the images on your memory card. Select the one you want to fix and press or touch OK (figure 11.9A, image 3). If there is a yellow box with an X in the center of the thumbnail, you cannot fine-tune that image.
- 3. The camera will automatically make its best adjustment and then display the adjusted image (figure 11.9A, image 4). The red arrow in image 4 points to the yellow adjustment pointer, which will be centered. If you are not satisfied with the camera’s Auto adjustment, use the Multi selector pad or your fingertip to move the yellow pointer along the scale to the left to remove pincushion distortion (add barrel) or to the right to remove barrel distortion (add pincushion). Screens 5 and 6 in figure 11.9A show the maximum settings (red arrows).
- 4. When you are happy with the appearance of the image, press or touch OK (Save) to save it, or press the Playback button to cancel (not shown).
The effect is not easy to see in these small images or on the Monitor of the camera. However, if you look closely at figure 11.9A, image 5, and compare it to image 6, you can see a slight difference. Greater adjustments should be made on a computer with full-size images.
Manual distortion adjustments work the same way, except the camera does not make an Auto adjustment before displaying an image that you can manually adjust.
Manual Distortion Control
You are in control of this operation. You can adjust the image until you think it looks good, without interference from the camera. This setting makes no initial distortion adjustment.
I was able to use any Nikkor lens I own (e.g., AI, D, G, E, S) to take a picture that the camera later allowed me to adjust (no yellow box with an X).

Figure 11.9B: Manual Distortion control
Here are the steps to manually correct distortion:
- 1. Follow the screen flow shown in figure 11.9B, images 1 and 2 (Distortion control > Manual), until you arrive at the third screen in the series.
- 2. You’ll see thumbnails of the images on your memory card. Select the one you want to adjust and press or touch OK (figure 11.9B, image 3).
- 3. The image will be displayed with the yellow pointer centered under the scale (figure 11.9B, image 4, red arrow). No adjustment has been made at this point. Move the yellow pointer along the scale to the left to remove pincushion distortion (add barrel) or to the right to remove barrel distortion (add pincushion). Full barrel distortion correction is applied in figure 11.9B, image 5 (red arrow), and full pincushion distortion correction is applied in image 6 (red arrow). As with the Auto distortion adjustment, the Manual distortion adjustment is rather minor.
- 4. When you are happy with the appearance of the image, press or touch OK (Save) to save it, or press the Playback button to cancel. You’ll see the new adjusted image on the Monitor.
Settings Recommendation: This function is only somewhat useful because it does not allow for larger corrections. However, it does allow minor distortion correction for images with just a little distortion. If you have no computer available and need to use an image that has a touch of distortion, this function may be helpful.
Perspective Control
When you use a wide-angle lens to take a picture from the base of a tall object, like a building, the object will look like it is falling over backward. You can correct the problem with a large-format, film-based, view camera by using its rise, fall, shift, tilt, and swing controls. Nikon makes perspective-control lenses that perform some of the functions of a view camera, namely tilt and shift—for a significant investment, of course.
Nikon has also given Z6 users some image correction capability with the Straighten, Distortion control, and Perspective control functions. We discussed the first two earlier in this chapter. Now let’s see how to use Perspective control.
Perspective control allows you to stretch the left, right, top, or bottom of an image in a way that tends to twist leaning objects so they appear straighter in the corrected image. Figure 11.10A, image 3, shows yellow pointers and their indicators (identified by the red arrows). You can move these pointers to change the perspective of the image by tilting the top toward or away from you or rotating the image to the left or right. This is a powerful control because it can help give certain images a much better perspective.

Figure 11.10A: Adjusting an image with Perspective control
Use the following steps to configure Perspective control:
- 1. Select Perspective control from the Retouch Menu and scroll to the right (figure 11.10A, image 1).
- 2. Choose an image from the list of thumbnails and press or touch OK to open it (figure 11.10A, image 2).
- 3. You will see gridlines for edge comparison and two slider controls that are operated by the Multi selector pad or your fingertip (figure 11.10A, image 3). Move the yellow pointer on the vertical scale up or down to tilt the top of the image toward you or away from you. Slide the yellow pointer on the horizontal scale to the left or right to turn the left or right edge toward you or away from you.
- 4. When the image looks the way you want it to, press or touch OK (Save) to save the image, or press the Playback button to cancel (figures 11.10B and C).
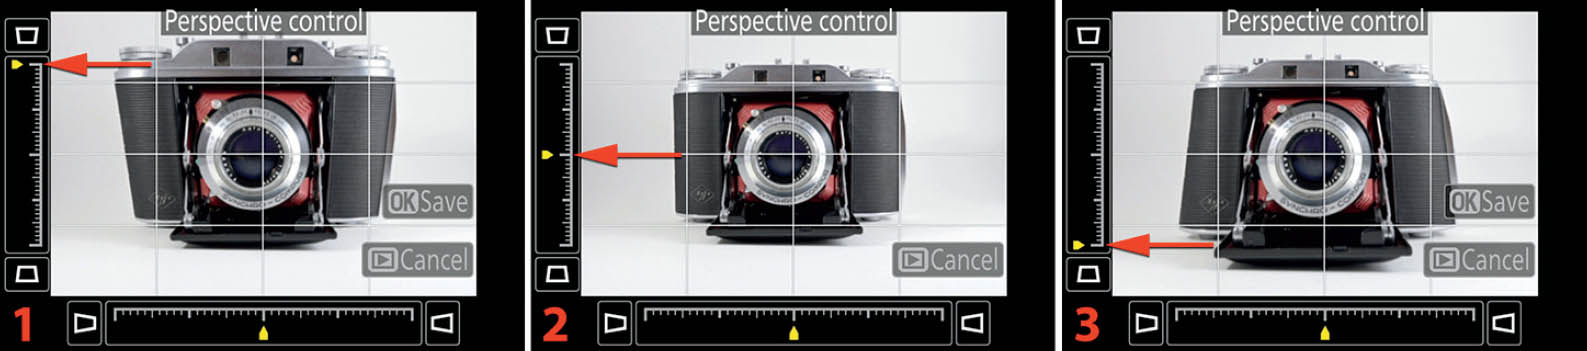
Figure 11.10B: Tilting the image
Figure 11.10B shows what happens to the image when you use the vertical slider on the left side. Notice how the top of the subject tilts either toward you or away from you (forward-to-backward leaning) according to how the vertical slider is positioned.

Figure 11.10C: Swinging the image
Figure 11.10C shows how the image swings to the left or right as you move the horizontal slider on the bottom. Can you see how powerful this functionality is to control perspective? The camera automatically crops off the top and bottom of the stretched ends to keep the image looking like a normal rectangle, so the final image will be smaller.
Settings Recommendation: Learn to use this rather powerful function! You now have excellent Perspective control, with no additional lens purchases! Add Straighten for leveling horizons (rotating the image), Distortion control for removing barrel and pincushion distortion, and finally Perspective control to remove angle distortion, and you have the basics of a graphics software program built right into the camera.
Image Overlay
The Image overlay function is a nice way to combine two RAW images as if they were taken as a multiple exposure. Basically, you can select a couple of NEF (RAW) shots and combine them into a new overlaid image.
The results can be a lot like what you get when using Photo Shooting Menu > Multiple exposure, but Image overlay gives you a visual way to overlay two separate images instead of shooting multiple exposures on one picture.
The results can be high quality because the overlay is done using RAW image data. You can vary the density of each image, with a review display (Overlay) showing how the combined image will appear, before you make the final combination of the two images.

Figure 11.11: Image overlay settings
Use the following steps to do an Image overlay:
- 1. Select Image overlay from the Retouch Menu and scroll to the right (figure 11.11, image 1).
- 2. Select the RAW Image 1 box (outlined in yellow in figure 11.11, image 2) from the combination screen and press or touch OK (Select) to open the selection screen.
- 3. Select an image from the selection screen (figure 11.11, image 3). Press or touch OK again to return to the combination screen with an image selected in the Image 1 position (figure 11.11, image 4). You can vary the gain of the first image by using the Multi selector pad or tapping on the yellow up/down pointers to scroll up or down in the X1.0 field (figure 11.11, image 4). The X1.0 setting is variable from X0.1 to X2.0. It lets you control how bright or dark (dense) an image is so it can more closely match the density of the other image in the overlay. X1.0 is normal image density, as shown.
- 4. Use the Multi selector pad or tap the RAW symbol under Image 2 to move the yellow box to the RAW Image 2 position (figure 11.11, image 5). Press or touch OK (Select) to open the image selection screen for the second picture.
- 5. Highlight the second image (figure 11.11, image 6) and press or touch OK (Select) to insert the image into the Image 2 position (figure 11.11, image 7). As mentioned in step 3, you can use the X1.0 field to vary the density of an image, in this case the second image in the overlay (figure 11.11, image 7). Try to match the density of Image 1 as much as possible to provide a realistic overlay.
- 6. Use the Multi selector pad or tap the Preview symbol to move the yellow box to the Preview area. You will see two selections below it: Overlay and Save (figure 11.11, image 8). Choose Overlay or Save and press or touch OK to achieve the following results:
- If you select Overlay, the Z6 will temporarily combine the images and you will see another screen that displays a larger view of the new image (not shown). You can press or touch OK (Save) to save the image with a new file name, or you can press the checkered Zoom out button to return to the previous screen.
- If you choose Save instead of Overlay and press or touch OK, the Z6 immediately combines the two images and saves the image with a new file name without letting you review the image first (figure 11.11, image 9). Basically, the Save selection saves now, and Overlay gives you a preview of the combination so you can modify or save it.
Settings Recommendation: This is an easy way to overlay images without a computer. There are some drawbacks, though. One image may have a strong background that is impossible to remove no matter how much you adjust the gain or image density (X0.1 to X2.0). This is a situation in which a computer excels because you can use software tools like masking in Photoshop to remove parts of the background and make a more realistic overlay. However, if you must combine two images in the field, you have a way to do it in-camera.
Trim Movie
Trim movie gives you a two-step process to cut a section out of the middle of a movie created with your Z6, or you can remove a beginning or ending segment. In addition, you can save an individual frame as a still image from anywhere in the movie.
There are two individual parts to the process of trimming a movie—choosing a start point and choosing an end point. You can use one or the other, or both. When you finalize one of the Start point and/or End point selections, the camera saves the file as a new movie with a new file name. This tends to create a bunch of smaller movies on your memory card that you’ll need to delete, taking care that you don’t delete the wrong one. There are two parts to Trim movie:
- Choose start/end point: This allows you to delete frames from the beginning or the end of your movie and choose a new starting or ending point.
- Save current frame: You can take a low-resolution 16:9 ratio JPEG snapshot of any frame in the movie.
Choose Start/End Point
You can start this entire process directly from the Retouch Menu, or you can select Trim movie from the i Menu when a video is showing on the Monitor (press the i button). The steps are basically the same except that you choose a movie from a list of movies in the Retouch Menu instead of starting with a movie on the Monitor, from the i Menu.
We will use the Retouch Menu method since we are in the Retouch Menu chapter. Just remember that these steps apply also to the Trim movie function under Retouch on the i Menu.

Figure 11.12A: Edit movie directly from the Retouch Menu
Following are the steps to choose a new start and end point for a movie directly from the Retouch Menu:
- 1. Highlight Trim Movie on the Retouch Menu and scroll to the right (figure 11.12A, image 1).
- 2. Choose a movie from the list of movies and press or touch OK to select it. You can briefly zoom in on the movie to make sure it is the one you want to edit by pressing and holding the Zoom in button or tapping the Zoom control (figure 11.12A, image 2).
- 3. In figure 11.12A, image 3, you will see several important controls labeled in red letters, A–F. The A and B touch buttons (top) control the positioning (trimming) of the yellow beginning- and end-of-movie trim tabs C and D (bottom). To trim the movie, you must select either the beginning-of-movie trim tab C or the end-of-movie trim tab D. You can toggle between the C and D trim tabs by touching the trim tab change button E. The active trim tab (C or D) has a tiny yellow line just above the tab, as seen in image 3 at the tip of the C label. Scissors button F allows you to save the trimmed movie, as long as you have trimmed at least 5 seconds from the video length.
- 4. As seen in figure 11.12A, image 4, the beginning-of-movie trim tab has been moved to the right, signifying that frames have been removed from the start of the video. To move this tab (trimming frames), you will press the A or B touch buttons and watch the movie as it scrolls, until you find the position where you want the video to begin. If you don’t want to trim anything from the end, you can save the movie immediately by tapping the scissors touch button (F), skipping the next step (step 5), and moving directly to step 6.
- 5. You can trim footage from the end of the movie by tapping the trim tab change button E. The emphasis will immediately switch from the beginning-of-movie trim tab C to the end-of-movie trim tab D (notice the tiny yellow line moving above the active tab; figure 11.12A, image 5). Now when you tap the A or B touch buttons, you will move the end-of-movie trim tab until you find your new end-of-movie position, dropping frames from the end of the video. When you have found the best movie ending position, tap the scissors touch button F to decide what to do with the new shortened movie. (Note: You can touch and drag either of the movie trim tabs C and D with your finger for high-speed movement through a long movie. Use the A and B touch buttons to fine-tune the trim position. A trim tab has to be active before you can drag it directly. Tap touch button E to toggle between the tabs.)
- 6. As shown in figure 11.12A, image 6, the camera is now ready to Save, Overwrite, Cancel, or Preview. Here is a list of what each option on the menu does:
- Save as new file: If you choose Save as new file, the camera will both retain the old, longer movie and create the new, shorter movie with its own new file name.
- Overwrite existing file: If you choose Overwrite existing file (be careful), the camera will overwrite the older, long movie with the new, shorter one.
- Cancel: If you choose Cancel, the camera returns to the location shown in figure 11.12A, image 4 or 5, and awaits further input from you.
- Preview: If you select Preview, the camera will play the movie from and/or to the position of the new cut point. In other words, it plays what would become the new, shorter movie if you save it. When the Preview movie is finished playing, the camera will return to the menu shown in figure 11.12A, image 6, and await further input.
- 7. Once you have chosen to save the file, the progress bar shown in figure 11.12A, image 7, will appear as the file is being saved to a brand-new, shorter movie file. When the save is complete, the screen shown in figure 11.12A, image 8, will appear briefly, informing you: Image saved.
- 8. Finally, the screen shown in figure 11.12A, image 9, will appear. The final screen is the new, shorter movie, saved under a new file name—as shown by the frame and scissors symbol at the red arrow.
Note: Your movie must be at least 1 second long when you’re done or the camera will refuse to cut any more frames and will give you this terse message: Movies cannot be edited to a length of less than 1 s.
Save Current Frame
You can save an individual low-resolution frame from anywhere in the movie. The still image frame size is based on the format of the movie (2160p or 1080p), which is set in Movie Shooting Menu > Frame size/frame rate:
- A still image created from a 3840×2160 (4K or UHD) movie is a little larger than 8 megapixels.
- A still image created from a 1920×1080 (Full HD) movie is a little larger than 2 megapixels.
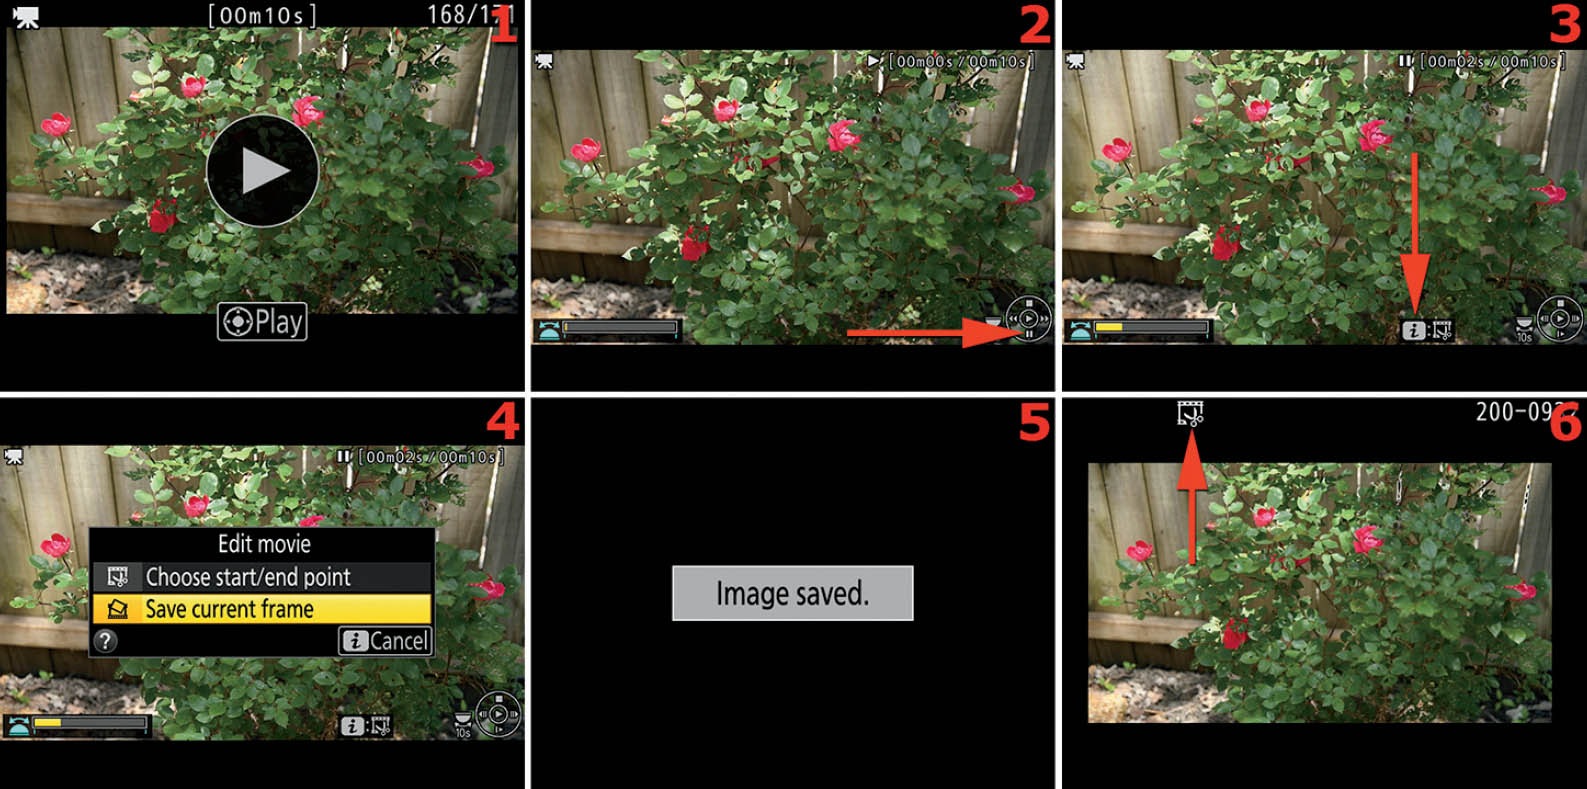
Figure 11.12B: Save an individual frame from a movie
Use these steps to save a single frame from the movie as a still image (using the Playback Retouch Menu):
- 1. Press the Playback button and scroll to the movie that contains the frame you want to save (figure 11.12B, image 1). Press the OK button or tap Play to play the movie.
- 2. Let the movie play until you reach the approximate point where you want to grab the frame from the movie, and then press down on the Multi selector pad to pause the movie (figure 11.12B, image 2).
- 3. The screen shown in figure 11.12B, image 3, will now appear. You can scroll left or right with the Multi selector pad to move one frame at a time while the movie is paused. You can also turn the rear Main command dial to jump forward or backward by 10 seconds in the movie. Once you’ve found the frame you want to save, press the i button to open the Edit movie menu.
- 4. Highlight Save current frame and press the OK button (figure 11.12B, image 4).
- 5. The Z6 will now cut out the frame you selected and save it under a new file name. A screen that says Image saved will appear briefly (figure 11.12B, image 5), and the new low-res image will appear on the Monitor (figure 11.12B, image 6).
Settings Recommendation: The Trim movie and Save current frame functions provide some editing functionality for those who do not like using a computer. Trimming a movie is better done in software like Apple Final Cut Pro or Adobe Premier Pro. Plus, the Z6 has the ability to capture a frame from a movie while it is being recorded, simply by pressing down on the Shutter-release button.
Side-by-Side Comparison
Side-by-side comparison allows you to compare an image you’ve retouched with its original source image. Interestingly, this function is not available from the main Retouch Menu. You’ll find it on the Playback Retouch Menu only, which you access by pressing the i button when a picture is displayed on the Monitor.

Figure 11.13: Side-by-side comparison
Here are the steps to compare an original and retouched image side by side on the camera’s Monitor:
- 1. Press the Playback button and find the image you want to compare to its retouched versions (figure 11.13, image 1).
- 2. Press the i button to access the i Menu, select Retouch, and scroll to the right (figure 11.13, image 2).
- 3. Scroll all the way down to the bottom of the Retouch Menu, select Side-by-side comparison, and scroll to the right (figure 11.13, image 3). The original image will appear on the left, and one of the retouched versions will appear on the right (figure 11.13, image 4).
- 4. When you have performed multiple Retouch operations on an image, look for tiny yellow pointers on top, bottom, or sides. Scroll in the direction of those pointers to see all the operations performed on the original image. The two images showing reflect that the original image had a D-Lighting session applied (left) and was trimmed to a smaller size.
Settings Recommendation: This function is very convenient because you can choose the original image or one of the retouched images, and the camera is smart enough to place them in the proper position in the Side-by-side comparison. You can tell an image has been retouched by looking for the retouch icon in the upper-left corner of the image when it’s displayed on the Monitor.
Author’s Conclusion
Nikon has given camera users who dislike computers many ways to work with their images in-camera. Although the Retouch Menu is not as fully featured as a computer graphics program, it does allow you to do quick one-off conversions for convenience.
I didn’t think this group of Retouch Menu functions would be all that useful to me when I first read about them. However, in the field I find myself using them more than I expected. Whether or not you use them often, it’s good to know you have them for emergency use.
Next, we’ll move into the final menu system in the camera. It’s called My Menu, and it may become very valuable to you as you learn how it works. It’s a place to put your often-used, favorite settings so you can get to them very quickly. Let’s see how My Menu and its cousin, Recent Settings, work in the next chapter.