![Custom Menu E. Exp/ISO/BULB/[Meter]](https://imgdetail.ebookreading.net/cover/cover/202111/EB9781681986333.jpg)
[Image Review] Settings/Info Settings
The Image Review screens provide different ways of viewing images on your memory card. You can view a single image or groups of images in configurations of 4, 9, 25, and 100 images per screen. There is also a Calendar format.
From the factory, only the single-image, 25-image, and Calendar formats are available, but we will examine how to select the other formats.

Figure 7.62: [Image Review] Settings
With all options enabled in [Image Review] Settings, you can rotate the Rear Dial clockwise to see six views of the images on the memory card (turning the Rear Dial counterclockwise zooms in on a single image with magnifications from 2× to 14×, in six steps; touch the screen and a vertical scale will appear on the right margin of the image, which you can use to slide your finger to change the enlargement in single-digit increments).
Figure 7.62, images 1–5, shows the views for 1, 4, 9, 25, and 100 images. Note that the format of the single-frame image shown in figure 7.62, image 1, depends on the selections made for [Playback Magnify] on the [Image Review]/Info menu. The Calendar view (figure 7.62, image 6) allows you to scroll to a date and select images that were taken on that day. If there are no thumbnail images on a date, no pictures were taken that day.
Let’s examine how to enable and disable the image view screens.

Figure 7.63: [Image Review] Setting choices
Use the following steps to enable or disable image view screens for [Image Review] Settings:
- 1.Select [Image Review]/Info Settings from the D1. Disp/[Sound]/PC menu and scroll to the right (figure 7.63, image 1).
- 2.Select [Image Review] Settings from the [Image Review]/Info Settings menu and scroll to the right (figure 7.63, image 2).
- 3.You will see five information screen choices (figure 7.63, image 3). On a new camera, 4, 9, and 100 will not be checked. Place a check mark to the left of the image review screen types you want to use. To add or remove a check mark, simply highlight the choice and press the OK button.
- 4.When you insert a check mark, the camera automatically saves the choice. Press the Menu button to return to the previous screen.
Settings Recommendation: I set my camera to use the 4, 9, 25, and Calendar image review screens. The 100-image view is a little small for my eyes, but if you look carefully you can make out enough detail to choose an image. Note that the green icons for Protection, Sharing, etc. are not displayed in the 100-image view. Experiment with these settings and see which are most useful to you.
Picture Mode Settings
The camera has a choice of 41 Picture Modes, as discussed in the Shooting Menu 1 chapter. If you do not use some of the Picture Modes, you can use this function to hide them (except for the Natural Picture Mode) from the Shooting Menu 1 > Picture Mode menu and any camera screens that allow you to choose a Picture Mode.
Let’s say you are not interested in using some of the Art Filter Modes. You could simply uncheck them from the Picture Mode Settings menu and they will disappear from any menu or screen that normally displays a choice of Picture Modes.
If you attempt to select the Picture Mode Settings menu option, but the option is grayed out, that’s probably because HDR is currently enabled.
Let’s examine how to enable and disable individual Picture Modes.
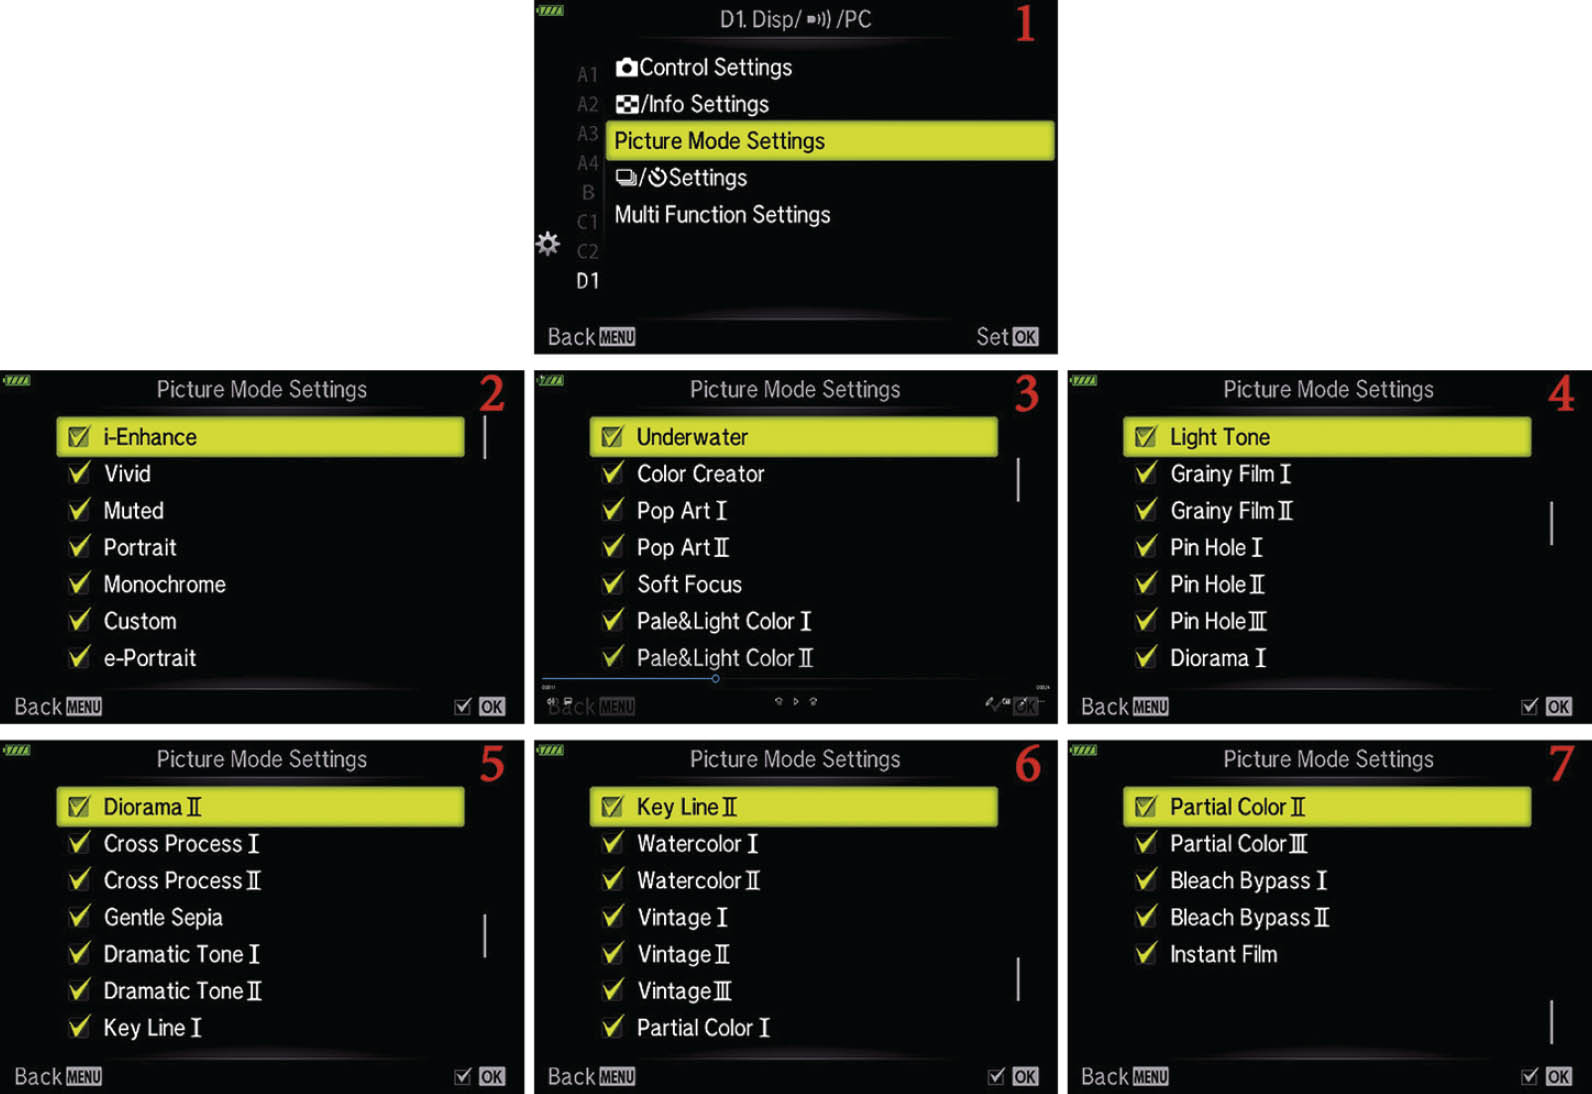
Figure 7.64: Enabling or disabling Picture Modes
Use the following steps to enable or disable Picture Modes from appearing on the camera menus and screens:
- 1.Select Picture Mode Settings from the D1. Disp/[Sound]/PC menu and scroll to the right (figure 7.64, image 1).
- 2.Scroll up or down with the Rear Dial or the Arrow pad and highlight any Picture Mode you want to disable or enable. The default is to have all Picture Modes available (figure 7.64, images 2–7). Press the OK button to uncheck any modes that you do not want to use, or to check any modes you want to restore.
- 3.When you insert or delete a check mark, the camera automatically and immediately saves the choice. Press the Menu button to return to the Picture Mode Settings screen.
Settings Recommendation: I leave all the Picture Modes checked and available. Although I don’t often use them, I play around with them sometimes. The E-M5 III is a fun camera because it has many effects for JPEG pictures. If you are a RAW shooter, Picture Modes are not of much interest because you cannot apply effects after the fact.
[Sequential Shooting] / [Self-Timer] Settings
The E-M5 III offers 19 different [Sequential]/[Self-timer] shooting modes, 18 of which can be enabled or disabled on the camera’s selection screens (the [Single] shooting mode is always enabled). It can be overwhelming and time-consuming to scroll through all of these options when you’re trying to select a mode to use, and there may be modes that you never use. The [Sequential]/[Self-timer] menu allows you to select which of the following modes are displayed on the camera’s selection screens, in addition to that [Single] shooting mode:
- [Single] (Anti-Shock)
- [Single] (Silent)
- [Sequential] H (High)
- [Sequential] H (Silent)
- Pro Cap H (High)
- [Sequential] L (Low)
- [Sequential] L (Anti-Shock)
- [Sequential] L (Silent)
- Pro Cap L (Low)
- [Self-timer] 12s (12 sec)
- [Self-timer] 12s (12 sec) (Anti-Shock)
- [Self-timer] 12s (12 sec) (Silent)
- [Self-timer] 2s (2 sec)
- [Self-timer] 2s (2 sec) (Anti-Shock)
- [Self-timer] 2s (2 sec) (Silent)
- [Self-timer] C (Custom)
- [Self-timer] C (Custom) (Anti-Shock)
- [Self-timer] C (Custom) (Silent)
Note that if the Hi Res Shot feature has been enabled on Shooting Menu 2, then the HiRes icon will be available for selection on the camera’s various selection screens, and will appear on the Shooting Menu 1 > [Sequential] / [Self-timer] / Interval Timer > [Sequential] / [Self-timer] list of shooting modes but, for the E-M5 III, will not appear in this list.
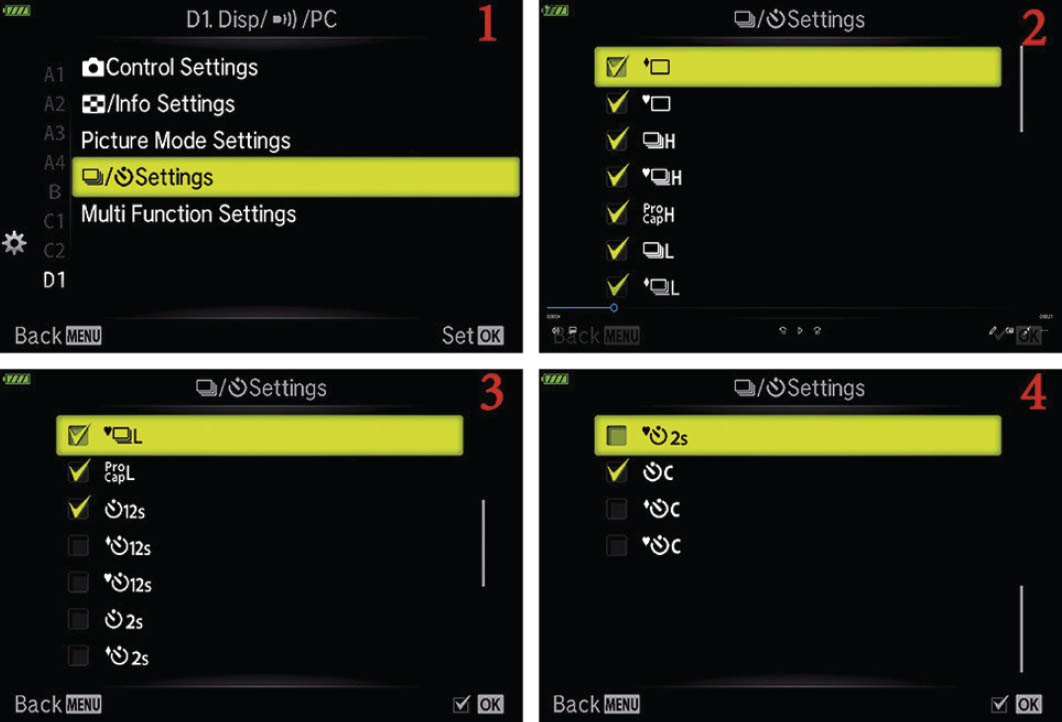
Figure 7.65: The [Sequential]/[Self-timer] Settings menu
Use these steps to decide which [Sequential]/[Self-timer] modes will be available on the camera’s selection screens:
- 1.Select [Sequential]/[Self-timer] Settings from the D1. Disp/[Sound]/PC menu and scroll to the right (figure 7.65, image 1).
- 2.Scroll up or down with the Arrow pad and highlight any [Sequential]/[Self-timer] modes you want to disable or enable (figure 7.65, images 2–4). Press the OK button to uncheck any modes that you do not want to use, or to check any modes you want to restore.
- 3.When you insert a check mark, the camera automatically saves the choice. Press the MENU button to return to the D1. Disp/[Sound]/PC screen.
Settings Recommendation: I find it time-consuming to scroll through all of these options if they are all enabled, so I only put check marks next to the modes I use regularly.
Multi Function Settings
By default, Multi Function is not assigned to any button, but can be assigned to most camera buttons. It has the Color Creator, Magnify, Image Aspect, S-OVF, and Peaking features enabled. Using this Multi Function Settings option, you can choose which and how many of seven features you would like to have associated with the Multi Function button: Color Creator, Front Dial-adjustable ISO, Rear Dial-adjustable WB, Magnify, Image Aspect, S-OVF, and Peaking. (Highlight & Shadow Control is always enabled, so is not listed in this menu.)

Figure 7.66: Selecting functions for Multi Function Settings
Use the following steps to select the functions to be made available from the Multi Function button:
- 1.Select Multi Function Settings from the D1. Disp/[Sound]/PC menu and scroll to the right (figure 7.66, image 1).
- 2.Select one or more of the functions from the list (figure 7.66, image 2), pressing the OK button after each selection.
- 3.Press the MENU button to return to the D1. Disp/[Sound]/PC menu (figure 7.66, image 1).
Live View Boost
Live View Boost makes the subject look bright on the monitor, regardless of how little ambient light there may be. It is amazingly capable of artificially opening up the shadows on the monitor and in the viewfinder. If the most important thing is to be able to see the subject in low light during composition, you may want to enable this function. If carefully controlled exposures are more important, do not enable it.
The Live View Boost option generally has three settings: Off, On1, and On2. With the E-M5 III, Live View Boost can be applied to any or all of four shooting environments: Manual Shooting, Bulb/Time, Live Composite, and Others. Note that Bulb/Time and Live Composite are special long-exposure options that are available only in the Manual Shooting mode.
Live View Boost does not affect the exposure of the picture; it affects only how the image appears on the monitor and in the viewfinder. Unfortunately, controls such as ± Exposure Compensation, although they still work normally to control exposure, will not display their effects on the screens when Live View Boost is enabled.
Live View Boost even prevents the Live Histogram display from updating correctly for Exposure Compensation changes. With Live View Boost enabled, the Live Histogram is limited to displaying the exposure the camera would provide without compensation. If you turn the dial for Exposure Compensation, the Histogram will not adjust and show the true exposure value, which could easily lead to under- or overexposure.
You can turn Live View Boost on or off for one (or more) of the following options: Manual Shooting, Bulb/Time, Live Composite, and Others. There are two separate On settings: On1 prioritizes the smoothness of the display, and On2 prioritizes image visibility in dark conditions by boosting the image brightness. Keep in mind that if you use On1 or On2, the view on the screen is not what the camera records.
Let’s examine how to turn the Live View Boost conditions on and off.

Figure 7.67: Enabling or disabling Live View Boost
Use these steps to turn Live View Boost on or off:
- 1.Select Live View Boost from the D2. Disp/[Sound]/PC menu and scroll to the right (figure 7.67, image 1).
- 2.Select the mode(s) for which you wish to set Live View Boost: Manual Shooting, Bulb/Time, Live Composite, or Others (figure 7.67, image 2).
- 3.Select On1, On2, or Off from the up/down menu (figure 7.67, image 3).
- 4.Press the OK button to Set the value.
Settings Recommendation: When you turn the dial for Exposure Compensation, you expect to see the image brighten or darken until it looks just right. You will not see the brightening or darkening effect with Exposure Compensation when Live View Boost is enabled because the screen is doing its best to brighten the subject to the max. Also, the Live Histogram will not update correctly for compensation. If you are in a dark room trying to shoot a subject by candlelight, Live View Boost can help you see the subject. However, I leave Live View Boost set to Off.
Art LV Mode
Using an Art filter places high demands on the camera microprocessor. That can lead to jerkiness in the electronic viewfinder (EVF) or the LCD monitor because it slows down the frame rate when you shoot quickly.
To counteract that demand, you can set the camera so it does not display the effect of the Art filter when you have the Shutter button pressed halfway down (mode2). In mode1 the camera displays the full Art filter effect and ignores the reduced frame rate. That doesn’t mean you won’t see the effect of the Art filter on the monitor and in the viewfinder in mode2—it simply means the effect may not be as pronounced because the camera shoots images so quickly. This function does not affect the look of the pictures you take, just how they are displayed on the camera screens while you shoot.
The point of this function is to allow you to have a faster frame rate, even when you shoot with microprocessor-intensive Art filters.
You will still see the effect of the Art filter on the camera display screens, but they may not be quite as deep and the refresh rate will be faster when you are using mode2. The camera’s help text for mode2 reports: “The Art Filter effect is lightened on the LCD and the viewing frame rate is faster.”
Let’s examine how to select one of the two modes.

Figure 7.68: Selecting an Art LV Mode for the best frame refresh rate while using Art filters
Use the following steps to modify the Art LV Mode setting:
- 1.Select Art LV Mode from the D2. Disp/[Sound]/PC menu and scroll to the right (figure 7.68, image 1).
- 2.Select mode1 or mode2 from the up/down menu (figure 7.68, images 2 and 3). The factory default is mode1.
- 3.Press the OK button to Set the value.
Settings Recommendation: Since this function does not affect the pictures you take, only the display screens, you will need to decide if you really need the ability of an Art Filter Mode to display with its full effect while you shoot multiple pictures. Most people would rather not have their camera slow down while they shoot quickly, so my recommendation is to use mode2. Of course, if you rarely or never use the Art filters while shooting bursts of images, this function may not be useful to you. I leave mine set to mode2 for the best refresh rate in case I decide to blast off a bunch of Art Grainy Film black-and-white images. If I am shooting with an Art filter at several frames per second, I don’t really need to examine each image as it flies by!
LV Close Up Settings
As discussed in the previous Button Functions section of this chapter and in Appendix A: Still Image Button Tasks Reference, you can assign the Magnify task to one of the Button Functions. The Magnify task will let one of the camera buttons zoom into, or magnify, the subject and show an extreme closeup. This is a great focus aid because you can see a small portion of the subject up close while using autofocus.
The LV Close Up Settings menu includes two functions that allow you to determine how the camera will behave when you are using the magnified Live View: LV Close Up Mode and Live View Boost.
The camera defaults to mode2 of the LV Close Up Mode, which allows the autofocus system to work while the subject remains magnified on the enlarged Live View screen. If you select mode1, the magnification will go away before autofocus will work. The image will zoom back out to normal when you press the Shutter button to initiate autofocus, and it will force you to autofocus with no magnification. Manual focus can be used with full magnification in either mode1 or mode2.
When enabled, Live View Boost makes the subject appear brighter on the monitor during LV Close Up. This allows you to check for accurate focus when shooting in dark locations. If Live View Boost is turned off, the brightness is not adjusted during LV Close Up.

Figure 7.69: Selecting LV Close Up Mode Settings
Use the following steps to modify the LV Close Up Settings:
- 1.Select LV Close Up Settings from the D2. Disp/[Sound]/PC menu and scroll to the right (figure 7.69, image 1).
- 2.Select LV Close Up Mode from the LV Close Up Settings menu and scroll to the right (figure 7.69, image 2).
- 3.Select mode1 or mode2 from the up/down menu (figure 7. 69, images 3 and 4). The factory default is mode2, and AF works during magnification.
- 4.Press the OK button to Set the value and return to the previous screen (figure 7.69, image 2).
- 5.Select Live View Boost and scroll to the right (figure 7.69, image 5).
- 6.Select Off or On from the up/down menu (figure 7.69, images 6 and 7), and then press the OK button to Set the value.
- 7.Press the MENU button to return to the D2. Disp/[Sound]/PC menu.
Settings Recommendation: One of the primary reasons I want to zoom in on or magnify the subject is to make sure autofocus is working well, so I leave LV Close Up Mode set to mode2.
[Playback Magnify] Default Setting
With this feature, you can use a 100 % enlargement ratio during image playback, making it possible to review images at a 1:1 pixel ratio. You can also set the magnification ratio to a specific ratio with this [Playback Magnify] Default Setting function.
On entering the Playback function, the monitor will display the recorded image at a magnification factor of 1X, and will maintain that magnification factor as you simply scroll, or use the index, to locate the desired image for magnification. Then, rotating the Rear Dial counterclockwise to enlarge the image, the camera will apply the value selected in this menu option, eliminating the need to scroll the Rear Dial to locate that value.
- Recently: Zoom in to the most recently selected zoom ratio.
- Equally Value: Images are displayed at a zoom ratio of 1:1. A [1:1] icon appears in the lower-left corner of the played-back image, just to the right of the green magnification factor.
- ×2, ×3, ×5, ×7, ×10, ×14: Any one of these values can be chosen to become the initial magnification factor once a playback image is chosen for magnification.
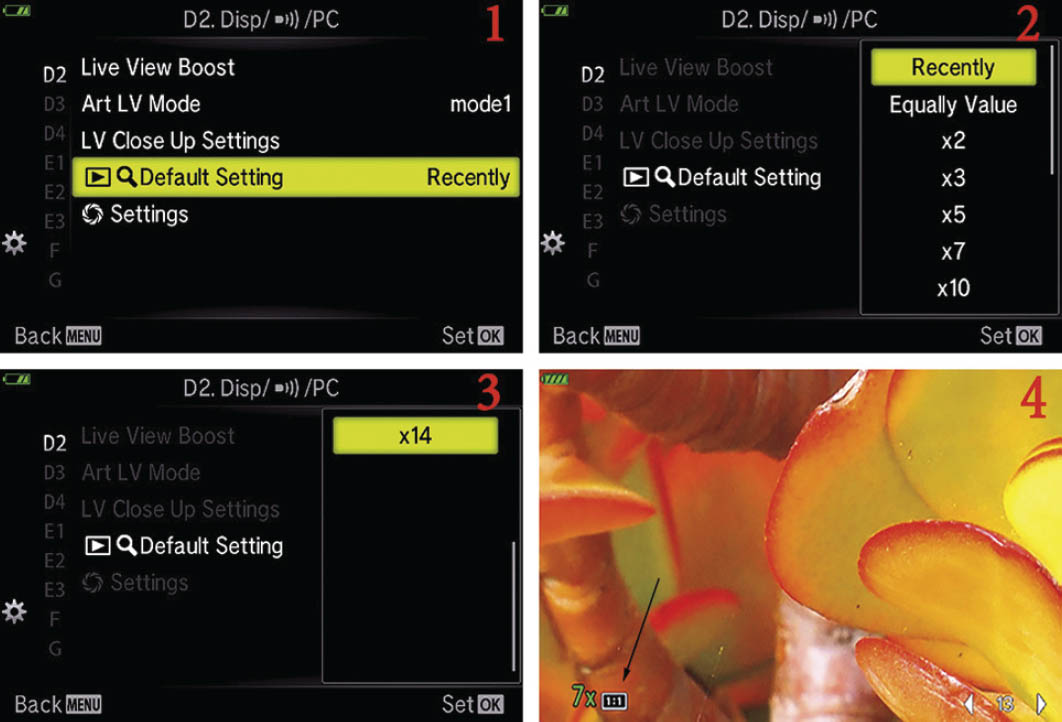
Figure 7.70: Choosing the starting zoom ratio
Use the following steps to modify the [Playback Magnify] Default Setting:
- 1.Select [Playback Magnify] Default Setting from the D2. Disp/[Sound]/PC menu and scroll to the right (figure 7.70, image 1).
- 2.Scroll the vertical menu to select a magnification option (figure 7.70, images 2 and 3).
- 3.Press the OK button to save your selection, and press the MENU button to return to the D2. Disp/[Sound]/PC menu.
If you selected the Equally Value option, then on zooming a displayed playback image, you will see the 1:1 icon (pointed to by the black arrow in figure 7.70, image 4) to the right of the green magnification factor, which is displayed in the lower-left corner of the image.
[Preview] Settings
[Preview] Lock
[Preview] Lock extends the power of the Preview button. Recall that if the Preview button is not assigned to some other task, it will stop down (close) the aperture while it is depressed so you can see the depth of field (zone of sharp focus) in your image. [Preview] Lock lets you do the same thing, except you don’t have to keep the Preview button depressed to preview the stopped-down aperture. Instead, you can press the Preview button once to lock the aperture in its stopped-down position, allowing you to see the depth of field, then press it again to unlock the aperture and open it back up to maximum size for bright subject viewing. This function is smart enough that it performs with Preview regardless of the button it is currently assigned to.
Let’s examine how to configure [Preview] Lock.
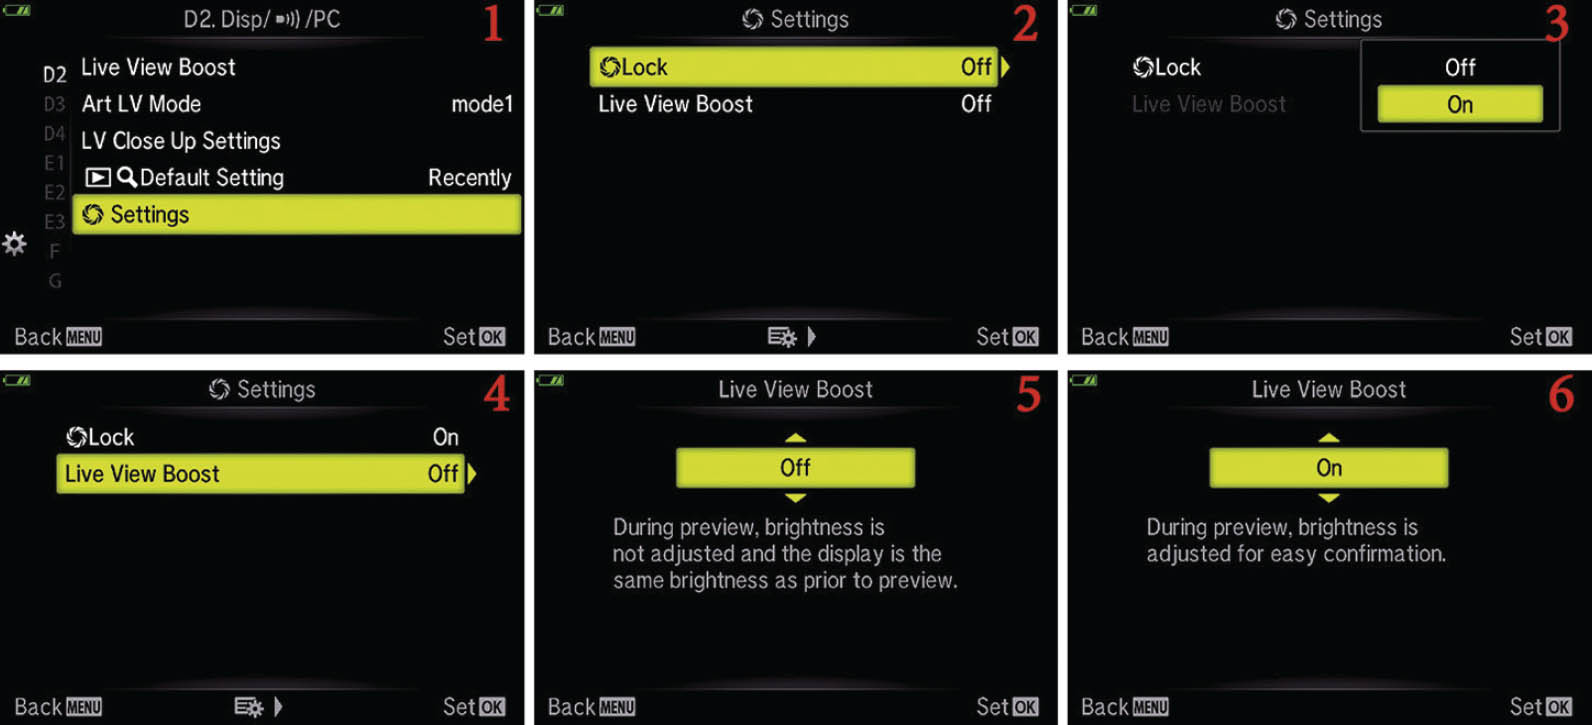
Figure 7.71: Enabling or disabling the [Preview] Settings
Use the following steps to enable or disable the [Preview] Settings:
- 1.Select [Preview] Settings from the D2. Disp/[Sound]/PC menu and scroll to the right (figure 7.71, image 1).
- 2.Select [Preview] Lock from the [Preview] Settings menu and scroll to the right (figure 7.71, image 2).
- 3.Select On or Off from the up/down menu (figure 7.71, image 3). The factory default is Off.
- 4.Press the OK button to Set the value. Press the MENU button to return to the [Preview] Settings menu shown in (figure 7.71, image 2).
- 5.Select Live View Boost and scroll to the right (figure 7.71, image 4).
- 6.Select On or Off from the up/down menu (figure 7.71, images 5 and 6). The factory default is Off.
- 7.Press the OK button to Set the value. Press the MENU button to return.
Settings Recommendation: Normally, the regular way a Preview button provides depth of field (DOF) preview is fine. Most of the time I leave this function set to Off. However, when I am working with macro shots and want to fine-tune where the depth of field falls within my image, I find it convenient to set this function to On and use [Preview] Lock to stop down the aperture while I use manual focus to move the depth of field back and forth until it is exactly where I want it. I love the fact that the electronic viewfinder gets rid of most of the darkness that results from a smaller aperture so I can see how to manipulate the DOF until it is exactly where I want it to be. If using the monitor, you may want to use the Live View Boost feature to achieve much the same result. This is a very convenient function for people who like to use hyperfocal focusing and still want to visually confirm the DOF boundaries.
Grid Settings
This function allows you to display six types of grids on your camera monitor or in the electronic viewfinder (EVF). (You can use I. EVF > EVF Style to select one of three EVF display styles. With style three, whatever grid is chosen here (D3. Disp/[Sound]/PC > Grid Settings > Displayed Grid) will also be displayed on the EVF. When D3. Disp/[Sound]/PC > Grid Settings > Apply Settings to EVF is set Off, styles one and two will recognize the display grid selected in I. EVF > EVF Grid Settings > Displayed Grid, and that grid will be displayed in the EVF while the grid chosen in D3. Disp/[Sound]/PC > Grid Settings > Displayed Grid will be displayed on the monitor.)
Let’s examine each grid type.
Here is a description of the six grid types shown in figure 7.72:
- Image 1 shows a 24-segment full-screen grid that is useful for many types of image alignment.
- Image 2 shows a 9-segment grid that is more centered on the screen. It is almost, but not quite, in the rule-of-thirds format.
- Image 3 shows a 9-segment grid that is precisely centered on the screen. It is in the rule-of-thirds format.
- Image 4 shows a cross-screen gradient grid that is similar to some rifle scopes.
- Image 5 shows an X-pattern grid that runs diagonally from corner to corner and identifies the center of the screen at the lines’ intersection. (You will see a plus sign on each of the four legs of the grid, approximately one-fourth of the way out from the grid’s intersection. I have yet to determine what purpose that serves.)
- Image 6 shows two horizontal grid lines, in the top and bottom areas of the screen. The area between the lines in this pattern closely resembles the 16:9 aspect ratio of high-definition movies and some still images.
- Image 7 shows the Live View Image Only screen with no grid lines. (Though not intended as “grid lines,” you will see vertical lines, at the left and right edges of the image area, and even the corners of a rectangle that identifies the Auto Focus area—except for the All-Points focus area—shown in a faint gray color that appears to conform to the default color specified at D3. Disp/[Sound]/PC > Grid Settings > Display Color > Preset 1. As soon as you select a preset and change the color specification, the resulting color will now be applied to those two vertical lines and to the AF area outline, even though no other grid parameters have been selected or altered; these lines and AF area corners show only on the camera’s monitor and will not be overlaid on your recorded images. These colors can be a minor nuisance in composition; if so, simply go back to the Preset that specified this color, reset it to the original values, and make that Preset active.)

Figure 7. 72: The six types of grids, and the normal Live View Image Only screen

Figure 7.73: Residual effects
In figure 7.73, image 1, you can see the two vertical lines that define the left and right edges of the display area for the composed picture, the two horizontal lines defined by the 16:9 aspect grid pattern, as well as the four corners of the 3X3 AF area I had created. Image 2 simply shows the All-Points AF area being selected to suppress the display of the AF area corners, and image 3 shows that with the grid turned off, the defined grid color still is displayed on the monitor; viewing through the EVF, you will not see these two vertical lines. A glance at image 7 in figure 7.72 might have you conclude that’s also true for the monitor, but a careful study of that image will show the two vertical lines, in bright red, are there at the extreme edges of the displayed picture. Indeed, for normal photography, these artifacts may cause a bit of concern during image composition, but are not recorded with the actual image. However, if you are directing the monitor output to the HDMI port, these artifacts will be included in the transmitted image. That’s how the images in figures 7.72 and 7.73 were captured (as were most of the images in this book).
Now let’s see how to select a grid pattern for the monitor and EVF.
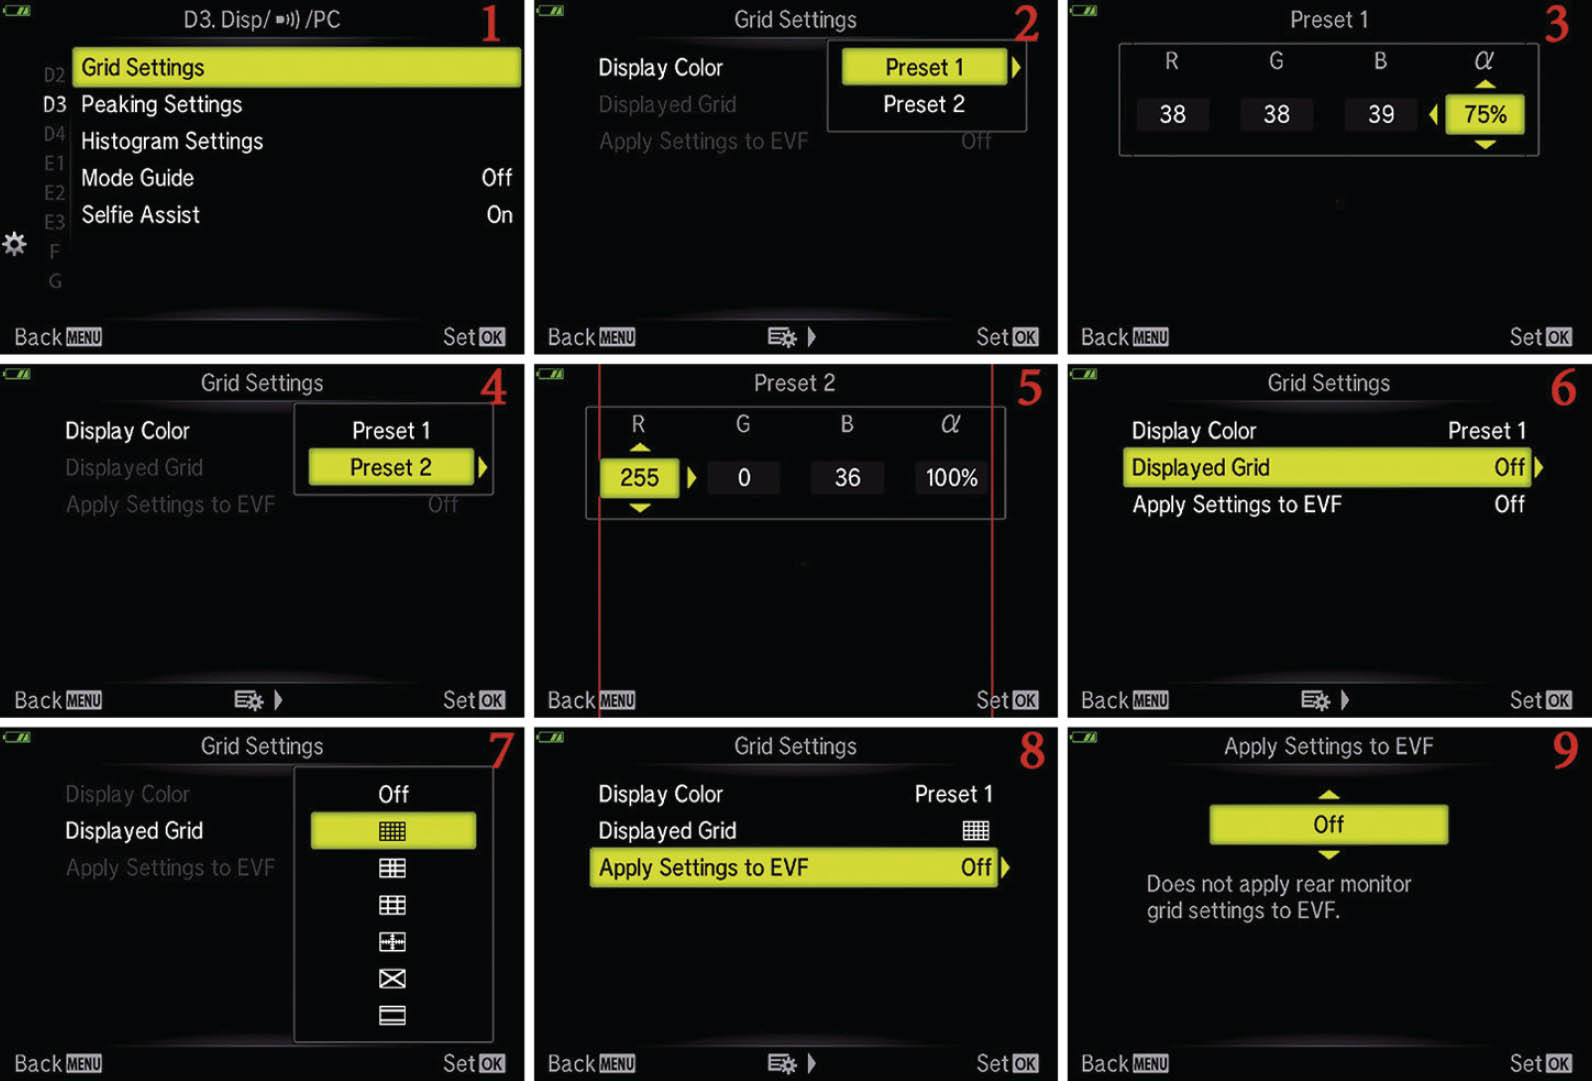
Figure 7.74: Selecting grid settings for the monitor
Use the following steps to choose your favorite grid pattern for the EVF and monitor:
- 1.Select Grid Settings from the D3. Disp/[Sound]/PC menu and scroll to the right (figure 7.74, image 1).
- 2.Select Display Color and scroll right. Select one of the Preset options and scroll right (figure 7.74, image 2 or image 4).
- 3.Rather than selecting from a limited set of colors, you can set each of the RGB variables to any value from 0 through 255, yielding over 16 million colors; the alpha variable provides the means to specify the strength of the resulting color (figure 7.74, images 3 and 5).
- 4.Press the OK button to Set the Display Color, and again to Set the selected Preset. This will also return you to the screen shown in image 2.
- 5.Select Displayed Grid and scroll right (figure 7.74, image 6).
- 6.Select the appropriate grid pattern or, if you want to simply disable the grid display, select the Off option. Press the OK button to Set your selection (figure 7.74, image 7).
- 7.To control whether these grid settings will also be overlaid on the EVF display, select Apply Settings to EVF, and scroll right (figure 7.74, image 8).
- 8.On the vertical menu, scroll to choose either On or Off, as appropriate.
- 9.Press the OK button to Set your selection. Press the OK button again to return to the initial Grid Settings selection menu.
Settings Recommendation: I like to use the grid pattern shown in figure 7.74, image 2, which is useful for leveling the horizon, keeping the lens level for architecture, and watching out for perspective distortion. I have never had a camera with so many patterns. Play with each of them and see which ones work best for you.
Peaking Settings
Peaking allows you to more precisely manually focus the subject by surrounding the in-focus areas in a white, black, yellow, or red outline. The default is white, but you can change it to one of the other colors if you need to improve the contrast between your image and the peaking coloration.
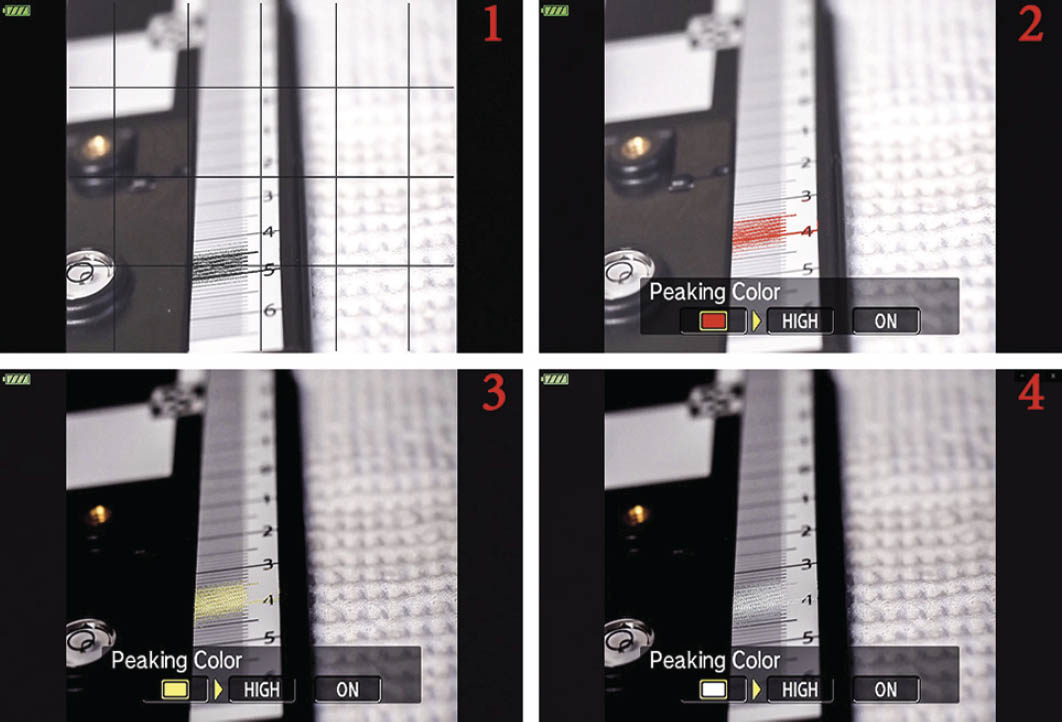
Figure 7.75: Peaking Results
White Peaking and Yellow Peaking slightly darken the entire image and boost the contrast so you can more easily see the contrasting borders of the in-focus areas (figure 7.75, images 3 and 4). Black Peaking and Red Peaking lighten the image and raise the contrast so you can more easily see the contrasting borders of the in-focus areas (figure 7.75, images 1 and 2). With Shooting Mode set to Manual, Peaking having been enabled (see following note), and these Peaking Settings having been configured, you will see that as you rotate the lens’s focusing ring, and any optical edge of your subject comes into focus, that edge will be identified with the chosen color. As the focusing ring continues to bring different areas into focus, those areas will then be highlighted. This highlighting lasts for a very short time, but during that time, you can press the INFO button to have it display a horizontal menu at the bottom of the screen (see figure 7.75, images 2, 3, and 4), allowing you to make configuration changes without having to return to menu navigation.
Note: You can enable or disable Peaking with the Custom Menu > A4. AF/MF > MF Assist > Peaking function.
Let’s examine how to select a color for when manual-focus Peaking is active.
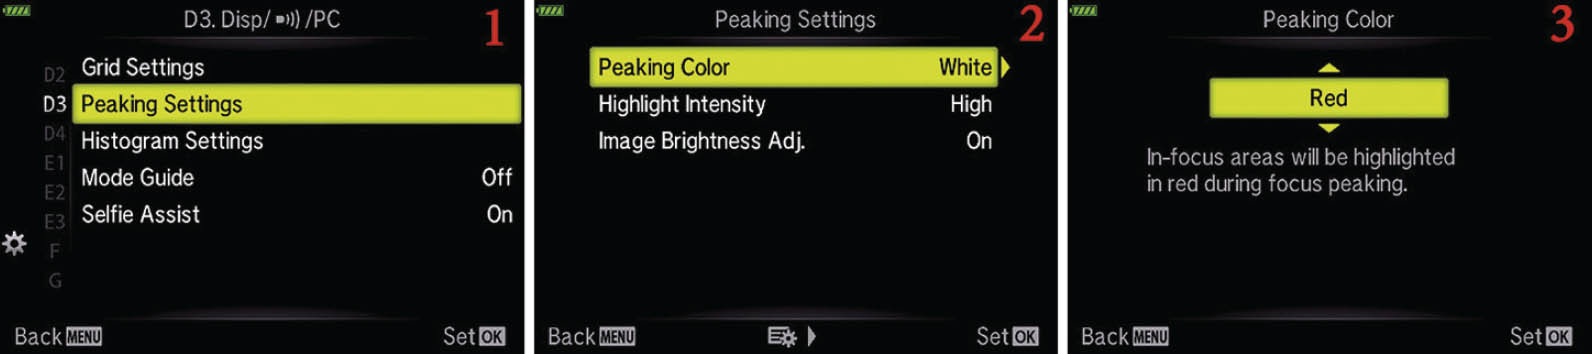
Figure 7.76: Selecting a Peaking color
Use the following steps to modify the Peaking Settings function:
- 1.Select Peaking Settings from the D3. Disp/[Sound]/PC menu and scroll to the right (figure 7.76, image 1).
- 2.Choose the Peaking Color option and scroll to the right (figure 7.76, image 2).
- 3.Select White, Black, Yellow, or Red from the up/down menu (figure 7.76, image 3). All these colors are useful for enhancing the in-focus edges of your subject. The factory default is White.
- 4.Press the OK button to Set the value.

Figure 7.77: Selecting the Peaking highlight intensity
- 5.To set the highlight intensity, select Highlight Intensity from the Peaking Settings menu (figure 7.77, image 1) and scroll to the right.
- 6.Choose the degree of intensity you desire from the up/down menu (figure 7.77, image 2).
- 7.Press the OK button to Set the value.
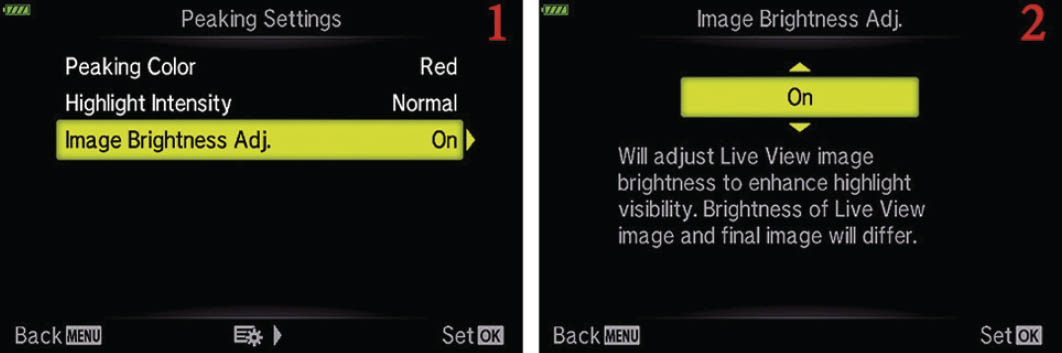
Figure 7.78: Selecting the Peaking image brightness
- 8.To adjust the image brightness, select Image Brightness Adj. from the Peaking Settings menu (figure 7.78, image 1) and scroll to the right.
- 9.Choose On or Off from the up/down menu (figure 7.78, image 2).
- 10.Press the OK button to Set the value.
Settings Recommendation: I use this function in different ways depending on the subject and background I am photographing. When I shoot a subject in a natural environment, I find that White is easier to see. When I shoot isolated images against a white background in my studio, I find that Black works best. If you’re working in black-and-white, you will probably want to use Red. You may want to change this setting if you photograph different types of subjects.
Histogram Settings
The Histogram display on the camera provides a window that shows the cutoff points for losing all detail in an image, which helps you determine how well the image is exposed. The left side of the Histogram window represents shadows, and the right side represents highlights.
The range of light that the camera can capture is symbolized by a Histogram scale that goes from 0 to 255, where 0 represents total black with no detail, and 255 represents pure white with no detail. Figure 7.79 shows a histogram in the shape of a bell curve. You can see the range of 0–255 along the horizontal axis.
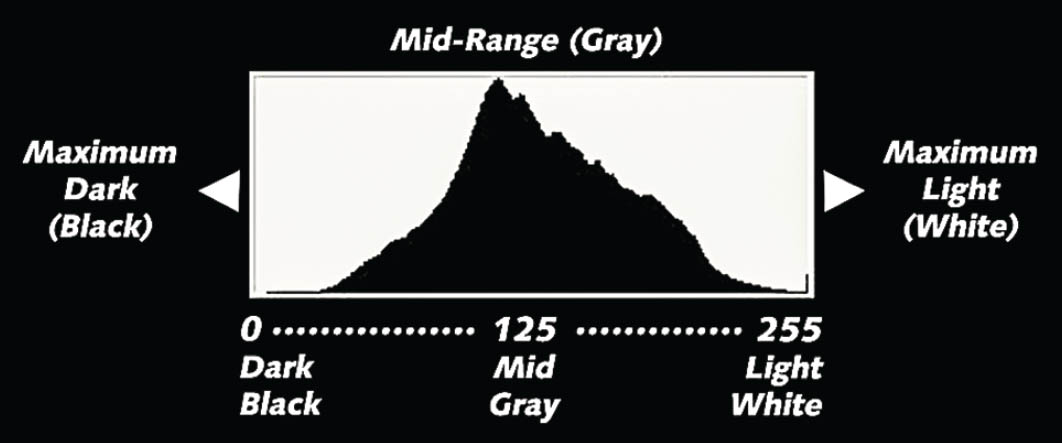
Figure 7.79: The Histogram scale represents total black (0) to pure white (255)
Using the Histogram
You can use the Histogram to ensure that your exposure settings don’t subject your images to over- and underexposure. Figure 7.80 shows how the Histogram reacts to conditions ranging from underexposed to well exposed to overexposed.

Figure 7.80: The Histogram scale can help you expose images properly
Notice how the graph is crammed to the left (clipped) for the underexposed image. It is cut off midpeak. The clipping indicates that some of the image will be pure black (0), with no detail, and the overall image may be too dark.
In the well-exposed image in the middle, you can see that the graph is centered between the left (shadow) and right (highlight) sides.
The graph of the overexposed image is clipped off on the right, at the middle of the peak, and some of the image will be pure white.
Whenever you see the Histogram graph clipped on the left, the image may be too dark; if it is clipped on the right, the image may be too light. If the Histogram is clipped on both the shadow and highlight sides, there is too much light range (contrast) for the camera to capture all detail in the dark and light areas within a single image.
In that case, you must use either high dynamic range (HDR) photography, where multiple images are taken with different exposures and then combined, or expose for the highlights to prevent the histogram from clipping on the right side. Notice how the Histogram graph just touches the left and right sides of the Histogram window in the well-exposed image (figure 7.80). If there is too much contrast in the image, you may have to accept having the Histogram just touch the right side (highlight) only and allow clipping to occur on the left side. That is called exposing for the highlights.
When the Histogram graph just touches the right side without clipping, but it is clipped on the left, there will be dark shadows in the image. That looks normal to our eyes. We expect shadows to be dark, but we do not expect to see a lack of highlight detail.

Figure 7.81: The Live Histogram display for a well-exposed natural light exposure
Use the normal exposure system—shutter speed, aperture, and ISO—to move the histogram to the left or right. You may need to use the ± Exposure Compensation system to fine-tune the position of the Histogram graph for the best exposure. Fortunately, the camera gives you a Live Histogram display, which appears when you repeatedly press the INFO button with the subject on the monitor (figure 7.81) or in the viewfinder.
The E-M5 III also gives you control over how conservatively the Histogram warns you of over- and underexposure. Normally you will leave the camera set so that pure black equals 0 and pure white equals 255. However, some photographers may want a little padding on either side of the histogram for extra protection. You can adjust the Histogram window size (range) so it no longer ranges from 0 to 255. Instead it can be moved by up to 10 increments on each side (a maximum range of 10 to 245).
Let’s examine how to change this setting.

Figure 7.82: Making the Histogram more or less conservative
Use these steps to change the range the Histogram uses to warn you of exposure problems:
- 1.Select Histogram Settings from the D3. Disp/[Sound]/PC menu and scroll to the right (figure 7.82, image 1).
- 2.Select a value for Highlight from 245 to 255 and a value for Shadow from 0 to 10 from the up/down menus (figure 7.82, images 2 and 3).
- 3.Press the OK button to Set the new Histogram values.
Settings Recommendation: If you are ultraconservative in your exposures, you may want to adjust this setting. Otherwise, leave it at the industry standard of 0–255, which is what I use.
Mode Guide
The Mode Guide reminds you of the purpose of each setting on the Mode Dial on top of the camera. Each of the modes has a help reminder, as follows:
Modes on Mode Dial
- P: The camera sets the aperture and shutter speed automatically.
- A: You set the aperture manually.
- S: You set the shutter speed manually.
- M: You set the aperture and shutter speed manually.
- B: Shoots with BULB function.
- C: As this is a Custom Mode that you can configure, there is no help reminder for this Mode Dial position.
- [Movie]: Start/stop recording a movie.
- ART: Apply creative effects to your images.
- SCN: The camera automatically applies settings for the Scene Mode you select.
- AUTO: The camera selects the ideal mode, and the Live Guide menu is accessible.

Figure7.83: Mode Guide reminder for Aperture-priority (A) mode
Figure 7.83 shows the Mode Guide reminder for Aperture-priority (A) mode. Simply selecting a setting by turning the Mode Dial will immediately display the help reminder for that mode on the monitor only.
Let’s see how to enable or disable the Mode Guide help reminders.
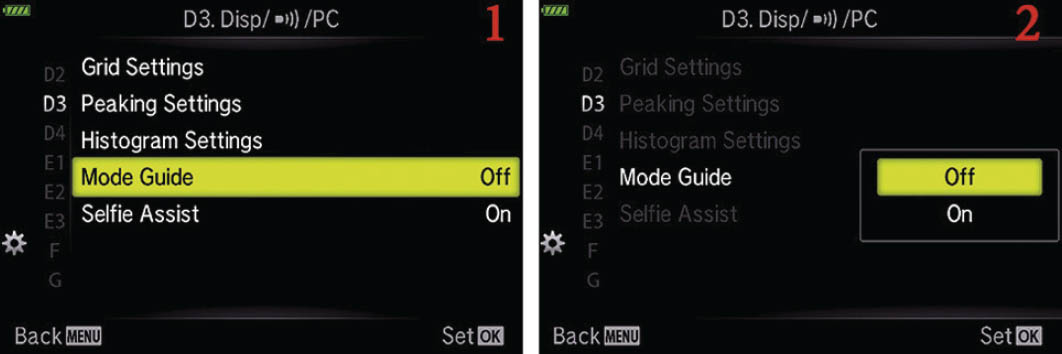
Figure 7.84: Enabling or disabling the Mode Guide reminder system
Use the following steps to turn the Mode Guide help system on or off:
- 1.Select Mode Guide from the D3. Disp/[Sound]/PC menu and scroll to the right (figure 7.84, image 1).
- 2.Select Off or On from the up/down menu (figure 7.84, image 2). The factory default is Off.
- 3.Press the OK button to Set the Mode Guide value.
Settings Recommendation: I am torn about this setting. I do not need help with understanding what P, S, A, and M modes do. However, the functionality of some other modes, which I rarely use, might slip my mind. For now I have this set to On and tolerate the help screen when I turn the Mode Dial. However, it does aggravate me nearly every time I use the dial. If you are not familiar with what each mode accomplishes, you might want to turn on the Mode Guide.
Selfie Assist
It’s nice to see that the E-M5 III can help you participate in the current “selfie” rage, and even provide some assistance. It has the ability to provide a mirror image in the LCD monitor when you open it for a selfie. This left-to-right reversal of the image occurs as you open the monitor past 135 degrees. At the same time, the display of exposure data is replaced with a touch-sensitive icon that shows the silhouette of a camera in an oblong graphic. If you have enabled the Custom Self-timer feature in the D1.Disp/[Sound]/PC > [Sequential] [Self-timer] menu, then you will see a second icon, to the right of the camera icon, for the custom self-timer. The purpose of these icons is to give you a touch-based shutter release (the camera silhouette), controlled by the custom self-timer. Initially, the self-timer icon will also show Off just to the right of the standard icon, but if you touch that icon, the white icon+Off will be replaced by a yellow icon+On. With the self-timer icon showing On, whatever settings you have set for the custom self-timer will be applied when you touch the camera silhouette icon. (If the monitor is showing no image data overlaid on the Live View image, the two icons will still be displayed.)
If you set the Mode Dial to AUTO, you will find that there is a third touch-sensitive icon in the lower-left corner of the screen. This icon is the e-Portrait function, which provides a pleasant rosy complexion for your self-portrait.
The Selfie Assist function is certainly listed on the D3. Disp/[Sound]/PC menu, but the Instruction Manual makes little mention of the function. What you’ve read here is primarily the result of our own effort to determine what this function does.
Use these steps to enable or disable this unique subset of touch screen capability:
- 1.Select Selfie Assist from the D3. Disp/[Sound]/PC menu and scroll to the right (figure 7.85, image 1).
- 2.Use the up/down menu to select On to enable the Touch Screen, or select Off to disable it (figure 7.85, image 2).
- 3.Press the OK button to Set your choice.

Figure 7.85: Enabling the Selfie Assist function
[Sound]
The [Sound] function controls the beep sound you hear when you are taking a picture and the camera successfully autofocuses. The beep can be useful at times—it is a reassurance that AF is working. However, in certain environments the beep simply calls attention to the fact that you are taking pictures.
If you are shooting a wedding, do you really want the camera to beep every time it autofocuses? Or if you are sneaking up on a grizzly bear, shouldn’t your camera cooperate by preventing you from becoming dinner?
The beep sound can be turned off (thankfully). Let’s see how.

Figure 7.86: Enabling or disabling the beep sound
Use the following steps to modify the [Sound] function:
- 1.Select [Sound] from the D4. Disp/[Sound]/PC menu and scroll to the right (figure 7.86, image 1).
- 2.Select Off or On from the up/down menu (figure 7.86, image 2). The factory default is On.
- 3.Press the OK button to Set the value.
Settings Recommendation: The first function I modify when I get a new camera is the one that disables beep sounds. I have learned over the years that some subjects don’t like the sound. If you are a new photographer, you may want to hear the sound for a while as a reassurance that autofocus has completed. Just be careful around large animals!
HDMI
High-definition multimedia interface (HDMI) lets your camera communicate with high-definition display devices for showing still pictures and videos. Like slideshows of the old film days, HDMI allows you to use a large screen to show off your work for family and friends (or clients).
The E-M5 III has an HDMI type D cable connector under the lower rubber flap on the left side, just above the USB port. HDMI is engraved on the rubber flap. You will need an HDMI type D to type A cable to plug your camera into a high-definition television (HDTV) or other HDMI device. HDTVs use a type A connector, and the E-M5 III uses a type D connector.
For your camera to interface with an HDTV or other high-definition display device, you will have to match the output frequency from your camera to the input frequency of the HDTV. The camera supports standard HDMI output frequencies, including C4K, 4K, 1080p, 720p, and 480p/576p. There are two ways to figure out which frequency to use when you plug your camera into an HDTV:
- Look up the required frequency in your HDTV user’s manual and set the camera to match.
- Plug the camera into the HDTV and see if it displays pictures. If not, change the HDMI output frequency until something shows up on the HDTV screen.
Let’s examine how to change the HDMI output frequency on the camera.

Figure 7.87: Changing the HDMI output size
Use the following steps to change the HDMI output size to match an HDMI display:
- 1.Select HDMI from the D4. Disp/[Sound]/PC menu and scroll to the right (figure 7.87, image 1).
- 2.Choose Output Size from the HDMI menu and scroll to the right (figure 7.87, image 2).
- 3.Select one of the listed HDMI output sizes from the HDMI up/down menu (figure 7.87, image 3). Most HDTVs support both 1080p and 720p, with newer TVs supporting 4K.
- 4.Press the OK button to Set the output size.
The E-M5 III supports HDMI-CEC (Consumer Electronics Council) with its HDMI Control function, which allows you to control the camera with the HDTV’s remote control. If your HDTV supports CEC, you can enable it in this HDMI menu and use the HDTV’s remote control to direct the camera output. Use the following steps to enable HDMI-CEC.

Figure 7.88: Using HDMI-CEC for camera remote control
- 1.Select HDMI from the D4. Disp/[Sound]/PC menu and scroll to the right (figure 7.88, image 1).
- 2.Choose the HDMI Control setting from the HDMI menu and scroll to the right (figure 7.88, image 2).
- 3.Select Off or On from the HDMI up/down menu (figure 7.88, image 3). On enables HDMI-CEC, and Off disables it.
- 4.Press the OK button to Set your choice.
The final step is to set the Output Frame Rate. You have two options: 50p Priority and 60p Priority.

Figure 7.89: Setting the HDMI Output Frame Rate
Use the following steps to set the HDMI Output Frame Rate:
- 1.Select HDMI from the D4. Disp/[Sound]/PC menu and scroll to the right (figure 7.89, image 1).
- 2.Choose the Output Frame Rate setting from the HDMI menu and scroll to the right (figure 7.89, image 2).
- 3.Select 60p Priority or 50p Priority from the menu (figure 7.89, image 3).
- 4.Press the OK button to Set your choice.
Settings Recommendation: When I plug my camera into my flat screen HDTV using the 1080p setting, it works fine. I can even use HDMI-CEC to control the display of images with my HDTV remote control. This is way more fun than the old days of breaking out a slide projector and jumping through hoops to get everything working for a slideshow. I can display videos and still images on my 50 inch (127 cm) HDTV.
USB Mode
The E-M5 III offers several industry standard modes for connecting the camera to external devices through the factory-supplied USB cable. The camera has a USB connector under the bottom rubber flap to the left of the LCD monitor. You can use the cable to transfer image and video files to your computer.
Let’s consider the four protocols the camera supports for connection to external devices, plus its Auto detect mode:
- Auto: This mode lets the camera decide which type of connection to use, depending on the type of device you plug your camera into. If you get no results with the Auto setting, test the other modes to see what works with the external device.
- Storage: This mode refers to the mass storage class (MSC) specification (be careful: Olympus also uses this initialism for a feature in some of their new lenses: Movie & Still Compatible mechanism), which is an industry standard for connecting a device containing storage memory to a computer. The MSC protocol is used by your camera, external hard drives, and card readers. You can use the Storage mode to transfer image and video files to your computer through Olympus Workspace software or other software. When you use Storage mode, the camera will show up in your computer’s file browser as a local hard drive. You can then access the DCIM folder on the memory card directly, then manually copy images and videos to and from the camera. When you plug the camera into a USB port on your computer using the factory-supplied USB cable, your computer should react by offering to open the Olympus Workspace software if you have installed it. Olympus Workspace will help you transfer images to your computer and allow you to enhance them (e.g., convert RAW files to JPEG). This is also the mode you must use when you are updating the firmware on your camera with Olympus Workspace software.
- MTP: This mode refers to media transfer protocol (MTP), which was created by Microsoft as an extended set of tools for synchronizing pictures, videos, sound files, and songs from devices to a computer with Windows installed. It offers content management tools for creating playlists, autosyncing, and transferring DRM-protected (licensed) media.
- PCM Recorder: This mode allows the camera to trigger and sync with an external Olympus PCM recorder such as the Olympus LS-100 IC recorder.
Now let’s consider how to select a USB Mode.

Figure 7.90: Selecting a USB Mode for image or video transfer
Use the following steps to select a USB Mode for image and video transfer and picture printing:
- 1.Select USB Mode from the D4. Disp/[Sound]/PC menu and scroll to the right (figure 7.90, image 1).
- 2.Select Auto, Storage, MTP, or PCM Recorder from the up/down menu (figure 7.90, image 2). Refer to the USB Mode section to decide which mode to use.
- 3.Press the OK button to Set the value.
Settings Recommendation: I leave my camera set to Storage so I can transfer images and videos through my USB cable. I also update my camera’s firmware whenever an update is available, which also requires the Storage mode.
Custom Menu E. Exp/ISO/BULB/[Meter]
The E. Exp/ISO/BULB/[Meter] menus are primarily composed of functions that directly affect how the image is exposed. We will start examining the functions by taking a look at the opening menu for the E. Exp/ISO/BULB/[Meter] functions in figure 7.91.
To enter the menu, you must select E1. Exp/ISO/BULB/[Meter] from the Custom Menu and scroll to the right. There are 15 functions inside the three E. Exp/ISO/BULB/[Meter] menus. Let’s consider each of them in detail.
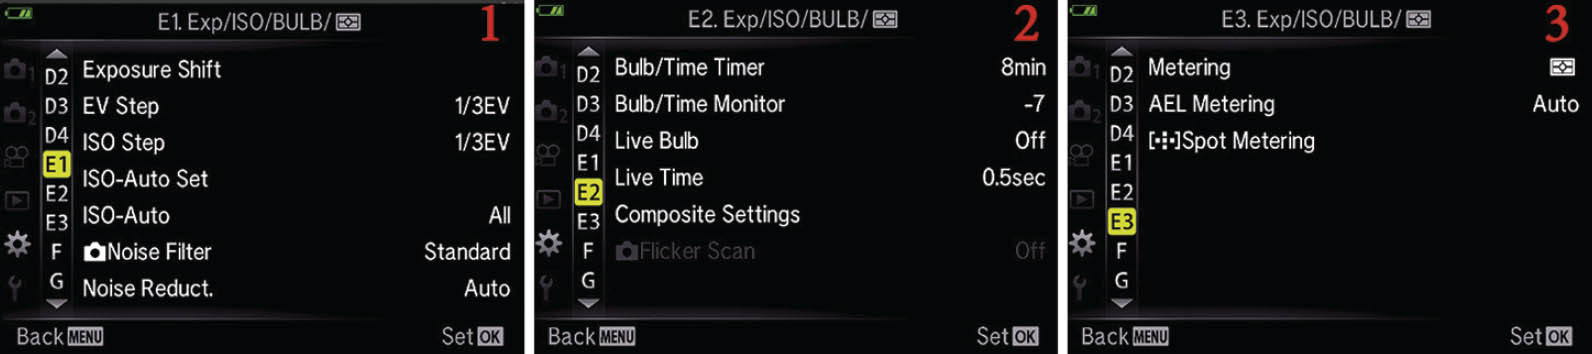
Figure 7.91: The opening menu selection for the E. Exp/ISO/BULB/[Meter] functions
Exposure Shift
If you think one of your camera light meters (Digital ESP, Center weighted, Spot) needs a little fine-tuning, you can use this function to set up a semi-permanent exposure compensation for individual light meter types.
For instance, if you usually shoot with the Digital ESP meter and you want the meter to add a half stop of exposure beyond the default, you can set it up with this function.
The camera allows you to fine-tune each light meter type in 1/6 stop (1/6 EV step) increments, up to one full stop over- or underexposed. In figure 7.92, image 4, you can see that I added 1/2 stop (+3/6). Let’s see how to accomplish Exposure Shift fine-tuning.
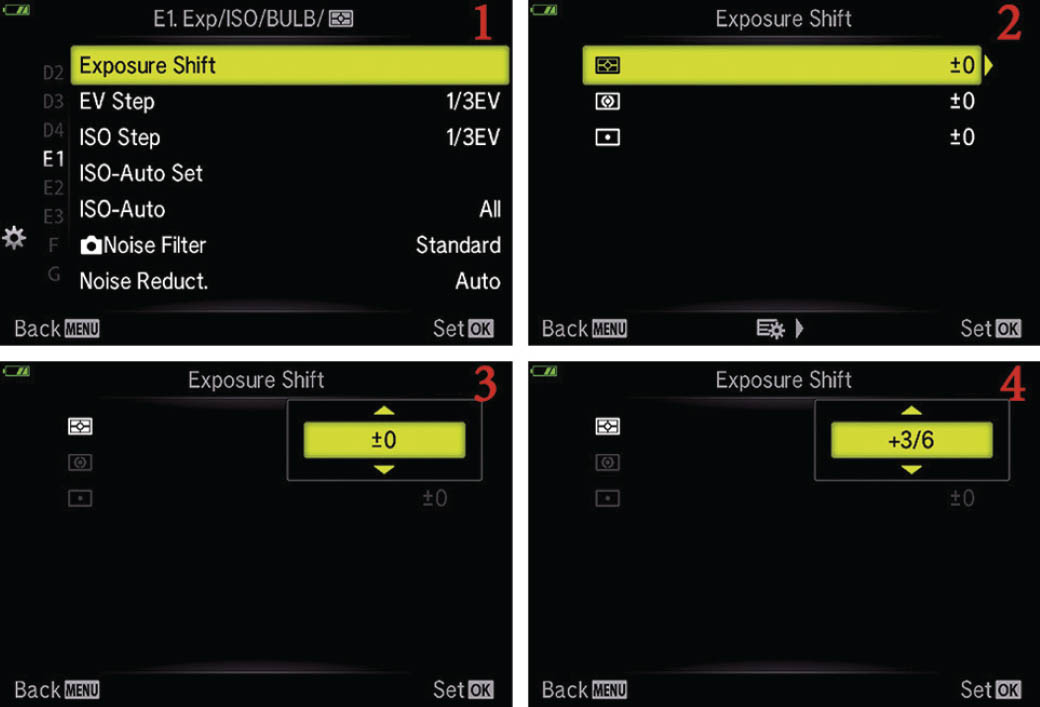
Figure 7.92: Fine-tuning the camera’s exposure meters
Use these steps to set up a semi-permanent Exposure Shift on any or all of the three light meter types:
- 1.Select Exposure Shift from the E1. Exp/ISO/BULB/[Meter] menu and scroll to the right (figure 7.92, image 1).
- 2.The top meter selection is the Digital ESP meter. The second meter type is the Center-weighted meter, and the third meter type is the Spot meter (figure 7.92, image 2). Let’s use the Digital ESP meter as an example of how to set up an Exposure Shift of 1/2 stop (+3/6). The process is the same for all meter types, so you can use these steps for whichever meter you want to fine-tune. Choose the meter you want to modify and scroll to the right.
- 3.In figure 7.92, image 3, the Digital ESP meter is selected, the Exposure Shift menu is open, and the camera is currently set to no Exposure Shift (±0). Use the Rear Dial or the buttons of the Arrow pad to select from −1 to +1 stop of Exposure Shift in 1/6 stop increments.
- 4.In figure 7.92, image 4, you can see that +3/6 EV steps (1/2 stop) is selected. The camera will add 1/2 stop of exposure compensation and mildly overexpose the image.
- 5.After you have selected how much you want to shift the exposure, press the OK button to lock in the Exposure Shift setting. Repeat these steps for any other meter type that you want to adjust.
Note: The Exposure Shift function is a form of exposure compensation. It is applied semipermanently; that is, it stays in place until you go back to the Exposure Shift function and remove the shift value. When you shift the exposure for any of the light meters, you may find that you do not have the normal range of exposure compensation after you adjust the meter.
Also, you will not see the effects of the Exposure Shift in the EVF or on the rear monitor, although you will be able to detect it in the image histogram.
Settings Recommendation: I have found that the exposure meters in the E-M5 III are very accurate, and I am quite satisfied with their performance. However, you may be shooting a style of photography that easily fools your light meter. In that case, experiment with this function to see if it will help overcome the exposure problem. Don’t forget that Exposure Shift is in place or you may find that your images are regularly over- or underexposed.
EV Step
Use this function to choose an exposure value (EV) increment when you select a shutter speed, aperture, exposure compensation, and bracketing exposure value. As photographers, we think of exposure in stops. A 1-stop increment doubles or halves the amount of light the camera can use for making a picture, depending on whether you are letting in more light (double) or less light (half). A single stop is equivalent to 1 EV step.
The camera allows you to use finer increments than 1 EV step when you make exposure adjustments. You can select from 1/3 EV step, 1/2 EV step, or 1 EV step. The following three EV step lists show a partial breakdown of EV steps that are available as you adjust an exposure:
1/3 EV step
- Shutter: 1/100, 1/125, 1/160, 1/200, 1/250, 1/320, etc.
- Aperture: f/5.6, f/6.3, f/7.1, f/8.0, f/9.0, f/10, etc.
- Compensation/bracketing: 0.0, 0.3, 0.7, 1.0, 1.3, 1.7, 2.0, 2.3, 2.7, 3.0, etc.
1/2 EV step
- Shutter: 1/90, 1/125, 1/180, 1/250, 1/350, 1/500, etc.
- Aperture: f/5.6, f/6.7, f/8.0, f/9.5, f/11, f/13, etc.
- Compensation/bracketing: 0.0, 0.5, 1.0, 1.5, 2.0, 2.5, 3.0, etc.
1 EV step (1 stop)
- Shutter: 1/60, 1/125, 1/250, 1/500, 1/1000, 1/2000, etc.
- Aperture: f/4.0, f/5.6, f/8.0, f/11, f/16, f/22, etc.
- Compensation/bracketing: 0.0, 1.0, 2.0, 3.0, 4.0, 5.0 (note that 5.0 is the maximum)
The fineness of your exposure control will vary depending on how you set this function; that is, which EV step increment you choose (1/3EV, 1/2EV, or 1EV step). Let’s examine how to select one of the three EV increment values.
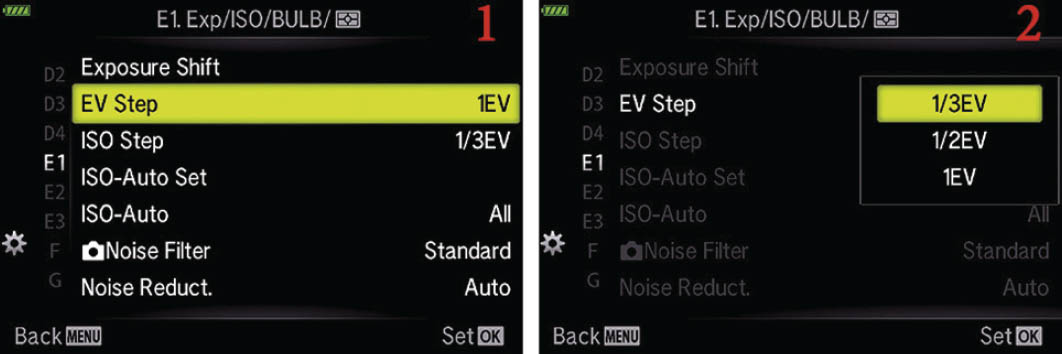
Figure 7.93: Choosing an EV-Step value for exposure control
Use the following steps to select an EV increment value for camera exposure settings:
- 1.Select EV Step from the E1. Exp/ISO/BULB/[Meter] menu and scroll to the right (figure 7.93, image 1).
- 2.Select 1/3EV, 1/2EV, or 1EV from the menu that appears (figure 7.93, image 2). Refer to the three previous EV step lists to help you decide which EV step is most appropriate for the type of pictures you are creating.
- 3.Press the OK button to Set the value.
Settings Recommendation: I leave my camera set to 1/3 EV step (1/3EV). Most photographers do the same. While using camera-supplied tools, such as the Live Histogram, it is best to have fine control over the exposure value. With 1/3 EV step, you can adjust the exposure in small increments. If you do not need such fine control, experiment with the other two selections.
ISO Step
All camera menus that allow you to change the ISO use the ISO Step function as the basis for the ISO increments on the camera displays. You can choose from either 1/3 EV step or 1 EV step.
Here is a partial list of ISO increments for both ISO Step values:
- 1/3 EV step: Auto, Low (100), 200, 250, 320, 400, 500, 640, 800, etc.
- 1 EV step: Auto, Low (100), 200, 400, 800, 1600, 3200, 6400, etc.
If you want to use smaller increments, leave this setting at the factory default of 1/3 EV. If you want to select ISO values in 1 EV step (1 stop) increments, you can change it here. Let’s see how.
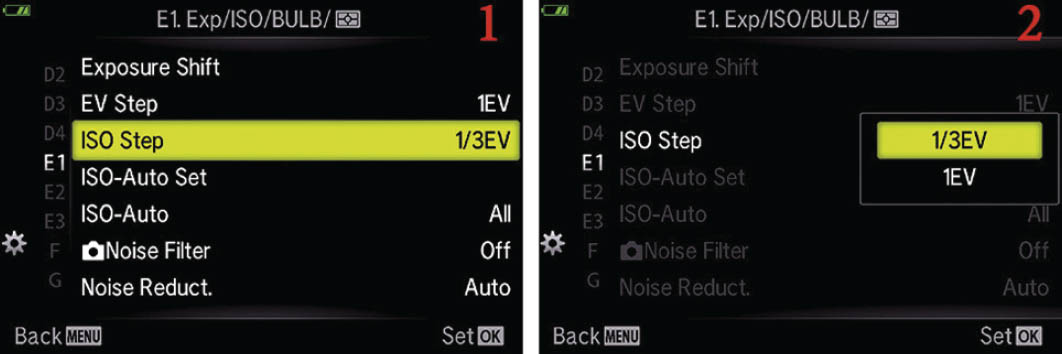
Figure 7.94: Choosing an ISO Step increment
Use the following steps to choose an ISO sensitivity setting:
- 1.Select ISO Step from the E1. Exp/ISO/BULB/[Meter] menu and scroll to the right (figure 7.94, image 1).
- 2.Select 1/3EV or 1EV from the menu that appears (figure 7.94, image 2).
- 3.Press the OK button to Set the value.
Settings Recommendation: I use the 1/3EV ISO Step value because I want fine increments of ISO values to choose from. If you prefer coarser 1-stop ISO sensitivity increments, choose 1EV instead.
ISO-Auto Set
When you set the ISO sensitivity to Auto, the camera will choose the best ISO to use for the current subject, without concern for image noise from high ISO values.
ISO-Auto Set is used to control the upper and lower range of your camera’s ISO sensitivity. In effect, you are telling the camera it can use any ISO value within a certain range, but it cannot exceed that range with higher or lower ISO values. When in Auto ISO, the total available ISO range is from ISO 200 to ISO 6400 (when not in Auto ISO, the range is from Low to ISO 25600.
There are two settings in the ISO-Auto Set function:
- Upper Limit: The Upper Limit setting controls the maximum ISO value that you will allow the camera to use in difficult lighting conditions. The camera is free to use any ISO value up to the Upper Limit setting. If you choose ISO 1600 as the Upper Limit, the camera can use any ISO from the lower Default limit (next setting) up to 1600, but it cannot exceed 1600.
- Default: The Default setting serves two purposes. First, it is the default ISO value that the camera will use when there is sufficient light to drop the ISO to the lowest setting. Second, it is the lowest ISO value the camera is allowed to use when the light gets brighter. If you select ISO 400 as the Default value, the camera is free to use any ISO from 400 up to the Upper Limit (previous setting).
Look at the Default and Upper Limit as a floor and a ceiling. When you use Auto ISO, the camera cannot drop the ISO below the Default floor or raise it above the Upper Limit ceiling. These values give you excellent control of the Auto ISO boundaries.
When shooting in either A mode (Aperture-priority mode) or in P mode (Program mode), you can specify a shutter speed at which the camera starts to automatically raise the ISO sensitivity. This is done with the Lowest S/S Setting option on this ISO-Auto Set menu.
Let’s examine how to select the settings.
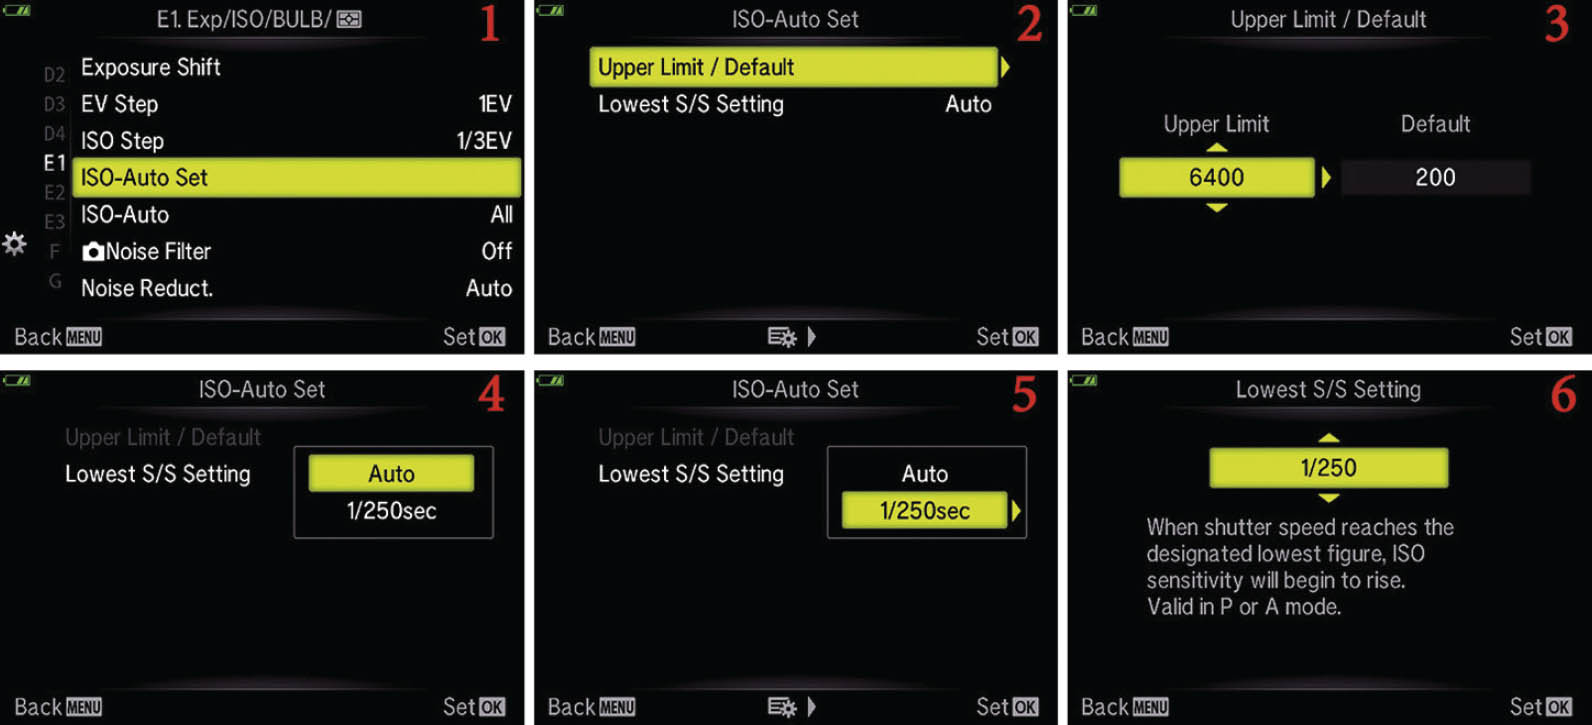
Figure 7.95: Choosing a High Limit and a Default value for Auto ISO
Use the following steps to choose an ISO-Auto Set value for the High Limit and Default settings:
- 1.Select ISO-Auto Set from the E1. Exp/ISO/BULB/[Meter] menu and scroll to the right (figure 7.95, image 1).
- 2.Select Upper Limit/Default from the ISO-Auto Set menu and scroll to the right (figure 7.95, image 2). Choose an ISO value from the Upper Limit up/down menu (figure 7.95, image 3). The available ISO values range from ISO 200 to ISO 6400. I chose an Upper Limit of ISO 6400. Choose an ISO value from the Default up/down menu (figure 7.95, image 3). The available ISO values range from ISO 200 to ISO 6400. I chose a Default of ISO 200. You cannot select the Low (ISO 100) value.
- 3.Press the OK button to Set the two values.
To set a Lowest S/S Setting:
- 1.Select Lowest S/S Setting and scroll to the right, opening the display shown in figure 7.95, image 4.
- 2.If you want the camera to automatically monitor exposure and set an appropriate shutter speed, select the Auto option and press the OK button to Set that value (figure 7.95, image 4).
- 3.Otherwise, select the fractional-second value (factory default value is 1/250sec) and scroll to the right (figure 7.95, image 5).
- 4.Choose a shutter speed from the Lowest S/S Setting up/down menu (figure 7.95, image 6). These shutter speeds range from 1/8000 sec to 30 seconds. Press the OK button to Set your choice.
Settings Recommendation: I use ISO 1600 as my High Limit. I don’t like the noise that results with higher ISO values, especially if I don’t nail the exposure. I use ISO 200 to ISO 400 as the lower Default value, depending on the ambient light and whether I am using flash. When I use flash indoors, I often use ISO 400 as Default and ISO 1600 as High Limit.
As for the Lowest S/S Setting, that will depend on the style of shooting at the moment; if I’m photographing a field sport competition, I’ll use a different Lowest S/S Setting than if I were photographing a very static landscape.
ISO-Auto
Use the ISO-Auto function to control which modes on the Mode Dial allow the use of automatic ISO (called Auto on the ISO selection menus; I will use Auto ISO in this book.) There are two settings in the ISO-Auto function:
- P/A/S: When this mode is selected the camera allows the Auto ISO function to be accessible on the menus only when you are using Program (P), Aperture-priority (A), and Shutter-priority (S) modes. Auto ISO will be grayed out and unavailable on all ISO selection menus when you are using Manual (M) mode.
- All: When you select this mode the camera will offer Auto ISO on all ISO selection menus when you use P, A, S, or M mode on the Mode Dial. Note that Manual (M) mode is included.
Let’s see how to select a setting.
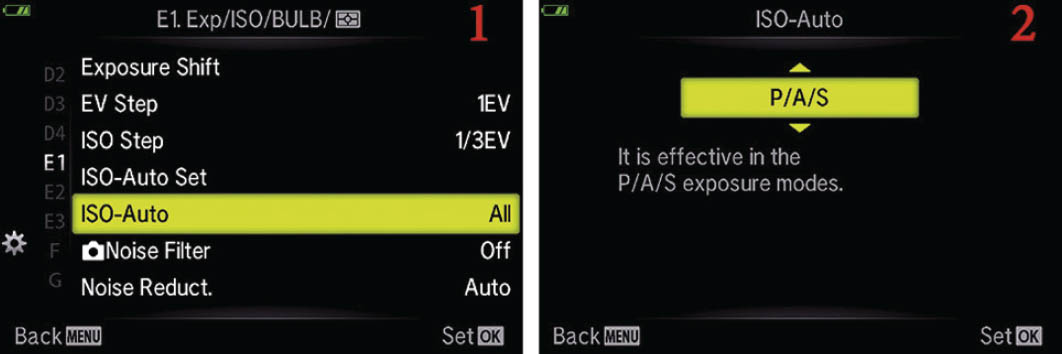
Figure 7.96: Choosing which Mode Dial settings allow Auto ISO
Use the following steps to choose an ISO-Auto setting:
- 1.Select ISO-Auto from the E1. Exp/ISO/BULB/[Meter] menu and scroll to the right (figure 7.96, image 1).
- 2.Select either P/A/S or All from the up/down menu (figure 7.96, image 2).
- 3.Press the OK button to Set the value.
Settings Recommendation: The All setting makes sense for the types of photography I do (events and nature). I use Auto ISO only when I must get the shot at all costs or when I am shooting just for fun. However, if I wanted to shoot with Auto ISO in Manual (M) mode, I wouldn’t want a limitation imposed upon me.
[Camera] Noise Filter
The [Camera] Noise Filter function is designed to remove high-ISO noise from your images by blurring the image slightly. The blurring action tends to blend the grainy noise detail into the darker background, lessening the degrading effect of noise. The camera then resharpens the image to bring out more edge detail.
There are four settings: Off, Low, Standard, and High. The camera defaults to Standard. From Low to High, each setting blurs the image more, making noise less apparent (and removing a minute amount of image detail).
Now let’s examine how to choose a Noise Filter setting.

Figure 7.97: Choosing a high-ISO Noise Filter setting
Use the following steps to select a high-ISO Noise Filter setting:
- 1.Select Noise Filter from the E1. Exp/ISO/BULB/[Meter] menu and scroll to the right (figure 7.97, image 1).
- 2.Select Off, Low, Standard, or High from the menu that appears (figure 7.97, image 2).
- 3.Press the OK button to Set the value.
Settings Recommendation: While I was shooting various indoor events (e.g., high school graduations, weddings, baptisms) with my E-M5 III, I had to shoot in rather low light. I used ISO 1600 and got excellent results as long as I kept my Live Histogram pegged on the bright side (exposed for the highlights). I found that the Standard high-ISO Noise Filter, which is the default, worked well for me. It seems to balance noise removal blurring and resharpening.
With a smaller sensor, such as the E-M5 III Micro Four Thirds sensor, it is critical that exposures are correct in low light. Brightening a high-ISO image will often lead to objectionable noise.
Judicious use of the high-ISO Noise Filter will help protect you from excessive noise in images where the light is not ideal.
Noise Reduct.
During a long exposure the sensor may exhibit more noise than is acceptable. The sensor gets warm after several seconds of use. This warming effect produces amplifier noise, which causes warmer sections of the sensor to have more noise than cooler sections.
This noise resembles a fog-like brightening around the edges of the frame. Also, there can be bright spots with various colors at numerous places in the image. This special type of long-exposure noise degrades the image in a different way than the noise from high-ISO sensitivity, which presents as grainy ugliness in darker areas of the image.
Using Noise Reduct.
When you enable Noise Reduct. (long-exposure noise reduction) and an exposure is longer than about 2.5 seconds, the camera will take two pictures with approximately the same exposure time. The first picture is normal. The second picture is a black-frame subtraction exposure, which is exposed for about the same duration as the first picture, but with the shutter closed.
The camera examines the noise in the black-frame subtraction exposure and subtracts it from the first image. Since long-exposure noise (bright spots in random places and fog at the edges) is different from high-ISO noise (grainy degradation in darker areas), the high-ISO Noise Filter function (previous subsection) would not work well with long-exposure noise. Therefore, for those of us who shoot long exposures regularly, the Noise Reduct. function is very important.
The main drawback to long-exposure noise reduction is that the total exposure time can be as much as doubled—a 5-second exposure becomes a 10-second process—because two exposures are made. The black-frame subtraction exposure is not written to the memory card; therefore, when the noise reduction process is done you will have only one image and it will have much less noise.
While the black-frame subtraction exposure is being processed, the orange memory card access symbol will blink in the top-left corner of any active display. While the symbol is flashing, you cannot use the camera. If you turn the camera off during a long-exposure noise reduction session, the image will be lost.
There are three selections available within the Noise Reduct. function:
- Auto: The camera chooses whether or not to use long-exposure noise reduction. It will usually kick in at a shutter speed of about 2.5 seconds or with a small aperture that makes the shutter stay open that long.
- On: Long-exposure noise reduction is active on all pictures taken at all shutter speeds, not just long exposures. If you will be shooting a number of exposures in a short period of time—regardless of shutter speed—you need to be aware of the cumulative effect, which results in the sensor not having sufficient time to cool between shots, and allows the temperature to increase incrementally with each shot. In such cases, setting either the Auto or the On option is recommended. Note that if you are shooting with either Sequential Low or Sequential High active, Noise Reduction is not applied.
- Off: No long-exposure noise reduction is performed on any image.
Now let’s see how to configure your camera to use Noise Reduct.
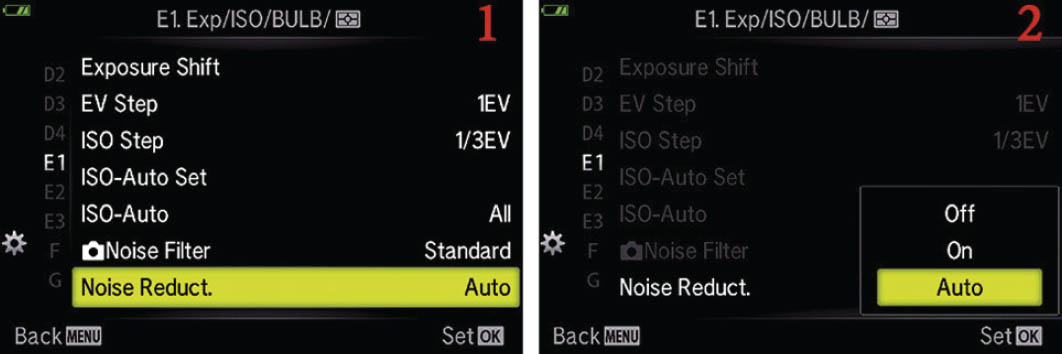
Figure 7.98: Selecting a Noise Reduct. setting for long exposures
Use the following steps to select a long-exposure Noise Reduct. setting:
- 1.Select Noise Reduct. from the E1. Exp/ISO/BULB/[Meter] menu and scroll to the right (figure 7.98 image 1).
- 2.Select Off, On, or Auto from the menu that appears (figure 7.98, image 2).
- 3.Press the OK button to Set the value.
Note: Noise Reduct. may also kick in when ambient temperatures are high, such as on a hot summer day. The sensor can get quite warm when the camera is exposed to the sun, even during a shooting session.
If you are shooting in [Sequential] H or [Sequential] L modes, firing off rapid bursts of images, the camera is smart enough to turn off Noise Reduct. for the image bursts. There is no need to slow the bursts down, even on a hot day.
Settings Recommendation: The factory default setting is Auto, and I’ve found that it works well for me. The camera consistently kicks in long-exposure noise reduction at a shutter speed of about 2.5 seconds and results in nicer-looking long exposures than without the setting enabled. When the picture is taken at a shutter speed faster than 2.5 seconds in Auto, the Noise Reduct. function is not used. Auto may be the best choice for most photographers because many exposures are shorter than 2.5 seconds, and Noise Reduct. will be used only when it is needed.
I don’t need Noise Reduct. all the time, so I don’t use the On setting, nor do I want to completely shut it Off. Make some long-exposure shots with and without Noise Reduct. enabled and see which works best for you.
Bulb/Time Timer
When you set your camera to Bulb (B) mode on the Mode Dial and turn the shutter speed to its lowest setting with the Rear Dial, you will find default specific shutter speed settings called BULB, LIVE TIME, and LIVECOMP. (Note: Do not confuse these camera shutter speed settings with the Live Bulb and Live Time function names in upcoming sections of this chapter.) The BULB, LIVE TIME, and LIVECOMP shutter speed settings allow you to make long exposures from 1 to 30 minutes in length.
The Bulb/Time Timer function allows you to control the maximum time for the long exposures. You can select from a range of 1min (1 minute) to 30min (30 minutes). When you use the BULB shutter speed setting, you have to manually hold the shutter open by pressing the Shutter button or using a locking shutter-release cable. We will discuss the BULB shutter speed in more detail in upcoming subsections. When you use the LIVE TIME shutter speed setting, the camera holds the shutter open for you.
Let’s examine how to select one of the Bulb/Time Timer settings.
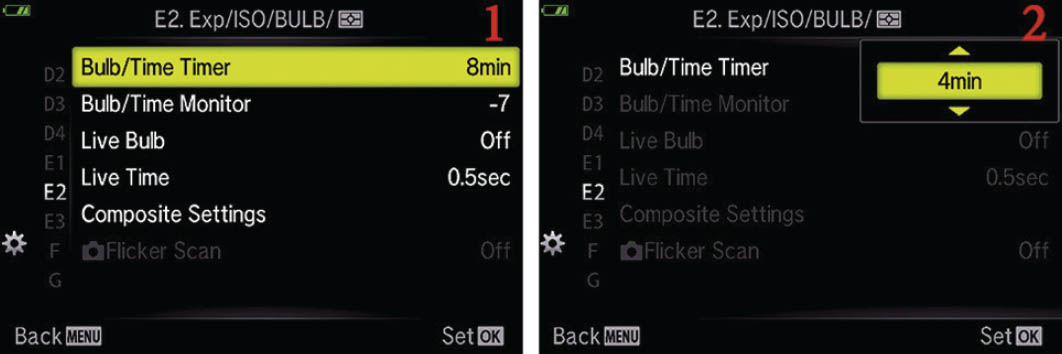
Figure 7.99: Choosing a time-out setting for the Bulb/Time Timer function
Use the following steps to choose a time-out or maximum time to have the shutter open when you use the BULB, LIVE TIME, or LIVECOMP shutter speed settings for long exposures:
- 1.Select Bulb/Time Timer from the E2. Exp/ISO/BULB/[Meter] menu and scroll to the right (figure 7.99, image 1).
- 2.Select one of the eight time-out values from the up/down menu. Your choices range from 1min to 30min (figure 7.99, image 2).
- 3.Press the OK button to Set the value.
Note: If you are using the Noise Reduct. function (see the Noise Reduct. subsection), the camera will use long-exposure noise reduction for each of your BULB or LIVE TIME exposures, effectively doubling the time of the exposure. Therefore, a 1-minute exposure will be doubled to 2 minutes, and an 8-minute exposure will be doubled to 16 minutes. This is due to the black-frame subtraction method the camera uses to reduce noise in long exposures. You can disable Noise Reduct. if you do not want the shutter to be open for double the exposure time, but your images may have fog and bright spots because of amplifier noise and hot pixels.
Settings Recommendation: You will have to decide how long your exposure needs to be for your purposes. For LIVE TIME shutter speed exposures, the camera will show you the light buildup of the actual exposure on the Live View display screen so you can see how the long exposure is progressing over time. The screen can update itself—showing you the progress of the exposure—up to 24 times during each exposure. The number of times the live exposure preview updates is governed by the sensitivity of the ISO setting. The amount of time between each screen update (from 0.5 to 60 seconds) is controlled by the upcoming Live Bulb and Live Time functions. For BULB shutter speed exposures, you will not see the light buildup on the Live View display screen. You will have to wait until you release the shutter and the Noise Reduct. function has finished removing long-exposure noise before the final image will appear on the screen.
Bulb/Time Monitor
You will normally use the BULB and LIVE TIME shutter speeds to take long exposures in the dark. Therefore, you may want the EVF and monitor to be very dim to preserve your night vision.
On the other hand, you may be shooting a one- or two-minute daylight exposure with a neutral-density (ND) filter to hold back the brightness of the exposure and allow a long exposure in normal light. In that case, you may want a normal or extra-bright EVF and monitor.
The camera allows you to change the brightness of the EVF and the monitor by using the Bulb/Time Monitor function. You can select from –7 to +7, or 14 steps of brightness. The factory default is –7 for a very dim monitor. You will see the monitor react immediately when you select the BULB or LIVE TIME shutter speeds.
Let’s examine how to select the monitor brightness for long exposures.
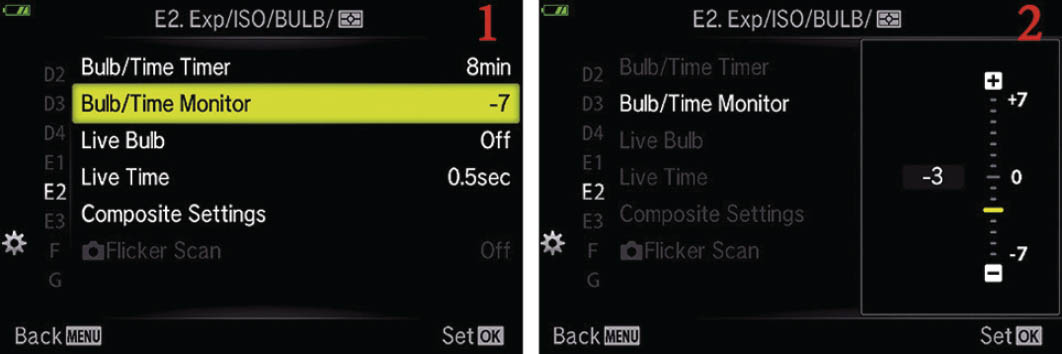
Figure 7.100: Choosing a monitor brightness level for BULB, LIVE TIME, and LIVECOMP
Use the following steps to choose an EVF and monitor brightness level when you use the BULB, LIVE TIME or LIVECOMP shutter speeds for long exposures:
- 1.Select Bulb/Time Monitor from the E2. Exp/ISO/BULB/[Meter] menu and scroll to the right (figure 7.100, image 1).
- 2.Use the Arrow pad up or down buttons or the Rear Dial to choose one of the 14 brightness levels from –7 to +7 (figure 7.100, image 2). The factory default is –7 (very dim).
- 3.Press the OK button to Set the value.
Settings Recommendation: I do most of my long exposure shooting at night, so I leave this value set to –7. However, if you like to do daytime long exposures with a neutral-density filter, you will want your monitor to be bright. If you select the BULB, LIVE TIME, or LIVECOMP shutter speeds during the day, with this setting at –7, the monitor will be too dim to see in normal daylight. Therefore, set the value in advance.
Live Bulb
When you rotate the Rear Dial while using BULB (B) mode on the Mode Dial, you will find the default BULB, LIVE TIME, and LIVECOMP shutter speeds as the slowest shutter speed settings.
With this Live Bulb function set to Off, the camera will use the BULB shutter speed to make exposures. If you select any other setting besides Off for the Live Bulb function, the camera will use the LIVE BULB shutter speed instead of the BULB shutter speed.
The same explanation applies to the TIME and LIVE TIME shutter settings. In other words: to use the LIVE BULB shutter function, the Live Bulb function at E2. Exp/ISO/BULB/[Meter] > Live Bulb must be set to a value other than Off. Similarly, to use the LIVE TIME shutter function, the Live Time function at E2. Exp/ISO/BULB/[Meter] > Live Time must be set to a value other than Off.
Note: To avoid confusion, please notice that this function is called Live Bulb. It controls a shutter speed setting named LIVE BULB. Notice the differences in uppercase and lowercase notations so you will not get Live Bulb (the Custom Menu function) and LIVE BULB (the shutter speed setting) confused as we discuss them. LIVE BULB and BULB work similarly when starting and ending the image exposure—notice which term is displayed on the camera screens during the exposure so you can tell the difference. Using the Live Bulb function with its LIVE BULB shutter speed allows you to see a buildup of the exposure on the camera’s Live View monitor. If you use the BULB shutter speed setting, which is available only when the Live Bulb function is set to Off, you will not see a buildup of exposure on the monitor. Instead, you will see the results of the exposure when the camera has closed the shutter after the exposure is complete and any long-exposure noise reduction has been completed (see the Custom Menu > E1. Exp/ISO/BULB/[Meter] > Noise Reduct. function).
When you use the BULB or LIVE BULB shutter speed settings, the camera opens the shutter (starts the exposure) when you press and hold the Shutter button all the way down or when you hold the shutter open with a locking cable release. The exposure ends when you release the Shutter button or cable release to close the shutter.
When Live Bulb (the function discussed in this section) is set to Off and you rotate the Rear Dial to the slowest shutter speed positions, BULB will be displayed instead of LIVE BULB as one of the last few shutter speed choices.
Let’s consider each of the BULB-type shutter speed settings.
BULB Shutter Speed
When this setting is selected, the word BULB will be displayed in the shutter speed position of the monitor or viewfinder (figure 7.101, image 1).

Figure 7.101: Using the BULB shutter speed setting
When you press and hold the Shutter button and start exposing a picture using BULB, the monitor turns black. It displays a count-up timer in the lower-right corner of the screen during the long exposure (figure 7.101, image 2). The count-up timer shows how long, in seconds and minutes, you have held the shutter open when using the BULB shutter speed.
As soon as you release the Shutter button, the exposure ends. If the exposure was longer than about 2.5 seconds and if long-exposure noise reduction is enabled (Custom Menu > E1. Exp/ISO/BULB/[Meter] > Noise Reduct.), the camera will execute a long-exposure noise reduction cycle, doubling the exposure time while removing long-exposure noise. You will see the orange card-access symbol flashing in the upper-left corner of the screen during the noise reduction cycle as well as a countdown timer that shows the remaining time required for the noise reduction process (figure 7.101, image 3). When it is done, the camera will display the new image on the monitor (figure 7.101, image 4).
LIVE BULB Shutter Speed
When you use the LIVE BULB shutter speed setting, your camera makes an exposure over time and displays the live results on your camera’s current display screen (viewfinder or monitor).
Press and hold the Shutter button to start the exposure, and the camera will start updating the live exposure on the current display screen. You can see the actual image being formed on the monitor during a LIVE BULB exposure in figure 7.102, images 2–4.

Figure 7.102: Using the LIVE BULB shutter speed setting
When the Live Bulb function is set to any value besides Off, the LIVE BULB shutter speed selection displays on the bottom left of the screen (figure 7.102, image 1).
Figure 7.102, image 2, shows the location of the Display Count so you can watch how many times the live exposure update has occurred (up to 24 times maximum, at Low ISO). Image 3 shows the Live histogram that you can use to determine when the exposure is correct. If you want a good exposure, release the Shutter button when the histogram graph approaches or touches the right side of the histogram window (figure 7.102, image 4).
The live exposure display will update in specific increments. You can select from 0.5sec (1/2 second) to 60sec (60 seconds) for the screen update increment. We will discuss how in a moment.
During an exposure using the LIVE BULB shutter speed, the camera will update the screen approximately 9 to 24 times (how many times is controlled by the ISO sensitivity). You can use the Live Bulb function to choose how often the screen updates during the long exposure for each of the 9 to 24 times (Display Count).
In other words, if you select 4sec in Live Bulb, the camera will update the live exposure display every four seconds up to 24 times during the actual live exposure process. You will see the image gradually appear on the screen.
The number of times (9 to 24) the live exposure display updates is controlled by the ISO sensitivity, as shown in the following Display Count list (figure 7.103, image 2):
- ISO LOW: Approximately 24 times
- ISO 400: Approximately 19 times
- ISO 800: Approximately 14 times
- ISO 1600: Approximately 9 times
Now let’s see how to choose a time increment for the Live Bulb function.
Setting a Time Increment for the Live Bulb Function
Use the Live Bulb function to choose how frequently the monitor displays an updated live exposure view when you use the LIVE BULB shutter speed, or whether the camera shows no live exposure updates when you use BULB (with the Live Bulb function set to Off).

Figure 7.103: Choose how often the live exposure view updates for LIVE BULB time exposures
Use the following steps to choose an update increment for LIVE BULB during long exposures:
- 1.Select Live Bulb from the E2. Exp/ISO/BULB/[Meter] menu and scroll to the right (figure 7.103, image 1).
- 2.Choose one of the values from the up/down menu, ranging from 0.5sec to 60sec (figure 7.103 image 2). The factory default setting is Off for BULB mode (no live exposure updates). If you want to watch the LIVE BULB mode update the screen with a live exposure, you must select how often you want it to update (e.g., 4sec) from the up/down menu. The approximate Display Count (9 times to 24 times) is shown below the up/down menu in image 2.
- 3.Press the OK button to Set the value.
Note: During the long exposure, if you have chosen to see the live exposure update—with Live Bulb set to anything other than Off—you will see the exposure forming on the screen. If you decide the exposure is correct for your subject, either by viewing it directly or by watching the Live histogram display on the screen, you can release the Shutter button and stop the exposure at that moment.
If you have the Noise Reduct. function enabled, the camera will do a noise reduction cycle equal in time to the original exposure. It will generally double the exposure time while using black-frame subtraction to reduce noise.
Settings Recommendation: I want my camera to show a live exposure update, so I set Live Bulb to something like 4sec, or maybe more for a very long exposure. The screen will be updated a maximum of 24 times, and that only when ISO is set to Low, so you will need to do some math to calculate an updated increment that matches the length of the planned exposure and the number of times the screen is updated.
I try to set the exposure frequency so the screen will update throughout the exposure. For instance, if I am doing a 1min exposure with the LIVE BULB shutter speed setting, at a lower ISO (24 steps) I set the Live Bulb function to 2sec so the camera will update each of the 24 steps every 2 seconds. That means I will see updates on my monitor every 2 seconds until the 24 update steps have completed.
There is a nearly identical function called Live Time (next subsection) that lets you control the updates of the screen when you use the LIVE TIME shutter speed.
Live Time
When you rotate the Rear Dial while using BULB (B) mode on the Mode Dial, you will find that LIVE TIME is one of the three slowest shutter speed settings.
Note: To avoid confusion, please notice that the function we will discuss in this section is called Live Time. It controls the shutter speed setting named LIVE TIME. Notice the uppercase and lowercase differences so you will not get Live Time (the Custom Menu function) and LIVE TIME (the shutter speed setting) confused as we discuss them.
When you use the LIVE TIME shutter speed setting, the camera opens the shutter (starts the exposure) when you press the Shutter button all the way down. You do not need to hold the Shutter button down when you use LIVE TIME, as you do when you use LIVE BULB (or BULB), because the camera makes the exposure for you based on the time limit that was set in the previously discussed Bulb/Time Timer function (Custom Menu > E2. Exp/ISO/BULB/[Meter] > Bulb/Time Timer).
The exposure ends when the Bulb/Time Timer function’s exposure time has expired or when you press the Shutter button all the way down once more. You may manually stop the exposure when you think it looks right on the monitor (or on the Live histogram display) by pressing the Shutter button.
As the camera makes an exposure over time and displays the live results of that exposure on your camera’s current display screen (viewfinder or monitor), you can see the actual image being formed, as shown in figure 7.104, images 2–4.
The LIVE TIME shutter speed selection is displayed on the bottom left of the screen (figure 7.104, image 1). Press the Shutter button to start the exposure, and the camera will start updating the live exposure on the current display screen.

Figure 7.104: Using the LIVE TIME shutter speed setting
Figure 7.104, image 2, shows the location of the Display Count so you can watch how many times the live exposure update has occurred (up to 24 times). Image 3 shows the Live histogram that you can use to determine when the exposure is correct.
The live exposure display will update in specific increments. You can select from 0.5sec (1/2 second) to 60sec (60 seconds) for the screen update increment. We will discuss how in a moment. Figure 7.104, image 4, shows the final exposure.
After you have selected a value besides Off for this Live Time function, the camera will update the screen during a long exposure from approximately 9 to 24 times (how many times is controlled by the ISO sensitivity). You can use this Live Time function to choose how often the screen updates during the long exposure for each of the 9 to 24 times.
In other words, if you select 4sec in Live Time, the camera will update the live exposure display every 4 seconds up to 24 times maximum during the actual live exposure process. You will see the image gradually appear on the screen.
The number of times (9 to 24) the live exposure display updates is controlled by the ISO sensitivity, as shown in the following Display Count list (figure 7.105, image 2):
- ISO LOW: Approximately 24 times
- ISO 400: Approximately 19 times
- ISO 800: Approximately 14 times
- ISO 1600: Approximately 9 times
Use the Live Time function to choose how frequently the monitor displays an updated live exposure view when you use the LIVE TIME shutter speed setting, or whether the camera shows no live exposure updates when you use LIVE TIME (with the Live Time function set to Off).

Figure 7.105: Choose how often the live exposure view updates for LIVE TIME long exposures
Use the following steps to choose an update increment for LIVE TIME during long exposures:
- 1.Select Live Time from the E2. Exp/ISO/BULB/[Meter] menu and scroll to the right (figure 7.105, image 1).
- 2.Choose one of the values from the up/down menu, ranging from 0.5sec to 60sec (figure 7.105 image 2). The factory default setting is 0.5sec (1/2 second live exposure updates). If you want to see up to 24 updates, you must select how often you want an update to display from the up/down menu (not Off). The approximate Display Count (9 times to 24 times) is shown below the up/down menu in figure 7.105, image 2. During the exposure, you will see the Display Count and a timer on the lower-right side of the screen while a Live histogram appears on the lower-left side of the screen.
- 3.Press the OK button to Set the value.
Note: During the long exposure, if you have chosen to see the live exposure update—with the Live Time function set to anything other than Off—you will see the exposure forming on the screen. If you decide the exposure is correct for your subject, either by viewing it directly or by watching the Live histogram display on the screen, you can press the Shutter button again to stop the exposure at that moment.
If you have the Noise Reduct. function enabled, the camera will do a noise reduction cycle equal in time to the original exposure. It will generally double the exposure time while using black-frame subtraction to reduce noise.
Settings Recommendation: I want my camera to show a live exposure update, so I set Live Time to a value, such as 2sec or 8sec, according to how long of an exposure is set in the Bulb/Time Timer function.
I try to set the exposure frequency so the screen will update all through the exposure. For instance, if I am doing an 8min exposure at a lower ISO (24 steps), I set the Live Time function to 15sec so the camera will update one of the 24 steps every 15 seconds. That means I will see the updates on my monitor every 15 seconds until the 24 update steps have completed.
Composite Settings (Live Composite)
The Live Composite function allows you to create composite images of subjects like a fireworks display (figure 7.106). You can set up many multiple exposures on one frame, with each exposure acting independently.

Figure 7.106: Sample composite fireworks image
The camera will automatically create a composite image as you watch the exposure timer count down. You can recompose the frame between exposures so you can capture multiple bright subjects with dark backgrounds. Figure 7.106 is 11 separate exposures that were composited.
There are two ways to configure the composite settings. You can use the Custom Menu first to configure the exposure time and then enter the Live Composite system, or you can enter the Live Composite system first then set the exposure time just before you shoot the frames you want to composite. Let’s consider both.
Setting the Composite Settings before Entering Live Composite
You can configure the exposure time for each frame before you enter the Live Composite system so your camera will be ready ahead of time. Here is how to preconfigure the composite exposure value (applies to each frame).

Figure 7.107: Configuring an exposure value before entering Live Composite mode
Use the following steps to preconfigure an exposure value that will be applied to each frame of the composite image:
- 1.Select Composite Settings from the E2. Exp/ISO/BULB/[Meter] menu and scroll to the right (figure 7.107, image 1).
- 2.Choose an Exposure time per image from the Composite Settings up/down menu (figure 7.107, image 2). Your choices in the up/down menu range from 1/2 second (1/2sec) to 60 seconds (60sec). Choose the time you want to use for each exposure in the composite series.
- 3.Press the OK button to Set your chosen value.
The camera is now ready to enter the Live Composite system and make your composite images.
Next, let’s consider how to set the Exposure time per image when you are already in the Live Composite system.
Setting the Composite Settings after Entering Live Composite
Open the Live Composite system by selecting the LIVECOMP shutter speed setting, which is at the slow end of the shutter speed selections, along with BULB and LIVE TIME.
Let’s see how to use the Live Composite system to create an image like the one shown in figure 7.106.

Figure 7.108: Selecting an exposure time while in Live Composite mode
Use these steps to set the Composite Settings after you activate the Live Composite system:
- 1.Set the camera to BULB (B) mode on the Mode Dial.
- 2.Using the Rear Dial, select LIVECOMP from the shutter speed settings. The LIVECOMP choice (figure 7.108, image 1, red arrow) is the slowest available shutter speed.
- 3.Press the Menu button to directly enter the Composite Settings screen (figure 7.108, image 2). Choose an Exposure time per image to be applied equally to each frame in the composite image. Your choices in the up/down menu range from 1/2 second (1/2sec) to 60 seconds (60sec).
- 4.Press the OK button to select the exposure time, and the camera will switch to the screen in figure 7.108, image 3. Nothing needs to be done on this screen, so press the Shutter button slightly to return to the first screen in the series (figure 7.108, image 1). The time value is selected and ready to use. The next few steps will capture the images to be composited.
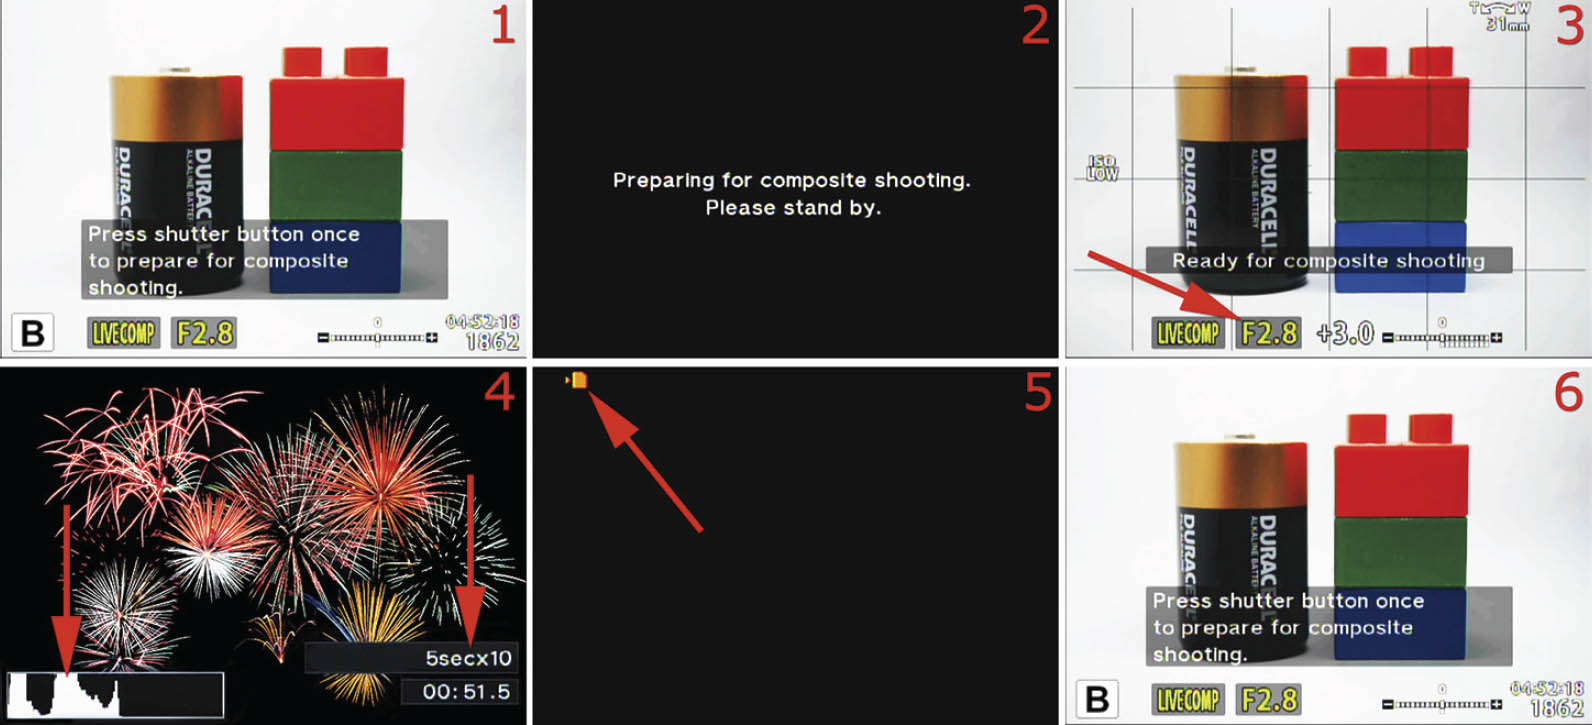
Figure 7.109: Taking pictures with the Live Composite system
- 1.The Live Composite screen (figure 7.109 image 1) will display this message: Press shutter button once to prepare for composite shooting.
- 2.Press the Shutter button all the way down once, and the camera will prepare to take the composite series. If the Composite Settings time is for a very short time, the message in figure 7.109, image 2 will not be displayed. Otherwise, a dark screen will open for a few seconds that says, Preparing for composite shooting. Please stand by (figure 7.109, image 2).
- 3.The next screen says, Ready for composite shooting. It will use the settings and exposure value you selected. Before proceeding, use the Front Dial to set the aperture (figure 7.109, image 3, red arrow). Then focus the camera on the subject or on the area where the subject will appear. It may be a good idea to use manual focus for subjects that will appear later in the series, such as a fireworks show. After you have focused the camera, press the Shutter button completely down one time to start the exposures.
- 4.The camera will start taking a series of timed pictures until one of the following occurs: you stop Live Composite by pressing the Shutter button fully; three hours have passed; or the battery dies. Three hours is the maximum run time for the Live Composite system before it automatically shuts down. At the left red arrow in figure 7.109, image 4, you can see that the camera is building a live histogram as it takes the exposures. You can watch this histogram to prevent overexposure as additional images are taken over time. At the right red arrow in image 4, you can see the camera counting down the exposures and time. The image shows 5secx10, which means each exposure is 5 seconds long (5sec), and 10 exposures have been made so far (x10). Just beneath the exposure count is a timer that displays the actual time of the Live Composite session. The time is counted in 1/2 second increments up to three hours. During the series of exposures you can move the camera to position a bright subject somewhere else in the frame, such as in image 4: each of those explosive bursts of color is the result of an individual exposure, with the camera slightly repositioned to allow placing the captured image in a different location in the resulting composited photograph.
- 5.Stop the Live Composite session by completely pressing the Shutter button once. The camera monitor will go black except for the orange memory card access symbol in the upper-left corner, which will blink as the camera finishes combining the images (figure 7.109, image 5). Finally, the camera will display the finished composite picture, according to the value you chose in Setup Menu > Rec View (default 1/2 second), then the camera will switch back to the main Live Composite screen so you can prepare for another session (figure 7.109, image 6).
- 6.If you would like to shoot another Live Composite series, simply repeat steps 3 through 9. If you are done shooting in Live Composite, select a different shutter speed to exit the Live Composite system, but remain in BULB mode.
Note: The camera will automatically adjust the brightness of the monitor during a Live Composite session. Finally, if you want to see the number of composited shots in the final image, you can find it later in your computer with the Olympus Workspace software: select the image, then select the Properties icon (which displays the non-intuitive lower-case “i”), and search the list of properties for Composite Settings.
[Camera] Flicker Scan
In either Shutter-priority mode (S) or in Manual mode (M), while shooting in Silent mode (Sequential Shooting or Self-timer mode), High Res Shot mode, or Pro Capture mode, banding may occur in photographs taken under LED lighting. [Camera] Flicker Scan can optimize shutter speed to reduce the banding that can occur. We tend to think of LED lighting being within a residence, but many cities are converting their street lighting and arena lighting to LED, so it’s important to look for banding when shooting in these environments.

Figure 7.110 Enabling [Camera] Flicker Scan
Use the following steps to enable [Camera] Flicker Scan:
- 1.Select [Camera] Flicker Scan from the E2. Exp/ISO/BULB/[Meter] menu and scroll to the right (figure 7.110, image 1).
- 2.Select On from the up/down menu (figure 7.110, image 2).
- 3.Press the OK button to Set the value, then press the MENU button repeatedly to exit the menus.
Settings Recommendation: As this addresses a fairly rare occurrence (for most of us), I tend to leave this feature disabled.
Metering
The E-M5 III has five meter types, which gives you great flexibility in how you expose your images. Using the meter styles built into the camera along with the Live Histogram will allow you to take some of the best-exposed images you’ve ever created.
Let’s look more closely at the five types of light meters built into the camera and discuss their differences:
[Digital ESP Metering]: ESP stands for electro sensitive pattern. The camera meters the image in a grid of 324 metered areas. It examines each of the 324 areas and uses complex mathematical computations to arrive at an excellent exposure most of the time. This metering mode works especially well for portraits when Face Priority is enabled.
[Center-Weighted Averaging Metering]: The camera averages the light between the subject and the background. It places more emphasis on the center area of the screen (large fuzzy red circle in the accompanying image) with less emphasis on parts of the scene that are farther away from the center. This mode is provided for those of us who learned to use a center-weighted meter and prefer to use that metering method. You will see a medium-sized circle in the middle of the monitor. The circle does not represent the actual size of the averaging meter’s most important metering area; it shows just the center.

[Spot Metering]: The camera uses a small circle in the center of the frame for metering. This circle is equivalent to 2 percent of the frame and is roughly represented by the red dot in the accompanying figure. All metering takes place in this 2 percent area. Heretofore, you would be required to place this nonmoveable spot on the area of the subject that you wanted to correctly meter by moving the camera then using autoexposure lock (AEL/AFL button) to lock the exposure while you recomposed the image (see the next subsection, AEL Metering). Or you could take multiple readings of different areas of the scene, determine the total light range, and set the exposure manually. While that is all still available (set Spot to “unselected“ on the E3. Exp/ISO/BULB/[Meter] > [AF Target] Spot Metering menu), the E-M5 III now defaults to E3. Exp/ISO/BULB/[Meter] > [AF Target] Spot Metering > Spot being enabled, so that the metering follows the AF Target Area’s focus.

[Spot Metering—Highlight (HI)]: This type of metering is similar to [Spot Metering] in that the camera uses a small circle to meter. This circle is equivalent to 2 percent of the frame and is roughly represented by the red dot in the accompanying figure. This metering mode is different because the camera tries to make white areas (highlights) stay white by increasing the exposure beyond a [Spot Metering] reading to give a bright, high-key look to the image.

[Spot Metering—Shadow (SH)]: This type of metering is similar to [Spot Metering] in that the camera uses a small circle to meter. This circle is equivalent to 2 percent of the frame and is roughly represented by the red dot in the accompanying figure. This metering mode is different because the camera tries to make dark areas (shadows) stay dark by decreasing the exposure below a [Spot Metering] reading to give a low-key look to the image.
Figure 7.111: The five types of light meters built into the camera
Now let’s examine how to select one of the metering types.
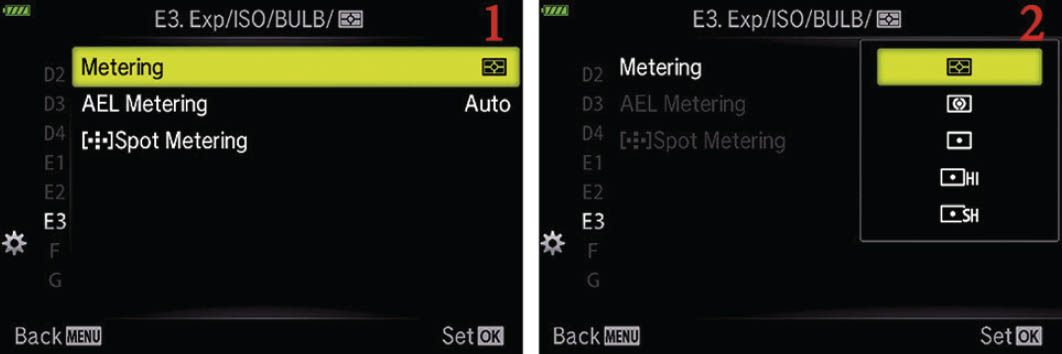
Figure 7.112: Choosing a light meter type
Use the following steps to choose a metering type:
- 1.Select Metering from the E3. Exp/ISO/BULB/[Meter] menu and scroll to the right (figure 7.112, image 1).
- 2.Select one of the five meter types shown in the menu (figure 7.112, image 2).
- 3.Press the OK button to Set the value.
Settings Recommendation: I usually use [Digital ESP Metering]. I like the way it evaluates all areas of the screen and arrives at an excellent exposure. Also, I have found that for portraiture, it is best to use Face Priority along with this meter type to have the best exposure.
There is a meter type for each of us: [Center-Weighted Averaging Metering] is good for old-timers who like this traditional meter style. The three types of [Spot Metering] allow extremely accurate metering of specific areas of a subject for those who understand how to use a spot meter. The highlight and shadow meters add icing to the cake.
I suggest experimenting with all these meter types until you are familiar with them.
AEL Metering
When you press the AEL/AFL button with the camera configured for autoexposure lock, the camera makes a meter reading, then locks the exposure until you release the AEL/AFL button. Olympus has provided a means for you to choose which type of meter your camera will use to make the exposure reading that will be locked.
There are five AEL Metering modes:
- Auto: When you press the AEL/AFL button, the camera uses whichever metering mode you selected in the Metering subsection. This is the factory default setting, and it is apparently the only way to access [Digital ESP Metering] for autoexposure lock.
- [Center-Weighted Averaging Metering]: When you press the AEL/AFL button, the camera switches to [Center-Weighted Averaging Metering], as described in the Metering subsection.
- [Spot Metering]: When you press the AEL/AFL button, the camera switches to [Spot Metering], as described in the Metering subsection.
- [Spot Metering—Highlight (HI)]: When you press the AEL/AFL button, the camera switches to [Spot Metering—Highlight (HI)], as described in the Metering subsection.
- [Spot Metering—Shadow (SH)]: When you press the AEL/AFL button, the camera switches to [Spot Metering—Shadow (SH)], as described in the Metering subsection.
Let’s see how to select one of the five metering types for autoexposure lock.
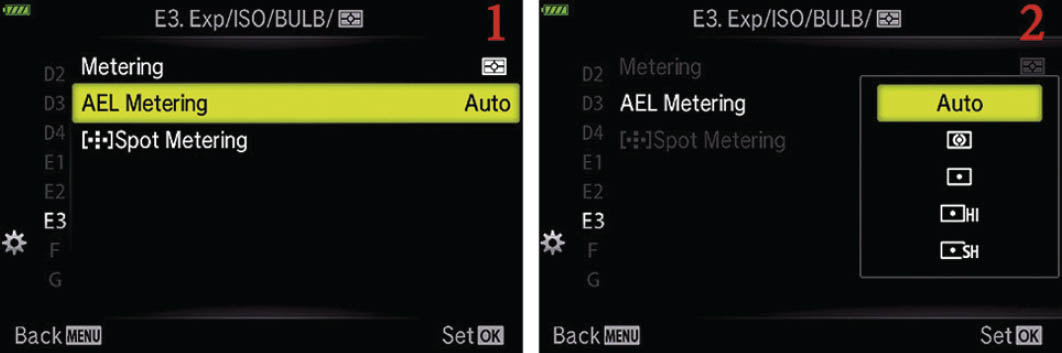
Figure 7.113 Choosing a metering mode for autoexposure lock
Use the following steps to choose a metering type when you press the AEL/AFL button:
- 1.Select AEL Metering from the E3. Exp/ISO/BULB/[Meter] menu and scroll to the right (figure 7.113, image 1).
- 2.Select one of the five meter types shown in the menu (figure 7.113, image 2).
- 3.Press the OK button to Set the value.
Settings Recommendation: The Auto mode seems to be the most reasonable setting for me. I normally have the best light meter type already selected before I use autoexposure lock.
However, maybe you are metering a beautiful sunset and decide to use autoexposure lock to meter a bright orange cloud. You might want to use [Spot Metering]. If you already had the AEL Metering function set to [Spot Metering], you would be ready to shoot. You could meter the bright cloud, recompose, take the shot, then continue shooting with [Digital ESP Metering] for more images of other subjects. In cases like this, it may be wise to separate the Metering types when you use normal metering and after pressing the AEL/AFL button.
[AF Target] Spot Metering
The E-M5 III allows you to tie the spot metering (and spot highlight and spot shadow metering) to the currently selected AF Target area. This makes a lot of sense, as you would think the area of focus would also be the area where you want to measure the light.
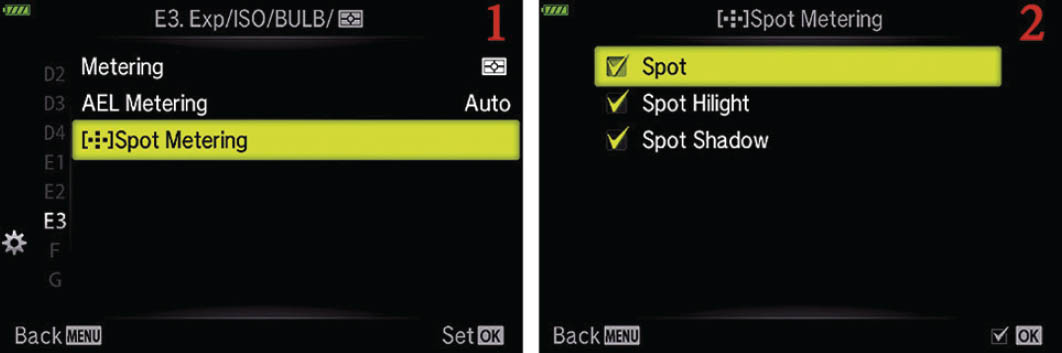
Figure 7.114: Enabling Spot Metering of the selected AF Target
Use the following steps to enable spot metering for the selected AF Target:
- 1.Select [AF Target] Spot Metering from the E3. Exp/ISO/BULB/[Meter] menu and scroll to the right (figure 7.114, image 1).
- 2.Place a check mark next to each spot metering type by highlighting it and pressing the OK button (figure 7.114, image 2).
- 3.Once you have made your selections, press the Menu button to return to the previous screen.
Settings Recommendation: I always tie the focus point to the spot metering so that the camera meters the most important area of the scene.
Custom Menu F. [Flash] Custom
The F. [Flash] Custom menu is primarily composed of functions that directly affect how the flash system works. First we will take a look at the opening menu screen for the F. [Flash] Custom functions (figure 7.115).
To enter the menu, select F. [Flash] Custom from the Custom Menu and scroll to the right. There are four functions in the F. [Flash] Custom menu. Let’s consider each of them in detail.

Figure 7.115: The opening menu selection for the F. [Flash] Custom functions
[Flash] X-Sync
The [Flash] X-Sync function sets a maximum shutter speed for shooting with an electronic flash unit mounted in the Hot shoe and turned on. The X-Sync speed is necessary because the shutter blades must be out of the way of the sensor before the flash can fire. If a shutter blade partially blocks the sensor, a dark shadow will appear in the image.
The X-Sync name comes from the old days when lenses had an actual X on the shutter-speed scale. You had to select the setting with a lever when you used flash. The old mechanical clockwork shutters had an electrical contact that closed the circuit and fired the flash when the shutter blades were completely out of the way. On the E-M5 III, X-Sync is controlled by an electronic timing circuit instead of a mechanical contact.
You can select an X-Sync speed from 1/60 second to 1/250 second, which is compatible with the little FL-LM3 that came with the camera, as well as several other flash units, such as the Olympus FL-600R.
The [Flash] X-Sync function controls the fastest or maximum shutter speed you can use with flash (without banding). The next subsection will consider the [Flash] Slow Limit, which controls the slowest or minimum shutter speed you can use with flash in certain exposure modes. You can use the two functions—[Flash] X-Sync and [Flash] Slow Limit—to control the upper and lower limits of the shutter speed when you use flash to get a mixture of flash lighting and ambient lighting. We will discuss how to blend the two types of light in the next subsection, [Flash] Slow Limit.
The camera will use the maximum X-Sync value only when you are shooting in a very bright environment in direct flash (Fill In) mode to prevent the ambient light from overly influencing the exposure. Most of the time, in low ambient light, the camera will automatically select a somewhat slower shutter speed, such as 1/60 second, unless you have [Flash] Slow Limit (next subsection) set so it cannot use a speed that low.
Let’s examine how to select an X-Sync value that matches your needs.

Figure 7.116: Selecting an X-Sync value
Use the following steps to choose a maximum shutter speed to use with flash:
- 1.Select [Flash] X-Sync from the F. [Flash] Custom menu and scroll to the right (figure 7.116, image 1).
- 2.Use the up or down button of the Arrow pad to choose one of the seven shutter speeds, which range from 1/60 to 1/250 (figure 7.116, image 2). The factory default setting is 1/250 second, expecting that you will be using the little FL-LM3 flash that came with the camera.
- 3.Press the OK button to Set the value.
Settings Recommendation: I normally use 1/250 second for the X-Sync value when I am depending on the flash unit for lighting a subject. However, when I am trying to synchronize flash with evening light outdoors, I may use a combination of the [Flash] X-Sync speed and [Flash] Slow Limit to allow ambient light to influence the exposure for a more balanced look. The camera has a nice range of shutter speeds for slow flash use.
[Flash] Slow Limit
The [Flash] Slow Limit function allows you to control the lower shutter speed limit when you use flash photography (slow flash). You may need this function when you want ambient light combined with light from a flash unit to illuminate the exposure. You may want ambient light to be the primary source of exposure and have the flash provide a little fill light. Or you may want the flash to provide the main illumination, with ambient light opening up the shadows in the background. You may even be using more than one flash in a wireless group of units that work with ambient light.
[Flash] Slow Limit works in partnership with the [Flash] X-Sync function (previous subsection) by allowing you to set the lower limit of the shutter speed when you shoot with flash; the shutter speed can be as slow as 30 seconds. The [Flash] X-Sync function controls the upper shutter speed limit, which cannot exceed 1/250 second but can be set as slow as 1/60 second.
When you have the camera set to Program (P) or Aperture-priority (A) mode on the Mode Dial, the camera controls the shutter speed and you control the aperture. Therefore, the lower shutter speed limit provided by the [Flash] Slow Limit function is important when you are using flash in P and A modes.
If you are using Shutter-priority (S) or Manual (M) mode on the Mode Dial, the [Flash] Slow Limit function has no effect because you can set the lower shutter speed to be as long (slow) as you would like.
Therefore, if you want to balance the illumination from the flash and the ambient light, you can either do it manually in S or M mode, or you can use P or A mode and depend on the [Flash] Slow Limit function to provide the minimum flash shutter speed.
To effectively balance the ambient light with the flash requires experimentation and experience and is beyond the scope of this book. You know that the camera cannot exceed 1/250 second for a maximum shutter speed ([Flash] X-Sync), and now you also know that the camera will allow you to set a minimum shutter speed ([Flash] Slow Limit). Therefore, you can use mostly ambient light by lengthening the shutter speed with a slower setting under [Flash] Slow Limit to let in more ambient light while the flash provides a burst of light for filling in some shadows.
Or you can use a shutter speed in [Flash] Slow Limit that is somewhat closer to the shutter speed in [Flash] X-Sync so the flash will provide the main light source while ambient light provides some background fill.
You will need to experiment with these two settings to find the appropriate balance for what you are trying to accomplish. Be sure to use a tripod if you use shutter speeds in [Flash] Slow Limit that are slow enough to allow camera shake or subject movement, which will appear in the image. Otherwise ghosting will be apparent in the image where the flash-lit portion of the subject is sharp and the ambient-lit portion of the subject is blurred.
Let’s examine how to set the [Flash] Slow Limit function for various shutter speeds.

Figure 7.117: Setting a minimum shutter speed for flash photography
Use the following steps to choose a minimum shutter speed to use with flash:
- 1.Select [Flash] Slow Limit from the F. [Flash] Custom menu and scroll to the right (figure 7.117, image 1).
- 2.Use the up or down button of the Arrow pad to choose a minimum flash shutter speed, ranging from 30 seconds to 1/250 second (figure 7.117, image 2). The factory default setting is 1/60 second.
- 3.Press the OK button to Set the value.
Note: Be aware of a photography rule called shutter speed as a function of focal length, or the reciprocal of focal length rule. This rule states that you should not make an exposure with, let’s say, a 200mm lens at a shutter speed of less than 1/200 second because anything slower may cause the camera to be susceptible to shake.
Settings Recommendation: I raise the minimum flash shutter speed to 1/100 or 1/125 second when I am shooting with flash indoors. I find that often 1/60 second (the default) is too slow and may allow some ghosting to occur, especially at weddings where I am shooting people walking down the aisle when fairly bright ambient light influences the exposure. If the shutter is open for 1/60 second, the flash will make a nice sharp picture for a short segment of the exposure duration, and ambient light continues to illuminate the subject for the remainder of the exposure duration, resulting in a ghosted blur.
On the other hand, when I am shooting in bright ambient light outside, I may allow the shutter speed to remain slower and take advantage of some ambient light with flash fill. I use a smaller aperture to keep from overexposing the subject.
This type of thing is always an experiment and has to be balanced. You can take advantage of your camera’s powerful tools to get the results you want.