
IN THIS CHAPTER
Sprites are one of the most important components in any graphical game. A sprite is, simply put, any graphic that appears on your screen. A sprite is every monster, every fireball, every tree, and every ladder. Some sprites move around the screen, some sprites have animations, and some will affect the game when something else collides with them.
Throughout this book, we will be building a game called Micro Racer. The goal of the game is simple: You are a car racing down a track. Enemy cars speed at you from the opposite direction. You must avoid these cars. You can pick up various weapons and objects along the way to help you repair your car, move faster, or blast enemies off the track.
This chapter will show you how to create the basic building block of all action games—a simple but robust Sprite class.
Suppose we want to model an ordinary scene straight from the real world. What do we see? People walk the sidewalks. Cars drive through the streets. Birds fly beneath the clouds. People, cars, and birds are objects that represent our physical world.
At any given time, these objects have positions that can be termed as absolute. From a given vantage point, every object is a certain horizontal distance, vertical distance, and depth away—this can be expressed as x, y, and z coordinates.
Many of these objects are also moving at a certain velocity and certain direction—again, things that can be expressed in terms of x, y, and z. Clouds move slowly, cars move quickly.
Finally, these objects may interact with each other. What happens when a bird hits a person? What happens when a car does? All the objects that make up the gameworld are known in game terminology as sprites.
In order to create and work with standard sprites in a two-dimensional gameworld, you will need to be able to access and set various properties. These include the following:
x position—The position x represents the horizontal coordinate of the sprite, measured in pixels. If the sprite's x and y position are inside the visible display area, then the sprite is drawn on the screen. The leftmost column of the screen is known as x position
0, the rightmost column of a 100-pixel-wide screen would be x position99.y position—This represents the vertical coordinate of the sprite. The top row of the screen is y position
0, and the bottom row of a 100-pixel-long screen would be y position99.Velocity Vx—This represents the horizontal speed of the sprite. In other words, in every frame the sprite will move Vx pixels. If Vx is a negative value, the sprite moves to the left, otherwise it moves to the right.
Velocity Vy—This is the vertical speed of the sprite If Vy is negative, the sprite will move up, otherwise the sprite will move downward. If both Vx and Vy are set to
0, then the sprite is stationary and does not move.Width—Represents the width of the sprite graphic. Together with the x position, it defines the right edge of the sprite on the x coordinate.
Height—Represents the height of the sprite graphic. Together with the y position, it defines the bottom edge of the sprite on the y coordinate.
Image—Points to the graphical representation of the sprite that is encoded in PNG format. The image file might contain a series of animated images that are defined by a frame number.
Frame—If a sprite is to be animated, it will contain more than one frame. This property enables you to set the current frame.
Visibility—During the game, some sprites might be disabled because they were hit, or they might be eliminated because they have moved off the screen. The visibility flag shows or hides the sprite.
Besides these properties, sprites can also have their own energy value, hit points, dollar value, number of lives, and many more properties that are different from game to game.
Some sprites might just contain one frame. For example, an arrow flying through the air might just consist of one simple image. However, sprites are at their most beautiful and interesting when they are animated. For example, a man walking might consist of three frames:
A man with both legs down.
A man with the right leg extended.
A man with the left leg extended.
You could then animate the man by calling the frames in sequence: 1,2,1,3,1,2, and so on.
If your game features a character being shown from the top down, you might want to create different frames for each direction the character can face.
The Sprite class that we will create must be able to handle multiple frames. The easiest way to do this is to put all of a Sprite's frames in one file, known as a filmstrip file. For example, Figure 15.1 shows a blown-up version of the car we are going to use in our racing game.
Notice that the two images in Figure 15.1 are nearly identical. The rightmost image, however, has white stripes in its tires. When these two frames are cycled quickly, it creates the illusion of speedy tire movement.
Notice that the width of the image in Figure 15.1 is twice as wide as the actual frame we want to show. This leads to the following simple formula:
filmstrip_width = frame_width * num_frames
You can easily extend the Sprite class, detailed in Listing 15.1, to add additional properties.
Example 15.1. Adding to the Sprite Class
import javax.microedition.lcdui.*;

public class Sprite
{
  private Image image;
  private int x;
  private int y;
  private int vx;
  private int vy;
  private int width;
  private int height;
  private int numFrames;
  private int frame;
  private boolean visible;

  public Sprite(Image image, int width, int height,
      int numFrames)
      throws Exception
  {
    this.image = image;
    this.width = width;
    this.height = height;
    this.numFrames = numFrames;
    if (image.getHeight() != height)
        throw new Exception("Height not correct.");
    if (image.getWidth() / numFrames != width)
        thro new Exception("Width not correct.");
  }

  public Image getImage()
  {
    return image;
  }

  public int getX()
  {
    return x;
  }

  public void setX(int x)
  {
    this.x = x;
  }

  public int getY()
  {
    return y;
  }

  public void setY(int y)
  {
    this.y = y;
  }

  public int getVx()
  {
    return vx;
  }

  public void setVx(int vx)
  {
    this.vx = vx;
  }

  public int getVy()
  {
    return vy;
  }

  public void setVy(int vy)
  {
    this.vy = vy;
  }

  public int getWidth()
  {
    return width;
  }
  public int getHeight()
  {
    return height;
  }

  public int getFrame()
  {
    return frame;
  }

  public void setFrame(int frame)
      throws Exception
  {
    if (frame < 0 || frame > numFrames - 1)
        throw new Exception ("Not correct frame number.");
    this.frame = frame;
  }

  public boolean isVisible()
  {
    return this.visible;
  }


  public void setVisible(boolean visible)
  {
    this.visible = visible;
  }
}
By default, sprites are inactive when they are first created. You pass in the number of frames. The Sprite class ensures that the image used for the sprite is wide enough to handle the given number of frames. An exception is thrown if the image width is not correct:
if (image.getWidth() / numFrames != width)
        thro new Exception("Width not correct.");
NOTE
A sprite's position and speed should ideally use floating-point numbers. Since J2ME does not include floating-point libraries, the next chapter will show you how to simulate floating-point numbers.
By default, the first frame of a sprite (with the numerical value of 0) is shown.
Images are the heart of sprites. Our Sprite classes must be able to load and properly display sprites.
Before an image can be used, it must be loaded from the resource file using the Image.createImage() method. In J2ME, the only resource file is in the JAR file, where all classes are located. Listing 15.2 shows what the loading procedure looks like. We will add this procedure to our global Cache class that contains all game-wide objects and variables.
Notice that images are loaded within a static block. This block is executed when the class is first loaded, generally before the first application's method starts.
Some devices have limitations on the size of JAR files. NTT DoCoMo iApplis, for example, may not be more than larger than 10 kilobytes. Other phones have limitations of 30–50 kilobytes.
The reason for this limitation has to do with slow 2G mobile networks with 9600bps bandwidths. If hundreds of users were to download a large Java game at the same time, it could overload the network.
WARNING
Over a 9600bps network, 10 kilobytes of data can take 10 seconds to download. Because mobile users will probably only wait one minute at the most, applications should always be smaller than 50 kilobytes (with an average size of 30 kilobytes).
JAR files not only contain game classes, but also include images. If your game has 20 or so sprites, this can easily take up a good 10K of additional room.
Given the size limitations of JAR files, it often makes sense to download images from the network as needed. The raw image data can then be stored in the phone's internal data records. The next chapter shows you to how grab images on-the-fly. Chapter 19, “Be Persistent: MIDP Data Storage,” shows you how to store these images on the phone for later use.
A good game will generally include many attractive graphics. The more characters, enemies, obstacles, and backgrounds you can draw, the richer your gameworld will be.
In MIDP, all the images you use must be in PNG format. PNG is a compressed format that uses all 24 bits as its color palette. If you take an in-depth look at a PNG file, you will notice the following:
Because a PNG file's header is so large, the more files you use, the more memory you are taking up. Because most images will use the same color palette, this amounts to wasted space.
Putting all the frames of a sprite in one filmstrip file, as in Figure 15.1, solves this problem. A lot of different images will have only one header.
The question then becomes, how does your MIDlet extract each frame from the filmstrip? Luckily, MIDP enables us to clip images as we draw them. The game needs to create a clip rectangle that equals the width of the frame. The image must then be positioned in such a way that the current frame of the image is located in the clipping rectangle.
Clipping an image takes some extra drawing time, however. As such, creating separate filmstrips for each sprite (as opposed to putting every frame of every sprite in one huge file) makes a lot of sense.
A sprite is meaningless unless it can be dealt with and drawn. A robust sprite engine must include not only the sprite data, but a SpriteManager class capable of storing collections of sprites. The engine also needs to include a rendering component to actually draw the sprites onto the screen.
Listing 15.3 shows how to integrate a paint() method into the Sprite class. By making each Sprite responsible for painting itself, you give it absolute control over its own visual fate. The main paint() method in your game, Canvas, simply needs to go through the list of sprites and individually call paint() on each one.
Example 15.3. Adding the paint() Method
public void paint(Graphics g)
{
  g.setClip(x, y, width, height);
  g.drawImage(image, x - frame * width, y,
      Graphics.TOP | Graphics.LEFT);
  g.setClip(0, 0, Cache.width, Cache.height);
}
The paint() method is pretty simple:
The clipping rectangle is set to the current x and y position, at the current width and height. This ensures that only one frame is drawn at a time.
The image itself is then drawn so that the frame we want corresponds with the upper left corner of the clipping rectangle. For example, if we want to draw the second frame of an animation, where each frame is 20 pixels wide, we offset the image's x position by 20.
The clipping rectangle is then re-sent to equal the full screen width and height.
Sprite collision detection is an essential attribute of any game engine. Collision detection lets you know when two sprites are touching. Pretty much every game is based on this principal: Bullet hits soldier, monster touches elf, pinball bumps into flipper, Bill Gates grabs money bags, shoes touch lava, and so on.
In our Micro Racer game, when the player's car collides with an enemy car, we will deduct one unit of energy. If the player loses all 100 energy units, the game is over. We'll also throw obstacles into the game. If the player's car hits an oil slick, for example, it will veer off to the side. Finally, we'll include power-ups. When the player's car touches a wrench, its damage will be fixed automatically.
The question is, how can we implement fast but accurate collision detection on small, slow, resource-limited devices?
The simplest form of collision detection is generally the fastest form. Each sprite and its image are treated as a rectangle. If one sprite's rectangle overlaps another sprite's rectangle, as in Figure 15.2, then we consider the sprites as having collided. Notice that in the figure there is a 4×2 section of overlapping rectangles.
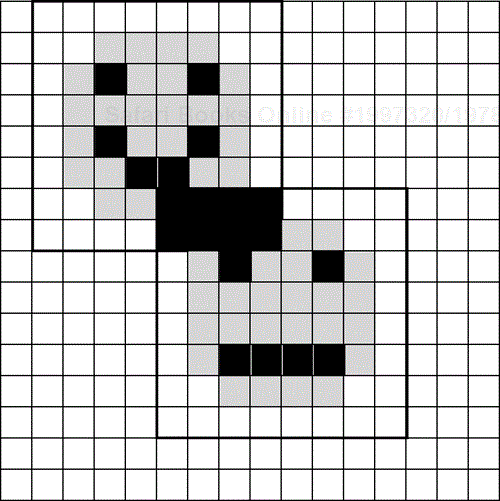
To implement this type of detection, you need to take the x position, y position, width, and height of two sprites and then do some simple math, as shown in Listing 15.4.
Example 15.4. Adding Collision Detection to the Sprite
public boolean collide(Sprite sprite)
{
  if ((x + width) > sprite.getX() &&
      x < sprite.getX() &&
      (y + height) > sprite.getY() &&
      y < sprite.getY())
          return true;
  return false;
}
Unfortunately, this is a very primitive form of detection. Most sprites are not actually rectangular. A racing car, for example, is shaped more like an I. Using this form of collision detection, the game might deduct energy from your car, even if the car doesn't actually touch an enemy.
Additionally, you might want to only detect collision within a certain part of a sprite. For example, when a knife hits a monster, you might want to deduct two hit points if the knife stabs the monster's face, and only one hit point if the knife hits the body.
The next chapter discusses how to implement a more advanced form of collision detection.
The Sprite class contains everything we need to draw and move sprites, but it doesn't have a lot of personality. To really make a game swing, child classes need to be created for various sprites, each containing their own properties and methods.
In our Micro Racer game, for example, we will have two types of sprites—the player and the enemy.
Many games feature a hero or protagonist. This is known as a player sprite. In our racing game, the red car is the player sprite. A player sprite is treated differently than other sprites. It represents the one unique object that defines how the game will progress.
In our racing game, the player sprite contains one additional property—energy. This property lets us know how often collisions have occurred. When energy reaches zero, the game is over. If the car can reach the end of a track without losing all its energy, the energy value is reset and the player is given a score.
A player child class is shown in Listing 15.5.
Example 15.5. The Player Sprite Child Class
import javax.microedition.lcdui.*;

public class Player extends Sprite
{
  protected int energy;

  public Player(Image image, int width, int height,
      int numFrames, int energy)
    throws Exception
  {
    super(image, width, height, numFrames);
    this.energy = energy;
  }

  public int getEnergy()
  {
    return energy;
  }

  public void setEnergy(int energy)
  {
    this.energy = energy;
  }
}
The Player class constructor calls its parent constructor, passing up most of the values. The only additional value helps set the car's initial energy.
A more advanced Player class might contain even more information, such as the amount of money the car's owner has made, the damage to various parts of the car, the number of bonus points the player has gained, and so on. We will flesh out this class in the final chapter of the book, “Micro Racer: Putting it All Together.”
Every PNG image is rectangular. However, a typical sprite itself usually has a much more interesting shape. For example, a bouncing ball would be circular. To make sprites seem realistic, not like strange blocks, it is important to set one color within every PNG file as the background, or transparent color.
When you create a PNG file using Photoshop or another design application, you can specify one of the colors to be transparent. When each pixel of a PNG image is rendered, this transparent color will be masked out and not drawn.
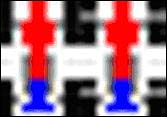
Unfortunately, the MIDP specification does not demand that image transparency be supported. Because J2ME is so limited, most manufacturers have only implemented the minimum MIDP requirements. As such, many phones, such as the Motorola i85s, do not support PNG transparency. This means that an image will appear with a blockish border around it, such as the bottommost sprite in Figure 15.3. This effect will look especially odd when two sprites overlap. The nontransparent corner of one sprite will paint over another sprite, slicing bits of it off.
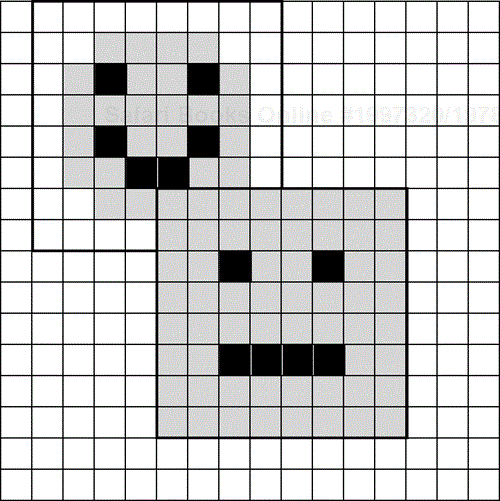
Luckily, there are several means of achieving transparency so that an image appears more realistic, as with the topmost smiley face in Figure 15.3:
Sprites can be drawn with primitive drawing methods.
Sprites can be drawn with smaller image chunks.
Sprites can be drawn into precise, clipped areas.
If your sprite is simplistic, there's no need to use a PNG file at all. Instead, you can create the image using MIDP primitive methods such as drawLine(), drawRect(), fillRect(), and so on.
Drawing primitives is also much faster than rendering a PNG using drawImage(). However, there are also weaknesses to this approach:
If your image gets complicated, you might need to use tons of drawing methods. This produces larger source code and execution code, resulting in a larger JAR file size.
Because PNG images are not used in this approach, all image design must be done by a Java programmer, who must be artistic enough to plot every pixel within the source code. A game artist will not be able to design and easily tweak images.
In theory, you could get around this problem by creating a tool to convert a PNG image or any other array of bits into a set of
drawLine()calls. However, this would involve lots of extra work.Although primitive graphical methods, in general, are faster then
drawImage(), calling dozens of primitive methods can be very slow.
In Listing 15.6, the Player class draws its car one line at a time using the drawLine() method. By calling other methods, the number of code lines can be significantly reduced. All coordinates are based on the (x, y) position of the sprite. The car appears in Figure 15.4.
Example 15.6. Creating a Car Using Primitives
public void paint(Graphics g)
{
  g.drawLine(x + 2, y + 1, x + 2, y + 3);
  g.drawLine(x + 7, y + 1, x + 7, y + 3);
  g.drawLine(x + 3, y + 2, x + 6, y + 2);
  g.drawLine(x + 4, y + 3, x + 4, y + 5);
  g.drawLine(x + 5, y + 3, x + 5, y + 5);
  g.drawLine(x + 3, y + 6, x + 3, y + 10);
  g.drawLine(x + 6, y + 6, x + 6, y + 10);
  g.drawLine(x + 4, y + 7, x + 4, y + 8);
  g.drawLine(x + 5, y + 7, x + 5, y + 8);
  g.drawLine(x + 2, y + 11, x + 2, y + 11);
  g.drawLine(x + 7, y + 11, x + 7, y + 11);
  g.drawLine(x + 3, y + 12, x + 6, y + 12);
  g.drawLine(x, y + 9, x, y + 13);
  g.drawLine(x + 1, y + 9, x + 1, y + 13);
  g.drawLine(x + 8, y + 9, x + 8, y + 13);
  g.drawLine(x + 9, y + 9, x + 9, y + 13);
}
Another means of achieving transparency is to separate the image into a few image chunks. Each chunk would be rectangular, but they could be combined together to form a nonrectangular graphical object.
To create this, your game artist will need to draw images for sprites and later split the images into many small rectangulars. You will then need to position these rectangles relative to each other to “put them together” in the way the artist intended.
This approach works if you have a small amount of chunks and a relatively rectangular-shaped object, such as with the simplistic car in our racing game. However, this approach makes it very hard to draw circular objects.
The last approach involves clipping each rectangular part of the image, then drawing the image on the screen. This is similar to the previous approach, except the work of dividing up the image into rectangular components is done programmatically, rather than by an artist.
Listing 15.7 shows a way to define an unlimited number of rectangular clipped areas using a two-dimensional array of integers that holds each rectangle's (x, y) position as well as its width and height.
Example 15.7. Using Many Clipping Rectangles
protected int areas[][] = { { 2, 1, 6, 3} , { 3, 4, 4, 5} ,
    {0, 9, 10, 14} };

public void paint(Graphics g)
{
  for (int i = 0; i < areas.length; i++)
  {
    g.setClip(areas[i][0], areas[i][1], areas[i][2],
        areas[i][3]);
    g.drawImage(image, x - frame * width, y,
        Graphics.TOP | Graphics.LEFT);
  }
  g.setClip(0, 0, Cache.width, Cache.height);
}
In this case, the image is drawn three separate times, and three separate clipping rectangles are created. This method takes more than three times as long as drawing a plain, nontransparent image.
We now have a Sprite class, a good basis for creating the rest of our game. But we're still dealing with some severe limitations—we need a way to download images over the network, a way for the game to handle and keep track of all our sprites, and a way to achieve better collision detection. All these techniques, and more, will be discussed in the next chapter.