
IN THIS CHAPTER
Let's face facts—graphics are the heart of gaming, and good graphics consist of writing and animating all sorts of images on a device's screen.
The MIDP UI component that supports this low-level approach is the javax.microedition.lcdui.Canvas class. This is the class where all the action happens.
Canvas handles low-level events and allows you to draw directly onto the device's display. The Canvas class, just like the Screen class, implements the javax.microedition.lcdui.Displayable interface. Just like a Form, an Alert, or any other type of screen, you can easily create and display multiple Canvases using the setDisplay() method.
For example, in the car racing game we have been creating, a list screen is used to select the track you want to race on, and a Canvas subclass would implement the actual game.
Canvases require applications to subclass them because the paint() method is declared abstract. The paint() method is where you actually put the pedal to the metal and draw things onto the screen.
Other methods found in the Canvas class are the following:
isDoubleBuffered()—. Checks whether the device uses double buffering when painting on the canvas.hasPointerEvents()—. Checks whether the device supports pointer press and release events. Most phones do not have touch screens and pointers. Most PDAs (such as the Palm) however, do support pointers.hasPointerMotionEvents()—. Checks whether the device supports pointer motion events (pointer is dragged).hasRepeatEvents()—. Checks whether the device can generate repeat events when the key is kept down. Some mobile phones can deal with this, but many do not.getKeyCode(int gameAction)—. Gets a key code that corresponds to the specified game action on the device.getKeyName(int keyCode)—. Gets an informative key string for a key.getGameAction(int keyCode)—. Gets the game action associated with the given key code of the device.keyPressed(int keyCode)—. Called when a key is first pressed.keyRepeated(int keyCode)—. Called when a key is repeated (held down).pointerPressed(int x, int y)—. Called when the pointer is pressed on a coordinate (x,y).pointerReleased(int x, int y)—. Called when the pointer is released on the coordinate (x,y).pointerDragged(int x, int y)—. Called when the pointer is dragged to the new coordinate (x,y).repaint(int x, int y, int width, int height)—. Requests a repaint for the specified region of the screen.showNotify()—. Called immediately prior to this canvas being made visible on the display. If you need to do something to the canvas right before it is shown, do it here.hideNotify()—. Called shortly after the canvas has been removed from the display. This is a good place to clean up any objects and free up some extra memory.paint(Graphics g)—. Renders the canvas. The application must implement this method in order to paint any graphics.
Canvas makes it easy to handle game actions, key presses, and pointer manipulations. Special methods are also provided to let you know what the current device can handle.
Using the keyPressed() method, for example, you can detect any time a user hits a soft key, a menu key, a cursor (arrow) key, or a number key on the phone's keypad. The MIDP API also includes a special set of game keys, which are usually mapped to the arrow keys and the main “send” or “fire” key. Games should use game actions instead of key codes whenever possible.
Event-handling methods are not declared abstract, and their default implementations are empty. That means they do nothing. This allows you to override only the methods you actually need.
Most mobile phones do not have a touch screen, where the user uses a stylus or mouse-like cursor to point to a location on the screen. Instead, most user input on micro devices is via the keypad.
Every key is assigned a special key code. The key code values are unique for each hardware key. The following key codes are defined:
KEY_NUM0toKEY_NUM9for numeric 0 through 9 keysKEY_STARfor the*keyKEY_POUNDfor#key
These key codes correspond to keys on an ITU-T standard telephone keypad. Other keys may be present on the keyboard, and they will have key codes different from those listed previously. In order to guarantee portability, applications should use only the standard key codes.
Most games use arrow keys and fire keys. The MID Profile defines the following game actions:
UP,DOWN,LEFT, andRIGHTfor navigation keys. Almost every phone now features these cursor keys.GAME_A,GAME_B,GAME_C, andGAME_Dfor special keys. This usually corresponds to the soft keys immediately beneath the screen.FIREfor a select key. This is usually in the center of the cursor keys, or is the phone's main Send or Talk key. For example, the Siemens SL45i maps the fire key to the left soft key.
Each key code may be mapped to at most one game action, but it may be associated with more than one key code. The application can translate a key code into a game action using the getGameAction() method, and it can translate a key code into a game action using the getKeyCode() method.
You can also add your own custom commands, as discussed in Chapter 9, “Creating a MIDlet.” Simply register a command listener and implement the public void commandAction(Command c, Displayable s) method.
Commands will be mapped to keys and menus in a device-specific way.
Unlike a relatively static business application, a game needs to be extremely responsive to user input. When a player hits or holds down the right cursor key to move his car to the right, the game sure as heck better be able to keep up.
Most J2ME devices use a separate thread for receiving keyboard commands. When a player presses a phone key, the key fires an event which is immediately transferred to the game. For example, when a user hits the right key, the keyPressed(int keycode) method is called. The keycode will equal RIGHT. As long as the player is pressing this key, we need to make sure to animate the race car to the right.
Now, as soon as the player releases the key, the keyReleased(int keycode) method is called. The game should be smart enough to immediately stop the race car's rightward movement.
As such, a typical action game doesn't really need to trigger a series of events when a key is pressed. Rather, a game needs to keep track of an input state.
This is easily done. Just create a global variable called key and change the variable as keys are pressed or released:
private int key;

public void keyPressed(int keyCode)
{
  key = getGameAction(keyCode);
}

public void keyReleased(int keyCode)
{
  // We set this to zero to indicate nothing is pressed.
  key = 0;
}
If you want the gameplay to be slightly different, you could ignore the keyReleased() method. This would make it so that your car responded to more realistic steering wheel physics: To straighten the race car's direction, the player would have to press the opposite direction key.
Instead of using the system above, you may optionally use the keyRepeated() method to determine if a key is continuously held down. However, some phones do not support this method and other phones wait quite a while before calling the method. To achieve smooth, 10 frames per second action, you should implement your own “repeat detection.”
Note that some older phones may not have game keys at all. As such, when creating an action game, it is a good idea to handle not only game (cursor) keys, but keypad keys. Use the following numeric key for compatibility with older phones:
Key 2 for up
Key 8 for down
Key 4 for left
Key 6 for right
Key 5 for fire
In Chapter 17, “Sprite Movement,” we will tie this key variable in with the sprite movement thread.
More expensive devices such as PDAs will have large touch screens with a minimal set of keys. In this case, you can use the pointerPressed() and pointerReleased() methods. To find out if a device supports the touch screen events, call the hasPointerEvents() method.
Similar to key events, pointer events are fired by touching the screen. The x and y coordinate of where the stylus is touching will be returned. Your game should define the screen area that is sensitive to screen touches.
For example, in our racing game, you can define the width of the screen in the game's Cache class. You can then treat any pointer presses on the right side of the screen as steering to the right. Touching the left side of the screen will steer left. Lifting the pointer will stop the car's side-to-side movement.
The code to handle this is listed here:
public void pointerPressed(int x, int y)
{
  if (x < getWidth() / 2)
      key = LEFT;
  else
      key = RIGHT
}

public void pointerReleased(int x, int y)
{
  key = 0;
}
You can also draw your own virtual command keys onto the game screen. In such a case, you'd create special screen areas reserved for navigation.
The javax.microedition.lcdui.Graphics class is an abstract class that represents the actual device's display.
The Graphics class provides simple 2D geometric rendering capabilities. You can easily use graphics to draw primitive lines, rectangles, and arcs. You can also fill in your rectangles and arcs with a solid color. Rectangles with rounded corners can also be specified.
Using Graphics, you can also easily draw text Strings or, most importantly, images. The only explicit drawing operation provided in the Graphics class is pixel replacement. The destination pixel value is simply replaced by the current pixel value specified in the graphics object being used for rendering. No facility for combining pixel values, such as raster-ops or alpha blending, is provided.
The Graphics class can be rendered directly to the display or to an offscreen image buffer, depending on the device. A graphics object for rendering to the display is passed to the Canvas paint() method. This is the only means by which a graphics object destined for the display can be obtained.
The default coordinate system's origin (0,0) is at the upper left-hand corner of the screen. The X-axis direction is positive towards the right, and the Y-axis direction is positive downwards. All coordinates are specified as integers.
Important methods within Graphics include the following:
translate(int x, int y)—. Translates the origin of the graphics context to the point (x, y) in the current coordinate system.getTranslateX()—. Gets the X coordinate of the translated origin of this graphics context.getTranslateY()—. Gets the Y coordinate of the translated origin of this graphics context.setStrokeStyle(int style)—. Sets the stroke style used for drawing lines, arcs, rectangles and rounded rectangles.getStrokeStyle()—. Gets the stroke style used for drawing operations.getRedComponent()—. Gets the red component of the current color.getGreenComponent()—. Gets the green component of the current color.getBlueComponent()—. Gets the blue component of the current color.getGrayScale()—. Gets the current grayscale value of the color being used for rendering operations.setColor(int red, int green, int blue)—. Sets the current color to the specified RGB values.setColor(int RGB)—. Sets the current color to the specified RGB value.setGrayScale(int value)—. Sets the current grayscale to be used for all subsequent rendering operations.setFont(Font font)—. Sets the font for all subsequent text rendering operations.getClipX()—. Gets the X offset of the current clipping area relative to the coordinate system origin of this graphics context.getClipY()—. Gets the Y offset of the current clipping area relative to the coordinate system origin of this graphics context.getClipWidth()—. Gets the width of the current clipping area.getClipHeight()—. Gets the height of the current clipping area.clipRect(int x, int y, int width, int height)—. Intersects the current clip with the specified rectangle. The resulting clipping area is the intersection of the current clipping area and the specified rectangle.setClip(int x, int y, int width, int height)—. Sets the current clip to the rectangle specified by the given coordinates.drawLine(int x1, int y1, int x2, int y2)—. Draws a line between the coordinates (x1,y1) and (x2,y2).drawRect(int x, int y, int width, int height)—. Draws the outline of the specified rectangle.fillRect(int x, int y, int width, int height)—. Fills the specified rectangle with the current color.drawRoundRect(int x, int y, int width, int height, int arcWidth, int arcHeight)—. Draws the outline of the specified rounded corner rectangle.fillRoundRect(int x, int y, int width, int height, int arcWidth, int arcHeight)—. Fills the specified rounded corner rectangle with the current color.drawArc(int x, int y, int width, int height, int startAngle, int arcAngle)—. Draws the outline of a circular or elliptical arc covering the specified rectangle.fillArc(int x, int y, int width, int height, int startAngle, int arcAngle)—. Fills a circular or elliptical arc covering the specified rectangle.drawString(String str, int x, int y, int anchor)—. Draws the specified string using the current font and color.drawSubstring(String str, int offset, int len, int x, int y, int anchor)—. Draws the specified substring using the current font and color.drawChar(char character, int x, int y, int anchor)—. Draws the specified character using the current font and color.drawChars(char[] data, int offset, int length, int x, int y, int anchor)—. Draws the specified characters using the current font and color.drawImage(Image img, int x, int y, int anchor)—. Draws the specified image by using the anchor point.
In J2ME, images are expressed using 24 bits per pixel. This means that J2ME, in theory, can handle full-color images. To define each pixel's color, three bytes are used—8 bits for the red component, 8 for the green, and 8 for the blue. Because most micro devices don't support all 24 bits, they map colors requested by the application into colors available on the device. For example, even though J2ME may support millions of colors, a device may only be able to handle black, white, and gray.
The current color of the Graphics object can be set by calling the Graphics.setColor() method. The color's red-green-blue components can be set separately or as an integer value. For example, the color red can be set using
setColor(255, 0, 0);
or
setColor(0xff0000);
The methods getRedComponent(), getGreenComponent(), and getBlueComponent() return the values of the current color. Currently, most mobile phones in the USA and Europe are black and white, offering only a few shades of gray. To see how the color is mapped into a gray scale, use the getGrayScale() method.
Lines, arcs, rectangles, and rounded rectangles may be drawn with either a SOLID or a DOTTED stroke style set by the Graphics.setStrokeStyle() method. For the SOLID stroke style, drawing operations are performed with a one-pixel wide pen that fills the pixel immediately below and to the right of the specified coordinate. Drawn lines touch pixels at both endpoints. Drawing operations under the DOTTED stroke style will touch a subset of pixels that would have been touched under the SOLID stroke style. The frequency and length of dots is implementation-dependent.
To draw a line, use the Graphics.drawLine() method. It accepts four parameters: x1, y1, x2, and y2. The parameters set two points on the screen (x1,y1) and (x2,y2), and a line is drawn between them. The current color and stroke style are used to draw the line.
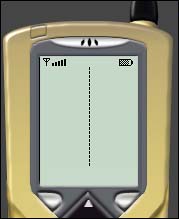
To create a dotted line in the middle of the road for our car racing game, you could use code similar to
public void paint(Graphics g)
  {
    g.setStrokeStyle(Graphics.DOTTED);
    g.drawLine(getWidth() / 2, 0, getWidth() / 2,
        getHeight() - 1);
  }
This code snippet uses the Canvas getWidth() method to get the display's width so the line is put in the middle. Figure 14.1 shows the result of the paint() method.
To draw a rectangle, the drawRect() method is used. Much like drawLine(), it also accepts four parameters: x, y, width, and height. The point (x,y) sets the upper-left coordinate of the rectangle and then draws the box with the given width and height. The rectangle can be solid or dotted, and is drawn in the currently specified color.
You can also draw filled rectangles with the fillRect() method. The current color is used as the fill. The resulting rectangle will cover an area that is (width+1) pixels wide and (height+1) pixels tall.
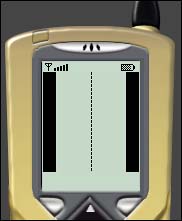
To draw the edges of the road, we could add on to our dotted line and use this code:
public void paint(Graphics g)
  {
    g.setStrokeStyle(Graphics.DOTTED);
    g.drawLine(getWidth() / 2, 0, getWidth() / 2,
        getHeight() - 1);
    g.setStrokeStyle(Graphics.SOLID);
    g.fillRect(0, 0, (getWidth() - ROAD_WIDTH) / 2,
        getHeight());
    g.fillRect((getWidth() + ROAD_WIDTH) / 2, 0,
        (getWidth() - ROAD_WIDTH) / 2, getHeight());
  }
The fillRect() method is called twice: once to create the left edge of the road, and once to create the right. Setting a solid style doesn't affect the filled rectangles, but will be used later for further drawings. To give the road a fixed width, the ROAD_WIDTH constant is used.
Figure 14.2 illustrates our new road.
To draw a rectangle with rounded corners, use the drawRoundRect() method. Similarly, you can fill a round rectangle using the fillRoundRect() method.
Both of these methods accept six parameters—four of them are equal to parameters in drawRect() and fillRect(), and two additional parameters provide the horizontal and vertical diameters of the arc at all four corners.
With the drawArc() method, you can draw the outline of a circular or elliptical arc covering a specified area on your device's screen. The resulting arc begins at a specific angle and extends a set number of degrees to the next angle. Angles start at 0 degrees, which is similar to the 3 o'clock position.
A positive value indicates a counter-clockwise rotation of the angle, whereas a negative value indicates a clockwise rotation. The center of the arc is the center of the rectangle whose origin is (x,y) and whose size is specified by the width and height arguments. Similarly, the fillArc() method fills a circular or elliptical arc covering the specified rectangle.
The javax.microedition.lcdui.Font class represents fonts and their font metrics. Fonts cannot be created by applications, but are defined in the system. Your game should query for a given font based on its attributes, and the system will provide the font that matches your requested attributes as closely as possible.
The Font class has the following attributes:
Style
Size
Face
The following styles are available for the font:
STYLE_BOLDSTYLE_ITALICSTYLE_PLAINSTYLE_UNDERLINED
The supported font sizes are
Finally, the various faces you can ask for are
FACE_MONOSPACE—. A monospace font, where each character is equally wide.FACE_PROPORTIONAL—. A font where letters are proportional to each other.FACE_SYSTEM—. The standard font used on this system.
So, to get a bold, medium-sized, and monospaced font, you would use
Font newfont = Font.getFont(Font.FACE_MONOSPACE,Font.STYLE_BOLD, Font.SIZE_MEDIUM) ;
You can then set the font in the paint method using
g.setFont(newfont);
To draw a string, you can use the following methods:
drawString()drawSubstring()drawChar()drawChars()
The drawString() method draws the specified string using the current font and color. The (x,y) position is the position of the anchor point defined by the parameters. In a similar way, the drawSubstring() method can be used to draw only part of a given string.
If you want to draw individual characters, or if you are dealing with an array of characters in lieu of a string, you can use the drawChar() and drawChars() methods.
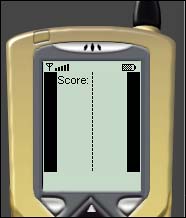
To draw the racing game's “heads up display” interface information, which contains the lives left, time left, and score, you could use the code as follows:
public void paint(Graphics g)
{
  g.setStrokeStyle(Graphics.DOTTED);
  g.drawLine(getWidth() / 2, 0, getWidth() / 2,
      getHeight() - 1);
  g.setStrokeStyle(Graphics.SOLID);
  g.fillRect(0, 0, (getWidth() - ROAD_WIDTH) / 2,
      getHeight());
  g.fillRect((getWidth() + ROAD_WIDTH) / 2, 0,
      (getWidth() - ROAD_WIDTH) / 2, getHeight());
  g.drawString("Score:", (getWidth() - ROAD_WIDTH) /
      2 + 1, 0, Graphics.TOP | Graphics.LEFT);
}
This creates a status line, shown in Figure 14.3.
Drawing primates and strings is all well and good, but what we're really here for is to draw some graphics!
To drop an image on a canvas, use the Graphics.drawImage() method. Simply specify at which point the graphic should be drawn.
In most cases, the upper left corner of your graphic should be drawn at the given point. As such, you should usually pass Graphics.TOP and Graphics.LEFT into the drawImage() method.
Note that, if you desire, your image can be drawn in different positions relative to the anchor point by passing in different anchor constants.
Valid constants include the following:
BASELINE—. Images should be aligned with the baseline of any text to be drawn at the given anchor point.BOTTOM—. Images should be aligned with the bottom of the given anchor point.HCENTER—. Images should be centered horizontally around the given anchor point.LEFT—. Images should be aligned with the right of the given anchor point.RIGHT—. Images should be aligned with the right of the given anchor point.TOP—. Images should be aligned with the top of the given anchor point.VCENTER—. Images should be centered vertically around the given anchor point.
The javax.microedition.lcdui.Image class holds graphical image data. Images exist only in offscreen memory, and will not be painted on the display unless an explicit command is issued by the application (such as within the paint() method of a Canvas) or when an Image object is placed within a form screen or an alert screen.
Images are either mutable or immutable, depending upon how they are created. Immutable images are generally created by loading image data (usually as a Portable Network Graphics, or PNG file) from resource bundles, from files, or from the network. They may not be modified once they are created.
Mutable images are created in offscreen memory. The application might paint into them after having created a Graphics object expressly for this purpose.
The Image class supports images stored in the PNG format, version 1.0.
The following methods are part of the Image class:
createImage(int width, int height)—. Creates a new, mutable image for off-screen drawing.createImage(Image source)—. Creates an immutable image from a source image.createImage(String name)—. Creates an immutable image from decoded image data obtained from the named resource.createImage(byte[] imageData, int offset, int length)—. Creates an immutable image, which is decoded from the data stored in the specified byte array at the specified offset and length. The data must be in a self-identifying image file format supported by the implementation, such as PNG.getGraphics()—. Creates a newGraphicsobject that renders to this image.isMutable()—. Checks whether this image is mutable. Mutable images can be modified by rendering to them through aGraphicsobject obtained from thegetGraphics()method of this object.
As we delve into more advanced animation techniques, you'll notice that it often makes sense to deal with a specific portion of the canvas at a given time. You will often want to create a little rectangle within the drawing area. Any draw commands issued inside the rectangle are registered. Anything outside the clipping region is ignored.
To set the current clip rectangle on the current Graphics screen, use the Graphics.setClip() method. Just pass in two sets of coordinates to create a rectangle.
After setClip() has been called, any rendering operations will have no effect outside the clipping area. This method is useful for implementing image transparency. We will discuss how to draw transparent images in Chapter 15, “Entering the Land of Sprites.”
Another advanced rendering technique involves moving the base origin of all drawing functions to a different point. For example, any time you pick an (x,y) coordinate position in which to paint a line, draw text, or drop an image, the canvas assumes that you are doing so based on the upper left corner at point (0,0).
If you like, you can translate the origin of the graphics context to any point you wish. To do so, just call the translate() method. All coordinates used in subsequent rendering operations on this graphics context will be relative to this new origin.
Note that the effect of calls to translate() are cumulative. If you set the new origin to (10,10) and then set it to (10,10) again, you will actually be drawing based on point (20,20).
Double buffering is a key technique used when drawing graphics. Because a screen's repaint is unpredictable, if you were to paint graphics directly to the device screen, you would notice a yucky flickering. This is because the screen might begin painting a new frame before it has fully finished drawing the last one.
Double buffering enables you to assemble a sort of offscreen “preview” of the exact way you want your screen to appear before it is painted. The way it works is that you draw all your sprites and other graphics onto an offscreen image that is the same size as the actual device screen. This offscreen image acts a buffer. When you are done drawing, you simply draw the entire offscreen image onto the “live” screen.
Many J2ME devices support double buffering themselves, but some devices, such as the Accompli A008, do not. To check whether your device supports this feature, call
isDoubleBuffered();
If the method returns false, you will need to implement your own double buffering.
This can be done as follows:
private Image scene = Image.createImage(getWidth(),
    getHeight());
private Graphics g = scene.getGraphics();

public void paint(Graphics gr)
{
  g.setStrokeStyle(Graphics.DOTTED);
  g.drawLine(getWidth() / 2, 0, getWidth() / 2,
      getHeight() - 1);
  g.setStrokeStyle(Graphics.SOLID);
  g.fillRect(0, 0, (getWidth() - ROAD_WIDTH) / 2,
      getHeight());
  g.fillRect((getWidth() + ROAD_WIDTH) / 2, 0,
      (getWidth() - ROAD_WIDTH) / 2, getHeight());
  g.drawString("Score:", (getWidth() - ROAD_WIDTH) /
      2 + 1, 0, Graphics.TOP | Graphics.LEFT);
  gr.drawImage(scene, 0, 0, Graphics.TOP |
      Graphics.LEFT);
}
In the example above, an additional Image object is added to the code. This represents the offscreen image. We will set the Graphics variable g to point to this image instead of the actual device screen, which is actually passed in as gr.
Notice that the size of the offscreen image must be the same as the size of the display, which we grab from the getWidth() and getHeight() method of Canvas.
When painting on the screen, all painting is in reality done to the offscreen image. In the last line of our paint routine, the full frame is rendered onto the real screen.
The Canvas class, along with Image, Font, and other such classes, gives you a lot of direct control. Using these classes, you can achieve endless graphical effects.
In later chapters we will delve more deeply into these classes, creating fully animated sprites that can easily be moved around the game screen, making your game come alive.