
So far, we've managed to create a bunch of sprites and draw them on the screen. But we're not painting a still life here; we're programming a game!
To make a game a game, it must read input events from the keyboard or the screen and move sprites accordingly. The game must also set up initial conditions, check controls for game operability, and provide artificial intelligence for computer-controlled characters or game moves.
Before we get too excited, though, there's one thing we're going to have to get out of the way: MIDP does not support floating-point math.
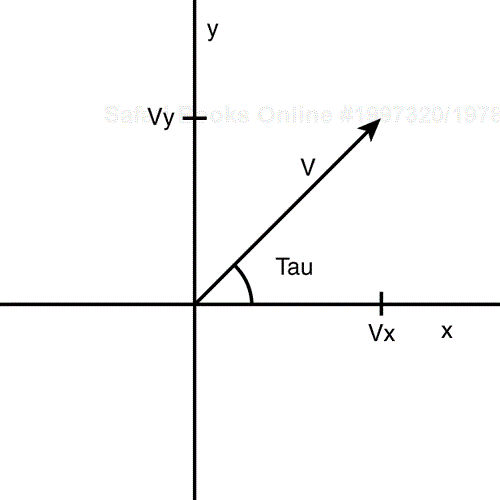
Why is floating-point math important for games? Imagine a game hero that can move in different directions, such as the enemy cars in our Micro Racer game. You'll want the cars to move at a constant speed, regardless of which direction the sprite is moving. To create this type of smooth movement, you would use a pair of simple trigonometric formulas:
Vx = V * cos(tau)
and
Vy = V * sin(tau)
where tau is an angle starting at the 3 o'clock position and increasing counterclockwise, as illustrated in Figure 17.1.
Unfortunately, the results of these formulas are going to involve decimal places. If you round things off, movement becomes nonlinear.
Additionally, 3D games are becoming very popular. It's conceivable that 3D engines, or isometric engines (games that simulate depth of scene, such as the view of a maze by peeking over its outer wall), will soon be feasible on smaller devices. In order to transform 3D polygons and draw 3D worlds, accurate linear algebra and trigonometric functions are imperative. This involves precise floating-point support.
Even if your target device doesn't support floating-point numbers, you can easily develop your own floating-point library, or even buy it from software companies specializing in such libraries.
When developing a floating-point math library, there are a few questions to be answered:
Should the floating-point library be based on IEEE or fixed-point arithmetic?
What is the level of precision that the game needs?
How fast is the target device?
The IEEE standard enables you to implement 32-, 64-, or higher-bit floating-point numbers, and to perform arithmetic on them. However, this standard is very difficult to implement and requires a lot of memory.
A more simplistic solution is to use fixed-point arithmetic, directly mapping floating-point numbers to integers. We will just imagine a decimal point between the third and fourth digits.
The weakness of using fixed-point arithmetic is that you are limited in how many decimal spots you can use after the floating point. However, the precision is generally good enough to suit the needs of sprite movement.
To achieve the best precision, you should use a long integer, because it is the largest numerical format in the Java language. Long integers offer 64 bits for floating-point number representation.
Because most devices have small screens and relatively coarse sprite movement, most sprite math usually involves real numbers in the range between 0.001 and 1000.000. Because you'll need four digits to represent 1.000, its integer value would be 1000. Further, the integer value of 1000.000 would be 1000000.
Our custom floating-point library must also implement common mathematical functions. For example, the trigonometric sine function can be calculated using an interactive formula. This approach is very precise if a high enough number of iterations are performed. Unfortunately, it is difficult to predict how many loops are needed to calculate sine with precision, and each loop eats up precious time.
A much faster approach is to use pre-calculated value tables (a list of values) for each function. The table for sine can have the results for angle values of 0, 10, 20, and so on, all the way to 90°. If a game needs to find the sine of 6°, the library uses linear interpolation to calculate it based on neighboring results. The more values that are in the table, the more precise results can be. More precision can also be achieved by interpolating through more points. Listing 17.1 implements a basic floating-point library for J2ME.
public class Float
{
  // The value of the number 1.
  public static final long VALUE_ONE = 1000;

  // The value of PI, to three decimal places.
  public static final long PI = 3142;

  // A sine table with 10 values.
  private static final long SIN_TABLE[] =
  {
    0, 173, 342, 500, 643, 766, 866, 940, 985, 1000
  } ;

  // A cosine table with 10 values.
  private static final long COS_TABLE[] =
{
  1000, 985, 940, 866, 766, 643, 500, 342, 173, 0
} ;

private Float() { }

// Create a float from a round integer.
public static long createFloat(long integer)
{
  if (integer > Long.MAX_VALUE / Float.VALUE_ONE)
      throw new RuntimeException(
          "Integer too large.");
  return integer * Float.VALUE_ONE;
}

// Create a float from a round integer and a decimal fraction.
public static long createFloat(long integer,
    long fraction)
{
  if (integer > Long.MAX_VALUE / Float.VALUE_ONE)
      throw new RuntimeException(
          "Integer too large.");
  if (fraction > Float.VALUE_ONE - 1)
      throw new RuntimeException("Fraction too large.");
  return integer * Float.VALUE_ONE + fraction;
}

// Get the integer value.
public static long getInteger(long value)
{
  return value / Float.VALUE_ONE;
}

// Get the decimal fraction value.
public static long getFraction(long value)
{
  return value % Float.VALUE_ONE;
}

// Add two floats.
public static long add(long value1, long value2)
{
  return value1 + value2;
}

// Subtract two floats.
public static long sub(long value1, long value2)
{
  return value1 - value2;
}

// Multiply two floats.
public static long mul(long value1, long value2)
{
  return value1 * value2 / Float.VALUE_ONE;
}

// Divide two floats.
public static long div(long value1, long value2)
{
  return value1 * Float.VALUE_ONE / value2;
}

// Get the inverse of a float.
public static long inv(long value)
{
  return Float.div(Float.VALUE_ONE, value);
}

// Get the absolute value of a float.
public static long abs(long value)
{
  if (value < 0)
     value = - value;
  return value;
}

// Get the sign of a float.
public static long sign(long value)
{
  return (value < 0 ? -1 : 1);
}

// Perform the sine function on a float.
public static long sin(long value)
{
  value = value % Float.createFloat(360);
  long sign = 1;
  if (value > Float.createFloat(180))
  {
    value = value - Float.createFloat(360);
    sign = -1;
  }
  long abs = Float.abs(value);
  if (abs > Float.createFloat(90))
      abs = Float.createFloat(180) - abs;
  if (abs == Float.createFloat(90))
      return Float.createFloat(1);
  if (abs == Float.createFloat(0))
      return Float.createFloat(0);
  int x1 = (int)Float.getInteger(Float.div(abs,
      Float.createFloat(10)));
  int x2 = x1 + 1;
  long y1 = SIN_TABLE[x1];
  long y2 = SIN_TABLE[x2];
  long k = Float.div(Float.sub(y2, y1),
      Float.sub(x2, x1));
  return sign * Float.add(y1,
      Float.mul(k, Float.sub(abs, x1)));
}

// Perform the cosine function on a float.
public static long cos(long value)
{
  value = value % Float.createFloat(360);
  long sign = -1;
  if (value > Float.createFloat(180))
  {
    value = value - Float.createFloat(360);
  }
  if (value >= Float.createFloat(-90) &&
      value <= Float.createFloat(90))
  sign = 1;
  long abs = Float.abs(value);
    if (abs > Float.createFloat(90))
        abs = Float.createFloat(180) - abs;
    if (abs == Float.createFloat(90))
        return Float.createFloat(0);
    if (abs == Float.createFloat(0))
        return Float.createFloat(1);
    int x1 = (int)Float.getInteger(
        Float.div(abs, Float.createFloat(10)));
    int x2 = x1 + 1;
    long y1 = COS_TABLE[x1];
    long y2 = COS_TABLE[x2];
    long k = Float.div(Float.sub(y2, y1),
        Float.sub(x2, x1));
    return sign * Float.add(y1,
        Float.mul(k, Float.sub(abs, x1)));
  }

  // Perform the tangent function on a float.
  public static long tan(long value)
  {
    return Float.div(Float.sin(value), Float.cos(value));
  }

  // Convert a value from radians to degrees.
  public static long toDeg(long value)
  {
    return Float.div(Float.mul(
        value, Float.createFloat(180)), Float.PI);
  }

  // Convert a value from degrees to radians.
  public static long toRad(long value)
  {
    return Float.div(Float.mul(value, Float.PI),
        Float.createFloat(180));
  }
}
Listing 17.1 creates a library that isn't complete, but offers enough functionality to move sprites in a game. All functions are static, enabling any other class to easily access the methods.
The float value is represented as a long integer. You must carefully keep track of numbers you use in the game—some long integers will actually be floating-point numbers.
The constant VALUE_ONE represents the number 1.0, and the number of zeros shows how many decimal places are reserved after the decimal point. You can change this value to offer different levels of precision. By increasing the constant, the maximum float value decreases.
Some values in mathematical libraries are represented as constants. The most commonly used constants are pi (π) and E. Because the game needs only trigonometric functions, the constant E is not needed. Pi has the value 3.142 to provide the highest precision possible with three decimal places after the decimal point.
A floating-point number can be created with two createFloat() methods. One method accepts just an integer value, and the other accepts an additional fraction part. If method parameters exceed the maximum value, an exception is thrown. To retrieve the integer part of a floating number, your game can call the getInteger() method. To retrieve the fraction part, call the getFraction() method.
Addition and subtraction are done in the traditional way. When multiplying, however, the result must be divided with the VALUE_ONE constant at the end to keep the result at the same decimal point precision. During division, the result is multiplied by VALUE_ONE to keep the same decimal point precision. To avoid additional precision losses, the numbers must be multiplied before dividing them.
There are also two tables in the code with results for major angles of sine and cosine. Both tables can be easily merged because they are mirrored. However, it is sometimes quicker to have more tables and less execution code.
Now we're almost ready to move some sprites.
First off, however, each sprite's initial condition must be set. Sprites must be placed at their starting positions and given initial values (for example, level of energy, x velocity, y velocity, and so on). If your game contains a timer, it should be reset. When your game is over, the initial conditions should be set once again.
Listing 17.2 expands Micro Racer's GameCanvas class to initialize the player sprite as well as the enemy sprites.
Example 17.2. Initializing It All
private SpriteManager enemyList;
private int length;

public GameCanvas()
{
  Cache.width = getWidth();
  Cache.height = getHeight();
  try
  {
    player = new Player(Cache.carImage,
        Cache.carImage.getWidth(),
        Cache.carImage.getHeight(), 1, INIT_ENERGY);
    // Place the player in the center of the screen
    player.setX(Float.createFloat((Cache.width –
        player.getWidth()) / 2));
    // Place the player at the very bottom
    player.setY(Float.createFloat(Cache.height –
        player.getHeight()));
    player.setVisible(true);
  } catch (Exception ex) { }
}

public void initEnemies()
{
  enemyList = new SpriteManager(Cache.width,
      Cache.height);
  int size = length / Cache.height - 1;
  Random rnd = new Random();
  // Create "size" enemies.
  for (int i = 1; i <= size; i++)
  {
    try
    {
      Sprite sprite = new Sprite(Cache.enemyImage,
          Cache.enemyImage.getWidth(),
          Cache.enemyImage.getHeight(), 1);
      // Set the X position of the sprite randomly
      int x = rnd.nextInt() % (ROAD_WIDTH -
          Cache.enemyImage.getWidth());
      x = (x < 0 ? -x : x);
      sprite.setX(Float.createFloat((Cache.width –
          ROAD_WIDTH) / 2 + x));
      // Scatter the sprites around the at various Y positions
      sprite.setY(Float.createFloat(- i *
          Cache.height));
      // Set the downward velocity to "speed"
      sprite.setVy(speed);
      enemyList.addSprite(sprite);
    }  catch (Exception ex) { }
  }
}

public void setSpeed(long speed)
{
  this.speed = speed;
}

public void setLength(int length)
{
  this.length = length;
}
In Listing 17.2, the player's race car is constructed and set at a default location at the bottom center. Afterwards, a sprite manager is created, and different enemy sprites are put in the list by calling the addSprite() method. The number of sprites is carefully calculated to put no more than four opponent cars on one screen at a time. The x position of each enemy is random, using the nextInt() method from Java's Random class. The x, y and velocity values are created as floating-point numbers.
In Micro Racer, the movement of the hero sprite depends on which keys the player presses. On the other hand, the movement of enemy sprites is determined by game intelligence. Enemy movement can be accomplished in different ways:
Predefined movement—The opponent sprites have their initial positions and velocities. These values never really change throughout the game.
Smart movement—The opponent sprites have their initial positions. Each car's velocity (direction and speed) is determined during the course of the game. For example, an opponent basketball player could always be running toward the ball.
Artificial intelligence (AI) movement—Opponent sprites use a custom artificial intelligence engine. This engine evaluates the history of the sprite's movement, learns from its mistakes, predicts what the player is going to do next, and defines the movement of sprites accordingly. A simple example of AI movement is in chess, where the computer can search through a tree of legal moves, calculating which combination of future moves will have the best effect—that is, avoiding traps, leading to the capture of an opponent's piece, and checkmate.
For starters, we'll keep things simple with our game. We will use predefined movement to position opponent cars randomly, keeping a reasonable number of cars on the screen at one time.
When the user selects a track to play using the Tracks form, the track's length will be set by calling the setLength() method, and the speed of enemy vehicles will be set using the setSpeed() method. In this way, each new track is more challenging than the last.
Movement occurs by creating a special game thread. This thread will continue running as long as the game is in progress. Any game actions can be handled in this loop. We can create a game thread in Listing 17.3.
Example 17.3. Creating a Game Thread
public class GameThread extends Thread
{
  public void run()
  {
    while (running)
    {
      long time = System.currentTimeMillis();
      moveSprites();
      // Check collisions
      repaint();
      serviceRepaints();
      time = System.currentTimeMillis() - time;
      try
      {
        if (time < DELAY)
            Thread.sleep(DELAY - (int)time);
      }
      catch (Exception ex) { }
    }
  }
}
The moveSprite() routine, which actually handles the movement of each sprite, is detailed in Listing 17.4.
Example 17.4. Moving the Sprites
private void moveSprites()
{
  switch (key)
  {
    case Canvas.LEFT:
        if (Float.getInteger(player.getX()) >
            (Cache.width - ROAD_WIDTH) / 2)
            player.setX(Float.sub(player.getX(),
            Float.createFloat(2)));
        break;
    case Canvas.RIGHT:
        if (Float.getInteger(player.getX()) +
            player.getWidth() <
            (Cache.width + ROAD_WIDTH) / 2)
            player.setX(Float.add(player.getX(),
            Float.createFloat(2)));
        break;
  }
  for (int i = 0; i < enemyList.size(); i++)
  {
    Sprite sprite = enemyList.getSprite(i);
    sprite.setY(Float.add(sprite.getY(),
        sprite.getVy()));
  }
}
Finally, we make sure to paint all our sprites in the paint() method of GameCanvas. This can be found in Listing 17.5.
Example 17.5. Painting Sprites
  public void paint(Graphics gr)
  {
""    // All the other paint functions happen here...
    // ...
    // Then we paint the enemy list
    enemyList.paint(g);
    // And then the player...
    player.paint(g);
    // And then drop it all onto the real screen
    gr.drawImage(scene, 0, 0, Graphics.TOP |
        Graphics.LEFT);
  }
The movement magic happens in the moveSprites() method. This method does the following:
Move the hero sprite. The race car moves either to the left if the player is holding down the left arrow key, or to the right if the player is holding down the right arrow key. Movement occurs by adding or subtracting 2 pixels (as a floating-point number) from the vehicle's current x position. If the race car hits either side of the track, movement stops.
Move opponent sprites. Opponent movement, for now, is pretty simple. Each enemy car is moved a set number of pixels down the screen. The enemy's current y position is increased by the enemy's current y velocity. An enemy can be slowed down or sped up by changing the y velocity value.
We now have all sorts of sprites moving around the game screen. All that remains now is to handle sprites when they interact, and to determine how the game ends.
Whenever your car touches an enemy car, it loses some energy. That means collision detection is essential. Because our Sprite class already has collision detection routines, it's just a matter of detecting and handling collisions. A method could be created as follows:
private void checkCollision()
{
  if (enemyList.collide(player))
      player.setEnergy(player.getEnergy() –
          COLLIDE_ENERGY);
  if (player.getEnergy() <= 0)
      running = false;
}
This method checks for a collision. If one occurs, the COLLIDE_ENERGY value is deducted from the player's energy. If the energy reaches zero, then we stop running the game loop.
It's important for players to know where they stand in a game at any given time. As such, the energy value is drawn at the top of the screen at all times. We'll also let the player know how much time has passed:
A game isn't much of a game unless you either lose or win it. In our Micro Racer game, you win if your car successfully reaches a track's finish line before losing all its energy. If your energy reaches zero, however, the game is over.
To set the finish line's location, we add this bit of code to the initEnemies() method:
private long line;

public void initEnemies()
{
   line = - Float.createFloat(length);
   ...
}
Recall that length is a global variable, which is set from the Tracks class. Each track has a different length.
The finish line can then be painted in the paint method:
public void paint(Graphics gr)
  {
    ...
    g.drawLine((getWidth() - ROAD_WIDTH) / 2,
        (int)Float.getInteger(line),
        (getWidth() + ROAD_WIDTH) / 2,
        (int)Float.getInteger(line));
    ...


  }
Finally, we'll create a method to detect whether the finish line has been crossed. If it is successfully crossed, we'll set the finished global flag to true, and stop running the game loop:
Okay, now let's piece this all together. The key is to add the appropriate methods to the GameThread loop. Listing 17.6 implements a game thread that checks for car collisions, checks whether the finish line has been crossed, increments the timer, and handles the endgame gracefully.
Example 17.6. The Final Game Loop
public class GameThread extends Thread
{
  public void run()
  {
    while (running)
    {
      long time = System.currentTimeMillis();
      moveSprites();
      checkCollision();
      checkFinishLine();
      timer++;
      repaint();
      serviceRepaints();
      time = System.currentTimeMillis() - time;
      try
      {
        if (time < DELAY)
            Thread.sleep(DELAY - (int)time);
      }
      catch (Exception ex) { }
    }
    if (finished)
    {
      // Tell the user the score.
      // Send the score to a high-score server..
    }
    else
    {
       // Tell the player that the game is over...
    }
    // Finally, return the the original menu form
    Display.getDisplay(midlet).setCurrent(form);
  }
}
Figure 17.2 shows the game in action.
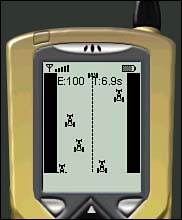
And so there you have it—a fully functional game. Although it might not be on par with Quake or Tomb Raider, Micro Racer is definitely a cute enough little action game to play during boring business meetings. The final version of the game is far from complete. In the remaining chapters, we'll add sounds, supercharge the game for Siemens or NTT DoCoMo phones, store data locally, and even add a multiplayer-networking component.