
2 A basic API implementation
- Reading and understanding the requirements of an API specification
- Structuring our application into a data layer, an application layer, and an interface layer
- Implementing API endpoints using FastAPI
- Implementing data validation models (schemas) using pydantic
- Testing the API using a Swagger UI
In this chapter, we implement the API for the orders service, which is one of the microservices of the CoffeeMesh website, the project we introduced in section 1.5. CoffeeMesh is an application that makes and delivers coffee on demand at any time, wherever you are. The orders service allows customers to place orders with CoffeeMesh. As we implement the orders API, you will get an early look into the concepts and processes that we dissect in more detail throughout this book. The code for this chapter is available under the ch02 folder of the GitHub repository provided with this book.
2.1 Introducing the orders API specification
Let’s begin by analyzing the requirements of the orders API. Using the orders API, we can place orders, update them, retrieve their details, or cancel them. The orders API specification is available in a file named ch02/oas.yaml in the GitHub repository for this book. OAS stands for OpenAPI specification, which is a standard format for documenting REST APIs. In chapter 5, you’ll learn to document your APIs using OpenAPI. As you can see in figure 2.1, the API specification describes a REST API with four main URL paths:
-
/orders—Allows us to retrieve lists of orders (GET) and create orders (POST). -
/orders/{order_id}—Allows us to retrieve the details of a specific order (GET), to update an order (PUT), and to delete an order (DELETE). -
/orders/{order_id}/cancel—Allows us to cancel an order (POST). -
/orders/{order_id}/pay—Allows us to pay for an order (POST).
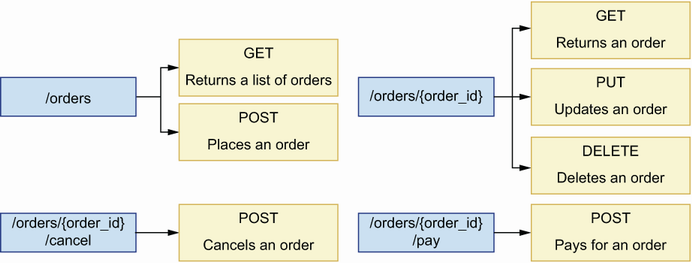
Figure 2.1 The orders API exposes seven endpoints structured around four URL paths. Each endpoint implements different capabilities, such as placing and cancelling an order.
In addition to documenting the API endpoints, the specification also includes data models that tell us what the data exchanged over those endpoints looks like. In OpenAPI, we call those models schemas, and you can find them within the components section of the orders API specification. Schemas tell us what properties must be included in a payload and what their types are.
For example, the OrderItemSchema schema specifies that the product and the size properties are required, but the quantity property is optional. When the quantity property is missing from the payload, the default value is 1. Our API implementation must therefore enforce the presence of the product and the size properties in the payload before we try to create the order.
Listing 2.1 Specification for OrderItemSchema
# file: oas.yaml

OrderItemSchema:
  type: object
  required:
    - product
    - size
  properties:
    product:
      type: string
    size:
      type: string
      enum:
        - small
        - medium
        - big
    quantity:
      type: integer
      default: 1
      minimum: 1
Now that we understand the requirements for building the orders API, let’s look at the architectural layout we will use for the implementation.
2.2 High-level architecture of the orders application
This section offers a high-level overview of the orders API’s architectural layout. Our goal is to identify the layers of the application and to enforce clear boundaries and separation of concerns between all layers.
As you can see in figure 2.2, we organize into three layers: the API layer, the business layer, and the data layer.

Figure 2.2 To enforce separation of concerns among the different components of our service, we structure our code around three layers: the data layer knows how to interface with the source of data; the business layer implements the service’s capabilities; and the interface layer implements the service’s API.
This way of structuring the application is an adaptation of the three-tier architecture pattern, which structures applications into a data layer, a business layer, and a presentation layer. As you can see in figure 2.3, the data layer is the part of the application that knows how to persist data so that we can retrieve it later. The data layer implements the data models required for interfacing with our source of data. For example, if our persistent storage is an SQL database, the models in the data layer will represent the tables in the database, often with the help of an object relational mapper (ORM) framework.

Figure 2.3 When a user request reaches the orders service, it’s first validated by the interface layer. Then the interface layer interfaces with the business layer to process the request. After processing, the data layer persists the data contained in the request.
The business layer implements our service’s capabilities. It controls the interactions between the API layer and the data layer. For the orders service, it’s the part that knows what to do to place, cancel, or pay for an order.
The API layer of a service is different from the business layer. The business layer implements the capabilities of a service, while the API layer is an adapter on top of the application logic that exposes the service’s capabilities to its consumers. Figure 2.2 illustrates this relationship among the layers of a service, while figure 2.3 illustrates how a user request is processed by each layer.
The API layer is an adapter on top of the business layer. Its most important job is validating incoming requests and returning the expected responses. The API layer communicates with the business layer, passing the data sent by the user, so that resources can be processed and persisted in the server. The API layer is equivalent to the presentation layer in three-tier architecture. Now that we know how we are going to structure our application, let’s jump straight into the code!
2.3 Implementing the API endpoints
In this section, you will learn to implement the API layer of the orders service. I’ll show you how to break down the implementation of the API into progressive steps. In the first step, we produce a minimal implementation of the endpoints with mock responses. In the following sections of this chapter, we enhance the implementation by adding data validation and dynamic responses. You’ll also learn about the FastAPI library and how you can use it to build a web API.

Before we start implementing the API, we need to set up our environment for this project. Create a folder named ch02 and move into it using the cd command in your terminal. We’ll use Pipenv to install and manage our dependencies.
Pipenv is a dependency management tool for Python that guarantees that the same versions of our dependencies are installed in different environments. In other words, Pipenv makes it possible to create environments in a deterministic way. To accomplish that, Pipenv uses a file called Pipfile.lock, which contains a description of the exact package versions that were installed.
Listing 2.2 Creating a virtual environment and installing dependencies with pipenv
① Create a virtual environment using pipenv and setting the runtime to Python 3.
② Install FastAPI and Uvicorn.
③ Activate the virtual environment.
Now that our dependencies are installed, let’s build the API. First, copy the API specification under ch02/oas.yaml in the GitHub repository for this book in the ch02 folder we created earlier. Then create a subfolder named orders, which will contain our API implementation. Within the orders folder, create a file called app.py. Create another subfolder called orders/api, and within that folder create a file called orders/api/ api.py. At this point, the project structure should look like this:
Listing 2.3 shows how to create an instance of the FastAPI application in file orders/ app.py. The instance of the FastAPI class from FastAPI is an object that represents the API we are implementing. It provides decorators (functions that add additional functionality to a function or class) that allow us to register our view functions.1
Listing 2.3 Creating an instance of the FastAPI application
# file: orders/app.py

from fastapi import FastAPI

app = FastAPI(debug=True)      ①

from orders.api import api     ②
① We create an instance of the FastAPI class. This object represents our API application.
② We import the api module so that our view functions can be registered at load time.
Listing 2.4 shows a minimal implementation of our API endpoints. The code goes within the orders/api/api.py file. We declare a static order object, and we return the same data in all the endpoints except the DELETE /orders/{order_id} endpoint, which returns an empty response. Later, we’ll change the implementation to use a dynamic list of orders. FastAPI decorators transform the data we return in every function into an HTTP response; they also map our functions to a specific URL in our server. By default, FastAPI includes 200 (OK) status codes in our responses, but we can override this behavior by using the status_code parameter in the routes decorators, like we do in the POST /orders and in the DELETE /orders/{order_id} endpoints.
Listing 2.4 Minimal implementation of the orders API
# file: orders/api/api.py

from datetime import datetime
from uuid import UUID

from starlette.responses import Response
from starlette import status

from orders.app import app

order = {                                                     ①
    'id': 'ff0f1355-e821-4178-9567-550dec27a373',
    'status': "delivered",
    'created': datetime.utcnow(),
    'order': [
        {
            'product': 'cappuccino',
            'size': 'medium',
            'quantity': 1
        }
    ]
}


@app.get('/orders')                                           ②
def get_orders():
    return {'orders': [orders]}


@app.post('/orders', status_code=status.HTTP_201_CREATED)     ③
def create_order():
    return order


@app.get('/orders/{order_id}')                                ④
def get_order(order_id: UUID):                                ⑤
    return order


@app.put('/orders/{order_id}')
def update_order(order_id: UUID):
    return order


@app.delete('/orders/{order_id}', status_code=status.HTTP_204_NO_CONTENT)
def delete_order(order_id: UUID):
    return Response(status_code=HTTPStatus.NO_CONTENT.value)  ⑥


@app.post('/orders/{order_id}/cancel')
def cancel_order(order_id: UUID):
    return order


@app.post('/orders/{order_id}/pay')
def pay_order(order_id: UUID):
    return order
① We define an order object to return in our responses.
② We register a GET endpoint for the /orders URL path.
③ We specify that the response’s status code is 201 (Created).
④ We define URL parameters, such as order_id, within curly brackets.
⑤ We capture the URL parameter as a function argument.
⑥ We use HTTPStatus.NO_CONTENT.value to return an empty response.
FastAPI exposes decorators named after HTTP methods, such as get() and post(). We use these decorators to register our API endpoints. FastAPI’s decorators take at least one argument, which is the URL path we want to register.
Our view functions can take any number of parameters. If the name of the parameter matches the name of a URL path parameter, FastAPI passes the path parameter from the URL to our view function on invocation. For example, as you can see in figure 2.4, the URL /orders/{order_id} defines a path parameter named order_id, and accordingly our view functions registered for that URL path take an argument named order_id. If a user navigates to the URL /orders/53e80ed2-b9d6-4c3b-b549-258aaaef9533, our view functions will be called with the order_id parameter set to 53e80ed2-b9d6-4c3b-b549-258aaaef9533. FastAPI allows us to specify the type and format of the URL path parameter by using type hints. In listing 2.4, we specify that order_id’s type is a universally unique identifier (UUID). FastAPI will invalidate any calls in which order_id doesn’t follow that format.

Figure 2.4 FastAPI knows how to map a request to the right function, and it passes any relevant parameters from the request to the function. In this illustration, a GET request on the /orders/{order_id} endpoint with order_id set to ff0f1355-e821-4178-9567-550dec27a373 is passed to the get_order() function.
FastAPI responses include a 200 (OK) status code by default, but we can change this behavior by setting the status_code parameter in the endpoints’ decorators. In listing 2.4, we set status_code to 201 (Created) in the POST /orders endpoint, and to 204 (No Content) in the DELETE /orders/{order_id} endpoint. For a detailed explanation of status codes, see section 4.6 in chapter 4.
You can now run the app to get a feeling of what the API looks like by executing the following command from the top-level orders directory:
This command loads the server with hot reloading enabled. Hot reloading restarts your server whenever you make changes to your files. Visit the http://127.0.0.1:8000/docs URL in a browser and you will see an interactive display of the API documentation generated by FastAPI from our code (see figure 2.5 for an illustration). This visualization is called Swagger UI, and it’s one of the most popular ways of visualizing REST APIs. Another popular visualization is Redoc, which is also supported by FastAPI under the http://127.0.0.1:8000/redoc URL.

Figure 2.5 View of the Swagger UI dynamically generated by FastAPI from our code. We can use this view to test the implementation of our endpoints.
If you click on any of the endpoints represented in the Swagger UI, you will see additional documentation about the endpoint. You will also see a Try it Out button, which gives you the opportunity to test the endpoint directly from this UI. Click that button, then click Execute, and you will get the hardcoded response we included in our endpoints (see figure 2.6 for an illustration).

Figure 2.6 To test an endpoint, click it to expand it. You’ll see a Try it Out button on the top-right corner of the endpoint’s description. Click that button, and then click the Execute button. This triggers a request to the server, and you’ll be able to see the response.
Now that we have the basic skeleton of our API, we’ll move on to implementing validators for our incoming payloads and our outgoing responses. The next section walks you through the steps needed to accomplish that.
2.4 Implementing data validation models with pydantic
Now that we have implemented the main layout for the URL paths of our API, we need to add validation for incoming payloads and how we marshal our outgoing responses. Data validation and marshalling are crucial operations in an API, and to deliver a successful API integration, we need to get them right. In the following sections, you’ll learn to add robust data validation and marshalling capabilities to your APIs. FastAPI uses pydantic for data validation, so we’ll start by learning to create pydantic models in this section.
DEFINITION Marshalling is the process of transforming an in-memory data structure into a format suitable for storage or transmission over a network. In the context of web APIs, marshalling refers to the process of transforming an object into a data structure that can be serialized into a content type of choice, like XML or JSON, with explicit mappings for the object attributes (see figure 2.7 for an illustration).

Figure 2.7 To build a response payload from a Python object, we first marshal the object into a serializable data structure, with explicit mapping of attributes between the object and the new structure. Deserializing the payload gives us back an object identical to the one we serialized.
The orders API specification contains three schemas: CreateOrderSchema, GetOrderSchema, and OrderItemSchema. Let’s analyze these schemas to make sure we understand how we need to implement our validation models.
Listing 2.5 Specification for the orders API schemas
# file: oas.yaml

components:
  schemas:
    OrderItemSchema:
      type: object                                        ①
      required:                                           ②
        - product
        - size
      properties:                                         ③
        product:
          type: string
        size:
          type: string
          enum:                                           ④
            - small
            - medium
            - big
        quantity:
          type: integer
          default: 1                                      ⑤
          minimum: 1                                      ⑥

    CreateOrderSchema:
      type: object
      required:
        - order
      properties:
        order:
          type: array
          items:                                          ⑦
            $ref: '#/components/schemas/OrderItemSchema'  ⑧

    GetOrderSchema:
      type: object
      required:
        - order
        - id
        - created
        - status
      properties:
        id:
          type: string
          format: uuid
        created:
          type: string
          format: date-time
        status:
          type: string
          enum:
            - created
            - progress
            - cancelled
            - dispatched
            - delivered
        order:
          type: array
          items:
            $ref: '#/components/schemas/OrderItemSchema'
① Every schema has a type, which in this case is an object.
② We list compulsory properties under the required keyword.
③ We list object properties under the properties keyword.
④ We constrain the values of a property using an enumeration.
⑤ Attributes can have a default value.
⑥ We can also specify a minimum value for a property.
⑦ We specify the type of the items in the array using the items keyword.
⑧ We use a JSON pointer to reference another schema within the same document.
We use GetOrderSchema when we return the details of an order from the server and CreateOrderSchema to validate an order placed by a customer. Figure 2.8 illustrates how the data validation flow works for CreateOrderSchema. As you can see, CreateOrderSchema only requires the presence of one property in the payload: the order property, which is an array of objects whose specification is defined by OrderItemSchema. OrderItemSchema has two required properties, product and size, and one optional property, quantity, which has a default value of 1. This means that, when processing a request payload, we must check that the product and size properties are present in the payload and that they have the right type. Figure 2.8 shows what happens when the quantity property is missing from the payload. In that case, we set the property to its default value of 1 in the server.

Figure 2.8 Data validation flow for request payloads against the CreateOrderSchema model. The diagram shows how each property of the request payload is validated against the properties defined in the schema and how we build an object from the resulting validation.
Now that we understand our API schemas, it’s time to implement them. Create a new file called orders/api/schemas.py. This file will contain our pydantic models. Listing 2.6 shows how we implement CreateOrderSchema, GetOrderSchema, and OrderItemSchema using pydantic. The code in listing 2.6 goes in the orders/api/schemas.py module. We define every schema as a class that inherits from pydantic’s BaseModel class, and we specify the type of every attribute using Python type hints. For attributes that can only take on a limited selection of values, we define an enumeration class. In this case, we define enumerations for the size and status properties. We set the type of OrderItemSchema’s quantity property to pydantic’s conint type, which enforces integer values. We also specify that quantity is an optional property and that its values should be equal or greater than 1, and we give it a default value of 1. Finally, we use pydantic’s conlist type to define CreateOrderSchema’s order property as a list with at least one element.
Listing 2.6 Implementation of the validation models using pydantic
# file: orders/api/schemas.py

from enum import Enum
from typing import List
from uuid import UUID

from pydantic import BaseModel, Field, conlist, conint


class Size(Enum):                                       ①
    small = 'small'
    medium = 'medium'
    big = 'big'


class Status(Enum):
    created = 'created'
    progress = 'progress'
    cancelled = 'cancelled'
    dispatched = 'dispatched'
    delivered = 'delivered'

class OrderItemSchema(BaseModel):                       ②
    product: str                                        ③
    size: Size                                          ④
    quantity: Optional[conint(ge=1, strict=True)] = 1   ⑤


class CreateOrderSchema(BaseModel):
    order:  conlist(OrderItemSchema, min_items=1)       ⑥


class GetOrderSchema(CreateOrderSchema):
    id: UUID
    created: datetime
    status: Status


class GetOrdersSchema(BaseModel):
    orders: List[GetOrderSchema]
① We declare an enumeration schema.
② Every pydantic model inherits from pydantic’s BaseModel.
③ We use Python-type hints to specify the type of an attribute.
④ We constrain the values of a property by setting its type to an enumeration.
⑤ We specify quantity’s minimum value, and we give it a default.
⑥ We use pydantic’s conlist type to define a list with at least one element.
Now that our validation models are implemented, in the following sections we’ll link them with the API to validate and marshal payloads.
2.5 Validating request payloads with pydantic
In this section, we use the models we implemented in section 2.4 to validate request payloads. How do we access request payloads within our view functions? We intercept request payloads by declaring them as a parameter of the view function, and to validate them we set their type to the relevant pydantic model.
Listing 2.7 Hooking validation models up with the API endpoints
# file: orders/api/api.py

from uuid import UUID

from starlette.responses import Response
from starlette import status

from orders.app import app
from orders.api.schemas import CreateOrderSchema         ①

...


@app.post('/orders', status_code=status.HTTP_201_CREATED)
def create_order(order_details: CreateOrderSchema):      ②
    return order


@app.get('/orders/{order_id}')
def get_order(order_id: UUID):
    return order


@app.put('/orders/{order_id}')
def update_order(order_id: UUID, order_details: CreateOrderSchema):
    return order

...
① We import the pydantic models so that we can use them for validation.
② We intercept a payload by declaring it as a parameter in our function, and we use type hints to validate it.
If you kept the application running, the changes are loaded automatically by the server, so you just need to refresh the browser to update the UI. If you click the POST endpoint of the /orders URL path, you’ll see that the UI now gives you an example of the payload expected by the server. Now, if you try editing the payload to remove any of the required fields, for example, the product field, and you send it to the server, you’ll get the following error message:
{
  "detail": [
    {
      "loc": [
        "body",
        "order",
        0,
        "product"
      ],
      "msg": "field required",
      "type": "value_error.missing"
    }
  ]
}
FastAPI generates an error message that points to where in the payload the error is found. The error message uses a JSON pointer to indicate where the problem is. A JSON pointer is a syntax that allows you to represent the path to a specific value within a JSON document. If this is the first time you’ve encountered JSON pointers, think of them as a different way of representing dictionary syntax and index notation in Python. For example, the error message "loc: /body/order/0/product" is roughly equivalent to the following notation in Python: loc['body']['order'][0]['product']. Figure 2.9 shows you how to interpret the JSON pointer from the error message to identify the source of the problem in the payload.

Figure 2.9 When a request fails due a malformed payload, we get a response with an error message. The error message uses a JSON pointer to tell us where the error is. In this case, the error message says that the property /body/order/0/product is missing from the payload.
You can also change the payload so that, instead of missing a required property, it contains an illegal value for the size property:
In this case, you’ll also get an informative error with the following message: "value is not a valid enumeration member; permitted: 'small', 'medium', 'big'". What happens if we make a typo in the payload? For example, imagine a client sent the following payload to the server:
In this case, FastAPI assumes that the quantity property is missing and that the client wishes to set its value to 1. This result could lead to confusion between the client and the server, and in such cases invalidating payloads with illegal properties helps us make the API integration more reliable. In chapter 6, you’ll learn to handle those situations.
One edge case with optional properties, such as OrderItemSchema’s quantity, is that pydantic assumes they’re nullable and therefore will accept payloads with quantity set to null. For example, if we send the following payload to the POST /orders endpoint, our server will accept it:
In terms of API integrations, optional isn’t quite the same as nullable: a property can be optional because it has a default value, but that doesn’t mean it can be null. To enforce the right behavior in pydantic, we need to include an additional validation rule that prevents users from setting the value of quantity to null. We use pydantic’s validator() decorator to define additional validation rules for our models.
Listing 2.8 Including additional validation rules for pydantic models
# file: orders/api/schemas.py

from datetime import datetime
from enum import Enum
from typing import List, Optional
from uuid import UUID

from pydantic import BaseModel, conint, validator


...


class OrderItemSchema(BaseModel):
    product: str
    size: Size
    quantity: Optional[conint(ge=1, strict=True)] = 1

    @validator('quantity')
    def quantity_non_nullable(cls, value):
        assert value is not None, 'quantity may not be None'
        return value
...
Now that we know how to test our API implementation using a Swagger UI, let’s see how we use pydantic to validate and serialize our API responses.
2.6 Marshalling and validating response payloads with pydantic
In this section, we’ll use the pydantic models implemented in section 2.4 to marshal and validate the response payloads of our API. Malformed payloads are one of the most common causes of API integration failures, so this step is crucial to deliver a robust API. For example, the schema for the response payload of the POST /orders endpoint is GetOrderSchema, which requires the presence of the id, created, status, and order fields. API clients will expect the presence of all these fields in the response payload and will raise errors if any of the fields is missing or comes in the wrong type or format.
NOTE Malformed response payloads are a common source of API integration failures. You can avoid this problem by validating your response payloads before they leave the server. In FastAPI, this is easily done by setting the response_model parameter of a route decorator.
Listing 2.9 shows how we use pydantic models to validate the responses from the GET /orders and the POST /orders endpoints. As you can see, we set the response_model parameter to a pydantic model in FastAPI’s route decorators. We follow the same approach to validate responses from all the other endpoints except the DELETE /orders/{order_id} endpoint, which returns an empty response. Feel free to check out the code in the GitHub repository for this book for the full implementation.
Listing 2.9 Hooking validation models for responses in the API endpoints
# file: orders/api/api.py

from uuid import UUID

from starlette.responses import Response
from starlette import status

from orders.app import app
from orders.api.schemas import (
    GetOrderSchema,
    CreateOrderSchema,
    GetOrdersSchema,
)

...

@app.get('/orders', response_model=GetOrdersSchema)
def get_orders():
    return [
        order
    ]


@app.post(
    '/orders',
    status_code=status.HTTP_201_CREATED,
    response_model=GetOrderSchema,
)

def create_order(order_details: CreateOrderSchema):
    return order
Now that we have response models, FastAPI will raise an error if a required property is missing from a response payload. It will also remove any properties that are not part of the schema, and it will try to cast each property into the right type. Let’s see this behavior at work.
In a browser, visit the http://127.0.0.1:8000/docs URL to load the Swagger UI for our API. Then head over to the GET /orders endpoint and send a request. You’ll get the order that we hardcoded at the top of the orders/api/api.py file. Let’s make some modifications to that payload to see how FastAPI handles them. To begin, let’s add an additional property called updated:
# orders/api/api.py
...

order = {
    'id': 'ff0f1355-e821-4178-9567-550dec27a373',
    'status': 'delivered',
    'created': datetime.utcnow(),
    'updated': datetime.utcnow(),
    'order': [
        {
            'product': 'cappuccino',
            'size': 'medium',
            'quantity': 1
        }
    ]
}

...
If we call the GET /orders endpoint again, we’ll get the same response we obtained before, without the updated property since it isn’t part of the GetOrderSchema model:
[
  {
    "order": [
      {
        "product": "cappuccino",
        "size": "medium",
        "quantity": 1
      }
    ],
    "id": "ff0f1355-e821-4178-9567-550dec27a373",
    "created": datetime.utcnow(),
    "status": "delivered"
  }
]
Let’s now remove the created property from the order payload and call the GET /orders endpoint again:
# orders/api/api.py
...

order = {
    'id': 'ff0f1355-e821-4178-9567-550dec27a373',
    'status': "delivered",
    'updated': datetime.utcnow(),
    'order': [
        {
            'product': 'cappuccino',
            'size': 'medium',
            'quantity': 1
        }
    ]
}
This time, FastAPI raises a server error telling us that the required created property is missing from the payload:
pydantic.error_wrappers.ValidationError: 1 validation error for GetOrderSchema
response -> 0 -> created
  field required (type=value_error.missing)
Let’s now change the value of the created property to a random string and run another request against the GET /orders endpoint:
# orders/api/api.py
...

order = {
    'id': 'ff0f1355-e821-4178-9567-550dec27a373',
    'status': "delivered",
    'created': 'asdf',
    'updated': 1740493905,
    'order': [
        {
            'product': 'cappuccino',
            'size': 'medium',
            'quantity': 1
        }
    ]
}

...
In this case, FastAPI raises a helpful error:
pydantic.error_wrappers.ValidationError: 1 validation error for GetOrderSchema
response -> 0 -> created
  value is not a valid integer (type=type_error.integer)
Our responses are being correctly validated and marshalled. Let’s now add a simple state management mechanism for the application so that we can place orders and change their state through the API.
2.7 Adding an in-memory list of orders to the API
So far, our API implementation has returned the same response object. Let’s change that by adding a simple in-memory collection of orders to manage the state of the application. To keep the implementation simple, we’ll represent the collection of orders as a Python list. We’ll manage the list within the view functions of the API layer. In chapter 7, you’ll learn useful patterns to add a robust controller and data persistence layers to the application.
Listing 2.10 shows the changes required for the view functions under api.py to manage the in-memory list of orders in our view functions. The changes in listing 2.9 go into the orders/api/api.py file. We represent the collection of orders as a Python list, and we assign it to the variable ORDERS. To keep it simple, we store the details of every order as a dictionary, and we update them by changing their properties in the dictionary.
Listing 2.10 Managing the application’s state with an in-memory list
# file: orders/api/api.py

import time
import uuid
from datetime import datetime
from uuid import UUID

from fastapi import HTTPException
from starlette.responses import Response
from starlette import status

from orders.app import app
from orders.api.schemas import GetOrderSchema, CreateOrderSchema


ORDERS = []                                              ①


@app.get('/orders', response_model=GetOrdersSchema)
def get_orders():
    return ORDERS                                        ②


@app.post(
    '/orders',
    status_code=status.HTTP_201_CREATED,
    response_model=GetOrderSchema,
)
def create_order(order_details: CreateOrderSchema):
    order = order_details.dict()                         ③
    order['id'] = uuid.uuid4()                           ④
    order['created'] = datetime.utcnow()
    order['status'] = 'created'
    ORDERS.append(order)                                 ⑤
    return order                                         ⑥


@app.get('/orders/{order_id}', response_model=GetOrderSchema)
def get_order(order_id: UUID):
    for order in ORDERS:                                 ⑦
        if order['id'] == order_id:
            return order
    raise HTTPException(                                 ⑧
        status_code=404, detail=f'Order with ID {order_id} not found'
    )


@app.put('/orders/{order_id}', response_model=GetOrderSchema)
def update_order(order_id: UUID, order_details: CreateOrderSchema):
    for order in ORDERS:
        if order['id'] == order_id:
            order.update(order_details.dict())
            return order
    raise HTTPException(
        status_code=404, detail=f'Order with ID {order_id} not found'
    )


@app.delete(
    '/orders/{order_id}',
    status_code=status.HTTP_204_NO_CONTENT,
    response_class=Response,
)
def delete_order(order_id: UUID):
    for index, order in enumerate(ORDERS):               ⑨
        if order['id'] == order_id:
            ORDERS.pop(index)
            return Response(status_code=HTTPStatus.NO_CONTENT.value)
    raise HTTPException(
        status_code=404, detail=f'Order with ID {order_id} not found'
    )


@app.post('/orders/{order_id}/cancel', response_model=GetOrderSchema)
def cancel_order(order_id: UUID):
    for order in ORDERS:
        if order['id'] == order_id:
            order['status'] = 'cancelled'
            return order
    raise HTTPException(
        status_code=404, detail=f'Order with ID {order_id} not found'
    )


@app.post('/orders/{order_id}/pay', response_model=GetOrderSchema)
def pay_order(order_id: UUID):
    for order in ORDERS:
        if order['id'] == order_id:
            order['status'] = 'progress'
            return order
    raise HTTPException(
        status_code=404, detail=f'Order with ID {order_id} not found'
    )
① We represent our in-memory list of orders as a Python list.
② To return the list of orders, we simply return the ORDERS list.
③ We transform every order into a dictionary.
④ We enrich the order object with server-side attributes, such as the ID.
⑤ To create the order, we add it to the list.
⑥ After appending the order to the list, we return it.
⑦ To find an order by ID, we iterate the ORDERS list and check their IDs.
⑧ If an order isn’t found, we raise an HTTPException with status_code set to 404 to return a 404 response.
⑨ We order from the list using the list.pop() method.
If you play around with the POST /orders endpoint, you’ll be able to create new orders, and using their IDs you’ll be able to update them by hitting the PUT /orders/{order_id} endpoint. In every endpoint under the /orders/{order_id} URL path, we check whether the order requested by the API client exists, and if it doesn’t we return a 404 (Not Found) response with a helpful message.
We are now able to use the orders API to create orders, update them, pay for them, cancel them, and get their details. You have implemented a fully working web API for a microservice application! You’ve become familiar with a bunch of new libraries to build web APIs, and you’ve seen how to add robust data validation to your APIs. You’ve also learned to put it all together and run it with success. Hopefully, this chapter has sparked your interest and excitement about designing and building microservices exposing web APIs. In the coming chapters, we’ll delve deeper into these topics, and you’ll learn to build and deliver robust and secure microservice API integrations.
Summary
-
To structure microservices into modular layers, we use an adaptation of the three-tier architecture pattern:
-
FastAPI is a popular framework for building web APIs. It’s highly performant, and it has a rich ecosystem of libraries that make it easier to build APIs.
-
FastAPI uses pydantic, a popular data validation library for Python. Pydantic uses type hints to create validation rules, which results in clean and easy-to-understand models.
-
FastAPI generates a Swagger UI dynamically from our code. A Swagger UI is a popular interactive visualization UI for APIs. Using the Swagger UI, we can easily test if our implementation is correct.
1 For a classic explanation of the decorator pattern, see Erich Gamma et al., Design Patterns (Addison-Wesley, 1995), pp. 175–184. For a more Pythonic introduction to decorators, see Luciano Ramalho, Fluent Python (O’Reilly, 2015), pp. 189–222.