Outlook features five main components: Mail, Calendar, Contacts, Tasks, and Notes. You can switch between components, depending on the task that you want to perform.
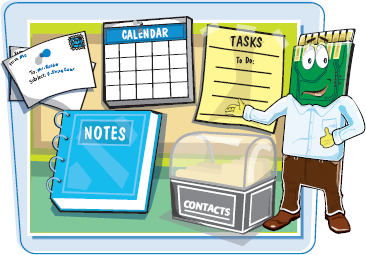
You can use Outlook to manage everyday tasks and e-mail correspondence. Outlook works much like a personal organizer and contains components for certain tasks, such as a Mail folder for e-mail tasks and a Calendar folder for scheduling appointments.
View Outlook Components
USE THE NAVIGATION PANE
Note
To learn more about the To-Do Bar, see the "Customize the To-Do Bar" task, later in this chapter.
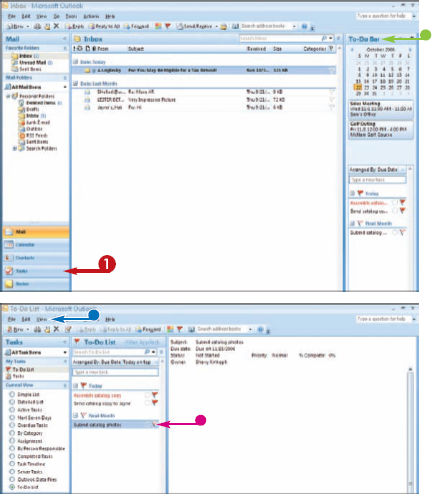
Outlook displays the component.
USE THE GO MENU
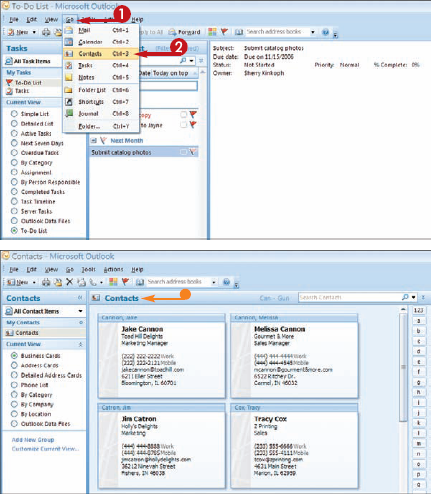
Outlook displays the component.
Depending on the component, Outlook offers different ways to view the information using the View menu.
Note
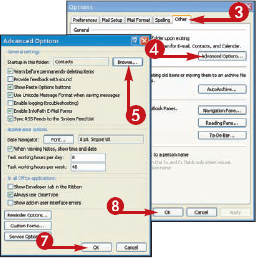
can I customize which component opens by default when I start Outlook?
Yes. By default, Outlook opens the Inbox for your Mail tasks as soon as you start the program. To start with another component instead, follow these steps:
You can use Outlook's Calendar component to keep track of your schedule. You can add notations on the calendar to remind you of appointments and other important events. When adding new appointments to the Calendar, you fill out appointment details, such as the name of the person with whom you are meeting, and the start and end times of the appointment.
Schedule an Appointment
Note
See the previous task, "View Outlook Components," to learn how to open a component.
Outlook opens the Appointment window, displaying the Appointment tab.
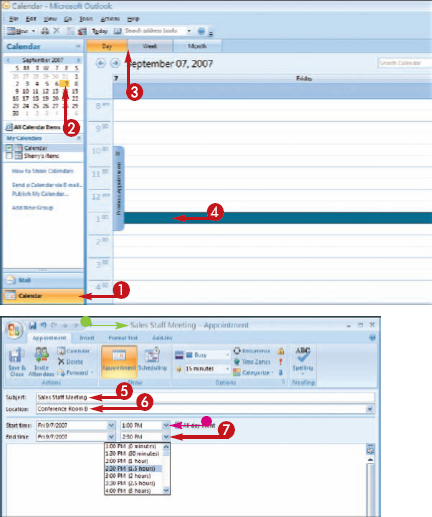
Outlook automatically sets a reminder about the appointment.
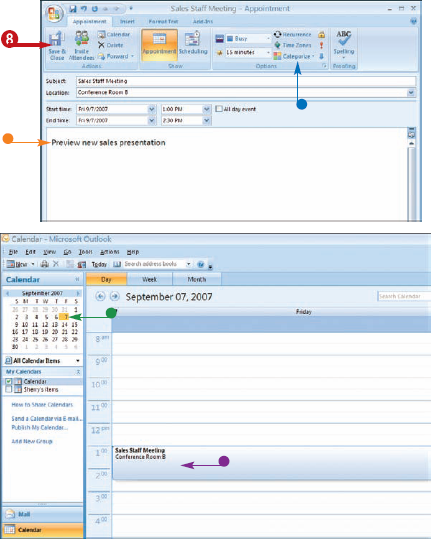
To view the appointment details again or to make changes, you can double-click the appointment to reopen the Appointment window.
Note
do I receive a reminder before an appointment?
If you set a Reminder option (
What does the Categorize option do?
You can click the Categorize button and assign color categories to your appointments. You can use color categories to help organize appointments in your calendar. For example, you might categorize all work-related appointments as blue and all non-work appointments as red.

If your schedule includes many of the same appointments over and over again, such as weekly sales or department meetings, you can set the appointment as a recurring appointment. Outlook adds the appointment to each week or month as you require.
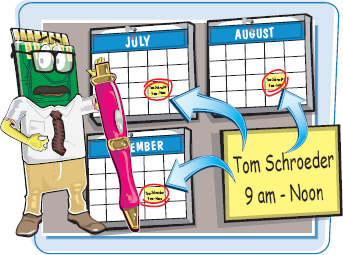
You can use this same technique to set recurring meetings and events on your Outlook Tasks.
Schedule a Recurring Appointment
Note
See the previous task, "Schedule an Appointment," to learn how to open an Appointment window
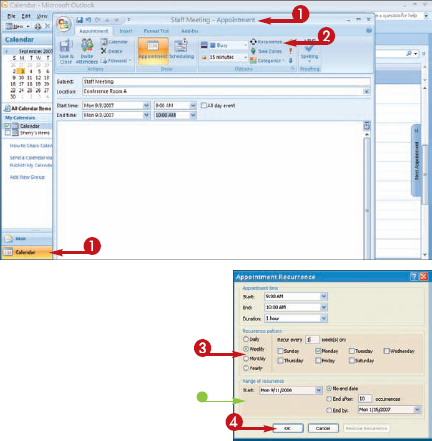
The Appointment Recurrence dialog box appears.
Outlook displays the appointment in the Calendar.
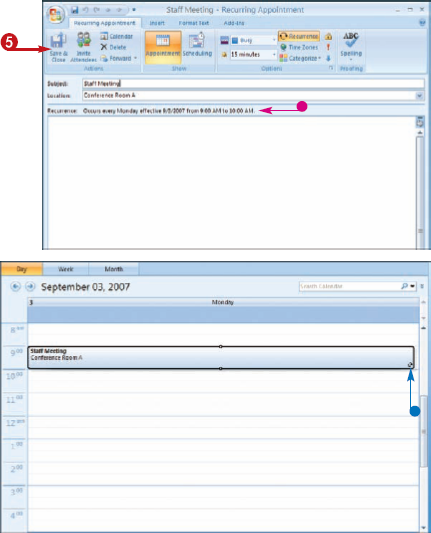
Note
How do I delete an appointment from the Calendar?
To remove an appointment, rightclick the appointment on the Calendar and click Delete You can also press

Is there an easy way to set an appointment with one of my contacts?
Yes. You can quickly create an appointment with anyone in your Contacts list. In the Contacts component, right-click the contact with whom you want to schedule an appointment. Next, click Create and then click New Meeting Request with Contact. This opens the Message window, where you can set up details concerning the appointment — such as the date and time — and e-mail the request.
If you need to track an activity that lasts the entire day or spans several days, such as an anniversary or a conference, you can schedule the date as an event. Events appear as banners at the top of the scheduled date.
Schedule an Event
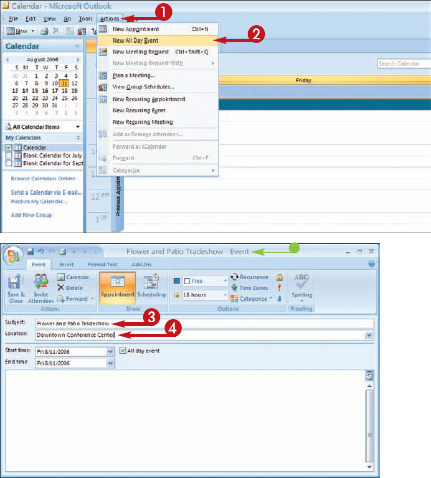
Outlook displays the Event window, which looks the same as the Appointment window.
You can also add a reminder or add notes about the event.
Note
To learn how to set appointments, see the "Schedule an Appointment" task, earlier in this chapter. To learn more about using notes, see the "Add a Note" task, later in this chapter.
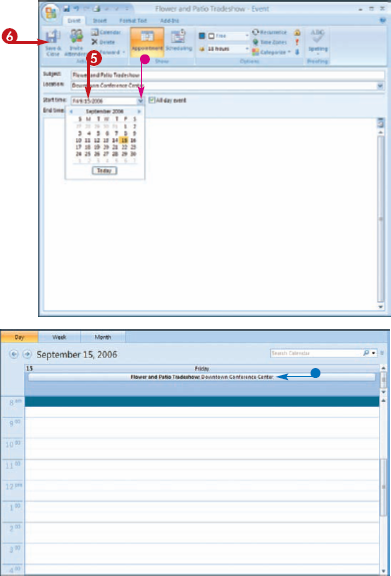
To edit an event, you can doubleclick the event banner.
Note
How do I edit a reminder?
To change the details about a reminder that you add to any appointment or event, reopen the Appointment window for the appointment or event, click the Reminder button (
How do I add a holiday to my calendar?
By default, holidays do not appear in Outlook. You can add a holiday by clicking Tools clicking Options and then clicking the Calendar Options button in the Preferences tab. This opens the Calendar Options dialog box. Click the Add Holidays button and then click the country whose holidays you want to add to the calendar.

If you use Outlook on a Microsoft Exchange Server network, you can use the Plan a Meeting feature to schedule meetings with other users. You can send e-mail messages inviting attendees, track responses, and designate resources, such as conference rooms or equipment. Plan a
Plan a Meeting
Outlook displays the Plan a Meeting window.
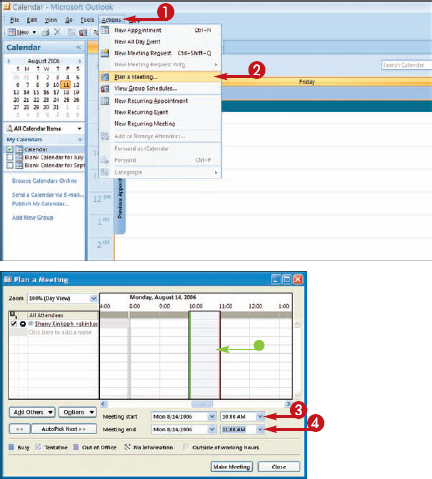

When you press

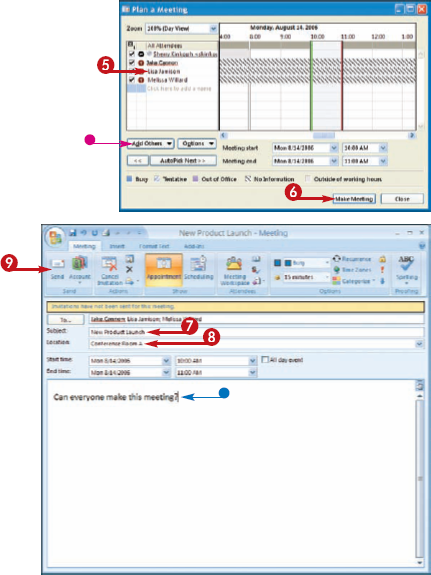

Outlook adds the subject to the window's title.

Outlook e-mails an invitation to each attendee
Note
See Chapter 23 to learn more about e-mailing with Outlook.
Note
How do I know if people respond to my meeting invitation?
To see who is attending the meeting, you must open the Plan a Meeting window and click the Scheduling tab. Outlook keeps track of replies to your invitation. To open the window, double-click the meeting appointment in your calendar. To respond to an invitation yourself, simply click the appropriate button at the top of the e-mail message in Outlook's Mail component.

How do I publish my calendar so that others can see it on the network?
To publish your calendar, click Tools, click Options and then click Calendar Options on the Preferences tab of the Options dialog box. Click Free/Busy Options to open the Free/Busy Options dialog box, and turn on any publishing features that you want to set.

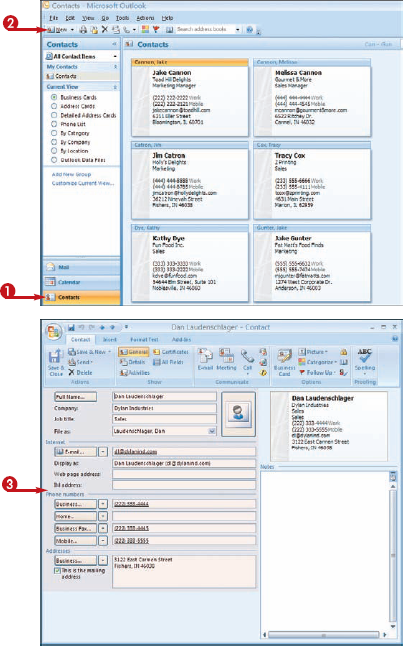
You can use the Contacts component to keep a list of people that you contact most often, such as amily, coworkers, or clients. You can keep track of information such as addresses, e-mail addresses, phone numbers, and more.
Create a New Contact

Note
See the "View Outlook Components" task, earlier in this chapter, to learn how to open a component.

Outlook opens the Contact window, and displays the General page

You can press

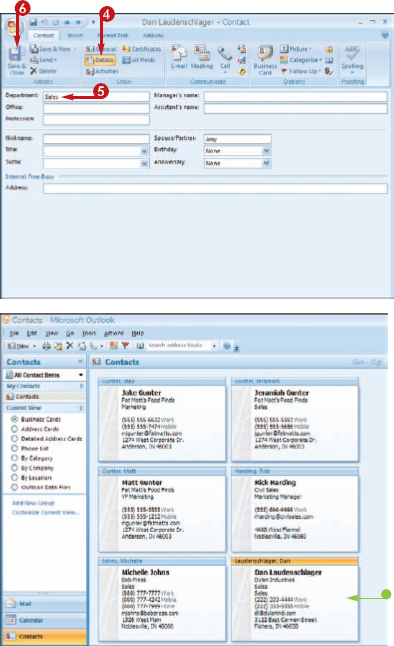
To edit contact details, you can double-click the contact to reopen the Contact window.
Note
Can I import a list of contacts from another program?
Yes. Click the File menu and then click Import and Export to open the Import and Export Wizard. The wizard guides you through the steps for importing a list of contacts from other sources, including Outlook Express.

How do I send an e-mail to a contact?
You can right-click the contact name, click Create and then click New Message to Contact This opens the Message window, where you can type a message to the contact. To learn more about e-mailing with Outlook, see Chapter 23.

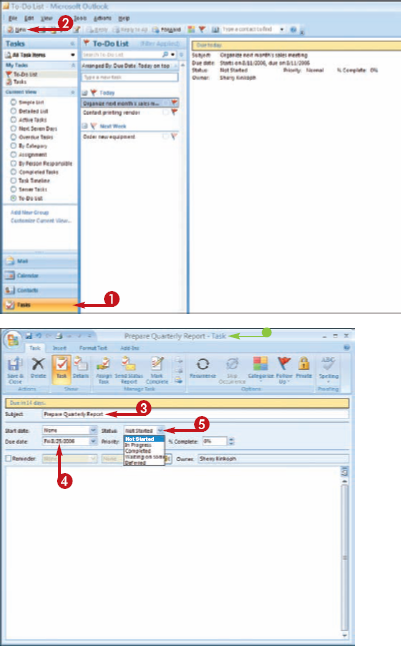
You can use Outlook's Task component to keep track of things that you need to do, such as a daily list of activities or project steps that you need to complete.
Create a New Task

Note
See the "View Outlook Components" task, earlier in this chapter, to learn how to open a component.

Outlook displays the Task window
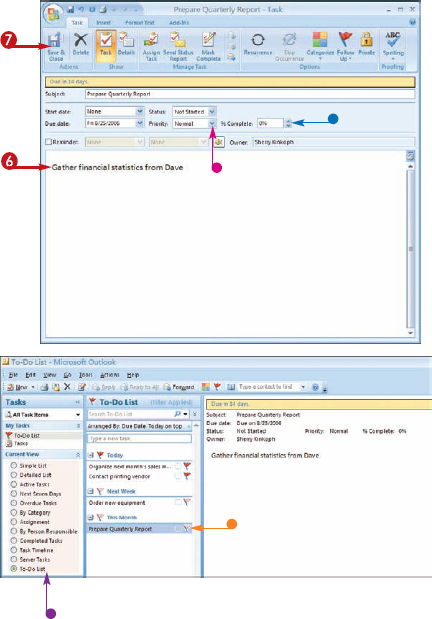
To view the task details again or make changes, you can doubleclick the task to reopen the Task window.
To change your view of tasks in the Tasks list, you can click a viewoption (
Note
How do I mark a task as completed
You can click the check box next to the task name to mark the task as complete. Completed tasks appear with a strikethrough on the Tasks list. To remove a task completely from the list, right-click the task and click Delete

CanI turn a task into an e-mail
Yes. You can assign a task to another user by turning the task into an e-mail message. Right-click the task and then click Assign Task to open the Task window. You can add an e-mail address and a message concerning the task, and then send the message. To learn more about e-mailing in Outlook, see Chapter 23.
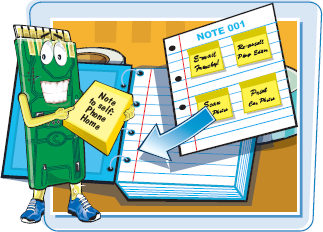
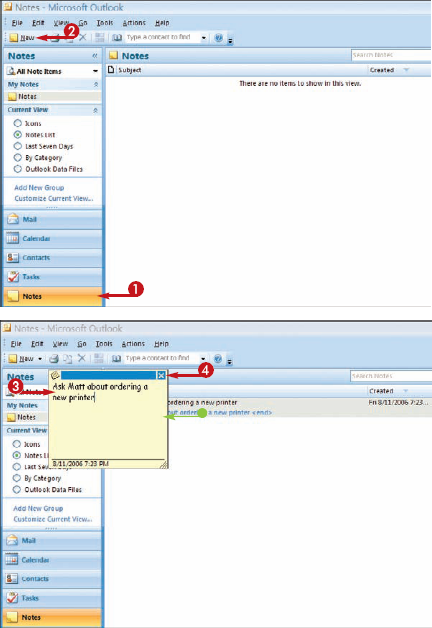
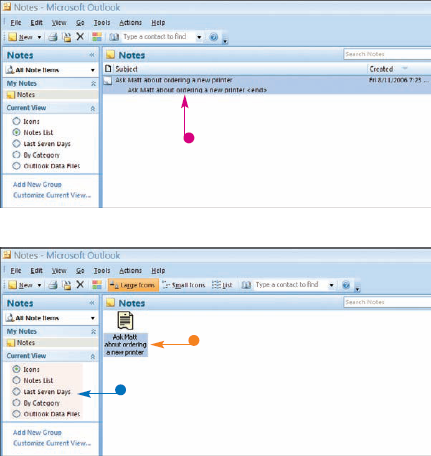
You can use the Notes component to create notes for yourself. Much like an electronic version of yellow sticky notes, Outlook's Notes allow you to write down ideas and thoughts, or any note text that you want to remind yourself of later. You can attach Outlook Notes to other items in Outlook as well as drag them onto the Windows desktop for easy viewing.
Add a Note

Note
See the "View Outlook Components" task, earlier in this chapter, to learn how to open a component.

To view the note again or to make changes, you can double-click the note to reopen the note window.
Note
Can I forward the note to another user?
Yes. You can turn any note into an instant e-mail attachment. Simply right-click the note in the Notes list, and then click Forward to open an e-mail Message window. You can address the note and add any additional message text. To learn more about e-mailing with Outlook, see Chapter 23.
How do I delete notes that I no longer want?
Right-click the note in the Notes list and then click Delete or press
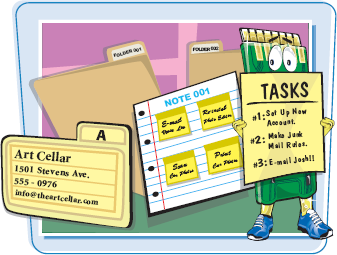
You can store your Outlook items, whether they are messages, tasks, or notes, in folders. By default, Outlook creates a set of folders for you to use when you install the program, including e-mail folders for managing incoming, outgoing, and deleted messages. You can use the Folders list to move items from one folder to another and create new folders in which to store Outlook items.
Organize Outlook Items
VIEW THE FOLDER LIST
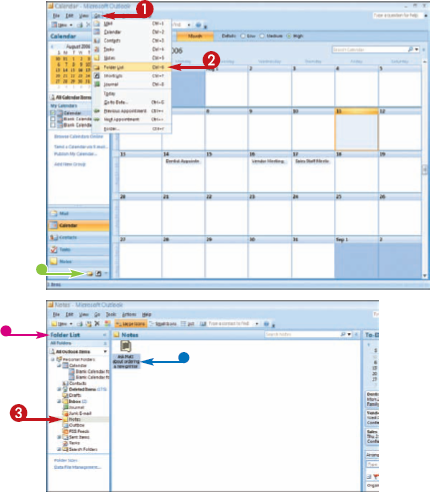
To move an item to another folder, you can click and drag the item and drop it on the folder's name.
CREATE A NEW FOLDER
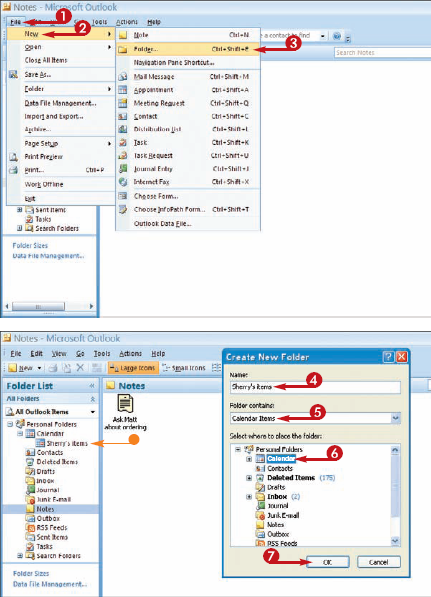
The Create New Folder dialog box appears.
Outlook creates the new folder.
Note
How do I delete an item from a folder?
Select the item that you want to delete, and then click the Delete button or press

CanI create subfolders for my work items and home items
Yes. You can create as many folders as you need for each type of Outlook item or for a variety of items. For example, you might create a subfolder in your Inbox folder to place all of the corporate correspondence that you send and receive, or create a folder in the Tasks folder for a special project.

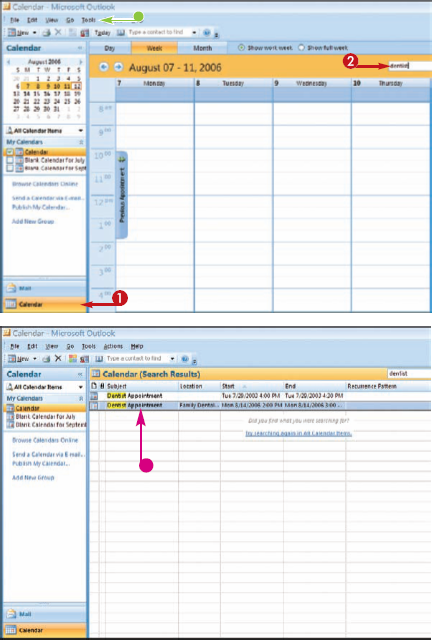
You can use Outlook's new search tool to quickly find an item in your Outlook components. Each component includes an Instant Search box that you can use to quickly look for a keyword or phrase within the component's items.
Perform an Instant Search
The Instant Search command on the Tools menu offers access to advance search options.
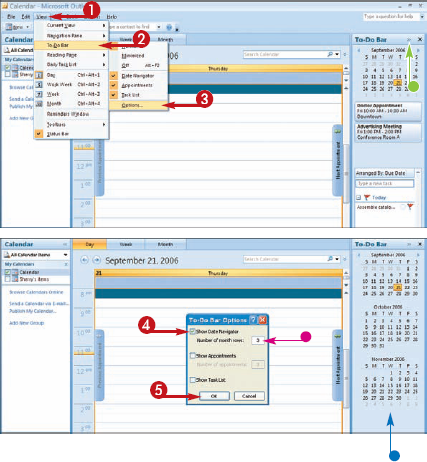
You can use Outlook's new To-Do Bar to quickly view the Date Navigator and the current day's appointments and tasks. The To-Do Bar appears by default when you open the Inbox, Contacts, or Notes components. You can customize the To-Do Bar to change which items appear in the list.
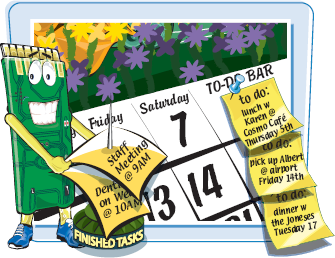
Customize the To-Do Bar
The To-Do Bar Options dialog box appears
