
Client Test Program for a SQL Cluster
To help in visualizing exactly what effect a SQL Server failure and subsequent fail-over may have on an end-user application, we have created a small test program using Visual Studio .NET 2003. This small C# (pronounced C-sharp) test program accesses the Northwind database that is included with SQL Server, and was created in about 10 minutes. It will display a few columns of data along with a couple of system variables that show connection information. This includes
CustomerID and CustomerName— A simple two-column display of data from the customer table that meets the selection criteria
ServerName— The SQL Server name that the client is connected to
SHOWDATETIME— The date and time (to the millisecond) of the data access
SPID— The SQL SPID that reflects the connection ID to SQL Server itself by the client application
This type of small program is very useful because the connection that it makes will always be to the virtual SQL Server. This will enable you to see what effect a fail-over will have with your client applications.
To populate this display grid, we will execute the following SQL Statement:
SELECT CustomerID, CompanyName, CONVERT (varchar(32), GETDATE(), 9)
AS SHOWDATETIME, @@SERVERNAME AS servername, @@SPID AS spid
FROM Customers WHERE (CustomerID LIKE 'BERG%')
From Visual Studio .NET's point of view, we would simply set up a simple form like the one in Figure 5.32, build a simple button that will retrieve the data from the SQL Server database on the virtual server, and also show the date, time, server name, and SPID information for each access invocation. Figure 5.32 also shows three inset dialog boxes that would appear when setting up the data adapter and SQL Select statement to populate the form.
Figure 5.32. Visual Studio .NET 2003 and creating the data adapter to the virtual SQL Server.
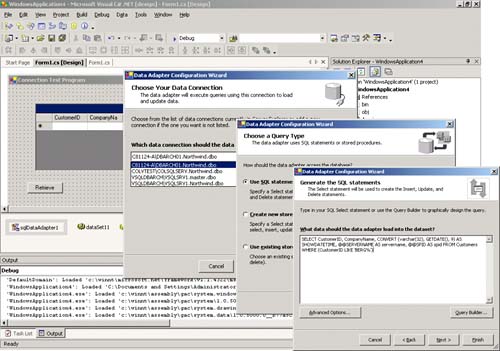
As is illustrated in Figure 5.32, you can create a SQL adapter to the virtual SQL Server via the SQL Server Configuration wizard. In our example, the new virtual SQL Server instance will appear in the Choose Your Data Connection dialog box. Select the virtual server that you want this application to connect to (VSQLDBARCHVSQLSRV1 in this case). Specify that you want to use SQL statements of your own for this SQL adapter connection (second dialog box). Then, drop in the following SELECT statement, and click on the Finish button (as seen in the third dialog box in Figure 5.32). The proper SQL adapter will be generated along with all the C# code needed to invoke and handle errors for this data access.
SELECT CustomerID, CompanyName, Convert(varchar(32),
GETDATE(),9) AS SHOWDATETIME,
@@SERVERNAME AS servername, @@SPID AS spid
FROM Customers WHERE (CustomerID LIKE 'BERG%')
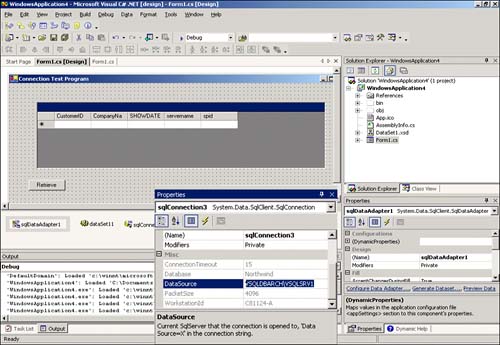
If you highlight the newly created sqlConnection icon at the bottom of the Design panel and right-mouse click, you can view the full properties of this SQL Server connection. Figure 5.33 shows the properties of the sqlDataAdapter and the sqlConnection. In particular, the sqlConnection properties should reflect the correct connection to the new virtual SQL server (data source).
workstation id="C81124-A";packet size=4096;user id=sa;
    data source="VSQLDBARCHVSQLSRV1";
persist security info=False;initial catalog=Northwind
Figure 5.33. Visual Studio .NET 2003 showing the sqlDataAdapter and the sqlConnection properties to the virtual SQL Server.
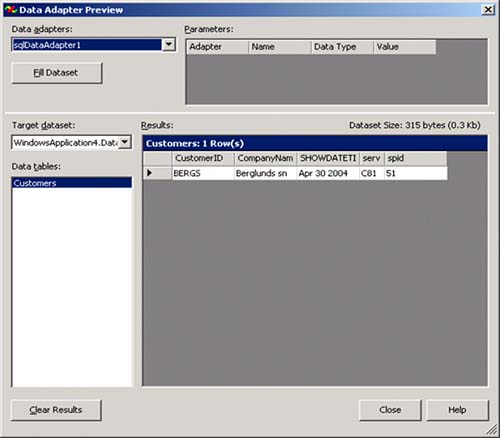
Now, to verify that your SQL adapter will actually return data to you, simply right-click on the sqlAdapter1 icon and choose the Preview Data option. Figure 5.34 shows this Data Adapter Preview screen for the sqlAdapter1. Simply click on the Fill Dataset button on this screen and the result rows should appear in the Results window (only one data row in this case). As you can also see in Figure 5.34, we show you the SQL statement that is being executed that returns the desired result set.
Figure 5.34. Executing the Data Adapter Preview for a sqlAdapter within Visual Studio .NET 2003.
The complete Client Test Program Visual Studio .NET project files will also be available on the Sams website for this title. It is called “WindowsApplication4.csproj” “HAClientTest4” Visual Studio .NET project.
Now, to see this client test program in action, simply hit the F5 key (build and execute) from within Visual Studio .NET, or double-click on the application's executable. At the top of Figure 5.35, you can see the first execution of the client test program. If you click on the Retrieve button, it will update the data grid with a new data access to the virtual SQL Server (as you can see in the servername column), show you the detail datetime information of the data access (in the SHOWDATETIME column), and also display the SQL Server process id that it is using for the data access (SPID column). Great; you are now executing a typical C# program against the virtual SQL Server.
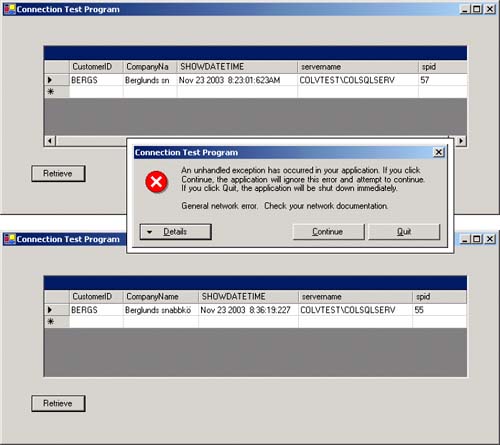
Now we want to demonstrate how this high availability approach works, from the client application point-of-view. In order to simulate the failure of the active node, we simply turned off the machine (COLTST1 in this case). We figured this would be the best (and most severe) test case of them all. Once you have simulated a failure, click on the Retrieve button in the client test program again, an unhandled exception occurs (shown in the middle of Figure.5.35). You can view the details of the error message, choose to quit the application, or choose to continue. Just choose Continue for now.
What has happened is the application can no longer connect to the failed SQL Server (because we turned COLTST1 off) and it is still in the middle of failing over to COLTST3. A fail-over will take a short amount of time. This will vary depending on the power and speed of the servers you have implemented and the number of “in-flight” transactions that need to be rolled back or forward at the time of the failure. In our test lab, we usually get a complete SQL fail-over to occur in about 30 to 45 seconds. This is very minor and well within most service level agreements and HA goals. We then simply clicked on the Retrieve button again in the client test program and we're talking to SQL Server again, but now owned by COLTST3. As you can see in the bottom of Figure 5.35, the data connection has returned the customer data, the SHOWDATETIME has been updated, and the servername still shows the same virtual SQL server name that the application needs to connect to, but the SPID has changed from 57 to 55. This is due to the new connection of the client test program to the newly owned (failed-over) SQL Server. The client test program has simply connected to the newly started SQL Server instance on COLTST3. The unhandled exception (error) goes away and the end-user never knows a complete fail-over occurred. They simply keep processing as usual. Better error handling can be programmed that would not show the “unhandled exception” error. You may want to display a simple error message: “database momentarily unavailable—please try again” would be much more user friendly. That's it for the test program. You can modify this a bit more for your own purposes if you desire.