13. Going Mobile
What You’ll Do
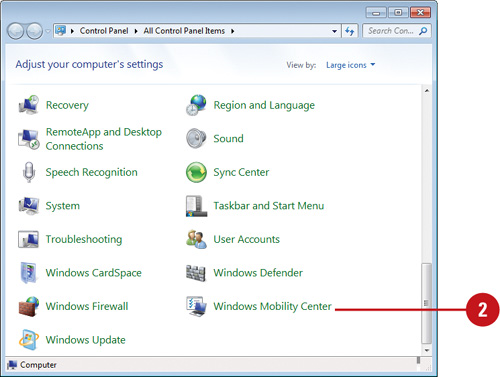
View the Windows Mobility Center
Connect to a Network Projector
Introduction
You no longer have to change mobile PC related options in different places. With the Windows Mobility Center, you can change or access mobile PC related options all in one place. In the Windows Mobility Center, you can adjust volume level and power options, check your network connectivity, connect to an external display, enable presentation settings, and access the Sync Center, which helps you keep files up-to-date when you’re working on different computers, such as a desktop computer and a laptop.
Keeping track of the latest versions of all your files on your desktop computer and laptop can become a problem. With the Sync Center, you can keep files (including documents, music, photos, and in some case contacts) and other information up-to-date between your computer and mobile devices, network folders, and compatible programs. The Sync Center works with offline files and keeps them in sync.
If you have a network projector at a remote location and you can connect to it, then you can operate the projector to give a presentation as if you were physically in the room. The Connect to the Network Project wizard makes it easy to establish a connection. Windows SideShow allows hardware manufacturers to build peripheral devices that you can use to view the information you need at a moments notice, such as a feed or Office PowerPoint presentation.
Windows 7 also comes standard with Tablet PC tools—Windows Journal, Tablet PC Input Panel, and Personalize Handwriting Recognition—that you can effectively use on a Tablet PC with a pen. If you have a Tablet PC or ink device, you can use the Pen and Touch and Tablet PC options to customize and personalize the way you work. If you use your Tablet PC to take notes in math or you work in an engineering or scientific profession, then you need the Math Input Panel.
Viewing the Windows Mobility Center
With the Windows Mobility Center, you can change or access mobile PC related options all in one place. You no longer have to change mobile PC related options in different places. In the Windows Mobility Center, you can adjust volume level and power options, check your network connectivity, connect to an external display, enable presentation settings, and access the Sync Center, which helps you keep files up-to-date when you’re working on different computers, such as a desktop computer and a laptop. You can make an option change in Windows Mobility Center, or click the icon on a tile to open the utility in the Control Panel, where you can make additional changes.
View Windows Mobility Center
![]() Click the Start button, and then click Control Panel.
Click the Start button, and then click Control Panel.
![]() Click the Windows Mobility Center icon in Small icons or Large icons view.
Click the Windows Mobility Center icon in Small icons or Large icons view.
Timesaver Click the battery meter icon in the notification area, and then click Windows Mobility Center, or press ![]() +X.
+X.
![]() Click a button or change an option for any of the following settings (options vary depending on your system):
Click a button or change an option for any of the following settings (options vary depending on your system):
• Brightness for the display.
• Volume for the speakers.
• Battery Status for power usage.
• Wireless Network on and off.
• Screen Rotation for a Tablet PC.
• External Display add or remove.
• Sync Center to keep files up-to-date.
• Presentation Settings on and off for giving a presentation.
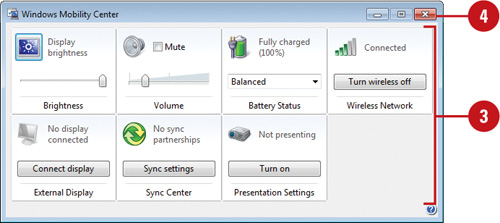
![]() When you’re done, click the Close button.
When you’re done, click the Close button.
Change Presentation Settings
![]() Click the Start button, and then click Control Panel.
Click the Start button, and then click Control Panel.
![]() Click the Windows Mobility Center icon in Small icons or Large icons view.
Click the Windows Mobility Center icon in Small icons or Large icons view.
![]() Click the Presentation Settings tile icon.
Click the Presentation Settings tile icon.

![]() Select or clear the Turn off the screen saver check box.
Select or clear the Turn off the screen saver check box.

![]() Select or clear the Set volume to check box. If you select it, drag the slider to adjust it.
Select or clear the Set volume to check box. If you select it, drag the slider to adjust it.
![]() Select or clear the Show this background check box. If you select it, select a background and specify a position.
Select or clear the Show this background check box. If you select it, select a background and specify a position.
![]() Click OK.
Click OK.
See Also
See “Controlling Power Options” on page 384 for information on using battery power and usage.
See “Keeping Files in Sync” on page 386 for information on keeping files up-to-date on different computers.
See “Using Multiple Monitors” on page 106 for information on using more than one monitor.
See “Controlling the Volume” on page 260 for information on using the volume control.
Controlling Power Options
Windows 7 works more efficiently for longer battery life including less power use for DVD playback, automatic screen dimming, power off unused ports, and more accurate battery life (New!). You can change power options properties for a portable or laptop computer to reduce power consumption and maximize battery life. For example, if you often leave your computer for a short time while working, you can set your computer to go into sleep, a state in which your computer saves everything in memory and turns off your monitor and hard disks after being idle for a set time. If you are often away from your computer for an extended time, you can set it to go into hibernate, a state in which your computer saves everything in memory and to your hard disk, and then shuts down. To help you set power options, you can choose one of the power plans, modify one to suit your needs, or create your own. A power plan is a predefined collection of power usage settings (dim display, turn off display, put to sleep, and adjust brightness). If you want more options, you can set advanced options to define the power button (sleep, hibernate, or shut down) or other settings, such as hybrid sleep, which adds saving to your hard disk to sleep mode.
Select and Modify a Power Plan
![]() Click the Power icon in the notification area, and then click More power options.
Click the Power icon in the notification area, and then click More power options.
• You can also click the Power Options icon in the Control Panel (Small or Large icons).
![]() To adjust screen brightness, drag the slider (New!).
To adjust screen brightness, drag the slider (New!).
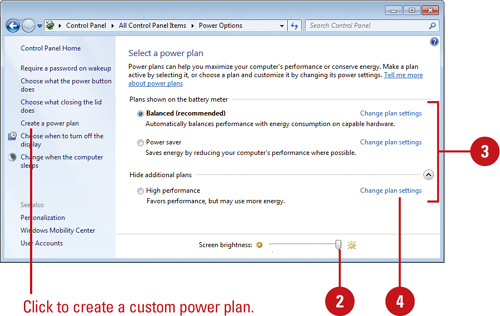
![]() Click the power plan option you want: Balanced, or Power saver, High performance.
Click the power plan option you want: Balanced, or Power saver, High performance.
![]() Click Change plan settings below the selected option.
Click Change plan settings below the selected option.
![]() Select an amount of time to:
Select an amount of time to:
• Dim the display. (New!)
• Turn off the display.
• Put the computer to sleep.
• Adjust plan brightness. (New!)
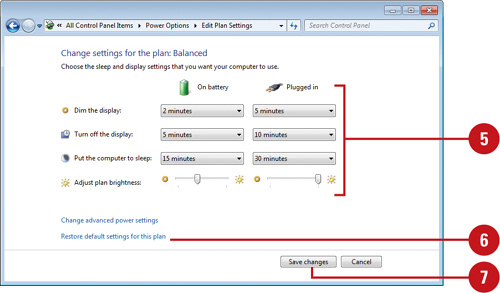
![]() To restore defaults, click Restore default settings for this plan, and then click Yes.
To restore defaults, click Restore default settings for this plan, and then click Yes.
![]() Click Save changes.
Click Save changes.
Define Power Button and Set Password Protection
![]() Click the Power icon in the notification area, and then click More power options.
Click the Power icon in the notification area, and then click More power options.
• You can also click the Power Options icon in the Control Panel (Small or Large icons).
![]() In the Navigation pane, click Choose what the power buttons does.
In the Navigation pane, click Choose what the power buttons does.
![]() Specify the options you want when you press the power or sleep button, or when you close the lid.
Specify the options you want when you press the power or sleep button, or when you close the lid.

![]() Select the Require a password (recommended) or Don’t require a password option.
Select the Require a password (recommended) or Don’t require a password option.
![]() Click Save changes.
Click Save changes.
Set Advanced Options
![]() Click the Power icon in the notification area, and then click More power options.
Click the Power icon in the notification area, and then click More power options.
• You can also click the Power Options icon in the Control Panel (Small or Large icons).
![]() Click Change plan settings below the selected power plan option.
Click Change plan settings below the selected power plan option.
![]() Click Change advanced power settings.
Click Change advanced power settings.
![]() Click the plus sign (+) and minus sign (-) icons to display the option you want to change.
Click the plus sign (+) and minus sign (-) icons to display the option you want to change.
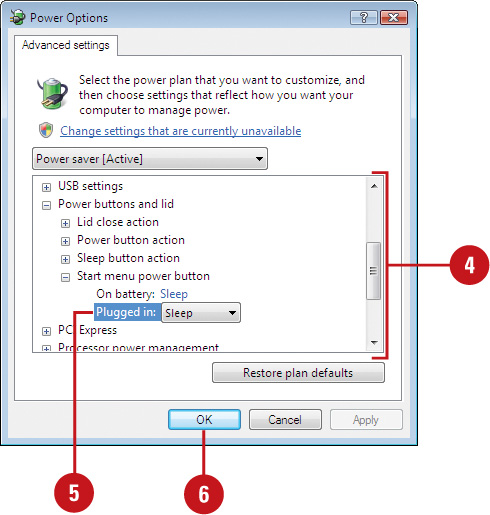
![]() Click the option list arrow, and then select a setting.
Click the option list arrow, and then select a setting.
![]() When you’re done, click OK.
When you’re done, click OK.
![]() Click Save changes.
Click Save changes.
Keeping Files in Sync
Keeping track of the latest versions of all your files on your desktop computer and laptop can become a problem. With the Sync Center, you can keep files (including documents, music, photos, and in some case contacts) and other information up-to-date between your computer and mobile devices, network folders, and compatible programs. You can keep files in sync (short for synchronization) in one direction (changes on one computer get changed on the other) or in both directions (changes on both computers get changed on both). The Sync Center compares files between the two computers and then copies the latest version in the appropriate place. If the same files get changed on both computers, the Sync Center asks you to resolve it. The Sync Center also works with offline files and keeps them in sync.
Sync with a Device
![]() Establish a connection between your computer and the mobile device, network folder, or program.
Establish a connection between your computer and the mobile device, network folder, or program.
![]() Click the Start button, and then click Control Panel.
Click the Start button, and then click Control Panel.
![]() Click the Sync Center icon in Small icons or Large icons view.
Click the Sync Center icon in Small icons or Large icons view.
Timesaver Click the Start button, point to All Programs, click Accessories, and then click Sync Center.
![]() In the left pane, click Set up new sync partnerships.
In the left pane, click Set up new sync partnerships.

![]() Click the name of the device in the list of partnerships.
Click the name of the device in the list of partnerships.
![]() Click the Set Up button on the toolbar.
Click the Set Up button on the toolbar.
![]() Follow the wizard instructions to select the settings and sync schedule you want. When you’re done, click Finish.
Follow the wizard instructions to select the settings and sync schedule you want. When you’re done, click Finish.

![]() To start syncing now, click the Sync button on the toolbar.
To start syncing now, click the Sync button on the toolbar.
Sync All Offline Files
![]() Click the Start button, and then click Control Panel.
Click the Start button, and then click Control Panel.
![]() Click the Sync Center icon in Small icons or Large icons view.
Click the Sync Center icon in Small icons or Large icons view.
![]() Click the Offline Files sync partnership.
Click the Offline Files sync partnership.

![]() If you want to sync the contents of a folder, open it up.
If you want to sync the contents of a folder, open it up.
![]() Click the Sync All button on the toolbar.
Click the Sync All button on the toolbar.
Sync Individual Offline Files
![]() Click the Start button, and then click Control Panel.
Click the Start button, and then click Control Panel.
![]() Click the Sync Center icon in Small icons or Large icons view.
Click the Sync Center icon in Small icons or Large icons view.
![]() Click the Offline Files sync partnership.
Click the Offline Files sync partnership.
![]() Select the folder you want to sync.
Select the folder you want to sync.

![]() To open the folder to view its contents, click the Browse button on the toolbar. When you’re done, click the Close button.
To open the folder to view its contents, click the Browse button on the toolbar. When you’re done, click the Close button.
![]() Click the Sync button on the toolbar.
Click the Sync button on the toolbar.
![]() To schedule the time you want to sync this folder, click the Schedule button on the toolbar, and then follow the wizard instructions.
To schedule the time you want to sync this folder, click the Schedule button on the toolbar, and then follow the wizard instructions.
Working with Offline Files
The Sync Center works with offline files and keeps them in sync. An offline file is a copy of a network file that is stored on your local computer for use when the network connection is not available. Before you can make a network file available offline, you need to enable offline files in the Sync Center utility in the Control Panel, where you can also set disk usage, security, and network options. When you make a network file available offline, the Windows automatically creates a copy on your local computer. Whenever the network versions are not available, the Sync Center opens the offline copy and then syncs it back with the network version when the connection becomes available again.
Change Offline Files Settings
![]() Click the Start button, and then click Control Panel.
Click the Start button, and then click Control Panel.
![]() Click the Sync Center icon in Small icons or Large icons view, and then click Manage offline files.
Click the Sync Center icon in Small icons or Large icons view, and then click Manage offline files.
![]() Click the General tab.
Click the General tab.
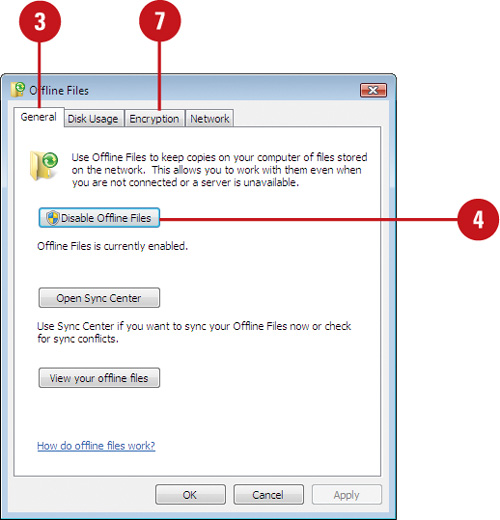
![]() To disable or enable offline files, click the Disable Offline Files or Enable Offline Files.
To disable or enable offline files, click the Disable Offline Files or Enable Offline Files.
![]() Click the Disk Usage tab.
Click the Disk Usage tab.

![]() To change disk space allocation for offline files, click Change Limits, drag the slider to adjust space usage, and then click OK.
To change disk space allocation for offline files, click Change Limits, drag the slider to adjust space usage, and then click OK.
![]() Click the Encryption tab.
Click the Encryption tab.
![]() Click Encrypt or Unencrypt to add or remove file security.
Click Encrypt or Unencrypt to add or remove file security.
![]() Click the Network tab.
Click the Network tab.
![]() Select the check box and specify time, if you want to automatically work offline on a slow network.
Select the check box and specify time, if you want to automatically work offline on a slow network.
![]() Click OK.
Click OK.
Make Files Available Offline
![]() Open the network file or folder you want to make available offline.
Open the network file or folder you want to make available offline.
![]() Right-click the file or folder, and then click Always Available Offline.
Right-click the file or folder, and then click Always Available Offline.
Timesaver Select the file or folder, and then click the Work Offline button on the toolbar.
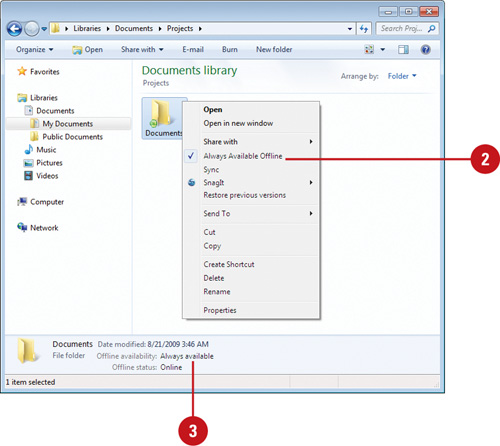
![]() To check if you’re working offline or not, open the network folder with the offline files, and check the Details pane for offline status information.
To check if you’re working offline or not, open the network folder with the offline files, and check the Details pane for offline status information.
View Offline Files
![]() Click the Start button, and then click Control Panel.
Click the Start button, and then click Control Panel.
![]() Click the Sync Center icon in Small icons or Large icons view, and then click Manage offline files.
Click the Sync Center icon in Small icons or Large icons view, and then click Manage offline files.
![]() Click the General tab.
Click the General tab.
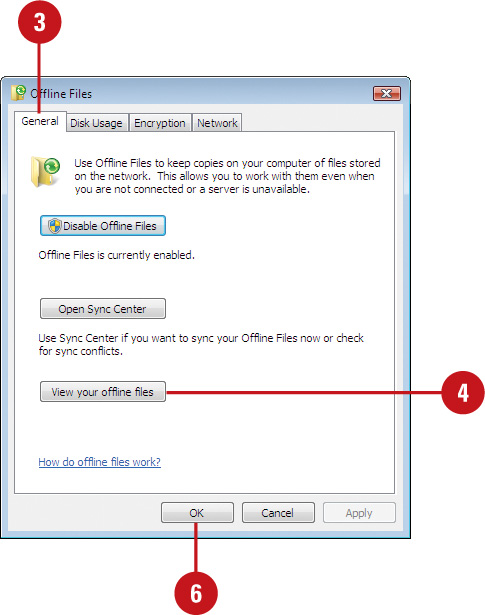
![]() Click the View your offline files button.
Click the View your offline files button.
![]() When you’re done, click the Close button on the window with the offline files.
When you’re done, click the Close button on the window with the offline files.
![]() Click OK to close the Offline Files dialog box.
Click OK to close the Offline Files dialog box.
Connecting to a Network Projector
A network projector is a video projector that is connected to a wireless or local area network. If you have a network projector at a remote location and you can connect to it, then you can operate the projector to give a presentation as if you were physically in the room. The audience for the presentation needs to be in the same room as the network projector and the presentation can’t be viewed over a network. To connect to a network projector, you can search for one on your network or you can enter a network or web address provided from your network administrator or the person in charge of the network projector. If the projector icon you select contains a lock, it’s security-enabled and requires a password.
Connect to a Network Projector
![]() Click the Start button, point to All Programs, click Accessories, and then click Connect to a Network Projector.
Click the Start button, point to All Programs, click Accessories, and then click Connect to a Network Projector.
![]() Click Allow the network projector to communicate with my computer if windows Firewall is blocking the network projector.
Click Allow the network projector to communicate with my computer if windows Firewall is blocking the network projector.
![]() Click one of the following commands:
Click one of the following commands:
• Search for a projector. Select a projector from the list, and then click Next to continue.
• Enter the projector address. Type a network address. The address can be a web address (http://server.com/...) or a network path (\server...)
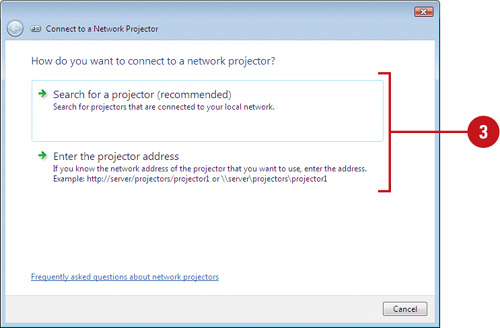
![]() If the projector is security-enabled, type a projector password.
If the projector is security-enabled, type a projector password.

![]() Click Connect.
Click Connect.
The Network Presentation dialog box opens and then minimizes on the taskbar. The desktop temporarily resizes to accommodate custom projector resolutions.
![]() Use the dialog box to pause and resume the presentation, or disconnect to exit the presentation.
Use the dialog box to pause and resume the presentation, or disconnect to exit the presentation.
Viewing Windows SideShow
Windows SideShow allows hardware manufacturers to build peripheral devices—such as LCD displays, remote controls, cell phones, or TVs—that can be used to view the information you need at a moments notice. Some devices are integrated into your computer, while other are separate from your computer. You can use Windows SideShow devices to check e-mail messages, view meeting schedules, or find addresses and phones numbers without having to start up your computer. To find a Windows SideShow device, check the Microsoft web site for details and look for the Windows SideShow logo on the hardware device. This innovative technology is just getting started, so new hardware will continue to expand as Windows 7 continues to grow. You install gadgets, or add-in programs to determine what information you want to gather and display using a Windows SideShow device. After you install a gadget, you can use Windows SideShow to turn it on.
View Windows SideShow
![]() Click the Start button, and then click Control Panel.
Click the Start button, and then click Control Panel.
![]() Click the Windows SideShow icon in Small icons or Large icons view.
Click the Windows SideShow icon in Small icons or Large icons view.
• You can also search for Windows SideShow in the Search box to access using Help and Support.
![]() To check more gadgets, click Get more gadgets online in the left pane.
To check more gadgets, click Get more gadgets online in the left pane.
Your web browser opens, displaying the gadgets you want to install. Follow the online instructions.
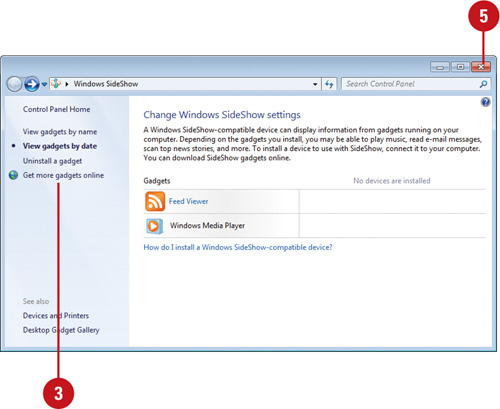
![]() Click the Close button to exit your web browser.
Click the Close button to exit your web browser.
![]() Click the Close button.
Click the Close button.
Working with Tablet PC Tools
Windows 7 comes standard with Tablet PC tools that you can effectively use on a Tablet PC with a pen. The tools are also available on a standard PC and you can use them with a mouse, but not as effectively. Windows 7 comes with three tools: Windows Journal, Tablet PC Input Panel, and Personalize Handwriting Recognition. Windows Journal allows you to handwrite notes and draw pictures that mimic a notebook pad. Tablet PC Input Panel allows you to enter text without using a standard keyboard. You use the writing pad or the character pad to convert your handwriting into typed text. You can also use the on-screen keyboard to enter characters. Personalize Handwriting Recognition (New!) provides writing samples and creates personalized dictionaries to help Windows recognize your handwriting more accurately.
Handwrite Journal Entries
![]() Click the Start button, point to All Programs, click Accessories, click Tablet PC, and then click Windows Journal.
Click the Start button, point to All Programs, click Accessories, click Tablet PC, and then click Windows Journal.
• Of first use. Click Install or Cancel to install the Journal Note Writer printer driver, which captures an image of the document.
![]() Click the Pen button arrow on the toolbar, and then select a pen style.
Click the Pen button arrow on the toolbar, and then select a pen style.
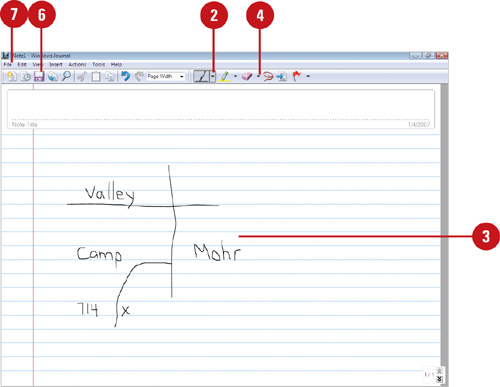
![]() Handwrite notes or make a drawing.
Handwrite notes or make a drawing.
![]() To make corrections, click the Erase button arrow, select an eraser size, and then drag to erase on the page.
To make corrections, click the Erase button arrow, select an eraser size, and then drag to erase on the page.
![]() Use many of the common tools on the toolbar and menus to create a handwritten document.
Use many of the common tools on the toolbar and menus to create a handwritten document.
![]() When you’re done, click the Save button on the toolbar, type a name, specify a location, and then click Save.
When you’re done, click the Save button on the toolbar, type a name, specify a location, and then click Save.
![]() Click the File menu, and then click Exit.
Click the File menu, and then click Exit.
Use Personalize Handwriting Recognition
![]() Click the Start button, point to All Programs, click Accessories, click Tablet PC, and then click Personalize Handwriting Recognition.
Click the Start button, point to All Programs, click Accessories, click Tablet PC, and then click Personalize Handwriting Recognition.
![]() Click Target specific recognition errors or Teach the recognizer your handwriting style.
Click Target specific recognition errors or Teach the recognizer your handwriting style.

![]() To set pen, flick, and handwriting options, click Change automatic learning settings, click a tab, select the options you want, and then click OK.
To set pen, flick, and handwriting options, click Change automatic learning settings, click a tab, select the options you want, and then click OK.
• Flicks tab. A flick is a quick stroke of the pen to navigate and perform shortcuts using your tablet pen. You can select options to use flicks to perform common commands and adjust the sensitivity slider.
• Pen Options tab. You can adjust how quickly you tap the screen when you double-tap or the distance the pointer can move between tapping when you double-tap, and then test your settings to make sure they are what you want.
![]() Click the options to select the type of handwriting you want to perform.
Click the options to select the type of handwriting you want to perform.
![]() Write the sentence indicated on the screen.
Write the sentence indicated on the screen.

![]() Use the Pen, Erase, and Clear all buttons to complete the sentence.
Use the Pen, Erase, and Clear all buttons to complete the sentence.
![]() Click Next to continue writing some more, click Save for later to save it and close, or Cancel to exit.
Click Next to continue writing some more, click Save for later to save it and close, or Cancel to exit.
![]() Click Close.
Click Close.
For Your Information: Using Windows Touch
If you have a touch screen PC with multitouch capability, you can use Windows Touch (New!) to free yourself from your mouse and touchpad to go directly to the screen. The Start menu and taskbar icons are bigger for touch screen use, and all Windows 7 programs are touch screen ready. The common gestures are press and hold to right-click, slide two fingers apart to zoom out and back together to zoom in, flick to scroll through a page, and touch two points and rotate to turn an image.
Using the Tablet PC Input Panel
Tablet PC Input Panel allows you to enter text without using a standard keyboard. You use the writing pad to convert your handwriting into typed text or the on-screen keyboard to enter characters. Tablet PC Input Panel includes correction tools (New!) that allow you to correct individual letters using the character pad, delete words, split a word, and join letters. If you’re not sure how to use one of the tools, a quick video is available to show you what to do.
Use the Tablet PC Input Panel
![]() Open a document to insert handwriting, such as WordPad.
Open a document to insert handwriting, such as WordPad.

![]() Click the Start button, point to All Programs, click Accessories, click Tablet PC, and then click Tablet PC Input Panel.
Click the Start button, point to All Programs, click Accessories, click Tablet PC, and then click Tablet PC Input Panel.
![]() To write continuously, click the Writing Pad button, handwrite a message, and then click the Insert button.
To write continuously, click the Writing Pad button, handwrite a message, and then click the Insert button.
• Correct. Point to the recognized text to show a selection, click it, write individual letters, and then click the Close button.
• Delete. Point to the recognized text to show a selection, and then drag a horizontal line through it.
• Split. Point to the recognized text to show a selection, and then drag a vertical line where you want the split.
• Join. Point to the recognized text to show a selection, and then drag a connection line between the two points.
![]() To use an on-screen keyboard, click the On-Screen Keyboard button, and then click the keys.
To use an on-screen keyboard, click the On-Screen Keyboard button, and then click the keys.

![]() When you’re done, click the Tools menu, and then click Exit..
When you’re done, click the Tools menu, and then click Exit..

Change Writing Tablet PC Options
![]() Click the Start button, point to All Programs, click Accessories, click Tablet PC, and then click Tablet PC Input Panel.
Click the Start button, point to All Programs, click Accessories, click Tablet PC, and then click Tablet PC Input Panel.
![]() Click the Tools menu, and then click Options.
Click the Tools menu, and then click Options.
![]() Click the Handwriting tab.
Click the Handwriting tab.

![]() Select the handwriting options you want:
Select the handwriting options you want:
• Appearance. Click the Ink thickness button, and then select a pen point thickness.
• New writing line. Drag the slider to specify how close to the end of the writing line you want to write before a new line appears.
![]() Click the Ink to text conversion tab.
Click the Ink to text conversion tab.

![]() Drag the sliders to adjust the Distance from ink and Length of pause you want to convert your ink to text as you write.
Drag the sliders to adjust the Distance from ink and Length of pause you want to convert your ink to text as you write.
![]() Click OK.
Click OK.
![]() When you’re done, click the Tools menu, and then click Exit..
When you’re done, click the Tools menu, and then click Exit..
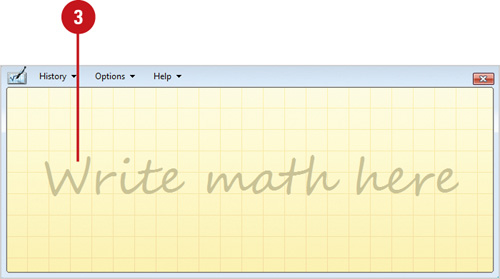
Using Math Input Panel
If you use your Tablet PC to take notes in math or you work in an engineering or scientific profession, then you need the Math Input Panel. The Math Input Panel (New!) recognizes handwritten math expressions and inserts them into other programs. The program needs to support Mathematical Markup Language (MathML). Just open the document in which you want to insert your math expressions, start Math Input Panel, handwrite your math expression, and then click Insert. If you take notes in Windows Journal, you can convert your handwritten math expression to normal text that you can use in a word processing program. Simply drag the select expression directly into the Math Input Panel.
Use the Math Input Panel
![]() Open the document in which you want to insert the math expression.
Open the document in which you want to insert the math expression.
![]() Click the Start button, point to All Programs, click Accessories, and then click Math Input Panel.
Click the Start button, point to All Programs, click Accessories, and then click Math Input Panel.
![]() Handwrite the math expression you want.
Handwrite the math expression you want.
As you write, the expression appears in the recognition box. The Write button is selected by default.
![]() To correct a letter, click the Select and Correct button, select a part of the expression, and then select a correction from the menu.
To correct a letter, click the Select and Correct button, select a part of the expression, and then select a correction from the menu.

![]() To erase the expression, click the Erase button, and then drag to erase it.
To erase the expression, click the Erase button, and then drag to erase it.
![]() To clear the expression and start over, click the Clear button.
To clear the expression and start over, click the Clear button.
![]() To undo or redo, click the Undo or Redo button.
To undo or redo, click the Undo or Redo button.
![]() Click Insert to place it in the open document.
Click Insert to place it in the open document.