14. Printing and Faxing
What You’ll Do
Manage Printers and Print Jobs
Change Printer Properties and Preferences
Change Fax Properties and Options
Introduction
After you create a document or picture, or open a web page or an e-mail, you can use Windows printing options to create a hard copy. You can print files from a folder window or within a program. The Add a Printer wizard makes it easy to install a printer directly attached to your computer or connected to a network. After you send a print job to the printer, you can check the status, pause and resume the print job, or cancel it. If a printer is not working the way you want, you can change printer properties, such as a printer’s computer connection or network location, sharing options, related software drivers, color management options, graphics settings, installed fonts, and other advanced settings. To customize your print jobs, you can also change printer preferences, such as orientation, page order, pages per sheet, paper size, paper tray selection, copy count, print quality, and color.
Windows also provides you with complete fax facilities from your computer. After the fax is set up, you can configure fax settings, send and receive faxes, track and monitor fax activity, and view faxes. Using Windows Fax and Scan, you can send and receive faxes, fax or e-mail scanned documents, and forward faxes as e-mail attachments from your computer. You can also change the send and receive properties for the fax to work with your phone line.
Understanding Printers
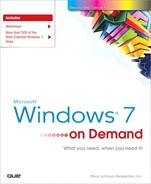
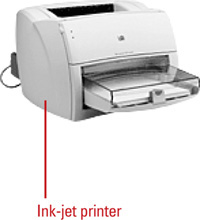
Although there are many different kinds of printers, there are two main categories: ink-jet and laser. An ink-jet printer works by spraying ionized ink on a sheet of paper. Ink-jet printers are less expensive and considerably slower than laser printers, but they still produce a good quality output. A laser printer utilizes a laser beam to produce an image on a drum, which is rolled through a reservoir of toner and transferred to the paper through a combination of heat and pressure. Laser printers are faster and produce a higher quality output than ink-jets, but they are also more expensive. Ink-jet and laser printers are combined with other hardware devices, such as a copier and scanner, into a multi-function device. A multi-function device provides common device functionality at a lower cost than purchasing each device separately. Printers are classified by two main characteristics: resolution and speed. Printer resolution refers to the sharpness and clarity of a printed page. For printers, the resolution indicates the number of dots per inch (dpi). For example, a 300-dpi printer is one that is capable of printing 300 distinct dots in a line one-inch long, or 90,000 dots per square inch. The higher the dpi, the sharper the print quality. Printer speed is measured in pages per minute (ppm). The speed of printers varies widely. In general, ink-jet printers range from about 4 to 10 ppm, while laser printers range from about 10 to 30 ppm. The speed depends on the amount of printer memory (the more the better) and the page’s contents: if there is just text or the page has only one color, the ppm is in the high range, but when a page contains graphics and/or has multiple colors, the ppm rate falls to the low range.

Viewing Printers
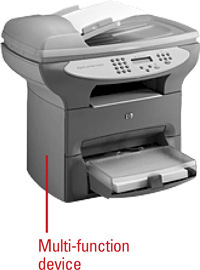
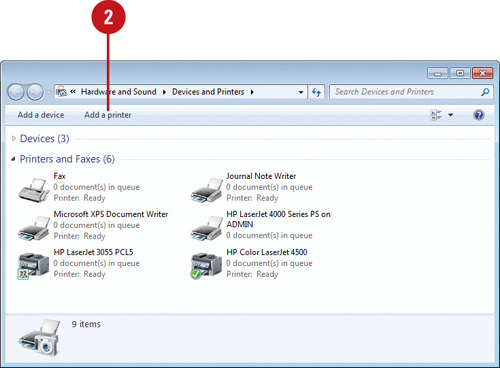
After you install a printer, the printer appears in the Devices and Printers window (New!)—a centralized place to check and manage all devices connected to your computer—and in a program’s Print dialog box, where you can view and change printer properties and personal preferences. Every installed printer on your computer is represented by an icon in the Devices and Printers window. When you select a printer icon, status information for that printer appears in the Details pane, such as number of documents to be printed, and whether the printer is ready to print. A printer icon appears in the window without a cable indicates a local printer, while a printer icon with a cable (not all instances) indicates a network printer. A local printer is a printer connected directly to your computer, and a network printer is one connected to a network to which you have access. A printer icon that appears with two heads indicates that other network users share the printer directly connected to your computer, known as a shared printer.
View Printer Properties
![]() Click the Start button, and then click Devices and Printers.
Click the Start button, and then click Devices and Printers.
![]() Click a printer icon.
Click a printer icon.
![]() Click the Close button.
Click the Close button.
Did You Know?
You can access additional buttons on the toolbar in the Devices and Printers window. In the Devices and Printers window, the toolbar display several commands, such as Add A Device, Add A Printer, See What’s Printing, and Manage Default Printers. However, there are more commands available on the toolbar. Click the double arrow () to display a menu with additional commands, such as Print Server Properties, and Remove device.
You can display printer status by displaying views in the Devices and Printers window. In the Devices and Printers window, click the Views button on the toolbar, and then click Tiles or Details. Printer status appears along with the printer name.
Installing a Printer
To install a printer, you do not need to shut down your computer. Simply attach the printer cable to the appropriate connector on your computer, according to the manufacturer’s instructions, and plug in the power cord. If you connect your printer to your computer through a USB port, Windows detects the new hardware device and installs the printer, and you are ready to print. Otherwise, you can use the Add a printer wizard in conjunction with the Found New Hardware wizard to detect and install the printer. The Add a printer wizard asks you a series of questions to help you install either a local or network printer, establish a connection, and print a test page.
Set Up a Local Printer Using the Add Printer Wizard
![]() Click the Start button, and then click Devices and Printers.
Click the Start button, and then click Devices and Printers.
![]() Click the Add a printer button on the toolbar.
Click the Add a printer button on the toolbar.
![]() Click Add a local printer.
Click Add a local printer.

![]() Select the Use an existing port or Create a new port option, and then click Next to continue.
Select the Use an existing port or Create a new port option, and then click Next to continue.
![]() Select the printer manufacturer and model, and then click Next to continue.
Select the printer manufacturer and model, and then click Next to continue.
![]() Type a printer name, and then click Next to continue.
Type a printer name, and then click Next to continue.
![]() Click the Do not share this printer or Share this printer so that others on your network can find and use it option, and then click Next to continue.
Click the Do not share this printer or Share this printer so that others on your network can find and use it option, and then click Next to continue.
![]() Select or clear the Set as the default printer check box.
Select or clear the Set as the default printer check box.
![]() To test the printer, click Print a test page.
To test the printer, click Print a test page.
![]() Click Finish.
Click Finish.
Set Up a Network Printer Using the Add Printer Wizard
![]() Click the Start button, and then click Devices and Printers.
Click the Start button, and then click Devices and Printers.
![]() Click the Add a printer button on the toolbar.
Click the Add a printer button on the toolbar.
![]() Click Add a network, wireless or Bluetooth printer.
Click Add a network, wireless or Bluetooth printer.
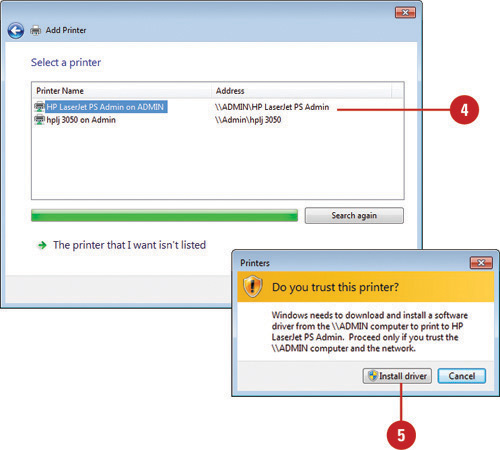
![]() Select the printer you want to install, and then click Next to continue.
Select the printer you want to install, and then click Next to continue.
![]() If necessary, click Install driver to install the printer driver.
If necessary, click Install driver to install the printer driver.
![]() If available, type a name for the printer, and then click Next to continue.
If available, type a name for the printer, and then click Next to continue.
![]() Select or clear the Set as the default printer check box.
Select or clear the Set as the default printer check box.
![]() To test the printer, click Print a test page.
To test the printer, click Print a test page.
![]() Click Finish.
Click Finish.
Did You Know?
You can display printer and communication ports. Click the Start button, click Devices and Printers, click the File menu, click Server Properties, and then click the Ports tab. The available ports don’t have a printer name associated with it.
For Your Information: Understanding USB Ports
A port is the location on the back of your computer where you connect the printer cable. You can connect the cable to either a printer port, which is labeled LPT1 or LPT2, to a communications port, which is labeled COM1 or COM2, or to a Universal Serial Bus port, which is labeled USB. A printer port is called a parallel port, which sends more than one byte simultaneously. A communications port is called a serial port, which sends information one byte at a time. The USB port is a new technology that is expected to replace parallel and serial ports. A USB (Universal Serial Bus) port is an external hardware interface on the computer that allows you to connect a USB device. A single USB port can be used to connect up to 127 peripheral devices, such as mice, modems, and keyboards, and supports data transfer rates of 480 Mbs (480 million bits per second). USB also supports plug and play installation and hot plugging, which is the ability to add and remove devices to a computer while the computer is running and have the operating system automatically recognize the change.
Specifying a Default Printer
If your computer is connected to more than one printer, you can choose the default printer. The default printer is typically the printer that you use most often. However, if you use different default printers based on your location, you can set them and let Windows 7 use location-aware printing (New!) to automatically select the right one, which is great for laptops. When you start a print job without specifying a printer, the job is sent to the default printer. You can select a default printer in the Devices and Printers window or when you set up a new printer. The default printer displays a green circle with a check mark in the printer icon.
Select a Default Printer
![]() Click the Start button, and then click Devices and Printers.
Click the Start button, and then click Devices and Printers.
![]() Right-click the printer icon you want to set as the default, and then click Set as default printer.
Right-click the printer icon you want to set as the default, and then click Set as default printer.

![]() Click the Close button.
Click the Close button.
Manage Default Printers
![]() Click the Start button, and then click Devices and Printers.
Click the Start button, and then click Devices and Printers.
![]() Click the Manage default printers button on the toolbar.
Click the Manage default printers button on the toolbar.
![]() Click the Always use the same printer as my default printer or Change my default printer when I change networks option.
Click the Always use the same printer as my default printer or Change my default printer when I change networks option.
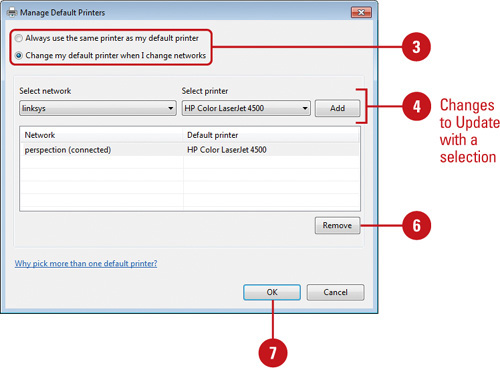
![]() Select a network, select a printer, and then click Add.
Select a network, select a printer, and then click Add.
![]() To change a printer, select and change it, and then click Update.
To change a printer, select and change it, and then click Update.
![]() To remove a printer, select it, and then click Remove.
To remove a printer, select it, and then click Remove.
![]() Click OK.
Click OK.
Renaming or Deleting a Printer
If you have trouble identifying a printer, or if you just want to change the name, you can rename it. You rename the same way you rename a file or folder. When you rename a printer, the new name appears in the Print dialog box for all your programs. If you no longer use a printer, you can delete it. When you delete the default printer, Windows displays a warning and changes the default printer to another available printer.
Rename a Printer
![]() Click the Start button, and then click Devices and Printers.
Click the Start button, and then click Devices and Printers.
![]() Right-click the printer icon you want to rename, and then click Printer properties.
Right-click the printer icon you want to rename, and then click Printer properties.
![]() Type a new name for the printer on the General tab.
Type a new name for the printer on the General tab.
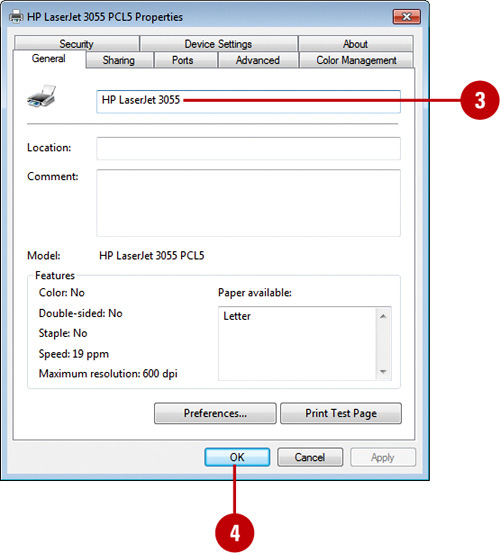
![]() Click OK.
Click OK.
Delete a Printer
![]() Click the Start button, and then click Devices and Printers.
Click the Start button, and then click Devices and Printers.
![]() Right-click the printer icon you want to delete, and then click Remove device.
Right-click the printer icon you want to delete, and then click Remove device.

Timesaver You can also press the Delete key, or click the Remove Device button on the toolbar (click to access).
![]() Click Yes to confirm the deletion.
Click Yes to confirm the deletion.
![]() Click the Close button.
Click the Close button.
Sharing a Printer
If you have a printer connected to your computer and your computer is connected to a network, you can share your printer with other network users. Before you can share a printer, you need to turn on printer sharing in the Network and Sharing Center window, which you can accomplish by using the Sharing tab in the Printer Properties dialog box. After you share a printer, the printer icon appears with two heads in the Devices and Printers window. For security purposes, if Windows Firewall is enabled (the default setting) on the computer with the shared computer, then you need to select the File and Printer Sharing check box on the Exceptions tab in Windows Firewall for others to use the shared printer.
Share a Printer
![]() Click the Start button, and then click Devices and Printers.
Click the Start button, and then click Devices and Printers.
![]() Right-click the printer you want to share, and then click Printer properties.
Right-click the printer you want to share, and then click Printer properties.
Trouble? If sharing options are not available, click the Change Sharing Options button, and then follow the instructions to turn on print sharing.
![]() Click the Sharing tab.
Click the Sharing tab.

![]() Select the Share this printer check box.
Select the Share this printer check box.
![]() Type a name for the printer (eight characters recommended), or use the suggested one.
Type a name for the printer (eight characters recommended), or use the suggested one.
![]() If other computers on the network are using different versions of Windows, click Additional Drivers to install other drivers for other computers, select the check boxes for the operating systems you want, and then click OK.
If other computers on the network are using different versions of Windows, click Additional Drivers to install other drivers for other computers, select the check boxes for the operating systems you want, and then click OK.
![]() If prompted, insert the Windows 7 DVD into your drive or provide a driver location, and then click OK.
If prompted, insert the Windows 7 DVD into your drive or provide a driver location, and then click OK.
![]() Click OK.
Click OK.
![]() Click the Close button.
Click the Close button.
Printing Documents
If you have a group of documents that you want to print, you can print them all directly from a folder window without having to open each one in its program. The program needs to be installed on your computer to complete the job.
Print Documents Using the Default Printer
![]() Open the folder that contains the documents you want to print.
Open the folder that contains the documents you want to print.
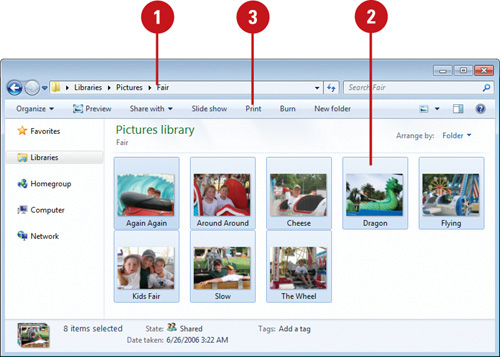
![]() Select the documents.
Select the documents.
![]() Click the Print button on the toolbar.
Click the Print button on the toolbar.
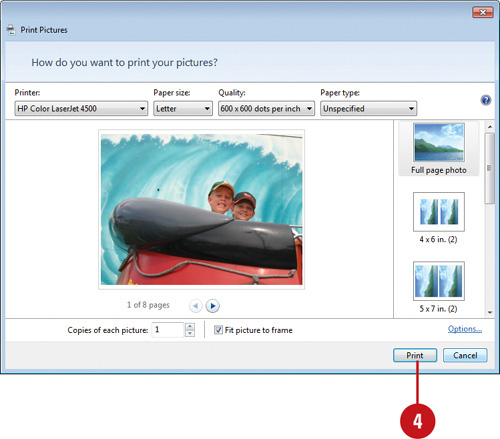
![]() If prompted, select the options you want, and then click Print.
If prompted, select the options you want, and then click Print.
Options vary depending on the type of documents you select.
Managing Printers and Print Jobs
After you send a print job to the printer from the Print dialog box in a program, or drag files to the Printer icon in the Devices and Printers window, you can check the status. To check the status of a printer or manage multiple print jobs, you can double-click the appropriate printer icon in the Devices and Printers window or on the taskbar in the notification area. A window opens showing the print queue, which is the list of files to be printed. You can use this window to cancel print jobs, temporarily pause print jobs, view printer properties, and so on. If you are having problems with a printer or print job, you can defer, or halt, the printing process to avoid getting error messages. With deferred printing, you can send a job to be printed even if your computer is not connected to a printer. To do this, you pause printing, and the file waits in the print queue until you turn off pause printing.
Pause and Resume Printing
![]() Click the Start button, and then click Devices and Printers.
Click the Start button, and then click Devices and Printers.
![]() Double-click the printer icon.
Double-click the printer icon.

![]() If a printer window opens, click the Printer link at the top.
If a printer window opens, click the Printer link at the top.
![]() Click the Printer menu, and then click Pause Printing.
Click the Printer menu, and then click Pause Printing.
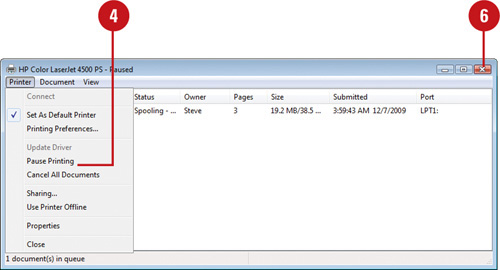
![]() To resume printing, click the Printer menu, and then click Resume Printing.
To resume printing, click the Printer menu, and then click Resume Printing.
![]() Click the Close button.
Click the Close button.
Pause a Print Job
![]() Click the Start button, and then click Devices and Printers.
Click the Start button, and then click Devices and Printers.
![]() Double-click the printer icon.
Double-click the printer icon.
![]() If a printer window opens, click the Printer link at the top.
If a printer window opens, click the Printer link at the top.
![]() Right-click the document you want to pause, and then click Pause.
Right-click the document you want to pause, and then click Pause.

![]() To resume the document printing, right-click the document you want to resume, and then click Restart.
To resume the document printing, right-click the document you want to resume, and then click Restart.
![]() Click the Close button.
Click the Close button.
Cancel a Print Job
![]() Click the Start button, and then click Devices and Printers.
Click the Start button, and then click Devices and Printers.
![]() Double-click the printer icon.
Double-click the printer icon.
![]() If a printer window opens, click the Printer link at the top.
If a printer window opens, click the Printer link at the top.
![]() Right-click the document you want to stop, and then click Cancel.
Right-click the document you want to stop, and then click Cancel.
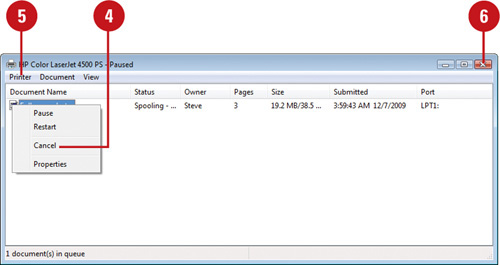
![]() To cancel all documents, click the Printer menu, click Cancel All Documents, and then click Yes to confirm the cancelation.
To cancel all documents, click the Printer menu, click Cancel All Documents, and then click Yes to confirm the cancelation.
![]() Click the Close button.
Click the Close button.
Security Alert: Displaying Printer Notification
For security purposes, if Windows Firewall is turned on (the default setting), printer notification information, such as “Ready” or “Paused,” in the Devices and Printers folder is slightly delayed and your computer no longer receives other printer notifications, such as “Print job completed” or “Printer out of paper”.
Changing Printer Properties
Viewing printer properties gives you information about a printer’s computer connection or network location, sharing options, related software drivers, color management options, graphics settings, installed fonts, and other advanced settings, such as spooling. Spooling, also known as background printing, is the process of storing a temporary copy of a file on the hard disk and then sending the file to the print device. Spooling allows you to continue working with the file as soon as it is stored on the disk instead of having to wait until the file is finished printing.
Change Printer Device and Spooling Properties
![]() Click the Start button, and then click Devices and Printers.
Click the Start button, and then click Devices and Printers.
![]() Right-click the printer icon you want to change, and then click Printer properties.
Right-click the printer icon you want to change, and then click Printer properties.
![]() Click the Device Settings tab.
Click the Device Settings tab.

![]() Click the plus sign (+) to expand the options you want to change.
Click the plus sign (+) to expand the options you want to change.
![]() Click an option link.
Click an option link.
![]() Click an option list arrow, and then select a setting.
Click an option list arrow, and then select a setting.
![]() Click the Advanced tab.
Click the Advanced tab.

![]() Click the Spool print documents so program finishes printing faster option.
Click the Spool print documents so program finishes printing faster option.
![]() Click a spooling option to specify when you want the printer to start printing your documents.
Click a spooling option to specify when you want the printer to start printing your documents.
![]() To keep documents in the spooler after they are printed, select the Keep printed documents check box.
To keep documents in the spooler after they are printed, select the Keep printed documents check box.
![]() To print documents that have completed spooling before other documents, select the Print spooled documents first check box.
To print documents that have completed spooling before other documents, select the Print spooled documents first check box.
![]() Click OK.
Click OK.
Changing Printer Preferences
In addition to printer properties, you can also view and change personal printer preferences, such as orientation, page order, pages per sheet, paper size, paper tray selection, copy count, and print quality and color. When you change personal printing preferences from the Devices and Printers folder, the default settings are changed for all documents you print to that printer. When you change personal preferences from the Print or Page Setup dialog boxes within a program, the settings are changed for individual documents. The available printing preferences depend on the printer.
Change Printer Preferences
![]() Click the Start button, and then click Devices and Printers.
Click the Start button, and then click Devices and Printers.
![]() Right-click the the printer icon you want to change, and then click Printing preferences.
Right-click the the printer icon you want to change, and then click Printing preferences.
![]() Click the tab with the option you want to change; tabs and options vary depending on the printer.
Click the tab with the option you want to change; tabs and options vary depending on the printer.
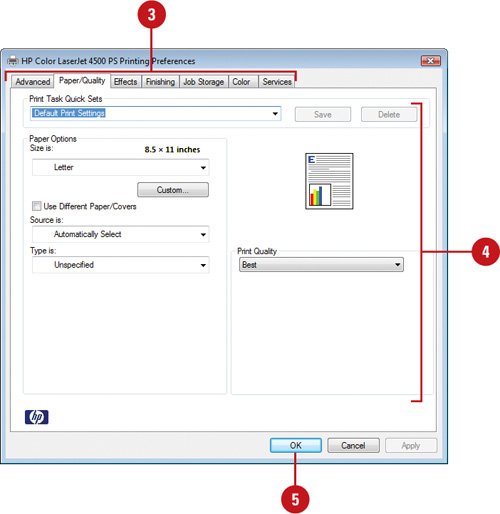
![]() Change the printer preferences you want to modify.
Change the printer preferences you want to modify.
![]() Click OK.
Click OK.
![]() Click the Close button.
Click the Close button.
Creating an XPS Document
Have you ever used Adobe Reader to view a document or created a PDF document? Well, now you can do the same type of thing with Microsoft’s XPS (XML Paper Specification). With XPS, you can share files with others who don’t have the same software. In addition, you can set permissions and add digital signatures to protect the document from unauthorized viewing and printing. You create an XPS document by printing it with the Microsoft XPS Document Writer printer (New!). The XPS Viewer—available in Windows 7—allows you to open any XPS document (New!). When you open a XPS document, it looks the same on the destination as it would on the source computer.
Create and View an XPS Document
![]() Open the program and document you want to create as an XPS document.
Open the program and document you want to create as an XPS document.
![]() Click the File menu, and then click Print.
Click the File menu, and then click Print.
![]() Select Microsoft XPS Document Writer as your printer.
Select Microsoft XPS Document Writer as your printer.
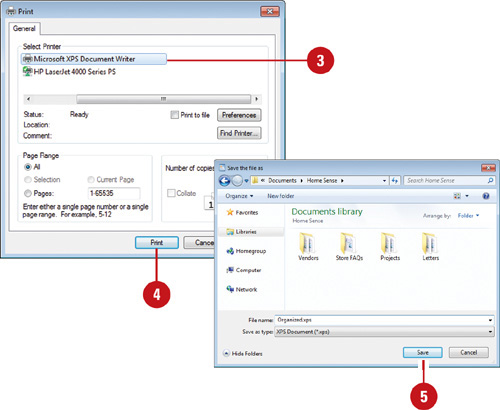
![]() Click Print.
Click Print.
![]() Specify a location, name the XPS document, and then click Save.
Specify a location, name the XPS document, and then click Save.
![]() Click the Start button, point to All Programs, and then click XPS Viewer.
Click the Start button, point to All Programs, and then click XPS Viewer.
![]() Click the File button, and then click Open.
Click the File button, and then click Open.
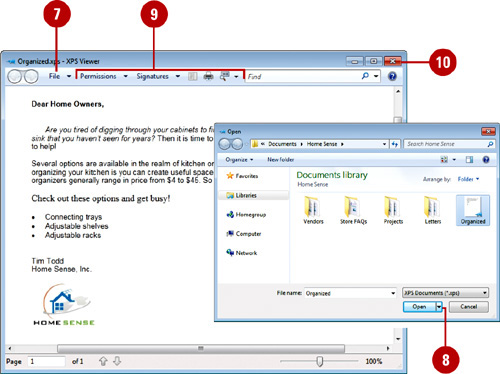
![]() Navigate to and select the XPS document you want to view, and then click Open.
Navigate to and select the XPS document you want to view, and then click Open.
![]() Use the buttons on the toolbar to set and remove security permissions, add digital signatures (a electronic stamp like a written signature), print the document, and change the view percentage.
Use the buttons on the toolbar to set and remove security permissions, add digital signatures (a electronic stamp like a written signature), print the document, and change the view percentage.
![]() When you’re done, click the Close button.
When you’re done, click the Close button.
Understanding Faxes
Windows Fax and Scan is a program that allows you to send and receive faxes, fax or e-mail scanned documents, and forward faxes as e-mail attachments from your computer. From Windows Fax and Scan, you can monitor the progress of incoming and outgoing fax activity.
Before you can use Windows Fax and Scan, you need a fax device for sending and receiving faxes. The fax device can be directly attached to your computer, known as a local fax, or located on a network, known as a fax server. Windows Fax and Scan makes it easy to setup a fax device with the Fax Setup wizard. You can only connect to one local fax, however you can connect to multiple fax servers or devices on a network. To start the Fax Setup wizard and set up a fax, start Windows Fax and Scan, click Fax in the left pane, click the Tools menu, click Fax Accounts, and then click Add. In the wizard, click Connect To A Fax server On My Network, and then follow the on-screen instructions.
Once your fax is installed, you can use Windows Fax and Scan to send and receive faxes, manage incoming and outgoing faxes, and change fax device properties. You can also send faxes from a folder window or the Print dialog box in a program. When you print using a fax printer, Windows Fax and Scan starts and opens the New Fax window, where you can send a fax just like you send an e-mail message.
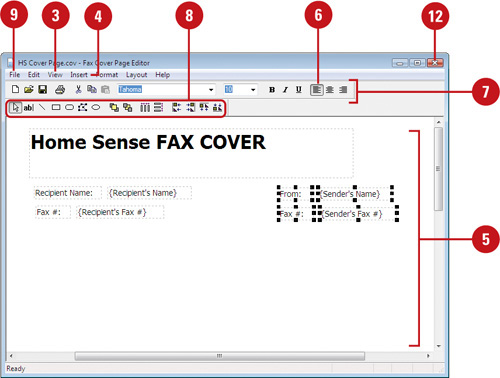
With the Fax Cover Page Editor, you can create and edit cover pages to use when you send a fax. The Fax Cover Page Editor is a full page editor that makes it easy to insert common fax page items, such as recipient, subject, number of pages, and message, and to format the page to create a professional look. You can also customize a few samples that come with the program.

Setting Up a Fax
If your computer has a fax modem installed, you can send and receive faxes through your computer. If you are not sure, you can use the Devices and Printers window to check if you have one installed. Using Windows Fax and Scan, you can send and receive faxes, fax or e-mail scanned documents, and forward faxes as e-mail attachments from your computer. The Fax Setup wizard helps you set up the Fax Service using a modem or a fax server. Afterwards, you can enter some personal information for the fax cover page, a phone number, and some options for the way you want to send and receive faxes.
Install a Modem
![]() If necessary, attach an analog phone line to your computer, and then turn the fax on. You can’t use a digital phone line to send or receive faxes.
If necessary, attach an analog phone line to your computer, and then turn the fax on. You can’t use a digital phone line to send or receive faxes.
If your computer has a built-in modem, Windows automatically detects and sets it up.
![]() Click the Start button, and then click Devices and Printers.
Click the Start button, and then click Devices and Printers.
![]() Click the Add a device button on the toolbar.
Click the Add a device button on the toolbar.
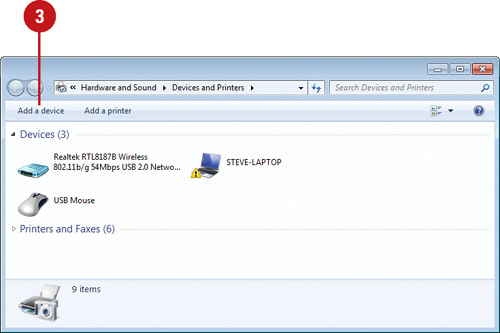
![]() Select the discovered modem device.
Select the discovered modem device.

![]() Click Next to continue.
Click Next to continue.
![]() Follow the Add a device wizard instructions to complete the installation.
Follow the Add a device wizard instructions to complete the installation.
Set Up for Faxing
![]() Click the Start button, point to All Programs, and then click Windows Fax and Scan.
Click the Start button, point to All Programs, and then click Windows Fax and Scan.
• You can also double-click the Fax icon in the Devices and Printers window to open Windows Fax and Scan.
![]() In the left pane, click Fax.
In the left pane, click Fax.
If you’re connecting to a fax device for the first time, the New Fax button starts the Fax Setup wizard.

![]() Click the New Fax button on the toolbar.
Click the New Fax button on the toolbar.
If the wizard doesn’t start, click the Tools menu, click Fax Accounts, and then click Add.
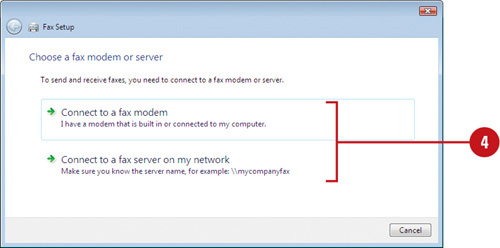
![]() Click Connect to a fax modem or Connect to a fax server on my network.
Click Connect to a fax modem or Connect to a fax server on my network.
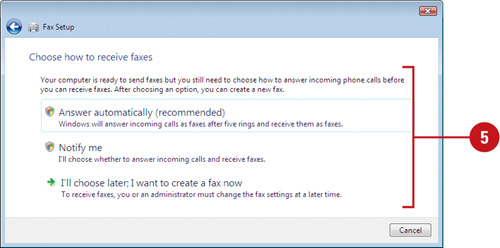
![]() Follow the wizard instructions to complete the set up; options vary depending on the fax modem you set up.
Follow the wizard instructions to complete the set up; options vary depending on the fax modem you set up.
Upon completion, the New Fax window opens.
![]() Click the Close button on the New Fax window.
Click the Close button on the New Fax window.
![]() Click the Tools menu, and then click Sender Information.
Click the Tools menu, and then click Sender Information.
![]() Enter the information you want cover pages to display.
Enter the information you want cover pages to display.
![]() Click OK.
Click OK.
Creating a Fax Cover Page
A cover page is typically a one page cover memo sent along with a fax containing the fax sender, a recipient, number of pages, a short message, and the transmission date and time. You can use the Fax Cover Page Editor to create your own cover pages or to customize cover page templates, known as common cover pages, that come with the program. You can copy and modify common cover pages without affecting the original templates. You can also edit existing cover pages and rename or delete personal cover pages as needed.
Create a Cover Page from Scratch
![]() Click the Start button, point to All Programs, click Windows Fax and Scan, and then click the Fax tab.
Click the Start button, point to All Programs, click Windows Fax and Scan, and then click the Fax tab.
![]() Click the Tools menu, click Cover Pages, and then click New.
Click the Tools menu, click Cover Pages, and then click New.
![]() Click the View menu, and then click Grid Lines.
Click the View menu, and then click Grid Lines.
![]() Click the Insert menu, point to Recipient, Sender, or Message, and then click an item.
Click the Insert menu, point to Recipient, Sender, or Message, and then click an item.
![]() Press and hold Ctrl, and then click the items you want to select.
Press and hold Ctrl, and then click the items you want to select.
![]() Drag the items to a new location, or use the alignment buttons on the toolbar.
Drag the items to a new location, or use the alignment buttons on the toolbar.
![]() Use the formatting buttons on the toolbar to format the text.
Use the formatting buttons on the toolbar to format the text.
![]() Use the drawing tools on the toolbar to add shapes and lines.
Use the drawing tools on the toolbar to add shapes and lines.
![]() Click the File menu, and then click Save As.
Click the File menu, and then click Save As.
![]() Type a name for the cover page.
Type a name for the cover page.

![]() Click Save.
Click Save.
![]() Click the Close button on the Fax Cover Page Editor.
Click the Close button on the Fax Cover Page Editor.
![]() Click Close.
Click Close.
Copy a Cover Page Template
![]() Click the Start button, point to All Programs, click Windows Fax and Scan, and then click the Fax tab.
Click the Start button, point to All Programs, click Windows Fax and Scan, and then click the Fax tab.
![]() Click the Tools menu, and then click Cover Pages.
Click the Tools menu, and then click Cover Pages.
![]() Click Copy.
Click Copy.
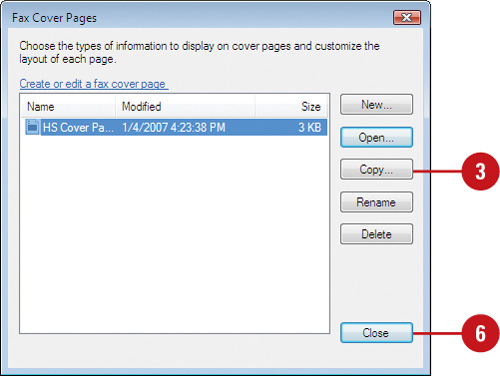
![]() Select a common fax cover page.
Select a common fax cover page.
![]() Click Open.
Click Open.
![]() Click Close.
Click Close.
Rename or Delete a Cover Page
![]() Click the Start button, point to All Programs, click Windows Fax and Scan, and then click the Fax tab.
Click the Start button, point to All Programs, click Windows Fax and Scan, and then click the Fax tab.
![]() Click the Tools menu, and then click Cover Pages.
Click the Tools menu, and then click Cover Pages.
![]() Click a cover page.
Click a cover page.
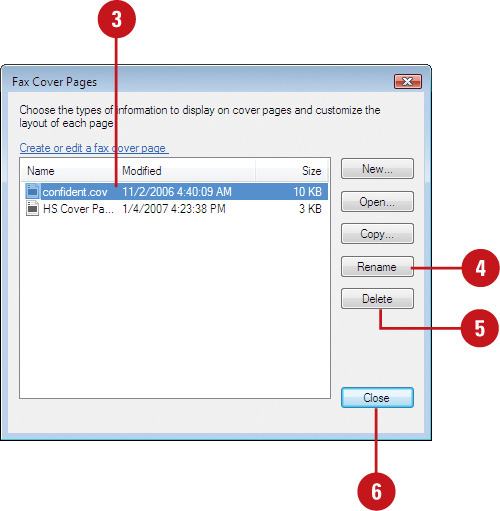
![]() To rename the cover page, click Rename, type a new name (include the extension .cov), and then press Enter.
To rename the cover page, click Rename, type a new name (include the extension .cov), and then press Enter.
![]() To delete the cover page, click Delete, and then click Yes to confirm it.
To delete the cover page, click Delete, and then click Yes to confirm it.
![]() Click Close.
Click Close.
Sending a Fax
After you install and configure your fax, you can send a fax using the New Fax window. You can send a cover page fax from the Printer window or from within Windows Fax and Scan, or a document fax from a program. When you send a fax, the New Fax window opens to help you create and send a fax. When you send a document fax, the program in which you open or create the document prints it to the fax device. When you print to a fax device, Windows Fax and Scan starts and opens the New Fax window where you can send the fax.
Send a Fax
![]() Click the Start button, point to All Programs, and then click Windows Fax and Scan.
Click the Start button, point to All Programs, and then click Windows Fax and Scan.
![]() Click the Fax tab.
Click the Fax tab.
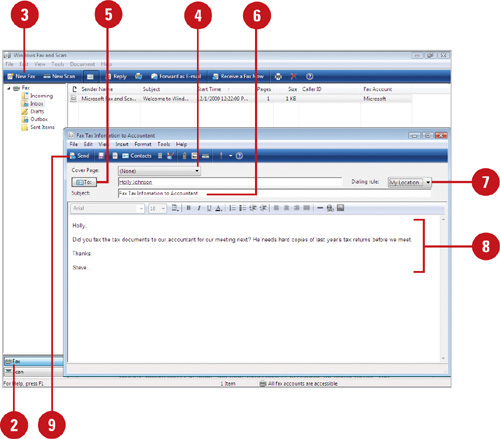
![]() Click the New Fax button.
Click the New Fax button.
![]() Click the Cover Page list arrow, and then select a cover page.
Click the Cover Page list arrow, and then select a cover page.
![]() Click the To button, select the recipients you want, click the To button, and then click OK.
Click the To button, select the recipients you want, click the To button, and then click OK.
![]() Type a subject.
Type a subject.
![]() Click the Dialing rule list arrow, and then select a rule.
Click the Dialing rule list arrow, and then select a rule.
![]() Type the message you want.
Type the message you want.
![]() Click the Send button on the toolbar.
Click the Send button on the toolbar.
Send a Fax from a Document
![]() Start the program and open or create the document you want to send as a fax.
Start the program and open or create the document you want to send as a fax.

![]() Click the File menu, and then click Print.
Click the File menu, and then click Print.
• For a Microsoft Office 2007 program, click the Office button, point to Print, and then click Print.
![]() Click the Fax printer as your printer.
Click the Fax printer as your printer.
![]() Click Print or OK.
Click Print or OK.
Windows Fax and Scan opens and starts a new fax.
![]() Click the Cover Page list arrow, and then select a cover page.
Click the Cover Page list arrow, and then select a cover page.
![]() Click the To button, select a recipients you want, click the To button, and then click OK.
Click the To button, select a recipients you want, click the To button, and then click OK.
![]() Type a subject, and any cover page notes you want.
Type a subject, and any cover page notes you want.
![]() Click the Dialing rule list arrow, and then select a rule.
Click the Dialing rule list arrow, and then select a rule.
![]() Type the message you want.
Type the message you want.
![]() Click the Send button on the toolbar.
Click the Send button on the toolbar.
Did You Know?
You can scan and fax a document. Scan the document using a scanner, open the scanned document in a program, and then print it to the fax directly from the program.
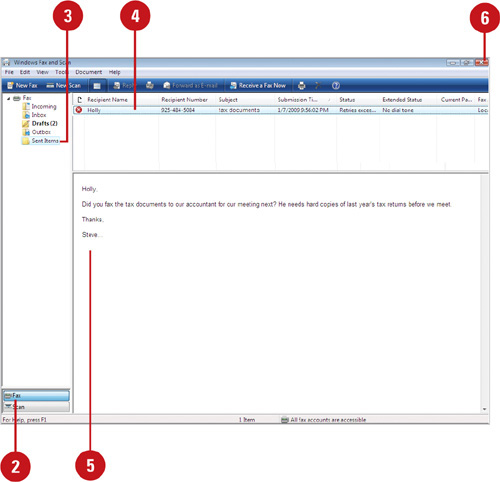
Managing Outgoing Faxes
After you send a fax, it’s sent to the Outbox folder of the Fax Console. The Outbox is a storage area for all faxes waiting to be sent, or in the process of being sent. From the Outbox, you can pause and resume faxes, restart failed faxes, and remove individual faxes as necessary. If a fax is being sent to multiple recipients, the fax for each recipient appears separately, so you can pause or delete a fax to one of the multiple recipients without affecting the others. When you change the status of a fax in the Outbox, the Status column changes to indicate the new state of the fax. Once a fax is sent successfully, it is moved to the Sent Items folder.
Cancel or Restart an Outgoing Fax
![]() Click the Start button, point to All Programs, and then click Windows Fax and Scan.
Click the Start button, point to All Programs, and then click Windows Fax and Scan.
![]() Click the Fax tab.
Click the Fax tab.
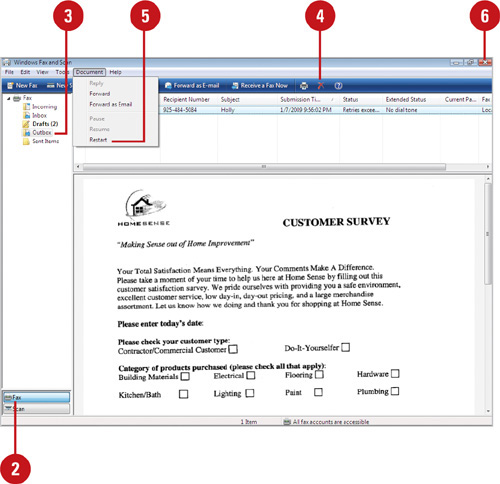
![]() Click the Outbox icon.
Click the Outbox icon.
![]() To cancel a fax, click the fax, and then click the Delete button.
To cancel a fax, click the fax, and then click the Delete button.
![]() To restart a failed fax, click the fax, click the Document menu, and then click Restart.
To restart a failed fax, click the fax, click the Document menu, and then click Restart.
![]() When you’re done, click the Close button.
When you’re done, click the Close button.
Did You Know?
You can’t remove a fax from a remote fax printer without deleting the fax printer. Click the remote fax printer from the Printer window, and then click the Delete This Printer button on the toolbar.
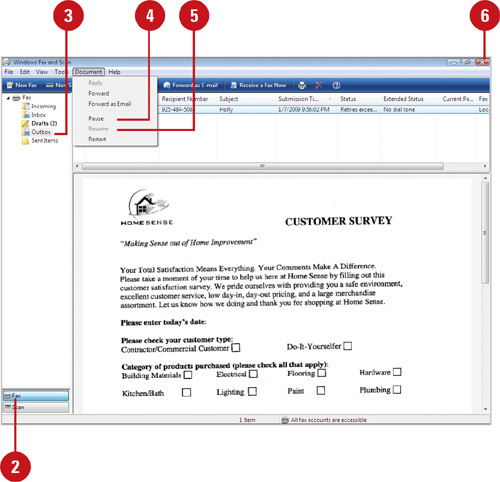
Pause or Resume an Outgoing Fax
![]() Click the Start button, point to All Programs, and then click Windows Fax and Scan.
Click the Start button, point to All Programs, and then click Windows Fax and Scan.
![]() Click the Fax tab.
Click the Fax tab.
![]() Click the Outbox icon.
Click the Outbox icon.
![]() To pause a fax, click the fax, click the Document menu, and then click Pause.
To pause a fax, click the fax, click the Document menu, and then click Pause.
![]() To resume a fax, click the paused fax, click the Document menu, and then click Resume.
To resume a fax, click the paused fax, click the Document menu, and then click Resume.
![]() When you’re done, click the Close button.
When you’re done, click the Close button.
View a Sent Fax
![]() Click the Start button, point to All Programs, and then click Windows Fax and Scan.
Click the Start button, point to All Programs, and then click Windows Fax and Scan.
![]() Click the Fax tab.
Click the Fax tab.
![]() Click the Sent Items icon.
Click the Sent Items icon.
![]() Click the fax you want to view.
Click the fax you want to view.
![]() Review the fax information.
Review the fax information.
![]() When you’re done, click the Close button.
When you’re done, click the Close button.
Receiving a Fax
If you have a phone line attached to your computer, you can set up Windows Fax and Scan to receive faxes automatically or manually. If the phone line is a dedicated fax line and set to receive faxes automatically, Windows Fax and Scan automatically stores the fax in your Inbox, just like an e-mail in your e-mail program. If the phone line is used for voice and fax calls, Windows Fax and Scan waits for you to answer the call before it receives the fax.
Receive a Fax Manually
![]() When you receive a call for a fax, click to receive the call to open the Fax Status Monitor dialog box.
When you receive a call for a fax, click to receive the call to open the Fax Status Monitor dialog box.
![]() Click Answer call, if necessary.
Click Answer call, if necessary.
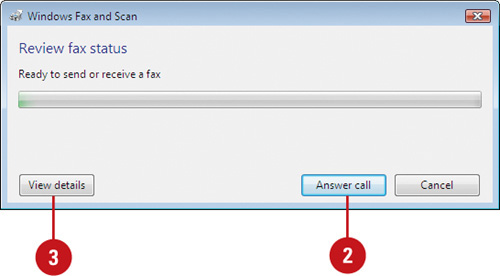
![]() Click View details to see details about the call.
Click View details to see details about the call.
![]() If there are problems with the fax or if you don’t want to receive it, click Disconnect.
If there are problems with the fax or if you don’t want to receive it, click Disconnect.
Change Receive Answer Mode
![]() Click the Start button, point to All Programs, click Windows Fax and Scan, and then click the Fax tab.
Click the Start button, point to All Programs, click Windows Fax and Scan, and then click the Fax tab.
![]() Click the Tools menu, and then click Fax Settings.
Click the Tools menu, and then click Fax Settings.
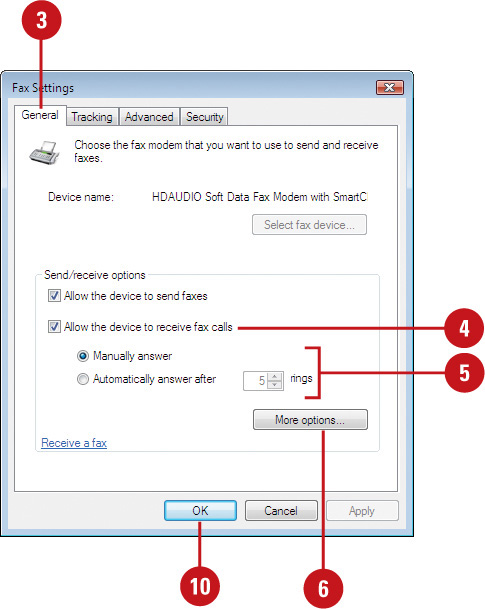
![]() Click the General tab.
Click the General tab.

![]() Select the Allow the device to receive fax calls check box.
Select the Allow the device to receive fax calls check box.
![]() Click the Manually answer or Automatically answer after X rings option.
Click the Manually answer or Automatically answer after X rings option.
![]() Click the Tracking tab, and then select the Received check box.
Click the Tracking tab, and then select the Received check box.
![]() Click OK.
Click OK.
Reviewing a Fax
After you receive a fax, you can use Fax Console to view, print, save, or e-mail the fax. Windows Fax and Scan informs you when a fax arrived, who sent it, how many pages were received, and the status of the job.
Review a Received Fax
![]() Click the Start button, point to All Programs, click Windows Fax and Scan, and then click the Fax tab.
Click the Start button, point to All Programs, click Windows Fax and Scan, and then click the Fax tab.
![]() To review the status of a fax being received, click the Incoming icon.
To review the status of a fax being received, click the Incoming icon.
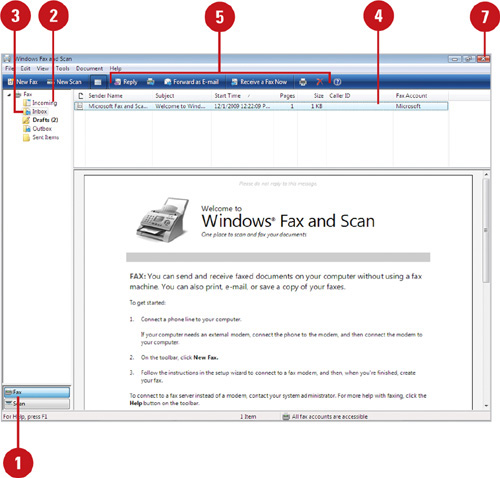
![]() Click the Inbox icon.
Click the Inbox icon.
![]() Click the fax you want to view.
Click the fax you want to view.
![]() Use the buttons on the toolbar to do the following:
Use the buttons on the toolbar to do the following:
• Reply to the fax as another fax.
• Forward the fax as another fax.
• E-mail the fax as an attachment to a message.
• Print the fax to your printer.
• Delete the fax.
![]() To save the fax as a TIF file, click the File menu, click Save As, specify a name and location, and then click Save.
To save the fax as a TIF file, click the File menu, click Save As, specify a name and location, and then click Save.
![]() When you’re done, click the Close button.
When you’re done, click the Close button.
Did You Know?
You can sort faxes by a variety of different categories. In Windows Fax and Scan, click the View menu, point to Arrange By, and then select the way you want to sort. You can arrange by Fax Account, Caller ID, Subject, and Number of Pages to name a few.
Changing Fax Properties
You can change the send and receive properties for a fax device to effectively work with your phone line. You can change the number of times the the fax device tries to resend a fax. You can also change where to store a fax when you receive it. If you need to specify the use of a Transmitting Station Identifier (TSID), which is an identification sent along with a fax to identify the source, and a Called Subscriber Identifier (CSID), which is an identification sent back to the sending fax device to confirm the identity of the source, you can specify those settings as well.
Change Send Properties
![]() Click the Start button, point to All Programs, click Windows Fax and Scan, and then click the Fax tab.
Click the Start button, point to All Programs, click Windows Fax and Scan, and then click the Fax tab.
![]() Click the Tools menu, and then click Fax Settings.
Click the Tools menu, and then click Fax Settings.
![]() Click the General tab.
Click the General tab.
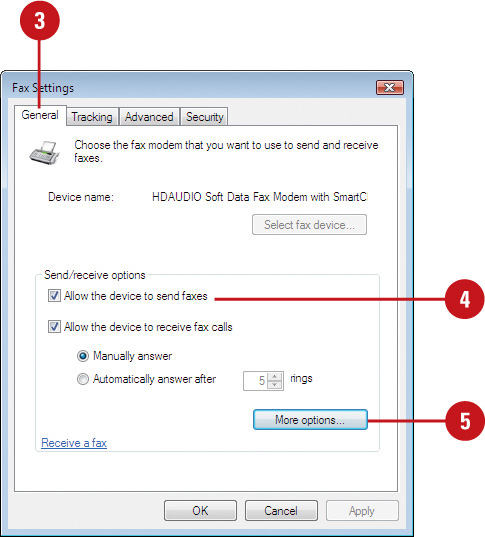
![]() Select the Allow the device to send faxes check box.
Select the Allow the device to send faxes check box.
![]() To change TSID or CSID, click More options, type the information, and then click OK.
To change TSID or CSID, click More options, type the information, and then click OK.
![]() Click the Advanced tab.
Click the Advanced tab.
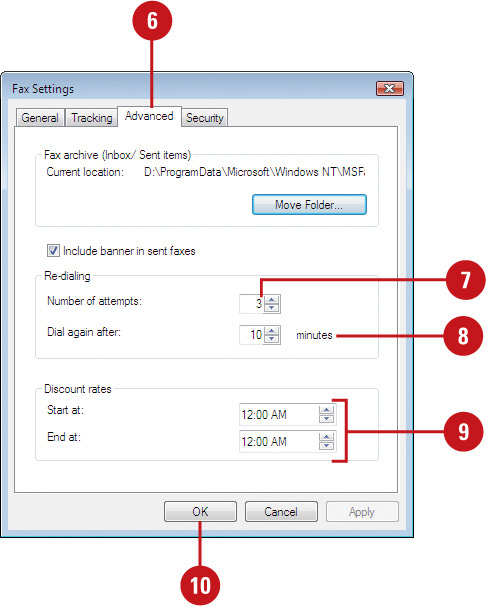
![]() Type the number of redialing attempts.
Type the number of redialing attempts.
![]() Type the number of minutes to dial again for a redial.
Type the number of minutes to dial again for a redial.
![]() To send faxes at a specific time when discount phone charges apply, specify a start and end time.
To send faxes at a specific time when discount phone charges apply, specify a start and end time.
![]() Click OK.
Click OK.
Change Receive Properties
![]() Click the Start button, point to All Programs, click Windows Fax and Scan, and then click the Fax tab.
Click the Start button, point to All Programs, click Windows Fax and Scan, and then click the Fax tab.
![]() Click the Tools menu, and then click Fax Settings.
Click the Tools menu, and then click Fax Settings.
![]() Click the General tab.
Click the General tab.
![]() Select the Allow the device to receive fax calls check box.
Select the Allow the device to receive fax calls check box.
![]() Click the Manually answer or Automatically answer after X rings option.
Click the Manually answer or Automatically answer after X rings option.
![]() Click More options.
Click More options.
![]() If you want, select the Print a copy to check box, and then select a printer.
If you want, select the Print a copy to check box, and then select a printer.

![]() If you want, select the Save a Copy to check box, and then select a folder.
If you want, select the Save a Copy to check box, and then select a folder.
![]() Click OK.
Click OK.
![]() Click OK.
Click OK.
Changing Fax Options
As you send and receive faxes, you can have fax track and notify you when events take place. For example, you can show a progress indicator when faxes are incoming or outgoing and display notifications when faxes arrive. You can also set fax options to automatically open the Fax Monitor when a fax is being sent or received and archive faxes for backup purposes.
Change Tracking Options
![]() Click the Start button, point to All Programs, click Windows Fax and Scan, and then click the Fax tab.
Click the Start button, point to All Programs, click Windows Fax and Scan, and then click the Fax tab.
![]() Click the Tools menu, and then click Fax Settings.
Click the Tools menu, and then click Fax Settings.
![]() Click the Tracking tab.
Click the Tracking tab.

![]() Select the check boxes in the Notifications you want.
Select the check boxes in the Notifications you want.
![]() Select the check boxes for the Fax Monitor you want.
Select the check boxes for the Fax Monitor you want.
![]() Click OK.
Click OK.
Change Archive Options
![]() Click the Start button, point to All Programs, click Windows Fax and Scan, and then click the Fax tab.
Click the Start button, point to All Programs, click Windows Fax and Scan, and then click the Fax tab.
![]() Click the Tools menu, and then click Fax Settings.
Click the Tools menu, and then click Fax Settings.
![]() Click the Advanced tab.
Click the Advanced tab.
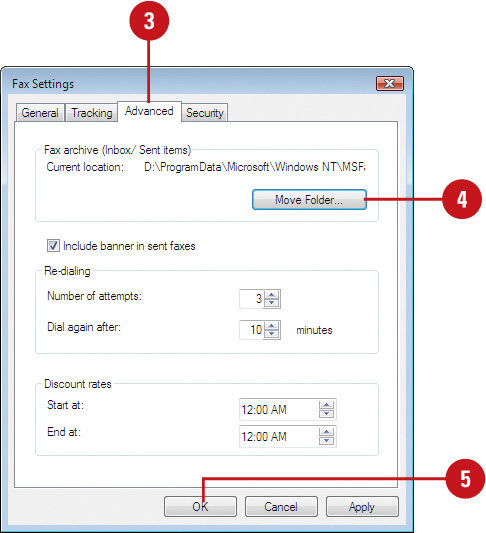
![]() Click Move Folder, select a folder, and then click OK.
Click Move Folder, select a folder, and then click OK.
![]() Click OK.
Click OK.