![]()
Getting Started with Azure Web Apps
The Azure Web Apps service provides the lowest bar of entry into the Azure cloud-computing world. It’s the easiest way to get started with Azure. It’s a platform as a service (PaaS) solution that helps you quickly deploy web-based apps that easily scale to meet the demands of your customers. Azure Web Apps supports most of the current popular development platforms and APIs in use today.
The Azure operations team takes care of managing the infrastructure, availability, maintenance, security, and patching of Azure to ensure reliable and secure performance, freeing you to focus on delivering your web app. Azure Web Apps also lets you scale up or out quickly, so that your apps can handle the load your customers put on the system. The Azure Portal allows you to configure the number and size of your VMs manually or to configure autoscaling so your VMs scale automatically to meet load demands on schedule.
The Azure Web Apps service gives you all you need to establish a global web presence for your web site. Regardless of the size of your organization, you need a robust, secure, and scalable platform to drive your business, brand awareness, and customer communications. Azure Web Apps can help maintain your corporate brand and identity with Microsoft’s financially backed business continuity service-level agreements (SLAs).
Use the Tools You Know
Azure Web Apps embraces the entire array of cross-platform tools and services that you already know and need to create a great web app experience. It lets you collaborate, deliver, and scale quickly across the entire development and operations lifecycle for continuous deployments.
With Azure Web Apps, you can quickly create new sites from the Azure gallery, which provides templates from popular web site content-management systems (CMSs) such as Orchard, WordPress, Drupal, Umbraco, DNN, and many other third-party web applications in the Azure marketplace. You can bring your existing web assets to Azure Web Apps from a variety of languages and frameworks. Azure Web Apps supports open source framework like .NET, Java, PHP, Node.js, and Python.
Azure Web Apps makes it easy to choose from various database backends to meet your needs for use with your apps. It includes support for many backend databases, including Microsoft SQL, MySQL, DocumentDB, Search, MongoDB, Redis, and Azure Table Storage. You can also use a SQL or MySQL database to test your apps at no cost.
Moving your apps to Azure Web Apps is pretty easy. You can use the familiar FTP tools or your source control management system. Azure Web Apps supports direct publishing from popular source control options, such as Visual Studio, Visual Studio Online, and GitYou, to help you move existing sites to Azure Web Apps easily with an online migration tool.
Quick Start: Creating a New Web App from the Portal
Azure Web Apps allows you to create a powerful new web site in seconds. It starts with simplicity at the core. It’s very simple to deploy a web site in Azure because you don’t need any tools to get started. Everything you need is available through the Portal.
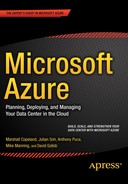
Once you’ve created your Azure account, you can sign in to the Azure Portal to begin creating your new web app. In the Portal, select New ![]() Web + Mobile
Web + Mobile ![]() Web App, as shown in Figure 5-1.
Web App, as shown in Figure 5-1.
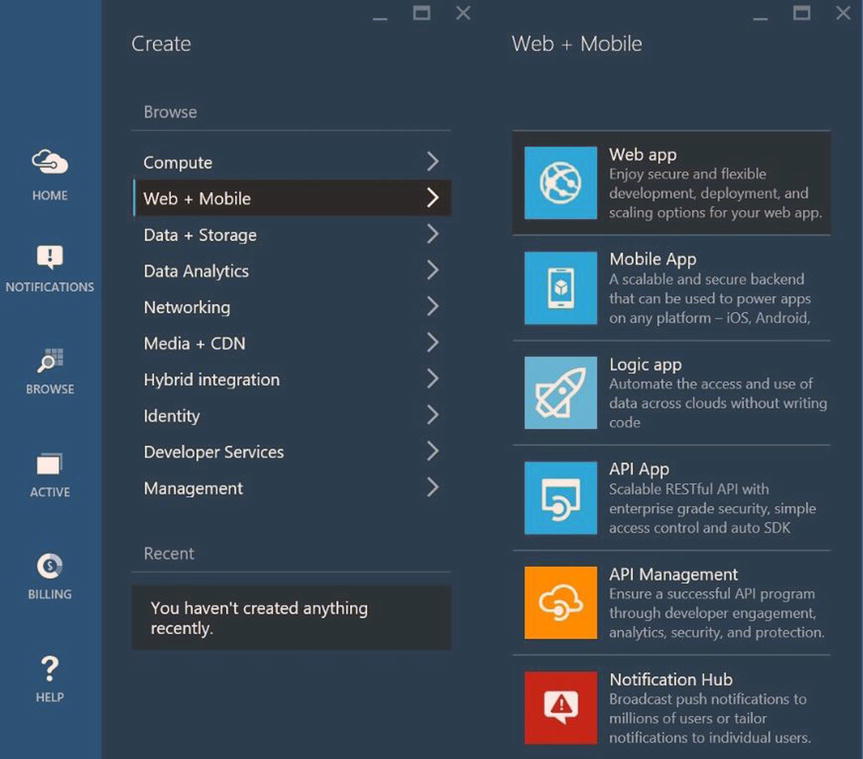
Figure 5-1. Creating a new web app
As shown in Figure 5-2, when the Web App pop out appears, enter the URL for your web site. The URL must be unique; azurewebsites.net is appended to it.
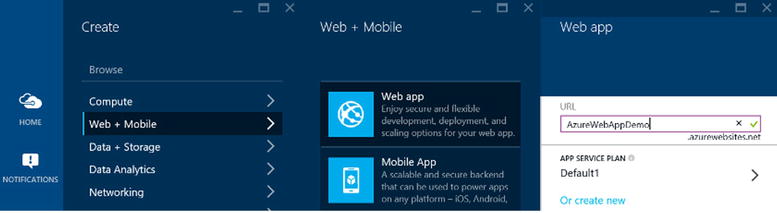
Figure 5-2. URL and other settings to get started
When creating your web site, you can choose from many pricing options. In this example, create your web site using the Free tier. If you want to change the web-hosting plan to a higher-priced tier, you can select from a list of available pricing options that include additional processor cores, more memory, and location, as shown in Figure 5-3.
Figure 5-3. Different pricing tiers add functionality and scale to your web app
After entering the URL for your web site and choosing the tier you want to use, select an existing resource group or create a new one. As shown in Figure 5-4, for this example, create a new resource group, giving it the same name as your URL so that you know its purpose.
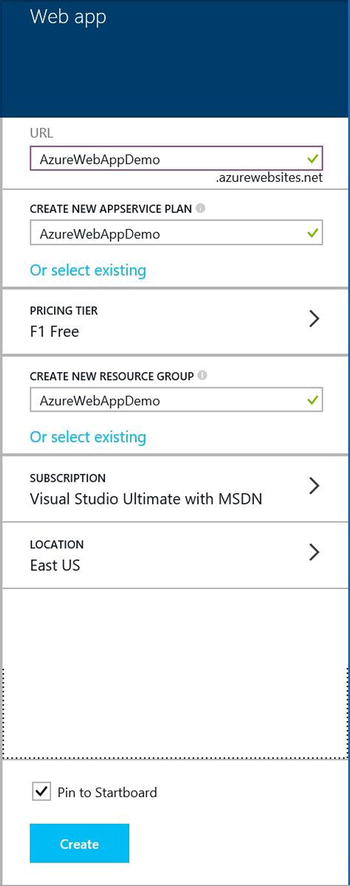
Figure 5-4. Azure web app pricing tier and resource groups
The final steps in creating your web app are to choose a subscription, if you have more than one, and setting the location of your app. It’s recommended that you set the location close to the part of the world from which you expect most of your web traffic to emanate. Doing this will improve the app’s performance, because traffic will have to travel a shorter distance when users are browsing your site.
When you have completed the settings, click Create (as shown at the bottom of Figure 5-4). If you wish to pin the app to your Startboard, select the check box before clicking the Create button. When the new app is created, you will see it on your Startboard on the main page of the Azure Portal, as shown in Figure 5-5.
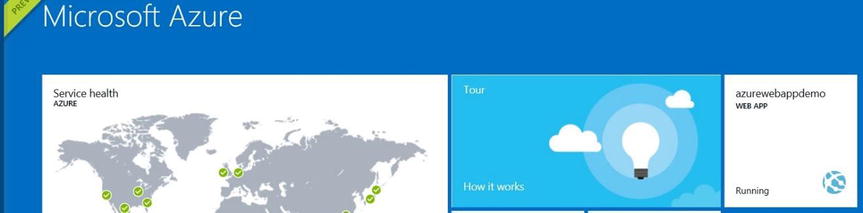
Figure 5-5. Azure Portal
Clicking the app opens the app window. As shown in Figure 5-6, you can see the app’s settings and perform traffic monitoring.
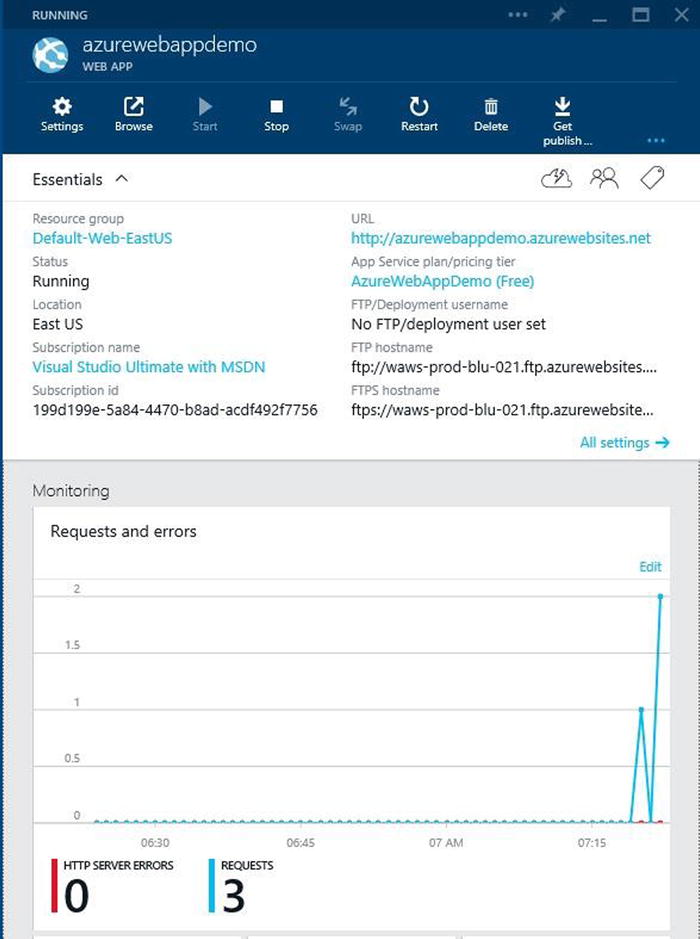
Figure 5-6. Azure web app settings and performance
You can view a lot of useful information about the app’s availability and performance by scrolling through the rest of the web app page and clicking sections. Some of the additional items shown are as follows:
- Storage usage
- Performance
- Scale (turn autoscale on or off, and set the scaling parameters)
- Monthly spend (the monthly cost of the site for which you will be billed when not using the Free tier)
- Events
- Alerts
- Deployment slots (used to test new app code in a staging environment)
Creating a Web App from the Marketplace
Alternately, you can create your web app from the Azure Marketplace. The Marketplace offers prebuilt, open source, and community-contributed projects that are made available in the gallery.
To get to the Marketplace, click the Home icon on the left side of the Portal to return to the Startboard. From there, click the Marketplace icon, as shown in Figure 5-7.

Figure 5-7. Azure Startboard in the Portal. You can pin frequently used objects here
After selecting the marketplace, you can select a project from the various categories, as shown in Figure 5-8. In this example, click Web + Mobile and then select an ASP.NET empty site to get started quickly.
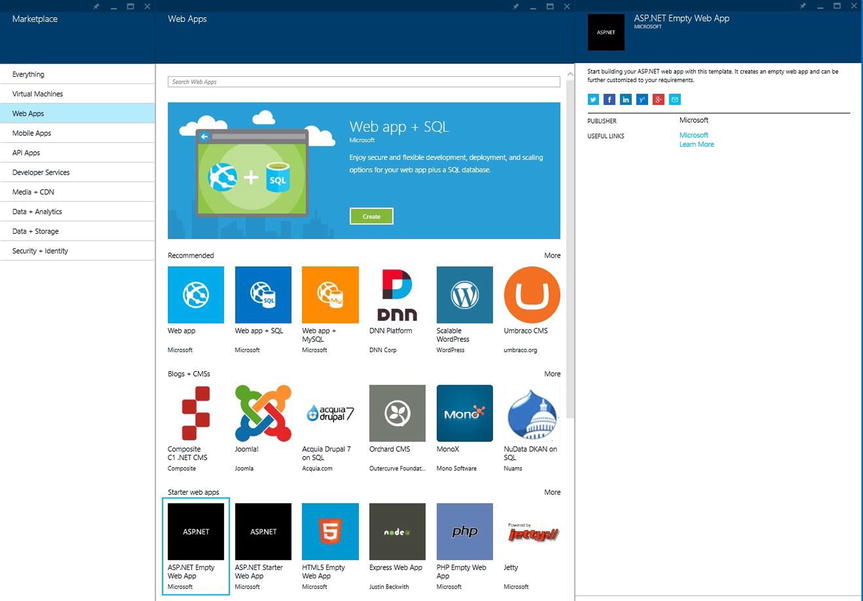
Figure 5-8. The Azure Marketplace has several community and partner projects to help you get started
In the ASP.NET pop-out window, click Create at the bottom of the page to create the new app. As shown in Figure 5-9, enter the ASP.NET empty site creation unique URL for the web site. As in the previous example, complete the rest of the settings by choosing a service plan or creating a new one, and select a pricing tier, subscription, and location.
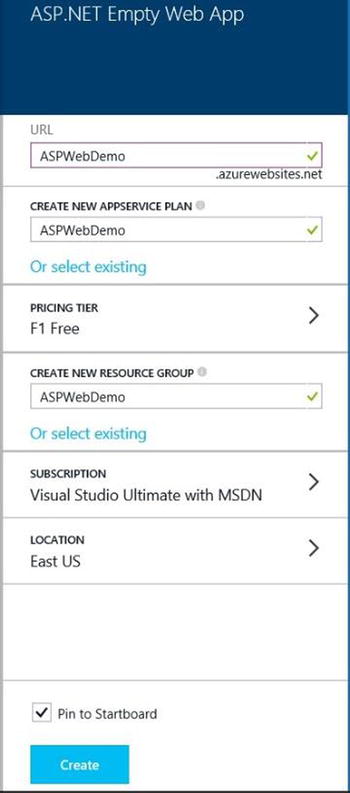
Figure 5-9. Creating an ASP.NET empty site from the Azure Marketplace
If you want to add the web site to your Azure Startboard, select the check box to do so and then click Create to create the web site.
Managing Your Azure Web Apps
Now that you’ve created a web app, you need to learn how to manage it from the Portal. Azure Web Apps is a very versatile platform that provides many features for configuring site settings, scaling, usage monitoring, and many other settings. If you choose to pin your web app to the Startboard, you can select it in order to load the web app dashboard into the Portal, as shown in Figure 5-10.
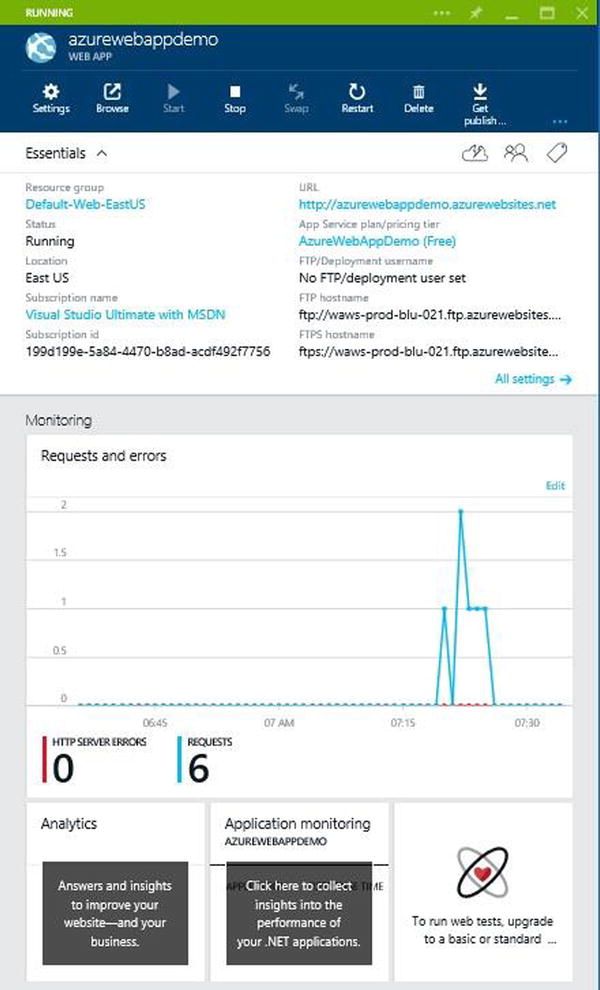
Figure 5-10. Web app dashboard
From the web app dashboard, you can control your site and modify its settings. If you click Settings in the dashboard, you see the Settings flyout in the Portal. As shown in Figure 5-11, it provides several options.
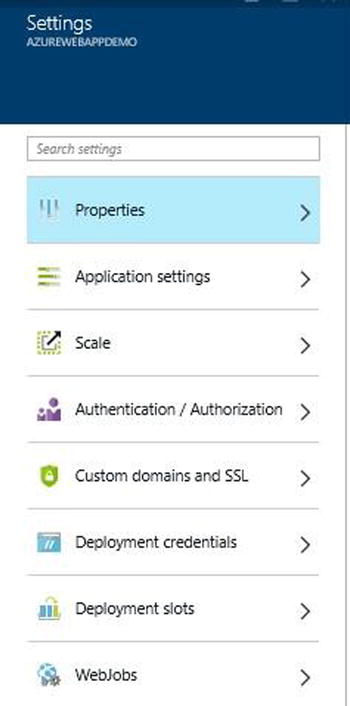
Figure 5-11. All the settings for the web app are managed from the Settings flyout in the Portal
In Figure 5-12, for example, the Web App Settings screen shows specific settings for the site. Here you can control application versions supported by the web app, including .NET framework, PHP, Java Python, and others. If you make any changes, be sure to click Save at the top.
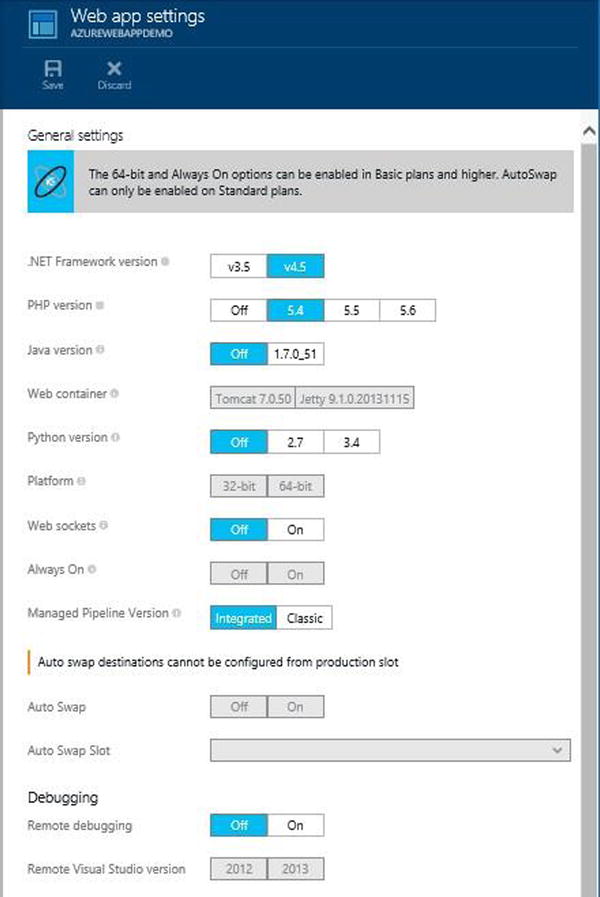
Figure 5-12. Web app application settings
Monitoring an Azure Web Site
Monitoring web app functionality is easy with Azure. You can add metrics to manage performance statistics. By default, when you create a web app in Azure, you can access the monitor from the site dashboard. There you can monitor CPU time, data in, data out, and HTTP server errors, as shown in Figure 5-13. You can also add metrics to measure things like response time and specific HTTP errors. Clicking the various items in the monitoring portal, such as Quotas, opens an additional window that gives you even more detailed information such as data out, memory used, file system storage used, and CPU usage for a given day.
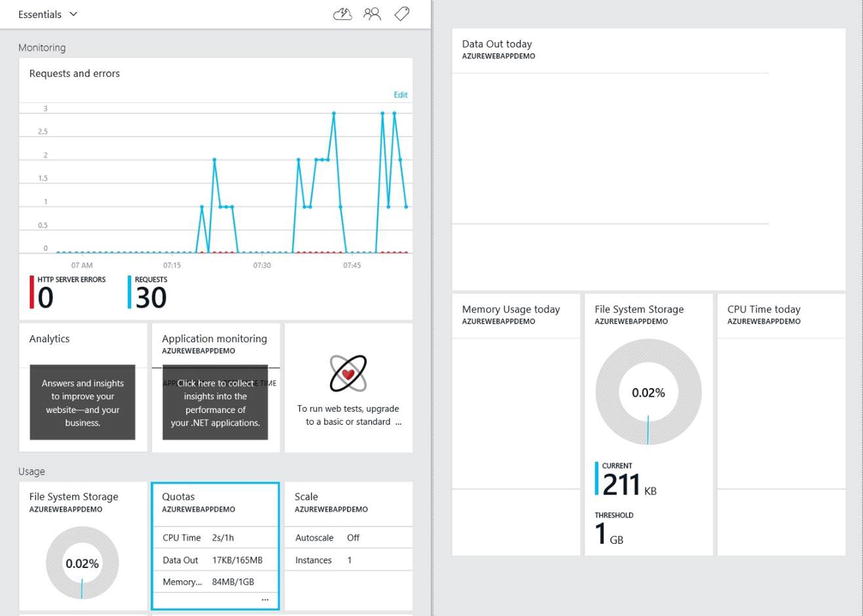
Figure 5-13. Web app monitoring is set up by default
Azure Web Apps Scaling
Scaling for Azure Web Apps gives you the option to increase the performance and throughput of your sites manually or automatically. Four service-level tiers are available in categories based on your needs: Free, Shared, Basic, and Standard. You can change the web app features at any time between those tiers to meet the demands of your business without incurring any downtime or service interruption.
The Free tier allows you to host up to 10 web apps in a shared environment. This tier does not offer any scaling. The Basic and Standard tiers run your web apps in private VMs, which are dedicated to you and your apps. You can host multiple web sites/domains in each Basic and Standard instance that you deploy.
The Free and Shared tiers are ideal for development and test scenarios; you can use the Free tier to evaluate the Azure platform quickly. When you've finished your evaluation or testing, you can easily convert the app to one of the paid tiers without delay or downtime in order to move your app into production so that it can begin serving customers. The Shared tier allows you to develop and test in an environment with features such as SSL, custom domain names, and more before putting your app into production, and it is suitable for low-traffic scenarios.
The Basic tier is designed for web apps with lower traffic requirements that do not need more advanced features like autoscale and traffic management. You can host unlimited web sites/domains using the Basic tier; pricing is based on the size and number of VM instances you run.
The Standard tier is designed for production web apps that are expected to see large amounts of web traffic or that require a higher level of performance. In this tier, you can host unlimited web sites/domains; just as with the other tiers, pricing is based on the size and number of VM instances you run.
In both the Basic tier and the Standard tier, built-in network load balancing support automatically distributes traffic across the VM instances to provide better performance as well as failover if one of your sites stops working. The Standard tier also includes built-in autoscale support that can automatically adjust the number of VM instances running to match your traffic needs, as shown in Figure 5-14.
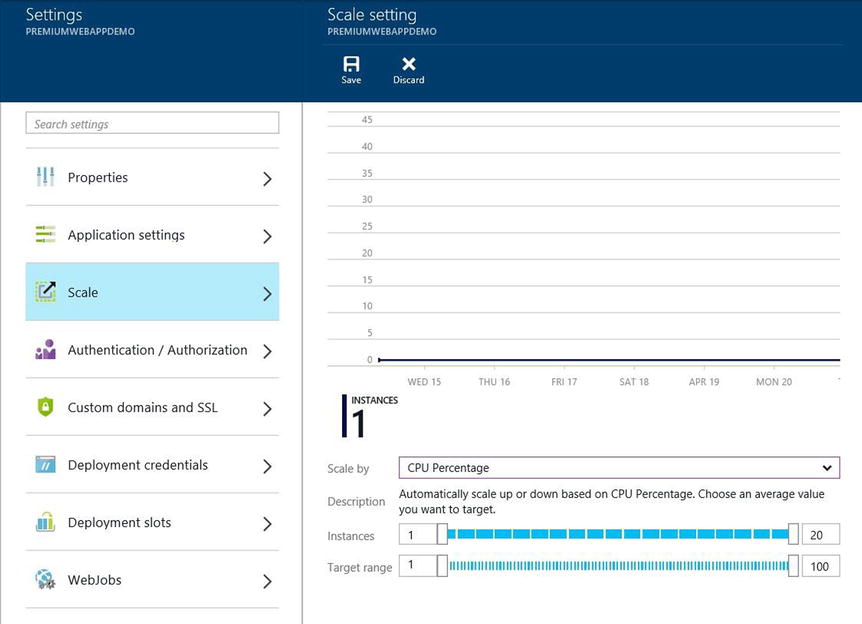
Figure 5-14. Changing to the Standard tier allows you to change the scale based on resources you need. You can set the instances, or you can configure autoscale
You can easily change and configure modes in the pricing tier portal in the Management Portal. You can scale up or down as required. These changes take only seconds to apply and affect all web apps within your web-hosting plan. They do not require your code to be changed or your applications to be redeployed.
When considering which web-hosting plan makes sense for your site, you must consider two related actions as you plan for your web app. The first is changing your web-hosting plan mode to a higher level of service; the second is configuring certain settings after you have switched to the higher level of service. Higher service tiers like Standard mode offer greater robustness and flexibility in determining the amount of resources, like the number of CPU cores, amount of memory, and storage deployed on Azure, as shown in Figure 5-15. In some cases, such as when you expect a greater-than-normal amount of traffic on your site due to a sale on your products, you also need to make sure you remove the spending cap on your Azure subscription so your site doesn’t shut down automatically.
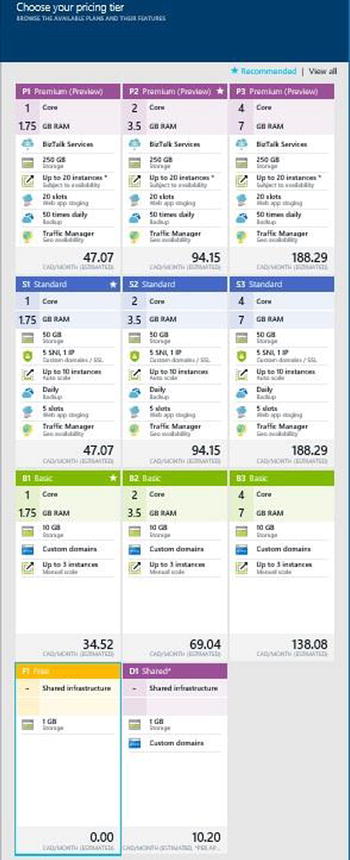
Figure 5-15. Pricing tier plan for web apps
Web Site Deployment with Azure Web Apps
There are many options for deploying your own content into Azure Web Apps. The easiest way is to deploy a web site that integrates with your source control system, such as Visual Studio. Automation makes the development process for continuous deployment easy. This is an efficient development and deployment method, but it also makes the backup and restore processes more manageable and reliable if you discover an issue with a change.
If you don’t have source control set up yet, the easiest way to get started is to use a cloud-hosted source control system. Visual Studio and WebMatrix are Microsoft integrated development environments (IDEs) that you can use for web development. Both provide built-in features that make it easy to deploy to Azure Web Apps.
With Visual Studio, you can manage a full development environment, giving you the ability to create many different kinds of applications, including new web applications, and publish them directly to web apps. WebMatrix is free, easy to learn, and quick to install, but Visual Studio offers many more features for working with web apps. From within the Visual Studio IDE, you can create, stop, start, and delete web apps; view logs as they are created in real-time; debug remotely; and do much more. Visual Studio also integrates with source control systems such as Visual Studio Online, Team Foundation Server, and Git repositories.
You can deploy content to your site by using FTP with credentials that you create for your Azure web site regardless of what IDE you use. Additionally, from an on-premises source control system, you can use Team Foundation Service, Git, or Mercurial on-premises to deploy directly from your repository to Azure Web Apps.
For more information on deploying your web apps into Azure App Service, see http://azure.microsoft.com/en-us/documentation/articles/web-sites-deploy.
Azure App Service Migration Assistant
If you already have a large deployment of web sites that you wish to migrate to Microsoft Azure, Microsoft provides a tool called the App Service Migration Assistant, which greatly simplifies and speeds up the process. The tool requires that your web sites be running on Internet Information Service (IIS) 6 or later. The Migration Assistant analyzes your existing IIS server installation and identifies which sites can be migrated. It also identifies any items or elements that can’t be migrated or are unsupported. With this information, you can make the necessary changes to your sites and migrate them to Azure when the updates are complete. The tool can be downloaded from https://www.movemetothecloud.net.
The Migration Assistant creates a readiness report, as shown in Figure 5-16, to identify any potential causes for concern or blocking issues that may prevent a successful migration from on-premises IIS to Azure App Service.
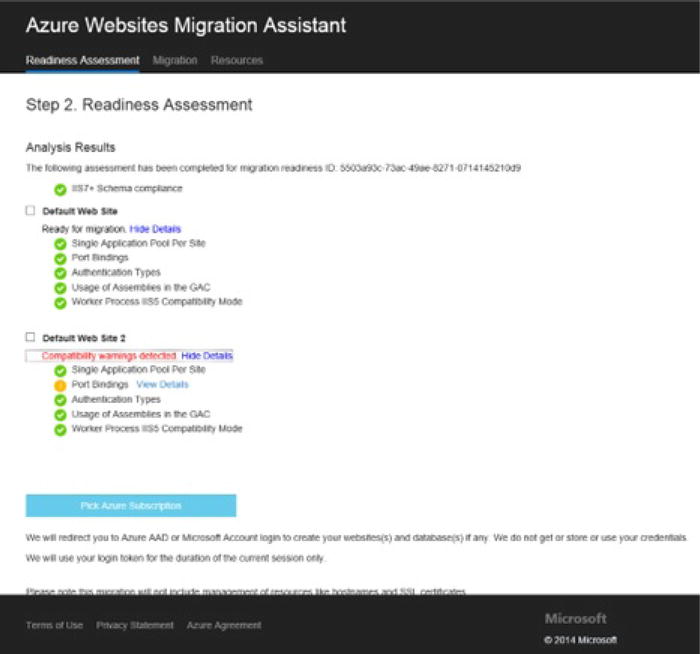
Figure 5-16. Azure App Service Migration Assistant readiness assessment
Some of the key items to be aware of are as follows:
- Port bindings: Azure App Service only supports port 80 for HTTP and port 443 for HTTPS traffic. Different port configurations are ignored, and traffic is routed to port 80 or 443.
- Authentication: Azure App Service supports anonymous authentication by default and forms authentication where specified by an application. Windows authentication can be used by integrating with Azure Active Directory and ADFS only. All other forms of authentication, such as basic authentication, are not currently supported.
- Global Assembly Cache (GAC): The GAC is not supported in Azure App Service. If your application references assemblies that you usually deploy to the GAC, you will need to deploy to the application bin folder on Azure App Service.
- IIS 5 compatibility mode: This is not supported on Azure App Service.
- Application pools: In Azure App Service, each site and its child applications run in the same application pool. If your site has multiple child applications using multiple application pools, consolidate them into a single application pool with common settings or migrate each application to a separate web app.
- COM components: Azure App Service does not allow the registration of COM components on the platform. If your web sites or applications use any COM components, you must rewrite them in managed code and deploy them with the web site or application.
- ISAPI filters: Azure App Service can support the use of ISAPI filters. You need to do the following:
- Deploy the DLLs with your web app.
- Register the DLLs using Web.config.
- Place an applicationHost.xdt file in the site root with the following content:
<?xml version="1.0"?>
<configuration xmlns:xdt="http://schemas.microsoft.com/XML-Document-Transform">
<configSections>
    <sectionGroup name="system.webServer">
      <section name="isapiFilters" xdt:Transform="SetAttributes(overrideModeDefault)" overrideModeDefault="Allow" />
    </sectionGroup>
  </configSections>
</configuration>
- Other components, like SharePoint, front page server extensions (FPSE), FTP, and SSL certificates will not be migrated.
RUNNING THE AZURE APP SERVICE MIGRATION ASSISTANT
To run the Migration Assistant, follow these steps:
- On the IIS server or a client computer, browse to https://www.movemetothecloud.net.
- Click the Dedicated IIS Server button to install Azure App Service Migration Assistant, as shown in Figure 5-17.
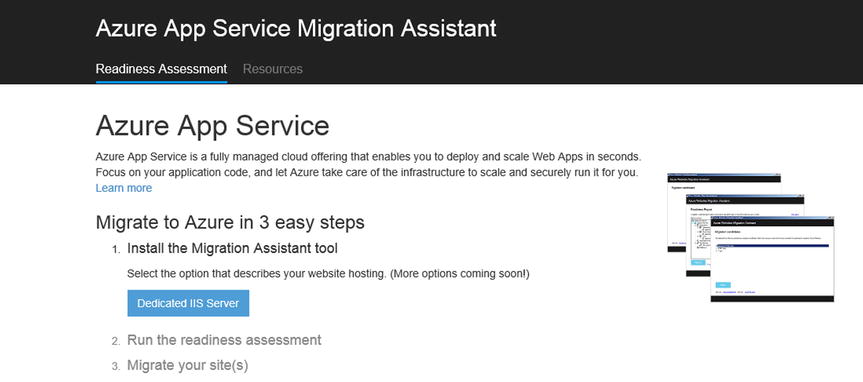
Figure 5-17. When you connect to the Migration Assistant web site, you land on this screen
- Click the Install Tool button to install the Migration Assistant on your computer, as shown in Figure 5-18.
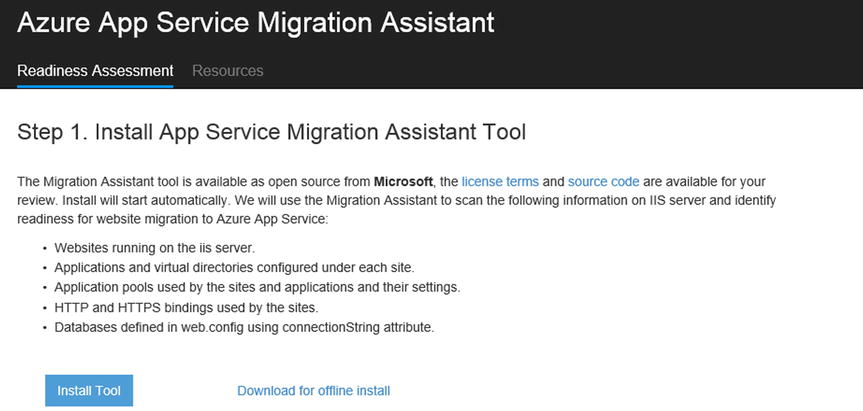
Figure 5-18. Azure App Service Migration Assistant installation screen
- When the Application Install – Security Warning pop-up window appears, as shown in Figure 5-19, click Install to proceed with the installation.
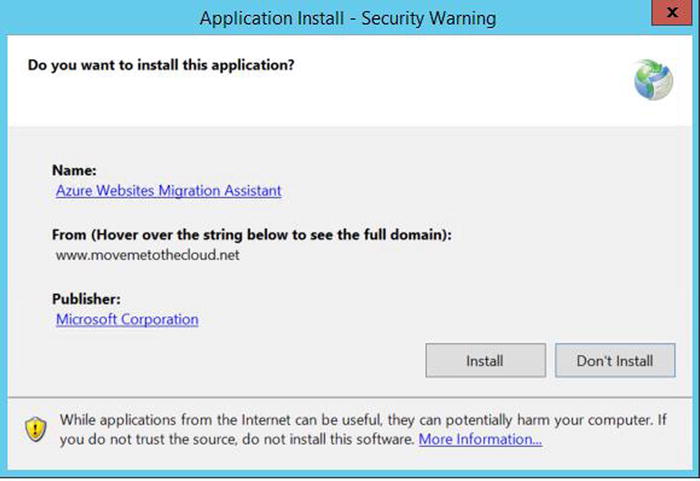
Figure 5-19. Application Install – Security Warning screen
- In the Open File window, click Run to begin the installation, as shown in Figure 5-20.
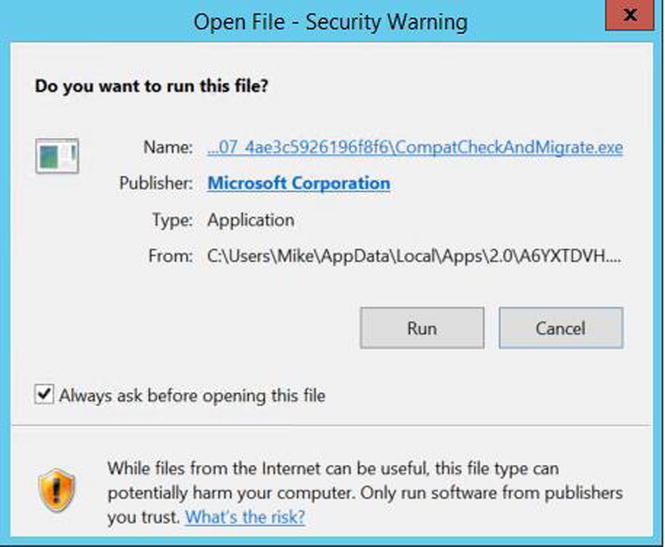
Figure 5-20. Open File – Security Warning screen
- The installer installs any required dependencies, such as Web Deploy, DacFX, and IIS. When the installation completes, you see a screen similar to the one shown in Figure 5-21.
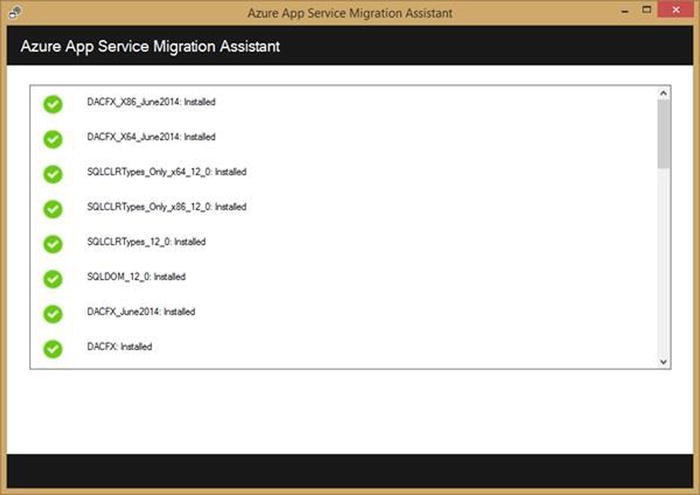
Figure 5-21. Completed Migration Assistant installation
When the installation completes, the tool starts automatically.
- Depending on whether you installed the tool on your local IIS server or on a different computer, choose the appropriate migration option. You can choose any of the following options:
- Migrate sites and databases on the local server to Azure
- Migrate sites and databases from one or more remote servers to Azure
- Migrate a SCOM site and database from one or more remote servers to Azure
- After choosing the appropriate migration option, click Continue, as shown in the example in Figure 5-22.
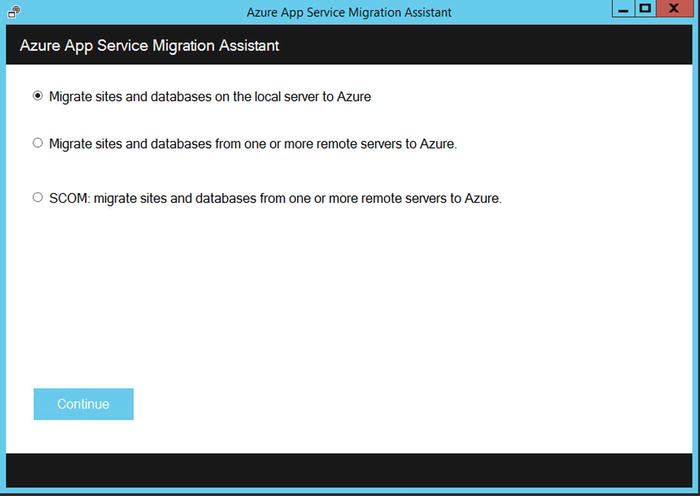
Figure 5-22. Azure App Service Migration Assistant
The Migration Assistant inspects your IIS server’s configuration, looking at the sites, applications, and application pools—as well as any dependencies—to identify web sites that can be migrated.
- Figure 5-23 shows three web sites: Default Web Site, WSUS Administration, and FTP. Each has an associated database that will also be migrated. Select some or all the sites you would like to assess, and then click Next.
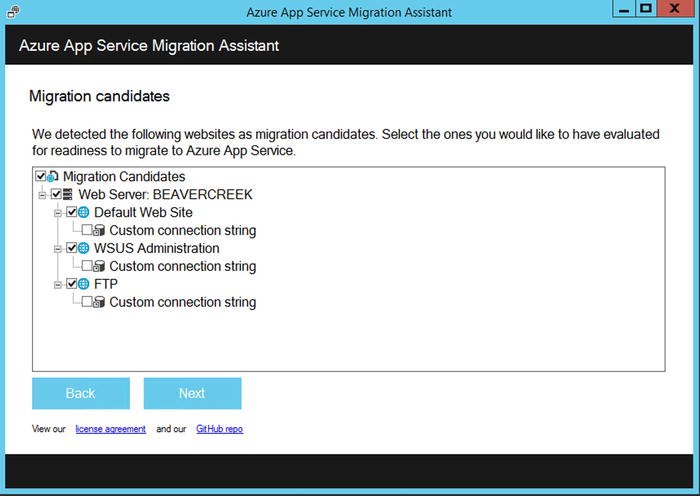
Figure 5-23. Azure App Service Migration Assistant candidates
- When the assessment completes, click Upload to upload the readiness report, as shown in Figure 5-24. Optionally, you can choose to save the file on your local computer, run the migration tool later, and upload the saved readiness report when you are ready for it.
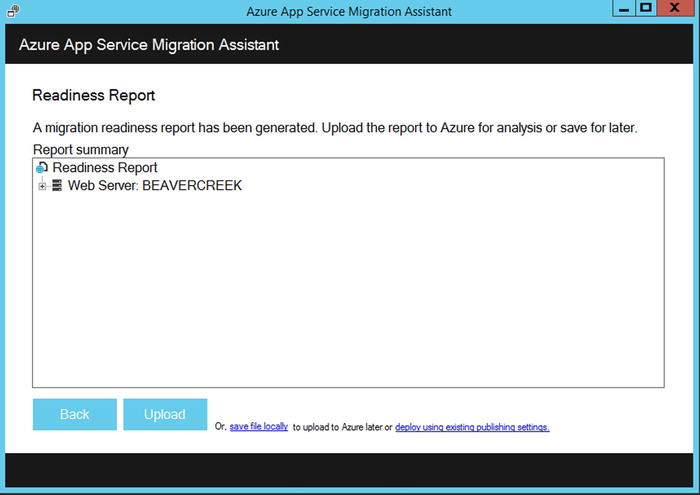
Figure 5-24. Migration Readiness Report
- Once your readiness report has been uploaded, Azure performs an analysis and displays the results, as shown in Figure 5-25. Be sure to read the assessment details carefully for each web site, and make sure you understand and have addressed each of the reported issues before proceeding with the migration of your web sites.
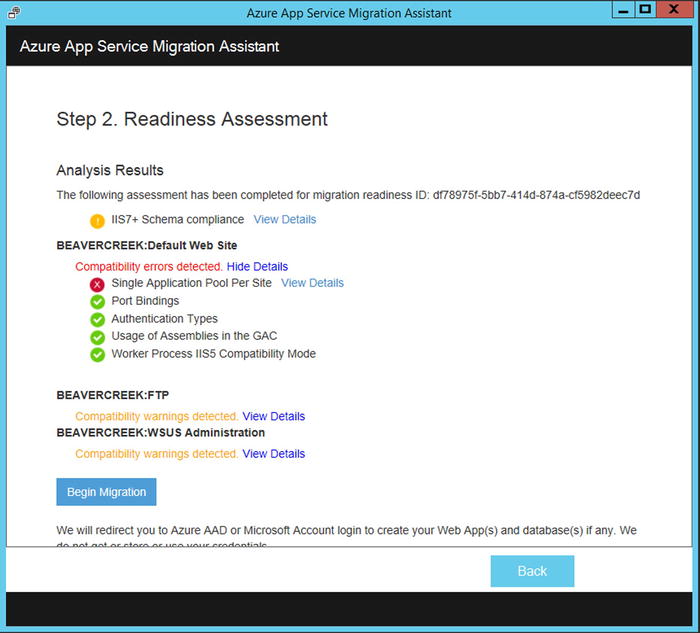
Figure 5-25. Readiness Assessment in the Migration Assistant
- When you are ready to proceed, click Begin Migration, as shown in Figure 5-25. You are redirected to Azure to log in to your account, as shown in Figure 5-26. The account that you use to log in requires an active subscription, and it must be a global administrator in your tenant.
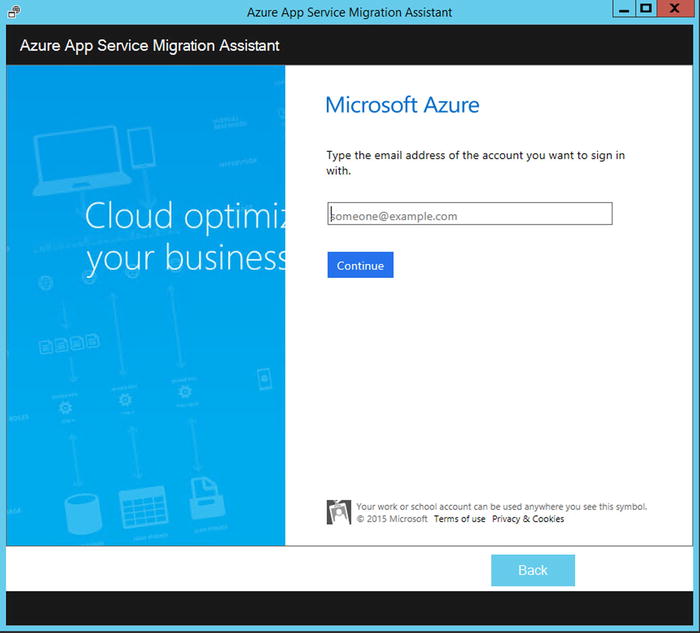
Figure 5-26. Azure login screen
- Select your tenant account, the correct subscription (if you have more than one), and the region to use for your migrated app service and databases, as shown in Figure 5-27. Finally, click Start Migration.
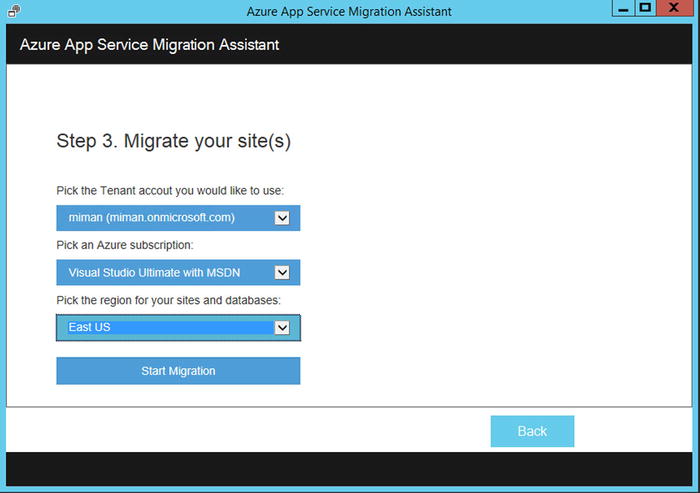
Figure 5-27. Selecting the location in Azure for the migration
- On the Web Apps screen, you can choose to migrate any or all of the web sites that are on the server, as seen in Figure 5-28.
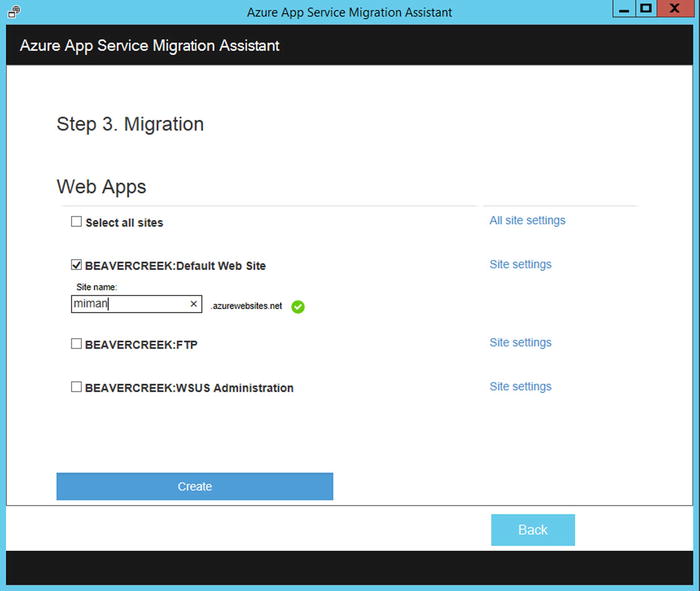
Figure 5-28. Azure Web Apps migration screen
- There is a Site Settings link to the right of the site name, as you can see in Figure 5-28. Clicking this link brings up a page that allows you to configure settings for the site on that screen, as shown in Figure 5-29. You can make changes to the default migration settings, such as the following:
- Selecting a web site mode. The available modes are Free, Shared, Basic, and Standard, and they may vary depending on your subscription.
- The worker size of the web app. You can choose Small, Medium, or Large.
- App service plan.
- Using an existing Azure SQL database or creating a new Azure SQL database. You can also choose a SQL edition: Basic, Standard, or Premium.
- The database performance level. The choices are S0, S1, and S2.
- The maximum database size. The sizes range from 100 MB up to 250 GB.
Figure 5-29 shows the BeaverCreek web site with the default settings.
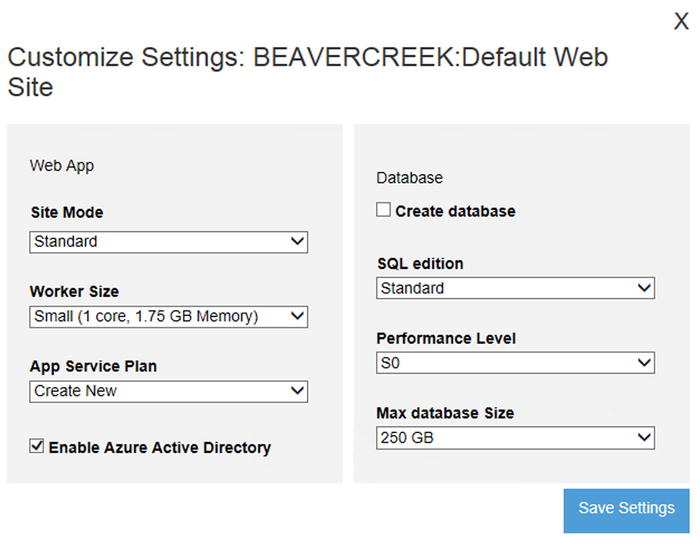
Figure 5-29. Web site settings screen
- Once you have confirmed that the desired settings are selected, click Begin Publish, as shown in Figure 5-30, to start the migration process.
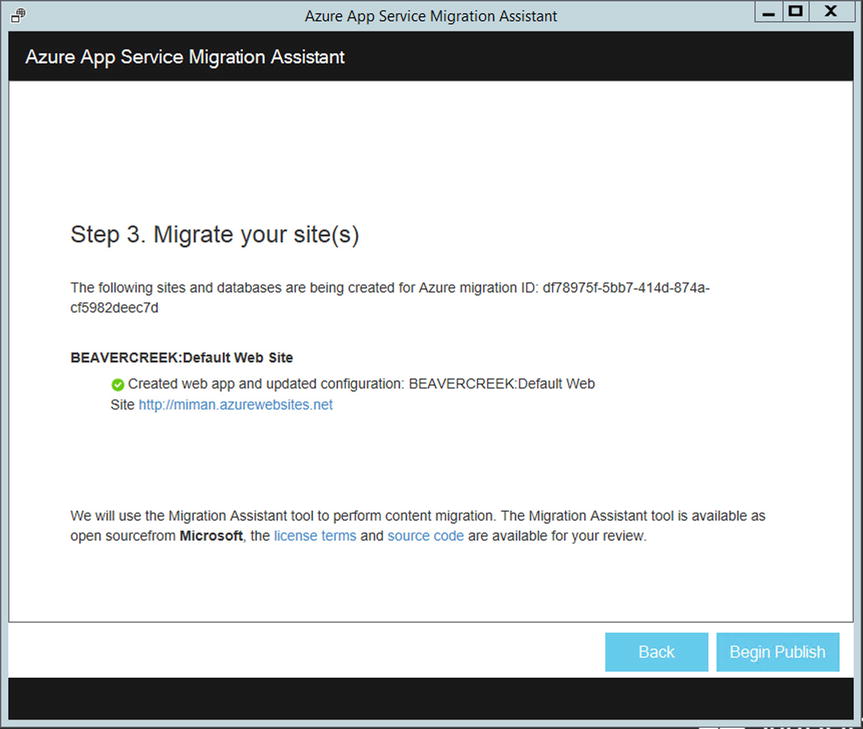
Figure 5-30. App migration publish screen
As you can see in Figure 5-31, the Migration Assistant creates the Azure SQL database, if selected, and the Azure app service if you chose to create a new one. It then publishes the web site content and databases. The progress of the migration is clearly shown in the tool.
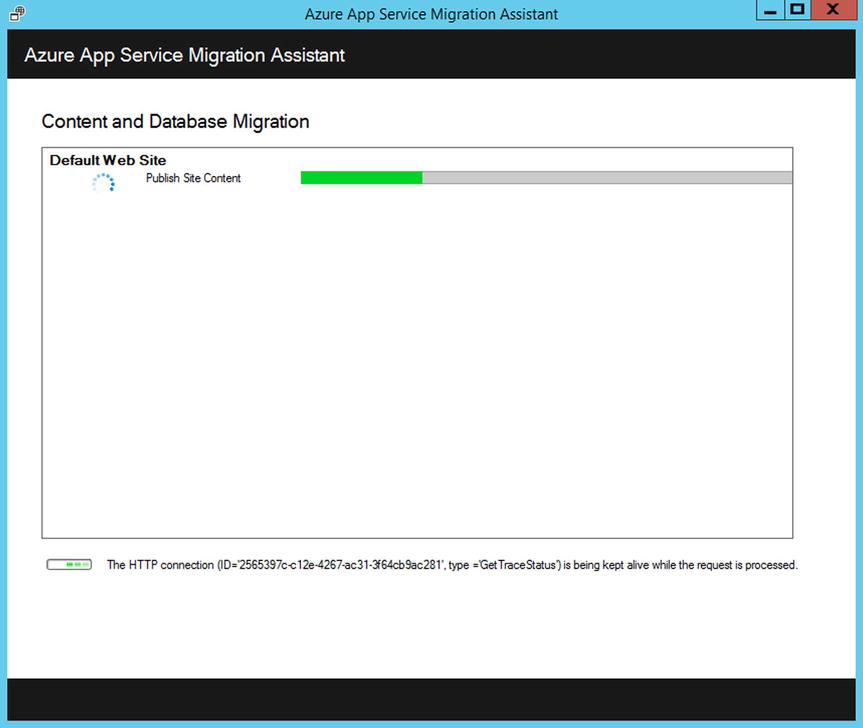
Figure 5-31. Azure App Service Migration Assistant progress screen
When the migration process completes, you see a summary screen similar to the one shown in Figure 5-32, which indicates whether the migration was successful and links to any newly created web sites.
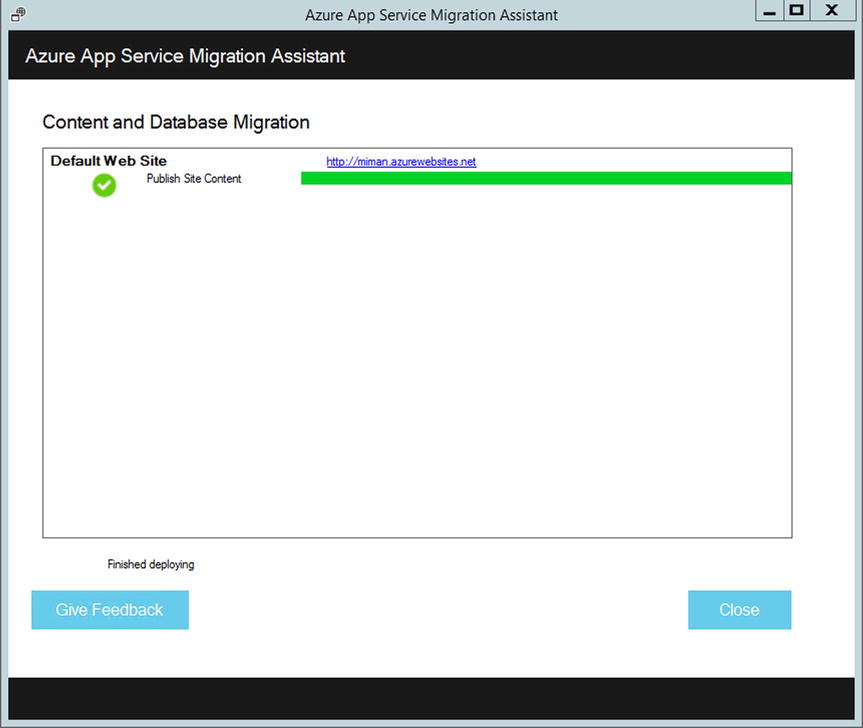
Figure 5-32. Azure App Service Migration Assistant completion screen
If an error occurs during the migration, the migration tool indicates the failure and rolls back the changes. You can also send the error report to Microsoft by clicking the Send Error Report button with the captured failure call stack and build message body.
When the migration completes, click the link to the Azure web sites to verify that the migration has succeeded. Browse your new Azure-based web site to make sure it functions as expected before changing your DNS settings to point to the new location of the site.
Now that you have migrated your web sites to Azure, you can manage them in the Azure Portal at https://portal.azure.com. In the Azure Portal, open the App Service blade to see your migrated web sites, and then click the site that you wish to manage, as shown in Figure 5-33. There you can manage settings such as configuring continuous publishing, creating backups, autoscaling, and monitoring usage or performance, as described earlier in this chapter.
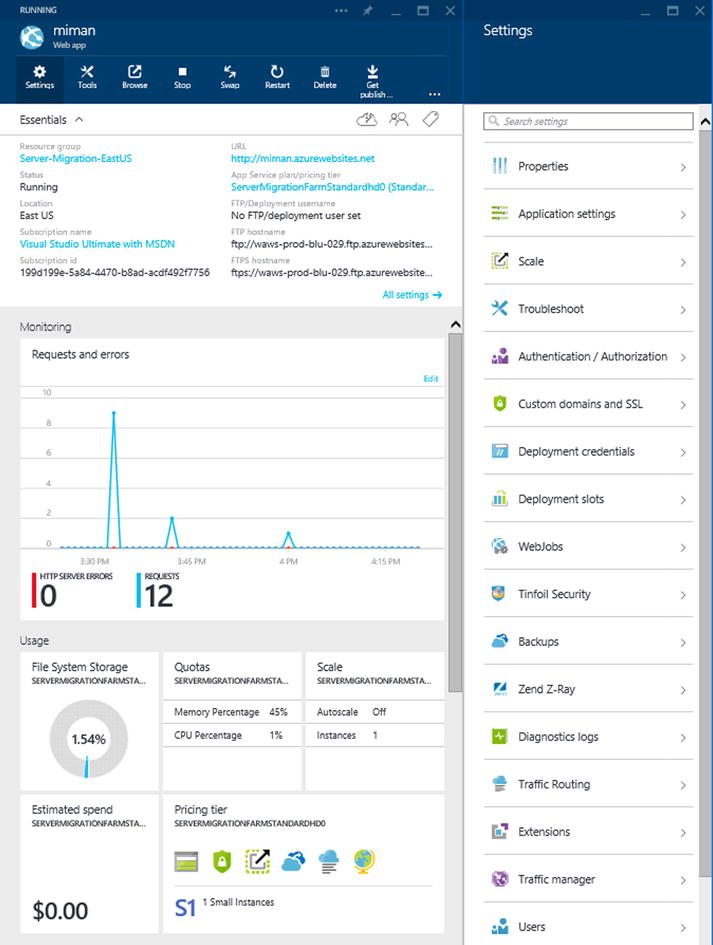
Figure 5-33. Migrated web site, now an Azure web app
Summary
In this chapter, you were introduced to the Azure Web Apps service and saw how easy it is to create and manage your web sites. Whether you are managing a small web site deployment or an enterprise deployment that needs to support a large retail operation, web apps can easily be scaled to suit your needs. Additionally, once your web sites are created in Azure, managing and monitoring them is simple with the available tools.
You also learned how easy it is to migrate your on-premises web sites into Azure Web Apps with the Azure App Service Migration Assistant. The Migration Assistant tool migrates your existing code and databases into Azure, allowing you to make the move to web apps quickly.
In the next chapter, you learn about the available storage options in Windows Azure. After finishing that chapter, you will have a good understanding of the options available in Windows Azure, and you can begin to plan your own Azure deployment.