Chapter 1
Azure Backup
Overview
Microsoft provides a comprehensive backup service solution in Azure called Azure Backup. You can use Azure Backup to back up on-premises, cloud-based, and Azure-based workloads for short-term and long-term retention in a secure yet cost-effective manner. Azure Backup has evolved over the years, adding a number of key features that have drastically improved its usability, reliability, and redundancy. As a result, it is a de-facto backup solution for most organizations that use Azure or are migrating to it.
Azure Backup provides different backup agents or solutions that you can use to back up your workloads, either in your on-premises environment or in Azure environments. These include the following:
Microsoft Azure Recovery Services (MARS)You can deploy the MARS agent in Azure or in on-premises Windows virtual machines (VMs) for files or for folder-level or system-state backups.
Microsoft System Center Data Protection Manager (DPM)Microsoft DPM has existed as a backup solution for years to manage on-premises physical or virtual Hyper-V or VMWare-based backups. It supports integration with Azure Backup for cloud-based data transfer and retention, providing a central console for managing those backups. DPM requires additional licensing apart from the costs associated with the Azure Backup service.
Microsoft Azure Backup Server (MABS)MABS is a modified version of DPM that was redeveloped and integrated with Azure Backup. It is included in the cost of the Azure Backup service. MABS helps address scenarios in which an on-premises backup server is required to back up and maintain a local copy of backups for short-term retention and Azure Storage is used for long-term retention. It supports backups of additional application workloads such as Microsoft Exchange, Microsoft SharePoint, and so on. You can even use it to back up Azure VMs to address specific backup scenarios with custom backup frequency and retention requirements.
Azure Backup extensionThe Azure Backup extension helps in scenarios where you want to back up an entire Azure VM (Windows/Linux) instead of individual files or folders or the system state alone.
As you can see, Azure Backup provides different toolsets to address different scenarios and environment requirements. Therefore, it is important to select the right option for your environment or workload based on its backup requirements.
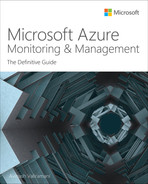
In addition to Azure IaaS, on-premises VMs, and physical on-premises servers, Azure Backup also supports the backup of various Azure services, as detailed here (see Figure 1-1):
Azure Managed DisksAzure Backup supports the backup and retention of Azure Managed Disks directly to a backup or Recovery Services vault.
Azure file sharesAzure Backup integrates with Azure files and enables you to configure backups as part of the service for short-term and long-term retention of file share data.
SQL Server running in Azure VMsAzure Backup supports SQL database-aware backups using the MARS agent or MABS solution, ensuring that restoration is possible in a consistent manner.
SAP HANA databases running in Azure VMsAzure Backup supports SAP HANA database-aware backups using the MARS agent or MABS solution, ensuring that restoration is possible in a consistent manner.
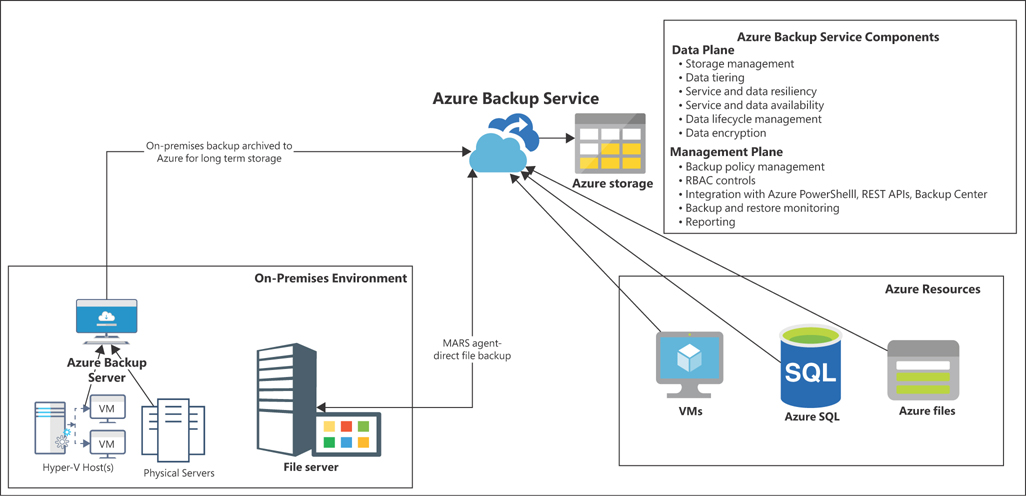
FIGURE 1-1Azure Backup Service components.
NoteThis support capability is constantly enhanced, so the preceding list might not include all the services covered by the time you read this book. Be sure to review any updated guidance specific to the workload you are trying to back up.
Key features
Azure Backup provides many key features. A few of the most important ones are detailed here:
Cost-effective cloud-based solutionAzure Backup provides an extremely cost-effective backup solution that addresses the needs of most small and large organizations. The service charges for backup storage are based on consumption, meaning that you need not procure or pay for storage before using it. You can add or remove workloads from the backup scope. Service charges will update monthly based on actual usage.
Integrated service in AzureAzure Backup is integrated into Azure, making it intuitive and easy to use. You can quickly begin backing up your workloads without procuring additional licensing or deploying additional servers for backup management.
Scalable by designAzure Backup is scalable by design, supporting the backup of a single VM or thousands of VMs, without requiring you to provision hardware or infrastructure in advance.
Highly available storageAzure Backup uses Azure Storage to store backups. As such, it employs the redundancy options available in Azure Storage, such as LRS, GRS, and ZRS storage, for data redundancy across regions.
Support for various Azure servicesAzure Backup provides support for various Azure services and is constantly updated to support more services. The current list of services supported includes Azure VMs, Azure file shares, Azure Blob storage, and Azure managed disks.
Different backup tools for different scenariosAzure Backup provides different backup tools such as the MARS agent, Azure Backup Server, DPM, and Azure Backup extension to address the needs of different organizations and scenarios.
Support for short- and long-term retentionAzure Backup supports both short-term and long-term backup retention and enables you to apply different backup policies to different workloads. In this way, you can retain backups per the requirements of each unique workload.
Secure by defaultAzure Backup uses TLS encryption to transfer backups to the backup or Recovery Services vault, making it secure by default. Backups are stored in Azure Storage, which is encrypted. Azure Backup also supports the backup of servers with encryption set up using BitLocker and/or Azure-Managed or Customer-Managed encryption keys with Azure Key Vault.
No online data transfer costsAzure Backup does not charge for any online data transfer to or from the service. Only offline transfers, if performed for initial backup uploads, are charged for on a one-time basis.
Centralized monitoring and managementWith Azure Backup, you can monitor and manage backups in a central console in the Azure Portal, making it easy to set up alerts from a single location. Azure Backup also supports integration with Azure Monitor to address advanced reporting scenarios.
Support for various management toolsAzure Backup supports management using the Azure Portal, Azure PowerShell, Azure command-line interface (CLI), ARM Templates, and REST APIs.
NoteThe remainder of this chapter focuses primarily on backup scenarios involving the MARS agent, as that is the most widely used backup option in the Azure Backup service.
Design and deployment concepts and considerations
Microsoft has evolved Azure Backup over time, applying its expertise in on-premises backups using Microsoft System Center Data Protection Manager (DPM) and providing more integrations for backing up various solutions such as Windows Server, Microsoft SQL, Microsoft SharePoint, Microsoft Exchange, Windows file servers, Azure VMs, Azure Storage, and an ever-growing list of supported solutions.
The Azure Backup service is built up of different components that provide a holistic, secure, scalable, and integrated backup service. As such, it should be your de facto backup service in Azure. Let’s go through each of these components to give you a better understanding of which backup components will likely work best in your environment, how to deploy them, and how best to secure and manage them.
Recovery Services vault
A Recovery Services vault is the central storage entity in Azure that manages the backup configuration, backup jobs, and associated backup data for Azure IaaS VMs, Azure file share, SQL, and SAP HANA database backups and other workloads supported by the service. The vault also serves as a central location to monitor and manage backups configured using Azure Backup Server, DPM, Windows Server, and more.
The main features of the vault include the following:
Centralized management and monitoringThe Recovery Services vault provides a single central management console to set up, manage, and monitor backups configured using the MARS agent. This makes it easy to keep an eye on backup status and set up alerts in case of backup or restore failures.
Enhanced security of backed-up dataThe Recovery Services vault allows you to set up a security PIN that prevents unauthorized configuration changes and data deletion. Whenever someone attempts such an action in the service, the vault enforces the PIN requirement; if the wrong PIN is entered, the action will be denied. For on-premises backups, the vault enforces a 16-character passphrase that is set up at the time of backup creation and is used to encrypt the data when stored in Azure.
Role-based access control (RBAC) using Azure ADThe Recovery Services vault supports RBAC leveraging Azure AD to control and limit access to the service only to authorized administrators based on their role or operational requirements.
Data resiliency and recoveryThe vault supports integration with LRS, ZRS, and GRS Azure Storage accounts to provide data resiliency across zones within an Azure region or across Azure regions. The vault also supports data restoration across paired Azure regions, thereby helping in scenarios where data must be brought online in a secondary region, or audit or compliance checks must be adhered to.
Protection against malicious attacksThe vault protects against malicious attacks by allowing the restoration of clean data before the date of the attack based on your retention policies. If you have enabled soft delete data retention, then the vault ensures that any malicious deletion of the vault data can be recovered for a period of 14 days after the deletion.
Scalable by designAzure currently supports 1,000 VMs using the MARS agent, 2,000 backup data sources or items, and 200 backup policies per Recovery Services vault. At present, each subscription supports 500 Recovery Services vaults, making it a highly scalable service that can address the backup requirements for most large organizations.
Backup Center
Backup Center provides a unified management experience for enterprises to govern, monitor, operate, and analyze backups at scale. As such, it is consistent with Azure’s native management experiences. Backup Center offers the following:
Single pane of glass to manage backupsBackup Center is designed to function well across a large and distributed Azure environment. You can use the Backup Center to efficiently manage backups spanning multiple workload types, vaults, subscriptions, regions, and Azure Lighthouse tenants.
Data source-centric managementBackup Center provides views and filters centered on the data sources you’re backing up—for example, VMs and databases. This allows a resource owner or a backup admin to monitor and operate backups of items without focusing on which vault an item is backed up to. A key feature of this design is the ability to filter views by data source-specific properties, such as data-source subscription, data-source resource group, and data-source tags. For example, if your organization assigns different tags to VMs belonging to different departments, you could use Backup Center to filter backup information based on the tags of the underlying VMs being backed up without needing to focus on the tag of the vault.
Connected experiencesBackup Center provides native integrations to existing Azure services that enable management at scale. For example, the Backup Center uses Azure Policy to help you govern your backups. It also leverages Azure workbooks and Azure Monitor Logs to provide you with detailed reports on backups. So, you don’t need to learn any new principles to use the varied features that the Backup Center offers. You can also discover community resources from the Backup Center.
Data plane
Azure Backup is broken down into two main components: the data plane and the management plane. Each plane provides specific functions and complements the other to ensure the service works as intended.
The functions performed by the data plane include the following:
Data protectionThe data plane ensures that the data-protection policies set up in the vault configuration are adhered to. It ensures that any data that is accidentally or maliciously deleted is available for recovery for 14 days. This is provided at no additional cost to all customers, as long as they enable the configuration.
Data encryption at restThe data plane ensures that all backup data at rest is encrypted based on the encryption configuration set up in the service. It performs data decryption as needed in the event of a data-restore operation.
Data lifecycle managementThe data plane manages the entire lifecycle of the backup data, ensuring that it adheres to the retention policies set up in the vault configuration.
Storage-management automationThe data plane manages the automatic provisioning, resizing, and scaling of the storage accounts used for the backup data.
Management plane
The management plane performs an additional set of complementary functions that support the overall management and access security of the vault. These include the following:
Backup policy managementThe management plane provides the capability to centrally configure and manage backup and retention policies.
Enforcement of RBAC controlsThe management plane provides the capability to configure RBAC permissions to control and limit access to the vault to authorized admins based on their role requirements. It monitors, authorizes, and logs all access requests, making it easier to track unauthorized requests.
Support for management toolsThe management plane provides the capability to manage the Recovery Services vault using the Azure Portal, Azure PowerShell, Azure CLI, REST APIs, and Backup Center.
Reporting and managementAll reporting, alerting, and management functionality is configurable thanks to capabilities provided within the management plane. It supports integration with Log Analytics for centralized backup monitoring across multiple vaults.
Faster restores using snapshotsThe management plane handles snapshot backups for Azure VM and Azure files, which allow for faster data restores than from a storage vault. This can help you reduce the RTO in your environment during any data-restore operations.
Backup agents
Azure Backup service components provide two main types of backup agents:
MARS agentThis supports system-state, file-level, and folder-level backups of Azure IaaS VMs and on-premises Windows Servers. It integrates with DPM and MABS servers to store local disk backups from those components in Azure for long-term retention.
Azure VM extensionThis is installed only on Azure IaaS VMs to carry out entire VM-level backups.
Supported backup types
Azure Backup supports various types of backups, which are selected based on the workload being backed up. Each type of backup provides different capabilities for backup and restoration. In general, most backup policies include a combination of these backup types to provide faster backups and limit data loss:
Full backupsThese are backups of target data sources that include entire VMs, databases, or file/folder structures. You should always start any new backup with a full backup to provide Azure Backup with a full copy of the data source, which it will need before it can perform any incremental, differential, or transaction log backups. Azure Backup currently allows only one full backup per day.
Differential backupsDifferential backups contain data from the last full backup. These types of backups are supported for SQL and SAP HANA databases running in Azure VMs. Differential backups are not the most efficient, as they take repeated backups of data modified since the last full backup, regardless of any changes to the data taking place on that day. It is important to use this backup type carefully. It can help speed up restores in certain scenarios, such as database backups, but also can result in additional use of backup storage. Azure Backup allows only one differential backup per day, and not on the same day as a full backup.
Incremental backupsThese backups contain data from the last full or incremental backup. Incremental backups are supported by SAP HANA databases running in Azure VMs. They are more efficient than differential backups, as they only back up changes since the last backup. This reduces any redundant backups of unchanged blocks. Incremental backups cannot be scheduled along with differential backups. Only one of the two can be set up to run on a regular basis. Incremental backups can be performed only once per day, and not on the same day as a full backup.
Transaction log backupsThese backups are supported by both SQL and SAP HANA databases running in Azure VMs. They are incremental log backups of the databases running on the target VMs. They can be scheduled to run once every 15 minutes at most. You can use transaction log backups along with full and incremental backups for a comprehensive database-backup strategy.
Backup policy
A backup policy defines a backup’s schedule and retention configuration. You can apply different backup policies to different workloads, based on each workload’s schedule and retention requirements. For example, you might create a backup policy that backs up a critical application server at 9 p.m. each day, with a retention of 365 days. In contrast, you might create a backup policy that backs up a non-critical application server every Sunday at 9 p.m., with a retention of four weeks.
You can have a maximum of 200 policies per vault and 100 items targeted per policy. If multiple applications or servers have the same retention and scheduling requirements, it is best to use the same backup policy to avoid hitting the subscription limit. If you reach the limit of 100 items for that policy, create a duplicate policy for the remaining items.
Backup scheduling
When you schedule backups, you must define the time and frequency at which backups should occur. This could be daily, weekly, monthly, yearly, or a combination of schedules:
Daily backups occur daily at the time specified.
Weekly backups require you to select the day of the week and the time when the backup should take place.
Monthly backups require you to define the day of the month and the time when the backup should take place.
Yearly backups require you to define the day of the year and the time when the backup should take place.
It is highly recommended that you schedule production backups during off-peak hours to limit its impact. Also, stagger backup jobs across the backup window so there aren’t too many backup jobs taking place at the same time. Otherwise, the backup jobs could cause a slowdown across your entire environment, and cause the backups to take longer, too.
Backup retention
Backup retention defines how long the backup should be stored in the Recovery Services vault. Any retention period limited to days defines a short-term retention window. Any retention period limited to weeks, months, or years defines a long-term retention window. Be sure to set up retention for each application based on that application’s audit, compliance, and recovery requirements.
You can also run backups on demand. For example, before an upgrade activity, you might decide to create a backup so you can roll back to that point in time if required. On-demand backups do not adhere to the retention policies configured or applied to that workload.
Backup compression
Azure Backup supports the compression of on-premises backup data at the source before it is transferred to the Recovery Services vault. This compression is a feature of the MARS agent set up for file or folder backups in the on-premises servers or the Azure Backup Server solution. Backups of Azure VMs using the backup extension do not support compression.
Backup monitoring
Azure Backup has a built-in monitoring engine that keeps track of all backup agents, scheduled backup jobs, job results, restore jobs, and other related administrative activities. You can use this built-in engine to monitor each Recovery Services vault. However, to monitor this information across multiple vaults, it is better to use other options, such as the following:
Backup ExplorerBackup Explorer is a pre-defined workbook provided by Microsoft as part of the Azure Monitor service. It provides a singular view of all backups and restore jobs, including job history across all backup vaults to which the admin has access. It can quickly help identify workloads that are currently not set up for backups.
Azure Monitor with Log AnalyticsYou can configure Azure Backup to store all logs in a Log Analytics workspace. Azure Monitor can create visualizations and alerts for job monitoring across multiple vaults.
Alerts
Azure Backup provides a built-in alerting engine that sends email-based alerts to defined users or distribution groups based on identified triggers. Examples of triggers might be backup failures, restore failures, backup data or protection deletion, and so on. The built-in engine provides sufficient capabilities to set up alerts for standard alerting scenarios. However, if custom alerts are required to address the scenarios not covered by the built-in engine, you can use Azure Monitor to set up alerts using Log Analytics for log ingestion.
Security
Azure Backup is secured on multiple levels, starting with backup data security during transit and at rest and extending to service access controls.
With regard to data in transit, Azure ensures that all data transferred from the MARS agent to Azure Backup and storage occurs over HTTPS. Additionally, any data transfer between Azure Backup and storage uses HTTPS, ensuring data security during transit.
Azure encrypts all data stored in the Azure storage (in other words, data at rest) using platform-managed keys or customer-managed keys stored in the Azure Key Vault service. This helps ensure that data is not readable if stolen from the back end. Azure Backup also supports the backup of Azure data encrypted disks using BitLocker encryption with Azure Key Vault integration.
Azure Backup service uses Azure role-based access control (RBAC) for granular access control of the Recovery Services vault. You can use pre-defined security roles available in RBAC to assign access to admins based on their roles and duties. These roles include the following:
Backup contributorsMembers can create and delete vaults; enable new backups; create, delete, and manage backup policies; stop and delete backup protection; and perform all operators activities.
OperatorsMembers can trigger backup and restore jobs.
ReadersMembers can read the backup configuration only.
You can also create custom roles with permissions per your environment and assign them to admins for granular control. Apart from the backup service itself, the back-end storage accounts that hold all the backup data are another point of concern. Azure ensures that another user or service, apart from Azure Backup service, cannot access these storage accounts during operations such as backups or restores.
Azure Backup walkthrough
The following sections walk you through the process of creating a Recovery Services vault and setting up Azure Backup to back up your Azure VMs using the Azure Portal, Azure PowerShell, and the Azure CLI. If you are following along, be sure to select resources and resource names based on your environment, including unique Recovery Services vault names for each of your deployments. Also be sure to delete any unwanted resources after you have completed testing to reduce charges levied by Microsoft for these resources.
Using The Azure Portal
To create a Recovery Services vault and set up an Azure VM backup using the Azure Portal, follow these steps:
Log in to the Azure Portal, type recovery service vaults in the search box and select it from the list that appears. (See Figure 1-2.)
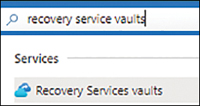
FIGURE 1-2Search for recovery service vaults.
Click Createor Create Recovery Services Vaultto start the Create Recovery Services Vault wizard. (See Figure 1-3.)
FIGURE 1-3Click Create Recovery Services Vault.
In the Basicstab of the Create Recovery Services Vault wizard (see Figure 1-4), enter the following information, and click Next:
SubscriptionSelect the subscription that will host the vault.
Resource GroupSelect the resource group you want to use to host the Recovery Services vault. Alternatively, to create a new resource group, click the Create Newlink and follow the prompts.
Vault NameType a name for the vault. If the name you type is already in use, the wizard will prompt you to select another name.
RegionSelect the Azure region in which you want to host the vault.
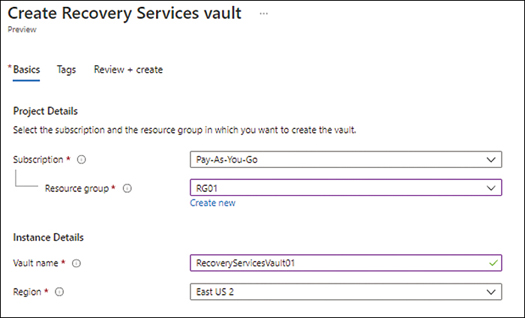
FIGURE 1-4The Basics tab of the Create Recovery Services Vault wizard.
In the Tagstab, enter any tags you would like to associate with the vault, or leave the fields blank (see Figure 1-5) and click Next.
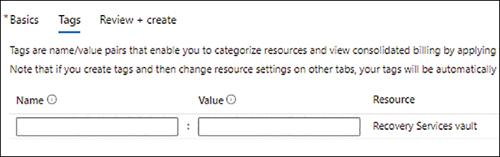
FIGURE 1-5The Tags tab of the Create Recovery Services Vault wizard.
In the Review + Createtab (see Figure 1-6), review your settings and click Create.
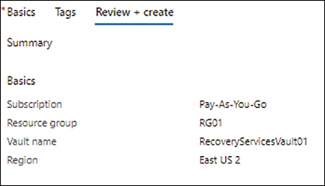
FIGURE 1-6The Review + Create tab of the Create Recovery Services Vault wizard.
After the Recovery Services vault is deployed, click the Go to Resource button to access its configuration options. (See Figure 1-7.)
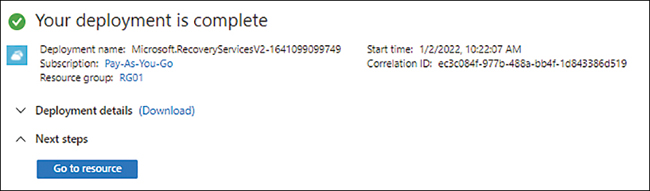
FIGURE 1-7Go to the vault’s configuration page.
In the Recovery Services vault’s configuration page, click the Backup button to start the Backup Goal wizard. (See Figure 1-8.)
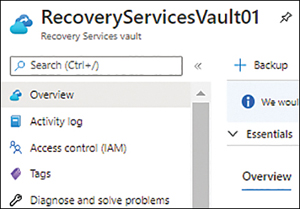
FIGURE 1-8Start the Backup Goal wizard.
In the Backup Goal wizard, click the alert message (The Storage Replication Is Set to Geo-Redundant…) shown at the top. (See Figure 1-9.)
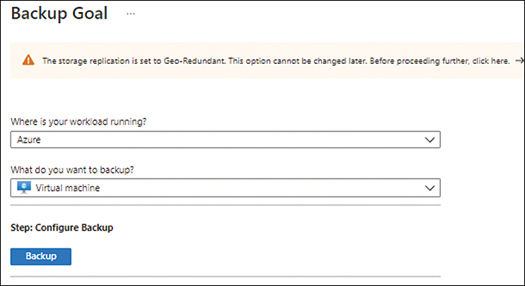
FIGURE 1-9Backup Goal wizard.
A Backup Configuration pane opens on the right. (See Figure 1-10.) Set the following options and click Save:
Storage Replication TypeFor this example, leave this set to Geo-Redundant.
Cross Region RestoreSet this to Enable if required.
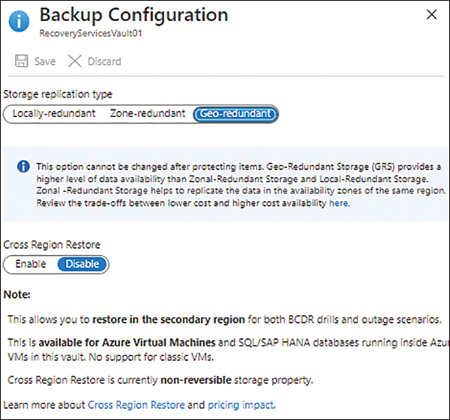
FIGURE 1-10The Backup Configuration options.
Back in the Backup Goal wizard (see Figure 1-11), set the following options. Then click the Backup button to start the Configure Backup wizard:
Where Is Your Workload Running?Leave this set to the default option, Azure. Alternatively, if you want to switch to an on-premises machine or some other option, open the drop-down list and select it.
What Do You Want to Back Up?Leave this set to the default option, Virtual Machine. Alternatively, open the drop-down list and a different option.

FIGURE 1-11The Backup Goal wizard (again).
In the Configure Backup wizard (see Figure 1-12), under Backup Policy, click the Create a New Policy link.
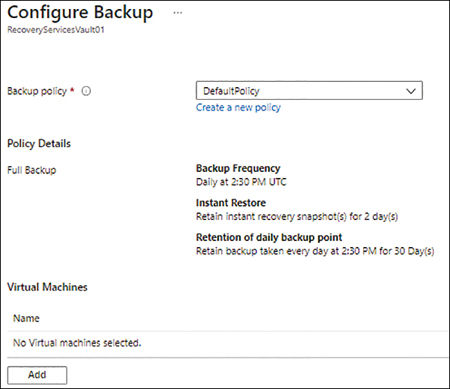
FIGURE 1-12Configure Backup.
In the Create Policy window (see Figure 1-13), enter the following information and click Create:
Policy NameEnter a unique policy name.
Backup ScheduleSpecify how frequently you want the backup to occur (daily, weekly, monthly, or yearly), at what time the backup should occur, and in what time zone the backup should occur.
Instant RestoreSpecify how many days an instant recovery snapshot should be retained. Instant restore will result in local short-term backup retention for quicker restores. It supports a maximum value of 5 days.
Retention RangeSpecify the number of days, weeks, months, and years of backups to retain and the day to target for each.
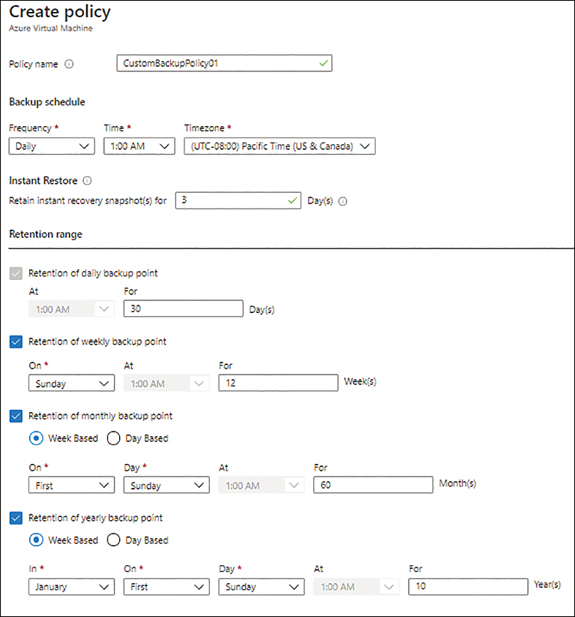
FIGURE 1-13Create Policy options.
Back in the Configure Backup wizard (refer to Figure 1-12), under Virtual Machines, click the Add button to open the Select Virtual Machines window. (See Figure 1-14.)
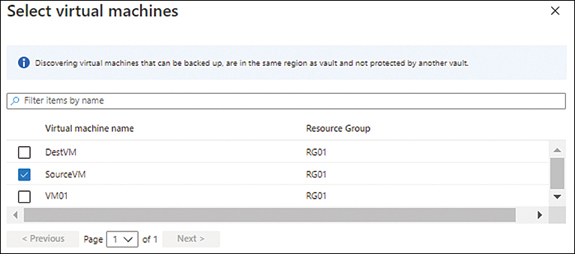
FIGURE 1-14The Select Virtual Machines window in the Configure Backup wizard.
Select the VMs you want to back up and click Add.
Back in the Configure Backup wizard, verify that the settings are correct.
Optionally, select the OS Disk Only check box if you want to limit the backup to include only the OS disk of the VM. (See Figure 1-15.)
Click Enable Backup.
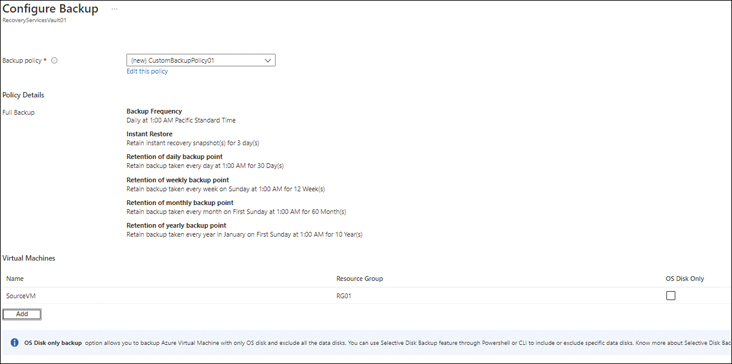
FIGURE 1-15Review your settings in the Configure Backup wizard and enable the backup.
After the backup is deployed to the Recovery Services vault, click the Go to Resource button to access the vault’s configuration options. (See Figure 1-16.)

FIGURE 1-16Go to the backup’s configuration page.
In the Recovery Services vault’s configuration page, under Protected Items, click Backup Items. (See Figure 1-17.)
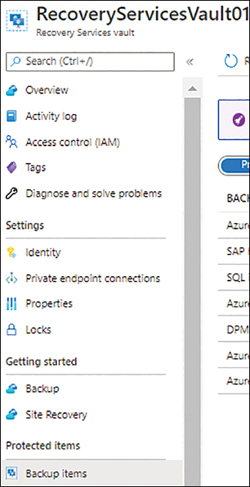
FIGURE 1-17The Backup Items option in the Recovery Services vault configuration page.
In the right pane, under Primary Region, select Azure Virtual Machine. (See Figure 1-18.)
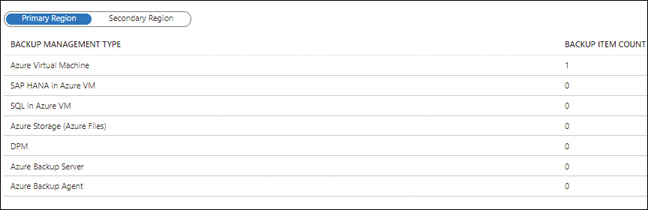
FIGURE 1-18Recovery Services vault – Primary Region.
A summary of backups you’ve created is displayed. (See Figure 1-19.)

FIGURE 1-19List of configured backups.
Click the backup you just created to see more details about it. (See Figure 1-20.)
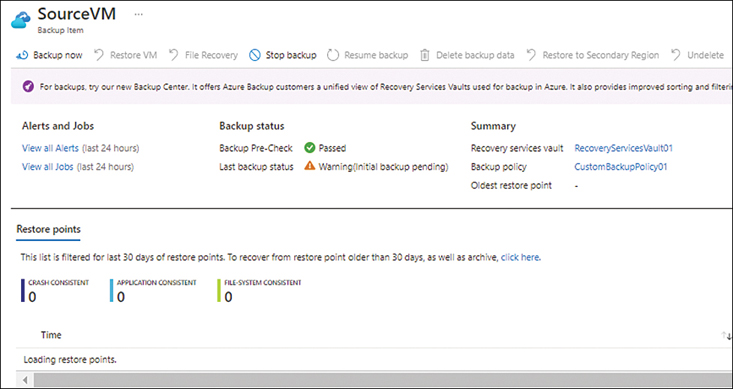
FIGURE 1-20Detailed information about the backup you configured.
Do one of the following:
Click Backup Nowto initiate a backup manually.
Wait for the backup to be triggered automatically, according to the schedule you set.
If you elected to initiate the backup manually, select the date until which the backup should be retained (see Figure 1-21) and click OK to start the backup.
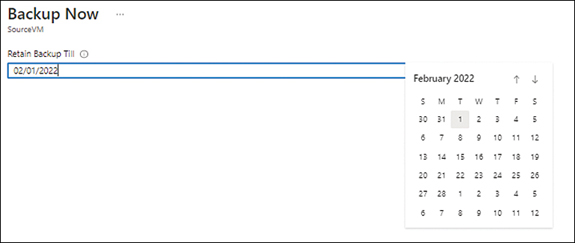
FIGURE 1-21Start a manual backup.
After the manual backup begins, click Notifications. Then select the backup job currently running (see Figure 1-22) to see a detailed view of the backup’s progress (see Figure 1-23).
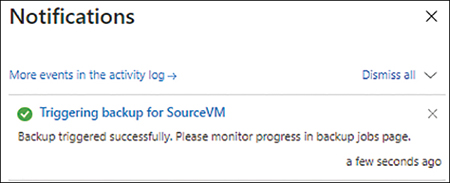
FIGURE 1-22The Notifications page.
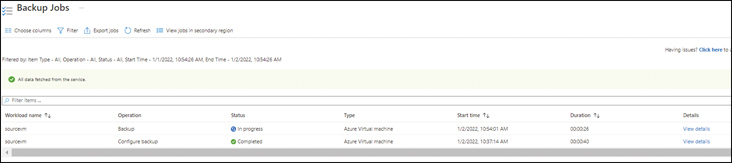
FIGURE 1-23Monitoring the backup job.
Using Azure Powershell
You can create a Recovery Services vault, set up a backup policy, and enable backups for an Azure VM using the New-AzRecoveryServicesVault, New-AzRecoveryServicesBackupProtectionPolicy, and Enable-AzRecoveryServicesBackupProtection Azure PowerShell commands. The following code shows you how. Use this snippet to create the same Recovery Services vault and VM backup as you did in the Azure Portal; when you do, be sure to either delete the previous Recovery Services vault or give this new vault a different name:
#Register the vault service
Register-AzResourceProvider -ProviderNamespace "Microsoft.RecoveryServices"

#Define variables
$vaultname = "RecoveryServicesVault01"
$rg = "RG01"
$location = "EastUS2"
$VM = "SourceVM"
#Create Recovery Services vault
New-AzRecoveryServicesVault -ResourceGroupName $RG -Name $vaultname -Location $location

#Set the storage redundancy and cross region restore config
Get-AzRecoveryServicesVault -Name $vaultname | Set-AzRecoveryServicesVaultContext
Get-AzRecoveryServicesVault -Name $vaultname | Set-AzRecoveryServicesBackupProperty -BackupStorageRedundancy GeoRedundant –EnableCrossRegionRestore

#Create Backup policy
$SchedulePolicy = Get-AzRecoveryServicesBackupSchedulePolicyObject -WorkloadType "AzureVM"
$Date = Get-Date
$SchedulePolicy.ScheduleRunTimes.Add($Date.ToUniversalTime())
$Retention = Get-AzRecoveryServicesBackupRetentionPolicyObject -WorkloadType "AzureVM"
$Retention.DailySchedule.DurationCountInDays = 30
$policy = New-AzRecoveryServicesBackupProtectionPolicy -Name CustomBackupPolicy01 -RetentionPolicy $Retention -SchedulePolicy $SchedulePolicy -VaultId $vaultname.ID -WorkloadType AzureVM

#Enable Azure VM Backup
Enable-AzRecoveryServicesBackupProtection -ResourceGroupName $RG -Name $VM -Policy $policy

#Trigger Backup Now
$bkpcontainer = Get-AzRecoveryServicesBackupContainer -ContainerType "AzureVM" -FriendlyName $VM
$bkpitem = Get-AzRecoveryServicesBackupItem -Container $bkpcontainer -WorkloadType "AzureVM"
Backup-AzRecoveryServicesBackupItem -Item $item

#Monitor backup status
Get-AzRecoveryservicesBackupJob
Using Azure CLI
You can create a Recovery Services vault, set up a backup policy, and enable backups for an Azure VM using the az backup vault create and az backup protection enable-for-vm Azure CLI commands. The following code shows you how. Use this snippet to create the same vault as you did in the Azure Portal and Azure PowerShell; when you do, be sure to either delete the previous vault or give this new vault a different name.
NoteCreating a custom policy using the Azure CLI requires knowledge of writing and editing JSON templates. Therefore, it would be best to use the Azure Portal or Azure PowerShell to create new policies and associate them using CLI. In this example, we will use the default policy instead of a custom policy to overcome this.
#Define variables
vaultname = "RecoveryServicesVault01"
rg = "RG01"
location = "East US 2"
vm = "SourceVM"
#Create the Recovery Services vault
az backup vault create --resource-group $rg
    --name $vaultname
    --location $location

#Set vault storage replication type and cross region restore config
az backup vault backup-properties set --name $vaultname
    --resource-group $rg
    --backup-storage-redundancy "GeoRedundant"
    --cross-region-restore-flag "True"

#Enable backup for SourceVM
az backup protection enable-for-vm --resource-group $rg --vault-name $vaultname --vm $vm --policy-name DefaultPolicy

#Start the Backup Now
az backup protection backup-now --resource-group $rg --vault-name $vaultname --container-name $vm --item-name $vm --backup-management-type AzureIaaSVM --retain-until 02-02-2021

#Monitor backup progress
az backup job list --resource-group $rg --vault-name $vaultname --output table
Best practices
Following are some general best practices for using Azure Backup:
Set the correct Azure Backup storage replication typeAzure Backup supports storage that uses either the LRS, ZRS, or GRS replication type. Each provides a progressively higher level of redundancy, but also increases the cost incurred. By default, the service creates a GRS storage for backups. However, if that level of redundancy is not required, or if you want to control the costs incurred by the storage, change this replication type before you create any backups. Once backups are initiated, this configuration cannot be changed.
Limit internet connectivity for backupsAzure Backup for VMs is performed directly over the Azure network, so there is no need to open access to any internet URLs for it. However, SQL and SAP HANA databases running on Azure VMs require connectivity using either the internet or Private Link to Azure Backup. If Azure Private Link is not a viable option, ensure that internet access for backups is limited to the network URLs required for Azure Backup. Azure publishes a list of these URLs publicly and updates them periodically as changes take place.
Use Private Endpoint and Private Link for SQL and SAP HANA backupsAlthough SQL and SAP HANA databases running on Azure VMs can be backed up over the internet, it is best to set up a Private Endpoint for Azure Backup to connect to using Private Link to ensure these backups take place over a private internal connection. This will prevent any chance of a man-in-the-middle attack.
Use Backup Center for better managementBackup Center is a free Azure service to centrally manage all backups spread across all Recovery Services vaults. Use this service to get a single view of all backups taking place in your environment.
Use Azure Policy for automated backup schedulingIn large organizations with hundreds or thousands of VMs, keeping track of and ensuring all new VMs are set up for backups per the organization’s requirements can be a daunting task. Use Azure Policy to define and apply a backup policy for any new VMs that are set up in a particular subscription, region, or resource group. This enables you to define the vault and backup policy that should be assigned automatically.
Use Log Analytics for centralized monitoring and reportingIntegrate all Recovery Services vaults with the Log Analytics service so that all metrics for each vault, including all backups, are automatically captured for the purposes of generating detailed reports and long-term tracking.
Use Azure Policy for automated diagnostic loggingYou can use Azure Policy to configure all Recovery Services vaults with a policy to set up the Log Analytics configuration automatically. This eliminates the management overhead involved with performing this activity manually for new vaults.
Use the archive tier to reduce costsAzure Backup supports the use of the archive storage tier for long-term retention backups of Azure VMs and SQL servers running in Azure VMs. This enables you to push monthly and yearly backup data to the archive tier if it must be retained for more than six months. This can help you bring down the cost of your backup storage significantly.
Set up security defaults to protect against malicious attacksSecurity defaults define the PIN and soft delete retention policies to ensure that unauthorized changes to the service and any malicious or accidental delete operations can be prevented or easily reversed. Be sure to set both up as soon as you create a new vault.