Chapter 2
Azure Site Recovery
Overview
Microsoft introduced the Azure Site Recovery (ASR) service in public preview in June 2014. ASR initially focused on Hyper-V–to–Hyper-V and on-premises Hyper-V–to–Azure recovery scenarios. Over time, the service evolved to include additional capabilities, such as support for various operating systems, Azure IaaS VMs, and complex workloads that you could replicate in coordination with each other so you could bring them online in Azure with a similar recovery point. The simplicity, stability, and cost effectiveness provided by ASR has made it a very popular service used by organizations for their business continuity and disaster recovery (BCDR) strategy.
The key features of this service include the following:
Simplified interface to set up, monitor, and manage BCDRASR provides an intuitive interface that makes it possible to easily set up, monitor, and manage the service.
Support for most commonly used operating systemsASR supports the replication of most operating systems, and the support list is expanding on a regular basis. This makes it possible to use ACR as a one-stop BCDR solution for most organizations.
Support to define replication schedules to meet the RTO and RPO objectivesfor most organizations ASR supports replication as low as 30 seconds for Hyper-V VMs and continuous replication for Azure VMs. VMware support is currently under preview but is expected to allow continuous replication.
Support for any workloadASR supports the replication of any workload as long as it is hosted on a supported operating system. This makes it a viable solution to address most organizations’ needs.
On-premises Hyper-V–to–Hyper-V replication, monitoring, and recovery orchestration across multiple DR sitesASR supports replication monitoring and failover coordination for on-premises Hyper-V–to–Hyper-V servers across multiple interconnected sites. Hyper-V replication is used for data replication, but ASR helps automate all the recovery steps from the cloud.
Azure–to–Azure IaaS VM replication, monitoring, and recovery orchestration across Azure regionsASR added support for Azure VM replication and failover across Azure regions in 2017. This allowed organizations to set up a BCDR strategy for their critical cloud workloads across multiple Azure regions.
On-premises Hyper-V–and physical servers–to–Azure replication, monitoring, and recovery orchestrationASR supports the entire recovery management for workloads hosted in on-premises Hyper-V and physical servers to Azure VMs. Azure Storage hosts the replicated data. VMs are created only after a failover is initiated, reducing the costs associated with a secondary datacenter.
App-consistent snapshots to recover applications more efficientlyASR supports using app-consistent snapshots for replication to ensure that applications are replicated using disk data, all data in memory, and all transactions in process.
Simplified and cost-effective pricingASR charges a fixed fee per server for the replication software; Azure Storage costs for replicated data are charged only after the VMs are failed over in Azure. This makes it extremely cost-effective when the DR site in Azure is not actively used to host VMs, as the majority of costs are related to running the VM. All this makes it possible for most organizations to afford a BCDR solution for their environment.
Testing DR withoutinterruption to production ASR supports the activation of the replicated data in isolated networks in Azure. This enables you to test VMs to make sure your application, database, and other workloads are working as needed before you need to actually use them in a DR scenario. This also enables scenarios in which application upgrades can be tested in the Azure cloud before implementing them in your on-premises environment.
Integration with SQL Server AlwaysOnASR supports integration with SQL Server AlwaysOn to allow for seamless recovery of both interconnected application and database workloads.
Integration with Azure AutomationAzure Automation enables you to set up scripts and automated actions to provision other Azure services or run pre- and post-failover scripts as part of your automated recovery procedure.
Multi-VM consistency using replication groupsASR supports setting up multi-VM replication groups so that multiple VMs are replicated together, and app-consistent and crash-consistent recovery points are created to facilitate failover. This enables you to address scenarios that require multiple VMs to be maintained at the same consistency.
ASR supports various recovery scenarios that can be used by organizations in different ways, depending on their individual needs. The following sections cover the two most important scenarios that ASR supports: Azure–to–Azure disaster recovery and on-premises Hyper-V–to–Azure disaster recovery. Read these sections to obtain a better understanding of how both these scenarios can be set up, managed, and monitored using ASR.
Azure–to–Azure disaster recovery
ASR enables you to set up the replication of an Azure IaaS VM to another Azure region. After you enable replication, ASR installs the Site Recovery agent extension on the Azure VM that is used to register the VM to the ASR service. Once this is done, existing disk data and changes to the disk are transferred to the target storage account or managed disk based on your selection. Data is transferred using Microsoft’s private network rather than the public internet, regardless of the Azure region selected, ensuring your data is transferred in a secure manner. Replication is continuous and crash-consistent, and app-consistent recovery points are created based on the replication policy that you set up for a VM.
Replication policy
The replication policy created and associated by default during the DR setup process defines the following:
Recovery-point retentionThis defines how far back in time ASR allows for recovery. The service retains recovery points based on retention timelines you define. At this time, the maximum supported recovery-point retention duration is 15 days for managed disks and 3 days for unmanaged disks; the default is 24 hours.
NoteThe higher the recovery-point retention period, the more data that is retained for that VM, and therefore the more you are charged for the storage used by the service.
Crash-consistent recovery pointsThese are snapshots of the state of the VM disk taken and sent to the target region. These recovery points do not capture the data in memory and can therefore result in applications being brought online in an inconsistent state when recovered. Although most applications these days support crash-consistent recovery points, it is best to use app-consistent recovery points for recovery, if possible. By default, these are created every 5 minutes.
App-consistent recovery pointsThese are snapshots of the on-disk data along with all processes, data, and transactions running in memory. These are captured using the Volume Shadow Copy Service on Windows Servers. App-consistent snapshots take longer than crash-consistent snapshots and can add load to the server depending on the available resources and frequency defined. You should test to make sure these snapshots are not causing significant overhead or resize your VM workload to accommodate the additional load. The minimum frequency supported for this snapshot is 1 hour; the default setting is 4 hours.
You can define a replication policy based on your application, workload, or recovery point objective (RPO) requirements and set up your replication configuration to use that policy when setting up replication.
Data security
ASR does not intercept, scan, or analyze data transferred between source and target regions. This makes the entire process transparent to the service and eliminates the risk of the replicated data being used for malicious purposes. Data is encrypted in transit as well as encrypted while at rest when stored in the target region.
Multi-VM consistency
Multiple interdependent VMs can be set up in a replication group during replication setup so they are replicated to the target region with shared crash-consistent and app-consistent recovery points. This might be necessary when multiple application, interface, and database servers require that level of data consistency across each to ensure a supported failover. All VMs in a replication group must be failed over at the same time and cannot be failed over individually.
A replication group can contain a maximum of 16 VMs. VMs can be added to a replication group only when they are being set up for replication. To add a VM that is already replicating to a replication group, you must re-create the replication for that VM. Multi-VM consistency is quite resource intensive. It is therefore recommended that you enable it only in scenarios in which it is important for VMs to have such shared snapshots.
NoteAll VMs that are part of a multi-VM consistency replication group must communicate with each other over port 20004. Make sure any firewalls or network security groups set up between the VMs are configured to allow this traffic.
Target environment configuration
You can define different configuration items for the target environment, even after setting up replication. However, there are a few configuration items that can be defined only during the initial setup. Following is a brief list of some of the key items that are supported at this time:
Target VM SKUYou can define this during replication setup, leave it set to automatic, or modify it after replication setup. When set to automatic, ASR will select a VM SKU that is the same or similar based on resource availability in the target region.
Target resource groupYou can define the target resource group during replication setup or leave it set to automatic, in which case the service will create a new resource group or modify an existing one after replication setup.
Target virtual networkYou can define the target virtual network during replication setup or leave it set to automatic, in which case the service will create a new one or modify an existing one after replication setup.
Target subnetThe service automatically assigns the VM to a subnet based on the source VM subnet setup. You can modify the target subnet after replication setup.
Target nameThe service automatically assigns a target name based on the source VM name. You can modify the target name after replication setup.
Target disk typeYou can define the target disk type during replication setup. The service automatically selects the disk type based on the source disk setup, but you can change it if required during replication setup.
Target subscriptionThe service automatically selects the subscription based on the source VM subscription, but if there is another subscription associated with the same Azure AD tenant, you can select it instead during replication setup.
Target proximity groupThe service automatically sets the target proximity group to None, but you can change this during replication setup.
Target VM availability configurationThe service automatically sets the target VM availability configuration based on the source VM, but you can change this at replication setup.
Failover and failback
In the event of a disaster in the primary region, you can failover the Azure VM to the target region using the ASR service. You will be asked to select the recovery point to use for the restoration. The target VM will then be created based on the settings you’ve defined and the replicated data.
The target VM is created in an unprotected state. Once the primary region is back online, you can set up failback replication for the VM. At this time, the site recovery service checks whether the source disk is still available. If one exists, it will check it for consistency and determine the missing changes to replicate over. If no disk exists, it will start the replication of the entire disk.
You can perform a failback in the same manner as the failover and perform it whenever you have the appropriate downtime.
Test and planned failovers
ASR supports test and planned failover options. Each option is useful in different scenarios.
In a test failover, ASR creates a VM in a test network defined by you, with the replicated data. It is recommended that you set up an isolated test network without connectivity to the primary network to avoid accidental writes from test applications to the primary database or other unexpected issues. The test VM does not commit write operations to the replication data. This enables you to make changes to the test VM—for example, application or database upgrades—without affecting the primary server or the replication in any way. You can perform test failovers to validate your VM and its workload failover as needed in the secondary region to perform application or database upgrade testing or for compliance auditory reasons. When you are finished testing, you can simply clean up the test environment; the test VM and associated disks will be deleted from the secondary Azure region, while the original replication continues unimpeded.
During a planned failover, ASR brings the VM online in the secondary region and allows changes to the VM to be committed to disk. While the changes are not replicated to the primary region, replication from the primary site is stopped. Use this option in scenarios where your primary VM is down or you are migrating to the secondary region.
Network security
You can control outbound replication traffic using network security groups (NSGs) in the source Azure region. ASR requires that any NSG rules set up enable outbound replication traffic. You can use service tags that Microsoft provides to define such outbound traffic rules. This ensures that any IP changes in the Microsoft services are automatically applied to your environment, as the service tags are updated by Microsoft when such changes occur, supporting uninterrupted replication for your workloads.
Azure–to–Azure disaster recovery walkthrough
The following section walks you through the process of setting up and testing Azure–to–Azure replication for a VM using the Azure Portal.
ImportantIf you are following along, you’ll want to select resources and unique resource names based on your environment for each of your deployments.
ImportantIf you are following along, delete any unwanted resources after you have completed testing to reduce charges being levied by Microsoft for these resources.
Using Azure Portal
Setup Azure Replication
To set up Azure–to–Azure VM replication using the Azure Portal, follow these steps:
Log in to the Azure Portal, browse to the VM you want to replicate, and click it to select it.
In the left pane of the selected VM’s configuration blade (see Figure 2-1), click Disaster Recovery to start the Azure Site Recovery wizard.

FIGURE 2-1Options in the SourceVM configuration blade.
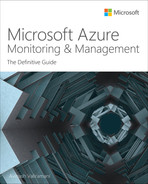
In the Basics tab of the Azure Site Recovery wizard, open the Target Region drop-down list and choose the region in which you would like to replicate the VM. (See Figure 2-2.) Then click Next: Advanced Settings.
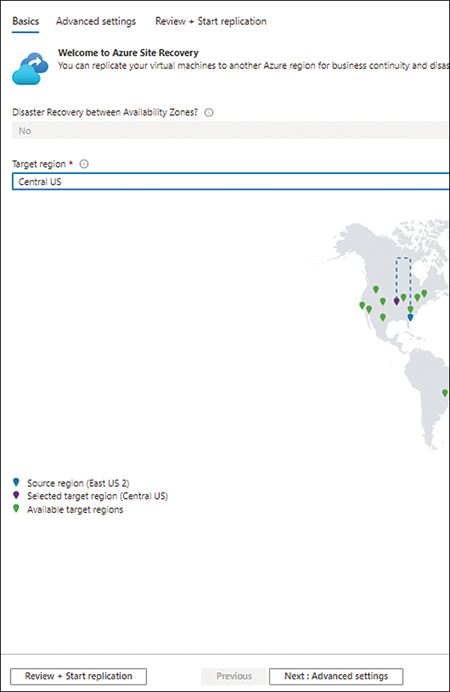
FIGURE 2-2Basics tab.
In the Advanced Settings tab (see Figure 2-3), enter the following information and click Next: Review + Start Replication:
SubscriptionSelect the subscription in which you want to create the replica VM.
VM Resource GroupSelect the resource group in which to create the replica VM. Alternatively, the wizard will create one automatically.
Virtual NetworkSelect the virtual network to use for the replica VM. Alternatively, the wizard will create one automatically.
AvailabilitySpecify whether the replica VM should be set up with availability enabled or leave it set to the default (Single Instance).
Proximity Placement GroupSpecify whether the replica VM should be placed in a proximity placement group.
Cache Storage AccountSelect an existing Azure storage account to use as the replication cache. Alternatively, the wizard will create one automatically.
Vault SubscriptionSelect the subscription in which to set up the Recovery Services vault.
Recovery Services VaultSelect an existing Recovery Services vault. Alternatively, the wizard will create one automatically.
Vault Resource GroupSelect an existing resource group in the target location. Alternatively, the wizard will create one automatically.
Replication PolicySelect an existing replication policy from the drop-down list. Alternatively, the wizard will create one automatically.
Update SettingsSpecify whether ASR should manage all update settings or if you will do so manually.
Automation AccountSelect an existing automation account to use for the site recovery configuration. Alternatively, the wizard will create one automatically.
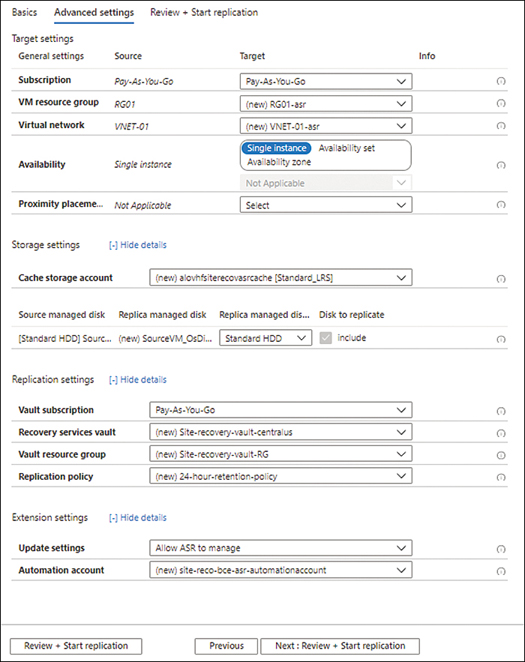
FIGURE 2-3Advanced Setting tab.
On the Review + Start Replication tab, check your settings and click Start Replication. (See Figure 2-4.)
FIGURE 2-4Review + Start Replication tab.
ASR creates the resources you requested, starting a number of jobs one after another to create all the different components.
Monitor the jobs to ensure they all complete successfully. (See Figure 2-5.)

FIGURE 2-5Site Recovery Jobs page.
NoteIn the event of any errors or failures, you will need to select the error message to view more details to identify the root cause and resolve the issue. You will then have to reinitiate the entire process.
Monitor Replication
When all the jobs are complete, in the Site Recovery service, under Replicated Items, you will see the SourceVM you just replicated.
Click SourceVM under Replicated Items.
A SourceVM Overview page displays the status of the replication, or sync. Notice in Figure 2-6 that Replication Health is Healthy, but Status is 0% Synchronized.

FIGURE 2-6The SourceVM Overview page with Replication Health and Status data.
Refresh and monitor this page until synchronization is complete.
When synchronization is complete, Status will change to Protected. (See Figure 2-7.) At this point, you can make changes to the replica VM configuration.
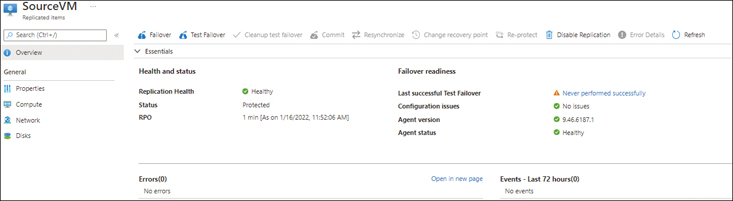
FIGURE 2-7The SourceVM overview page with the updated Replication Health and Status data.
Customize Replica Configurations
In the left pane of the SourceVM’s Replicated Items configuration blade, click Compute.
On the Compute Properties page (see Figure 2-8), enter the following information and click Save:
NameType the VM name in the Name row of the Target Settings column.
Resource GroupEnter the resource group in the Resource Group row of the Target Settings column.
SizeEnter the size in the Size row of the Target Settings column.

FIGURE 2-8Compute settings.
In the left pane of the SourceVM’s Replicated Items configuration blade, click Network.
Click Edit to make changes to the following settings, if desired. (See Figure 2-9.) Then click Save:
Target Network
Test Failover Network
Accelerated Networking
Subnet
Network Security Group
Private IP Address
Public IP
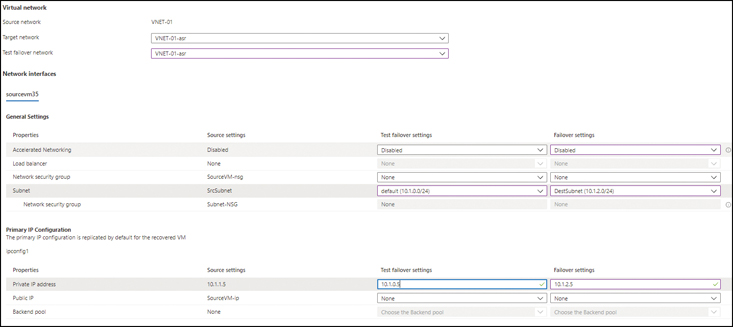
FIGURE 2-9Network settings.
In the left pane of the SourceVM’s Replicated Items configuration blade, click Disks to monitor pending changes to the source VM to assess how the sync is progressing. (See Figure 2-10.)

FIGURE 2-10Disks replication status.
Next, you’ll perform a test failover to test the replica VM.
Test Failover
Back in the Overview page in the SourceVM’s Replicated Items configuration blade, click the Test Failover button. (See Figure 2-11.) A Test Failover page opens.

FIGURE 2-11Click the Test Failover button.
In the Test Failover page (see Figure 2-12), set the following options as shown and click OK:
FromThis automatically lists the Azure region where your source VM is running.
ToThis automatically lists the Azure region where your replica VM is set to be created.
Choose a Recovery PointChoose the recovery point to restore to and create the replica VM. You will generally want to select Latest Processes (Low RTO) for the least data loss possible.
Azure Virtual NetworkThis automatically lists the Azure virtual network where your replica VM is set to be created.

FIGURE 2-12Test Failover page.
ASR stores the recovery point in the target region and creates a new VM with a name similar to the source VM. For example, if the source VM were named DC01, the new VM would be named DC01-test. Figure 2-13 shows the result.
NoteYou can log in to the VM using Azure Bastion (if provisioned in the target region) or by assigning a public IP to the VM.
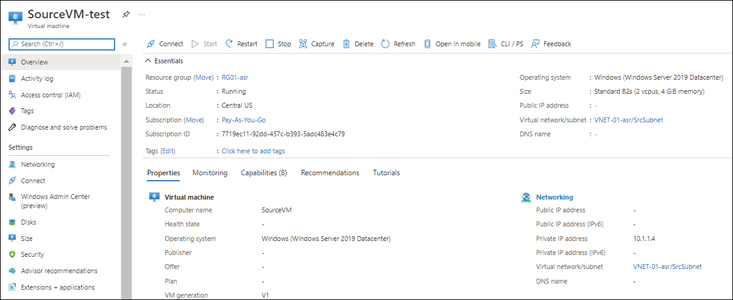
FIGURE 2-13SourceVM-test Overview page.
Log in to the new VM and verify that all the data, apps, and services reflect correctly.
Now that you have finished testing, you’re ready to clean up the test environment.
Cleanup Test Failover
Back in the Overview page in the SourceVM’s Replicated Items configuration blade (see Figure 2-14), click the Cleanup Test Failover button.

FIGURE 2-14Click the Clean Test Failover button.
In the Test Failover Cleanup dialog box (see Figure 2-15), type any notes from the test that you would like to record in the Notes box. These could include the test participants, test outcomes, issues encountered, or changes to incorporate in future tests or after testing the replication configuration.
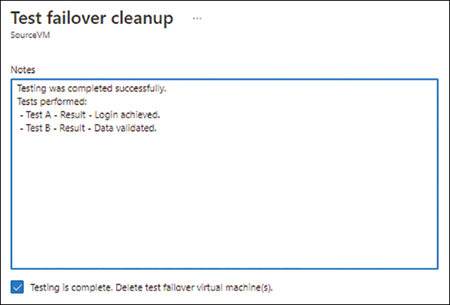
FIGURE 2-15The Test Failover Cleanup dialog box.
Select the Testing Is Complete. Delete Test Failover Virtual Machine(s) check box and click OK to initiate the cleanup job.
From the Test Failover Cleanup page (see Figure 2-16), monitor the cleanup job to ensure it completes successfully.

FIGURE 2-16Test Failover Cleanup page, showing the progress of the cleanup job.
If all your tests have completed successfully, you’re ready to perform a full failover of the VM to the Azure region to which you are replicating.
Perform Failover
Back in the Overview page in the SourceVM’s Replicated Items configuration blade (see Figure 2-17), click the Failover button.

FIGURE 2-17Click the Failover button.
In the Failover dialog box (see Figure 2-18), verify your settings, select the Shut Down Machine Before Beginning Failover check box if desired, and click OK to launch the ASR failover job.
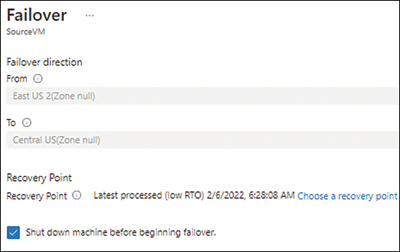
FIGURE 2-18Failover dialog box.
On the Failover page (see Figure 2-19), monitor the progress of the replication job to ensure all the steps complete successfully. If any errors occur, they will appear highlighted on the page, and you will need to analyze and fix them before re-running the failover job.

FIGURE 2-19Failover job summary page.
When the failover is complete, browse to the failed-over VM in the target region, log in to the VM, and validate that your application, database, or required services are online and working as intended.
Now it’s time to commit the VM. When you commit the VM, you will no longer be able to change the recovery point. Committing the VM will allow you to set up re-protect to enable the sync of the failed-over VM back to the source location, if required.
Back in the Overview page in the SourceVM replica’s configuration blade (see Figure 2-20), click the Commit button. Then, when prompted, click the Confirm button.
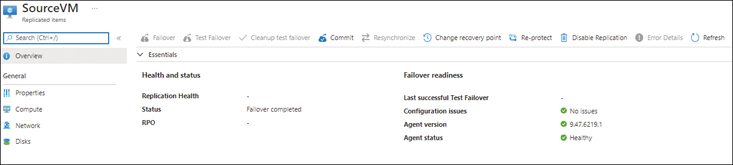
FIGURE 2-20Click the Commit button.
Now you can set up re-protection for the failed-over VM with the source VM. This provides redundancy for the failed-over VM in case of a disaster in the new site.
To set up re-protection, in the Overview page in the SourceVM’s Replicated Items configuration blade, click the Re-protect button.
In the Re-protect page (see Figure 2-21), validate or customize the settings as needed and click OK to start the re-protection job.
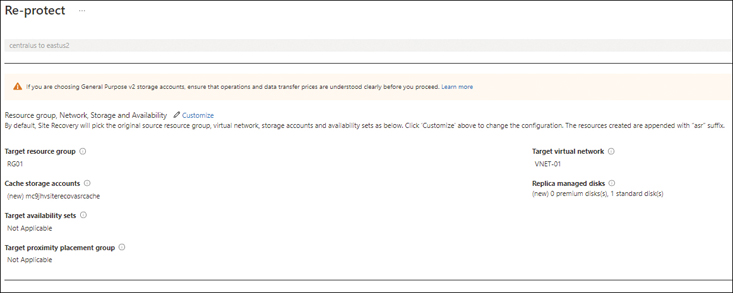
FIGURE 2-21Re-protect page.
Monitor the progress of the re-protection job to confirm that all the steps finish successfully. (See Figure 2-22.)
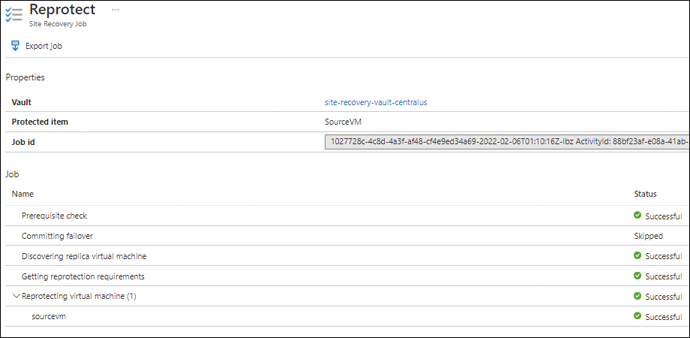
FIGURE 2-22Reprotect page for the Site Recovery job.
When the re-protection job is complete, return to the Overview page in the SourceVM’s configuration blade to monitor the replication status. (See Figure 2-23.) When Status is at 100% or Healthy, you can test failover or failover the VM if you want to switch back to your primary site.

FIGURE 2-23Overview page of the SourceVM replica showing the replication status.
Hyper-V–to–Azure disaster recovery
Companies that use Hyper-V with or without System Center Virtual Machine Manager (SCVMM) can benefit from using ASR to set up a disaster recovery for their on-premises environment in Azure. Considering the costs associated with ASR and its comprehensive integration with Hyper-V and SCVMM, it is an ideal solution for organizations of any size.
In the past, setting up a disaster-recovery (DR) site meant hosting infrastructure in another datacenter and managing all the associated networking components, upgrades, and updates for each infrastructure layer on an ongoing basis. Due to the initial setup and ongoing maintenance costs of such a design, most small and mid-size businesses shied away from setting up a DR site, and instead relied on offsite backups for their recovery strategy. Today, however, thanks to cost benefits and ease of management and maintenance, all organizations can benefit from ASR.
ASR supports Hyper-V hosts starting from Windows Server 2012 R2 (with the latest updates) to the latest Windows Server release. Similarly, for VMM, the minimum supported version is Virtual Machine Manager 2012 R2 to the latest release.
For Hyper-V VMs, you can replicate all VMs that are supported for hosting in Azure. It is therefore important that you check for the most recent guidance from Microsoft published online regarding the latest support matrix for Hyper-V hosts, VMM servers, and Hyper-V VMs. This guidance changes from time to time as different operating systems reach end of life or end of support.
NoteASR integrates with Microsoft applications such as SharePoint, Exchange, Dynamics, SQL Server, and Active Directory, and works closely with leading vendors, including Oracle, SAP, IBM, and Red Hat.
Replication components
ASR uses different components, depending on your Hyper-V environment:
Hyper-V with VMM/Hyper-V cluster with VMMIn this scenario (see Figure 2-24), you deploy the ASR Provider agent on the VMM server and the Recovery Services agent on each Hyper-V host. The Hyper-V VMs do not require anything to be installed on them.
Hyper-V without VMM/Hyper-V cluster without VMMIn this scenario, you deploy the ASR Provider agent and Recovery Services agent on each Hyper-V host. The Hyper-V VMs do not require anything to be installed on them. (See Figure 2-25.)
Each scenario requires you to provision a Recovery Services vault, a storage account, and a virtual network in the same Azure region to reference during replication setup. Replication can be set as frequently as every 30 seconds (except in scenarios where premium storage is used for replication) or as infrequently as every 5 minutes, enabling you to achieve extremely low recovery point objectives and low data loss.
NoteAlthough LRS and GRS storage account types are supported, it is recommended to use GRS, if costs permit, so your replicated data is maintained in multiple Azure regions. This way, a failover can be initiated in a secondary region if the primary Azure region is also down when an on-premises outage occurs.
NoteInitial replication from on-premises must be performed over the network. Offline replication for the initial data or any subsequent data transfers is not supported.
Replication policy
Similar to Azure–to–Azure replication, you must create a replication policy and associate it with your replication configuration during the DR setup process. This involves setting the following options:
Copy FrequencyThis defines how often delta sync occurs after the initial replication is completed. Options range from 30 seconds to 5 minutes.
Recovery Point RetentionThis defines how far back in time ASR allows for recovery, as the service retains recovery points based on retention timelines that you define. The maximum supported recovery-point retention at this time is 24 hours.
App-Consistent Recovery PointsThese are snapshots of the on-disk data along with all processes, data, and transactions running in memory. They are captured using the Volume Shadow Copy Service on Windows Servers. App-consistent snapshots take longer than crash-consistent snapshots and can add load to the server depending on the available resources and frequency defined. You should test to make sure these snapshots are not causing significant overhead or resize your VM workload to accommodate the additional load. The minimum frequency supported for this snapshot is 1 hour.

FIGURE 2-24Hyper-V with VMM/Hyper-V cluster with VMM topology.

FIGURE 2-25Hyper-V without VMM/Hyper-V cluster without VMM topology.
You can also define whether the replication should initialize immediately once the configuration is completed or schedule it to be initiated at a later time in the day.
Data security
Similar to the Azure–to–Azure DR scenario, ASR does not intercept, scan, or analyze data transferred between your on-premises and Azure target regions. This makes the entire process transparent to the service and eliminates the risk of the replicated data being used for malicious purposes. ASR only obtains metadata information to monitor replication health and coordinate failover activities. Data is encrypted in transit as well as encrypted while at rest when stored in the target region.
Failover and failback
In case of a disaster in the on-premises Hyper-V environment, you can failover the Azure VM to the target region using the ASR service. You will be asked to select the recovery point to use for the restoration. The target VM will then be created based on settings you’ve defined and the replicated data.
The target VM is created in an unprotected state. Once the on-premises datacenter is back online, you can set up failback replication for the VM from Azure to the on-premises Hyper-V host. At this time, you can choose to either perform a delta sync, during which ASR will check the source disk for consistency and determine the missing changes to replicate over, or, if that is not possible, to choose the full download option so the entire disk is replicated from Azure back on-premises. (In most cases when the Azure VM has been running for quite a few days, you will have to perform the full download option to set up failback.) Once replicated, you can perform a failback in the same manner as the failover whenever you have the appropriate amount of downtime available.
Test, planned, and unplanned failovers
Similar to Azure–to–Azure disaster recovery, ASR supports test and planned failover options even for Hyper-V VMs replicating to Azure. In addition, it supports unplanned failover in case the primary site has gone offline without giving you the ability to perform a graceful failover to Azure.
In a test failover, ASR creates a VM in a test network defined by you, with the replicated data for that Hyper-V VM. It is recommended that you set up an isolated test network without connectivity to the primary network to avoid accidental writes from test applications to the primary database or other unexpected issues. The test VM does not commit write operations to the replication data. This enables you to make changes to the test VM—for example, application or database upgrades—without affecting the primary server or the replication in any way. You can perform test failovers to validate your VM and its workload failover as needed in Azure to perform application or database upgrade testing or for compliance auditory reasons. This can also help in scenarios in which you are running low on resources on-premises and need a temporary test environment to quickly validate application changes. When you are finished testing, you can simply clean up the test environment; the test VM and associated disks will be deleted from Azure, while the original replication on-premises continues unimpeded.
During a planned failover, ASR performs a final delta sync from on-premises Hyper-V to ensure all changes are replicated to Azure. Thereafter, a VM is built based on the target configuration and brought online in the defined Azure region. The VM allows changes to be committed to disk. Although the changes are not replicated to the primary region, replication from the primary site is stopped, and the primary VM is shut down before the failover is initiated. Use this option in scenarios when you are migrating from on-premises to Azure.
If your on-premises environment is already offline, you will have to perform an unplanned failover. In such a scenario, ASR is unable to replicate any final changes from the on-premises VM. It will allow you to choose from one of the already replicated recovery points, however.
Network requirements
ASR primarily uses the public internet to replicate data directly to Azure Storage public endpoints. Replication occurs over SSL, ensuring data is protected during transit. Replication over a point-to-site (P2S) or site-to-site (S2S) VPN is not supported at this time. You must ensure your Hyper-V hosts have access to the Azure Storage endpoints over the internet for data transfers to take place.
Although P2S and S2S connectivity is not supported, ASR does support replication over ExpressRoute connections from on-premises to the Azure datacenter in which you are hosting your DR site. You must set up the Azure Storage used for storing replication logs to use ExpressRoute with Microsoft peering for this to work.
Hyper-V–to–Azure disaster recovery walkthrough
The following section walks you through the process of setting up and testing Hyper-V (without VMM)–to–Azure replication for a VM using the Azure Portal.
PrerequisitesTo build the base environment required to perform the steps in this walkthrough, you need a basic understanding of installing and configuring Hyper-V hosts, and of creating, configuring, and managing Hyper-V VMs.
ImportantBefore you begin, review all the prerequisites and ensure your Hyper-V hosts and VMs are updated and compatible for replication to Azure.
ImportantIf you are following along, you’ll want to select resources and unique resource names based on your environment for each of your deployments.
ImportantIf you are following along, delete any unwanted resources after you have completed testing to reduce charges being levied by Microsoft for these resources.
Using The Azure Portal
Setting up Hyper-V–to–Azure replication using the Azure Portal involves creating a Recovery Services vault, preparing the infrastructure, preparing your Hyper-V servers, configuring Hyper-V replication, setting up replication, customizing the configuration, performing test and planned failovers, and completing the migration. Follow these steps:
Create Recovery Services Vault
Start by creating the Recovery Services vault. To do so, log in to the Azure Portal, type recovery service vaults in the search box, and select it from the list that appears. (See Figure 2-26.)

FIGURE 2-26Search for the Recovery Services vault service.
Click Create or Create Recovery Services Vault to start the Create Recovery Services Vault wizard. (See Figure 2-27.)

FIGURE 2-27Click Create Recovery Services Vault.
In the Basics tab of the Create Recovery Services Vault wizard (see Figure 2-28), enter the information, and click Next:
SubscriptionSelect the subscription that will host the vault.
Resource GroupSelect the resource group you want to use to host the Recovery Services vault. Alternatively, to create a new resource group, click the Create New link and follow the prompts.
Vault NameType a name for the vault. If the name you type is already in use, the wizard will prompt you to select another name.
RegionSelect the Azure region in which you want to host the vault.
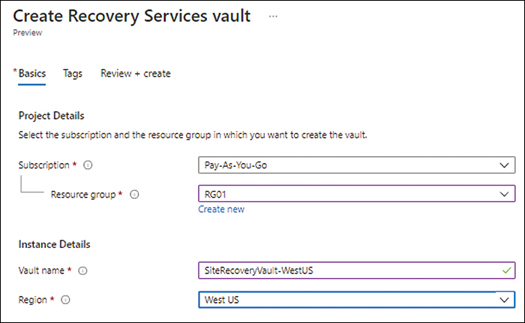
FIGURE 2-28The Basics tab of the Create Recovery Services Vault wizard.
In the Tags tab, enter any tags you would like to associate with the vault or leave the fields blank (see Figure 2-29) and click Next.

FIGURE 2-29The Tags tab of the Create Recovery Services Vault wizard.
In the Review + Create tab (see Figure 2-30), review your settings and click Create.
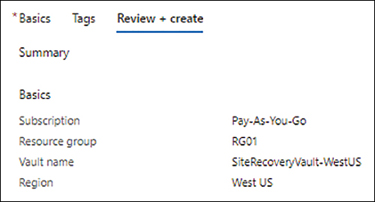
FIGURE 2-30The Review + Create tab of the Create Recovery Services Vault wizard.
Integrate Hyper-V Environment for Replication
After the Recovery Services vault is deployed, click the Go to Resource button to access its configuration options.
In the Recovery Services vault’s configuration page, click the Enable Site Recovery button to begin creating the necessary ASR infrastructure. (See Figure 2-31.)
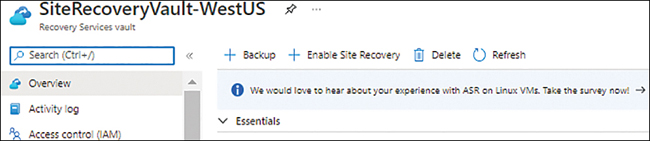
FIGURE 2-31Site Recovery Vault-West US overview page.
On the Protect Your Infrastructure for Disaster Recovery page (see Figure 2-32), under Hyper-V Machines to Azure, click the Prepare Infrastructure link to launch the Prepare Infrastructure wizard.

FIGURE 2-32Protect Your Infrastructure for Disaster Recovery page.
In the Deployment Planning tab of the Prepare Infrastructure wizard (see Figure 2-33), open the Deployment Planning Completed? drop-down list and choose I Will Do It Later. Then click Next.

FIGURE 2-33The Deployment Planning tab of the Prepare Infrastructure wizard.
In the Source Settings tab, next to Are You Using System Center VMM to Manage Hyper-V Hosts?, select the No option button.
Next to Hyper-V Site, click the Add Hyper-V Site link. (See Figure 2-34.)

FIGURE 2-34The Source Settings tab of the Prepare Infrastructure wizard.
In the Create Hyper-V Site pop-up (see Figure 2-35), under Name, enter a unique name for the site. Then click Create.

FIGURE 2-35Create Hyper-V Site pop-up.
Back in the Source Settings tab of the Prepare Infrastructure wizard, open the Hyper-V Site drop-down list and choose the site you just created. (See Figure 2-36.)

FIGURE 2-36The Source Settings tab of the Prepare Infrastructure wizard with the Hyper-V site listed.
Next to Hyper-V Servers, click the Add Hyper-V Server link to start the Add Server wizard.
In the Add Server wizard (see Figure 2-37), do the following:
Click the Downloadlink in step 3 to download the Microsoft ASR Provider agent for Hyper-V.
Click the Downloadlink in step 4 to download the vault registration key. Save this key in a safe location on your hard drive, as you will need it later for the host registration.

FIGURE 2-37Add Server wizard.
Copy the installer and vault registration key to each of the Hyper-V hosts and run the installer on each.
Now you’re ready to prepare your Hyper-V servers.
Run the installer to launch the Azure Site Recovery Provider Setup (Hyper-V Server) wizard. (You’ll do this for each Hyper-V host.)
On the Microsoft Update page (see Figure 2-38), select the On option button to automatically check for Microsoft updates, and click Next.

FIGURE 2-38Microsoft Update page of the Azure Site Recovery Provider Setup (Hyper-V Server) wizard.
On the Installation page (see Figure 2-39), click the Browse button and select the location where you want to install the Provider agent. Then click Install.

FIGURE 2-39Provider Installation page of the Azure Site Recovery Provider Setup (Hyper-V Server) wizard.
Confirm that the agent is installed successfully. (See Figure 2-40.) Then click Register to start the Microsoft Azure Site Recovery Registration wizard.

FIGURE 2-40Confirm that the agent is installed successfully and click Register.
In the Vault Settings page of the Microsoft Azure Site Recovery Registration wizard (see Figure 2-41), click Browse, locate and select the vault registration key you copied in step 16, and click Next.

FIGURE 2-41Vault Settings page of the Microsoft Azure Site Recovery Registration wizard.
On the Proxy Settings page (see Figure 2-42), select the Connect Directly to Azure Site Recovery Without a Proxy Server option button (as shown here) or the Connect to Azure Site Recovery Using a Proxy Server option button, depending on how internet connectivity is managed in your environment, and click Next.

FIGURE 2-42Proxy Settings page of the Microsoft Azure Site Recovery Registration wizard.
On the Registration page, monitor the progress of the registration process. When it is complete, click Finish. (See Figure 2-43.)

FIGURE 2-43Proxy Settings page of the Microsoft Azure Site Recovery Registration wizard.
Back in the Source Settings tab of the Prepare Infrastructure wizard, confirm that the host you registered appears in the list of Hyper-V servers (see Figure 2-44), and click Next.
NoteIt can take 15 to 30 minutes for the registered host to appear in the Source Settings page of the Prepare Infrastructure wizard.

FIGURE 2-44The Source Settings tab of the Prepare Infrastructure wizard with the Hyper-V server listed.
In the Target Settings tab, open the Subscription drop-down list and select the subscription in which you want to create the replication.
Leave Post-Failover Deployment Model set to Resource Manager (the default).
If you have provisioned the necessary storage accounts and networks in the target region, you’ll see them listed in the Target Settings tab. (See Figure 2-45.) If not, you’ll see error messages prompting you to provision them. (See Figure 2-46.)
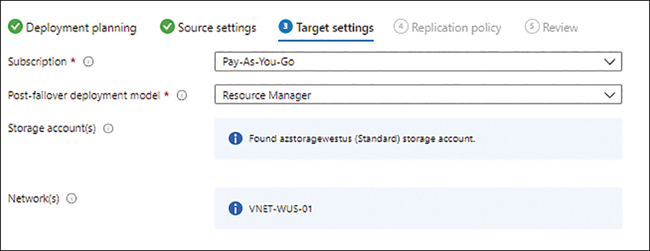
FIGURE 2-45Target Settings tab in the Prepare Infrastructure wizard with storage accounts and networks correctly provisioned.

FIGURE 2-46Target Settings tab in the Prepare Infrastructure wizard without storage accounts and networks correctly provisioned.
In the Replication Policy tab (see Figure 2-47), under the Replication Policy drop-down list, click the Create New Policy and Associate link.

FIGURE 2-47Replication Policy tab of the Prepare Infrastructure wizard.
In the Create and Associate Policy dialog box (see Figure 2-48), enter the following information and click Create:
NameEnter a unique name for the policy.
SourceType Select Hyper-V.
TargetType Select Azure.
CopyFrequency Select a value between 5 and 15 minutes.
Recovery-Point Retention in HoursEnter the recovery-point retention period.
App-Consistent Snapshot Frequency in HoursEnter the app-consistent snapshot frequency.
Initial Replication Start TimeSelect Immediately. Alternatively, choose a specific time to start the replication.

FIGURE 2-48Create and Associate Policy dialog box.
Back in the Replication Policy tab of the Prepare Infrastructure wizard, confirm that the replication policy was successfully created and associated (see Figure 2-49) and click Next.

FIGURE 2-49Replication Policy tab in the Prepare Infrastructure wizard with the replication policy successfully created and associated.
In the Review tab (see Figure 2-50), review your settings and click Finish.

FIGURE 2-50Review tab in the Prepare Infrastructure wizard.
Now you can set up replication.
Setup Replication
Switch to the Site Recovery service and, under Hyper-V Machines to Azure, click Enable Replication to start the Enable Replication wizard.
In the Source Environment tab of the Enable Replication wizard, open the Source Location drop-down list and select the Hyper-V site configuration you created earlier. (See Figure 2-51.) Then click Next.

FIGURE 2-51Source Environment tab of the Enable Replication wizard.
In the Target Environment tab (see Figure 2-52), enter the following information and click Next:
SubscriptionSelect the subscription you want to set as the target environment.
Post-Failover Resource GroupSelect the resource group you want to use.
Post-Failover Deployment ModelSelect Resource Manager.
Storage AccountSelect the storage account to use.
NetworkSelect Configure Now for Selected Machines.
Virtual NetworkSelect the virtual network to use.
SubnetSelect the subnet to use.

FIGURE 2-52Target Environment tab of the Enable Replication wizard.
In the Virtual Machine Selection tab (see Figure 2-53), select the VMs for which you want to enable replication and click Next.

FIGURE 2-53Virtual Machine Selection tab of the Enable Replication wizard.
In the Replication Settings tab (see Figure 2-54), for each VM selected in the previous step, select the OS type, OS disk, and disks to replicate, and click Next.

FIGURE 2-54Replication Settings tab of the Enable Replication wizard.
In the Replication Policy tab (see Figure 2-55), select the replication policy you created earlier and click Next.
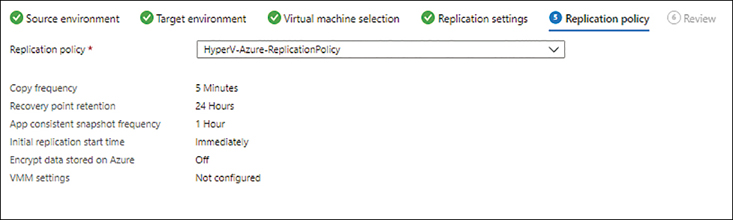
FIGURE 2-55Replication Policy tab of the Enable Replication wizard.
In the Review tab (see Figure 2-56), check your settings and click Enable Replication.
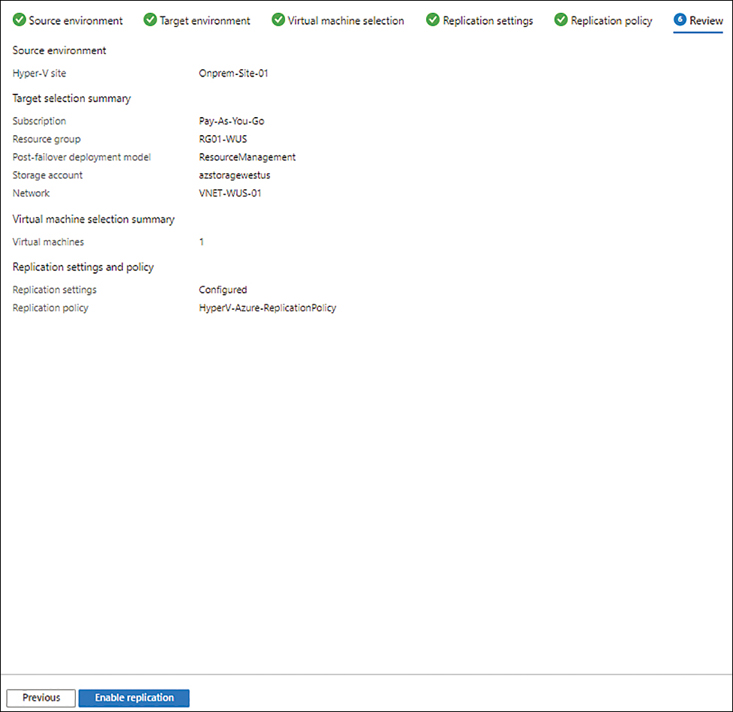
FIGURE 2-56Review tab of the Enable Replication wizard.
On the Enable Replication page (see Figure 2-57), monitor the progress of the job to ensure that all the steps complete successfully. If any errors occur, they will appear highlighted on the page, and you will need to analyze and fix them before re-running the enable replication process.

FIGURE 2-57Enable Replication page.
When replication is enabled, switch to the Overview page for the replicated VM in the Recovery Services vault (see Figure 2-58). Notice that Replication Health shows Healthy, and Status shows the amount of replication that has been completed thus far. When Status reaches 100% or Protected, you can proceed to the next steps.

FIGURE 2-58Overview page of the replicated VM’s configuration blade.
In the left pane of the replicated VM’s configuration blade, click the Compute and Network option to access all compute and network settings for the replicating VM. (See Figure 2-59.) You can edit any or most of the settings shown on this page based on your requirements.

FIGURE 2-59Compute and Network options.
Repeat steps 17–40 for all replicated VMs.
Test Failover
Repeat steps 14–16 in the “Test Failover” section of the Azure–to–Azure disaster recovery walkthrough to perform a test failover to validate that the replicated machines will work correctly in Azure after a failover.
Cleanup Test Failover
Repeat steps 17–20 in the “Cleanup Test Failover” section of the Azure–to–Azure disaster recovery walkthrough to perform a cleanup after successful failover testing.
Perform Failover
After you complete a successful test failover, repeat steps 20–24 in the “Perform Failover” section of the Azure–to–Azure disaster recovery walkthrough to fail over the VM(s) to Azure.
Log in to the VM to confirm that your workload is working correctly.
Switch to the Overview page for the replicated VM in the Recovery Services vault (see Figure 2-60) and click Complete Migration.
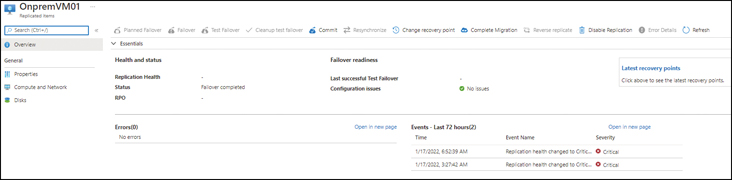
FIGURE 2-60Overview page of the replicated VM’s configuration blade.
In the Complete Migration page, read the message about what completing migration entails and click OK.
Monitor the migration job to ensure that all the steps completed successfully. (See Figure 2-61.)
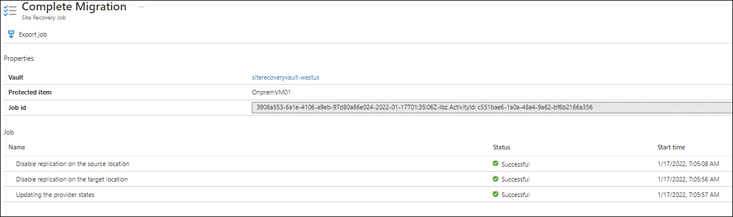
FIGURE 2-61Complete Migration page.
Recovery plans
Recovery plans help you to define groups of interconnected and interdependent VMs to failover together in an orchestrated manner. You can also separate interdependent VMs that require other services to be online, before they are brought online into different groups, and sequence them accordingly.
At this time, ASR supports the creation of a maximum of seven groups, and a maximum of 100 protected VMs can be managed in a single recovery plan. If you have more VMs, you will have to define multiple recovery plans. You also need to plan and identify the right group to associate a VM within a recovery plan based on its dependency on services running in other VMs. For example, you want to bring database VMs online before bringing application VMs online so that application services do not error out when trying to connect to the database. Similarly, you want to bring Active Directory and DNS services online before bringing database servers online because SQL services running using AD service accounts would fail in the absence of an active DC in the network.
Recovery plans help you both in failover to Azure and failback from Azure. In addition, you can use scripts to perform additional activities before and after a group is brought online. This can include creation of other Azure resources such as Firewall, NAT gateways, application gateways, and so on, or triggering runbooks that carry out a set of activities.
The same VM can be part of multiple recovery plans. Based on the order in which a recovery plan is triggered, if a VM in one recovery plan is already online, the subsequent plan will ignore it during its sequence.
The benefits of using a recovery plan are as follows:
It supports the structured activation of VMs in Azure.
Interdependent or connected services can be brought online gracefully.
Other dependent services, such as Firewall, WAF, NSG, Public IP, and so on, can be built in parallel and need not be pre-provisioned, reducing costs.
It supports task automation, reducing overall recovery time.
It can be used to test failover to ensure that the VMs function as needed after failover without any manual intervention.
Recovery plan walkthrough
The following section walks you through the process of creating a recovery plan for five VMs replicated to Azure using the Azure Portal. Make sure that you set up replication for multiple VMs first to be able to create the recovery plan with multiple groups.
Using The Azure Portal
To create a recovery plan using the Azure Portal, follow these steps:
Locate and select the Recovery Services vault you created earlier for VM replication.
In the left pane of the Recovery Services vault’s configuration blade, under Manage,click Recovery Plans (Site Recovery). (See Figure 2-62.)
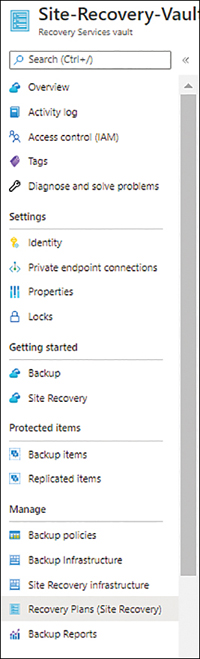
FIGURE 2-62Click the Recovery Plans (Site Recovery) option.
In the right pane, click Recovery Plan. (See Figure 2-63.)

FIGURE 2-63Create a recovery plan.
In the Create Recovery Plan dialog box (see Figure 2-64), enter the following information:
NameEnter a unique name for the recovery plan.
SourceSelect the source Hyper-V site.
TargetSelect Microsoft Azure.
Allow Items with Deployment ModelLeave this set to Resource Manager (the default).

FIGURE 2-64Create Recovery Plan dialog box.
Under Selected Items, click the Select Items link. Then, in the Select Items pane, select the VMs to include in the recovery plan. (See Figure 2-65.)

FIGURE 2-65Select the VMs to include in the recovery plan.
After you select all the required VMs, click the Create button to create the recovery plan. (See Figure 2-66.)

FIGURE 2-66Create the recovery plan.
After the plan is created, go to its Overview tab. (See Figure 2-67.)

FIGURE 2-67Overview tab of Recoveryplan01.
Click the Customize button.
Use any of the following options to customize the recovery plan. (See Figure 2-68.)
GroupCreate new groups in the plan to group VMs together for activation during the failover process.
SaveSave changes made to the plan.
DiscardDiscard changes made to the plan.
Change GroupChange the order of the VMs in a single group or across groups.
TipYou can also add custom steps to perform at the start or end of a group activation.
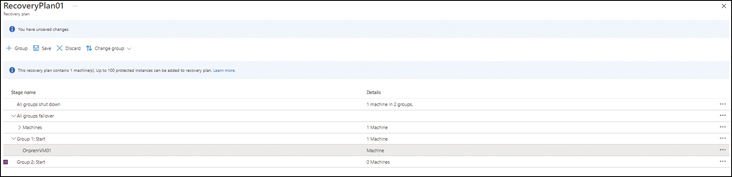
FIGURE 2-68Customize the recovery plan.
Back in the recovery plan’s Overview tab, click Test Failover or Failover.
In the Test Failover or Failover dialog box (see Figure 2-69), specify the direction of the failover, the recovery point, and whether the source VMs should be shut down. Then click Test Failover or Failover.
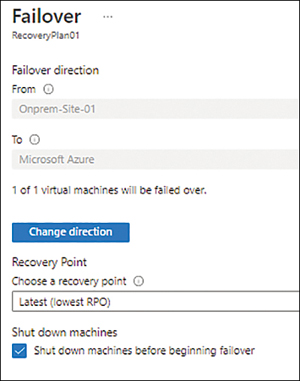
FIGURE 2-69The Failover dialog box.
When the test failover or failover job is initiated, monitor it until it completes successfully. (See Figure 2-70.)
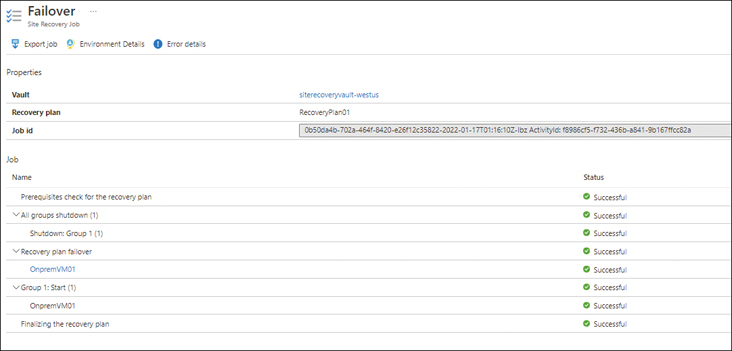
FIGURE 2-70Failover job status page.
When the test failover or failover is complete, log in to the VM and verify that your application, database, or workload is working correctly.
In the VM’s Overview page (see Figure 2-71), click the Commit button to ensure no further changes are made to your workload.

FIGURE 2-71Overview tab of the VM configuration.
When prompted, click OK to confirm that you want to commit the VM and start the commit job.
Monitor the job progress to make sure all the job steps complete successfully. (See Figure 2-72.)

FIGURE 2-72Commit job page.
Best practices
Following are some general best practices for building and maintaining your ASR environment:
Use service tags to reduce complexity in network security rulesService tags are a great way to manage traffic rules associated with Azure services. Use service tags whenever possible to reduce the management overhead of tracking and maintaining service changes that could potentially affect communications with the ASR service.
Use RBAC ASR rolesAzure provides three RBAC roles specifically for ASR to enable you to granularly control access to the service. Use these roles to restrict access to admins based on their administrative activities in your environment. These roles include the following:
Site Recovery ContributorThis role provides all access to ASR components and operations. Recommended for DR administrators in charge of maintaining and managing your DR environment.
Site Recovery OperatorThis role limits access to initiating failover and failback operations. Recommended for administrators in charge of DR failover and failback in the absence of the DR administrators.
Site Recovery ReaderThis role limits access to viewing ASR configuration and management operations. Recommended for administrators in charge of monitoring the DR environment but not performing any further administrative actions.
Use test failover functionalityThe test failover option in ASR is a great way to test application updates and upgrades and validate that your DR is working as expected before the need to trigger an actual DR operation arises. Use this functionality at least once to ensure your DR plan works as intended.
Perform regular DR drillsIt is highly recommended that you perform regular DR drills so that administrators and business teams are aware of all the procedures to activate when the need arises. Clearly document the different roles and activities in your DR plan to avoid confusion.
Use Accelerated Networking inAzure–to–Azure scenarios Accelerated Networking is a feature available for Azure VMs that enables single root I/O virtualization (SR-IOV) to the Azure VM. This improves the network performance of the VM by bypassing the host from the network data path. If Accelerated Networking can benefit your VM in Azure, set up the configuration even for the target VM in the secondary Azure region as part of the ASR configuration.
Exclude unwanted disks from replication configurationASR enables you to exclude unwanted disks from the replication configuration. This can reduce storage usage on the Azure end and speed up replication as bandwidth usage is optimized. Examples of such disks include the SQL Server tempdb disk and the paging file disk on a Windows VM.
Monitor app-consistent backups for performanceUse app-consistent backups for your application as far as possible but ensure that you monitor your on-premises environment for the impact associated with the frequency of the snapshots. If you notice a detrimental impact, you may need to increase resources to your on-premises workloads or reduce the snapshot frequency.
Build recovery plans for each unique applicationIt is a good practice to build a recovery plan for each unique application if multiple servers need to be placed online for that application. This helps you bring individual applications online for testing as and when needed. This also helps you in including any scripts and steps exclusively required for each application within its respective recovery plan, making it easier to track and manage this on a regular basis.