
Chapter 4 Mitigating security issues
Recent ransomware outbreaks, such as WannaCry and Petya, reinforced the importance of having a vulnerability-management system. But they also reinforced the fact that many computers are not fully updated and do not use the most secure configuration.
To enhance your overall security posture, you need to increase your protection. A security assessment is critical to identifying the current security state of your assets—and what you need to do to improve it. Azure Security Center can perform a security assessment for all major workloads: compute, network, storage, and applications. The result of this security assessment is a set of recommendations that will help you enhance the security posture of your workloads.
In this chapter, you will learn how to use Security Center to perform a security assessment for major workloads, and how to use the result of this assessment to improve your defense system.
Compute recommendations
In Chapter 2, you learned about the Security Center agent and how it performs an initial security assessment. As part of your onboarding process, you should make sure to address all critical (high-priority) recommendations first, evaluate all other recommendations, and apply the recommendations according to your environment’s needs.
Some recommendations may require system downtime—for example, to apply certain security updates. This means that after you identify the changes that need to be made in the target system, you may need to start a change-control process to maintain compliance with the security assessment.
TIP
Recommendations are applicable only for operating systems that are sup-ported in Security Center. Visit the latest version of supported operating systems at https://aka.ms/ASCSupportedOS.
Compute recommendations include recommendations for Azure virtual machines (VMs) and non-Azure computers. These recommendations vary depending on the environment. For this reason, it is important to be aware of the full list of recommendations that might apply to your environment:
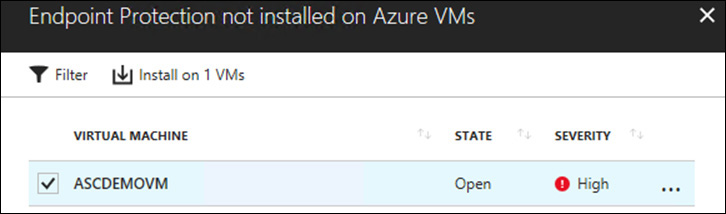
![]() Endpoint Protection Issues This shows a list of computers that are missing an endpoint protection. Alternatively, it can serve as a warning about endpoint protection not being fully updated in a target system.
Endpoint Protection Issues This shows a list of computers that are missing an endpoint protection. Alternatively, it can serve as a warning about endpoint protection not being fully updated in a target system.
![]() Missing Scan Data This shows the systems that are missing the most current scan data collected by the agent.
Missing Scan Data This shows the systems that are missing the most current scan data collected by the agent.
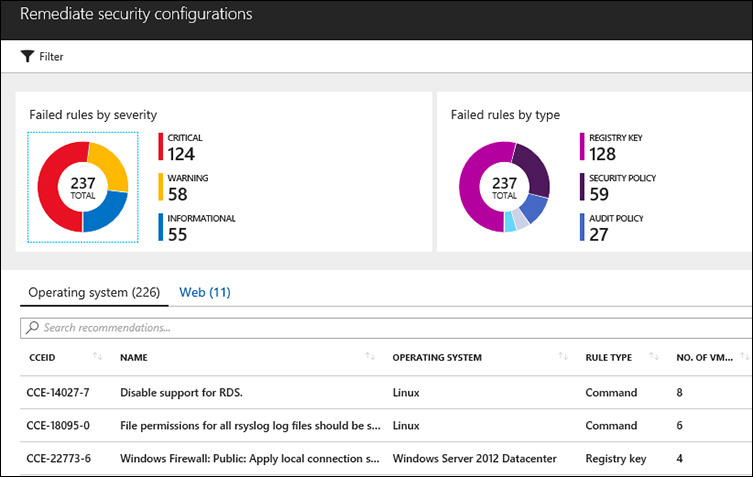
![]() Remediate Security Configurations This shows a list of computers (Windows and Linux) that are not using the most secure configuration according to Common Configuration Enumeration (CCE) standards.
Remediate Security Configurations This shows a list of computers (Windows and Linux) that are not using the most secure configuration according to Common Configuration Enumeration (CCE) standards.
![]() Missing System Updates This shows a list of computers that are missing security and critical updates.
Missing System Updates This shows a list of computers that are missing security and critical updates.
![]() Missing Disk Encryption This shows a list of Azure VMs that don’t have disk encryption enabled.
Missing Disk Encryption This shows a list of Azure VMs that don’t have disk encryption enabled.
![]() Vulnerability Assessment Not Installed In some scenarios Security Center may recommend the installation of a vulnerability-assessment solution, such as Qualys, on one or more Azure VMs.
Vulnerability Assessment Not Installed In some scenarios Security Center may recommend the installation of a vulnerability-assessment solution, such as Qualys, on one or more Azure VMs.
![]() VM Agent Is Missing or Not Responding When Security Center recognizes that a VM is missing the agent, or that the agent is installed but not responding, Security Center will list all Azure VMs that are exhibiting this behavior.
VM Agent Is Missing or Not Responding When Security Center recognizes that a VM is missing the agent, or that the agent is installed but not responding, Security Center will list all Azure VMs that are exhibiting this behavior.
![]() Restart Pending This appears when Security Center identifies that there is a restart pending in one or more Azure VMs.
Restart Pending This appears when Security Center identifies that there is a restart pending in one or more Azure VMs.
![]() Apply a Just-in-Time Network Access Control This suggests that you apply just-in-time network access for one or more Azure VMs.
Apply a Just-in-Time Network Access Control This suggests that you apply just-in-time network access for one or more Azure VMs.
![]() OS Version Not Updated This is specifically for Platform as a Service (PaaS). It recommends that you update the operating system (OS) version for your cloud service to the most recent version available for your OS family.
OS Version Not Updated This is specifically for Platform as a Service (PaaS). It recommends that you update the operating system (OS) version for your cloud service to the most recent version available for your OS family.
TIP
Keep in mind that new recommendations may be included without further notice. For the latest list of compute recommendations, see https://aka.ms/ASCComputeRec.
The following sections cover the implementation of some of these recommendations.
Setting up endpoint protection
Security Center can detect whether your VM or computer has endpoint protection installed on it, and whether this endpoint protection is up to date. However, this capability will detect only a certain number of supported endpoint protection partners. At the time of this writing, the supported partners are as follows:
![]() Windows Defender (Microsoft Antimalware)
Windows Defender (Microsoft Antimalware)
![]() System Center Endpoint Protection (Microsoft Antimalware)
System Center Endpoint Protection (Microsoft Antimalware)
![]() Trend Micro – All versions
Trend Micro – All versions
![]() Symantec v12.1.1100+
Symantec v12.1.1100+
TIP
The list of partners is always in revision, and new partners may be included without further notice. For the latest list of supported endpoint protection, visit https://aka.ms/ASCPartners.
If a recommendation suggests the installation of endpoint protection in non-Azure VMs and computers, you will need to do this manually, following the instructions from the antimalware vendor of your choice. For VMs in Azure, System Center will guide you through the installation process, and you can choose the endpoint protection based on the options available in the Azure marketplace. Follow these steps to remediate a compute recommendation by deploying Windows Defender (Microsoft Antimalware) in an Azure VM:
Open the Azure Portal and sign in as a user who has Security Admin privileges.
In the left pane, click Security Center.
In the left pane of the Security Center window, under Prevention, click Compute.
Click the Endpoint Protection Issues recommendation. The dashboard shown in Figure 4-1 appears.
Click the Endpoint Protection Not Installed on Azure VMs recommendation. The blade shown in Figure 4-2 appears.
Leave the VM selected and click Install on 1 VMs.
NOTE
If there is more than one VM in the list, select only the ones for which you want to install an endpoint protection solution.
The Select Endpoint Protection blade opens. (See Figure 4-3.) It contains two options:
 Microsoft Antimalware This is a free solution from Microsoft. Deep Security Agent This is a fee-based solution from TrendMicro. If you select this option, you’ll need to provide your license information.
In this case, click Microsoft Antimalware.
The Microsoft Antimalware blade appears, with a description of this service. Click Create to add this extension to your VM.
The Install Microsoft Antimalware blade appears. (See Figure 4-4.) It contains the following options:
Excluded Files and Locations Here, you can specify any paths or locations to exclude from the scan. To add multiple paths or locations, separate them with semicolons. This is an optional setting. Excluded Files and Extensions This box lets you specify file names or extensions to exclude from the scan. Again, to add multiple names or extensions, you separate them with a semicolon. Note that you should avoid using wildcard characters. Excluded Processes Use this box to specify any processes that should be excluded from the scan—again, using semicolons to separate multiple processes. Real-Time Protection By default, this check box is enabled. Unless you have a good business reason to do otherwise, you should leave it that way. Run a Scheduled Scan Selecting this check box enables you to run a scheduled scan. Scan Type If you selected the Run a Scheduled Scan check box, you can use this drop-down list to specify the type of scan. (A quick scan is run by default.) Scan Day If you selected the Run a Scheduled Scan check box, you can use this drop-down list to specify the day that the scan will run. Scan Time If you selected the Run a Scheduled Scan check box, you can use this drop-down list to specify what time the scan will run. The time is indicated in increments of 60 minutes (60 = 1 AM, 120 = 2AM, and so on).Leave the default selections and click the Create button. In the upper-right corner of the dashboard, you will see a notification that the installation has started in the target system, as shown in Figure 4-5.
Close all blades and go back to the main Security Center dashboard. The installation time varies depending on the environment.
To verify whether the Microsoft Antimalware extension was installed, open the VM properties in Azure and click the Extensions options. (See Figure 4-6.)


Remediate Security Configurations
Security Center uses Common Configuration Enumeration (CCE) standards to validate the security state of a VM or computer’s configuration. If a VM or computer is not compliant with the CCE standard that was tested, Security Center will generate a security recommendation. Follow these steps to get a sense of how these recommendations work:
Open the Azure Portal and sign in as a user who has Security Admin privileges.
In the left pane, click Security Center.
In the left pane of the Security Center window, under Prevention, click Compute.
Click Remediate security configurations. The Remediate security configurations blade appears. (See Figure 4-7.)
In this blade, you can quickly see the number of resources that do not comply with various CCE standards, and the type of standard in question (registry, security policy, or audit policy). For more information on any of these vulnerabilities, click the associated resource to view a comprehensive description. (See Figure 4-8.)
Read the description to better understand the vulnerability, gauge its potential impact, and identify suggested countermeasures.
Click the Search button to identify which computers are not compliant with this rule. Azure launches Log Analytics and displays the query result. (See Figure 4-9.)


This is an example of a recommendation that cannot be remediated directly from Security Center. The intent here is to bring awareness that some machines are missing the security best practices and to help you identify these machines. From there, you will need to deploy the countermeasure using other tools. Most of these recommendations can be addressed using Group Policy in Active Directory if you are using Windows-based, domain-joined virtual machines.
TIP
For information about which CCE rules are tested, visit https://gallery.technet.microsoft.com/Azure-Security-Center-a789e335.
Networking recommendations
An Azure virtual network is a logical isolation of the Azure cloud dedicated to your subscription. Security Center identifies the Azure virtual networks available in your subscription and provides recommendations to improve overall security. Networking recommendations vary depending on the environment. For this reason, it is important to be aware of the full list of recommendations that might apply to your environment:
![]() Add a Next Generation Firewall After scanning your virtual network, Security Center may recommend that you install a Next Generation Firewall (NGFW) in your environment. Because this option is not natively available, Security Center will recommend various partners that can help you with this.
Add a Next Generation Firewall After scanning your virtual network, Security Center may recommend that you install a Next Generation Firewall (NGFW) in your environment. Because this option is not natively available, Security Center will recommend various partners that can help you with this.
![]() Route Traffic Through NGFW Only This setting suggests that you configure network security group (NSG) rules to force inbound traffic to your VM through your NGFW.
Route Traffic Through NGFW Only This setting suggests that you configure network security group (NSG) rules to force inbound traffic to your VM through your NGFW.
![]() NSGs on Subnets Not Enabled After scanning your virtual network, Security Center may recommend that you enable an NSG on subnets or VMs.
NSGs on Subnets Not Enabled After scanning your virtual network, Security Center may recommend that you enable an NSG on subnets or VMs.
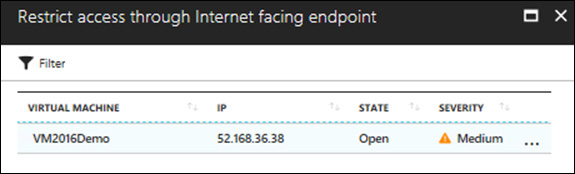
![]() Restrict Access Through Internet Facing Endpoint After scanning your virtual network, Security Center may recommend that you configure inbound traffic rules for NSGs.
Restrict Access Through Internet Facing Endpoint After scanning your virtual network, Security Center may recommend that you configure inbound traffic rules for NSGs.
The following sections cover the implementation of some of these recommendations.
NSGs on subnets not enabled
An NSG contains a list of security rules that allow or deny network traffic to resources connected to Azure Virtual Networks (VNets). You can associate NSGs with VMs, NICs, and subnets. Security Center will verify whether your subnet needs to have an NSG to be more secure. If so, it will create a network recommendation for it. Follow these steps to access the network recommendations:
Open the Azure Portal and sign in as a user who has Security Admin privileges.
In the left pane, click Security Center.
In the left pane of the Security Center window, under Prevention, click Networking. The Networking blade appears. (See Figure 4-10.)
The top of the blade features a list of recommendations specifically for your Azure VNet environment. Below that are recommendations pertaining to endpoints that are exposed to the internet. Finally, the bottom of the blade shows the virtual network topology.
Click the NSGs on Subnet Not Enabled recommendation. The Configure Missing Network Security Groups for Subnets blade appears. (See Figure 4-11.)
Select the subnet for which you want to enable the security group. The Choose Network Security Group blade appears. (See Figure 4-12.)
You can select an NSG from the list or click Create New to create a new one. In this case, click ASCDEMOVM-nsg. You’ll see a notification like the one in Figure 4-13.
When this process is complete, the recommendation will disappear, and you can move on to the next one.


Restrict access through internet-facing endpoint
Security management and control are imperative when dealing with cloud resources. When new VMs are provisioned in your IaaS environment, you need to ensure that these VMs are not fully exposed to the internet. This can be difficult in a large environment. Fortunately, Security Center provides full visibility of internet-facing endpoints in a single location. Follow these steps to access this network recommendation:
Open the Azure Portal and sign in as a user who has Security Admin privileges.
In the left pane, click Security Center.
In the left pane of the Security Center window, under Prevention, click Networking. The Networking blade appears.
Click the Restrict Access Through Internet Facing Endpoint recommendation. The Restrict Access Through Internet Facing Endpoint blade appears. (See Figure 4-14.)
Click a VM in the list. The NSG blade appears. (See Figure 4-15.) Notice that the current inbound rule allows any source (*) to connect to this VM using TCP.
Click Edit Inbound Rules (at the top of the page). The Inbound Security Rules page opens. (See Figure 4-16.)
You can change the default rule (default-allow-rdp) by altering the source port to a specific IP or IP range. To do so, click default-allow-rdp. The default-allow-rdp blade appears. (See Figure 4-17.) The settings that you will harden in this page will vary depending on your organization’s needs.
To address the Security Center recommendation, you should at least change the value in the Source field to a specific IP address or an IP address range.
Click Save, and close all other blades.


Storage and data
One of the ultimate goals of an attacker is to gain access to a target’s data. Therefore, it is important to address all security recommendations for storage (where the data is located) and for the data itself. Security Center meets these requirements by providing security recommendations for Azure SQL databases and for Azure Storage, which includes each VM’s virtual hard disk (VHD). Storage and data recommendations vary depending on the environment. For this reason, it is important to be aware of the full list of recommendations that might apply to your environment:
![]() Server Auditing and Threat Detection Not Enabled This setting is specific for Azure SQL and is available only if you currently have an Azure SQL workload. It recommends that you enable auditing and threat detection on the server level.
Server Auditing and Threat Detection Not Enabled This setting is specific for Azure SQL and is available only if you currently have an Azure SQL workload. It recommends that you enable auditing and threat detection on the server level.
![]() Database Auditing and Threat Detection Not Enabled This setting recommends that you turn on auditing and threat detection for Azure SQL databases.
Database Auditing and Threat Detection Not Enabled This setting recommends that you turn on auditing and threat detection for Azure SQL databases.
![]() TDE Not Enabled This setting recommends that you turn on Transparent Data Encryption (TDE) for your Azure SQL database. TDE protects your data and helps you meet compliance requirements by encrypting your database.
TDE Not Enabled This setting recommends that you turn on Transparent Data Encryption (TDE) for your Azure SQL database. TDE protects your data and helps you meet compliance requirements by encrypting your database.
![]() Healthy Databases This setting shows which Azure SQL databases are healthy. (It offers no further security recommendations.)
Healthy Databases This setting shows which Azure SQL databases are healthy. (It offers no further security recommendations.)
![]() Storage Encryption Not Enabled This setting shows which storage accounts do not have encryption enabled.
Storage Encryption Not Enabled This setting shows which storage accounts do not have encryption enabled.
![]() Healthy Storage Accounts This setting shows which storage accounts are healthy. (It offers no further security recommendations.)
Healthy Storage Accounts This setting shows which storage accounts are healthy. (It offers no further security recommendations.)
NOTE
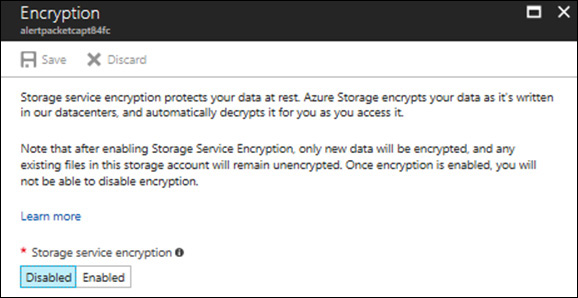
After you enable Storage Encryption, only new data will be encrypted. Any existing files in this storage account will remain unencrypted. Once encryption is en-abled, it cannot be disabled.
The following sections cover the implementation of some of these recommendations.
Server auditing and threat detection not enabled
Security Center can perform a security assessment to verify whether you are leveraging Azure SQL auditing and threat detection security capabilities. Auditing and threat detection can assist you in the following tasks:
![]() Maintaining regulatory compliance
Maintaining regulatory compliance
![]() Understanding database activity
Understanding database activity
![]() Gaining insight into discrepancies and anomalies
Gaining insight into discrepancies and anomalies
![]() Identifying security violations
Identifying security violations
After you turn on auditing, you can configure threat detection settings and set up email security alerts. Threat detection detects anomalous database activities indicating potential security threats to the database. This enables you to detect and respond to potential threats as they occur. Follow these steps to address this recommendation:
Open the Azure Portal and sign in as a user who has Security Admin privileges.
In the left pane, click Security Center.
In the left pane of the Security Center window, under Prevention, click Storage and Data. The Data Resources blade appears. (See Figure 4-18.)
Click the Server Auditing & Threat Detection Not Enabled recommendation. The Enable Auditing & Threat Detection on SQL Servers blade appears. (See Figure 4-19.)
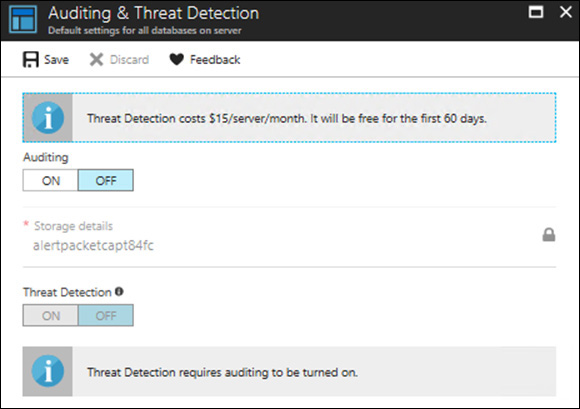
Click the server for which you want to change this setting. The Auditing & Threat Detection blade appears. (See Figure 4-20.)
TIP
Be sure to read the information about the charges that will apply if you enable these options.
Under Auditing, click ON.
Under Threat Detection, click ON.
Click Save and close all pages.
TIP
For more information about Azure SQL database threat detection, visit https://aka.ms/AzureSQLTD.


Storage encryption not enabled
Security Center can perform a security assessment to verify whether your Azure Storage account is encrypted. Azure Storage Service Encryption (SSE) for Data at Rest can help you protect and safeguard your data in Azure. When this feature is enabled, Azure Storage automatically encrypts your data before persisting to storage and decrypts it before retrieval. Follow these steps to address this recommendation:
Open the Azure Portal and sign in as a user who has Security Admin privileges.
In the left pane, click Security Center.
In the left pane of the Security Center window, under Prevention, click Storage and Data. The Data Resources blade appears.
Click the Storage Encryption Not Enabled recommendation. The Enable Storage Encryption blade appears. (See Figure 4-21.)
Click the storage account that needs to be encrypted. The Encryption page opens. (See Figure 4-22.)
Click Enabled. Then click Save.
TIP
For more information about Azure Storage Service Encryption for Data at Rest, visit https://aka.ms/AzureSSE.

Applications
Many customers host their web applications in VMs running on Azure, which means they need to ensure that the security states of these VMs are well configured. This should be done not only on the operating system side (which was done under the compute recommendations) but also at the web application level.
Application recommendations include security recommendations for Internet Information Services (IIS) web applications running on Azure VMs. Application recommendations vary depending on the environment. For this reason, it is important to be aware of the full list of recommendations that might apply to your environment:
![]() Web Application Firewall Not Installed When Security Center detects a web application that needs advanced protection, it will recommend that you install a web application firewall (WAF) from a Microsoft partner.
Web Application Firewall Not Installed When Security Center detects a web application that needs advanced protection, it will recommend that you install a web application firewall (WAF) from a Microsoft partner.
![]() Finalize Application Protection After you install the WAF, Security Center will generate another recommendation to finalize the protection of your web application. Here you will see a list of additional recommendations, such as changing the web application DNS record to match the WAF IP address, and will also suggest traffic restriction using NSGs.
Finalize Application Protection After you install the WAF, Security Center will generate another recommendation to finalize the protection of your web application. Here you will see a list of additional recommendations, such as changing the web application DNS record to match the WAF IP address, and will also suggest traffic restriction using NSGs.
![]() Healthy Web Applications This shows you which web applications are healthy. (It includes no further security recommendations.)
Healthy Web Applications This shows you which web applications are healthy. (It includes no further security recommendations.)
The following section covers the implementation the web application firewall recommendation in more detail.
Web application firewall not installed
Web applications are increasingly becoming targets of cyberattacks such as SQL injection, cross-site scripting (XSS), and many others documented at the OWASP Top 10. (For more information, see www.owasp.org/index.php/Category:OWASP_Top_Ten_Project.) Although many of these attacks are preventable via code that has been put through a full Security Development Lifecycle, or SDL (www.microsoft.com/en-us/sdl/), it can be hard to prevent some of these attacks in the application code itself, as it may require rigorous maintenance, patching, and monitoring on multiple layers. A web application firewall can enhance the protection of your web application from web vulnerabilities and attacks without modification to application code. Follow these steps to address this recommendation:
Open the Azure Portal and sign in as a user who has Security Admin privileges.
In the left pane, click Security Center.
In the left pane of the Security Center window, under Prevention, click Applications. The Applications blade appears. (See Figure 4-23.)
Click the Web Application Firewall Not Installed recommendation to open the Web Application Firewall Not Installed page. (See Figure 4-24.)
Click an application that needs a WAF. The Add a Web Application Firewall blade appears. (See Figure 4-25.)
Click Create New. The Create a New Web Application Firewall Solution blade appears. (See Figure 4-26.) From this point forward, the steps may vary depending on the solution you choose. Consult the partner’s solution documentation for further information.


