Sometimes there is just no escape from using JavaScript. For example, Blazor itself uses JavaScript to update the browser’s DOM from your Blazor components. You can, too. In this chapter, you will look at interoperability with JavaScript and, as an example, you will build a Blazor component library to display a line chart using a popular open source JavaScript library for charts. This chapter does require you to have some basic JavaScript knowledge.
Calling JavaScript from C#
Browsers have a lot of capabilities you might want to use in your Blazor website. For example, you might want to use the Browser’s local storage to keep track of some data. Thanks to Blazor’s JavaScript interoperability, this is easy.
Providing a Glue Function
To call JavaScript functionality, you start by building a glue function in JavaScript. I like to call these functions glue functions (my own naming convention) because they become the glue between .NET and JavaScript.
Glue functions are regular JavaScript functions. A JavaScript glue function can take any number of arguments, on the condition that the arguments are JSON serializable (meaning that you can only use types that are convertible to JSON, including classes whose properties are JSON serializable). This is required because the arguments and return type are sent as JSON between .NET and JavaScript runtimes.
You then add this function to the global scope object, which in the browser is the window object. You will look at an example a little later, so keep reading. You can then call this JavaScript glue function from your Blazor component, as you will see in the next section.
Using IJSRuntime to Call the Glue Function
Back to .NET land. To invoke your JavaScript glue function from C#, you use the .NET IJSRuntime instance provided through dependency injection. This instance has the InvokeAsync<T> generic method, which takes the name of the glue function and its arguments and returns a value of type T, which is the .NET return type of the glue function. If your JavaScript method returns nothing, there is also the InvokeVoidAsync method. If this sounds confusing, you will look at an example right away.
The InvokeAsync method is asynchronous to support all asynchronous scenarios, and this is the recommended way of calling JavaScript. If you need to call the glue function synchronously, you can downcast the IJSRuntime instance to IJSInProcessRuntime and call its synchronous Invoke<T> method. This method takes the same arguments as InvokeAsync<T> with the same constraints.
Using synchronous calls for JavaScript interop is not recommended! Server-side Blazor requires the use of asynchronous calls because the calls will be serialized over SignalR to the client.
Storing Data in the Browser with Interop
It’s time to look at an example, and you will start with the JavaScript glue function. Open the MyFirstBlazor solution you used in previous chapters. Open the wwwroot folder from the MyFirstBlazor.Client project and add a new subfolder called scripts. Add a new JavaScript file to the scripts folder called interop.js and add the glue functions from Listing 8-1. These glue functions allow you to access the localStorage object from the browser, which allows you to store data on the client’s computer so you can access it later, even after the user has restarted the browser.
(function () {
window.blazorLocalStorage = {
get: key => key in localStorage ? JSON.parse(localStorage[key]) : null,
Your Blazor website needs to include this script, so open the index.html file from the wwwroot folder and add a script reference after the Blazor script, as shown in Listing 8-2.
Now let’s look at how to call these set/get glue functions. Open the Index.razor Blazor component and modify it to look like Listing 8-3. The Counter component now will use local storage to remember the last value of the counter. Even restarting your browser will not lose the value of the counter because local storage is permanent. To do this, you use a Counter property, which invokes your glue functions in the property setter to store the last value.
Invoking the glue functions from a Blazor component
The Counter component overrides the OnInitializedAsync to retrieve the last stored value from local storage using the window.blazorLocalStorage.get glue function. It is possible that there is no value yet, and that is why the InvokeAsync uses a nullable int.
Run the solution and modify the Counter’s value. Now when you refresh your browser, you will see the last value of Counter. The Counter is now persisted between sessions! You can exit your browser, open it again, and you will see the Counter again with the last value.
Passing a Reference to JavaScript
Sometimes your JavaScript needs to access one of your HTML elements. You can do this by storing the element in an ElementReference and then pass this ElementReference to the glue function.
Never use JavaScript interop to modify the DOM because this will interfere with the Blazor rendering process! If you need to modify the browser’s DOM, use a Blazor component.
You should use this ElementReference as an opaque handle, meaning you can only pass it to a JavaScript glue function, which will receive it as a JavaScript reference to the element. You cannot even pass the ElementReference to another component.
Let’s look at an example by setting the focus on an input element using interop. Start by adding a property of type ElementReference to the @code area in Index.html as in Listing 8-4.
private ElementReference inputElement;
Listing 8-4
Adding an ElementRef property
Then add an input element with a @ref attribute to set the inputElement field as in Listing 8-5.
<p>
Current count:
<span>@CurrentCount</span>
<input @ref="inputElement" @bind="CurrentCount"/>
</p>
Listing 8-5
Setting the inputElement
Now add another JavaScript file setFocus.cs with the glue function from Listing 8-6. Don’t forget to add the script reference to index.html.
(function () {
window.blazorFocus = {
set: (element) => { element.focus(); }
};
})();
Listing 8-6
Adding the setFocus glue function
Now comes the “tricky” part. Blazor will create your component and then call the life cycle methods such as OnInitialized. If you invoke the setFocus glue function in OnInitialized, the DOM has not been updated with the input element so this will result in a runtime error because the glue function will receive a null reference. You need to wait for the DOM to be updated, which means that you should only pass the ElementReference to your glue function in the OnAfterRender/OnAfterRenderAsync method!
Override the OnAfterRenderAsync method as in Listing 8-7.
Passing the ElementReference in OnAfterRenderAsync
Run your solution and you should see that the input element receives focus automatically, as in Figure 8-1.
Figure 8-1
The Counter input element receives focus automatically
Calling .NET Methods from JavaScript
You can also call .NET methods from JavaScript. For example, your JavaScript might want to tell your component that something interesting has happened, like the user clicking something in the browser. Or your JavaScript might want to ask the Blazor component about some data it needs. You can call a .NET method, but with a couple of conditions. First, your .NET method’s arguments and return value need to be JSON serializable, the method must be public, and you need to add the JSInvokable attribute to the method. The method can be a static or instance method.
To invoke a static method, you use the JavaScript DotNet.invokeMethodAsync or DotNet.invokeMethod function, passing the name of the assembly, the name of the method, and its arguments. To call an instance method, you pass the instance wrapped as a DotNetObjectRef to a JavaScript glue function, which can then invoke the .NET method using the DotNetObjectRef’s invokeMethodAsync or invokeMethod function, passing the name of the .NET method and its arguments.
Adding a Glue Function Taking a .NET Instance
Let’s continue with the previous example. When you make a change to local storage, the storage triggers a JavaScript storage event, passing the old and new value (and more). This allows you to register for changes in other browser tabs or windows and use it to update the page with the latest data in localStorage.
Open interop.js from the previous example and add a watch function, as in Listing 8-8.
(function () {
window.blazorLocalStorage = {
get: key => key in localStorage ? JSON.parse(localStorage[key]) : null,
The watch function allows you to register for local storage changes
The watch function takes a reference to a DotNetObjectRef instance and invokes the UpdateCounter method when storage changes.
Adding a JSInvokable Method to Invoke
Open Counter.razor and add the UpdateCounter method to the @code area, as shown in Listing 8-9.
[JSInvokable]
public async Task UpdateCounter()
{
Console.WriteLine("Update");
int? c = await JSRuntime.InvokeAsync<int?>("blazorLocalStorage.get",
nameof(CurrentCount));
if (c.HasValue)
{
currentCount = c.Value;
}
this.StateHasChanged();
}
Listing 8-9
The UpdateCounter method
This method triggers the UI to update with the latest value of Counter. Please note that this method follows the .NET async pattern returning a Task instance. To complete the example, add the OnInitializedAsync life cycle method shown in Listing 8-10.
int? c = await JSRuntime.InvokeAsync<int?>("blazorLocalStorage.get",
nameof(CurrentCount));
if (c.HasValue)
{
currentCount = c.Value;
}
}
Listing 8-10
The OnInitialized method
The OnInitialized method wraps the Counter component’s this reference in a DotNetObjectRef and passes it to the blazorLocalStorage.watch glue function.
To see this in action, open two browser tabs on your website. When you change the value in one tab, you should see the other tab update to the same value automatically!
Using Services for Interop
The previous example is not the way I would recommend doing interop with JavaScript. There is a better way, and that is encapsulating the JSRuntime code in a service. This will hide all the dirty details of interacting with JavaScript and allow for easier maintenance.
Building the ILocalStorage Service
Start by adding a new interface to the Services folder of the MyFirstBlazor.Client project. Name it ILocalStorage and add the three methods from Listing 8-11 to it.
using System.Threading.Tasks;
namespace MyFirstBlazor.Client.Services
{
public interface ILocalStorage
{
Task<T> GetProperty<T>(string propName);
Task<object> SetProperty<T>(string propName, T value);
Task<object> WatchAsync<T>(T instance) where T : class;
}
}
Listing 8-11
Building the ILocalStorage service interface
These methods correspond with the glue functions from interop.js.
Now add a new class to the same Services folder and name it LocalStorage. This class should implement the ILocalStorage interface from Listing 8-12. See how this class hides away all the details of performing JavaScript interop? And this is a simple case!
using Microsoft.JSInterop;
using System.Threading.Tasks;
namespace MyFirstBlazor.Client.Services
{
public class LocalStorage : ILocalStorage
{
private readonly IJSRuntime jsRuntime;
public LocalStorage(IJSRuntime jsRuntime)
=> this.jsRuntime = jsRuntime;
public async Task<T> GetProperty<T>(string propName)
Registering the LocalStorage service in dependency injection
The Counter with the LocalStorage Service
Go back to the Counter component and replace each call of JSRuntime using blazorLocalStorage with the LocalStorage service. Start by adding the inject directive for the ILocalStorage service as in Listing 8-14.
@page "/counter"
@page "/counter/{CurrentCount:int}"
@layout NestedLayout
@inject NavigationManager uriHelper
@inject IJSRuntime JSRuntime
@using MyFirstBlazor.Client.Services
@inject ILocalStorage LocalStorage
Listing 8-14
Injecting the ILocalStorage service into the Counter component
Now onto the OnInitialiazedAsync method, where we retrieve the value from local storage. Replace the JSRuntime calls with LocalStorage calls, as in Listing 8-15.
In this section, you will build a Blazor component library to display charts by using a popular open source JavaScript library called Chart.js (www.chartjs.org). However, wrapping the whole library would make this chapter way too long, so you’ll just build a simple line-chart component.
Creating the Blazor Component Library
Open Visual Studio and start by creating a new Blazor Server App project called ChartTestProject. This project will only be used for testing the chart component. Now right-click the solution and add a new Razor Class Library called U2U.Components.Chart.
If you are using Visual Studio Code, open a command prompt and type
Now you have the Blazor component library project. Let’s use it in the test project. Look for Component1.razor in the U2U.Components.Chart project and rename it to LineChart.razor. Add a reference to the component library in the client project. In Visual Studio, right-click the ChartTestProject and select Add ➤ Reference. Check the U2U.Components.Chart project, shown in Figure 8-2, and click OK.
Figure 8-2
Adding a reference to the component library
With Visual Studio Code, use the integrated terminal, change the current directory to ChartTestProject.Client, and type this command:
Adding the component library namespace to the Blazor project
Open the Index.razor file from the Pages folder and add the LineChart component shown in Listing 8-19.
@page "/"
<h1>Hello, world!</h1>
Welcome to your new app.
<LineChart/>
Listing 8-19
Adding the LineChart component
Build and run this project. You should see the new component as in Figure 8-3, but the styling is wrong!
Figure 8-3
Using the component library, but styling is missing
Let’s fix the styling. In the ChartTestProject, look for _Host.cshtml. This time we are using Server-Side Blazor, which means that your Blazor App component is rendered by the ASP.NET Core runtime. There is no Index.html! Instead, add it here in the <head> section, as in Listing 8-20. You should only have to add a single <link> element to the bottom of the <head> section.
Build and run your application. It should now look like Figure 8-4.
Figure 8-4
Testing if the component library has been added correctly
Adding Chart.js to the Component Library
The LineChart component doesn’t look like a chart, so it’s time to fix this! First, you need to add the Chart.js JavaScript library to the component library project. Go to www.chartjs.org/. This is the main page for Chart.js. Now click the GitHub button, shown in Figure 8-5, to open the project’s GitHub page.
Since it takes some time between writing a book and you reading it, there is a big chance that the version number will have incremented. Make sure you select a version starting with 2 since version 3 will contain breaking changes.
Click Chart.bundle.min.js to download it.
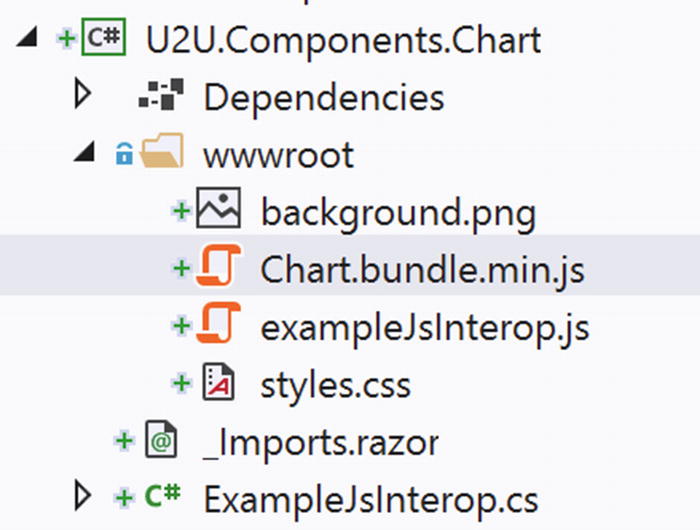
After it has been downloaded, copy this file to the wwwroot folder of the U2U.Components.Chart project, as shown in Figure 8-7.
Figure 8-7
Copying Chart.bundle.min.js into the wwwroot folder
You will also need to add this as a <script> tag to _Host.cshtml (or index.html with Blazor WebAssembly) as in Listing 8-21. You only have to add one <script> element to the bottom of the <body> section.
Verifying If the JavaScript Library Loaded Correctly
Do you know about Murphy’s law? It states, “Anything that can possibly go wrong, does.” Let’s make sure that the Chart.js library gets loaded by the browser. Run your Blazor project and open the browser’s debugger. Check if Chart.bundle.min.js has been loaded correctly. The easiest way to do this is to see if the window.Chart has been set (Chart.js adds one constructor function called Chart to the window global object). You can do this from the Console tab of the debugger by typing window.Chart, as shown in Figure 8-8.
Figure 8-8
Using the browser’s console to check the value of window.Chart
If this returns undefined, rebuild the U2U.Components.Chart project. Then you can try refreshing the browser after emptying the browser’s cache. When the browser’s debugger is shown, right-click the refresh button and you’ll get a drop-down menu, as shown in Figure 8-9. Select the Empty Cache and Hard Reload menu item.
Figure 8-9
Reloading the page after clearing the cache
Adding Chart.js Data and Options Classes
Open your browser and type in www.chartjs.org/docs/latest/. Here you can see a sample of using Chart.js in JavaScript. This library requires two data structures to be passed to it: one containing the chart data and one containing the options. This section will add these classes to the Blazor component library, but now using C#. Again, I am not going for full coverage of all the features of Chart.js to keep things crisp.
The ChartOptions Class
Let’s start with the options class. Right-click the U2U.Components.Chart library and add a new class called ChartOptions as in Listing 8-22.
This is a fair amount of code. You might consider copying it from the sources provided with this book. I’ve also left out comments describing each property for conciseness.
namespace U2U.Components.Chart
{
public class ChartOptions
{
public class TitleOptions
{
public static readonly TitleOptions Default
= new TitleOptions();
public bool Display { get; set; } = false;
}
public class ScalesOptions
{
public static readonly ScalesOptions Default
= new ScalesOptions();
public class ScaleOptions
{
public static readonly ScaleOptions Default
= new ScaleOptions();
public class TickOptions
{
public static readonly TickOptions Default
= new TickOptions();
public bool BeginAtZero { get; set; } = true;
public int Max { get; set; } = 100;
}
public bool Display { get; set; } = true;
public TickOptions Ticks { get; set; }
= TickOptions.Default;
}
public ScaleOptions[] YAxes { get; set; }
= new ScaleOptions[] { ScaleOptions.Default };
}
public static readonly ChartOptions Default
= new ChartOptions { };
public TitleOptions Title { get; set; }
= TitleOptions.Default;
public bool Responsive { get; set; } = true;
public bool MaintainAspectRatio { get; set; } = true;
public ScalesOptions Scales { get; set; }
= ScalesOptions.Default;
}
}
Listing 8-22
The ChartOptions class
This C# class, with nested classes, reflects the JavaScript options object (partially) from Chart.js. You don’t have to bind to all the things in the library, just the bits you need. Note that I’ve added Default static properties to each class to make it easier for developers to construct the options hierarchy.
The LineChartData Class
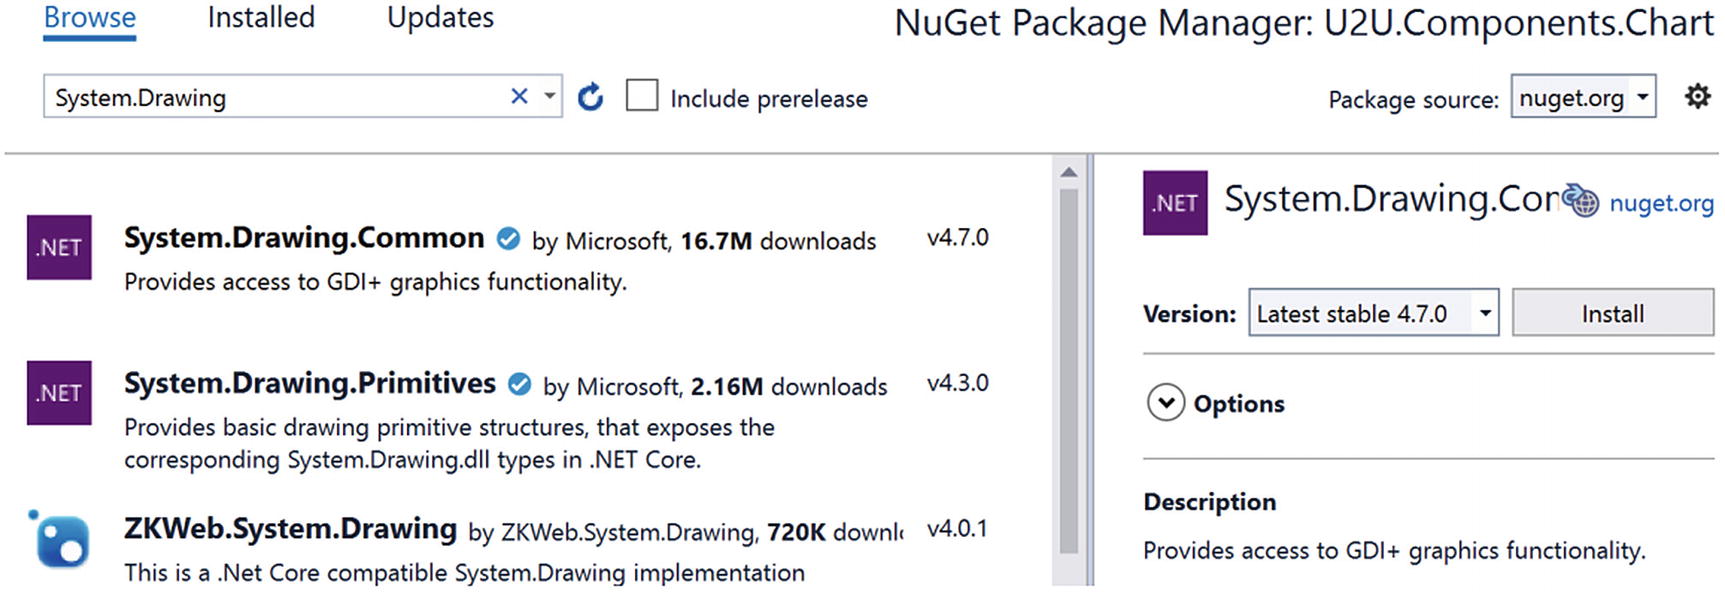
Chart.js expects you to give it the data it will render. For this, it needs to know a couple of things, like the color of the line, the color of the fill beneath the line, and, of course, the numbers to plot the graph. So how will you represent colors and points in your Blazor component? As it turns out, there are classes in .NET to represent colors and points: System.Drawing.Color and System.Drawing.Point. Unfortunately, you cannot use Color because it doesn’t convert into a JavaScript color, but you can allow users to use it in their code. I’ll discuss how to do this a little later.
Right-click the U2U.Components.Chart project and select Manage NuGet Packages…. Select the Browse tab and look for the System.Drawing.Common package as in Figure 8-10. Install this package to add support for System.Drawing classes.
Figure 8-10
Add the System.Drawing.Common package
Add a new class LineChartData to the component library, as shown in Listing 8-23.
using System;
using System.Collections.Generic;
using System.Drawing;
namespace U2U.Components.Chart
{
public class LineChartData
{
public class DataSet
{
public string Label { get; set; }
public List<Point> Data { get; set; } = null;
public string BackgroundColor { get; set; }
public string BorderColor { get; set; }
public int BorderWidth { get; set; } = 2;
}
public string[] Labels { get; set; }
= Array.Empty<string>();
public DataSet[] Datasets { get; set; }
}
}
Listing 8-23
The LineChartData class
Most of this class should be clear, except maybe for Array.Empty<string>(). This method returns an empty array of the generic argument. But why is this better? You cannot modify an empty array, so you can use the same instance everywhere (this is also known as the Flyweight Pattern). This is like string.Empty, and using it puts less strain on the garbage collector.
Registering the JavaScript Glue Function
To invoke the Chart.js library, you need to add a little JavaScript of your own. Open the wwwroot folder of the component library project and start by renaming the exampleJsInterop.js file to JsInterop.js and replacing the code with Listing 8-24.
window.components = (function () {
return {
chart: function (id, data, options) {
var context = document.getElementById(id)
.getContext('2d');
var chart = new Chart(context, {
type: 'line',
data: data,
options: options
});
}
};
})();
Listing 8-24
Registering the JavaScript glue class
This adds a window.components.chart glue function that when invoked calls the Chart function (from Chart.js), passing in the graphics context for the canvas, data, and options. It is very important that you pass the id of the canvas because someone might want to use the LineChart component several times on the same page. By using a unique id for each LineChart component, you end up with canvasses with unique ids.
Add a <script> element to the _Host.cshtml (or index.html with Blazor WebAssembly) after the chartjs script as in Listing 8-25.
If your Blazor project needs to reference a static resource from a component library, always use a relative URL that starts with _content/<<LibraryName>>. This way the runtime knows it needs to read this from the component library.
Your LineChart component will need to call the Chart.js library using your window.components.chart glue function. But putting all this logic in the LineChart component directly is something you want to avoid. Instead, you will build a service encapsulating this logic and inject the service into the LineChart component. Should the Blazor team at Microsoft decide to change the way JavaScript interoperability works (they have done that before), then you will only need to change one class (again, the single responsibility principle). Start by adding a new interface to the U2U.Component.Chart library project called IChartInterop with the code from Listing 8-26.
As you can see, this interface’s CreateLineChart method closely matches the window.components.chart glue function. Let’s implement this service. Add a new class called ChartInterop to the component library project and implement it as in Listing 8-27.
using Microsoft.JSInterop;
namespace U2U.Components.Chart
{
/// <summary>
/// It is always a good idea to hide specific implementation
/// details behind a service class
/// </summary>
public class ChartInterop : IChartInterop
{
public IJSRuntime JSRuntime { get; }
public ChartInterop(IJSRuntime jsRuntime)
=> JSRuntime = jsRuntime;
public void CreateLineChart(string id, LineChartData data,
This CreateLineChart method invokes the JavaScript components.chart function you added in Listing 8-24.
Time to configure dependency injection. You could ask the user of the library to add the IChartInterop dependency directly, but you don’t want to put too much responsibility in the user’s hands. Instead, you will provide the user with a handy C# extension method that hides all the gory details from the user. Add the new class called DependencyInjection to the component library project with the code from Listing 8-28.
This class provides you with the AddCharts extension method that the user of the LineChart component can now add to the client project. Let’s do this. Make sure everything builds first, and then open Startup.cs (since we are using a Blazor Server project, dependency injection is configured in the Startup class’s ConfigureServices method) in the ChartTestProject and add a call to AddCharts as in Listing 8-29.
public void ConfigureServices(IServiceCollection services)
{
services.AddRazorPages();
services.AddServerSideBlazor();
services.AddSingleton<WeatherForecastService>();
services.AddCharts();
}
Listing 8-29
Convenient dependency injection with AddCharts
The user of the component does not need to know any implementation details to use the LineChart component. Mission accomplished!
Implementing the LineChart Component
Now you are ready to implement the LineChart component. Chart.js does all its drawings using an HTML5 canvas element, and this will be the markup of the LineChart component. Update LineChart.razor to match Listing 8-30.
@inject IChartInterop JsInterop
<canvas id="@Id" class="@Class">
</canvas>
@code {
[Parameter]
public string Id { get; set; }
[Parameter]
public string Class { get; set; }
[Parameter]
public LineChartData Data { get; set; }
[Parameter]
public ChartOptions Options { get; set; } = ChartOptions.Default;
The LineChart component has a couple of parameters. The Id parameter is used to give each LineChart’s canvas a unique identifier; this way you can use LineChart several times on the same page. The Class parameter can be used to give the canvas one or more CSS classes to add some style (and you can never have enough style). Finally, the Data and Options parameters get passed to JavaScript to configure the chart.
Now comes the tricky part (this is like the earlier section where you wanted to set the focus on the input). To call the JavaScript chart function, the canvas needs to be in the browser’s DOM. When does that happen? Blazor creates the component hierarchy, calls each component’s OnInitialized, OnInitializedsAsync, OnParametersSet, and OnParametersSetAsync methods, and then uses the component hierarchy to build its internal tree, which then is used to update the browser’s DOM. Then Blazor calls each component’s OnAfterRender method. Because the canvas element should already be part of the DOM, you need to wait for the OnAfterRender method before calling JsInterop.CreateLineChart.
Using the LineChart Component
With everything in place, you can now complete the LineChart component from the Index page in your ChartTestProject. Update the Index.razor file to match Listing 8-31. You will add the toJS() extension method later, so ignore any errors till then.
You start by adding two @using directives for the U2U.Components.Chart and System.Drawing namespaces. Then you add the Id, Class, Data, and Options parameters. You give these parameters values in the OnInitialized method (should you get this data asynchronously from the server, you would use the OnInitializedAsync method). One more thing before you can build and run the project and admire your work: add a new class called ColorExtensions to the U2U.Component.Chart project. Implement it as shown in Listing 8-32.
using System.Drawing;
namespace U2U.Components.Chart
{
public static class ColorExtensions
{
public static string ToJs(this Color c)
=> $"rgba({c.R}, {c.G}, {c.B}, {c.A})";
}
}
Listing 8-32
The ColorExtensions class with the toJS extension method
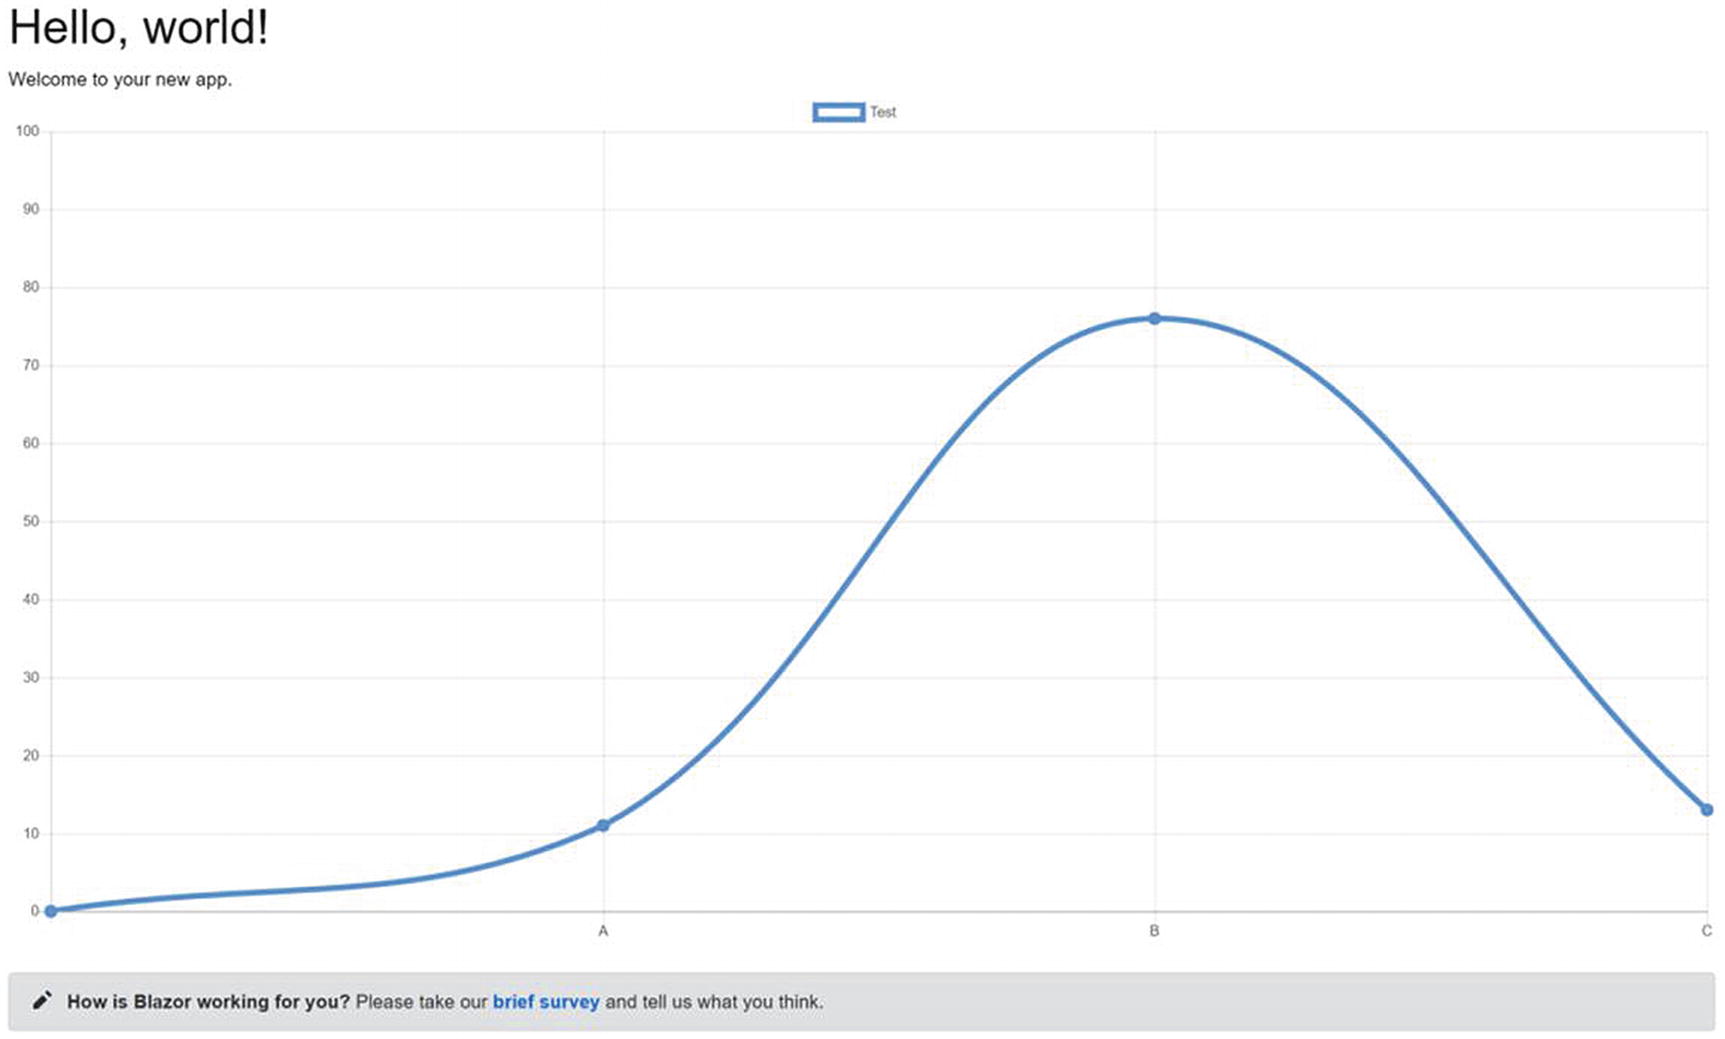
Build and run your project. If all is well, you should see Figure 8-11.
Figure 8-11
The finished chart example
Summary
In this chapter, you saw how you can call JavaScript from your Blazor components using the IJSRuntime.InvokeAsync<T> method. This requires you to register a JavaScript glue function by adding this function to the browser’s window global object.
You can also call your .NET static or instance method from JavaScript. Start by adding the JSInvokable attribute to the .NET method. If the method is static, you use the JavaScript DotNet.invokeMethodAsync function (or DotNet.invokeMethod if the call is synchronous), passing the name of the assembly, the name of the method, and its arguments. If the method is an instance method, you pass the .NET instance wrapped in a DotNetObjectRef to the glue function, which can then use the InvokeMethodAsync function to call the method, passing the name of the method and its arguments.
Finally, you applied this knowledge by wrapping the Chart.js open source library to draw a nice line chart. You built a Blazor component library, added some classes to pass the data to the Chart function, and then used a glue function to draw the chart.