
Microsoft is a recent player in the anti-virus and anti-spyware market. For this reason, customers have looked to other companies in the past for anti-virus and anti-spyware solutions. Companies such as Norton and McAfee have dominated the anti-virus market for years. Software like Spy-Ware Search and Destroy and Ad-Aware from Lavasoft are some of the most popular anti-spyware products. Some of these products have suited home users well, but companies needed a more comprehensive solution to combat the virus, malware, and spyware problems they face on a daily basis.
The Microsoft Forefront line of products is that comprehensive suite that many companies need to implement a level of protection necessary to deal with today’s threats. There have been a number of cases in past years where malware, worms, or viruses have bought businesses and agencies to a complete standstill. For example, in 2003, Maryland’s Motor Vehicle Administration was shut down due to the blaster worm. Examples of agency shutdowns like this are quite common, and as more agencies grow to depend on computers, the likelihood of additional incidents continues to grow. Companies and agencies can no longer afford to be lax on security; they need a comprehensive solution that will help to ensure their systems will stay up and running.
Microsoft has not always been at the forefront of security-related issues. In the past, their operating systems have been known to have bugs and flaws that led to wide-scale security problems for companies and agencies. Starting with the release of Server 2003, Microsoft began using the idea of “trustworthy” computing. The idea of trustworthy computing basically meant that consumers should have a reasonable expectation of security out of the box. In a nutshell, this meant that Microsoft would no longer start unnecessary services or install optional components by default on their operating system. Microsoft Sever 2003 had a much better reputation for security compared to previous Microsoft products, and this has helped to sway opinions that Microsoft was a company unconcerned with security. And with the release of Vista, Microsoft has shown the public that the security of their operating systems is a very high priority.
Microsoft Forefront Client Security will help companies and agencies in the fight to keep their computers free of spyware, malware, and viruses. In order for the product to work effectively, companies need to implement procedures so that definitions are kept up to date. With the release of their Client Security offering, Microsoft provides the mechanisms for the security of clients. However, administrators need to have a good grasp on the Forefront line of products in order to utilize and deploy the product effectively.
Although knowing the Forefront product inside and out will certainly will benefit the network administrator, it is not enough. Written company policies should be in place to ensure that workers remain compliant and vigilant in the fight against computer threats. Finally, user education is also an important component of a company’s fight against various computer threats. Software security product solutions will be effective only if users know how to utilize them properly. A security professional should learn the product well and be able to explain to employees the reasons that these security measures are in place.
Microsoft Forefront Client Security (FCS) provides unified malware protection for desktops, laptops, and servers. It provides simple administration through central management while providing critical visibility and reporting capabilities. Table 2.1 lists each feature within services provided earlier. FCS simplifies security management by using a single policy that configures anti-virus, anti-spyware, and state assessment technologies for all computers within a network. FCS consists of a security agent that is installed on desktops, laptops, and server operating systems. It provides real-time protection and scheduled scanning against threats such as spyware, viruses, and rootkits. FCS also consists of a central management server that allows administrators to easily manage and update preconfigured or customized malware protection agents. Administrators are also able to generate reports and alerts about the security status of their environment. FCS is able to protect Windows 2000, Windows XP, Windows Server 2003, and Windows Vista. It works with both 32-bit and 64-bit environments.
Table 2.1. FCS Client Security Features
Services | Features |
|---|---|
Unified Protection |
|
Simplified Administration |
|
Critical Visibility and Control |
|
Before we begin installing Forefront Client Security (FCS), we need to know exactly what we will be installing. We must understand the roles that are required in a successful FCS deployment and what the hardware and software requirements are. FCS isn’t just client software; as we mentioned earlier it provides simple administration through central management. Hence a server or servers, depending on your environment, is required.
An FCS server consists of four roles, each which can reside on a single physical box or on separate systems depending on your environment and requirements. Those roles are management server, collection server, reporting server, and distribution server. An explanation of each role is shown later in this chapter. During installation FCS installs its own Microsoft Operations Manager (MOM) server, which it leverages for client alerts and event management.
FCS can be implemented in numerous topologies. It can hold all roles on a single system or expand out to six servers depending on the environment. Most small- to medium-sized companies will implement one to three servers, with three servers supporting up to 5000 users. Figures 2.1, 2.2, and 2.3 shows what a one-, two-, and three-server implementation looks like. Larger installations can include four, five, or six servers and can manage well over 10,000 managed systems. Table 2.2 lists the hardware and software requirements for an FCS implementation as provided by Microsoft.

Table 2.2. FCS Hardware and Software Requirements
Server Role | Processor and Memory | Operating System | Software | Hard Disk |
|---|---|---|---|---|
Management Server | 1 GHz or faster with at least 1 GB RAM | Windows Server 2003 Standard or Enterprise with Service Pack 1 or Windows Server 2003 R2. No ×64 editions | .NET Framework 2.0 GPMC with SP1 IIS 6.0 or greater ASP.NET Microsoft FrontPage Server Extensions MMC 3.0 | 512 MB or more |
Collection Server without database | 1 GHz or faster with at least 512 MB RAM | Windows Server 2003 Standard or Enterprise with Service Pack 1 or Windows Server 2003 R2. No ×64 editions | .NET Framework 2.0 | 1 GB or more |
Collection Server with database or SQL Server with just the collection database | Dual 2 GHz or faster with at least 2 GB RAM | Windows Server 2003 Standard or Enterprise with Service Pack 1 or Windows Server 2003 R2. No ×64 editions | SQL Server 2005 with SP1 Standard or Enterprise | 30 GB or more |
Reporting Server without database | 1 GHz or faster with at least 512 MB RAM | Windows Server 2003 Standard or Enterprise with Service Pack 1 or Windows Server 2003 R2. No ×64 editions | IIS 6.0 or later, ASP.NET, and FrontPage Server Extensions | 512 MB or more |
Reporting Server with database or SQL Server with just reporting database | Dual 2 GHz or faster with 2 GB RAM or more | Windows Server 2003 Standard or Enterprise with Service Pack 1 or Windows Server 2003 R2. No ×64 editions | SQL Server 2005 with SP1 Standard or Enterprise (with Reporting Services) | 75 GB or more |
Distribution Server | WSUS guidelines found at http://go.microsoft.com/fwlink/?LinkId=77980 | Windows Server 2003 Standard or Enterprise with Service Pack 1 or Windows Server 2003 R2. No ×64 editions | IIS 6.0 and ASP.NET .NET Framework 2.0 with SP1 | See WSUS guidelines |
Combined: Management, Collection, and Reporting Server | Dual 2.85 GHz or faster with 4 GB RAM or more | Windows Server 2003 Standard or Enterprise with Service Pack 1 or Windows Server 2003 R2. No ×64 editions | SQL Server 2005 with SP1 Standard or Enterprise (with Reporting Services) .NET Framework 2.0 GPMC with SP1 IIS 6.0 or wlater, ASP.NET, and FrontPage Server Extensions MMC 3.0 | 100 GB or more |
Combined: Collection Database and Reporting Database server | Dual 2.85 GHz or faster with 4 GB RAM or more | Windows Server 2003 Standard or Enterprise with Service Pack 1 or Windows Server 2003 R2. No ×64 editions | SQL Server 2005 with SP1 Standard or Enterprise (with Reporting Services) | 100 GB or more |
Combined: Single Server with all roles including distribution | Dual 2.85 GHz or faster with 4 GB RAM or more | Windows Server 2003 Standard or Enterprise with Service Pack 1 or Windows Server 2003 R2. No ×64 editions | SQL Server 2005 with SP1 Standard or Enterprise (with Reporting Services) .NET Framework 2.0 GPMC with SP1 IIS 6.0 or later, ASP.NET, and FrontPage Server Extensions MMC 3.0 WSUS 2.0 with SP1 or higher | 100 GB or more |
Client Computer | 500 MHz or faster with 256 MB RAM or more | Windows 2000 with SP4 and Update Rollup 1 and GDI+ installed Windows XP with SP2 and waith filter manager rollup package Windows Server 2003 with SP1 Windows Server 2003 R2 Windows Vista Business Windows Vista Enterprise Windows Vista Ultimate X64 editions are supported for clients TabletPC version of Windows is NOT supported | Windows Update Agent 2.0 Windows installer 3.1 | 350 MB or more |
As we mentioned earlier, most companies will implement one to three servers. Figure 2.1 shows all roles and databases residing on a single physical computer.
An administrator may require a two-server implementation if they already have a WSUS server in their environment, but the current server cannot support all FCS roles. Figure 2.2 shows a typical two-server implementation.
A three-server topology usually appears when the reporting database is used heavily and the load from it significantly slows down the primary FCS system running the Management, Collection, and Reporting roles. Although we are not moving the Reporting role from the primary server we are moving the database to a dedicated or existing SQL Server 2005 system in an effort to improve performance. Figure 2.3 shows a three-server implementation.
As we mentioned earlier, there are other topologies that expand to six servers in an attempt to improve performance. This includes having the individual server roles running on their own separate servers. Once again this would benefit mostly large enterprises managing 10,000 computers and beyond. Table 2.2 lists FCS hardware and software requirements for various server roles.
The Management Server role is used to manage Forefront Client Security, and includes the FCS console and the MOM console. You use the FCS console to examine the Dashboard, which reveals information such as detecting malware, vulnerabilities, out-of-date policies, and alerts. It also allows administrators to create policies such as malware scanning, security state assessments, and whether virus protection and spyware protection are enabled, to name a few.
The Collection Server role requires the use of Microsoft SQL Server 2005 Standard or Enterprise, depending upon the number of managed systems you plan to support. It is in charge of event and heartbeat data. The database can reside on the Collection Server itself or sit on a separate SQL Server 2005 system.
This server role also requires SQL Server 2005. If it resides on the same box as the Collection Server’s database, then only one copy of SQL Server 2005 is required. This role also requires SQL Server Reporting Service 2005, which enables administrators to run preset or customized reports. The reporting server acts as an archive of data that is no longer stored on the Collection Server.
This is the server role that delivers anti-malware definitions to clients. This is typically a WSUS server but can be an SMS system as well.
Now that we are familiar with the server roles, software and hardware requirements, clients that are supported, and the different topologies available we can focus on installing Forefront Client Security. For our example we will be using a single-server topology, meaning that all roles and databases will reside on one box. At this point we have following installed on our server:
MMC 3.0 already comes with the R2 release of Windows Server 2003, so we don’t have to download it. FCS requires the use of four service accounts, and you can use a single domain user account to fill all four roles. Table 2.3 lists the service accounts used in FCS.
Table 2.3. Service Accounts Used in FCS
Account | Type | Description |
|---|---|---|
Data Access Server (DAS) | Domain user, but if also used on the collection server it needs to have local administrator rights | The Collection Server uses the DAS account to access the colletion database. |
Reporting Account | Domain user | Used on the Reporting Server to access both the reporting and collection databases. |
Action Account | Domain user and local administrator on the Collection Server | This account must be a local administrator on the Collection Server. The Collection Server uses this account to run server side scripts and security state assessment scans. The action account MUST be a domain user account. |
Domain Transformation Services (DTS) | Domain user | Used by the reporting server to run a DTS job that transfers data from the collection database to the reporting database. |
As you see, it really makes things a lot simpler if we just use one domain-based account that meets the security requirements of each role. Once we’ve verified that our prerequisites are met we can now install Forefront Client Security on the server. Follow these steps to install FCS:
With an account that has local administrator privileges, logon to the server that will run FCS.
Insert the Microsoft Forefront Client Security DVD in the DVD-ROM drive.
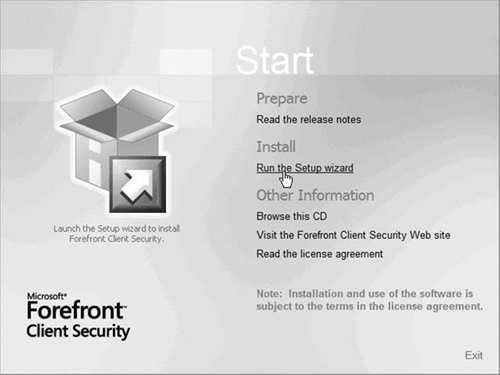
On the FCS Startup screen, choose Run the Setup wizard as shown in Figure 2.4.
At the Before You Begin screen, verify that your name and organization are correct, and then click Next.
At the License Agreement screen, you’ll be asked to select I accept the terms in the license agreement. If you agree to them, just put a check mark in the appropriate box and click Next.
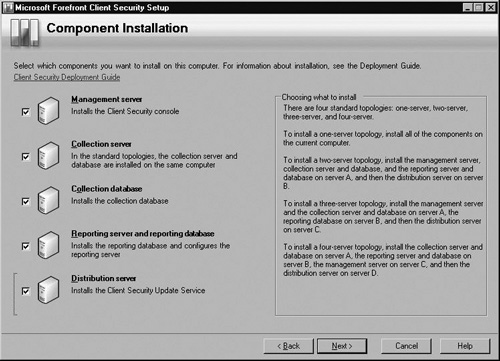
Now you’ll come to the Component Installation screen. For our scenario, a single-server, Select each component as shown in Figure 2.5, then click Next.
At the Collection Server screen shown in Figure 2.6, enter the server’s computer name in the Collection server box (done by default). In the Management group name box, enter the name of the group name or accept the default, ForefrontClientSecurity. Make sure you record the Management group name because you will need it when configuring Client Security. In the DAS account box, enter the username and password for the DAS account created during the prerequisites. In our example, we actually created a username DAS. We recommend that you use a name less conspicuous, but for our example, we chose something easy to remember. Remember that the account is a domain user, and then click Next.
In the Collection Database screen as shown in Figure 2.7, verify that the Collection database will be stored on the current server and then accept the default size of the database or modify it. Note: If you select a size for the database that exceeds the amount of drive space available, the setup will fail. In the Report account portion you can use either the DAS account you created earlier or another domain user account at your discretion. In our example, you see that we are continuing to use the DAS account. Now click Next.
At the Reporting database screen shown in Figure 2.8, verify that the Reporting database is the current server and that the database size is appropriate for your expected amount of reporting. In the DTS account section either reuse the DAS account for the DTS account or use a different domain user account. Click Next.
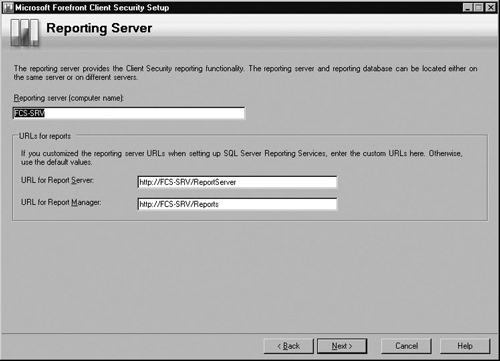
On the Reporting Server screen shown in Figure 2.9, verify that the Reporting server is correct. In the URLs for reports section, verify that the URL for Report Server and the URL for Report Manager boxes are correct. They should be the ones you specified when setting up SQL Server Reporting Services. If you used the default values (http://<servername>/ReportServer and http://<servername>/Reports), click Next. If they are not the default values, enter the correct URLs, then click Next.
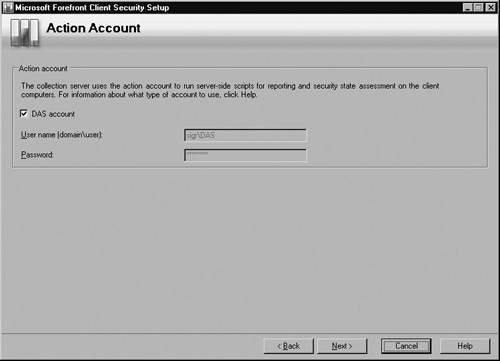
In the Action Account screen shown in Figure 2.10, either use the DAS account you’ve used earlier or enter a new domain user account, then click Next.
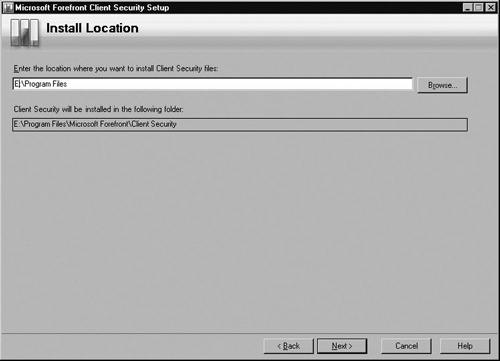
Now you need to specify the location where you want to install the Client Security files. If you choose the default (C:Program Files), click Next. Otherwise, enter a location where you would like these files (see Figure 2.11).
Next is the Verifying Settings and Requirements screen as shown in Figure 2.12. Forefront Client Security setup will verify that you meet the system requirements. If you receive an error, you will not be able to install FCS until the error(s) is resolved. If you receive a warning, you have the option of taking the suggestion from FCS or not, but you can continue the installation. In our example, we are given a warning that having two or more processors is recommended. For now, we will continue. After the verification is complete, click Next.
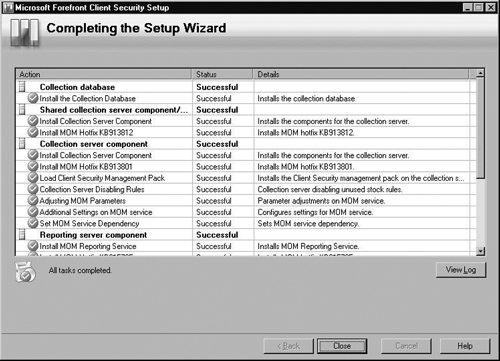
The Completing Setup screen is shown in Figure 2.13. FCS will complete the setup and provide you a status of each item being installed. Once it’s finished, click Close.


Once the installation is complete, you’ll notice two new programs: Forefront Client Security, which is the actual client piece that can be seen on the system tray in the bottom-right corner and the Forefront Client Security Console, which is used as the primary interface for managing FCS.
To get to the FCS Console, click Start | All Programs | Microsoft Forefront | Client Security | Microsoft Forefront Client Security Console. When you run the FCS Console for the first time, you will run through a wizard that will take you through the rest of the configuration.
At the Before You Begin screen shown in Figure 2.14, click Next.
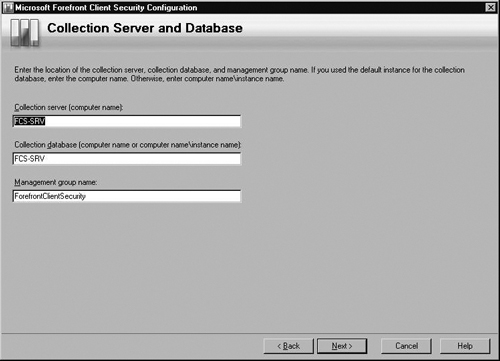
At the Collection Server and Database screen, shown in Figure 2.15, verify that the correct Collection server, Collection database, and Management group name are shown. Click Next.
On the Reporting Database screen seen in Figure 2.16, verify the computer name is correct in the Reporting database box, and then enter the username and password used for reporting. This should be the domain user account you created earlier.
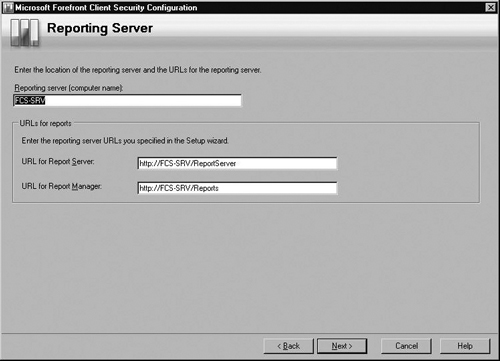
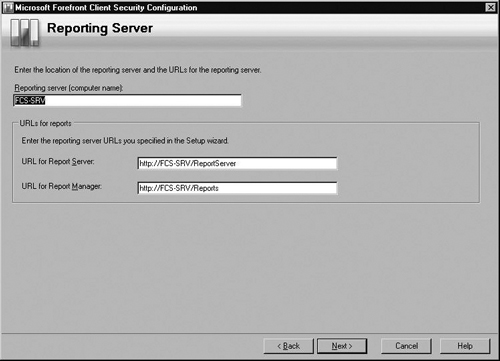
In the Reporting Server screen, verify the correct computer name is entered for the Reporting server and that the URLs for both the Report Server and the Report Manager are correct. Once you’ve confirmed this, click Next. Figure 2.17 has the information entered for our scenario.
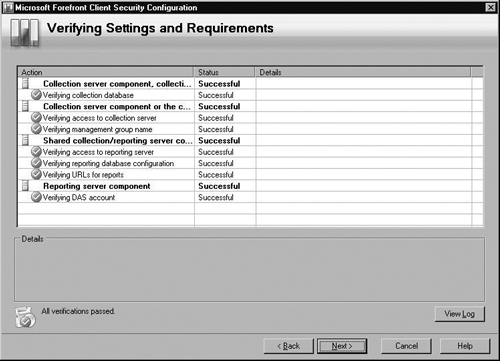
Next you’ll come to the Verifying Settings and Requirements, which setup will do. If everything is successful as you see in Figure 2.18, click Next. Otherwise, examine the details of any failures and troubleshoot from there.
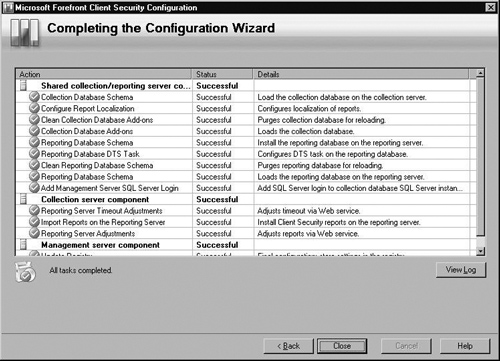
Next you’ll come to the Completing the Configuration Wizard shown in Figure 2.19, where setup will complete the tasks listed in the Action column. After all tasks have completed successfully, click Close.

In deploying the Client Security to client systems (XP, Vista, Windows 2000, Windows Server 2003), we need to create and deploy a policy to those systems. Policies are where we decide centrally what the scan schedules and configuration will be. Once the client system has a policy, the computer will download the client software from the distribution server. After deployment, the client systems need to be approved in MOM before they are able to report data. Typically this happens within an hour.
Here are the steps required for creating and deploying policies in FCS.
Click Start | All Programs | Microsoft Forefront | Client Security | Microsoft Forefront Client Security Console. The Microsoft Forefront Client Security Console appears and the Dashboard is at the forefront as seen in Figure 2.20.
Now we need to create a policy. In the FCS Console, click the Policy Management tab, then click New. On the General Tab, enter a Name and any Comments you like about the policy. In our example, we are calling this policy Client Settings.
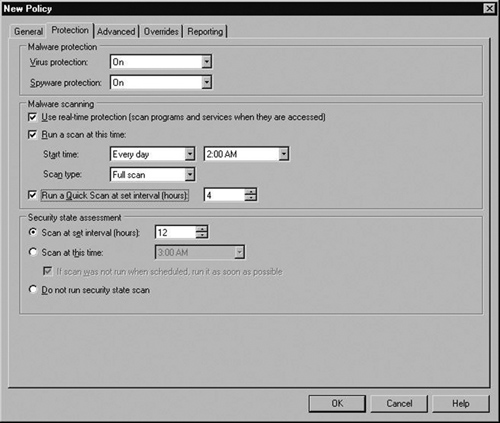
Now go to the Protection tab, where you will select what protection you want on. You can turn Virus protection and Spyware protection On or Off. You can choose to Use real-time protection, which scans programs and services when they are accessed. You can schedule to Run a scan at a certain day, everyday, and an exact time. You can choose the type of scan such as a Full scan, or a Quick scan. You can also choose to run a Quick scan at certain hourly intervals. Security state assessment scans can also be set or not. For our scenario, we’ve decided on all the defaults plus to Run a Quick Scan every four hours as you see in Figure 2.21.
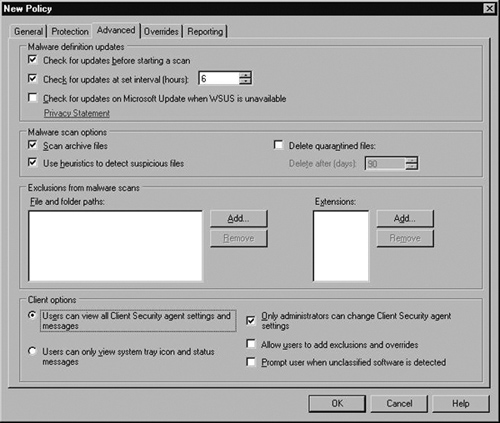
Once finished, click the Advanced tab; the options seen in Figure 2.22 appear. Here we have kept the defaults for Check for updates before starting a scan, Check for updates at set interval (hours) 6, Scan archive files, and Use heuristics to detect suspicious files. We have modified the Client options to Users can view all Client Security agents settings and messages and Only administrators can change Client Security agent settings. The Overrides tab allows you to change responses to specific malware threats that may be default.
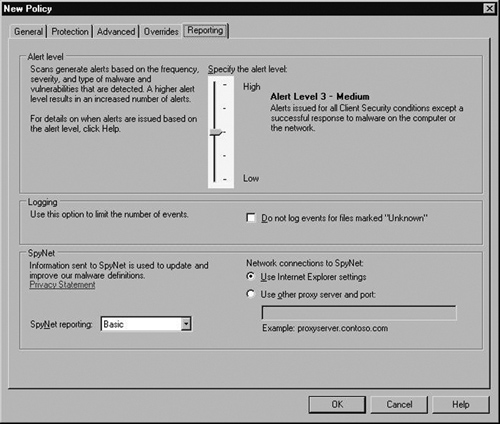
Although we are not changing anything in the Reporting tab, Figure 2.23 shows all the options available, including the ability to specify Alert levels, Logging, and SpyNet settings. SpyNet will be covered later in this chapter. Now click OK.

Once completed you will see the new policy listed in FCS as shown in Figure 2.24.

Now that we have created our policy for the Client Security, we need to turn our attention to deploying it. To deploy a policy:
Open the Client Security console (Start | All Programs | Microsoft Forefront | Client Security | Microsoft Forefront Client Security Console).
Go to the Policy Management and click on the policy you want to deploy. In our case, we are deploying the policy called Client Settings. Click Deploy as shown in Figure 2.25.
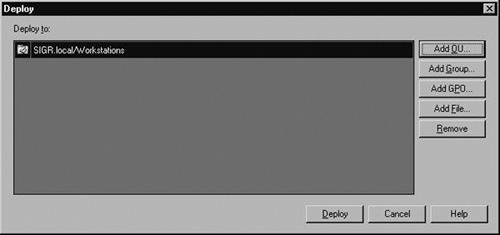
At the Deploy dialog box, you have the option of selecting where you want to deploy your target or targets. In our example, we will be deploying to an OU. As you see, not only can you deploy to an OU but you can also deploy to AD security groups, GPOs, and .reg files. Figure 2.26 shows that we are deploying to the Workstations OU in our Active Directory deployment.

If you return to the Client Security console, you will see that information such as Last Modified, Modified By, Last Deployed, Deployed By, and Deployed To are now populated with the correct information. So now that we have Microsoft Forefront Client Security installed on our server and we have created and deployed our settings policy, we now need to install the client software on the client computers.
The Forefront Client security agent runs on Windows Vista, Windows XP SP2, Windows 2000 SP4, Windows Server 2003 R2, and Windows Server 2003 SP1. Before installing the agent software, verify that your client is up to date on all critical updates. If there are any other anti-virus and anti-spyware software currently installed on the client system, uninstall them. In Windows Vista, be sure to disable Defender’s service. For Windows 2000 SP4 clients, be sure to install the Windows Update Agent 2.0 and the Windows Installer 3.1. Installation of the client agent can be done via a logon script, automated installation via SMS, or manually. We will walk through doing it manually. To install the client agent manually:
Insert the Forefront Client Security DVD in the DVD-ROM drive of the client system.
On the DVD, copy the CLIENT directory somewhere on the client workstation.
After the CLIENT directory has been copied, click Start | Run.
In the Run dialog box, point to the CLIENT directory you just copied and run the ClientSetup.exe command. For our example, we copied the CLIENT directory from the C root. After that we ran the command ClientSetup.exe /MS FCS-SRV.sigr.local /CG ForefrontClientSecurity. The /MS parameter specifies the name of the FCS Server, and the /CG parameter specifies the name of the configuration group that you created during the FCS install. The switches for ClientSetup.exe are listed in Table 2.4.
Table 2.4. ClientSetup.exe Switches
/CG <ManagementGroupName> | Specify the MOM management group name. Default is ForefrontClientSecurity. |
/MS <ManagementServerName> | The fully qualified domain name of the Management server. Ex: srv1.test.com. |
/I | Specify a folder to install the client in besides the default. |
/NOMOM | Tell ClientSetup.exe not to install the MOM agent. Used on a separate Collection Server. |
A command window will come up with a flashing cursor in the upper left corner. After the install, the command window disappears and the Forefront agent can be seen in the lower right corner of the system tray as seen in Figure 2.27. Now that the Forefront Client Security agent is installed let’s get acquainted with it.

By opening the FCS agent, which can be done by clicking the green icon with the check mark in it on the system tray or by clicking Start | All Programs | Microsoft Forefront | Forefront Client Security, we see an interface very similar to that of Defender. We have in the upper portion of the utility options for Home, Scan, History, Tools, and Help (which is displayed as a question mark inside a blue circle) FCS client on machine. Show this tab.
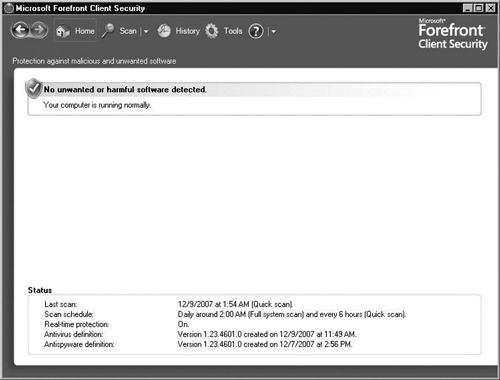
The Home screen provides us with information about any malware that was detected and the status of the agent in the bottom half of the screen. The Status area informs us of our Last scan, Scan schedule, Real-time protection, and current Antivirus and Antispyware definitions, as seen in Figure 2.28.
To the right of the help icon (blue button with the white question mark) is a down-arrow button. Clicking the down-arrow button provides you with an option to manually Check for Updates, if you would like to be even more proactive. If no new definitions are not found, the FCS agent will display a message reading No new definitions or updates are available. If there are updates, the FCS agent will download them and update the information on the Home screen.
The Scan button kicks off a scan of the computer. By default it will kick off a Full Scan of the system, but if you click the down-arrow button on the right side of the Scan option you can choose from a Quick Scan, Full Scan, and a Custom Scan, as shown in Figure 2.29.

A quick scan checks the most likely places on your system where malware may exist, plus it scans all running programs. To run a quick scan from the FCS agent, just click the down-arrow button beside the Scan button as seen in Figure 2.29 and choose Quick Scan or choose Custom Scan and select it from the list.
A full scan checks all files on the hard disk, and currently running programs. Conducting a full scan will effect performance, hence it might best to schedule it when you are not using the system (e.g., during the night; we will cover this under the Tools option of the FCS agent). Figure 2.30 shows a full scan running on a system.

If you select Custom Scan, you can choose your scanning options. With Custom Scan, you select Scan selected drives and folders, you can choose which drives you want to scan, which directories you would like to scan, and which directories you would prefer not to scan. Once you have made your decision, back at the Select scan options screen, click Scan Now and your custom scan will begin.
Minifilter technology in Forefront Client Security is what allows the FCS agent to perform real-time scanning via the Windows Filter Manager. This enables the scanning of files and programs before they even run. A huge benefit to this is that disruption to the user is done so at a minimum.
History in the FCS agent displays any actions that have been applied to malware and any other potentially unwanted software that has been detected. Here you can review and monitor items you’ve permitted by going to the Allow items section. You can also remove or restore items that have been placed in the Quarantined items area. The History screen also informs you if you have joined Microsoft’s SpyNet, the level of your membership, and allows you to change any settings you like.
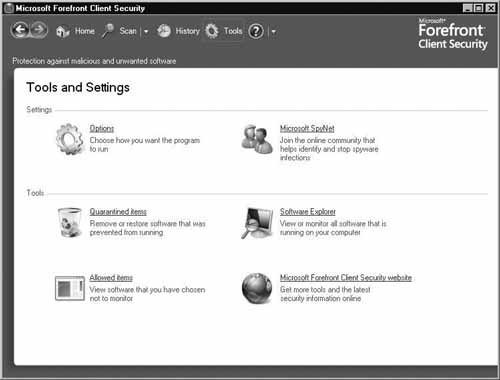
Possibly the busiest screen in the FCS client agent, the Tools option is made up of two sections. The Settings section and the Tools section. The Settings section consists of Options and Microsoft SpyNet, the Tools section consists of Quarantined items, Software Explorer, Allowed items, and Microsoft Forefront Client Security website. Figure 2.31 shows the Tools option screen within the FCS agent.
Options allows you to choose how you want the FCS agent to run. Figure 2.32 shows the options available within the Options category. Under Options within Tools, you are able to schedule scanning on the system. You can choose how often you want to scan, the time for it to take place, and the type. You can set an interval (in hours) if you like for running a quick scan. The option of checking for updated definitions before scanning is available. Within the Options area, you can set what’s referred to as Default actions. Here you can decide what to do when a certain level of alert item happens. Alert items come in Severe, High, Medium, and Low.
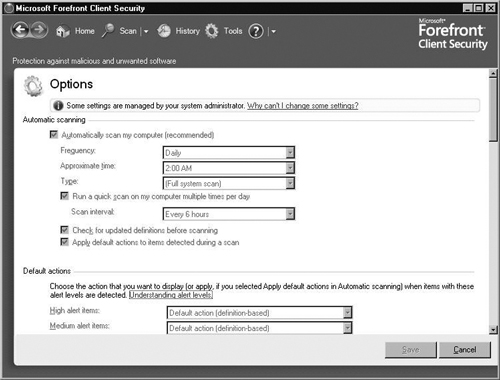
As you’ve probably noticed, all of our settings are grayed out. The reason is because we created a centrally managed policy that configured these settings earlier.
Also in the settings section of Tools and Settings under the Tools tab in FCS client are the Microsoft SpyNet settings. Microsoft SpyNet is the online community network of Windows Defender and Forefront Client Security users and administrators that helps determine what software should be investigated as potential spyware. This community can help administrators see how others are responding to software that has not yet been classified for risk. Ratings from the SpyNet community are one of the factors used by Microsoft in determining which software to investigate as potential risks.
Under the Tools section below the Settings section of the Tools tab is Software Explorer, which allows users to change how a program runs on their PCs. This typically is used when you are sure that you have identified a specific program causing a problem. Software Explorer categorizes programs in the following way: Startup Programs, Currently Running Programs, Network Connected Programs, and Winsock Service Providers. Software Explorer provides a great deal of information about programs on the system. It even groups them by manufacturer. For instance, all Microsoft programs will be listed under their name, even the Google Toolbar Notifier is listed—of course, under Google. Programs also are classified by Software Explorer as shown in Figure 2.33.

Quarantined items are found under the Tools section below the Settings section of the Tools tab. This is software that was found risky or unwanted that the user has decided not to remove, or has allowed to remain when originally notified. A user may find it beneficial at first to quarantine a program before having the FCS agent remove it. If the user quarantines a program, the FCS agent moves that program to another location and prevents it from running. If the user restores the program it is moved back to its original location and allowed to run. If the user chooses to remove the program then it is permanently deleted.
This option is also found under the Tools section below the Settings section of the Tools tab. By clicking this option, Internet Explorer opens and goes to the Microsoft Forefront Client Security Web site. Here you can find up-to-date helpful information like white papers, web casts, virtual labs, downloads, and a technical library. This site is very useful for administrators and users wanting to become more knowledgeable about Microsoft Forefront Client Security.
The Help function is shown beside the Tools tab at the top of the FCS agent as a blue dot with a white question mark, and provides access to FCS agent help file.
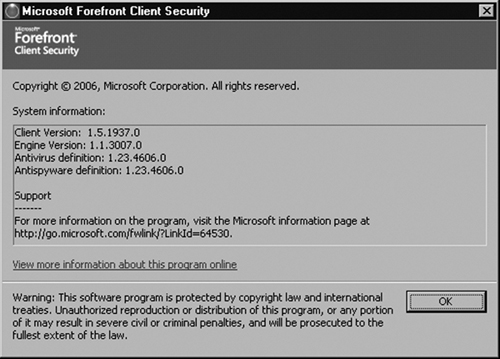
By clicking the down-arrow key beside the Help button, you can select About Microsoft Forefront Client Security and view information about what client and engine version you are running, and you can see the definition versions for the antivirus and antispyware functions. Figure 2.34 shows the system information found in the About Microsoft Forefront Client Security box.
So far we have gone through what Forefront provides; how to prepare for the installation, performing the installation, creating and deploying policies, installing the client security agent; and walked through the options available in the FCS agent. Now let’s watch FCS in action. In our test scenario, we have attempted to download a file that will act as a test virus. The file is known as EICAR, a well-known test file that can be downloaded from numerous sites on the Internet such as www.eicar.org/anti_virus_test_file.htm. As soon as we began to download EICAR, the Forefront Client Security agent immediately warned us that a virus had been found, which you see in Figure 2.35.

If we click Smart Clean, the FCS agent will remove the virus. If you choose to find out more information about the virus, we can select Review and the Home screen from the agent will appear with the Apply actions to detected items screen, while providing information about the virus as shown in Figure 2.36.

By default, for severe alert levels the action is to remove the virus. If we wanted we could select Quarantine or Always allow instead. Since this is a severe alert level we’re going to take the FCS agent’s default action and remove this virus. Remember we can remove the virus by selecting Smart Clean, or in this case we can remove it by selecting Apply Actions.
Once the virus is removed, the Home screen will inform us that the computer is running normally again. If we went to the History tab, we would see that we successfully removed the EICAR virus as shown in Figure 2.37.

So how do we tell when FCS is running correctly and if it is not? Where do we begin to troubleshoot if it isn’t?
Like any product that runs on Windows, we need to verify functionality, verify all corresponding services are running as expected, watch for any alerts, but most importantly we need to start in Event Viewer and research any errors associated with FCS. As we’ve already learned, FCS makes use of quite a few number of products (SQL Server, WSUS, MOM, IIS, etc.). It’s impossible to cover all issues that can arise with FCS. What we can do though, is walk you through some areas to look at when problems do arise. In this situation what we’re doing is making sure that updates are being received by the client and walking through the places to look to verify that they are.
One of the most common issues we mentioned comes in the form of clients not receiving updated definitions. Although this mostly entails WSUS, it helps to know where clients download their updated definitions. Definition updates download to the Definition Updates Folder, which by default is located in the C:Documents and SettingsAll UsersApplication DataMicrosoftMicrosoft ForefrontClient SecurityClientAntimalware directory on systems other than Windows Vista. In Windows Vista the Definition Updates Folder is located in the C:ProgramData MicrosoftMicrosoft ForefrontClient SecurityClientAntimalware. Within the Definition Updates folder are four subdirectories. One folder’s name is an actual GUID, which will differ from machine to machine. The other folders are Backup, Default, and Updates. The updates are downloaded in the Updates directory just until they are installed, then those updated files will no longer appear in this directory. They will appear in the folder that has a GUID as the name.
Note
Keep in mind that in Windows Vista the C:Users folder replaces the C:Documents and Settings folder from previous versions of Windows in holding each user’s profile.
The subdirectory with the GUID holds the definition updates that are in use. The files are base and delta definition files. The files you will see in this folder are:
Mpengine.dll: Malware scanning engine
Mpasbase.vdm: Anti-spyware base definition file
Mpasdlta.vdm: Anti-spyware delta definition file
Mpavbase.vdm: Anti-virus base definition file
Mpavdlta.vdm: Anti-virus delta definition file
Definitions that are currently loaded reside here.
The backup folder holds a previous version of the files that were stored in the GUID directory and are used in case a rollback is necessary. If any of the base of delta files doesn’t install correctly then FCS is able to perform a rollback, pulling the previous version from the backup folder, bringing it to its previous stable state.
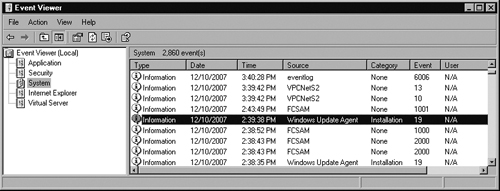
Since the days of NT, the first place to look for problems is Event Viewer. For FCS, events are logged in the System Log, which regardless of the client OS the path to Event Viewer should be about the same. For Windows Vista for example, you can click the Start button | Control Panel | Administrative Tools and click Event Viewer; the path is the same in Windows XP. Once Event Viewer is open, just click the icon to the left of where it says System. Here you can search any issues that may arise in FCS, plus you can verify that updates are being received, as you see in Figures 2.38 and 2.39 for Windows XP, and in Figures 2.40 and 2.41 for Windows Vista, by looking for Event 19s.


Note
Event Viewer in Windows Vista presents a newer interface with more event logs and better detailed events. It provides a summary of Administrative events such as how many errors have been received in the last hour, 24 hours, 7 days, and total to name a few. You can also examine errors or events in more detail and in different views such as an XML view or a ‘Friendly’ view. The first place to troubleshoot problems has improved dramatically in Windows Vista.
Depending on your situation and issues you need to troubleshoot, starting in Event Viewer and working your way down is usually the best way to go.
Microsoft Forefront Client Security (FCS) provides unified malware protection for desktops, laptops, and servers. It is a central management solution providing critical visibility and reporting capabilities to administrators. FCS includes server roles and components, plus client agents. There are four server roles in an FCS solution. They include a management server, a collection server, a reporting server, and a distribution server. FCS supports topologies of one to six servers in any given solution.
There are software prerequisites that are required in any FCS solution. Software and services such as SQL Server 2005 with SP1, SQL Server Reporting Services, IIS 6.0 or later, WSUS (if it is the distribution server), ASP.NET, and Windows Server 2003 SP1 or R2 to name a few. The client agent runs on Windows 2000, Windows XP, Windows Server 2003, Windows Vista, and x64 bit clients.
Policies can be deployed with settings for scheduled scanning, quick scan intervals, client options, alert level settings, and even SpyNet reporting participation. Policies can be deployed to OUs, Active Directory security groups, GPOs, and even .reg files.
The client software agent can be installed via scripting, automated installation tools, or manually. The agent has the same look and feel of Defender. With the appropriate rights a user can check for updates, conduct local scans, examine any actions that have been applied via the History button, and even view quarantined items. Troubleshooting in FCS typically begins by examining what functionality is working and what is missing, then examining the system log in Event Viewer and if necessary verifying all services are running as expected.
FCS is more than a product; it is a solution that takes advantage of the products and infrastructure that Microsoft has been perfecting for years.
| Microsoft Forefront Client Security (FCS) provides centralized unified malware protection for desktops, laptops, and servers. |
| FCS consists of Unified Protection, Simplified Administration, and Critical Visibility and Control. |
| FCS protects Windows 2000, Windows XP, Windows Server 2003, and Windows Vista. X64 bit is supported for the client agent. |
| FCS supports one to six server topologies. |
| Four server roles in FCS: Management Server, Collection Server, Reporting Server, and Distribution Server. |
| FCS leverages technologies from Microsoft Operations Manager (MOM) and WSUS or SMS. |
| Requirements for FCS are Windows Server 2003 SP2 (R2 also supported), SQL Server 2005 SP2 (Standard or Enterprise), SQL Server Reporting Services, .NET 2.0 Framework, IIS 6.0 or above, ASP.NET, FrontPage Server Extensions, GMPC SP1, WSUS, or SMS. |
| Administrators can centrally deploy policies using Microsoft Forefront Security Console. |
| Policies can be deployed to OUs, Active Directory Security Groups, GPOs, and .reg files. |
| FCS Kernel Mode Minifilter performs real-time scanning of files and programs before they ever run. |
| Verifying FCS functionality by examining the services that are running are correct, reading logs, and viewing alerts are additional ways of checking the health of FCS. |
| Definition Updates are held in the GUID named folder under the Definition Update folder on each client. |
| The system log in Event Viewer is the best place to start when troubleshooting issues with FCS. |