
Chapter 14: Analyzing and Investigating Sign-in Logs and Elevated Risk Users
The previous chapter covered planning and implementing our privileged access for administrator accounts and managing them with access reviews. This included the benefits of using privileged identity management and how to audit these privileged assignments. In this chapter, we will discuss how to analyze, review, and investigate our logs and events for protecting against risky sign-ins and elevated risk users.
We're going to cover the following main topics:
- Analyzing and investigating sign-in logs to troubleshoot access issues
- Reviewing and monitoring Azure AD audit logs
- Analyzing Azure Active Directory workbooks and reporting
Technical requirements
In this chapter, we will continue to explore configuring a tenant for Microsoft 365 and Azure. There will be exercises that will require access to Azure Active Directory. If you have not yet created the trial licenses for Microsoft 365, please follow the directions provided within Chapter 1, Preparing for Your Microsoft Exam.
Analyzing and investigating sign-in logs to troubleshoot access issues
In Chapter 9, Planning, Implementing, and Administering Conditional Access and Azure Identity Protection, we discussed how user and sign-in risk can be used as a condition for access and authorization to applications. Azure Identity Protection utilizes the activity logs to determine potential threats, vulnerabilities, and anomalous behavior among users. Sign-in logs are based on two types of reporting: activity and security.
Activity reporting within Microsoft shows what is taking place within the infrastructure. The various activities include the following:
- Sign-ins, which is the usage information of managed applications and user sign-in activities within Azure AD or a hybrid identity architecture.
- Audit logs that provide system activity for users and groups, managed applications, and directory activities.
- Provisioning logs enable customers to monitor activity that pertains to the provisioning service for enterprise and cloud applications. For example, if someone created a group in Salesforce or imported a user into ServiceNow.
Security reporting pertains to the identity protection activity within Azure AD. These include the risky sign-ins and user risks that are logged:
- Risky sign-ins indicate that a sign-in attempt might not have been made by the legitimate owner of the account. This is generally found through an anonymous IP address being used or an impossible travel event, where the legitimate user has signed in from a known IP address and another sign-in attempt takes place moments later from a location that is hours away.
- Users flagged as risky users are an indicator that the user's account has potentially been compromised. This activity can determine potential brute force attacks on a user account.
Activity and security report data can be accessed by the following Azure AD roles: Security Administrator, Security Reader, Global Reader, and Report Reader. Users that only require the ability to view these reports should be assigned the reader roles. Security Administrator allows a user to create and respond to alerts and configure reports for others to view. The Global Administrator role also has full access to these reports, but it is not recommended to assign someone that only requires access to these reports with this role when adhering to the principles of least privilege.
The ability to access sign-in activity is available with all Azure AD licenses. However, if you require the capabilities of Azure Identity Protection, such as sign-in risk and user risk detection, you will require the Azure AD Premium P2 license.
In the following steps, you will see how to access these reports to monitor sign-in activity and determine any sign-in patterns that may signify a potential threat:
- Go to portal.azure.com and select Azure Active Directory:

Figure 14.1 – Navigate to Azure Active Directory
- On the Azure Active Directory menu, scroll down to Monitoring and select Sign-ins logs to open and view the sign-ins report. Reports may not be available if you have created your Azure AD tenant within the past 2 hours. The sign-in reports display sign-ins where a user manually enters a username and password, also known as interactive sign-ins. These reports do not display service-to-service authentication or non-interactive sign-ins:
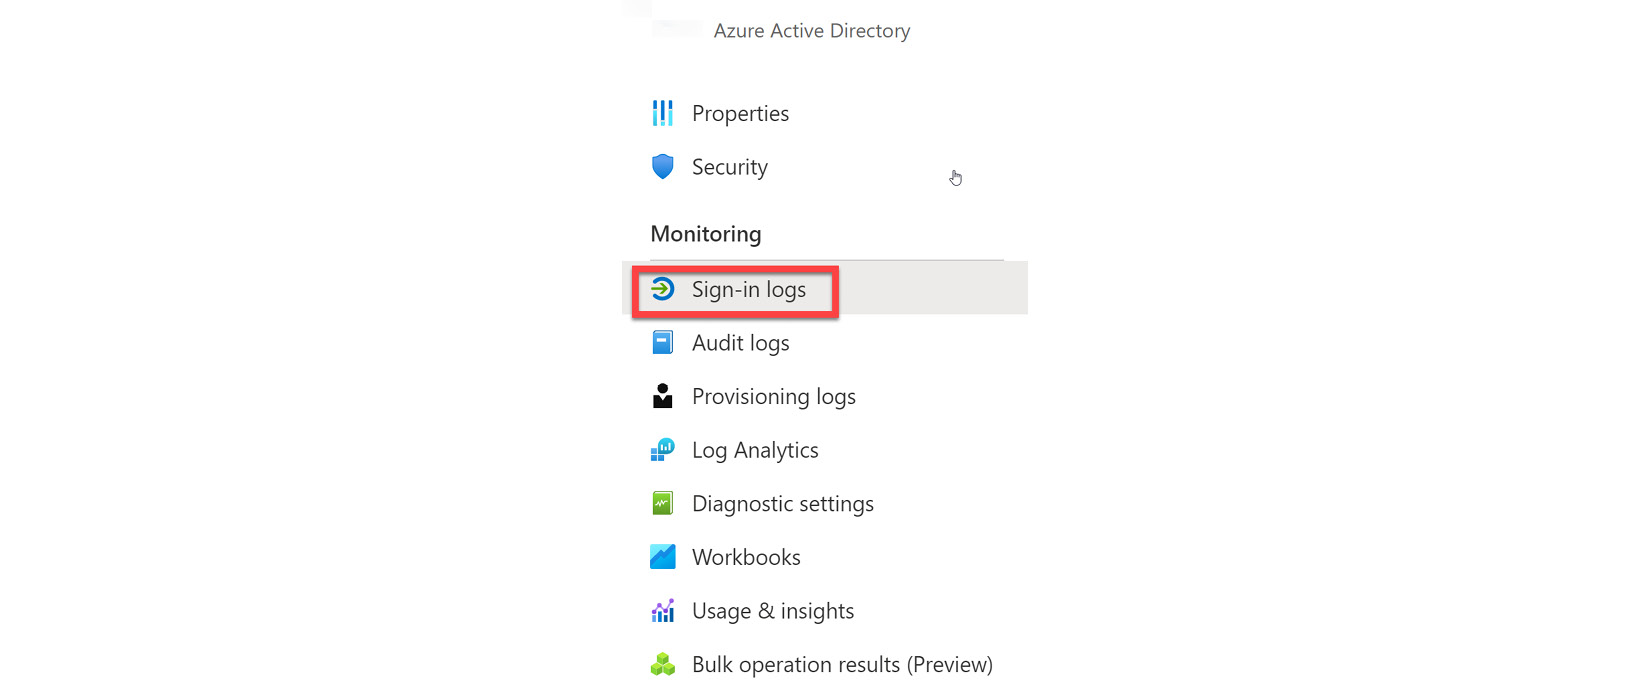
Figure 14.2 – Sign-in logs under Monitoring
- On the Sign-in logs report tile, there is a default list of headings in the view that includes the sign-in date, user, application, sign-in status, the status of any risk or failure, and the status of multi-factor authentication:
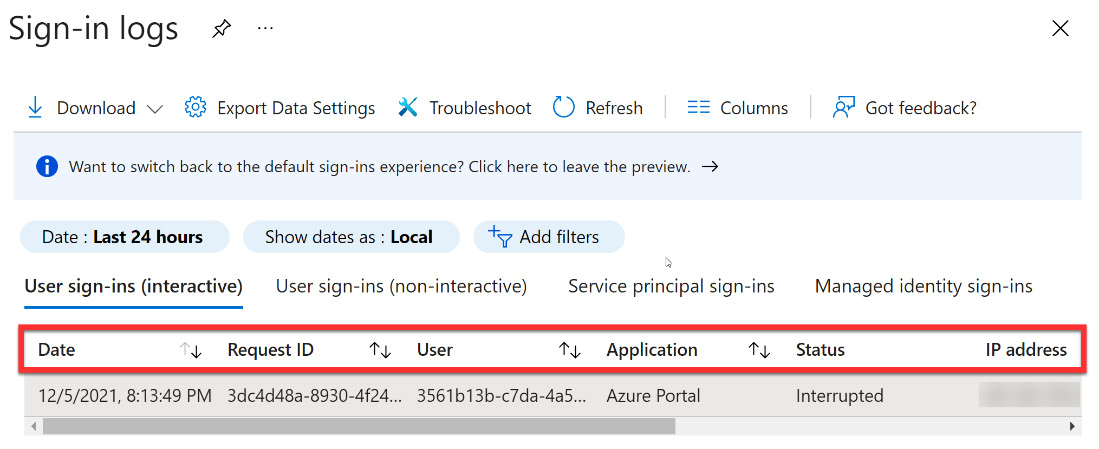
Figure 14.3 – Log headings

Figure 14.4 – Customize the columns
- Figure 14.5 shows some of the additional columns that you can add or remove for the report view:

Figure 14.5 – Additional columns to add
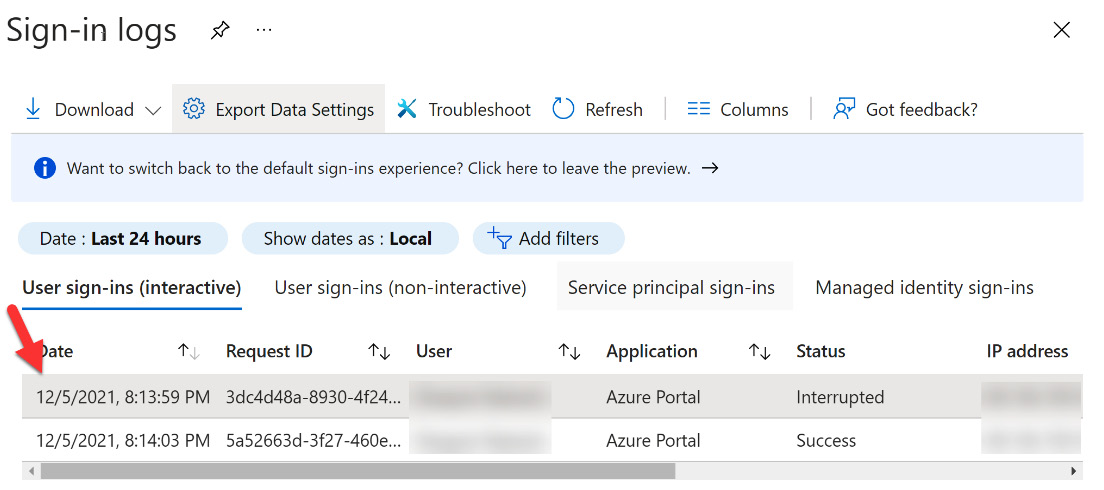
Figure 14.6 – Select a row to review details
- The detailed view provides additional filtering tabs that can be used to review additional information, including location, device, authentication details, conditional access, and additional details that might be helpful in troubleshooting. For this exercise, select and review tabs, such as the Basic info or Conditional Access tab and review the information that is provided. The Basic info tab is shown in Figure 14.7:

Figure 14.7 – Activity details for sign-in
- In the Basic info tab, note that Client app presents the method that was used to connect to the tenant. This information can be used to identify whether an application that supports modern authentication was used to sign in:

Figure 14.8 – Sign-in activity client app
- These activities can be downloaded into a .csv or .json file from within the tile by selecting Download. When downloading the sign-in activity, a message will provide information on the maximum number of records that can be downloaded. This number is a constraint set by the Azure AD report retention policies:

Figure 14.9 – Download sign-in logs
- In addition to filtering and downloading sign-in activity data, Azure AD and the Azure portal provide data shortcuts to review and investigate additional points of sign-in data. These shortcuts provide graphical representations of sign-in activity and can be found in the following locations within the portal interface:
- The identity security protection overview within the Azure AD portal.
- The Azure AD Users overview provides user sign-in data.
- The Azure AD Groups overview provides group sign-in data.
- The Azure AD Identity Protection overview provides potential risky sign-in data.
- The Enterprise Applications overview provides sign-in activity for registered enterprise applications.
Sign-in activity log data has a default retention period of 30 days, and the graph shows activity for those 30 days. Within the sign-in activity graphs, you have the capability to select a specific day and review the data for that day. Additional information about data retention can be found at this link: https://docs.microsoft.com/azure/active-directory/reports-monitoring/reference-reports-data-retention. PowerShell commands to view these logs are also available at this link: https://docs.microsoft.com/en-us/powershell/module/azuread/get-azureadauditdirectorylogs?view=azureadps-2.0-preview.
The sign-in activity data shows the following information:
- The user that has signed in
- The application that the user was targeting to sign in to
- The status of the sign-in to that application
- Whether MFA was enforced as part of the sign-in
Figure 14.10 shows these options:

Figure 14.10 – Authentication details
When you select one of the options, you can view the details of the user ID, user, username, application ID, application, client, location, IP address, date, MFA required, and sign-in status. On the user's page, the complete overview of all user sign-ins can be accessed by selecting the sign-ins within the Activity section.
The IP address does not provide a definitive connection between the IP address and the physical location of the device used to sign in. IP address mapping can be complicated by mobile provider information and VPN connections that are not necessarily the physical IP address of the device. Azure AD reports provide a best-effort conversion of an IP address to a physical location based on traces, registry data, reverse lookups, and other information.
If you want to gain insights into the usage of managed applications, there is an application-centric view of the sign-in data that provides the following:
- The users that are accessing the applications.
- A list of the top three applications used within the company.
- Information on how new applications are doing based on sign-in activity. This data can be viewed within the top three application data.
The Enterprise applications overview provides an entry point to access the data for application usage graphs for the past 30 days. Figure 14.11 shows Enterprise applications in the Azure Active Directory menu:

Figure 14.11 – Enterprise applications
Select a day on the graph to get detailed information on sign-in activities, as shown in Figure 14.12:
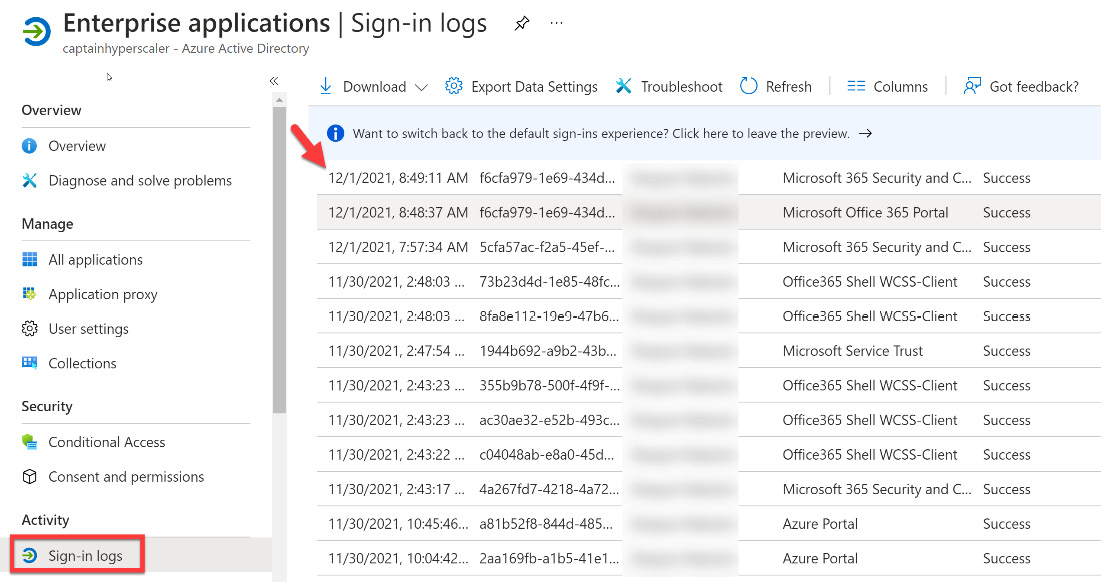
Figure 14.12 – Enterprise applications Sign-in logs
The sign-in activity for that day gives you an overview of the sign-in events for your enterprise applications.
Now that you have an understanding of sign-in logs and the information that they provide, in the next section, we will discuss how to review and monitor Azure AD audit logs.
Reviewing and monitoring Azure AD audit logs
In the previous section, we discussed sign-in logs and the information that they provide in terms of user and application sign-in activity. This section will discuss Azure AD audit logs and the information that they provide for reviewing and monitoring compliance.
Azure AD reports provide information that you will need to monitor and determine what is taking place within your environment and how it is doing. Azure AD audit logs provide information and records that pertain to activities for compliance.
The following steps cover how to access the audit reports and review the information:
- Within portal.azure.com, navigate to Azure Active Directory and select Audit logs under the Monitoring section of the menu:

Figure 14.13 – Audit logs
- View the default view that lists the following information: the data and time of the occurrence, the service that logged the occurrence, the category and name of the activity, the status of the activity (Success or Failure), the target, and the initiator/actor of the activity. This view is shown in Figure 14.14:
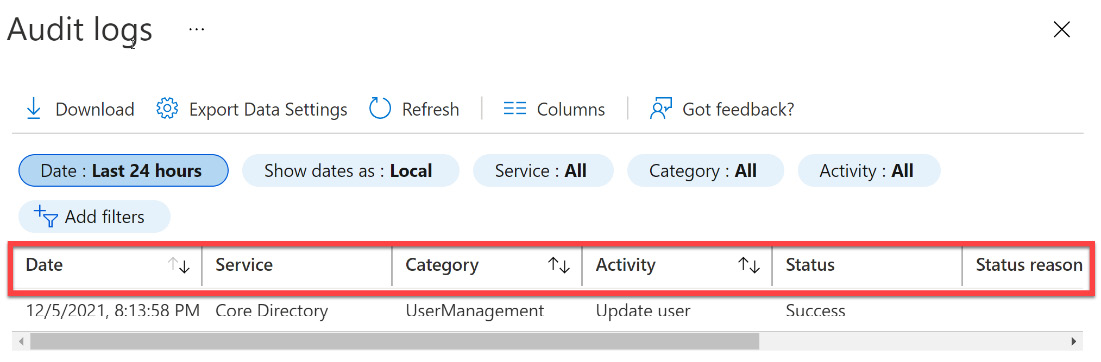
Figure 14.14 – Audit log columns
- The audit logs can be filtered by the fields Service, Category, Activity, Status, Target, Initiated by, and date range, as shown in Figure 14.15:
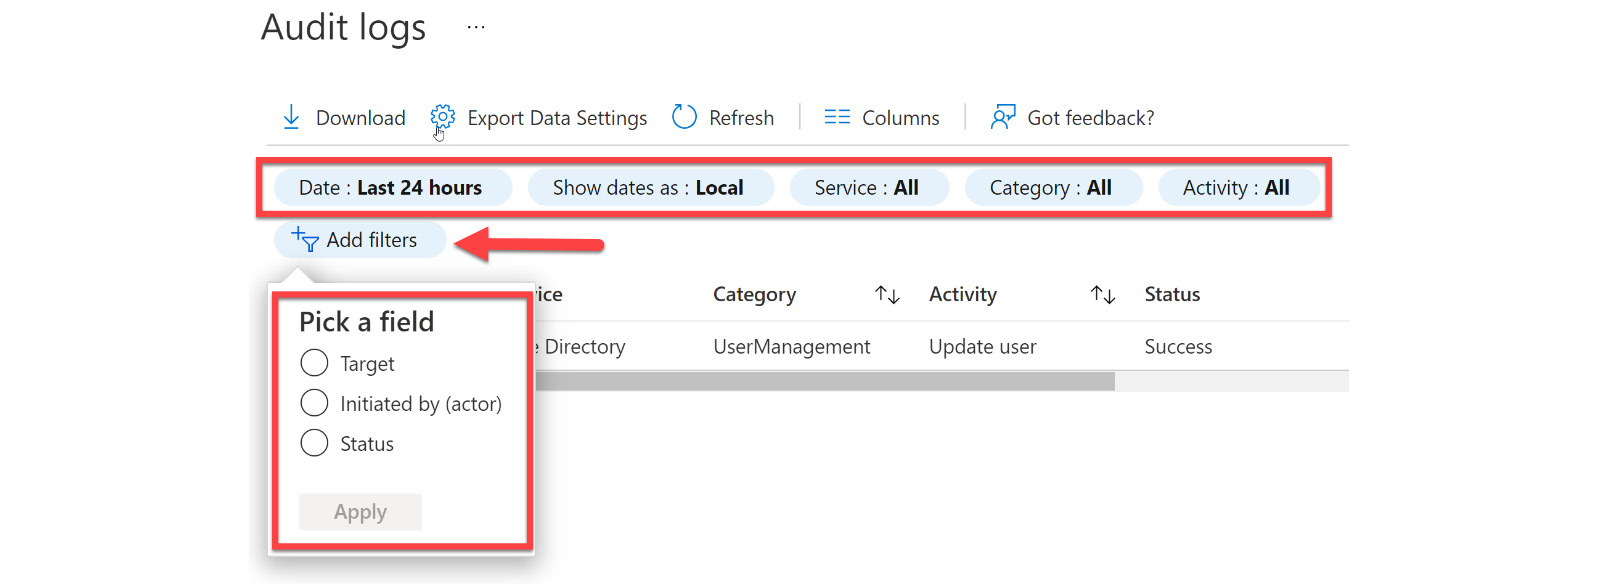
Figure 14.15 – Filter settings and additional filters
- When selecting the Service filter, you have an additional list of selections that includes all services: AAD Management UX, Access Reviews, Account Provisioning, Application Proxy, Authentication Methods, Azure AD Recommendations, B2C, Conditional Access, Core Directory, Entitlement Management, Hybrid Authentication, Identity Protection Invited Users, MIM Service, MyApps, PIM, Self-service Group Management, Self-service group Management, Self-service Password Management, and Terms of use. This list allows you to review, monitor, and remediate potential compliance issues within your environment. Part of this list is shown in Figure 14.16:
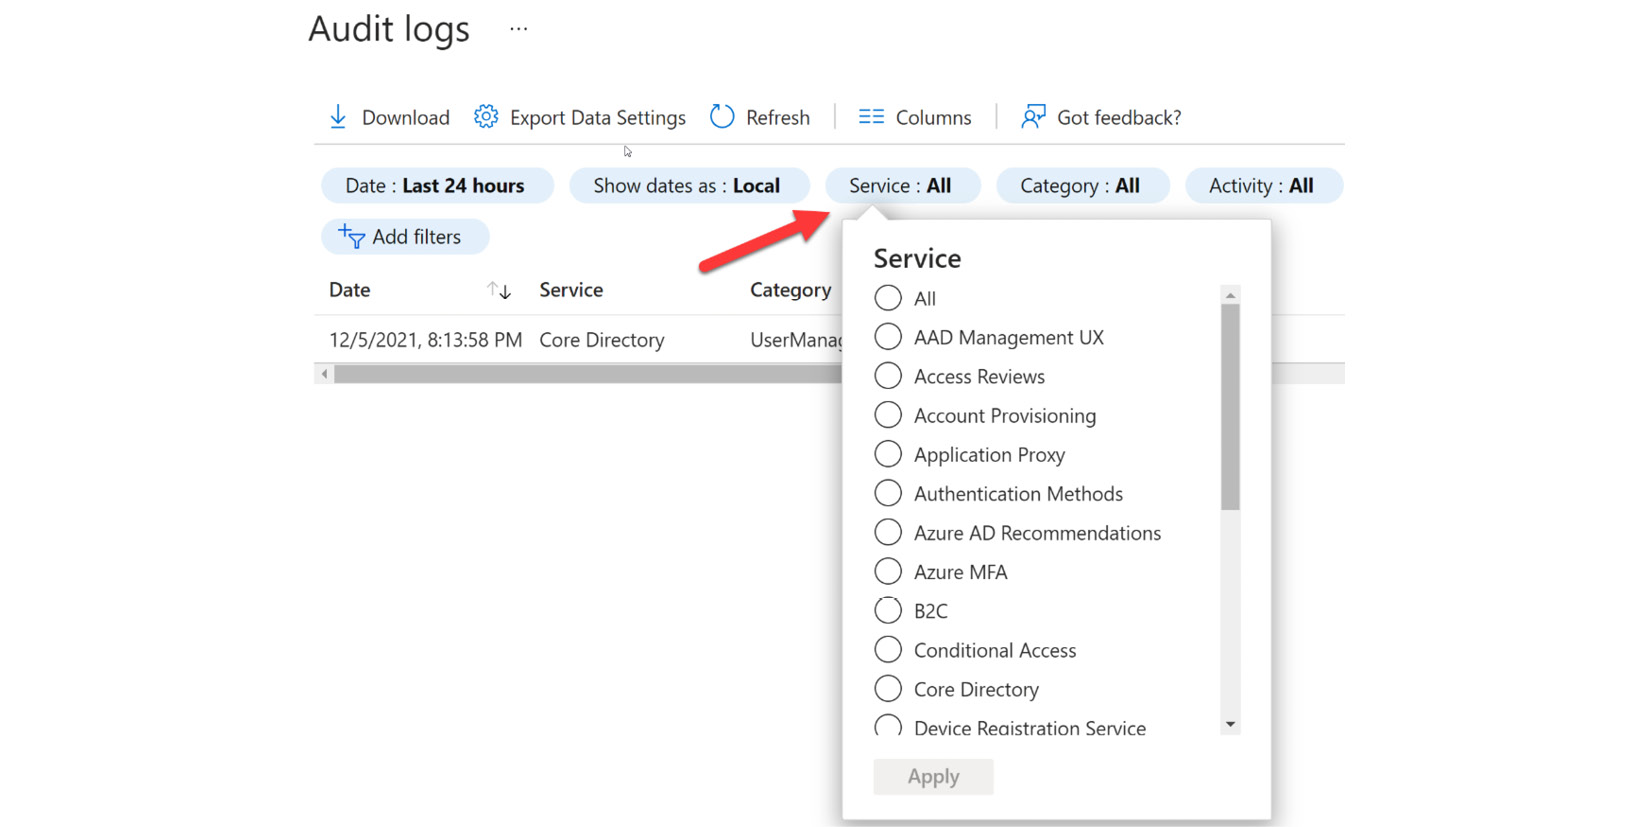
Figure 14.16 – Service filters
- The category filter allows you to filter additional information that pertains to authentication and authorization categories, such as AdministrativeUnit, ApplicationManagement, Authentication, Authorization, Contact, Device, DeviceConfiguration, DirectoryManagement, EntitlementManagement, GroupManagements, KerberosDomain, KeyManagement, Label, PermissionGrantPolicy, Policy, ResourceManagement, RoleManagement, UserManagement, Other, or All selected. This is shown in Figure 14.17:
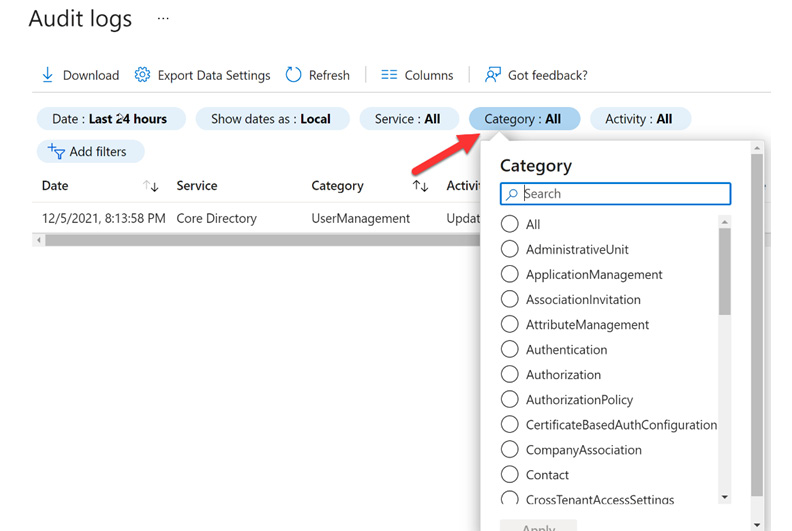
Figure 14.17 – Category filters
- The activity filter provides information based on the category and activity filters that you selected in the previous steps. From this view, you can select a specific activity, or you can choose all activities. The following link provides the list of all audit activities. These audit activities can be viewed through the Graph API: https://graph.windows.net//activities/auditActivityTypesV2?api-version=beta.
Additional filters include the status filter, target filter, initiated by filter, and date range. These filters allow you to drill down into information based on different operations. The status filter can be set to all, success, or failure. The target filter searches a particular target name or User Principal Name (UPN). Initiated by defines the actor's name or UPN starts with identifier. The target name and initiated by filters are case-sensitive. The date range will filter data based on date windows of 7 days, 24 hours, or a custom range. A custom date timeframe allows you to configure a start time and end time.
The fully filtered audit report can be seen in Figure 14.18:

Figure 14.18 – Audit log with the custom date of the last 30 days
By selecting the Download button, filtered data can then be downloaded to a .csv or .json file for up to 250,000 records. The number of records is a constraint defined by Azure AD report retention policies.
The preceding steps explain how to access audit logs through Azure AD in the Azure portal. Audit data can also be accessed within the users and groups, and enterprise applications tiles.
To access audit logs within users and groups, navigate to one of these sections within Azure AD, as shown in Figure 14.19:

Figure 14.19 – Users Audit logs
These audit logs can be found under the Activity section of the Users tab, as shown in Figure 14.19. These audit logs provide information regarding the types of updates applied to users, users that were changed and how many, password changes and how many, administrator activity within the directory, groups that have been added, group membership changes, owner changes within groups, and licenses assigned to groups or users. User information can be found within UserManagement and group information is in the GroupManagement category.
The final audit logs to discuss are the Enterprise applications audit logs. These application-based audit reports provide you with updates and additions to applications, removed applications, changes in application service principals, application name changes, and consent given to an application and by who. Access to review this data can be found in the filtered view under Audit logs, which is found in the Activity section of the Enterprise applications tile, as shown in Figure 14.20:
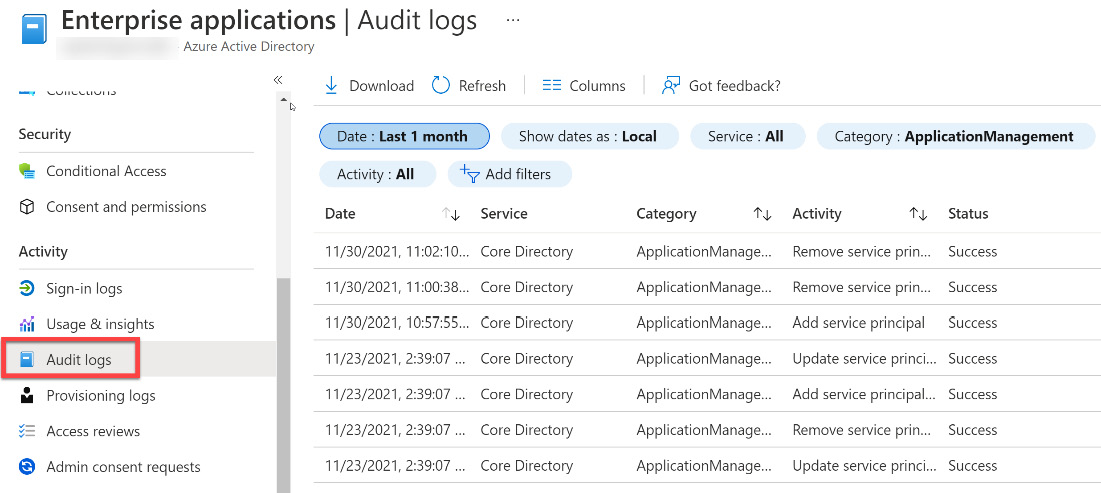
Figure 14.20 – Enterprise applications Audit logs
Selecting an application type provides the entry point to a preselected enterprise application and the targets of the application, as shown in Figure 14.21:
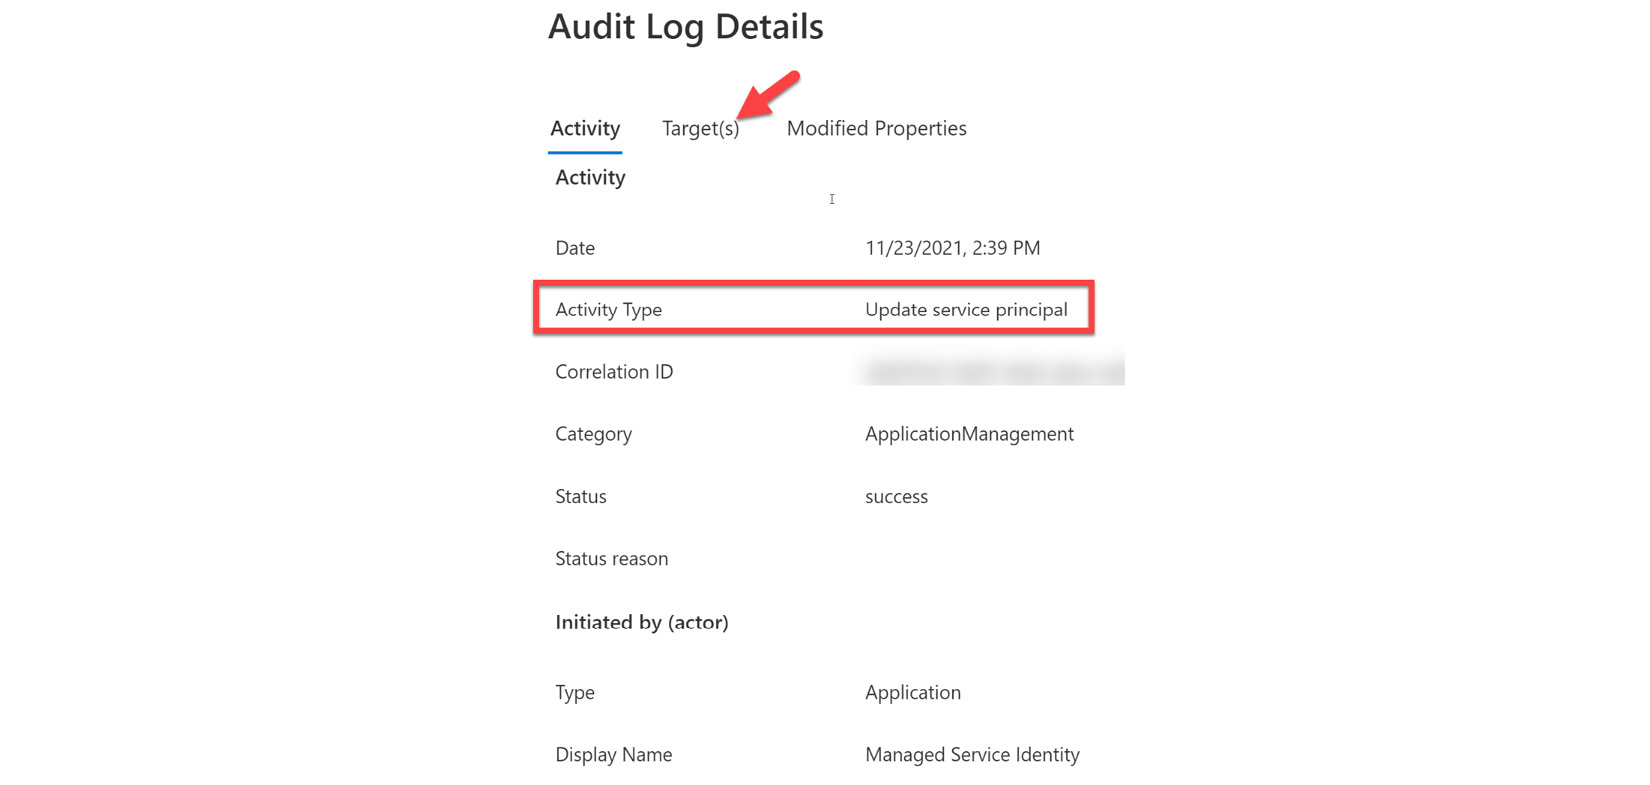
Figure 14.21 – Application audit log details
You now know how to access the audit logs to review and monitor identity and access compliance within Azure AD. In the next section, we will learn how to analyze Azure AD workbooks and provide additional reports from these workbooks.
Analyzing Azure Active Directory workbooks and reporting
The previous section explained how to access the different audit reports within Azure AD to review and monitor compliance. Activity logs and audit logs provide reports for our usage and compliance within Azure AD for users, groups, and applications. In addition to these reports, usage and insights reports can provide additional application-centric views into sign-in data.
The information within usage and insights can provide information such as the following:
- The most used applications within the company
- Applications that have the most failed sign-ins
- The top sign-in errors for each of your applications
The licensing within your tenant to access usage and data reports required is either an Azure AD Premium P1 or P2 license. Users are required to have the role of Security Administrator, Security Reader, Report Reader, or Global Administrator. As stated throughout this book, you should adhere to the principles of least privilege by only assigning the minimum level of access needed by the user. The Global Administrator role should be the last role that is considered if the user only requires access to Azure AD usage and insights. Individual users with an Azure AD Premium P1 or P2 license assigned and not one of the prior mentioned roles do have access to their own sign-in usage and insights.
The following steps are used to access usage and insights reports:
- From within the Azure portal, navigate to Azure Active Directory and select Enterprise applications from the menu:

Figure 14.22 – Enterprise applications in Azure AD

Figure 14.23 – Enterprise applications Usage & insights
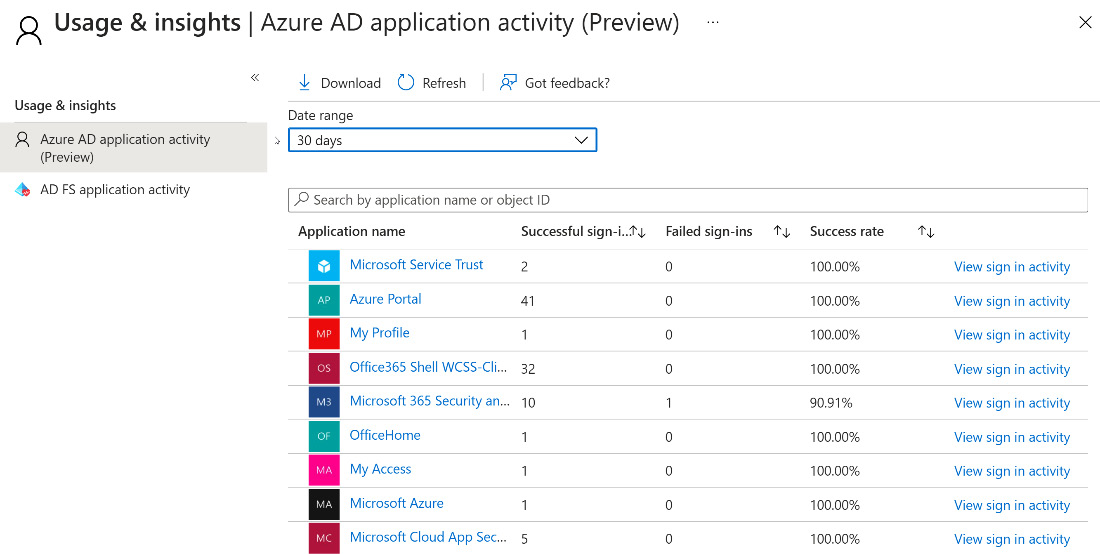
Figure 14.24 – Azure AD application activity
- The columns within the report can be used to sort the report based on successful sign-ins, failed sign-ins, and the success rate:
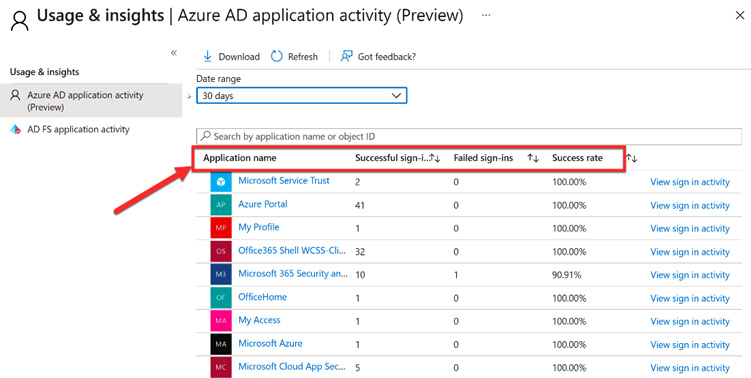
Figure 14.25 – Application activity columns
- The report can be focused on dates, up to 30 days, or specific applications. Select Azure Portal from the list:

Figure 14.26 – Azure portal sign-in activity
- On the graph, you can select a specific day for the detailed list of sign-in activities for an application:

Figure 14.27 – Select today's date in the graph
- Figure 14.28 shows the details for a selected date:
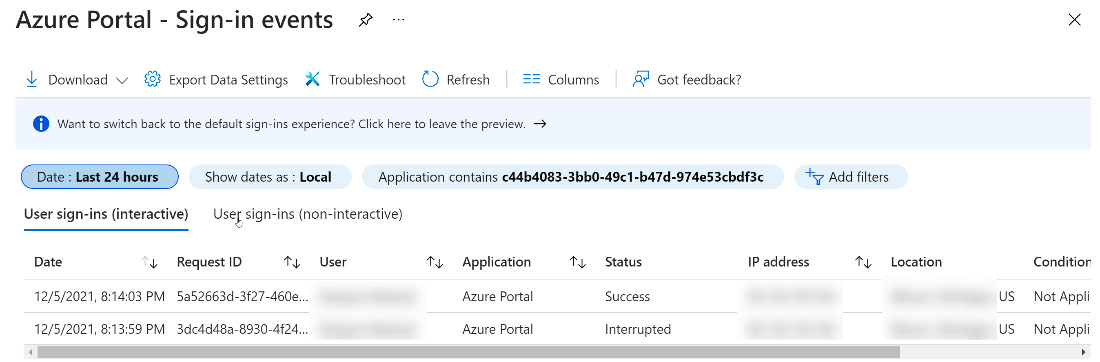
Figure 14.28 – Azure portal event list
After you have set up and are able to view the usage and insights, you may want to configure notifications and alerts regarding issues on the Azure Active Directory Domain Services (Azure AD DS) domain. Within the monitoring of Azure is the ability to monitor the health status of Azure AD DS. From this health status, email notifications can be configured to report on health alerts as soon as an issue is detected on the domain. The notifications specify in the email the managed domain that has the alert, the time that the issue was detected, and a link to the health page in the Azure portal. You can then troubleshoot within the portal based on the advice provided to resolve the issue.
Before selecting any links within an email, be sure that the email has been sent by Microsoft by verifying the sender's address. These notifications will come from the [email protected] address.
Azure AD DS notifications are sent for important updates within the domain that are urgent issues that impact the service within the domain and that should be addressed immediately. These alerts are also located within the Azure portal on the Azure AD DS health page. Open alerts that are left unresolved will be resent every 4 days. Additional information on service health alerts for Azure AD DS can be found at this link: https://docs.microsoft.com/azure/active-directory-domain-services/check-health. Information on how to use the alerts to troubleshoot can be found at this link: https://docs.microsoft.com/azure/active-directory-domain-services/troubleshoot-alerts.
Email notifications should be sent to a list of administrators that should be responding to alerts and issues. There is a limit of five email recipients for these notifications. A distribution group can be created to send to additional recipients.
The following steps show how to configure email notification recipients. There is a cost to creating Azure AD Domain Services. You can go through these steps to create them, or you can simply read these steps for understanding and reference at a later date. This is not a major component of the exam:
- Within the Azure portal, search and navigate to Azure AD Domain Services:

Figure 14.29 – Search for Azure AD Domain Services
- Select your managed domain or create a managed domain, if you have not already. Create a managed domain named aaddsdomain.com:

Figure 14.30 – Create an Azure AD Domain Service
- On the left menu of the Azure AD Domain Services tile, select Notification settings.
- Select Add email recipient and enter the email address.
- Select Save to save the changes. Any changes that are made in the notification settings affect the entire managed domain, not just you as the user.
You now understand how to configure an Azure AD DS domain and configure notifications. Next, we will provide a summary of what was discussed in this chapter.
Summary
In this chapter, we covered how to analyze and investigate sign-in logs and elevated risk users within Azure AD. This included sign-in logs and audit logs, and how to configure and filter reports for these logs. We looked at how to review usage and insights workbooks for activity. We also reviewed how to monitor, troubleshoot, and configure alert notifications for Azure AD Domain Services managed domains.
In the next chapter we will learn how to enable and integrate Azure AD Logs with SIEM Solutions.