
Chapter 3: Implementing and Configuring Azure Active Directory
Now that you understand identity and access management and how it has evolved with the use and adoption of cloud technologies, this chapter will focus on how to implement Microsoft's cloud identity service, Azure Active Directory (AAD). This chapter will explain the base levels of implementing and configuring the tenant, domain, users, and devices. Later chapters will go deeper into some of these topics.
In this chapter, we're going to cover the following main topics:
- Configuring and managing AAD roles
- Configuring and managing custom domains
- Configuring and managing device registration options
- Configuring tenant-wide settings
Technical requirements
In this chapter, we will begin to explore configuring a tenant for the use of Microsoft 365 and AAD. There will be exercises that will require access to AAD If you have not yet created the trial licenses for Microsoft 365, please follow the directions provided within Chapter 1, Preparing for Your Microsoft Exam.
Configuring and managing AAD roles
This section will get us started with the various roles that are required to complete configuration tasks and manage the Azure Active Directory tenant. Azure Active Directory is the cloud identity service within Microsoft that handles all user, device, and service identity and access management for Microsoft 365, Azure, Dynamics 365, and Power Platform. When you create an account or tenant within Microsoft, you are creating an Azure Active Directory account. This section will focus on the planning, configuring, and managing of various role assignments that are required to support the Azure Active Directory tenant.
Azure Active Directory tenant
When signing up for services within Microsoft 365 and/or Azure, you are required to create a unique tenant. The tenant serves as your company identity within Azure Active Directory. It is important to note that when you sign up and create the name of your tenant, this name cannot be changed. After the name of the tenant has been selected, Azure Active Directory provides a domain name that includes that tenant. This domain name will be tenantname.onmicrosoft.com. This is a fully qualified domain name (FQDN) that can be used externally for email and website addresses.
Most companies have their own registered FQDN that they would like to use, such as companyname.com. The process for configuring and registering these domain names in Azure Active Directory will be discussed later in this chapter. Until this custom domain has been verified within the Azure Active Directory tenant, users and resources will use tenantname.onmicrosoft.com as their domain identity. Now that we understand what makes up the tenant, let's discuss Azure Active Directory roles.
Azure Active Directory roles
In the previous chapter, the process of authentication and authorization was discussed within IAM. A key component of the authorization of a user, group, or resource is the role that is assigned. The IAM role defines what that identity is authorized to access and the level at which it can interact with resources within the scope of the role. Let's break down the components of a role within Azure Active Directory.
As previously stated, the role determines the level of authorization a user, group, or resource has within Azure Active Directory. When an employee is added to Azure Active Directory, by default, they are given the role of user if they are part of the company tenant or guest if they are invited from an external tenant. If that employee requires some level of management or administration within the tenant, then an additional role or roles may be required to authorize them to perform these tasks.
The following screenshot shows the list of built-in roles that are available within Azure Active Directory:

Figure 3.1 – List of built-in Azure AD roles
Within each built-in role, there is a pre-defined set of permissions, as shown in the following screenshot:
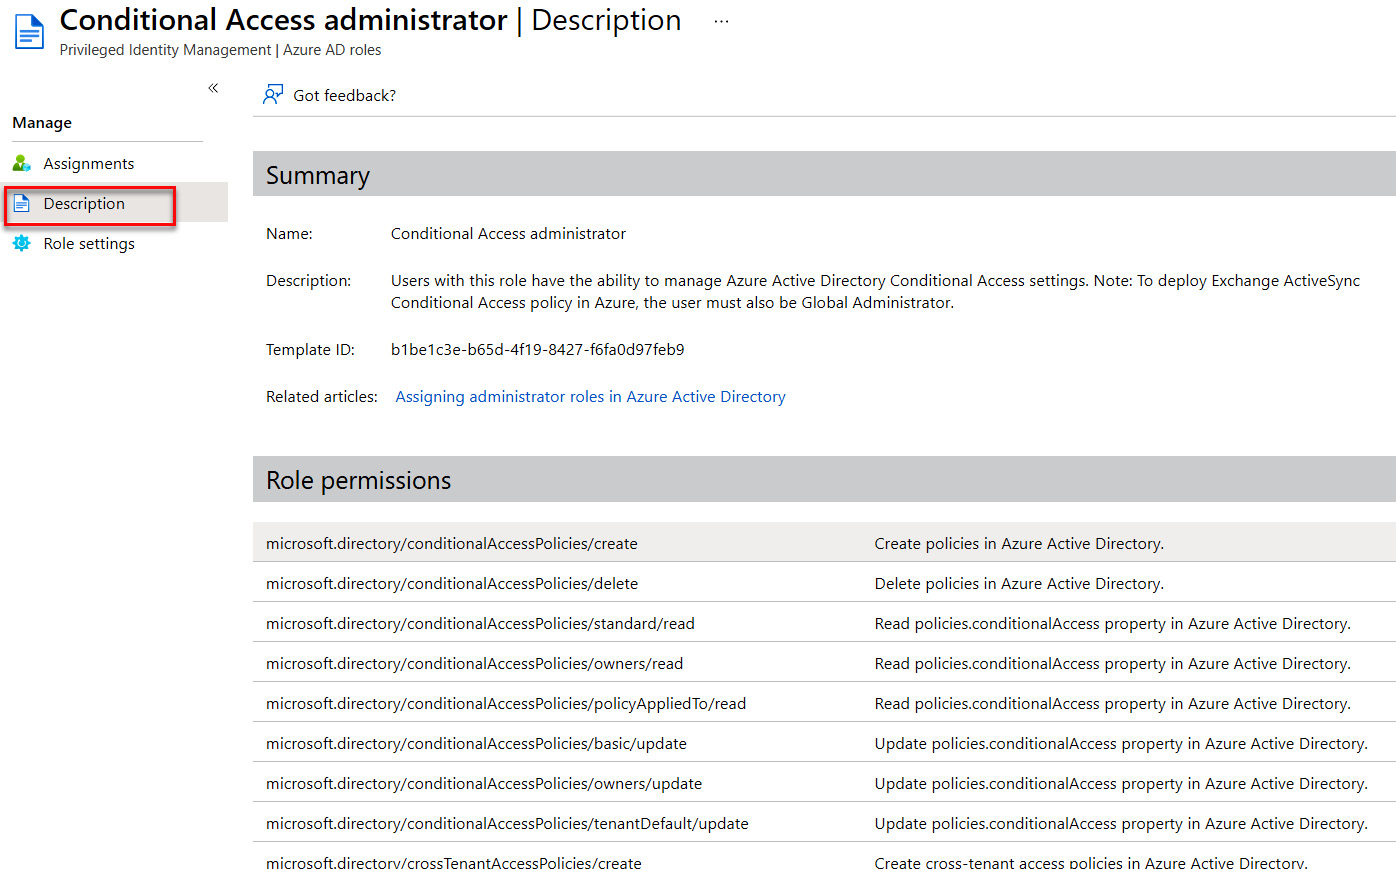
Figure 3.2 – Example of role permissions
A user, group, or resource may be assigned more than one built-in role as their access permissions within the tenant. If you require a more restrictive role than what is provided within the built-in roles, then you can create a custom role. For custom roles, as shown in Figure 3.3, the permissions are set based on the requirements that you, as the identity and access administrator, have determined are necessary:

Figure 3.3 – Permission settings for a custom role
When creating a custom role, it is important to understand the required tasks that a user, group, or resource needs to be able to execute. Knowing this information and planning the role assignments properly will decrease the number of potential support requests from users that cannot access resources that they need to complete daily tasks. The next section will provide some guidance for planning and assigning roles.
Planning and assigning roles
In the previous chapter, the principle of least privilege was discussed. When planning and assigning roles to users, groups, and resources, utilizing the principle of least privilege should be the baseline for determining permissions. The primary goal within our planning process is to limit the number of administrators in order to decrease the attack surface in the case of an identity breach. The identity and access administrator should identify those users, groups, and resources that require permanent administrator roles and verify this requirement with stakeholders. These requirements should be reviewed regularly to verify that they are still relevant. If certain users or groups only require administrative permissions on a temporary basis, then they should be assigned an administrator role on a just-in-time basis. The concept of just-in-time administrator roles will be discussed in Chapter 13, Planning and Implementing Privileged Access and Access Reviews.
Azure Active Directory roles are governed by the overall tenant in which they are assigned. If you have multiple subscriptions or domains within the tenant, the assigned Azure Active Directory roles will be inherited. Some of the more widely used roles include Global Administrator, Billing Administrator, Helpdesk Administrator, Security Administrator, Compliance Administrator, and User Administrator. The Global Administrator has full administrative control over the tenant. A best practice is that there is redundancy in this role assignment while also avoiding misuse of this role. The recommendation is that you have more than two but less than five Global Administrators within your tenant. Other users that require administrator-level access can be given more direct roles based on the principle of least privilege. To find out more about built-in roles and their capabilities, please review the Microsoft Docs page: https://docs.microsoft.com/en-us/azure/active-directory/roles/permissions-reference.
This page provides the full list of built-in roles within Azure Active Directory and includes a link for each of the roles to show the full set of permissions that role provides to the user. When planning and assigning roles, or preparing for the exam, it is important to understand where the common roles listed previously are required and what permissions they have for services.
For example, the Billing Administrator, User Administrator, and Helpdesk Administrator have similar capabilities when it comes to licenses, user management, and support tickets. However, only the Billing Administrator can add licenses to the tenant, and the User Administrator is the only role in this example that can create users and groups. Each of these roles can assign licenses to users and groups, review service health, and create a support ticket with Microsoft. When planning a role for a user or group, it is important to understand the differences and map the role assignment based on the tasks that user or group will be required to complete.
Note: Azure Active Directory and role-based access control (RBAC)
The scope of the Identity and Access Administrator exam focuses on roles and permissions within Azure Active Directory. However, as an identity and access administrator that works with Azure resources, you should be familiar with role-based access control, or RBAC. RBAC provides resource-level permissions that are assigned within the resources rather than at the Azure Active Directory level. The terminology changes from the use of Administrator to Owner, Contributor, and Reader. Azure Active Directory roles and RBAC will co-exist within the Microsoft cloud. If you have Azure resources, you will want to plan and determine whether to utilize Azure AD or RBAC for access and permission to subscriptions, resource groups, or individual resources. RBAC roles for managing IAM provide a resource-focused approach to IAM.
The importance of planning cannot be stressed enough when determining role assignments within your organization. As an identity and access administrator, meeting with stakeholders and managers to discuss the tasks required by users and groups within the company is the first step in building a tenant that provides a baseline of security and principle of least privilege, while also allowing users and groups to perform the tasks required to execute the job requirements.
When the planning is complete for user and group role assignments, you are ready to assign those roles. This can be completed through the Roles and administrators menu in Azure Active Directory, within the user account, by creating a group that is assigned a role or roles, and using the PowerShell command. Each of these options is provided in the following screenshots.
Figure 3.4 demonstrates assigning a role. You would assign a role to a user or users from the list of roles by selecting the role that you want to assign:
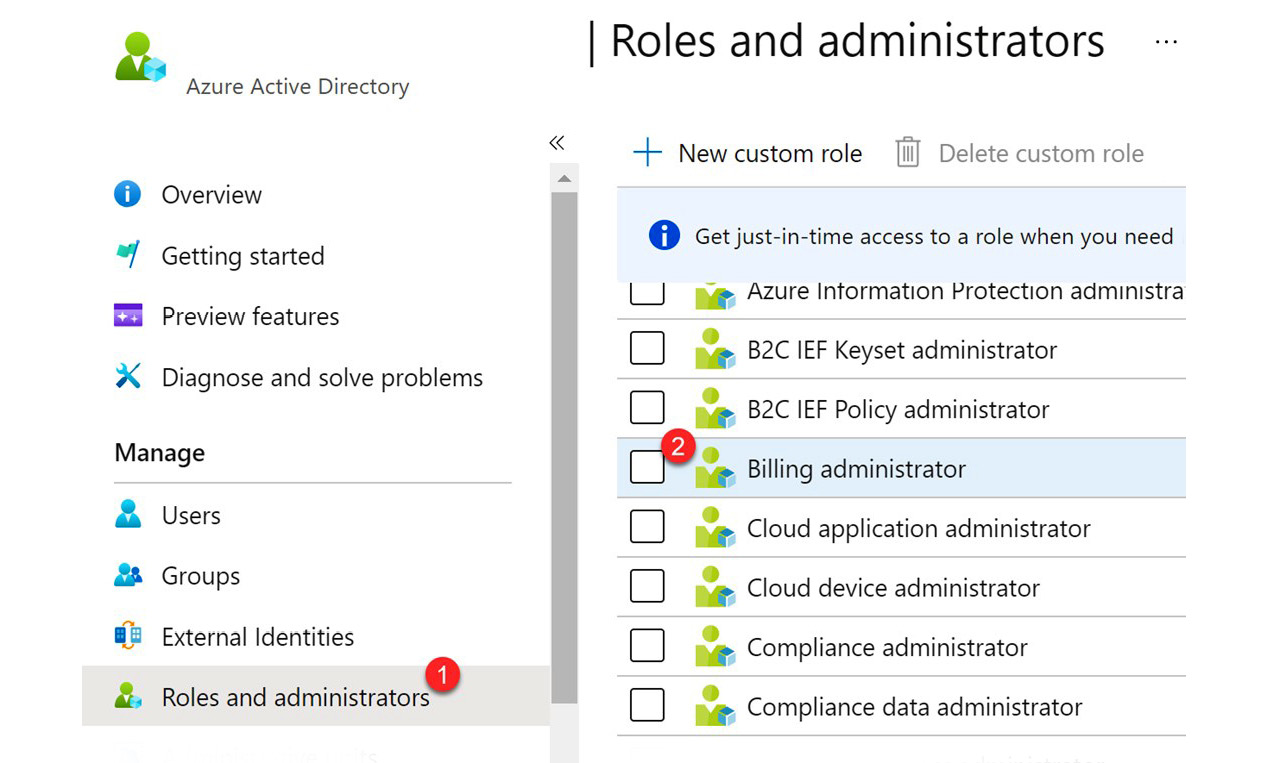
Figure 3.4 – Assigning a role
Next, you would select + Add assignments, as seen in the following screenshot:
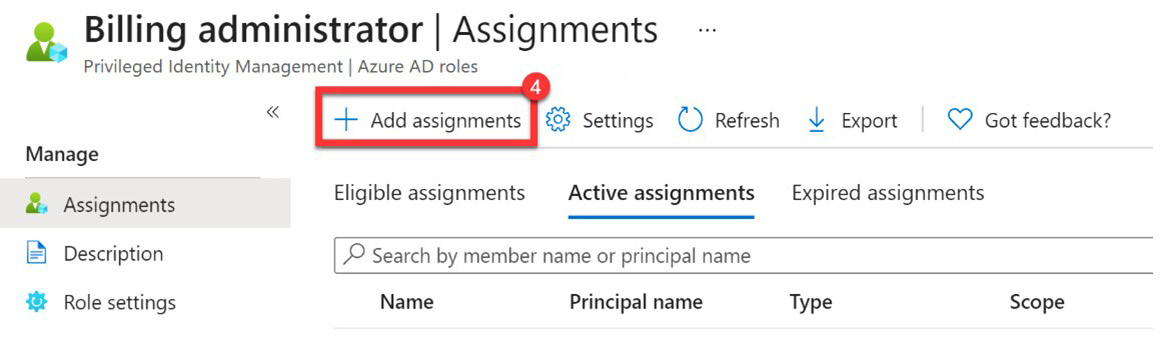
Figure 3.5 – Add assignment from the list of roles
Within the user information in Azure Active Directory, you can also assign a role to that user, as shown in the following screenshot:

Figure 3.6 – Add an assignment from a user account
If you require the role to be assigned to a group of users, then you can create a group with an Azure Active Directory assigned to that group: https://docs.microsoft.com/en-us/azure/active-directory/roles/groups-concept.
To complete this task, within Azure Active Directory, select Groups, as shown in the following screenshot:

Figure 3.7 – Manage groups in Azure AD
And then you can select + New group as seen here:

Figure 3.8 – Create a new group
In the tile to create a new group, move Azure AD roles can be assigned to the group to Yes, select No roles selected under Roles, select a role, save, and click Create. All of this is demonstrated here:

Figure 3.9 – Assign a role to the Azure AD group
In addition to the previous examples of assigning roles within the Azure Active Directory portal, roles can also be assigned using PowerShell with the following commands. These steps can also be found at this link: https://docs.microsoft.com/en-us/powershell/module/msonline/add-msolrolemember?view=azureadps-1:
- Open PowerShell and install the PowerShell module for Azure AD using the following:
Install-module MSOnline
- Connect to Azure with your username and password as follows:
Connect-MsolService
- Next, you will assign that role to a user using the following command:
Add-MsolRoleMember -RoleName "[Administrator role name]" -RoleMemberEmailAddress "[email address]"
Once you have established the permissions of users and groups within your tenant based on the tasks that they will need to execute within the tenant, you will want to have a custom domain, most likely for your tenant, that establishes your company brand. The next section will discuss how to configure, validate, and manage a custom domain.
Configuring and managing custom domains
We have planned and assigned our key administrator roles within our organization, now we should determine how we are going to brand our company. When creating a tenant subscription within Microsoft 365 or Azure, the domain that is registered is tenantname.onmicrosoft.com. This domain becomes a permanent part of the Azure Active Directory tenant and cannot be removed. The domain is public and can be used for sending and receiving emails, and for users to log in to Microsoft services. However, most companies prefer to have a more recognized naming convention for their company domain. To accomplish this, these custom domains must be registered and verified within Azure Active Directory.
Adding and verifying a custom domain to set as the primary domain
As was stated previously, when you create your Microsoft subscription, you create a name for your tenant that becomes your primary domain for your subscription. This uses onmicrosoft.com as the verified portion of the domain with the name of the tenant in front of it. For example, mycompany.onmicrosoft.com. Once this tenant is created, it cannot be changed. In order to utilize a more recognized branded domain, such as mycompany.com, you will have to go through some steps to verify that domain within Microsoft and with your domain registrar.
If you want this domain to be utilized publicly for email and websites, you must first purchase the domain from a domain registrar. The domain registrar is a broker for checking, validating, and certifying the use of a domain. Microsoft provides the option to buy a domain within the Microsoft 365 admin center, or you can utilize an external domain registrar, such as GoDaddy.com. Within the Microsoft 365 admin center menu, navigate to the Settings drop-down arrow, and then choose Domains. The following screenshot shows the Buy domain option within the Domains settings in the Microsoft 365 admin center:

Figure 3.10 – Buy a domain from Microsoft
When you buy your domain directly from Microsoft, this domain will be ready for use without any additional configuration required. The following steps will focus on configuration for an external domain registrar:
- If you are purchasing, or have purchased, a domain from an external domain registrar, within the same Domains settings tile, select + Add domain to add a domain that you own. The following screenshot shows this option in the tile:

Figure 3.11 – Add a domain that is currently owned
- From here, the wizard in the admin center will step you through the process of adding the custom domain. Once this custom domain has been added, this domain can be used as the default domain for the company and user email addresses. Next are the steps to complete this verification.
- Within the Microsoft 365 admin center menu, navigate to the Settings drop-down arrow and then choose Domains.
- From this tile, select + Add domain to add a domain that you own. Figure 3.11 illustrates this step.
- A step-by-step wizard will open. Follow the steps provided. The first of these steps is to enter the domain name that you want to verify and select Use this domain as shown in the following screenshot:
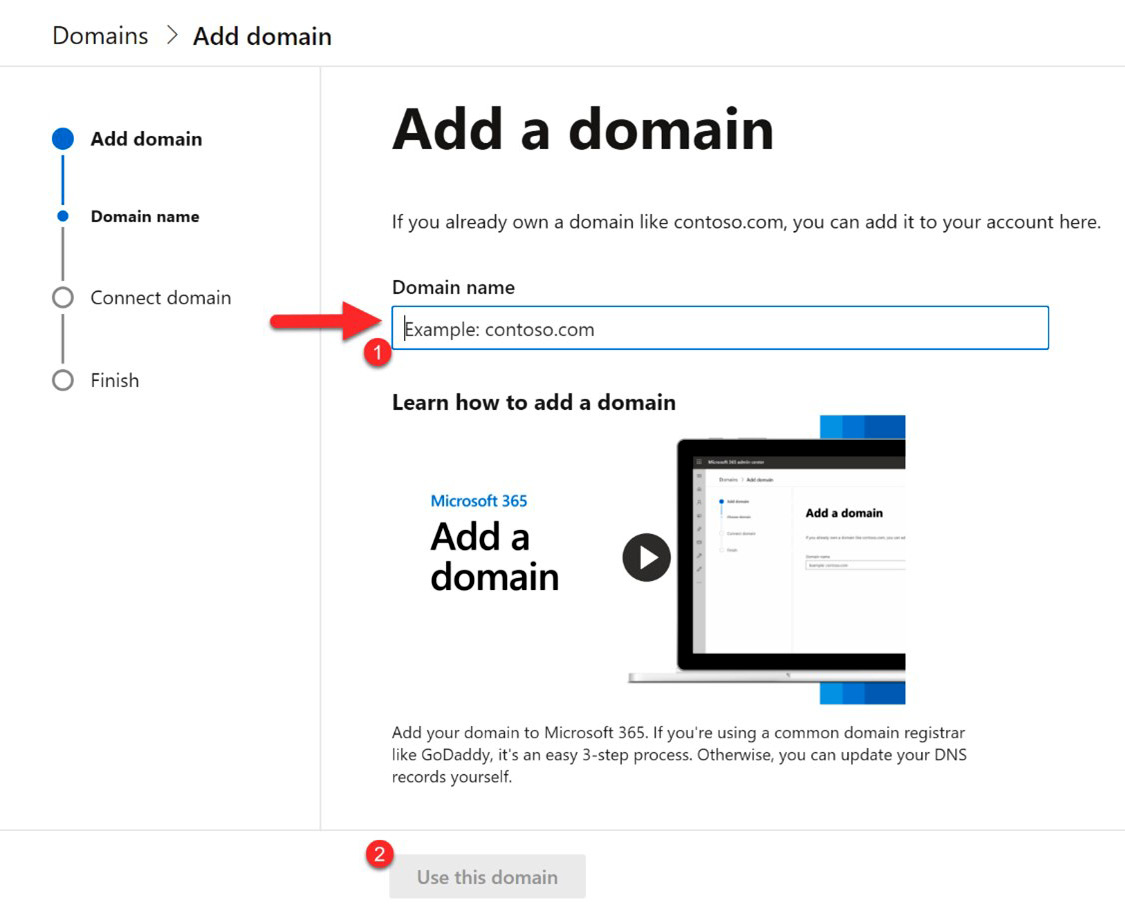
Figure 3.12 – Enter the domain name
- After identifying the domain to add, you will need to connect the Microsoft account with the domain registrar. To accomplish this, the recommended step is to use the TXT record from Microsoft as shown here:
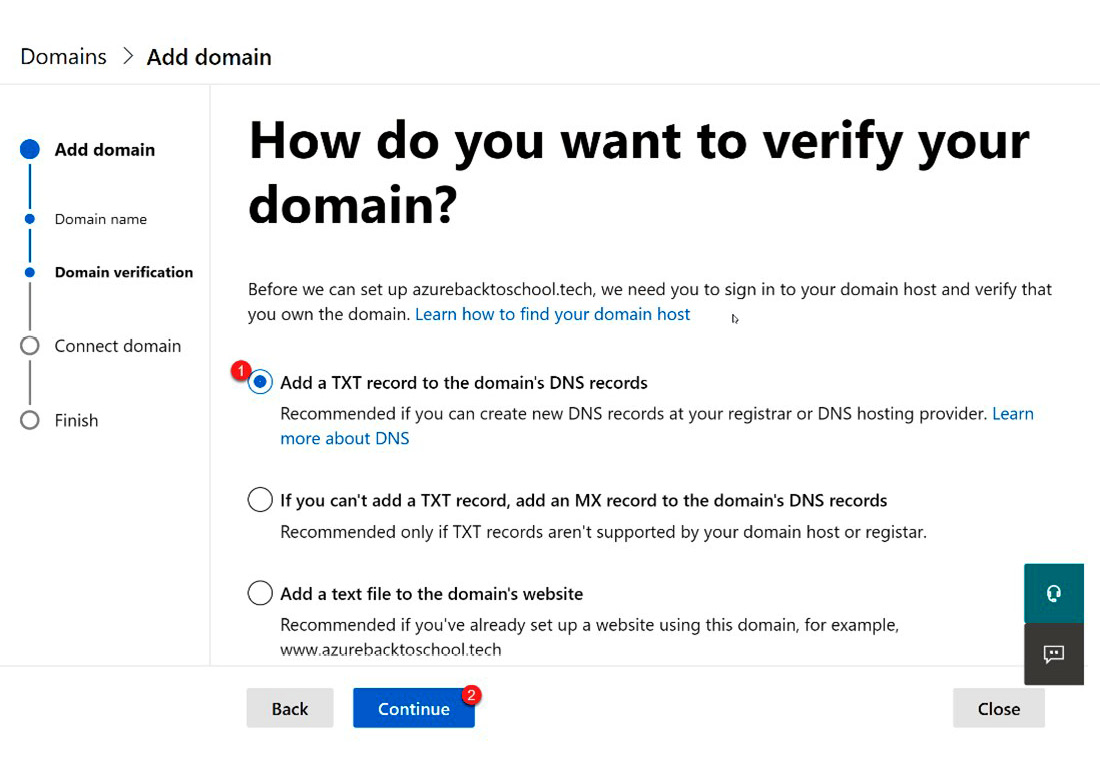
Figure 3.13 – Add a TXT record to the domain registrar
- After selecting Continue, the TXT information will be provided, and you will be instructed to go to your domain registrar and add the provided information shown in Figure 3.14. There is also a link on this tile for step-by-step instructions, for additional help. Here is the link to that page in Microsoft Docs: https://docs.microsoft.com/en-us/microsoft-365/admin/get-help-with-domains/create-dns-records-at-any-dns-hosting-provider?view=o365-worldwide#BKMK_verify:
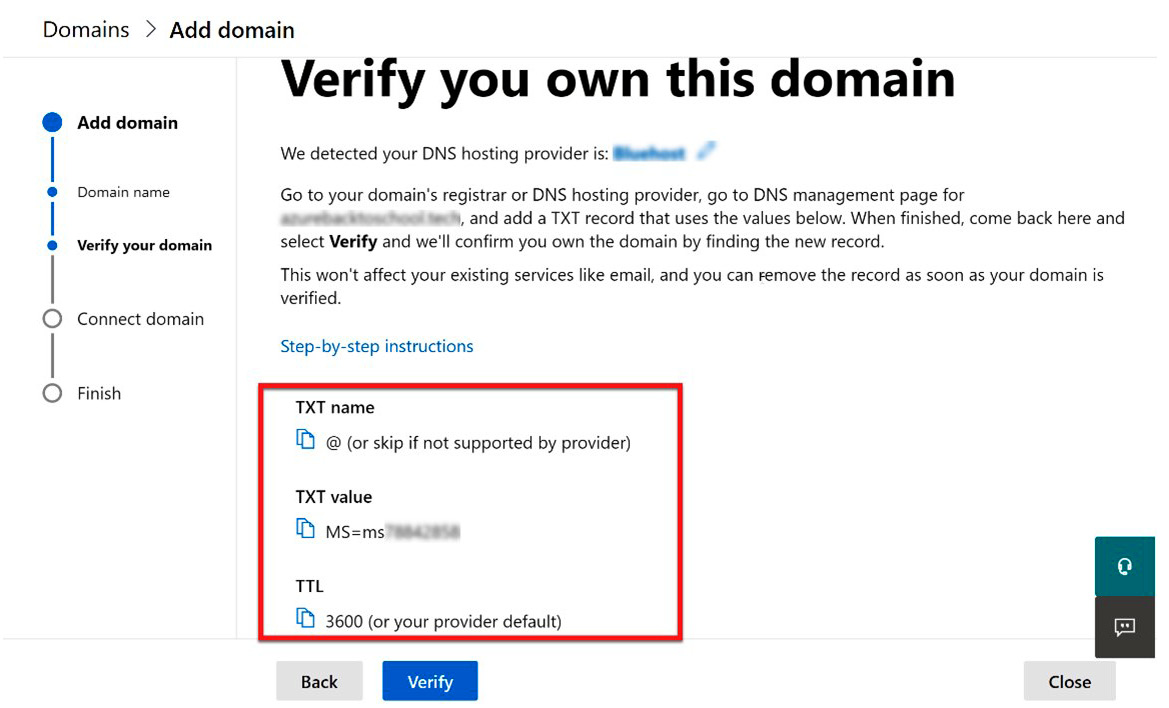
Figure 3.14 – Information needed for the domain registrar
- This next step will require you to log in to your domain registrar or company that hosts your domain. When you log in to your domain registrar, navigate to your domain, select the option to manage the domain, and then find the TXT records for the domain. From here, you will want to select Add Record. The following screenshot illustrates what this looks like on bluehost.com:

Figure 3.15 – Example of how to add a TXT record to a domain registrar
- Enter the information provided from step 7 and select Save, as shown in the following screenshot:
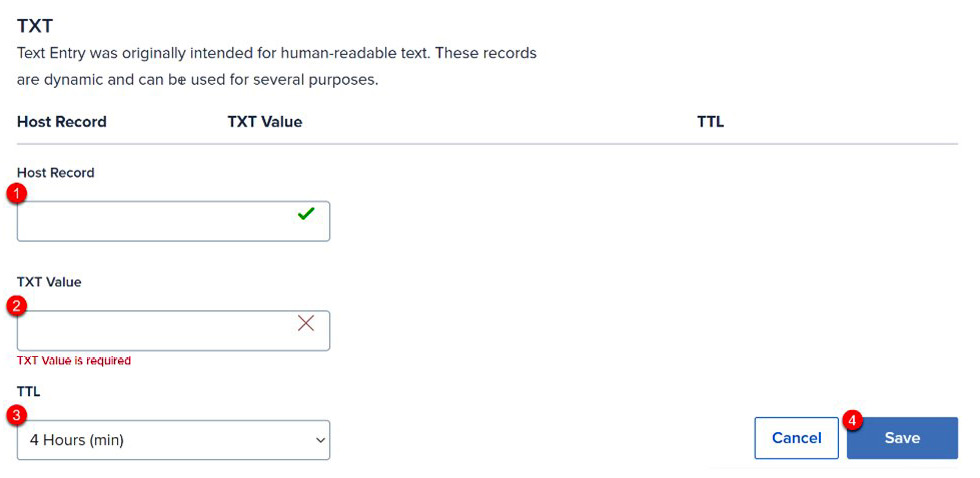
Figure 3.16 – Enter TXT information from Microsoft
- After you have completed step 9, return to the Microsoft admin center and select Verify. The next tile will provide you with additional information. Simply select Continue and you will be directed to the Add DNS records tile. This tile allows you to configure the new domain for email protection. Through the verification process, the information needed should be populated as follows:
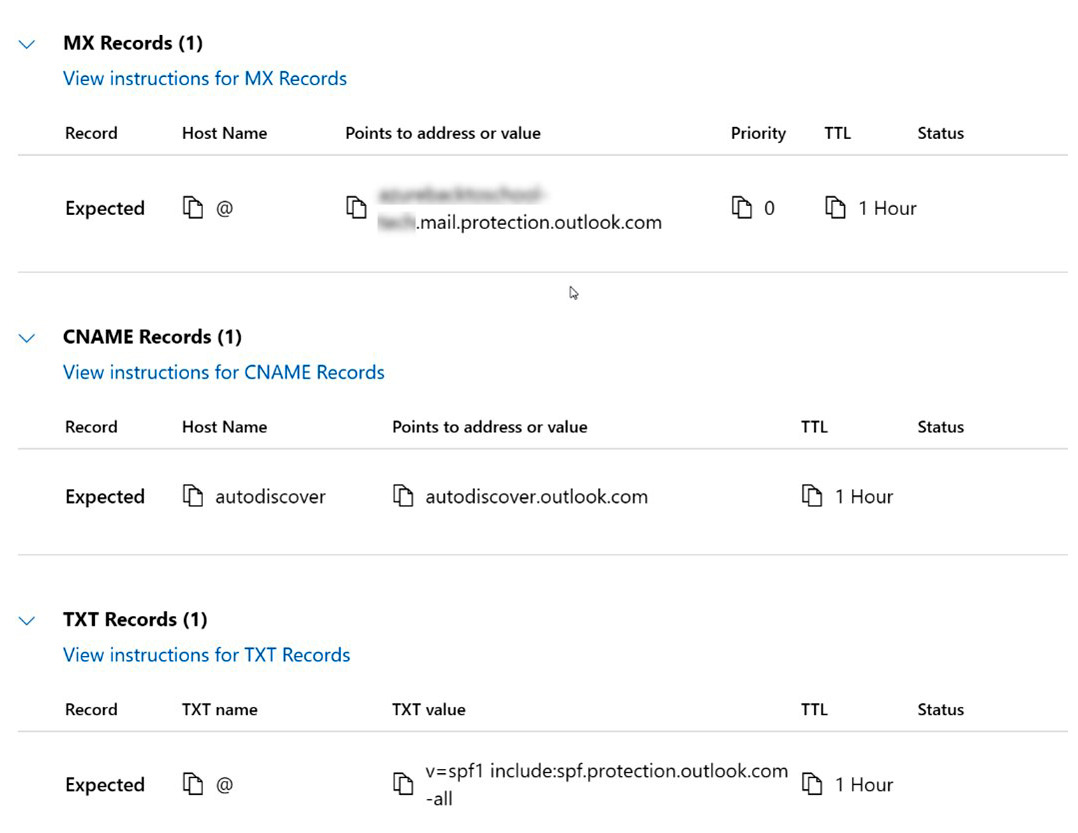
Figure 3.17 – Exchange Online Protection information
- Return to the domain registrar and populate the information provided. This is only necessary if you plan on utilizing the Exchange or Exchange Online Protection services. If this domain is only being used for website addresses and not email, you can uncheck the Exchange and Exchange Online Protection box and select Continue:
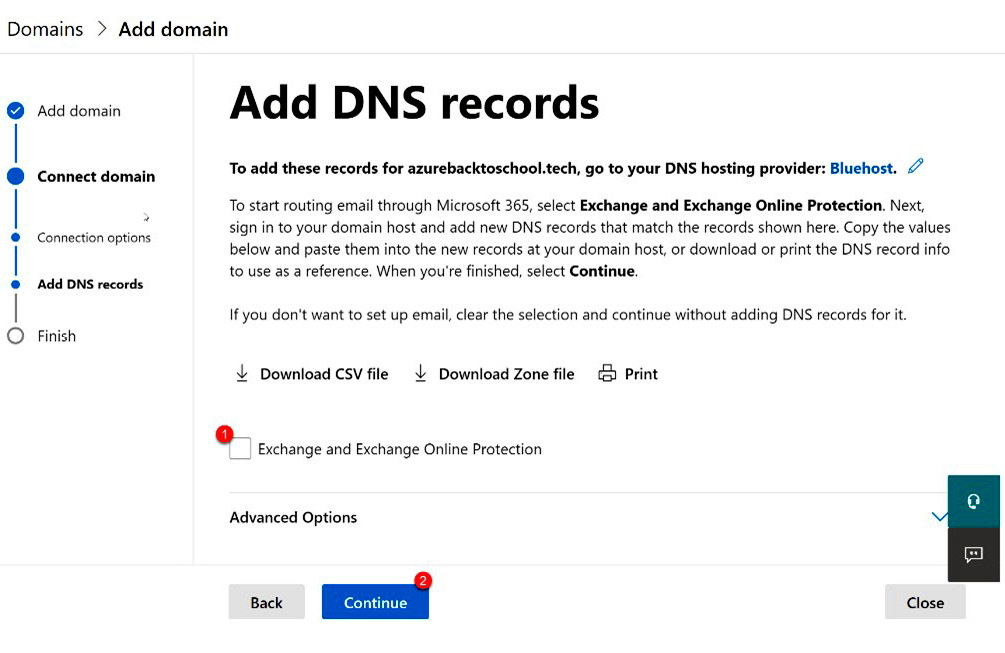
Figure 3.18 – Add domain without Exchange email
Note
If you choose to uncheck this box and continue, your domain will be verified but will not be available through Microsoft for email or other services since DNS will not be configured between Microsoft and the domain registrar. This process can be revisited by going to Domains, choosing the domain, selecting DNS, and then Manage DNS.
- If you are using this domain for email, return to the domain registrar and enter the information provided in Figure 3.18 from step 8. Continue to step 11.
- Once you have configured the email protection records, select the checkbox for Exchange and Exchange Online Protection and select Continue as seen here:

Figure 3.19 – Add Exchange email support to the domain

Figure 3.20 – Complete the domain setup
- You will be directed to your list of domains and will now see your new custom domain in the list. From here, you can choose to make your newly verified domain your default. The following screenshot illustrates how to do this:
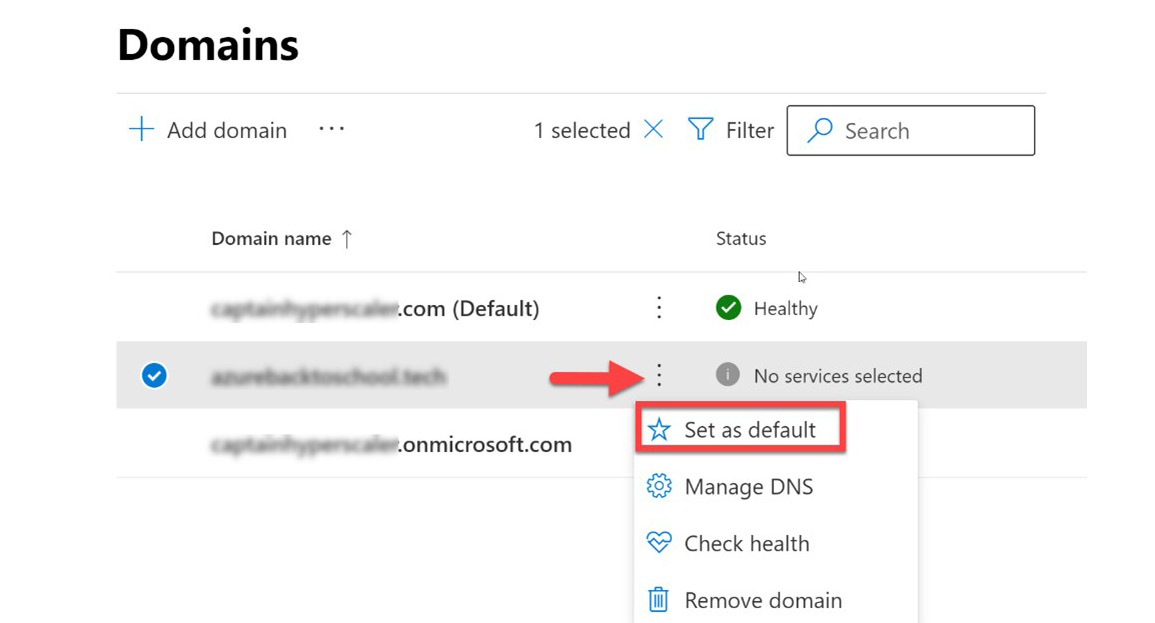
Figure 3.21 – Set the new domain as the default
You have now gone through the steps to add and verify a new custom domain. In the next section, we will discuss how these custom domains can now be used within Microsoft 365, Azure, and Azure Active Directory.
Custom domains and sub-domains
As stated in the previous section, most companies want to have proper branding usage with their domain to provide a professional appearance to visitors of the website and email addresses outside the default tenantname.onmicrosoft.com address that is provided upon initial subscription creation. This branded custom domain is usually something that is easy to remember, such as companyname.com. For this section, we will refer to this as the root domain.
Once we have gone through the steps in the previous section to verify the root domain, we can use that domain within our Azure Active Directory tenant for Microsoft 365 and Azure services. Microsoft can manage up to 900 domain names within Azure Active Directory. If you are federating domains with on-premises Active Directory, this goes down to 450 domains.
Once you verify a root domain, we can add various sub-domains that can be used by department or geography to segment the organization. Examples of department sub-domains may be sales.mycompany.com or support.mycompany.com. Geographic sub-domain examples could be us.mycompany.com, uk.mycompany.com, or au.mycompany.com. These subdomains can all be used to easily direct to specific internet or intranet sites that are specific to those visitors or users, respectively.
These sub-domains can be created and customized in any manner that the company feels is best to utilize them. If they are strictly for internal use and do not need access across the internet, they can be created and used immediately. In most cases, even for an intranet site, users may require accessing and authenticating them across the public internet. In this use case, the sub-domain DNS will need to be added to the domain registrar for proper access. The following screenshots are the steps to add the DNS for the sub-domain. They are the same as for the root domain but without the TXT requirement for verification:
- From the Domains tile, select + Add domain:

Figure 3.22 – Add a sub-domain
- Enter in the sub-domain. This is in the form of subdomain.mycompany.com, with mycompany.com being a previously verified root domain within Microsoft. After entering the domain name, select Use this domain as shown here:
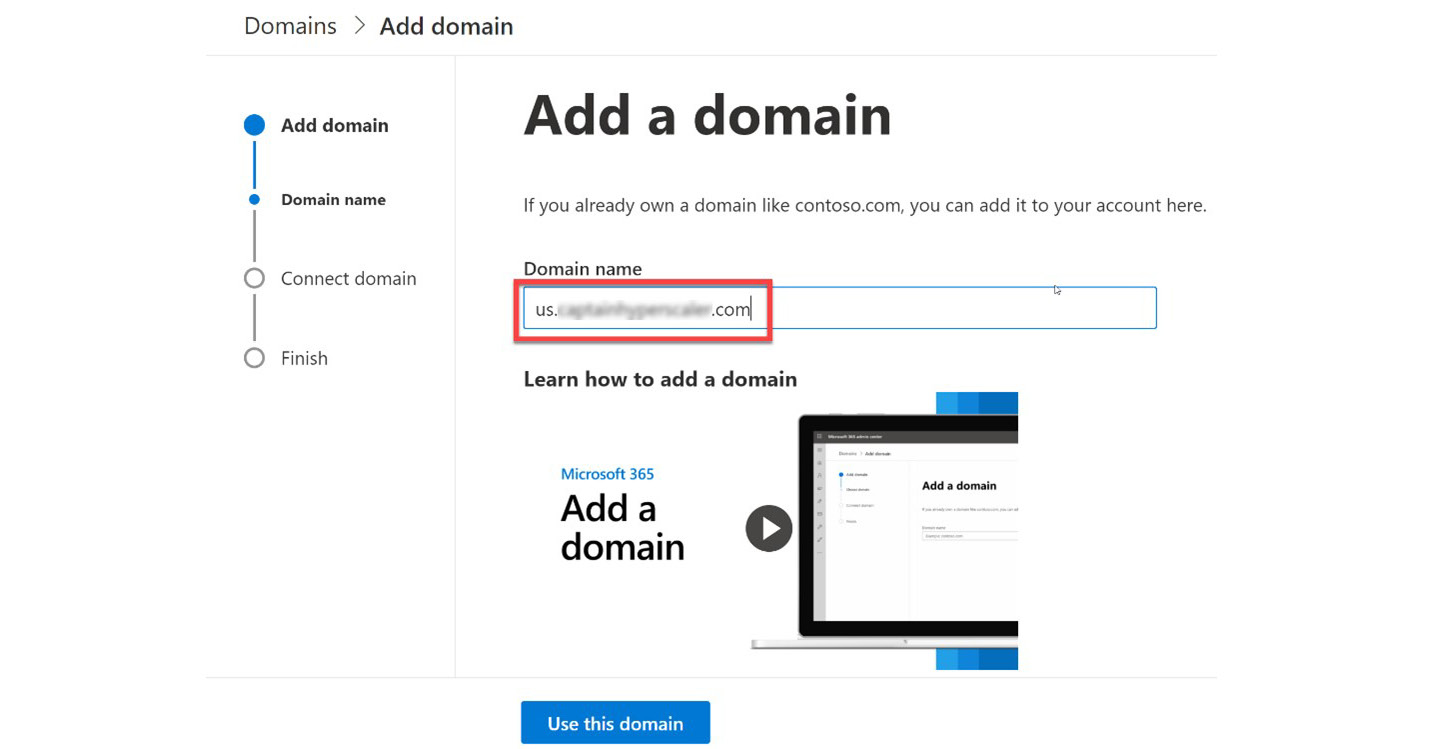
Figure 3.23 – Enter the sub-domain name
- The next tile will explain the need to configure DNS. Select Next and the next tile will provide you with the DNS information that needs to be added to the domain registrar. Note at the top of the tile that this step will automatically prompt you to log in to your domain registrar to add the following information:
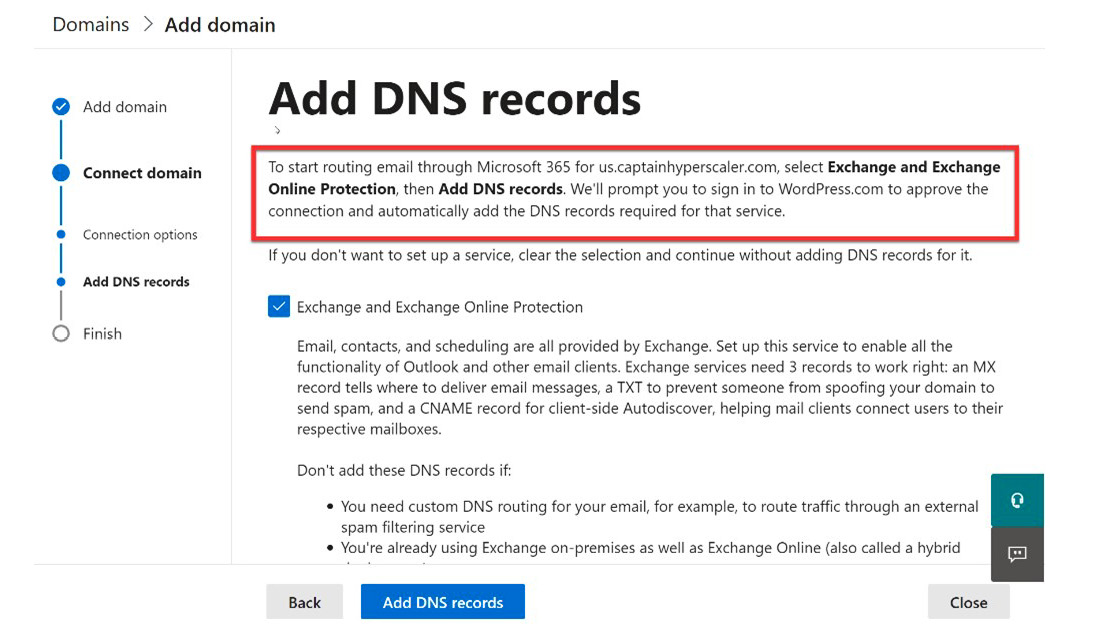
Figure 3.24 – Include DNS for Exchange email support
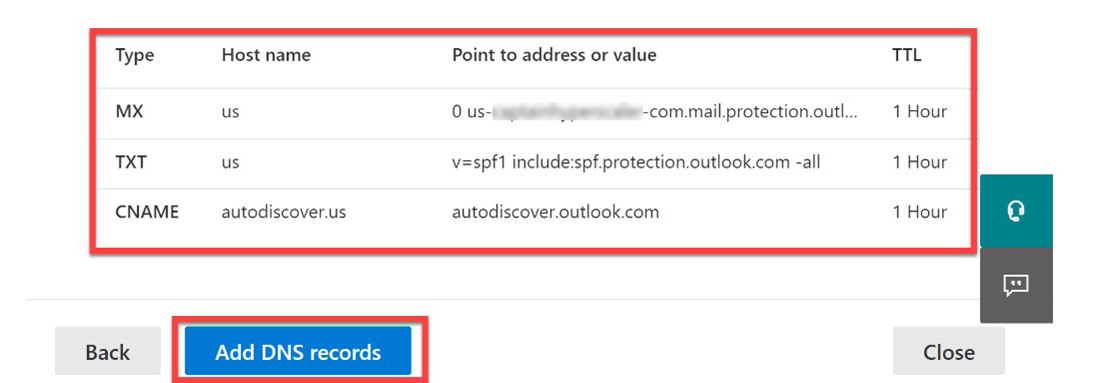
Figure 3.25 – DNS records to add for the sub-domain
- Log in to the domain registrar and select Confirm to make the required changes to add the sub-domain DNS, as follows:

Figure 3.26 – Authorize the DNS changes for the domain registrar
- The final step is to finish the configuration process. You will be returned to the main Domain tile and your sub-domain will be available. As you probably noticed, since the root domain was previously verified, the manual process from the previous section to add DNS to the domain registrar was no longer required, making it much easier to add a sub-domain than a new root domain.
The previous sections focused on how to add a custom domain and a sub-domain along with how these may be used within the company. There may be a need to make changes to these domains or remove these domains from your tenant. The next section will provide information on how this can be done.
Managing DNS and deleting a custom domain
In most cases, a company that purchases a primary domain, such as mycompany.com, will own that domain for the life of the company. Even though the domain for the company does not change, the domain registrar may change. In this case, the DNS will need to be reconfigured for the new domain registrar.
In some cases, a secondary domain may also no longer be needed. For example, the company may be running a sales promotion that has its own verified root domain that was used, or the company may have purchased another company with a brand that no longer exists. In these cases, the domain may need to be deleted from the Microsoft account to avoid use.
Deleting the custom domain can be completed within the Azure Active Directory or Microsoft 365 admin portals. Before deleting the custom domain, it is important to make sure that no users or applications are assigned to that domain. These resources include the following:
- Any user that has a username or email address that uses the custom domain
- Any group that has an email address that uses the custom domain name
- Any application that is registered in Azure AD and is using the custom domain name as its URI
These users, groups, and applications will need to be changed to a different domain name or deleted prior to deleting the custom domain name.
Rather than searching for and finding resources that are utilizing the custom domain name, the ForceDelete command can be used in situations where less than 1,000 resources are utilizing the custom domain name. Using ForceDelete will remove the custom domain name from resources and reassign the default initial tenantname.onmicrosoft.com to those resources.
Now that you have configured your Microsoft 365 and Azure tenant for a company-branded domain, we will discuss in the next section how Azure AD can also be used to register devices to Azure AD.
Configuring and managing device registration options
Securing identity and access for users, groups, and resources has become an important aspect of utilizing cloud services. Since organizations that utilize cloud services are no longer the owners of and responsible parties for the physical cloud infrastructure, identity and access have become the perimeter control plane for protection. In the past, we protected device access through the use of VPN connections into the private data center. In hybrid or public architectures, this is no longer the best option. The requirement to register our devices to Azure AD helps to bridge the security control gap. The following sections will discuss more about the process and capabilities that are provided when registering devices to Azure AD.
Azure AD-registered devices
Whether a company has supplied their users with devices, or a device is a personally owned bring your own device (BYOD), a company may require the device to be registered to access company resources. For cloud-only or cloud-first companies, this would require the device to be registered with Azure AD. Registering a device with Azure AD does not require the user account to be used to sign in to the device but will require users to access a company portal to access company apps and resources.
Devices that are registered to Azure AD can be further managed using mobile device management (MDM) or mobile application management (MAM) to protect sensitive information and applications through Conditional Access (CA) policies. MDM, MAM, and CA policies will be further discussed in later chapters.
The important detail to remember is that for Azure AD-registered devices, the user account is not used to access the device, but a company portal for apps and services. This option is best for devices that may be accessed by multiple users for applications in the company portal, or for personal devices where a user has a personal account to log in to the device. This option is also necessary when Azure AD-joined configuration is not an option, such as with macOS, iOS, Android, or Windows 10 Home devices. Additional information on Azure AD-registered devices can be found at this link: https://docs.microsoft.com/en-us/azure/active-directory/devices/concept-azure-ad-register.
In the next sections, we will discuss scenarios where user accounts are used for device access and authentication.
Azure AD-joined devices
The next option for device configuration in Azure AD is for these devices to be Azure AD joined. In this scenario, a user account on the company Azure AD is used to sign in to the device and that authorizes that user to access the company resources from that device. Azure AD-joined devices are used for cloud-only or cloud-first companies, similar to Azure AD-registered devices, but the company user accounts are set up on these devices and required to unlock the device.
With an Azure AD-joined device, the company can utilize additional login options, such as Windows Hello for Business on Windows 10 devices. Like Azure AD-registered devices, Azure AD-joined devices can also be managed through MDM/MAM and CA policies for additional layers of security.
The primary use scenario for a device to be Azure AD joined is when the company needs to secure and encrypt the device when applications and files are native to that device. This option can be used for any Windows 10 operating system with the exception of Windows 10 Home and is the preferred option when configuring a company-owned device. Additional information on Azure AD-joined devices can be found at this link: https://docs.microsoft.com/en-us/azure/active-directory/devices/concept-azure-ad-join.
In the next section, we will discuss how to use devices in a hybrid AD infrastructure.
Hybrid AD-joined devices
Most companies have moved to utilizing cloud services while still maintaining applications in a private data center. Within these hybrid infrastructures, there may be a current Active Directory Domain Service (AD DS) in place that is handling identity and access management. In these cases, the AD DS services on-premises need to be synchronized with the cloud identity services of Azure Active Directory in order to provide a seamless authentication experience for users. This synchronization is performed utilizing Azure AD Connect on the on-premises domain. The various synchronization and configuration options will be covered in detail in a later chapter.
Hybrid identity infrastructures manage devices differently than cloud-based infrastructures. These devices are generally joined to the on-premises AD DS for management through Group Policy or Endpoint Configuration Manager, formerly System Center Configuration Manager. The devices that can be managed within this on-premises infrastructure are limited to Windows operating systems that include Windows 7, 8.1, and 10.
If your hybrid identity infrastructure requires management of iOS, macOS, and Android devices, then a co-management environment needs to be configured with Endpoint Configuration Manager and Intune Endpoint Management. The co-management capabilities provide the flexibility to manage a combination of legacy and modern authentication. Additional information can be found at this link: https://docs.microsoft.com/en-us/azure/active-directory/devices/concept-azure-ad-join-hybrid.
In the next section, we will discuss some of the tenant-wide setting options for managing identity and access.
Configuring tenant-wide settings
In this section, we will explore some of the tenant-wide settings within Azure Active Directory. These may be settings that are pre-configured by default when creating your Azure Active Directory tenant, and some may need to be enabled. This section will provide guidance on best practices for these settings.
Member and guest users
In Azure Active Directory, every user falls into one of two categories – they are either a member or a guest. Depending on which type of user you are, you have certain default permissions within the Azure Active Directory tenant.
Members are those users that are assigned to the tenant directly. They are given a username that is a part of the domain. By default, they have the capability to register applications, invite guest users, manage their user profile, and possibly reset their own password, if this is enabled. To disable or adjust these capabilities, an administrator would need to change the default settings.
Guest users are users that are invited to the tenant by a member. They have limited capabilities by default and by design. Guests are generally from a partner company that may be working on a project with members of the tenant. They may need access to certain applications and need to be a part of an internal distribution group for collaboration and communication. Unlike members, guests can manage their profile and password, but do not have the capability to read directory information and register applications. If enabled, guest users can be given the capability to invite other guests.
External and guest user access will be discussed further in another chapter.
Managing security defaults
If you are just getting started utilizing cloud infrastructure, the managed security defaults are helpful to create a baseline security posture for your tenant. Managed security defaults can be enabled through Properties on the Azure AD menu tile, as can be seen in Figure 3.27. Select Manage Security defaults, toggle Enable Security defaults to Yes, and save:

Figure 3.27 – Enable managed security defaults in Azure AD
This enables the defaults for your Azure AD tenant. The defaults that are enabled include the following:
- A requirement for all users to register for Azure AD Multi-Factor Authentication (MFA).
- Enforce and require the use of MFA for all administrators.
- Blocking legacy authentication methods.
- Requiring the use of MFA for all users when necessary for accessing sensitive information.
- Protection of privileged activities such as access to the Azure portal.
Note
In a later chapter, we will discuss CA policies.
When enabling CA policies within Azure AD, it is required to disable managed security defaults. Managed security defaults are helpful to enable when you are getting started with your Azure AD tenant to create a protection baseline for your identity and access management. As you progress in your configuration of the Azure AD tenant and services within Microsoft 365 and Azure, you will find additional ways to protect your identities that may provide more flexibility and protection for identity and access.
Summary
In this chapter, we provided the steps to create a brand for your Azure AD tenant by adding a custom domain. We discussed how to add sub-domains and remove domains, as needed. We also provided the different options for connecting and managing devices on your Azure AD or hybrid identity infrastructure. Finally, we provided an overview of default user capabilities and how to turn on managed security defaults to protect your Azure AD tenant.
In Chapter 5, Implementing and Managing External Identities and Guests, we will further discuss how to create, configure, and manage the identities of users, groups, and applications.