10. Manage OneNote options and the interface
Practice files
No practice files are necessary to complete the practice tasks in this chapter.
OneNote is designed to be easy to use, with commands laid out on the ribbon so you can discover them easily. Although the way OneNote is installed works perfectly for many users, you might want to change how it responds to your commands. For example, you could show or hide the Mini Toolbar or the Paste Options button, and you can add your name and initials to make tracking changes easier.
You can change the Quick Access Toolbar and the ribbon by adding, moving, and deleting controls. If you find that you use a command such as Print Preview frequently, you can add it to the Quick Access Toolbar so it’s readily available. You can also change the ribbon so the tabs and commands you want are displayed where you want them.
This chapter guides you through procedures related to setting OneNote app options, customizing the Quick Access Toolbar, and customizing the ribbon.
Set OneNote app options
The Home tab of the ribbon gives you access to a wide variety of formatting tools, but if you’re editing text at the bottom of a page, it can take some time to move the pointer to the ribbon and back. To put those formatting and other tools closer to text you’ve selected, OneNote displays the Mini Toolbar, which contains many formatting tools from the Home tab of the ribbon.

Display the Mini Toolbar to keep formatting tools close at hand
If you prefer that OneNote not display the Mini Toolbar, you can turn it off. You can also determine whether or not OneNote displays information about an app element in a ScreenTip. ScreenTips are small, temporary windows that appear when you point to buttons and other screen elements; they explain what those elements do. If there are keyboard shortcuts available for the feature, the ScreenTip includes that information. Some users prefer to have ScreenTips turned on, whereas others prefer to have them turned off. Regardless of your choice, you can set OneNote to reflect your preference.
If your work requires you to collaborate with others on projects, your organization might use information about who has created and edited Microsoft Office files, so that your colleagues can collaborate with you effectively. Regardless of whether you collaborate with other users by editing shared OneNote notebooks or work by yourself, you should take a moment, if you haven’t yet, to enter your name and initials into OneNote. These initials will be used for all the Office apps you work with. Adding this information helps you and your colleagues track who made which changes, facilitating discussion and exploration when you examine a notebook after completing a series of edits.
Other decisions you can make include whether or not to show the OneNote icon on the Windows taskbar, whether to display the page tabs pane (which show the names of pages within a section) on the right or left side of the app window, whether to show or hide note containers (the outlines that appear around notes), and whether the Paste Options button appears on the page after you paste elements from the Clipboard into your notebook.

Choose whether OneNote displays the Paste Options button when you paste the contents of the Clipboard into your page
If you create a lot of numbered and bulleted lists in OneNote, you might find it easier to create a numbered list by typing the number 1, followed by a period and a space, to start a list. Similarly, you can start a bulleted list by typing an asterisk or hyphen, followed by a space. These list settings are turned on by default, so if you prefer not to create a numbered or bulleted list when you type either of those text sequences, you can turn off that behavior in OneNote.
To turn the display of the Mini Toolbar off or on
1. Click the File tab of the ribbon to display the Backstage view.
2. In the left pane of the Backstage view, click Options to open the OneNote Options dialog box.
3. On the General page, in the User Interface Options area, do either of the following:
• Clear the Show Mini Toolbar on selection check box to turn off the display of the Mini Toolbar when you select text.
• Select the Show Mini Toolbar on selection check box to have OneNote display the Mini Toolbar when you select text.
4. Click OK.
To change the display of ScreenTips
1. In the OneNote Options dialog box, display the General page.
2. In the User Interface Options area, click the ScreenTip style list arrow, and then do any of the following:
• Click Show feature descriptions in ScreenTips to display ScreenTips that include descriptions of the features.
• Click Don’t show feature descriptions in ScreenTips to display ScreenTips that include only the name of the command, without a description.
• Click Don’t show ScreenTips to turn off the display of ScreenTips altogether.
3. Click OK.
To edit your user name and initials
1. In the OneNote Options dialog box, display the General page.
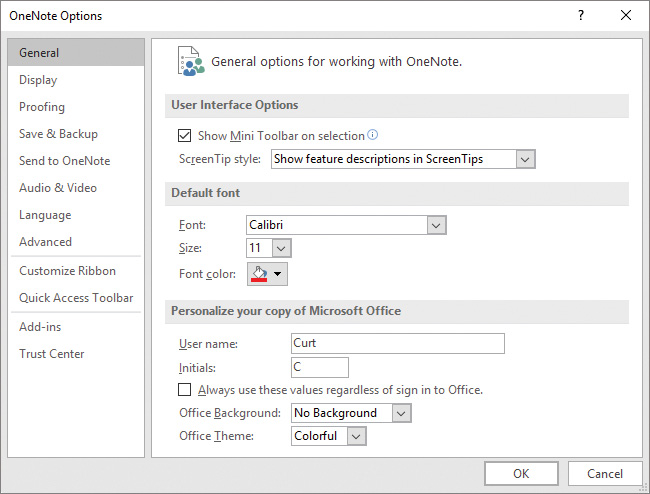
Office apps use the name and initials entered here to track edits to notebooks and other documents
2. In the User name box, enter your name.
3. In the Initials box, enter the initials you want to use.
![]() Important
Important
Editing your user name and initials in OneNote changes those values for every Office app.
4. Click OK.
5. A dialog box opens to inform you that you must restart OneNote for the changes to take effect. Click OK.
To show or hide the OneNote icon on the Windows taskbar
1. In the OneNote Options dialog box, display the Display page.
2. Do either of the following to the Place OneNote icon in the notification area of the taskbar check box:
• Select the check box to display the shortcut icon for creating quick notes and displaying screen clippings.
• Clear the check box to hide the icon.
3. Click OK.
To change where the page tabs pane is displayed
1. On the Display page of the OneNote Options dialog box, do either of the following to the Page tabs appear on the left check box:
• Select the check box to display the page tabs on the left of the app window.
• Clear the check box to display the page tabs on the right of the app window.
2. Click OK.
To show or hide note containers on pages
1. On the Display page of the OneNote Options dialog box, do either of the following to the Show note containers on pages check box:
• Select the check box to display note containers.
• Clear the check box to hide note containers.
2. Click OK.
![]() Tip
Tip
Containers are the borders that appear around each note, or set of paragraphs and objects, on the notebook page. Containers make it easier to format or move notes.
To turn the display of the Paste Options button on or off
1. In the OneNote Options dialog box, click Advanced to display the Advanced page.
2. In the Editing area, do either of the following to the Show Paste Options button when content is pasted check box:
• Select the check box to have OneNote display the Paste Options button after you paste text from the Clipboard.
• Clear the check box to turn off the display of the Paste Options button after you paste text from the Clipboard.
3. Click OK.
![]() Tip
Tip
The paste options give you the choice of keeping the source formatting (the default), merging with the formatting at the destination location, keeping only the text of the content you’re pasting, or pasting picture formatting if you’re pasting a picture. You can also change the default paste option.
To turn the automatic creation of numbered lists on or off
1. In the OneNote Options dialog box, display the Advanced page.
2. In the Editing area, do either of the following to the Apply numbering to lists automatically check box:
• Select the check box to turn on automatic numbered list creation.
• Clear the check box to turn off automatic numbered list creation.
3. Click OK.
![]() Tip
Tip
When automatic numbered lists are turned on, you can enter a number, a period, and a space to automatically indent the number and turn the paragraph into a numbered list item.
To turn the automatic creation of bulleted lists on or off
1. In the OneNote Options dialog box, display the Advanced page.

Specify whether OneNote creates bulleted lists automatically
2. In the Editing area, do either of the following to the Apply bullets to lists automatically check box:
• Select the check box to turn on automatic bulleted list creation.
• Clear the check box to turn off automatic bulleted list creation.
3. Click OK.
![]() Tip
Tip
When automatic bulleted lists are turned on, you can enter an asterisk or hyphen, followed by a space, to automatically indent the bullet and turn the paragraph into a bulleted list item.
Customize the Quick Access Toolbar
As you continue to work with OneNote, you might discover that you use certain commands much more frequently than others. If your notebooks draw data from external sources, for example, you might find yourself using certain ribbon buttons much more often than other users. You can make any button accessible with one click by adding the button to the Quick Access Toolbar, located just above the ribbon in the upper-left corner of the OneNote app window. You’ll find the tools you need to change the buttons on the Quick Access Toolbar in the OneNote Options dialog box.

Control which buttons are displayed on the Quick Access Toolbar
You can add buttons to the Quick Access Toolbar, change their positions, and remove them when you no longer need them. Later, if you want to return the Quick Access Toolbar to its original state, you can reset just the Quick Access Toolbar or the entire ribbon interface.
You can also choose whether your Quick Access Toolbar changes affect all your notebooks or just the active notebook. If you’d like to export your Quick Access Toolbar customizations to a file that can be used to apply those changes to another OneNote installation, you can do so quickly.
To add a button to the Quick Access Toolbar
1. In the OneNote Options dialog box, click Quick Access Toolbar to display the Quick Access Toolbar page.
2. In the Choose commands from list, click the category of commands from which you want to choose.
3. In the Choose commands from pane, do either of the following to add a command to the Customize Quick Access Toolbar pane:
• Click the command you want to add to the Quick Access Toolbar, and then click the Add button between the two lists.
• Double-click the command you want to add to the Quick Access Toolbar.
4. Click OK.
To change the order of buttons on the Quick Access Toolbar
1. In the OneNote Options dialog box, display the Quick Access Toolbar page.
2. In the Customize Quick Access Toolbar pane, click the button you want to move.

Change the order of buttons on the Quick Access Toolbar
3. To the right of the Customize Quick Access Toolbar pane, do either of the following:
• Click the Move Up button to move the button higher in the list and to the left on the Quick Access Toolbar.
• Click the Move Down button to move the button lower in the list and to the right on the Quick Access Toolbar.
4. Repeat steps 2 and 3 until the buttons are in the order you want.
5. Click OK.
To remove a button from the Quick Access Toolbar
1. In the OneNote Options dialog box, display the Quick Access Toolbar page.
2. In the Customize Quick Access Toolbar pane, do either of the following:
• Click the command you want to remove from the Quick Access Toolbar, and then click the Remove button between the two panes.
• Double-click the button you want to remove from the Quick Access Toolbar.
3. Click OK.
To export your Quick Access Toolbar settings to a file
1. In the OneNote Options dialog box, display the Quick Access Toolbar page.
2. Click Import/Export, and then click Export all customizations.
3. In the File Save dialog box, navigate to the folder where you want to place the customizations file.
4. In the File name box, enter a name for the settings file.
5. Click Save.
![]() Tip
Tip
This operation exports all your customizations for both the ribbon and Quick Access Toolbar.
To import the Quick Access Toolbar settings from a file
1. In the OneNote Options dialog box, display the Quick Access Toolbar page.
2. Click Import/Export, and then click Import customization file.
3. In the File Open dialog box, navigate to the folder that contains the customization file, and then click the file.
4. Click Open.
5. In the OneNote Options dialog box, click OK.
To reset the Quick Access Toolbar to its original configuration
1. In the OneNote Options dialog box, display the Quick Access Toolbar page.
2. Below the Customize Quick Access Toolbar pane, click the Reset button.
3. Do either of the following:
• Click Reset only Quick Access Toolbar.
• Click Reset all customizations to reset both the Quick Access Toolbar configuration and the ribbon configuration.
4. Click OK.
Customize the ribbon
You can easily customize the entire ribbon in OneNote by hiding and displaying ribbon tabs, reordering tabs that are displayed on the ribbon, customizing existing tabs (including tool tabs, which appear when specific items are selected), and creating custom tabs. You’ll find the tools to customize the ribbon in the OneNote Options dialog box.

Control the tabs, groups, and commands that the ribbon displays
From the Customize Ribbon page of the OneNote Options dialog box, you can select which tabs are displayed on the ribbon and in what order. In the right pane, each ribbon tab name has a check box next to it. If a check box is selected, that tab appears on the ribbon.
Just as you can change the order of the tabs on the ribbon, you can change the order of the groups of commands on a tab.
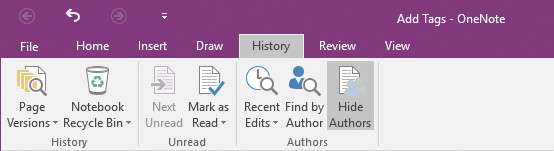
For example, the History tab contains three groups: Unread, Authors, and History. If you use the History group more frequently than the other groups, you could move it to the left end of the tab.
Change the order of items on built-in ribbon tabs
You can also remove groups from a ribbon tab. If you remove a group from a built-in tab and later decide you want to restore it, you can put it back without too much trouble.
The built-in ribbon tabs are designed for maximum efficiency, so adding new command groups might crowd the other items on the tab and make those controls harder to find. Rather than adding controls to an existing ribbon tab, you can create a custom tab and then add groups and commands to it. The default New Tab (Custom) name doesn’t tell you anything about the commands on your new ribbon tab, so you can rename it to reflect its contents.
![]() Tip
Tip
You can change the order of the groups and commands on your custom ribbon tabs by using the same techniques that are used for the built-in tabs.
You can export your ribbon customizations to a file that can be used to apply those changes to another OneNote installation. When you’re ready to apply saved customizations to OneNote, you can then import the file and apply them. And, as with the Quick Access Toolbar, you can always reset the ribbon to its original state.
The ribbon is designed to use space efficiently, but you can hide it if you want to increase the amount of space available inside the app window.
1. In the OneNote Options dialog box, click Customize Ribbon to display the Customize Ribbon page.
2. In the Customize the Ribbon pane on the right side of the page, select the check box next to the name of the tab you want to display.

Select the check box next to the tab you want to display on the ribbon
3. Click OK.
To hide a ribbon tab
1. In the OneNote Options dialog box, display the Customize Ribbon page.
2. In the Customize the Ribbon pane on the right side of the page, clear the check box next to the name of the tab you want to hide.
3. Click OK.
To reorder ribbon tabs and groups
![]() Tip
Tip
You can’t move individual commands on the built-in tabs; you can move only groups and tabs.
1. In the OneNote Options dialog box, display the Customize Ribbon page.
2. If you want to reorder the groups on a tab, first display the groups by clicking the expand list button (the plus sign) to the left of the tab.
3. In the ribbon elements list, click the element (tab or group) you want to move.
4. To the right of the list, do either of the following:
• Click the Move Up button to move the element higher in the list and to the left on the ribbon tab.
• Click the Move Down button to move the element lower in the list and to the right on the ribbon tab.
5. Repeat steps 3 and 4 until the elements are in the order you want.
6. Click OK.
To create a custom ribbon tab
1. In the OneNote Options dialog box, display the Customize Ribbon page.
2. Below the list on the right, click the New Tab button. The new tab, named New Tab (Custom), is added to the list on the right. It contains one group, named New Group (Custom).
To create a custom group on a ribbon tab
1. In the OneNote Options dialog box, display the Customize Ribbon page.
2. If necessary, in the list on the right, click the expand list button (the plus sign) to the left of the tab on which you want to add the custom group, to display the groups on the tab.
3. In the list on the right, click the ribbon tab on which you want to create the custom group.
4. Click New Group. The new group, named New Group (Custom), is added to the tab in the location you indicated.
To add a button to a custom group on the ribbon
1. In the OneNote Options dialog box, display the Customize Ribbon page.
2. In the Customize the Ribbon list, click Main Tabs, Tool Tabs, or All Tabs to display those tabs in the adjacent pane.
3. In the Customize the Ribbon pane, click the custom group to which you want to add a button.
4. In the Choose commands from list, click a category to display those commands in the adjacent pane.
5. In the Choose commands from pane, click the command you want to add to the ribbon.
6. Click the Add button between the two panes to add the button to the Customize The Ribbon pane and to the ribbon.
7. Click OK.
To rename a ribbon element
1. In the OneNote Options dialog box, display the Customize Ribbon page.
2. In the Customize the Ribbon pane, click the ribbon tab, group, or command you want to rename.
3. Below the Customize the Ribbon pane, click the Rename button.
4. In the Rename dialog box, do the following:
a. In the Display name box, enter a new name for the ribbon element.
b. If you are renaming a group or command and want to change its symbol, select a symbol from the Symbol gallery.
c. Click OK.
5. In the OneNote Options dialog box, click OK.
To remove an element from the ribbon
1. In the OneNote Options dialog box, display the Customize Ribbon page.
2. In the Customize the Ribbon pane, click the ribbon tab, group, or command you want to remove.
3. Click the Remove button between the two panes to remove the button from the Customize The Ribbon pane and from the ribbon.
4. Click OK.
To export your ribbon customizations to a file
1. In the OneNote Options dialog box, display the Customize Ribbon page.
2. Click Import/Export, and then click Export all customizations.
3. In the File Save dialog box, navigate to the folder in which you want to save the customizations file, and then in the File name box, enter a name for the settings file.
4. Click Save.
To import ribbon customizations from a file
1. In the OneNote Options dialog box, display the Customize Ribbon page.
2. Click Import/Export, and then click Import customization file.
3. In the File Open dialog box, navigate to and click the configuration file, and then click Open.
4. In the OneNote Options dialog box, click OK.
To reset the ribbon to its original configuration
1. In the OneNote Options dialog box, display the Customize Ribbon page.
2. If you want to reset only one tab, select the tab in the list on the right.
3. Below the list, click the Reset button.
4. Do either of the following:
• Click Reset only selected Ribbon tab to reset the selected tab’s customizations and to remove all the groups and commands you added to that tab.
• Click Reset all customizations to reset all the ribbon tabs and Quick Access Toolbar customizations and to remove all custom tabs, groups, and commands.

Reset the ribbon and Quick Access Toolbar to their original settings
5. In the dialog box that opens, click Yes.
To hide or unhide the ribbon
1. To hide the ribbon, in the lower-right corner of the ribbon, click the Collapse the Ribbon arrow.
2. To unhide the ribbon, click a tab to temporarily open the ribbon, and then click the Pin the ribbon pushpin in the lower-right corner of the ribbon.
Or
1. Press Ctrl+F1.
![]() Customize the Quick Access Toolbar
Customize the Quick Access Toolbar

Set OneNote app options
Open any notebook in OneNote, and then perform the following tasks:
1. Display the General page of the OneNote Options dialog box.
2. Enter values for your user name and initials.
3. On the Advanced page of the OneNote Options dialog box, clear the Show Paste Options button when content is pasted check box.
4. Clear the Apply bullets to lists automatically check box.
5. Click OK to save your changes, or click Cancel to leave the OneNote options as they were before you opened the dialog box.
![]() Tip
Tip
If you plan to continue working in OneNote, you should click Cancel so the app’s behavior is unchanged.
Customize the Quick Access Toolbar
Open any notebook in OneNote, and then perform the following tasks:
1. Display the Quick Access Toolbar page of the OneNote Options dialog box.
2. From the Popular Commands category, add the Bullets and Print Preview buttons to the Quick Access Toolbar.
3. Move the Print Preview button to the left end of the Quick Access Toolbar.
4. Remove the Bullets button from the Quick Access Toolbar.
5. Reset only the Quick Access Toolbar to its original configuration.
1. Display the Customize Ribbon page of the OneNote Options dialog box.
2. Move the Review tab to the left end of the ribbon.
3. On the View tab of the ribbon, move the Window group to the leftmost position on the tab.