
Collaboration with Microsoft 365 services is a major feature of the Power Platform, and understanding the capabilities and how to enable these features is a significant skill required by functional consultants. Generating documents from data is often a key requirement.
In this chapter, we will look at integrating Power Apps and Power Automate with Microsoft 365, Word, and Excel.
The topics covered in this chapter are the following:
- Understanding integration with SharePoint
- Using Power Apps with Microsoft Teams
- Using Power Automate with Microsoft Teams
- Integrating Microsoft Teams with the Common Data Service
- Creating Word and Excel templates
By the end of this chapter, you will be able to add a Power App to Microsoft Teams and create templates in Word and Excel.
Understanding integration with SharePoint
Handling documents is a common requirement when creating solutions with the Power Platform. You can add documents directly to the Common Data Service or you can use SharePoint as your document store.
Model-driven apps can upload and attach files to records using Notes. There are some issues with using Notes for document management:
- Files are stored in the Common Data Service and use precious storage capacity.
- There is no capability to open an attached file, edit it, and save it back to the app – you must save it locally and upload it again.
- There are no features such as check-out/check-in.
- There is no version control.
Microsoft provides the ability to integrate the Common Data Service with SharePoint. With SharePoint integration, a document library is created for each record where the entity is enabled for Document Management.
Using SharePoint for managing documents in model-driven apps provides the following benefits:
- Enables the use of SharePoint Document Management features including check-out/check-in and versioning from within a model-driven app
- Allows collaboration with non-Power Platform and non-Dynamics 365 users
- Provides the infrastructure to support OneNote integration in model-driven apps
You can configure SharePoint integration from the Power Platform admin center.
You will require SharePoint integration to be enabled if you want to use the collaboration features with Microsoft Teams. Microsoft Teams is an effective way of collaborating with other workers. First, we will look at using Power Apps inside of Microsoft Teams, and will then look at the collaboration options.
Using Power Apps with Microsoft Teams
Microsoft Teams is becoming a key collaboration app that is the focus of a user's daily work. To prevent the need for users to switch between applications when accessing their data, it is possible to embed Power Apps in Microsoft Team channels.
First, we will look at adding a model-driven app to a channel.
Model-driven apps with Microsoft Teams
Many organizations create teams and channels to allow users to work together on projects or to manage a particular customer. If you have a model-driven app, you can display data from the Common Data Service in Microsoft Teams. This allows users to access data where they are working and not have to switch and navigate to other applications.
You can add forms and views from a model-driven Power App to tabs in channels.
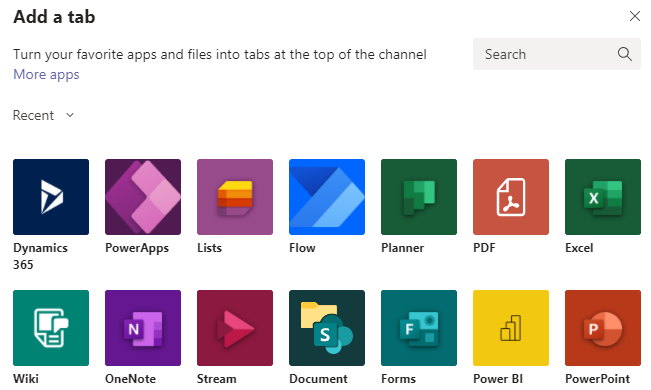
To add a record from the Common Data Service, you start from a channel in the Microsoft Teams app and click on Add a tab. The following page will be shown:
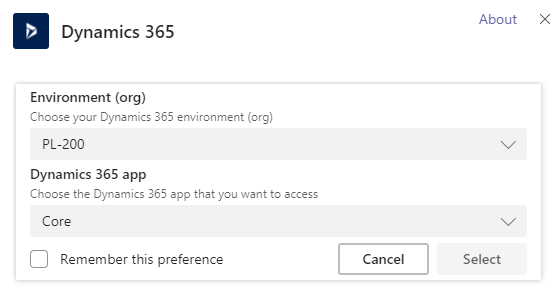
You should select the Dynamics 365 app and you will see the following page:

On the page shown in the preceding screenshot, you should select your environment and a model-driven app by clicking on the pencil icon at the top of the page. This will produce the following dialog:
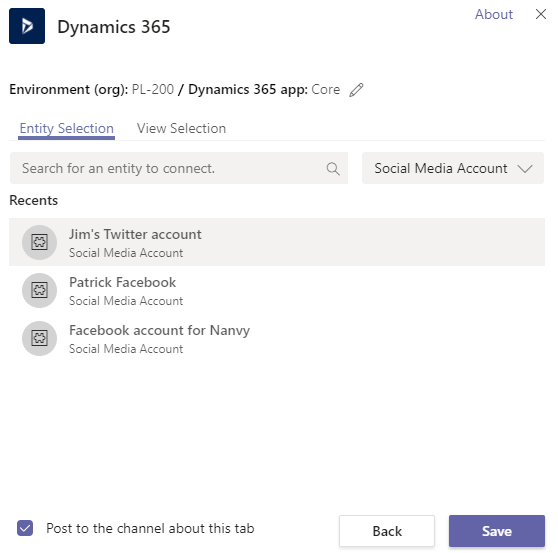
After choosing your environment and model-driven app, you can search for the record you want to add to the channel, as shown in the following screenshot:
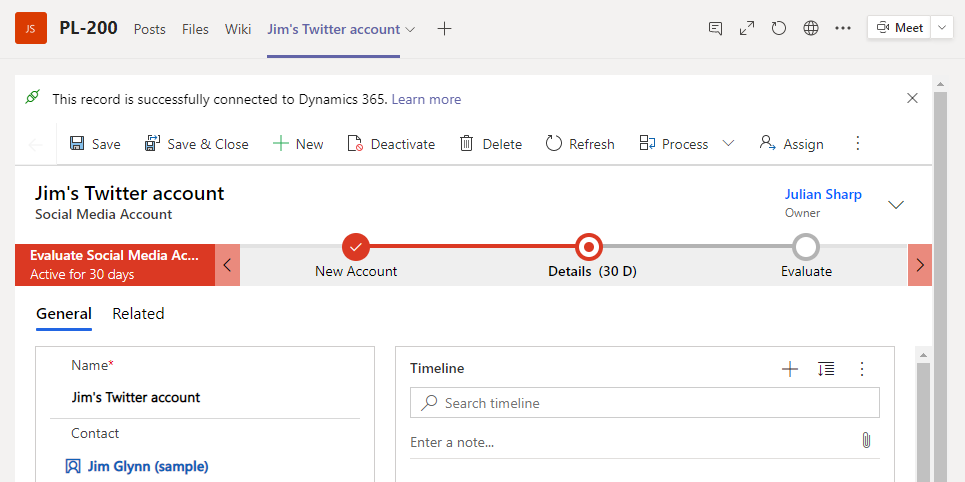
After clicking on Save, a new tab is added to the channel showing the main form from the model-driven app, as shown in the following screenshot:
You can add a view as a tab by selecting View Selection on the page displayed when adding the Dynamics 365 app, as shown in the next screenshot:
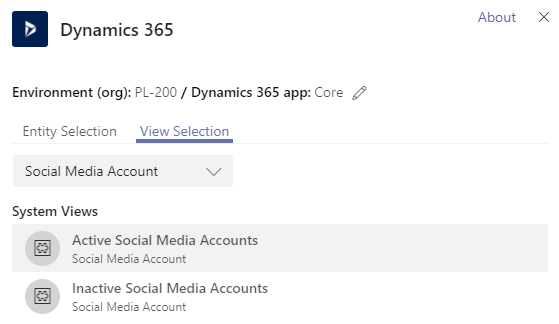
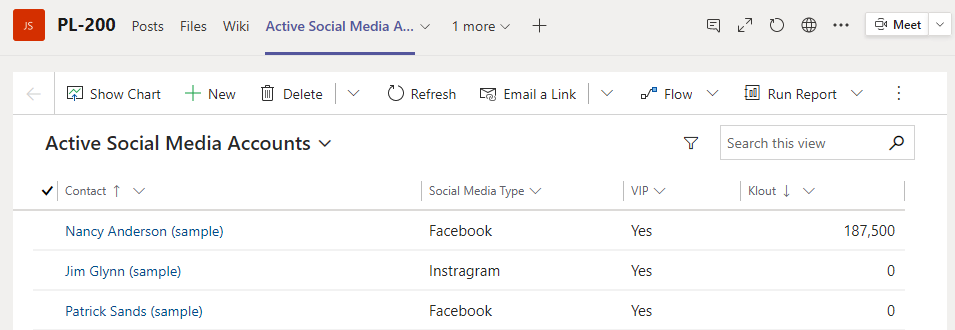
You should select the entity and view you want to use. After clicking Save, a new tab is added to the channel showing the main form from the model-driven app, as shown in the following screenshot:
By default, only the first-party model-driven apps supplied by Microsoft can be selected. If you have a custom model-driven app, you need to enable the model-driven integration with Microsoft Teams from the settings in the Power Platform admin center, as shown in the following screenshot:

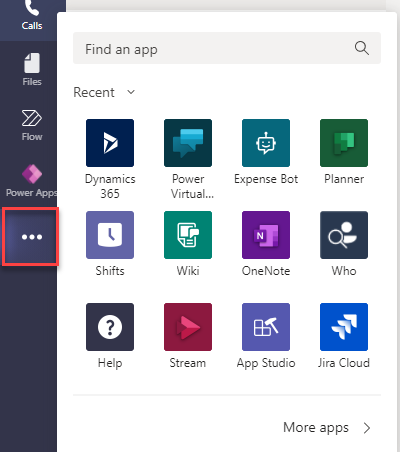
As well as adding the Dynamics 365 app to channels, you can add the Dynamics 365 app to Teams by clicking the ellipses on the left-hand rail (in the Teams app bar) in Teams as indicated in this screenshot:
This will add the model-driven app to Teams, as shown in the following screenshot:

The Settings tab allows you to change the environment and model-driven app used. You can pin the app to the navigation bar for easier access.
Displaying Common Data Service records and apps in Microsoft Teams allows users to access their data where they work. You can also embed canvas apps within Microsoft Teams.
Canvas apps with Microsoft Teams
Canvas apps can provide specific functionality to users to perform their roles. Adding a canvas app to a channel is an effective way to deploy canvas apps to users.
To embed a canvas app, you start from a channel in the Microsoft Team app and click on Add a tab. The following page will be shown:

You should select the Power Apps app and you will see the following page. You can search for the app you want to add to the channel, as shown in the following screenshot:

After clicking on Save, a new tab is added to the channel showing the canvas app, as shown in this screenshot:

Only apps that you own or that have been shared with you can be added with the preceding method.
As well as adding a canvas app to a channel, you can add the same canvas app to Teams so it appears on the left-hand rail (the Teams app bar), as shown in the following screenshot:
To add a canvas app as a Teams app, you need to navigate to the maker portal and display the app's details page as shown in the following screenshot:

On this page, click on the Add to Teams button in the toolbar and a pane will open on the right-hand side. The details page is shown in the following screenshot:
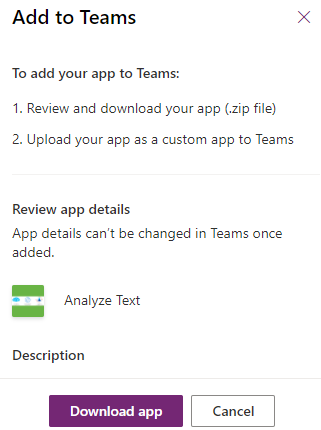
You should download the app as a .zip file. In Microsoft Teams, you need to click on Apps in the bottom left-hand rail and click on the Upload a custom app link. Then, select the .zip file and click on Add.
You can upload the app as a personal app, or if you are an administrator you can upload it for your entire organization.
If you want this app to appear for all users, you need to upload the app for the organization and then, in the Teams admin portal, edit the global app setup policy and add the canvas app to the list of pinned apps:

You can see that there are several options for displaying Power Apps within Microsoft Teams. Microsoft is working to make the use of Power Apps within Teams a lot easier with the introduction of Project Oakdale.
Project Oakdale
Project Oakdale is in public preview at the time of writing; however, it is a major innovation from Microsoft, and you need to be aware of it. Project Oakdale provides the capability to create data models and canvas apps inside of Microsoft Teams. With Project Oakdale you do not need to create an app and go through the steps to install and share the app; instead, you create an app within a team and all members of the team can access the app.
To use Project Oakdale, you need to click on Apps in the bottom left-hand rail, then search for and select Power Apps. This adds the Power Apps app to the left-hand rail, as shown in the following screenshot:
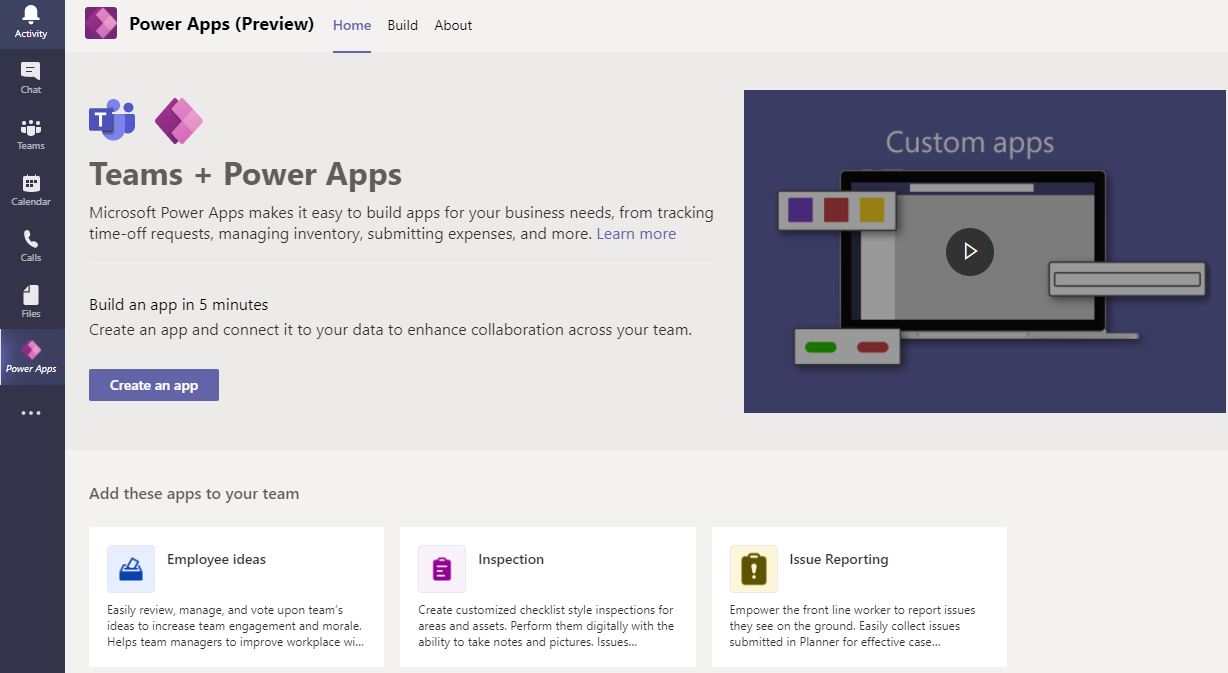
From this page, you can create tables to store your data and create apps. There are sample apps you can deploy for common business challenges such as inspections and issue reporting.
This ability to combine with Microsoft Teams is not limited to Power Apps; the other parts of the Power Platform can be used with Teams as well. In the next section, we will look at how you can use Power Automate with Microsoft Teams.
Using Power Automate with Microsoft Teams
If you use Power Automate flows in your organization, you can manage your flows from within Microsoft Teams. You can add the Flow app to a tab in a channel, or to the left-hand rail, as shown in the following screenshot:

From the Flow app, you can create and monitor flows, and manage approvals.
Microsoft Teams has a connector that you can use with Power Automate. This connector has several triggers and actions that can be classified as follows:
- Messaging: The posting of messages to a channel
- Team management: Creation of teams and channels and management of their memberships
Common scenarios for using Power Automate with the Teams connector include the following:
- Setting up automated replies to messages posted to a channel
- Posting messages to a channel when a task has been added to Planner
- Creating a channel when a record is created in the Common Data Service
We have learned so far about embedding apps within Microsoft Teams. There is a further level of integration between the Common Data Service and Microsoft Teams. This integration concerns the synchronization of files.
Integrating Microsoft Teams with the Common Data Service
The integration between Microsoft Teams and the Common Data Service shares documents between the Common Data Service record and the Microsoft Teams channel:
- Documents show in the Files tab in Microsoft Teams.
- Documents show under Documents in the model-driven app.
The integration between the Common Data Service and Microsoft Teams is disabled by default. You have two options for integrating with Microsoft Teams:
- Basic: Configuration must be performed in Microsoft Teams.
- Enhanced: Configuration is driven by a wizard in the model-driven app.
The following screenshot shows the options to enable Microsoft Teams integration in the system settings:

There are different privileges required to enable the two options:
- Basic: Configuration must be performed by a user with the System Administrator role in the Common Data Service environment.
- Enhanced: Configuration must be performed by a user with the Global Administrator role in the Office 365 tenant.
Upon enabling the Basic Teams integration, a Collaborate button is added to the model-driven app's forms. The Collaborate button does not actually make any changes; instead, it tells the user to open Microsoft Teams and add the Dynamics 365 app to a channel and select a record.
Enabling the Enhanced Teams integration can only be performed after the Basic Teams integration has been enabled. Similarly, enabling the enhanced integration adds the Collaborate button to model-drivel record forms and views. Clicking on the Collaborate button starts a wizard that connects the Common Data Service record to a Microsoft Teams channel.
The final part of integrating with Microsoft 365 is using Word and Excel templates to generate output using data stored in Common Data Service entities.
Creating Word and Excel templates
Most systems require formatted output generated from data. You could use the Export to Excel feature to extract data and then format it externally, but often the formatted output needs to be generated regularly. The Common Data Service has templates that can be used to generate formatted output. These templates can be used with the automation capabilities of the Power Platform and the Common Data Service.
There are three types of template that can be used to create formatted output using data in the Common Data Service:
- Excel
- Word
First, we will look at using email templates to send emails containing data held in the Common Data Service.
Email templates
Email templates can be used manually by a user when creating an email in a model-driven app, or automatically with a classic workflow. You can also use email templates using the campaign functionality in Dynamics 365 Sales.
The email templates are managed from Templates under Advanced Settings, as shown in the following screenshot:

There are several email templates supplied by Microsoft for automatic notifications about import data jobs and bulk delete jobs. The Dynamics 365 Sales and Dynamics 365 Customer Service apps include some email templates.
You can create personal email templates or organizational templates. A personal email template is created from personal options. A personal email template can be converted to an organizational template. An organizational template can be reverted back to a personal template.
Email templates have many limitations, including the following:
- A limited choice of fonts and other formatting options
- Cannot edit the HTML
- No spell checker
- Cannot embed images
- Can only be created for accounts, contacts, opportunities, leads, quotes, orders, invoices, and cases
- Cannot change the entity once saved
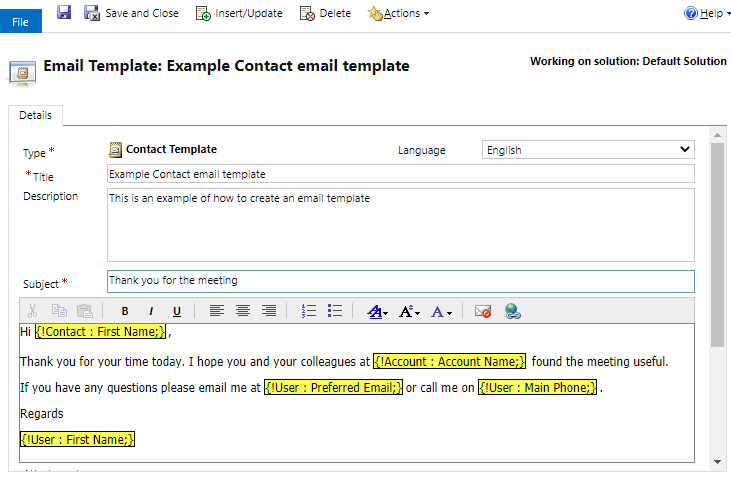
When you select a record type for an email template, you can add in fields from that entity, and from the user who is the owner of the record, using the Insert/Update button in the command bar. The next screenshot shows using fields on an email template for a contact:
You can also create an email template for the Global record type. This means the email is not linked to an entity, but can instead be used with any entity. However, a global email template cannot access any fields except for the record owner.
Email templates can however be included in a solution and migrated through environments as part of application life cycle management. Email templates operate on one record at a time. If you want to process a set of records, then Excel templates are a better choice.
Excel templates
Excel templates are used to produce lists and charts from data held in the Common Data Service. They are used with a list of records in a view.
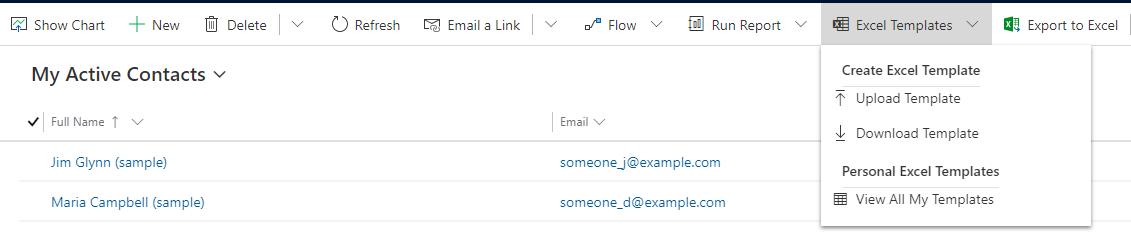
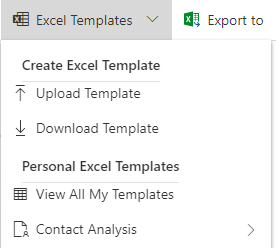
You can create an Excel template from any view. In the following screenshot, you can see the options you get when you click the Excel Templates button:
To create a new template, click on Download Template and the following window will appear:
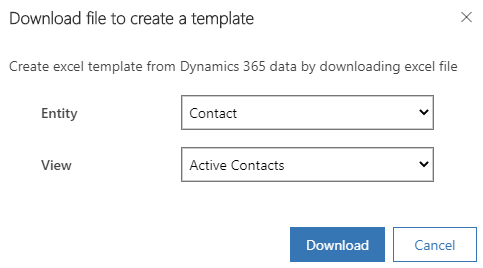
You select the entity and view you want to use, and an Excel document will be downloaded to your computer. You can then edit the Excel document, where you will have full formatting, formulas, and charting available.
Once you have created your Excel document, upload it by clicking on Excel Templates, selecting Upload Template, and browsing to your Excel document. It will then be available for selection:
You can open the Excel template in either the Excel desktop app, or by using Excel Online, as shown in the next screenshot:

Excel templates are useful for lists of data you want to show in charts, but if you need a more formal document, Word templates are a better choice.
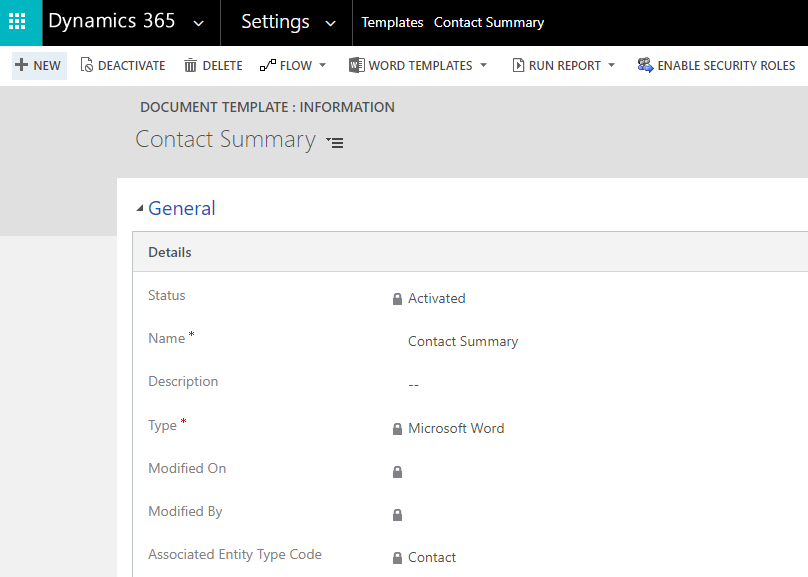
Word templates
Unlike Excel templates, Word templates can include data from other entities. Word templates are based on a single record but can include records from other entities that are related to it. You can include many-to-one, one-to-many, and many-to-many relationships.
The following screenshot shows how to download a Word template from within a model-driven app form:
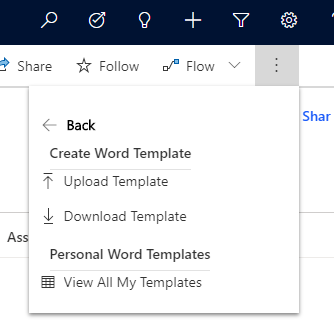
Clicking on Download Template will display the following screen, where you can select the relationships that you want to include in your Word template:

You select the relationships you want to use, and a Word document will be downloaded to your computer. You can edit the Word document, where you will have full formatting available.
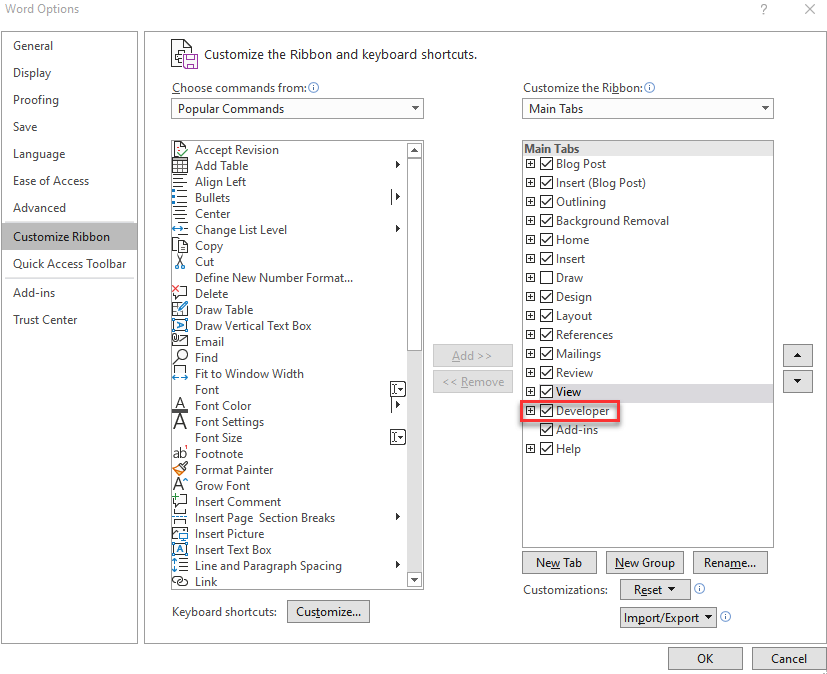
There are some steps you need to undertake to be able to use the Common Data Service fields and add them to the template. You need to do the following:
- Enable the Developer tab in Word.
- Show the XML pane.
- Select CRM schema.
- Add fields as plain text.
First, you must add the Developer tab to Word. To do this, open Word, and in the File & Options menu, click on Customize Ribbon and enable the Developer tab as shown in the following screenshot:
When you open the Word template, you need to expose the CRM schema and fields. You need to do the following:
- Select the Developer tab.
- Click on the XML Mapping Pane tile.
- This will open the pane on the right-hand side of the Word window. Then you need to select the schema for CRM from the drop-down list.
When you have done all of this, you will be able to see all the fields for the entity, as shown in the following screenshot:

- To add a field, right-click on the field in the XML page, select Insert Content Control, and choose Plain Text.
Once you have finished editing, you can upload the template and it will then be available for use by clicking on the Word Template button. You can also generate documents from a Word template using the SetDocumentTemplate action either in Workflow or in a Power Automate flow. With Dynamics 365 Sales, there is the functionality to generate and email quotes formatted as PDFs using Word templates.
Users can create and upload templates, but templates need to be made available to the users who need them. Next, we will look at the security aspects of templates.
Controlling access to templates
You use security roles to control the creating and editing of personal and organizational templates. Word and Excel templates share the same security privileges, as shown in the following screenshot:
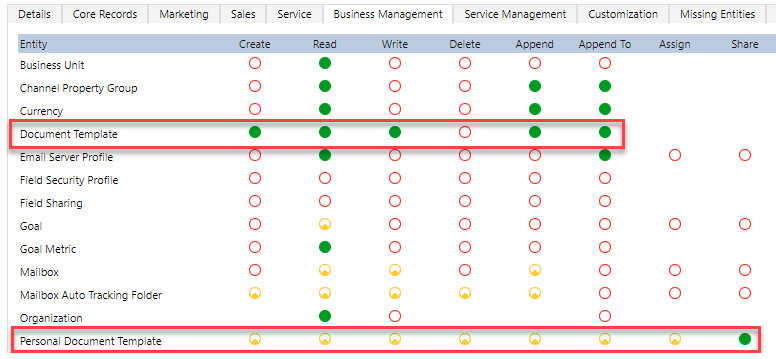
If you upload a document template from within a view in a model-driven app, the template will be a personal template. You can share a personal document template with users and teams.
If you upload a document template into the Document settings under Advanced Settings, the template will be an organizational template:
By default, the template will be available to all users, but you can restrict a document template to users with specific roles by clicking on ENABLE SECURITY ROLES in the command bar and selecting the relevant roles, as shown in the following screenshot:

Email templates have separate security privileges to Word and Excel templates, as shown in this screenshot:

Unlike document templates, email templates can't be restricted by security roles.
The following table provides a quick summary of the differences between email, Word, and Excel templates:
| Word | Excel | |
| Solution-aware | Not solution-aware. | Not solution-aware. |
| Account, Contact, Lead, Opportunity, Quote, Order, Invoice, Case, User, or Global | All entities. | All entities. |
| Single record | Single record with related records (1:N, N:N, N:1 relationships). | A view of records. |
| Limited formatting | Full formatting. | Full formatting. |
| Create in classic workflow | Action to generate in classic workflow and flow. | Manual only. |
| Personal and organizational | Personal and organizational. | Personal and organizational. |
| Security for email templates | Security for document templates. |
Security for document templates. |
| No individual template security | Templates can be linked to roles. | Templates can be linked to roles. |
| No PDFs | PDFs for Quote and other sales entities. | No PDFs. |
As we have now seen, the Common Data Service, Power Platform, and Microsoft Teams provide a powerful combination of tools and services that can be used to create collaborative experiences for users.
Summary
In this chapter, we learned about the different options for collaborating using the services in Microsoft 365.
You should now understand the integration points between the Common Data Service and Microsoft 365. You will now be able to deploy your apps in Microsoft Teams and can generate documents using Word and Excel templates.
By using the skills you have learned in this chapter, you will be able to create apps that are accessible wherever the user works, and users will be able to share information more easily.
In the next chapter, we will look at the tools and processes around moving changes from development through testing to the production environment using solutions.
Questions
After reading this chapter, test your knowledge with these questions. You will find the answers to these questions in the Assessments chapter at the end of the book:
- You are a Power Platform Functional Consultant. You use templates within your model-driven app. You need to transport templates between environments. Which template can be included in a solution?
A) Data maps
B) Email templates
C) Excel templates
D) Templates for data import
E) Word templates
- You are a functional consultant. You need to create a Word template that is only accessible by a subset of users. Your solution: create an organizational template and assign a security role to the template. Does this solution meet the goal?
A) Yes
B) No
- You are a functional consultant. You need to create a Word template that is only accessible by a subset of users. Your solution: create a personal template and share it with a team. Does this solution meet the goal?
A) Yes
B) No
- You are a functional consultant. You need to create a Word template that is only accessible by a subset of users. Your solution: in the security role settings, set all privileges for article templates. Does this solution meet the goal?
A) Yes
B) No
- You need to configure the integration with Microsoft Teams. What must you configure before you can configure Microsoft Teams?
A) Server-side synchronization
B) OneDrive for Business
C) Server-based integration
D) Office 365 Groups connector
- You need to create a Word template. What should you do?
A) Install Dynamics 365 for Outlook.
B) Install the Office Data Connector add-in.
C) Enable the Developer tab.
D) Install the Open XML SDK.
- You need to add a canvas app to the left-hand rail in Microsoft Teams for all users. What should you do?
A) Share the app with all Team members.
B) Edit the Teams global app setup policy.
C) Enable the embedding of model-driven apps within Microsoft Teams.
D) Enable enhanced Teams integration.
- From which two places can you run a canvas app in Microsoft Teams?
A) A team
B) A channel
C) The Teams app bar
D) The Teams admin portal
- What can you do with Power Automate in Microsoft Teams?
A) Pin an app to the Teams app bar.
B) Add a model-driven app as a tab in a channel.
C) Remove a member from a team.
D) Create a channel.
Further reading
For more details on the topics covered in this chapter, please refer to the following resources:
- Set up model-driven apps in Dynamics 365 to use SharePoint Online: https://docs.microsoft.com/power-platform/admin/set-up-dynamics-365-online-to-use-sharepoint-online
- Enable OneDrive for Business (online): https://docs.microsoft.com/power-platform/admin/enable-onedrive-for-business
- Set up OneNote integration: https://docs.microsoft.com/power-platform/admin/set-up-onenote-integration-in-dynamics-365
- Deploy Microsoft 365 groups Dynamics 365 (online): https://docs.microsoft.com/power-platform/admin/deploy-office-365-groups
- Use the personal dashboard: https://docs.microsoft.com/dynamics365/teams-integration/teams-personal-use
- Embed a canvas app as tab app in Teams: https://docs.microsoft.com/powerapps/teams/embed-teams-tab
- Embed a canvas app as personal app in Teams: https://docs.microsoft.com/powerapps/teams/embed-teams-app
- Create apps in Microsoft Teams by using Power Apps: https://docs.microsoft.com/powerapps/teams/create-apps-overview
- Manage app setup policies in Microsoft Teams: https://docs.microsoft.com/microsoftteams/teams-app-setup-policies
- Manage your apps in the Microsoft Teams admin center: https://docs.microsoft.com/MicrosoftTeams/manage-apps
- Microsoft Teams integration: https://docs.microsoft.com/power-platform/admin/about-teams-environment#microsoft-teams-integration
- Microsoft Teams integration with customer engagement apps in Dynamics 365: https://docs.microsoft.com/dynamics365/teams-integration/teams-integration
- Install and set up Microsoft Teams integration: https://docs.microsoft.com/dynamics365/teams-integration/teams-install-app
- Difference between the Basic and Enhanced Collaboration Experiences with Microsoft Teams: https://docs.microsoft.com/dynamics365/teams-integration/teams-basic-vs-enhanced-collaboration
- The Microsoft Teams connector: https://docs.microsoft.com/connectors/teams/
- Analyze and share your data with Excel templates: https://docs.microsoft.com/power-platform/admin/analyze-your-data-with-excel-templates
- Use Word templates to create standardized documents: https://docs.microsoft.com/power-platform/admin/using-word-templates-dynamics-365
- Create templates for email: https://docs.microsoft.com/power-platform/admin/create-templates-email