
Power Virtual Agents chatbots allow users to create chatbots without the need for code. You can deploy Power Virtual Agents chatbots to your website and to other channels, such as Microsoft Teams.
This chapter describes how to create, publish, and monitor Power Virtual Agents bots using the Power Virtual Agents portal. You will learn how to create and deploy a bot before gaining an understanding of some of the key concepts you should implement when building chatbots.
The following topics will be covered in this chapter:
- Introducing Power Virtual Agents
- Creating a chatbot
- Publishing chatbots
- Adding a chatbot to Microsoft Teams
- Monitoring chatbots
By the end of this chapter, you will be able to create chatbots using Power Virtual Agents, deploy them to websites and to Microsoft Teams, and monitor chatbot usage.
Introducing Power Virtual Agents
Power Virtual Agents chatbots are chatbots powered by artificial intelligence (AI) that allow users to focus on more complex and higher-value work while the chatbots themselves handle simple repetitive interactions. As with Chapter 18, AI Builder, you do not need to be a data scientist or even a developer to create chatbots using Power Virtual Agents.
Power Virtual Agents chatbots interact with customers and employees, answer questions, and provide information. You can deploy Power Virtual Agents chatbots to multiple channels, including your own website, Facebook, and Microsoft Teams.
Microsoft provides an alternative method for building chatbots using Azure Bot Service. The principal difference is that Azure Bot Service uses C# or Node.js to create your bot, while Power Virtual Agents follows the no-code approach of the Power Platform.
In this section, we will look at the scenarios and use cases for Power Virtual Agents chatbots, as well as the best practices for building chatbots. First, we will look at the benefits of using Power Virtual Agents to create your chatbots.
Benefits of using Power Virtual Agents
Using Power Virtual Agents to build your chatbots brings many benefits to you as a non-developer, as well as to your organization. With Power Virtual Agents, you can create chatbots using an easy to use, no-code graphical interface from within a web browser, as shown in the following screenshot:

As shown in the preceding screenshot, Power Virtual Agents has a navigation bar on the left-hand side. The right-hand pane contains the authoring canvas, which is where you can see the questions and messages being relayed. The middle pane allows you to test your bot as you build it.
Power Virtual Agents allows you to understand the questions that are being asked so that customers and users do not have to ask these questions using exactly the same phrases you specified in your chatbot. For example, in the middle pane shown in the preceding screenshot, the question being asked has been phrased differently from the phrases shown in the authoring canvas.
The benefits of using a no-code graphical interface for building chatbots are as follows:
- You can build a bot alongside the subject matter experts (SMEs), thus reducing the time to build the bot and increasing user ownership and adoption.
- The question flow in the chatbot can be adjusted quickly so that it responds to changing circumstances and demands.
- Removes the need for custom code.
- Removes the need to understand Azure AI services.
Power Virtual Agents chatbots come with telemetry built-in so that you can monitor how your chatbots are being used. Once you've done this, you can change your chatbot to increase its effectiveness.
There are many ways to use chatbots that have been created with Power Virtual Agents. We will look at a few common use cases in the following subsection.
Use cases for Power Virtual Agents
Chatbots automate responses to questions and requests. There are many scenarios where chatbots can be used to enhance your organization's productivity. Some of the uses for chatbots are as follows:
- Customer support: Automation of customer support using a chatbot on a website. The chatbot can answer simple questions such as what are your opening hours?, when will my order be delivered?, and how do I return this item I purchased? Chatbots can deliver responses promptly and can easily be scaled during peak loads to handle multiple requests. Chatbots can also escalate to a human agent if necessary.
- Sales help: Chatbots can be used internally to support sales users by providing information on products, pricing, and availability.
- Ticket sales: A chatbot can interact with a customer to inform them of the dates a performer is scheduled for, the ticket types that are available, and their prices. The chatbot can then make the booking for the customer.
- FAQs: A common use for chatbots is to get them to provide the answers to frequently asked questions on your website.
- Employee helpdesk: Chatbots can be used to answer employee queries about their benefits or leave entitlement.
Chatbots are easy to build, but it is easy to build a chatbot that performs poorly.
Best practices for chatbots
Chatbots can be abandoned if the user of the chatbot cannot obtain the responses they want. The purpose of a chatbot is to handle repetitive tasks and to lower the volume of issues that human agents must handle. If the chatbot cannot fulfill its purpose, then you will have unhappy customers.
You should make sure that you identify the correct reasons for using a chatbot. The best chatbots are clear about what their purpose is and try not to respond to all questions.
There are several principles for conversational AI that you should follow:
- Transparency: A customer should know they are interacting with a bot. The purpose of the bot should be clear. The limitations of the bot should be stated.
- Escalation to a human: It should be possible to seamlessly transfer to a human agent.
- Limit the bot: Reduce the scope of the bot to its purpose.
- Treat people fairly: Be aware of bias.
- Respect privacy: Chatbots collect customer data, so make sure that this data is handled appropriately.
Now that you know what Power Virtual Agents is, let's create a chatbot.
Creating a chatbot
The process of creating a chatbot in Power Virtual Agents is straightforward and only requires a web browser. In this section, we will learn how to create a bot and then how to share it with other users.
Power Virtual Agents requires a license to be built and run. However, you can start a free trial of Power Virtual Agents simply by navigating to the Power Virtual Agents portal (https://powerva.microsoft.com). Clicking on Start free trial will provision Power Virtual Agents. After a short delay, the following window will be displayed, where you can create a new bot:

When you see the preceding screen, you will need to provide a Name for your bot, select the Language that the bot will use, and select the Environment where the bot will store its configuration and data. If you have permission, you can create an environment from this window.
To create further chatbots, you must click on the bot icon in the top-right of the Power Virtual Agents portal, as shown in the following screenshot. A pane will open on the right-hand side so that you can choose an environment:

After clicking on + New bot, the window shown in Figure 15.2 will appear. Creating a new bot takes a few minutes. You will be provided with sample lessons and system messages to help you get started. From here, you can learn how to author your own bots or simply delete them.
Sharing a bot
You can permit other users to edit your chatbot and access the chatbot's session logs by sharing it with users. From the Home page in the Power Virtual Agents portal, click on the Share button on the top-right. Clicking on the Share button opens a pane on the right-hand side of the portal. To share your chatbot, enter the user's email address and click on the Share button.
Users can collaborate on chatbots, with different users working on distinct parts of the bot at the same time.
We will use the sample topics included with the new bot to publish and deploy a chatbot.
Publishing chatbots
Once you have built and tested your Power Virtual Agents chatbot, you must publish your chatbot so that your customers can interact with it. In this section, you will learn how to publish chatbots and add them to different channels.
Publishing a bot is straightforward. Click on Publish in the left-hand navigation pane; the portal will open the publishing page, as shown in the following screenshot:

Clicking on Publish and then Publish again at the confirmation prompt will make the bot available to others.
Once you have published your chatbot, a link to a demo website will be created, where you can try the bot out yourself or allow your colleagues to test it. You can do this by copying the URL and sending it to them.
Once you are content that the bot is ready for your users or customers, you can add the bot to one or more channels.
Adding the chatbot to channels
Channels are the places where your chatbot can be accessed. The channels that you can select include the following:
- Website
- Microsoft Teams
- Slack
To configure a channel, click on Manage in the left-hand navigation and then select Channels. You will see a screen similar to the following:
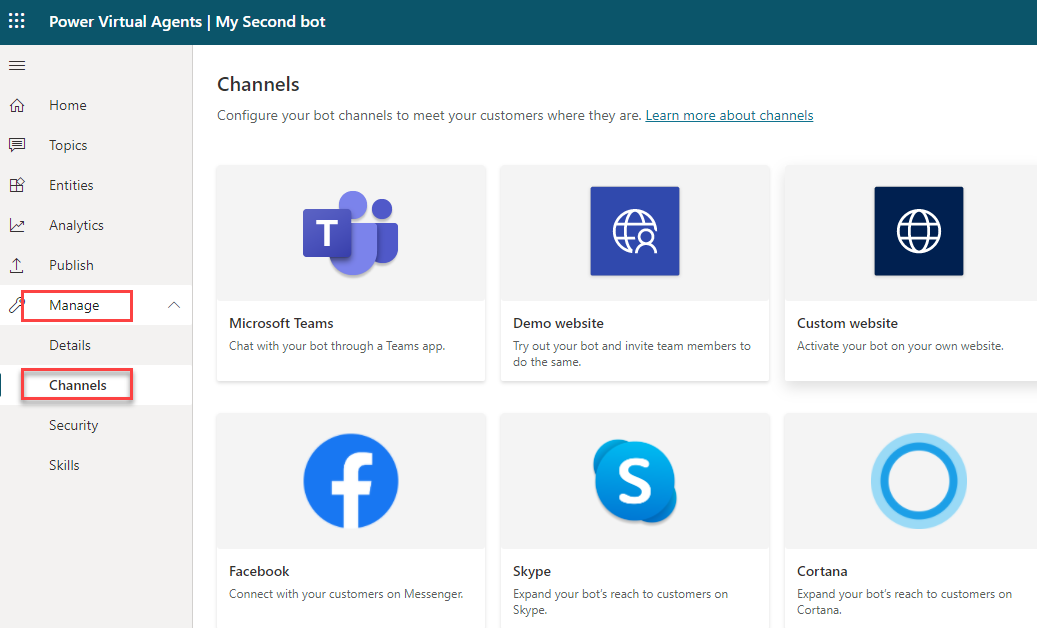
The configuration for each channel depends on how that service operates. Clicking on Custom website will generate some embed code that you can add to your website pages. Clicking on the Slack channel generates the IDs you'll need to enter in the Slack application. For Facebook, you need to get the respective IDs and secrets from Facebook and add those details to the Power Virtual Agents portal.
Next, we'll learn how to add a bot to a Microsoft Teams channel.
Adding a chatbot to Microsoft Teams
Chatbots can be used by internal users, as well as external customers. Microsoft Teams is an ideal location to deploy your chatbot as it will operate as a native Teams bot and share Teams' appearance.
Chatbots built using Power Virtual Agents can be used inside Microsoft Teams. You need to select the Microsoft Teams channel and click Turn on Teams. Once you've done this, the following pane will appear:
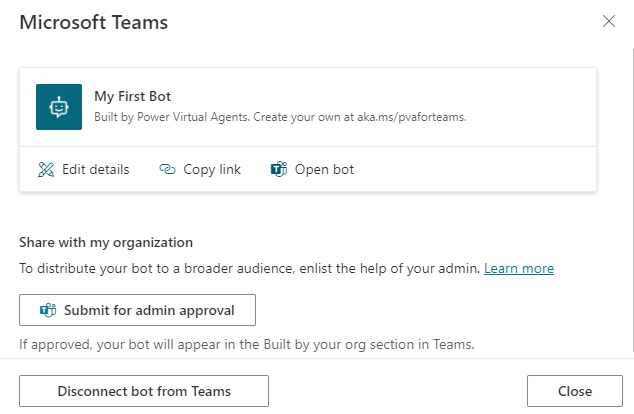
Clicking on Open bot will open Microsoft Teams. A window will appear where you can add the chatbot to Teams:

Clicking on Add will add the chatbot to Teams. The following screenshot shows the chatbot working within Teams:

The chatbot will only be available for your user. To allow other users to add the chatbot themselves, you need to share the chatbot with your organization. The Submit for Admin approval button, shown in Figure 15.6, allows you to do this. There are two ways you can do this:
- Download a manifest file: A .zip file must be downloaded. A Teams admin can upload this file to Teams.
- Submit for admin approval: The chatbot app will be listed in the Teams Admin portal for a Teams admin to approve.
With that, you have learned how to create chatbots for Microsoft Teams. Your privileges in Microsoft Teams will determine which options are available to you.
Building great chatbots requires monitoring how the chatbot is being used and analyzing where users are failing to get the responses they need. Fortunately, Power Virtual Agents comes with comprehensive monitoring.
Monitoring chatbots
Power Virtual Agents has telemetry built in. This allows you to monitor how your chatbots are being used, where the question flow is causing your chatbot to be abandoned, and which topics are being used. By monitoring your chatbots, you can then optimize your chatbot and increase its effectiveness.
Clicking on Analytics in the Power Virtual Agents portal will show the Analytics page, as shown in the following screenshot:

There are four tabs on the Analytics page:
- Summary: An overview of the bot's performance. The charts use AI to highlight topics that have the greatest impact on escalations, abandons, and resolutions.
- Customer Satisfaction: If you capture feedback in your chatbot, customer satisfaction (CSAT) scores are shown over time, with the topics that have the greatest impact on CSAT highlighted.
- Sessions: The Sessions tab allows you to download transcripts of chat sessions.
- Billing: The Power Virtual Agents license comes with a set capacity for the number of sessions you can run. This tab allows you to track how many sessions have been billed against your capacity allowance.
You should monitor these analytics for trends and pay attention to abandon rates, as well as which topics are the most influential.
Summary
This chapter described how to build chatbots without using code or having to know certain AI techniques. We used Power Virtual Agents for this purpose.
You should now understand how to create and publish chatbots. You should be able to use channels, including Microsoft Teams, to make your bots available to users and customers. You should also be able to monitor chatbots for performance and analyze where you can improve them. Using these skills, you can create interactive chatbots that will improve customer satisfaction and allow users to concentrate on higher-value activities.
In the next chapter, we will learn how to author your own chatbots by adding conversation triggers, messages, conditions, and actions.
Questions
Now that you've read this chapter, test your knowledge with these questions. You will find the answers to these questions in the Assessments section at the end of this book:
- What must you do before you add a Power Virtual Agents chatbot to a channel?
A) Share
B) Publish
C) Test
D) Add a skill
- Which tab in Power Virtual Agents Analytics should you use to find how much of your licensed capacity has been used?
A) Summary
B) Customer Satisfaction
C) Sessions
D) Billing
- You need to make your Power Virtual Agents chatbot available to all users of Microsoft Teams. What should you do?
A) Export
B) Copy the URL
C) Share
D) Submit for admin approval
- You create a new chatbot in Power Virtual Agents. Which two of the following must you select?
A) Channel
B) Environment
C) Language
D) Skill
Further reading
- Power Virtual Agents overview: https://docs.microsoft.com/power-virtual-agents/fundamentals-what-is-power-virtual-agents
- Working with environments in Power Virtual Agents: https://docs.microsoft.com/power-virtual-agents/environments-first-run-experience
- Creating and deleting Power Virtual Agents bots: https://docs.microsoft.com/power-virtual-agents/authoring-first-bot
- Key Concepts – Publishing your bot: https://docs.microsoft.com/power-virtual-agents/publication-fundamentals-publish-channels
- Sharing your bot with other users: https://docs.microsoft.com/power-virtual-agents/admin-share-bots
- Configuring the demo website and adding the bot to your live website: https://docs.microsoft.com/power-virtual-agents/publication-connect-bot-to-web-channels
- Adding a bot to Microsoft Teams: https://docs.microsoft.com/power-virtual-agents/publication-add-bot-to-microsoft-teams
- Power Virtual Agents app in Microsoft Teams: https://docs.microsoft.com/power-virtual-agents/teams/fundamentals-what-is-power-virtual-agents-teams
- Analysis in Power Virtual Agents: https://docs.microsoft.com/power-virtual-agents/analytics-overview