Chapter 14: Leveraging Azure DevOps for Power Platform
Azure DevOps is the one-stop solution that encompasses task and test management, source control, and pipelines for the build, unit test, and deploy solutions. Using Azure DevOps provides Power Platform projects with a framework through which implementation activities may be managed and monitored. In this chapter, you will learn how to implement task management, source control, and application life cycle management (ALM) using Azure DevOps.
In this chapter, we are going to cover the following topics:
- Leveraging Azure DevOps for task management
- Leveraging Azure DevOps for source control
- Leveraging Azure DevOps for application life cycle management (ALM)
Leveraging Azure DevOps for task management
Power Platform solution architects are often responsible for creating a base structure that holds requirements, tasks, and bugs. Azure DevOps includes four work item models:
- Agile
- CMMI
- Scrum
- Basic
You will typically work with product owners and business analysts to select the most appropriate model for the project. The project’s work items are created and distributed across the team for implementation. The following screenshot illustrates a set of work items for a Power Platform Portal and Model-Driven App backend solution:
Figure 14.1 – Example Azure DevOps task management backlog view
Azure DevOps’s work item processes allow the business to track and manage the work being carried out by the implementation teams and provide a compass and clear directives for each team member to work on.
Leveraging Azure DevOps for source control
Azure DevOps provides two types of source control: Git and Team Foundation Version Control (previously known as TFS). A source control repository is created by default when a new Azure DevOps project is instantiated, where the user is presented with the aforementioned version control options:
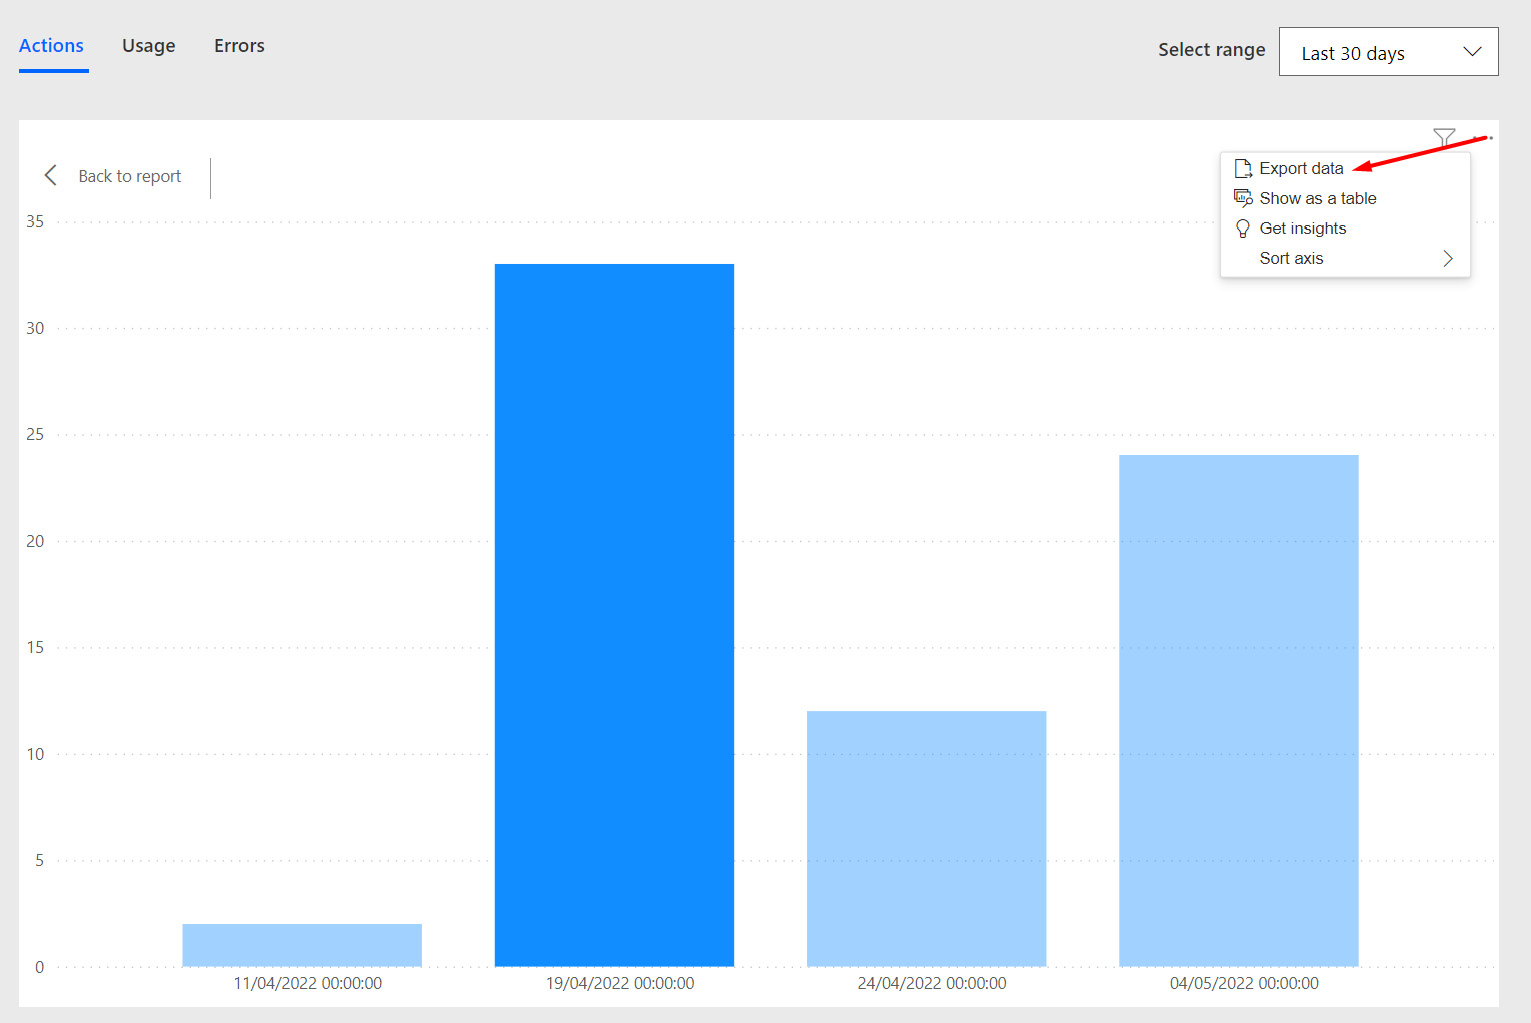
Figure 14.2 – Azure DevOps source control repository options
Additional repositories may be added, which may differ from the default. The following screenshot shows an additional repository being created within an existing project:

Figure 14.3 – Creating additional repositories within Azure DevOps
Source control is an essential part of the Power Platform implementation process, typically storing the following artifacts:
- Dataverse plugin source code
- Model-Driven Apps customization source code (PCFs, web resources, and images)
- Dataverse exported solutions
- Data (master data, reference data) to be deployed to target environments
- Azure component source code (for example, Azure Functions)
Solution architects define the project’s ways of working to ensure all team members develop and manage sources within the Azure DevOps repositories.
Manual and automated source control of Power Platform solutions
Power Platform solutions contain the definition for tables, processes, apps, forms, and other components used to define the Power Platform configuration. These solutions are exported from a source/development environment as ZIP files and then imported into target environments (for example, QA and production environments).
Storing Power Platform solutions in a source control environment provides a means of recording and versioning the system’s configuration. Deployments to target environments may also be carried out from solution files stored in source control. Automated deployments will be discussed in more detail in the upcoming sections.
Solution files may be stored either as ZIP files or extracted to a file and folder structure using the Power Platform SolutionPackager tool (please refer to the SolutionPackager tool’s docs for additional details: https://docs.microsoft.com/power-platform/alm/solution-packager-tool).
The following screenshot illustrates a typical source control folder structure that’s used to store Power Platform solutions:

Figure 14.4 – Storing Power Platform solutions in source control
Solution files may be checked into source control manually or via an automated process such as an Azure DevOps pipeline. Manually submitting solution files may be carried out using standard source control tools (for example, the Azure DevOps web portal itself). The next section discusses the options available for automated source control of Power Platform solutions.
Automated source control of Power Platform solutions
Azure DevOps pipelines provide a mechanism for automated source control of Power Platform solutions. Solutions may be exported, validated, extracted, and checked into a source control repository. The following diagram illustrates a typical Azure DevOps pipeline that automatically checks solutions into a repository:

Figure 14.5 – Azure DevOps pipeline for automated Power Platform solution source control
The Azure DevOps pipeline shown in the preceding diagram can be created by following these steps:
- Create an Azure DevOps pipeline
Navigate to the Pipelines option within the Azure DevOps project:
Figure 14.6 – Creating an Azure DevOps pipeline
- Select the classic editor option
In the New pipeline screen, select the Use the classic editor option. Selecting this option will allow you to create DevOps tasks using an editor UI:

Figure 14.7 – Selecting the classic editor option to manage pipelines using a UI rather than a YAML script
- Select a source control repository
Selecting the source control repository and branch where Power Platform solutions will be checked into Azure DevOps provides both Git and TFVC options for version control.
In this example, we will be using the Azure Repos Git option:
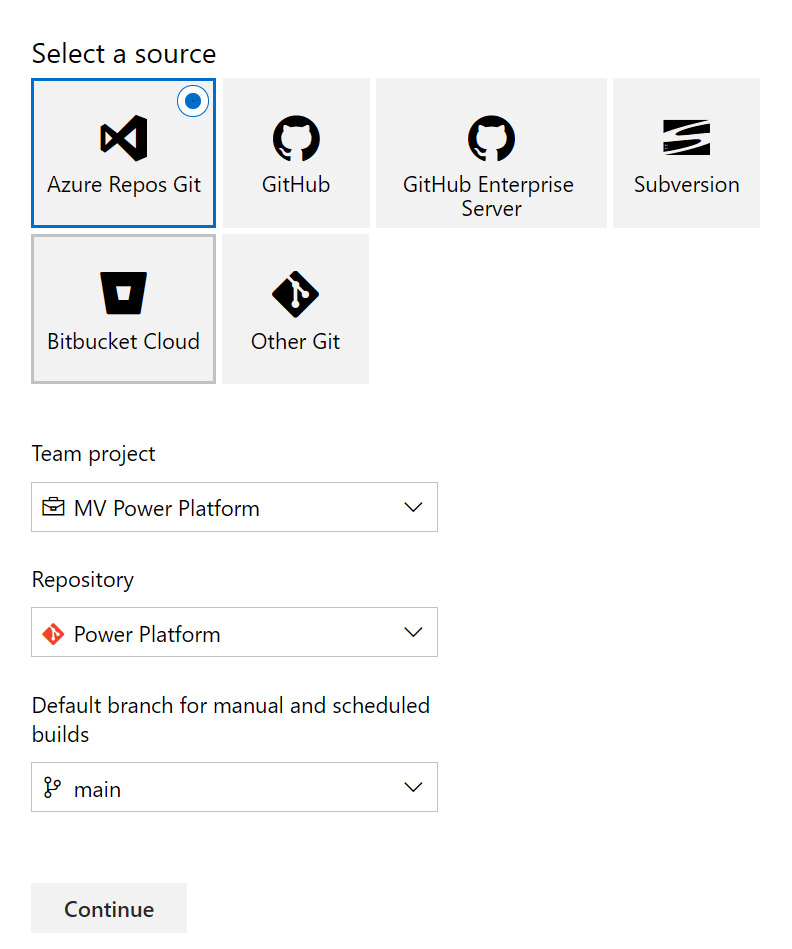
Figure 14.8 – Selecting the repository and branch where Power Platform solutions will be checked in
After that, select the Empty job option to start from a clear pipeline:

Figure 14.9 – Selecting the Empty job option to start with a clear pipeline
- Add the Power Platform Tool Installer task
- Click the + button on the first task placeholder, search for Power Platform Tool Installer, and press the Add button:
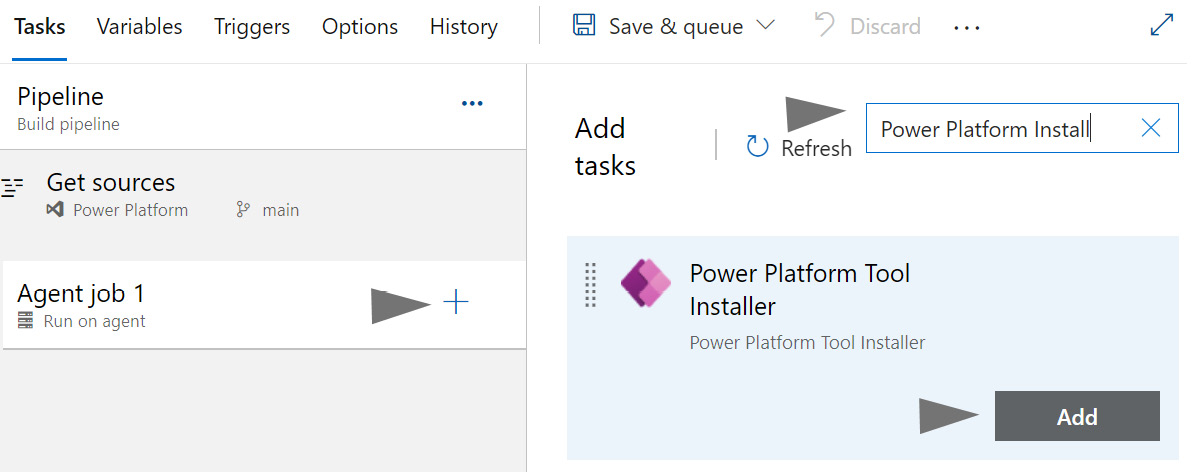
Figure 14.10 – Adding Power Platform Tool Installer
- If the Power Platform Tool Installer option does not appear in the search results, please search for Power Platform on the same screen, and add the free Azure DevOps Power Platform Build Tools extension by pressing the Get it free button:
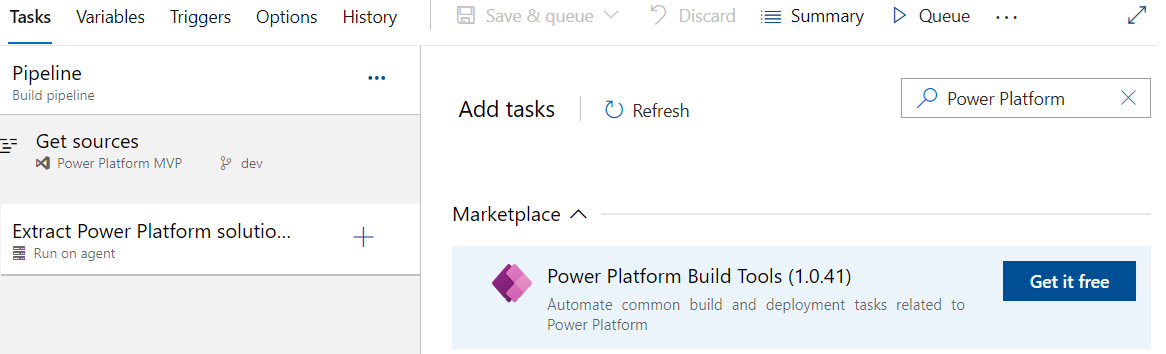
Figure 14.11 – Getting Power Platform Build Tools for your Azure DevOps organization if it’s not already installed
- Once Power Platform Tool Installer has been set as the first task, the task itself may be given a name, as follows:

Figure 14.12 – Naming tasks in Azure DevOps pipelines
- Add the Power Platform Export Solution task
Search for and add the Power Platform Export Solution task using the same method when adding the Power Platform Tool Installer task and set the following key fields:
- Display Name: This allows you to give the task a descriptive name, which could include the name of the solution being exported.
- Authentication type: Two options are available. The first allows for standard username/password credentials to be used when connecting to the Power Platform environments and will require an AD user for authentication. While useful under certain circumstances, the second authentication type option is recommended as it does not require a full Power Platform user and leverages the application user functionality. If this is the first time that a service connection is being used within an Azure DevOps project, you will be required to create one at this point by pressing the + New button.
- Solution Name: The name for the solution to be exported. Note that this is not the display name for the solution. You may obtain the name from the solution list in the make.powerapps.com portal.
- Solution Output File: The path and filename for the Power Platform solution ZIP file. You may want to create the repository folder structure in advance. The following example illustrates a solution being exported to the PowerPlatform.Solutions/Packed/CoreComponents_managed.zip source control path.
- Export as Managed Solution: Solutions may be exported as managed or unmanaged. In this example, we are exporting a managed solution. However, we will add a second task to export an unmanaged version later.
The following screenshot illustrates a task that’s been configured to export a managed solution:
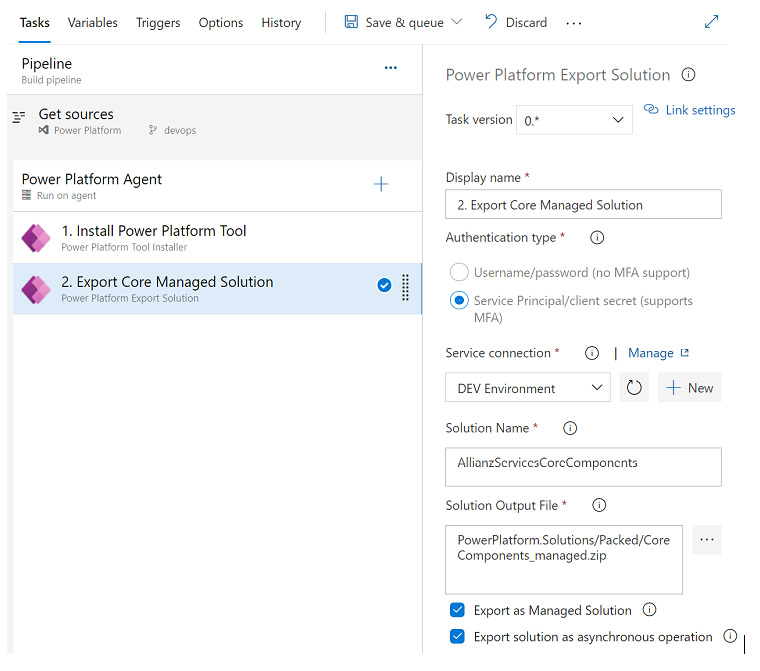
Figure 14.13 – Configuring the Power Platform Export Solution task in an Azure DevOps pipeline
Now, let’s look at creating a new service principal.
- Adding a new service principal
- Click on the + New button to add a new Azure DevOps service principal:

Figure 14.14 – Adding a new Azure DevOps service principal
You will be presented with a form similar to the following:
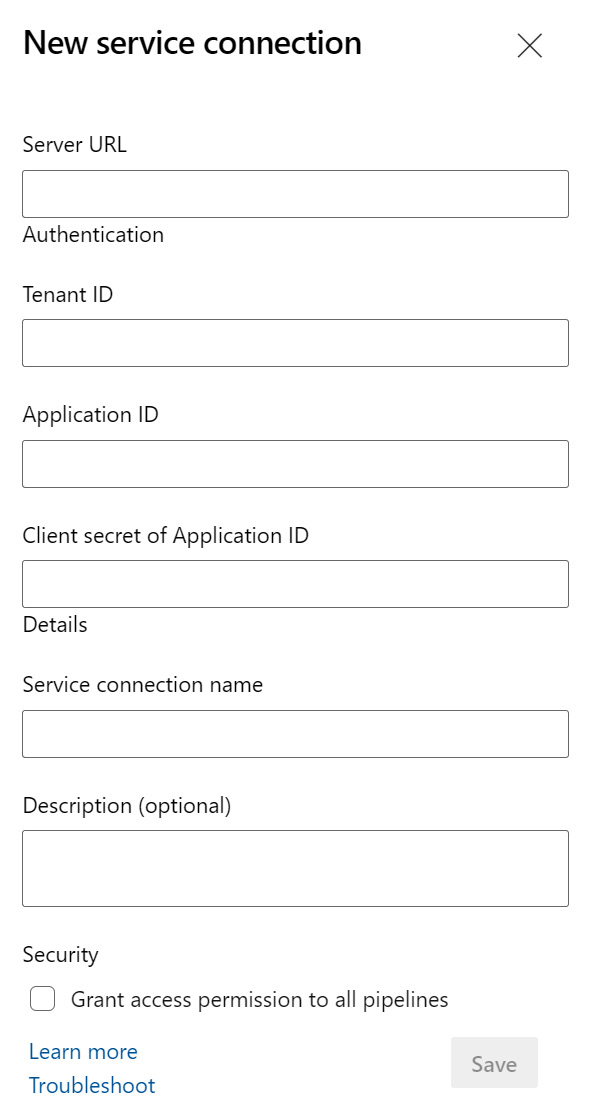
Figure 14.15 – New service connection form
If an Azure Application Registration and corresponding Power Platform Application User have already been created, you can proceed to fill in the New service connection form. Alternatively, the steps required to create these are as follows.
Note
Application registrations may be created via the Azure portal/Power Platform admin center or a PowerShell script. For details on creating service principals using PowerShell, please refer to https://docs.microsoft.com/power-platform/alm/devops-build-tools#configure-service-connections-using-a-service-principal.
- Open the Azure Active Directory page within the Azure portal (portal.azure.com):
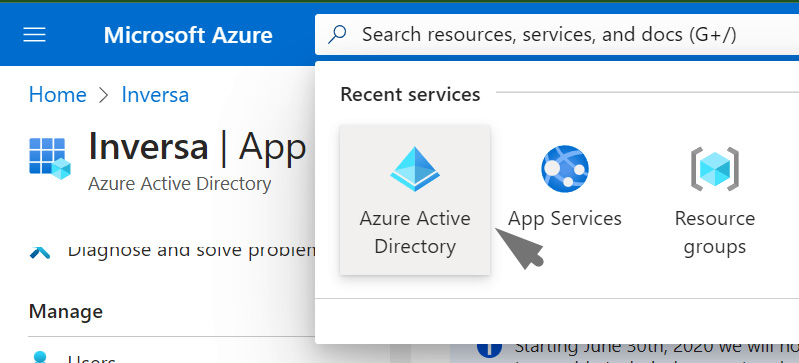
Figure 14.16 – The Azure Active Directory configuration page
Add a new app registration:

Figure 14.17 – Adding a new app registration
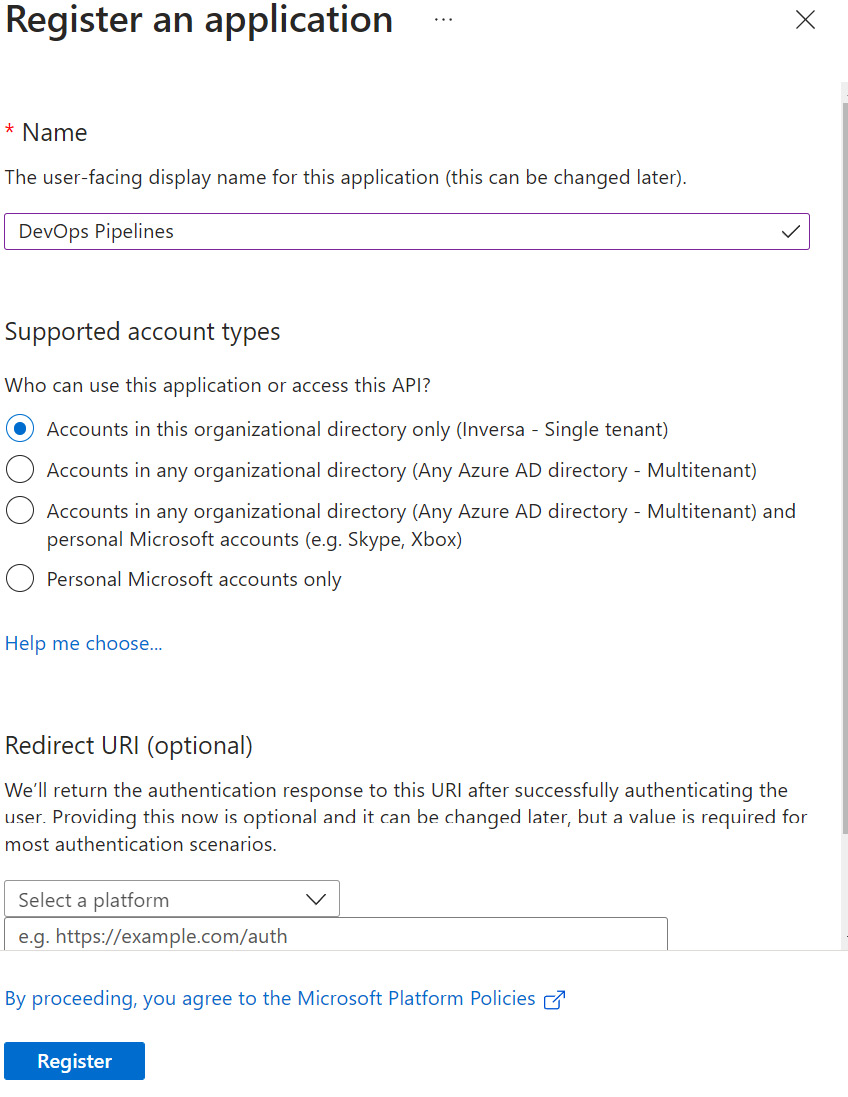
Figure 14.18 – Configuring the app registration options
- Once app registration has been added, you need to note down the application (client) ID and the directory (tenant) ID, as these will be required when you configure the service principal in Azure DevOps:
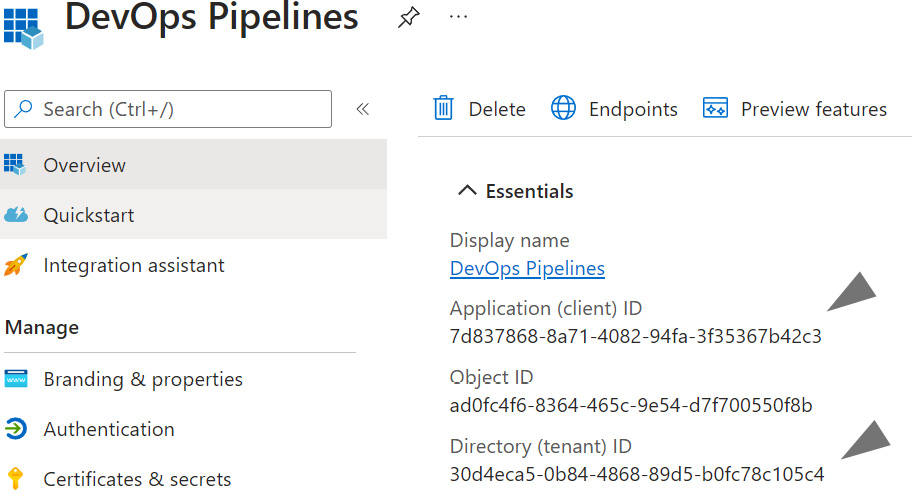
Figure 14.19 – The application ID and tenant IDs for an Azure app registration
Next, we will generate a secret for the app registration via the Certificates & secrets menu, selecting the validity period as required. After the secret expires, a new secret will need to be generated and the Azure DevOps service principal updated. The following screenshot shows an app registration secret being generated with an expiry period of 12 months:
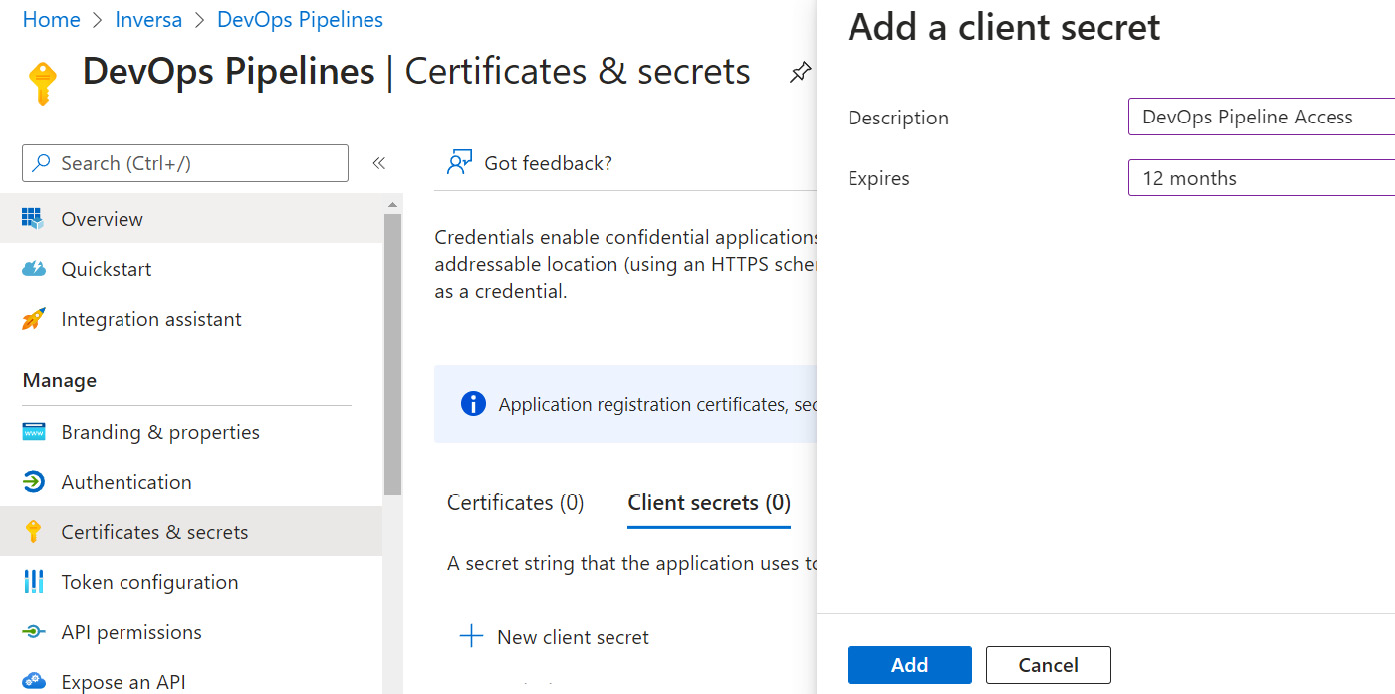
Figure 14.20 – Generating an authentication secret for an app registration
The app registration secret is used instead of a password when authenticating using a service principal. It is important to note the automatically generated secret at the point it is created, as it is not possible to retrieve it from the Azure portal at a later date. The app registration secret is displayed as follows:

Figure 14.21 – App registration secret
Now that we have the application ID, tenant ID, and application secret, we can complete the Azure DevOps Power Platform service connection form:
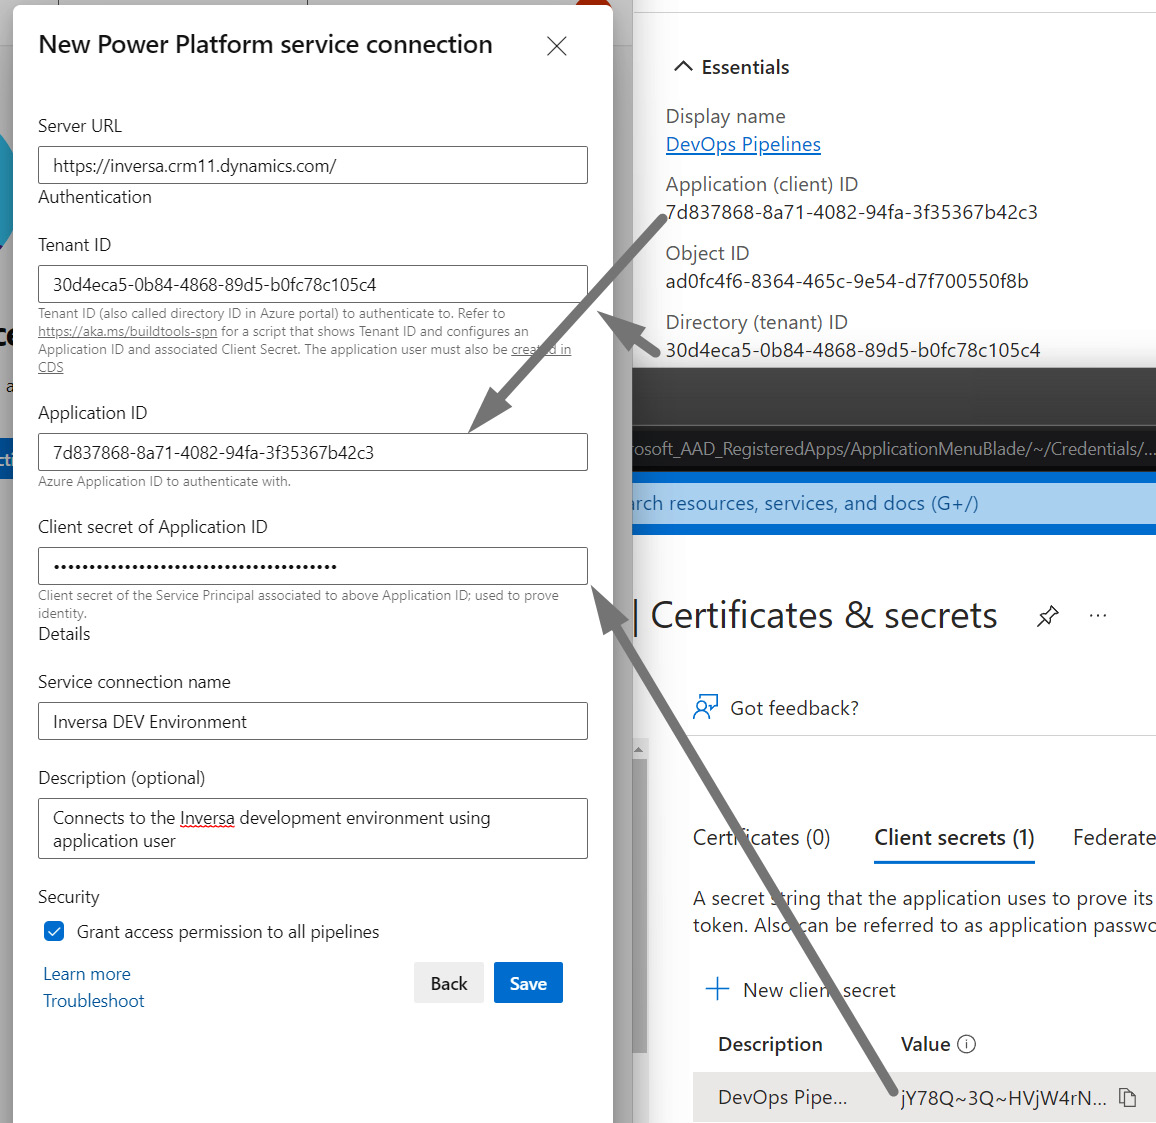
Figure 14.22 – Completing the Azure DevOps power Service connection with the app registration details
Once the app registration is in place, you can create a matching Power Platform Application User. From the Power Platform admin center, navigate to the environment that requires the service principal connection and open the Application users screen:
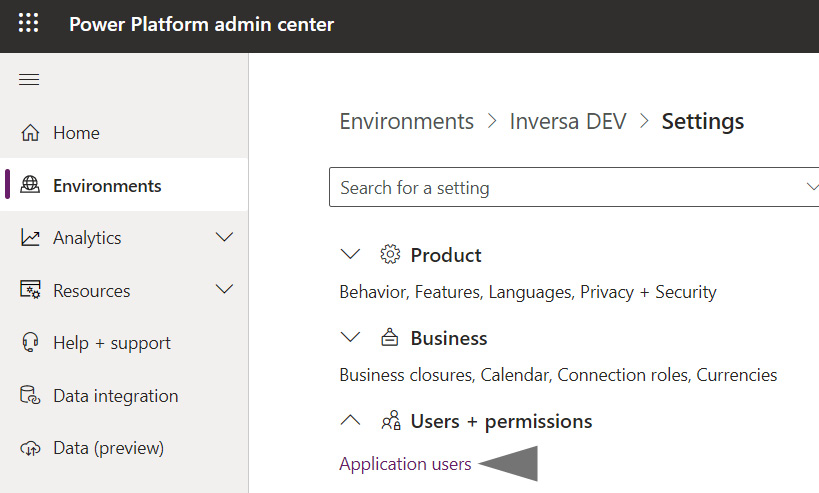
Figure 14.23 – Adding a Power Platform application user
From the Application users screen, select New app user. Select a security role with sufficient administrative privileges to export solutions (in the following screenshot, we have selected a custom security role called DevOps that will provide enough privileges):
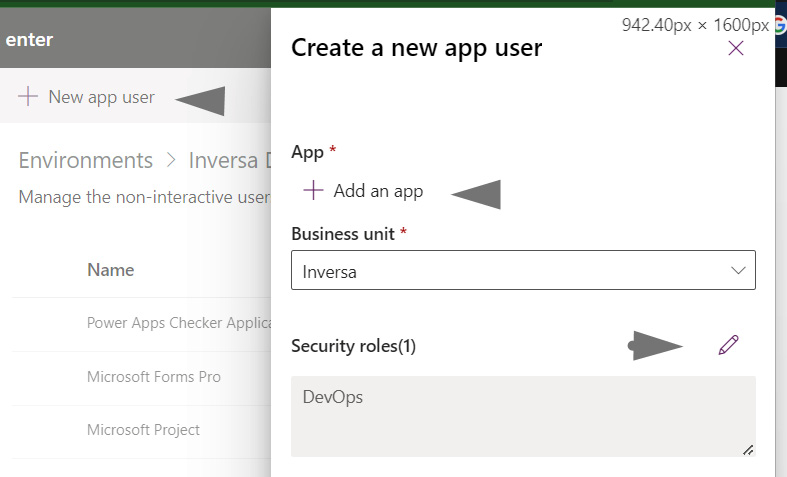
Figure 14.24 – Selecting a security role for the application user
Pressing the + Add an app button will bring up all the app registrations that exist in the tenant. Select the app registration you created for this particular Application User:

Figure 14.25 – Linking a Power Platform application user to an app registration
Once the app registration and security roles have been set, click the Create button:
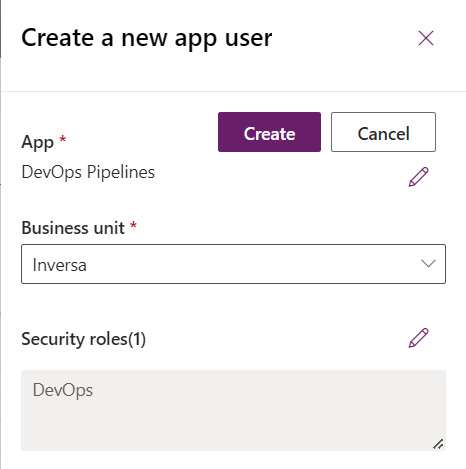
Figure 14.26 – Power Platform application user ready for creation
Once the application user has been created, they can be managed via the Power Platform Application users view:
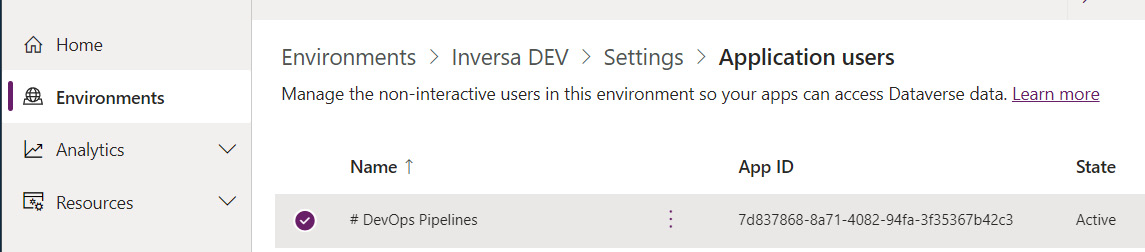
Figure 14.27 –Application users list
We have now configured the following:
- Azure app registration
- A Power Platform application user
- An Azure DevOps service principal
With these three components in place, the Azure DevOps pipelines are ready to communicate with the Power Platform environment.
- Set the service principal on the Azure DevOps export task
With the Azure DevOps service principal in place, we can set the corresponding field on the Power Platform Export Solution task:
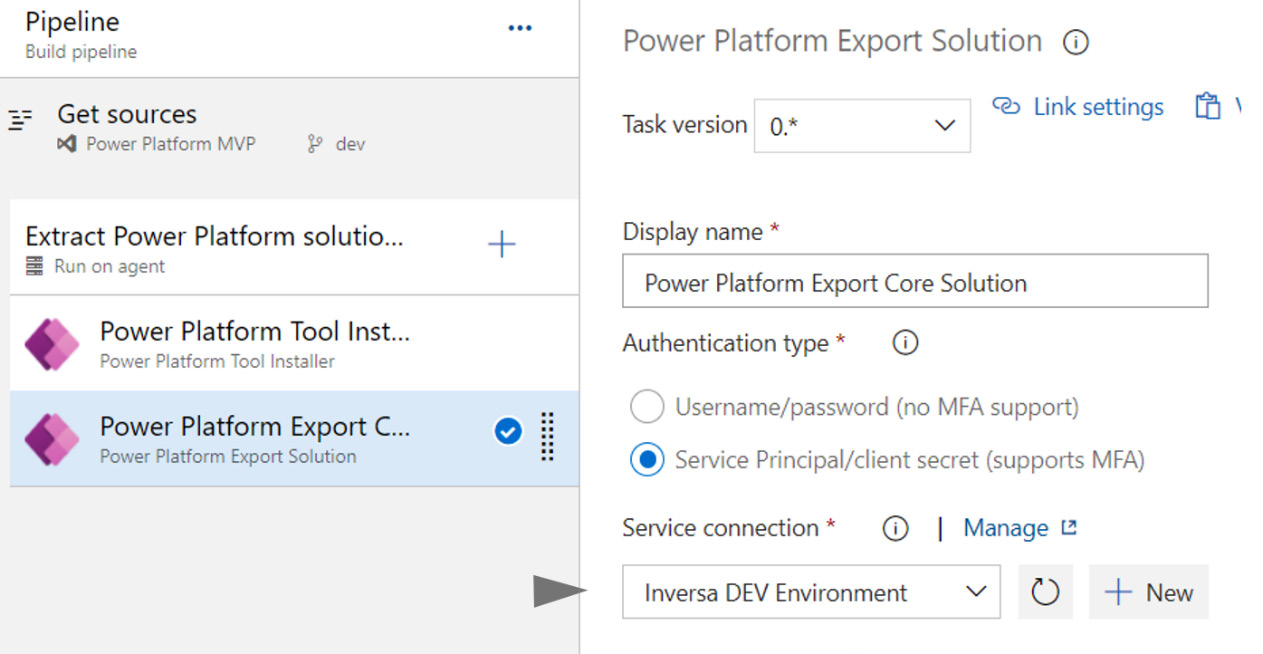
Figure 14.28 – Setting the service principal for the Power Platform Export Solution task
- Testing the Azure DevOps Service Principal connection
Now is a great time to validate the connection from Azure DevOps to the Power Platform environment. Pressing the Save and Queue button (or just Queue if the save option is not available) will run the pipeline tasks in sequence:
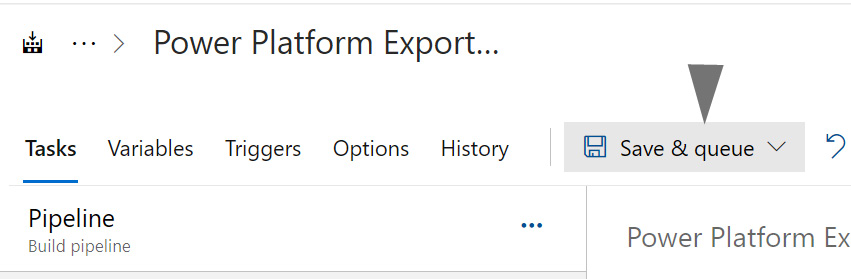
Figure 14.29 – Running the Azure DevOps pipeline
If this is the first pipeline you’ve created within an Azure DevOps organization, you may find that the parallelism capacity for Microsoft-hosted pipeline agents is 0. If that is the case, the pipeline execution will exit with the following error:

Figure 14.30 – Azure DevOps pipeline error displayed when no hosted agent capacity is available
There are three options to resolve this pipeline capacity issue:
- Request a free parallelism grant: Completing the following form will typically increase capacity by 1: https://aka.ms/azpipelines-parallelism-request within two business days.
- Install a self-hosted Azure Pipeline agent: Please refer to the following document for details on self-hosted agents: https://docs.microsoft.com/azure/devops/pipelines/agents/agents?view=azure-devops&tabs=browser#install.
- Purchase additional capacity: Linking the Azure DevOps project to an active Azure subscription means additional Microsoft-hosted jobs may be added. The Parallel jobs menu within the Azure DevOps Project Settings page provides a means of increasing capacity. One parallel job is required to run pipelines. Selecting the Change option will allow you to select an appropriate Azure subscription and increase the capacity:
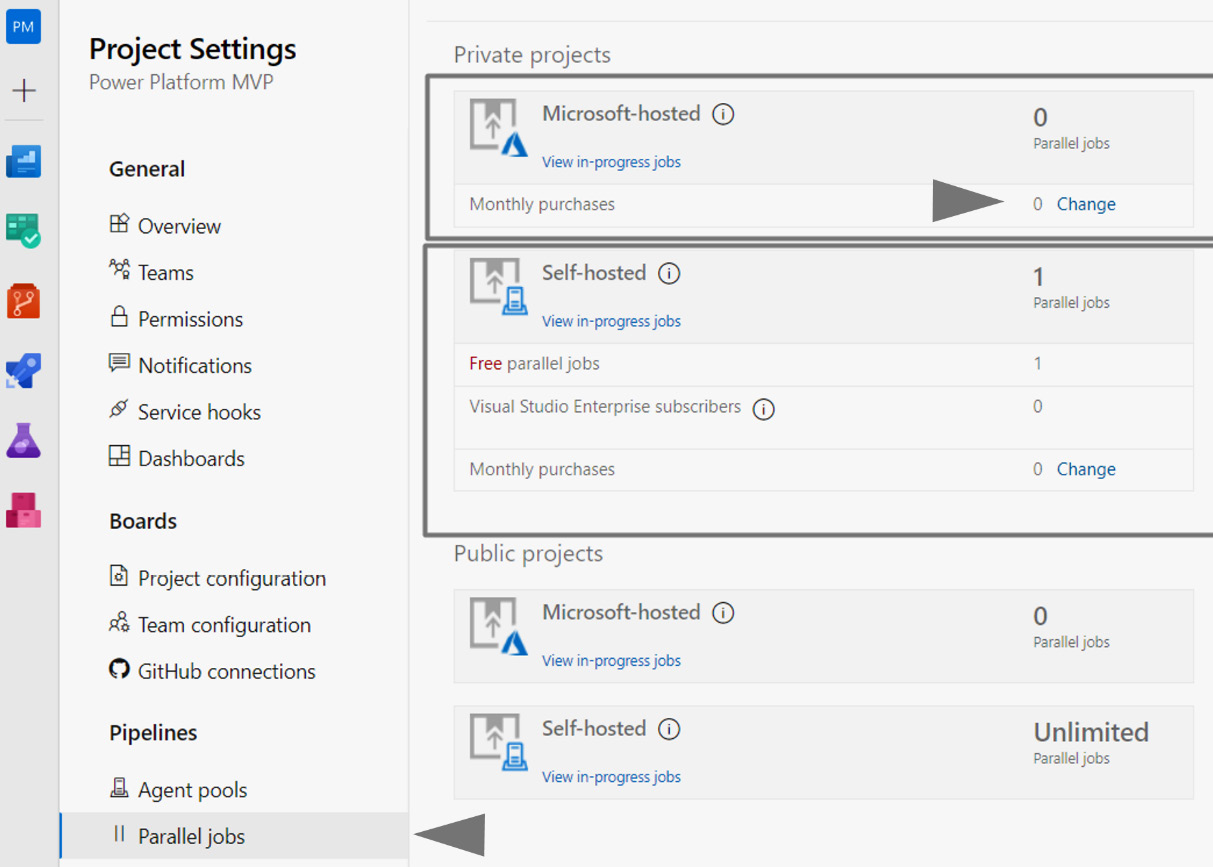
Figure 14.31 – Increasing Microsoft-hosted parallel jobs capacity in the Azure DevOps Project Settings page
Once capacity has been increased, pipelines will run without displaying a capacity error.
- Add pipeline tasks to export any other required solutions
We have created a task to export a Power Platform solution and validated it as functional and able to connect to Dataverse. At this point, you may wish to extract any other solutions that make up the implementation. A managed version of the solution may also be exported for safe-keeping in source control.
Adding Power Platform Export Solution tasks will be the same as the first export – that is, changing the source solution to be exported and deciding whether to export a managed/unmanaged solution. The following screenshot shows four Power Platform Export Solution tasks, where a core solution and a flows solution are being exported in both managed and unmanaged formats:
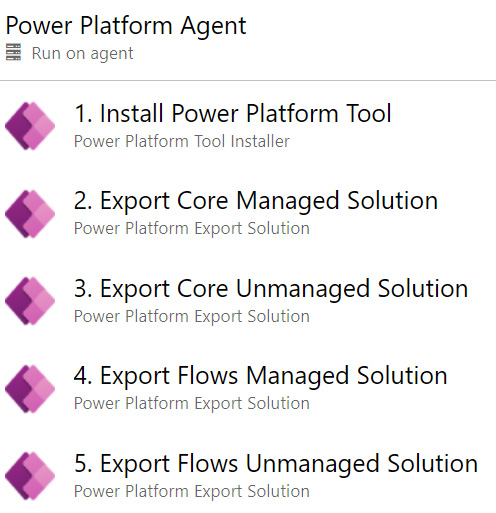
Figure 14.32 – Adding export tasks for all the required solutions
- Add a task to run the Power Platform solution checker
An Azure DevOps pipeline is ideal for running an automated Power Platform solution checker. Once the solution files have been exported, running a solution check can help ensure only solutions that meet the project’s specific quality criteria are checked into source control and deployed to target environments.
Add a task by searching for Power Platform Checker and configuring the following key fields:
- Service connection: The environment that will run the solution checker. This is typically the same as the source environment.
- Local Files to Analyze: A path and file wildcard search for solution ZIP files to be checked. We will be checking all the managed solutions in our example.
- Error Level: The minimum solution checker entry that will be considered an error, stopping the pipeline’s execution and preventing the solution from entering source control. The following options are available:
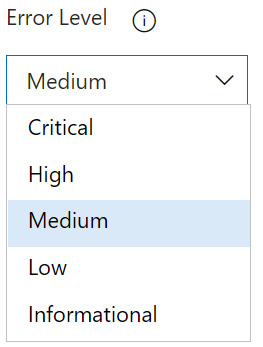
Figure 14.33 – Solution checker Error Level options
- Error threshold: The number of errors that will stop the execution of the pipeline.
The following screenshot illustrates the Power Platform solution checker options:
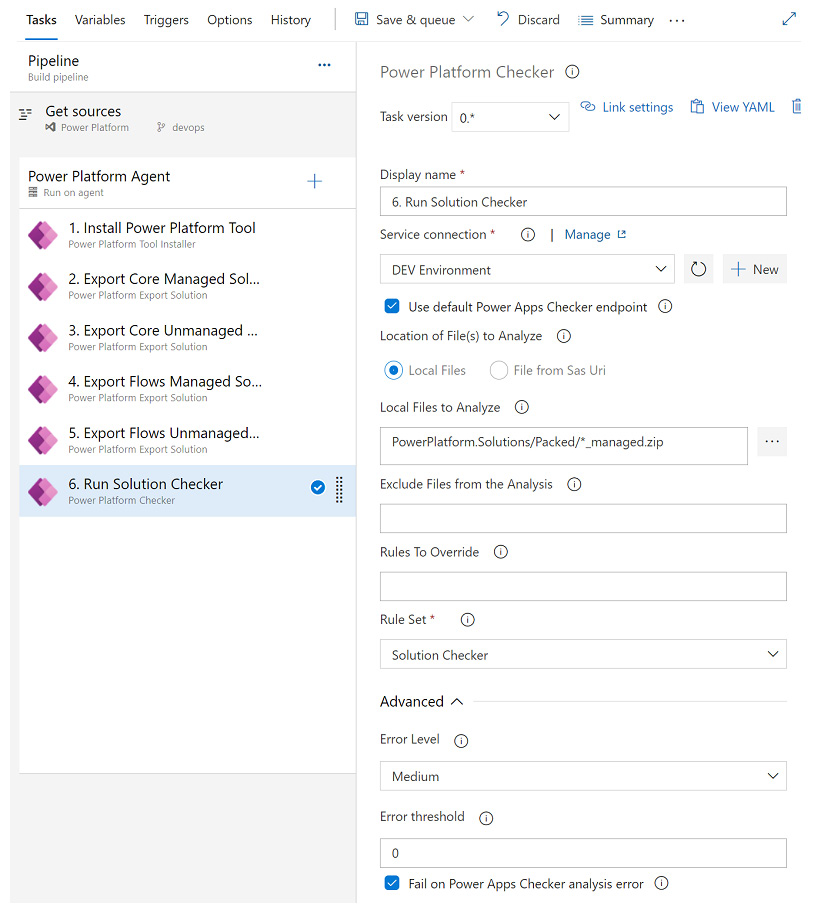
Figure 14.34 – Pipeline options available in the Power Platform Checker task
- Add a task to extract the Power Platform solutions for source control
Extracting a Power Platform solution into its individual components results in a folder and file structure that is better suited for source control and versioning than a ZIP file.
In this example, we will clear the folder where the extracted solution components live (as a previous check-in would have filled the folder already) before extracting our freshly exported Power Platform solutions. The sequence of tasks is illustrated in the following screenshot:
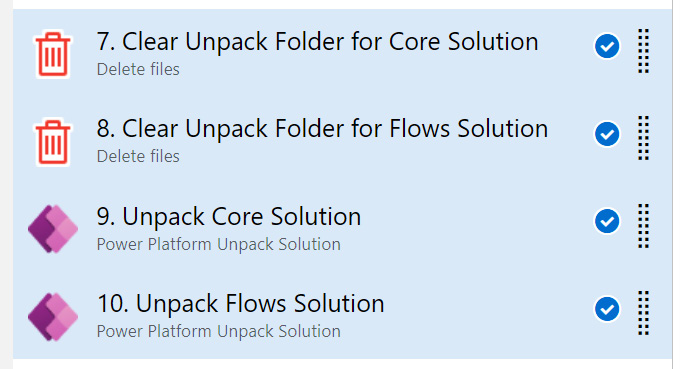
Figure 14.35 – A sequence of pipeline tasks that clear the previously extracted folders and proceed to extract the new solutions
First, we must add an action to Delete files that were previously extracted and checked into source control. The following example clears the PowerPlatform.Solutions/Extracted/Core folder, ready for the new set of components to be extracted:
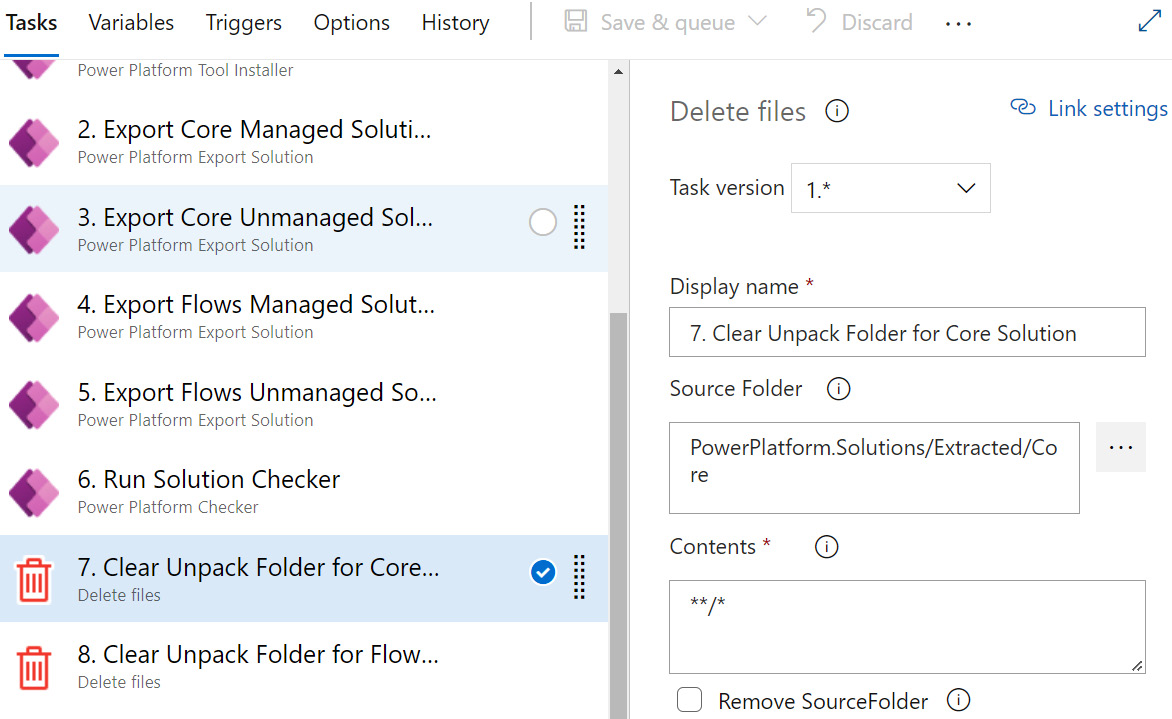
Figure 14.36 – Adding a Delete files action to clear previously checked-in solution components
You must repeat the Delete files action for as many folders as required to ensure all previously extracted solution components have been cleared. This prevents deleted Power Platform components from resurfacing unexpectedly.
We are now ready to add a Power Platform Unpack Solution task to the pipeline. The key configuration parameters to be completed are as follows:
- Solution Input File: The path to the solution ZIP file that was exported in the previous pipeline steps.
- Target Folder to Unpack Solution: The path in the source control folder structure where the extracted components will be saved.
- Type of Solution: The available options are Managed, Unmanaged, and Both. Selecting Both requires unmanaged and managed file versions, with the managed version having a filename ending in _managed.zip:

Figure 14.37 – Options available for the Power Platform Unpack Solution task
The following link provides additional details on the solution packer options related to this task: https://docs.microsoft.com/power-platform/alm/solution-packager-tool.
You must then repeat the Power Platform Unpack Solution task for any other solutions that have been extracted in the previous pipeline steps.
- Check the solutions into source control
Once the solutions have been exported, verified, and unpacked, they are ready to be checked into source control. There are various ways of checking in files from a DevOps pipeline. In our example, we will be using Git as our source control repository and a Command line task to carry out the necessary Git commands.
The following screenshot illustrates a Command line task that checks all updates into a Git repository, including solution ZIP files and extracted solution components:
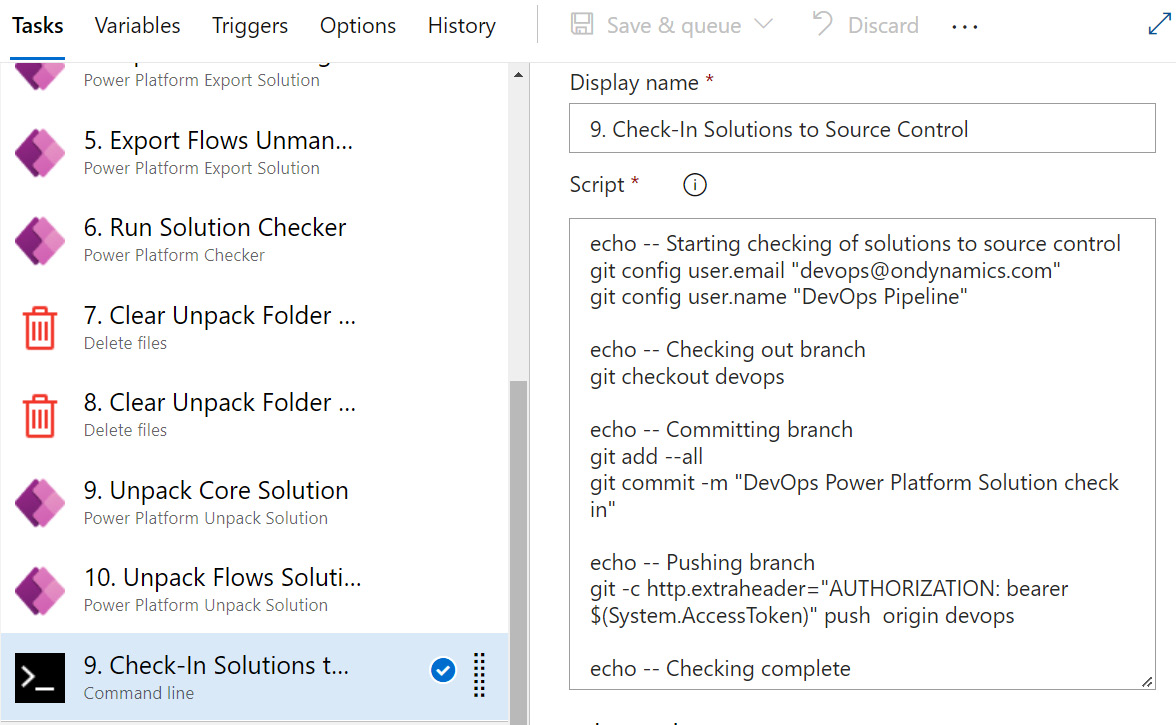
Figure 14.38 – An Azure DevOps Command line task, configured to check changes into a Git repository
The command-line script that’s been used in the example pipeline task is as follows:
echo -- Starting checking of solutions to source control
git config user.email "[email protected]"
git config user.name "DevOps Pipeline"
echo -- Checking out branch
git checkout devops
echo -- Committing branch
git add --all
git commit -m "DevOps Power Platform Solution check in"
echo -- Pushing branch
git -c http.extraheader="AUTHORIZATION: bearer $(System.AccessToken)" push origin devops
echo -- Checking complete
Note that the command-line script references a System.AccessToken, a variable that’s automatically populated by the pipeline to facilitate authentication. The following pipeline agent setting must be ticked for System.AccessToken to be accessible to the script:
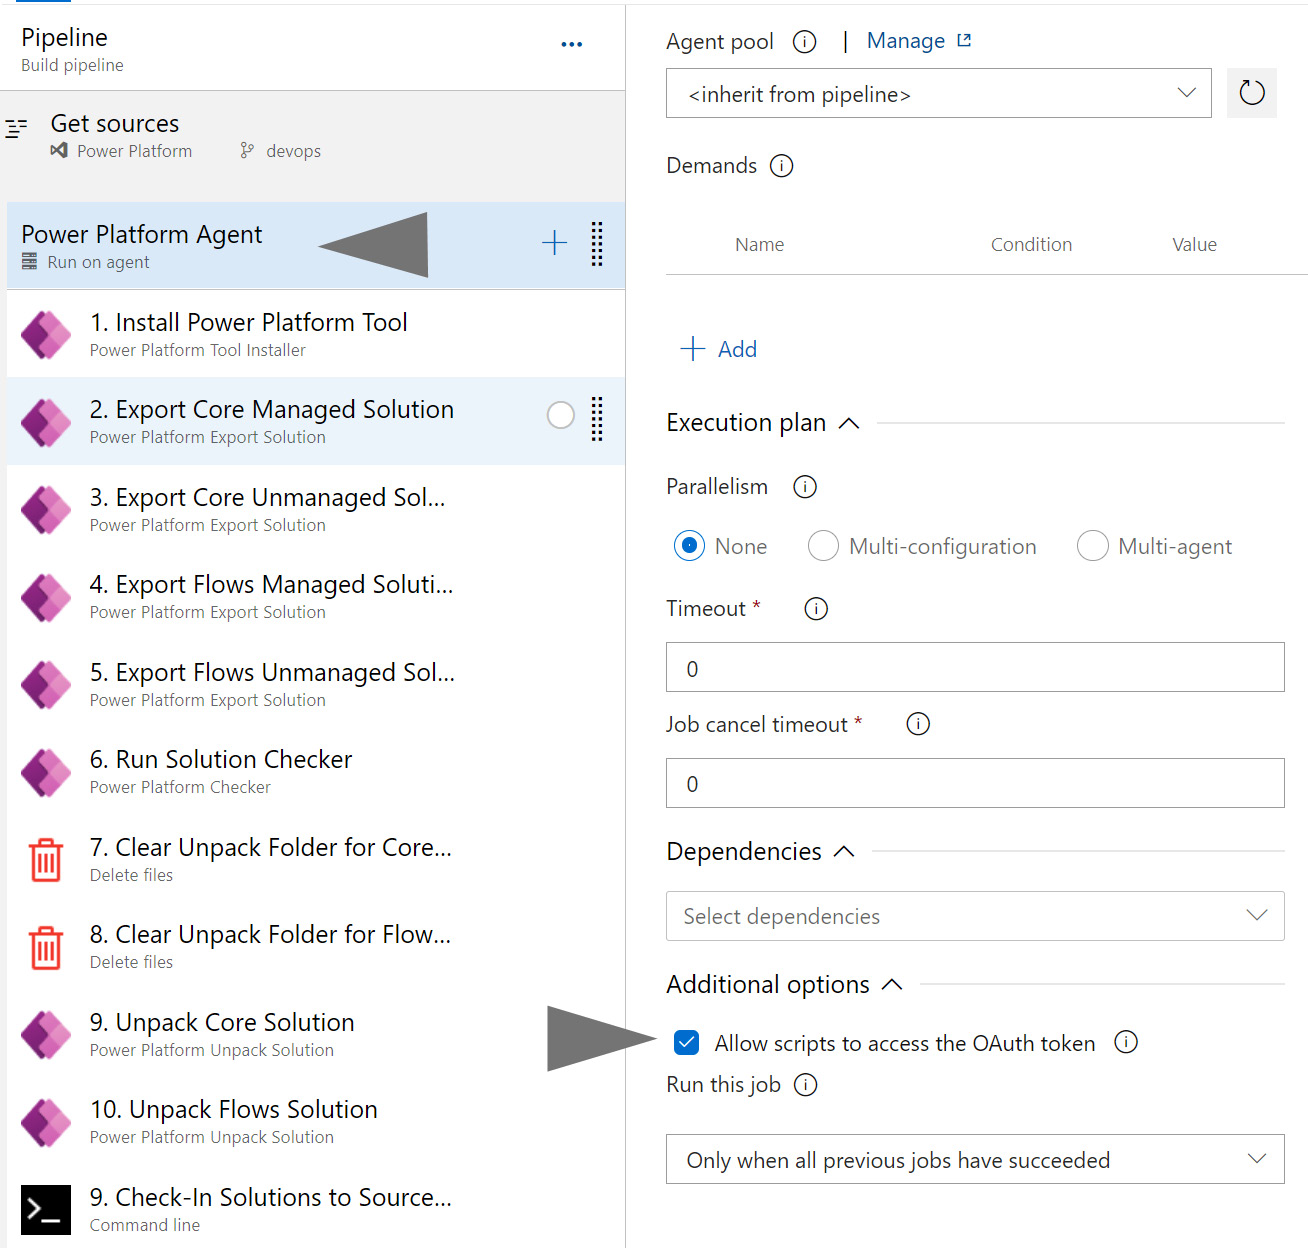
Figure 14.39 – The pipeline agent setting that allows scripts to use System.AccessToken for authentication
Finally, the project user needs Contribute permissions to be able to check the solution files into the repository. Permission may be assigned to the project user via the Repository menu on the project’s settings page, as shown in the following screenshot:
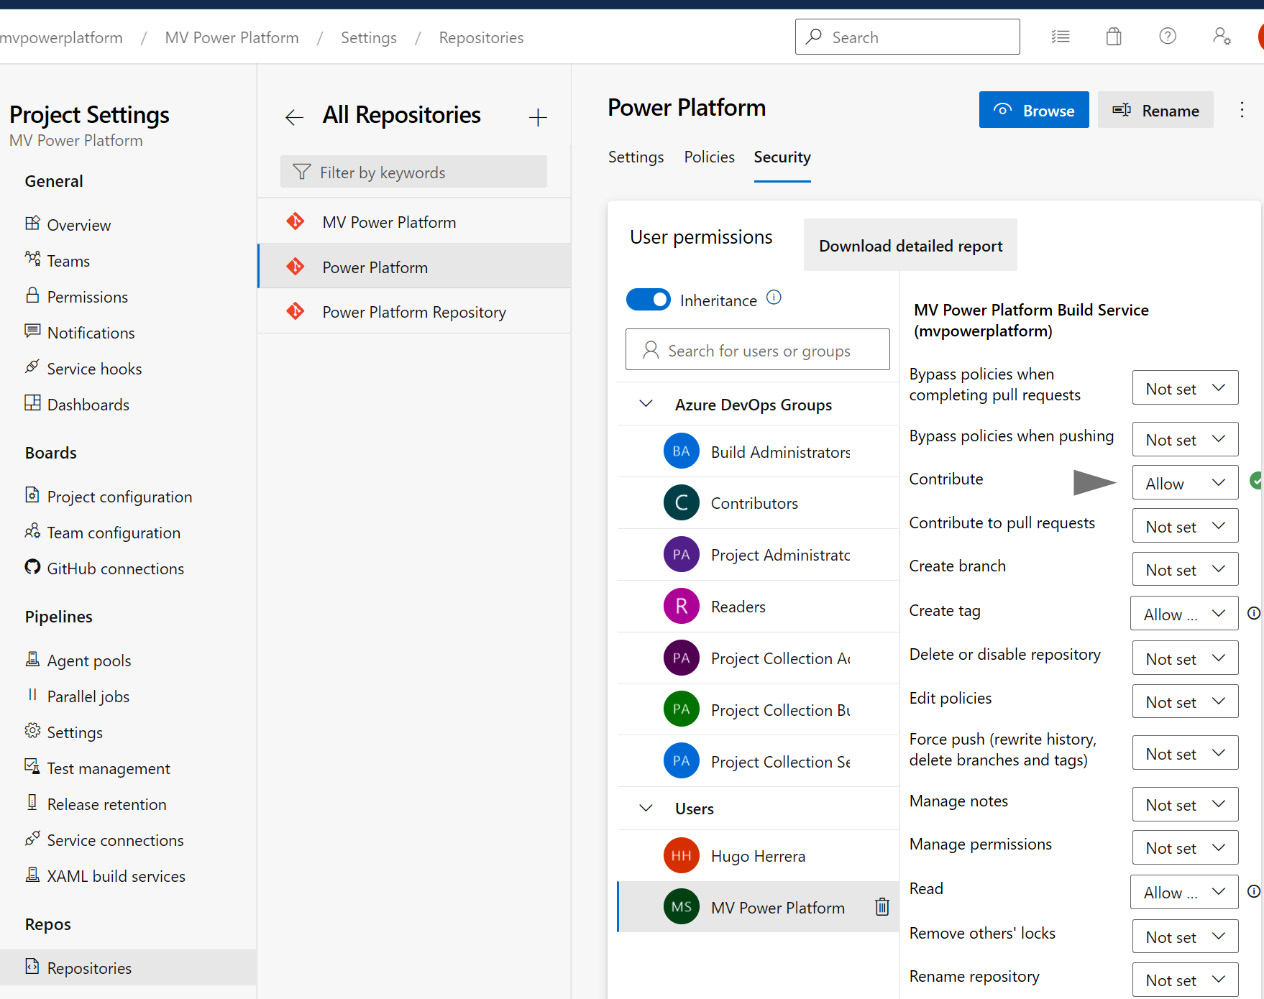
Figure 14.40 – Granting the project user permission to check files into the repository
- Test the pipeline
Once the pipeline tasks have been completed, the entire process can be validated through a sequence of test runs. The runtime logs provide a means of troubleshooting any issues that are encountered by the steps until the pipeline configuration runs through to completion, as shown in the following screenshot:

Figure 14.41 – A successful DevOps pipeline execution
- Decide whether to schedule the pipeline for regular check-ins to source control
Unless configured otherwise, DevOps pipelines are triggered manually. Depending on the project team’s ways of working, performing a daily check-in of the Power Platform solution may be beneficial. Scheduled check-ins also have the added benefit of alerting the DevOps team of any issues with the solutions. The process will fail if the solution checker finds problems with the exported solutions.
The following screenshot shows the pipeline configured for execution every night at 23:00 hours:
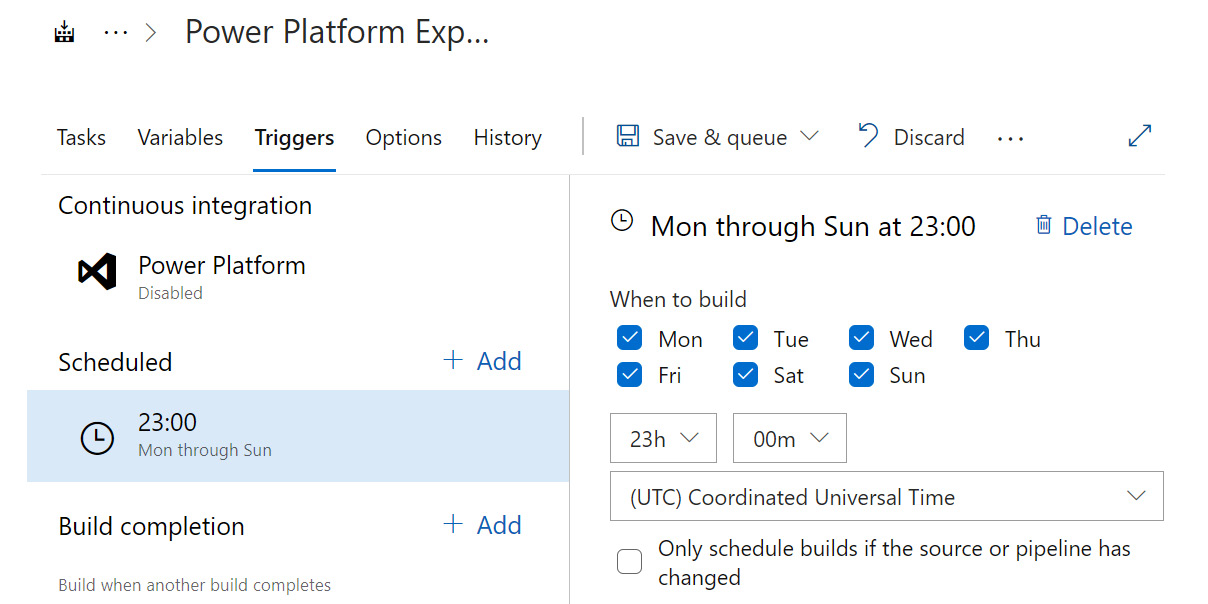
Figure 14.42 – A DevOps pipeline configured to run every night at 23:00 hours
With that, we have created an Azure DevOps pipeline that extracts solutions from a development environment, runs the Power Platform solution checker, extracts the solution components, and checks the results into source control. In the next section, we will look at source control for Power Pages.
Managing source control for Power Pages
Power Pages store their configurations in Dataverse tables. As a result, configuration for Power Pages can be exported and deployed using standard tools such as the Configuration Data Migration tool or XRMToolbox plugins such as Portal Records Mover.
The Portal Records Mover plugin provides a mechanism for exporting Power Page configurations to files and for direct transfer from one environment to another. It has handy features that enable/disable system plugins that would otherwise conflict with the import process. The following screenshot illustrates the main screen of Portal Records Mover:
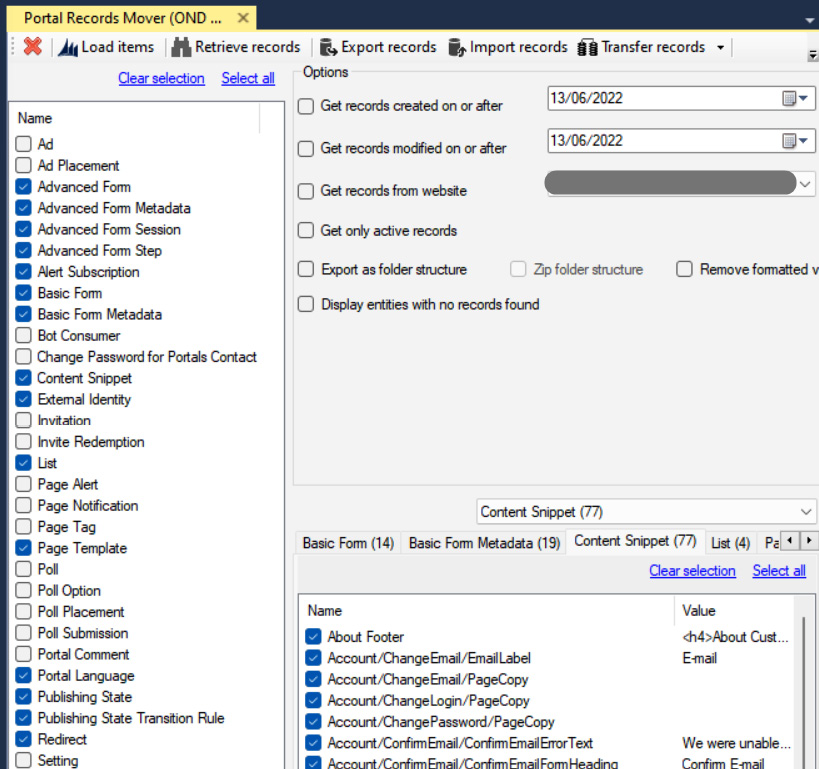
Figure 14.43 – The Power Portal Records Mover main screen
The Portal Records Mover configuration files may be exported and stored in source control alongside its setting files, as follows:

Figure 14.44 – Power Pages configuration files saved in a file structure for source control
Reference Documentation on the Portal Records Mover Plugin
For further details on the Portal Records Mover plugin for XrmToolbox, please go to https://www.xrmtoolbox.com/plugins/MscrmTools.PortalRecordsMover/.
Storing Power Page JavaScript and CSS configurations in source control will also provide a means of versioning and tracking changes. These files can be managed manually or exported into a folder structure similar to the one shown in the following screenshot by using the Portal Code Editor plugin for XrmToolbox:

Figure 14.45 – Power Page JavaScript and CSS files saved in a folder structure and checked into source control
The Portal Code Editor export facility is shown in the following screenshot:
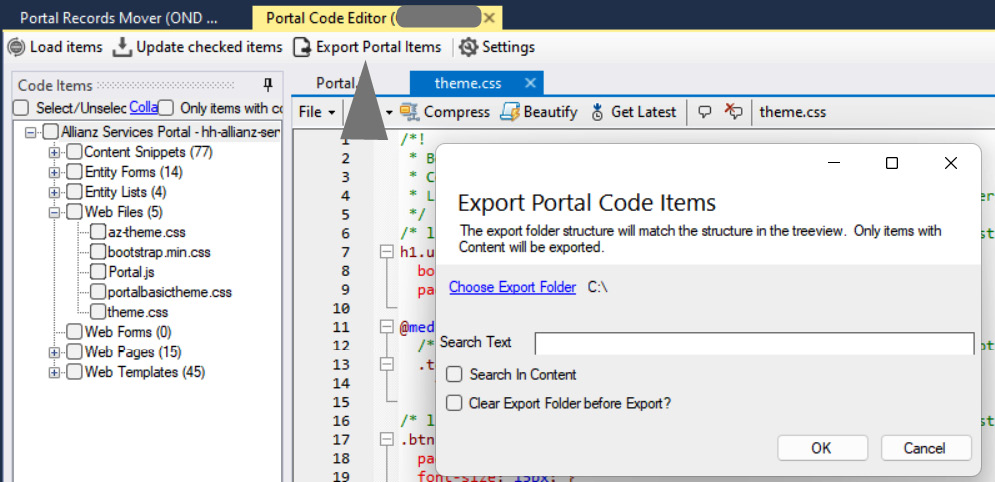
Figure 14.46 – Using the Portal Code Editor plugin to export code items to a folder structure
Reference Documentation on the Portal Code Editor Plugin
For further details on the Portal Code Editor plugin for XrmToolbox, please go to https://www.xrmtoolbox.com/plugins/MscrmTools.PortalCodeEditor/.
The Power Pages extension for Visual Studio Code also downloads and edits portal code, including Liquid templates. For further details, please go to https://docs.microsoft.com/en-us/power-apps/maker/portals/vs-code-extension.
Managing source control of Dataverse plugins
Dataverse plugins are built using the .NET Framework and follow standard C# source control practices. All Dataverse plugins should be checked into source control, where they will be used for future enhancements and bug fixes:

Figure 14.47 – A Dataverse plugin within a Visual Studio project structure checked into source control
Conclusion
In this section, we reviewed the options available for storing and managing Power Platform configurations in source control. The next chapter discusses automated Power Platform deployments. But for now, let’s learn how to leverage Azure DevOps for ALM.
Leveraging Azure DevOps for application life cycle management (ALM)
Releases in Azure DevOps effectively manage the application life cycle for Power Platform solutions. The concept of Releases revolves around a set of source artifacts (for example, Power Platform solution files) and a sequence of release pipelines that deploy those artifacts to target environments (for example, QA and PROD Power Platform environments).
Solution architects configure release pipelines, setting up a framework for continuous delivery that provides the following benefits:
- Reduce delivery risks via a sequenced and controlled deployment strategy.
- Reduce the risk of errors caused by manual deployments.
- Increase productivity and release capacity through automation.
In this section, we will create a Release Pipeline that deploys to QA and production environments from source control.
Configuring release pipelines for automated deployments
In this section, we will create a release pipeline that retrieves Power Platform solution files stored in source control, validates the solution files by testing the deployment to a validation environment, and then proceeds to deploy the solution to QA if valid. The deployment to the production environment can then be triggered manually, using precisely the same solution files deployed to QA.
The following diagram illustrates the Release Pipeline we are about to create:
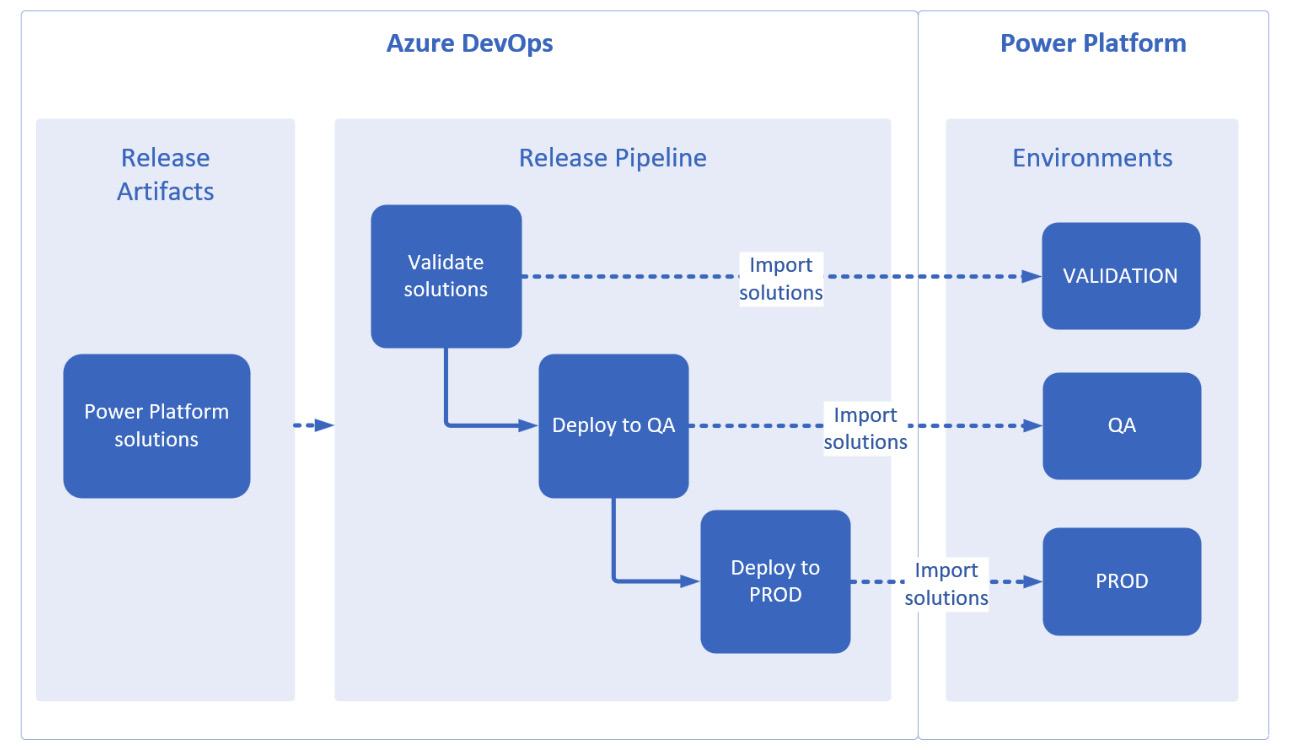
Figure 14.48 – Example Release Pipeline deployment to QA and production Power Platform environments
Follow these steps to create an Azure DevOps Release Pipeline:
- Open the New Release Pipeline page
Navigate to the Azure DevOps Pipelines | Releases menu and select the New release pipeline option:
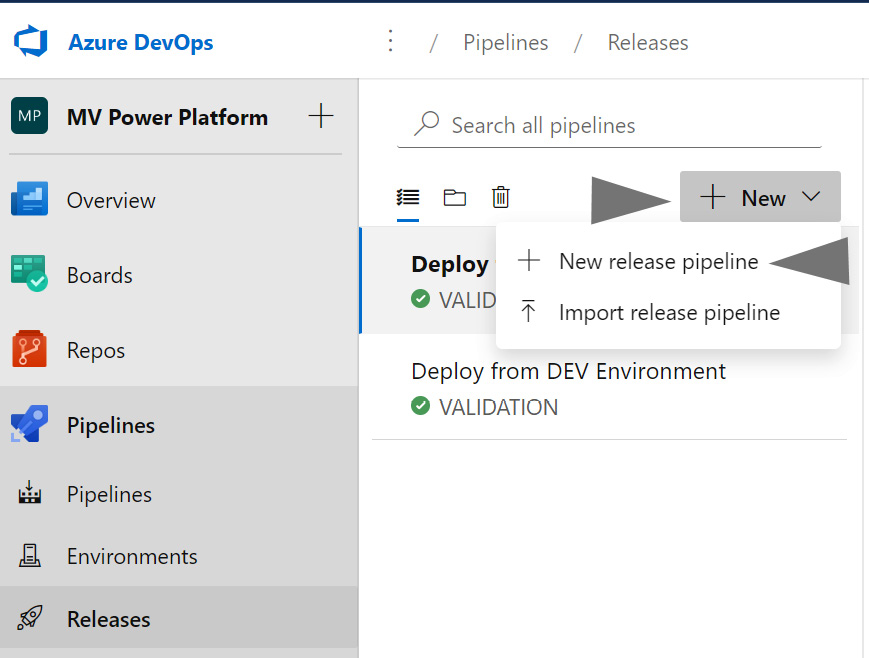
Figure 14.49 – Opening the New release pipeline editor
- Start from an empty job
When asked to select a template, select the Empty job option to create a Power Platform deployment release:
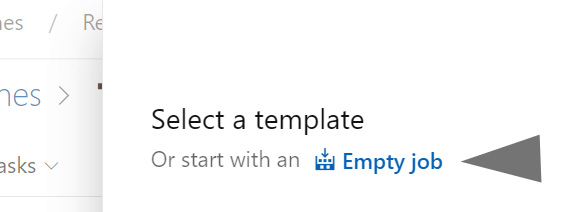
Figure 14.50 – Creating a Power Platform Release Pipeline from a clear template
- Label the first stage in the release
A stage is automatically added when the release is created. In our scenario, we will label the stage VALIDATION as it will check the solution and run a test deployment to a VALIDATION environment:
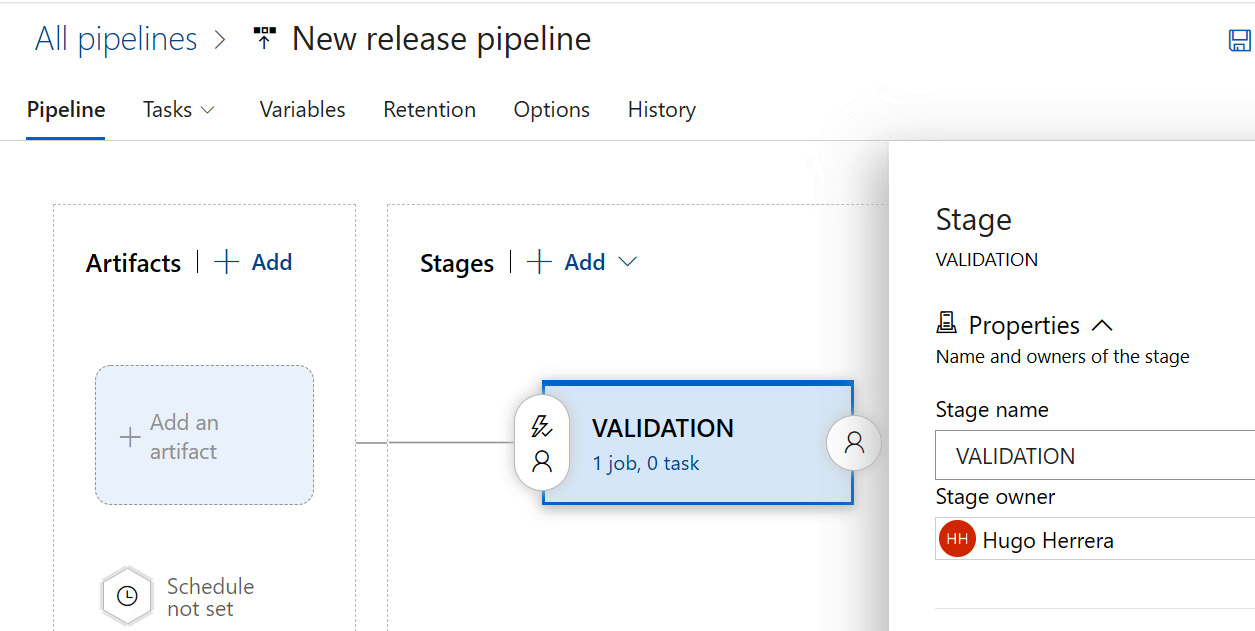
Figure 14.51 – Naming the Release stage
- Select the Power Platform solutions as source artifacts
Select the Add an artifact option and select the repository and branch that holds the Power Platform solution files (please see the previous section for details on creating a build pipeline that automatically checks Power Platform solutions into source control):

Figure 14.52 – Selecting the location of the source Power Platform solution files
- Add the Power Platform deployment tasks to the VALIDATION stage
The newly created VALIDATION stage is currently empty. Clicking on the job/task option highlighted in the following screenshot will bring up the stage editor:
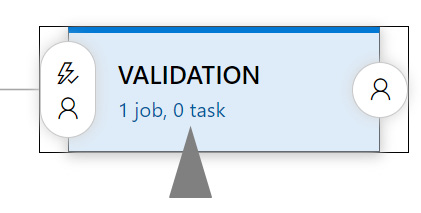
Figure 14.53 – Opening the stage editor
The first task to add will be the Power Platform Tool Installer task (please see the previous section for details on installing Power Platform Tools on a new Azure DevOps organization):
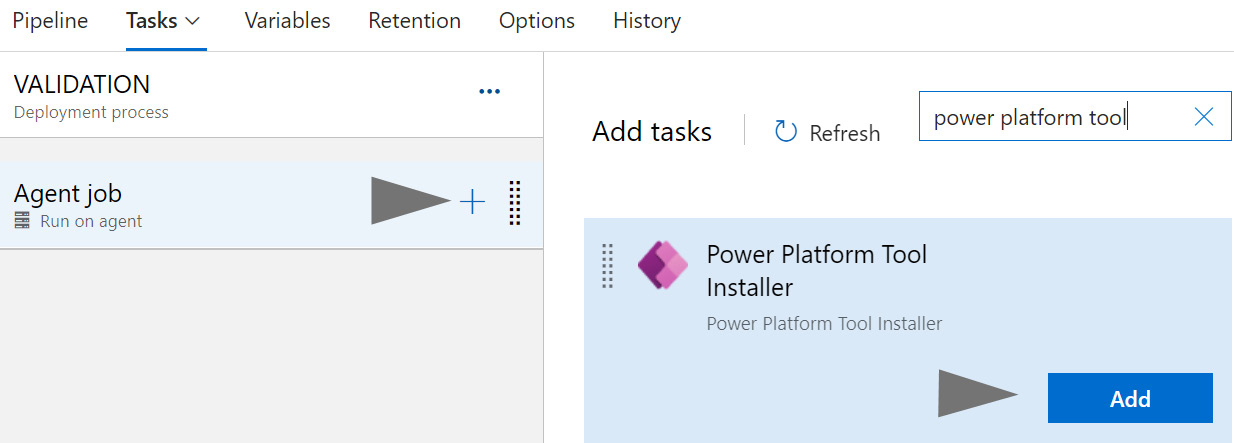
Figure 14.54 – Adding the Power Platform Tool Installer task to a Release stage
- Add the Power Platform Checker task to the VALIDATION stage
Add the Power Platform Checker task to the stage:
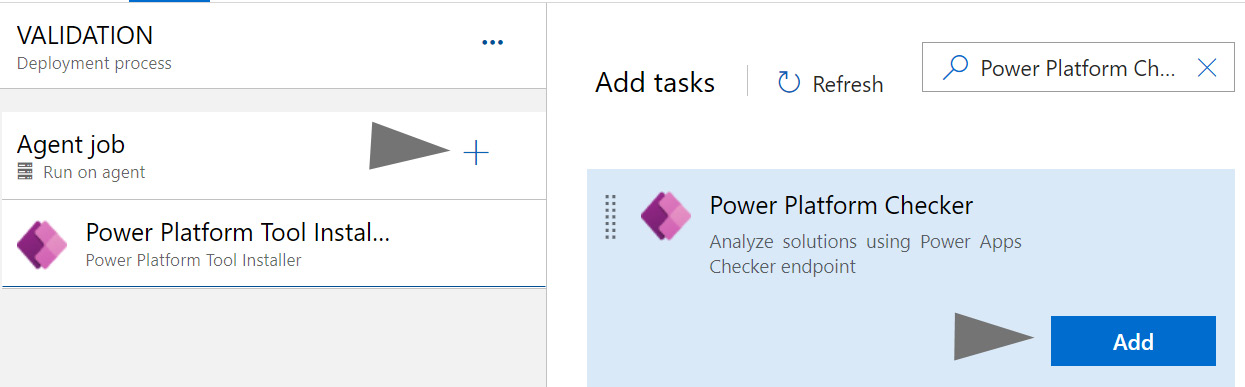
Figure 14.55 – Adding the Power Platform Checker task to a Release stage
Proceed to configure the Power Platform Checker task to validate the solutions that are about to be imported into the target system. In this scenario, we will be checking all the managed solutions in the Packed folder, as shown in the following screenshot:
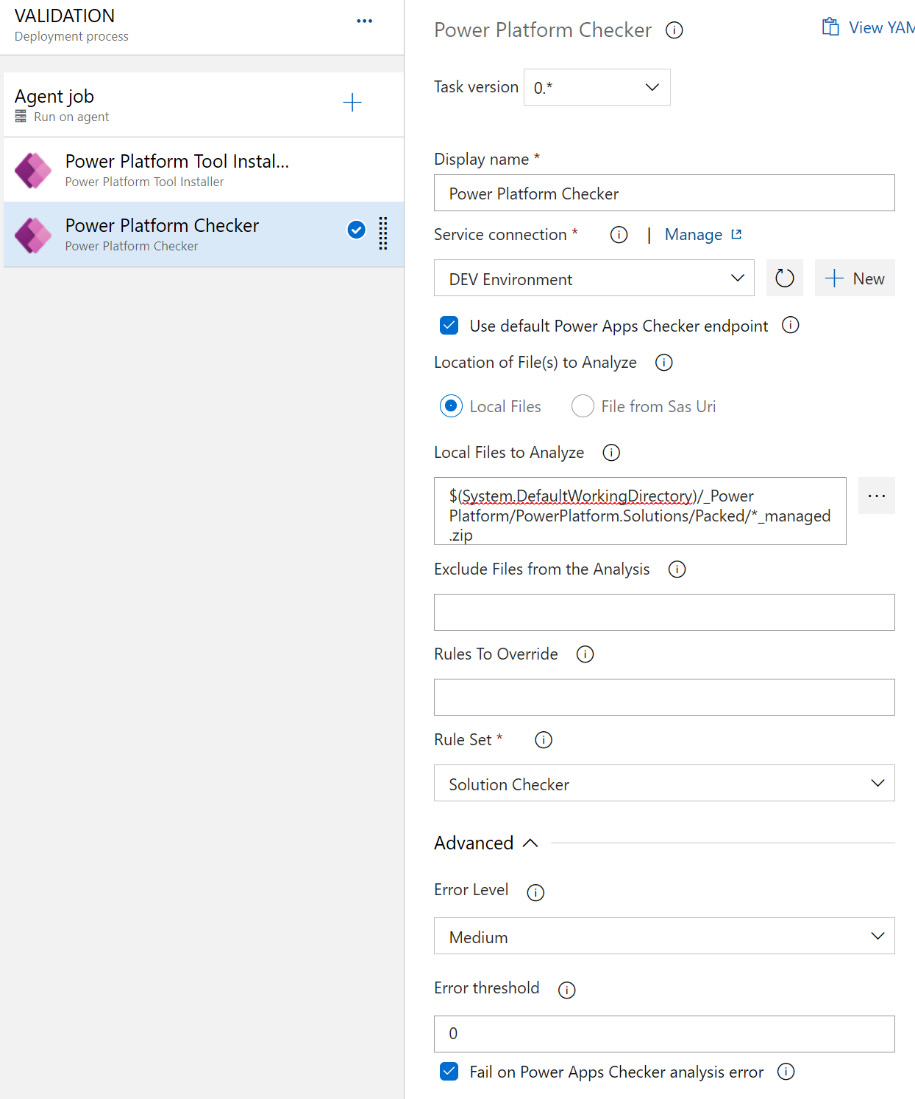
Figure 14.56 – Adding the Power Platform Checker task to a Release stage
The service connections we set up in the previous section may be used for this exercise.
- Add the Power Platform Backup Environment task to the VALIDATION stage
The Power Platform Backup Environment task will create a backup of the VALIDATION environment before the solutions are imported, which can later be used to restore the environment to the state before the solutions were imported:
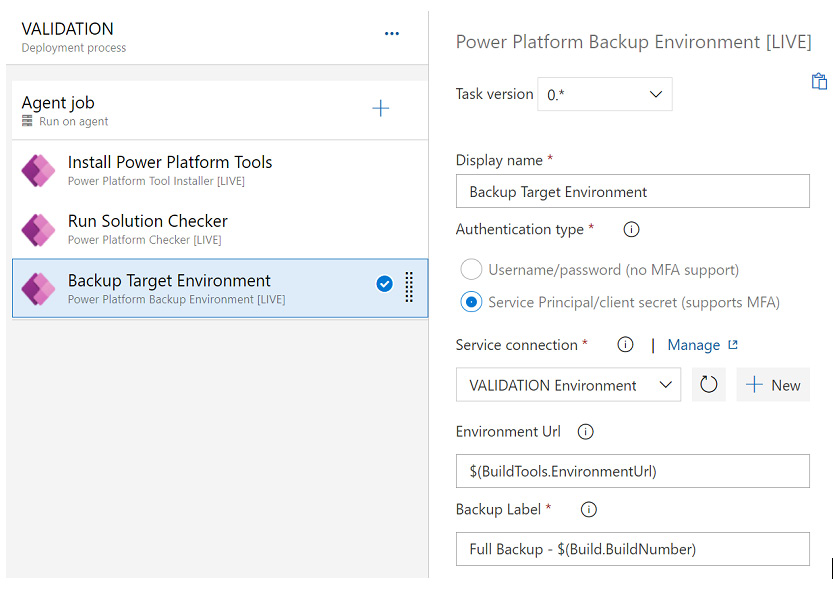
Figure 14.57 – Adding the Power Platform Backup Environment task to the VALIDATION stage
Note
When using a service principal connection, the Power Platform Backup Environment task requires additional privileges to perform the backup. The following document provides details on how to set up the service principal using PowerShell: https://docs.microsoft.com/en-us/power-platform/admin/powerplatform-api-create-service-principal.
- Add the Power Platform Import Solution task to the VALIDATION stage
Search for the Power Platform Import Solution task and configure it to import the first Power Platform solution to a target environment. The process is the same as the solution import tasks we completed in the previous section:

Figure 14.58 – Adding a Power Platform Import Solution task to the VALIDATION stage
Any other solutions that need to be imported into a target system must be added as additional tasks in the Release stage. We added a second Flows solution import task in the following screenshot:

Figure 14.59 – Adding other solutions that need to be imported during the VALIDATION stage
- Save and test the pipeline stage
Save the stage and select Create release to test the Release pipeline:
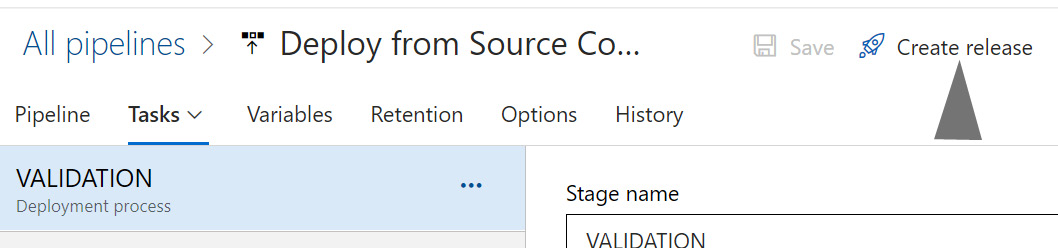
Figure 14.60 – Running the Release pipeline
Any issues that are raised during the execution of the release may be resolved in the same way as standard pipelines.
- Add a QA Deployment Stage
Now that the VALIDATION stage has been completed and tested, we can create a QA deployment stage:
Select the Clone option below the VALIDATION stage to replicate the stage:
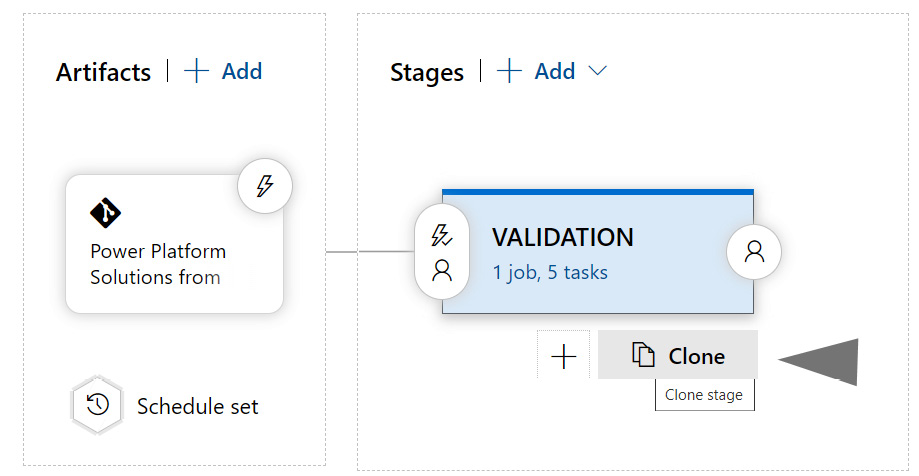
Figure 14.61 – Adding the QA deployment stage after the VALIDATION stage
- Configure the QA deployment stage name and target
Name the stage appropriately (for example, QA) and update all the Power Platform-related tasks, ensuring they point to the correct target environment:
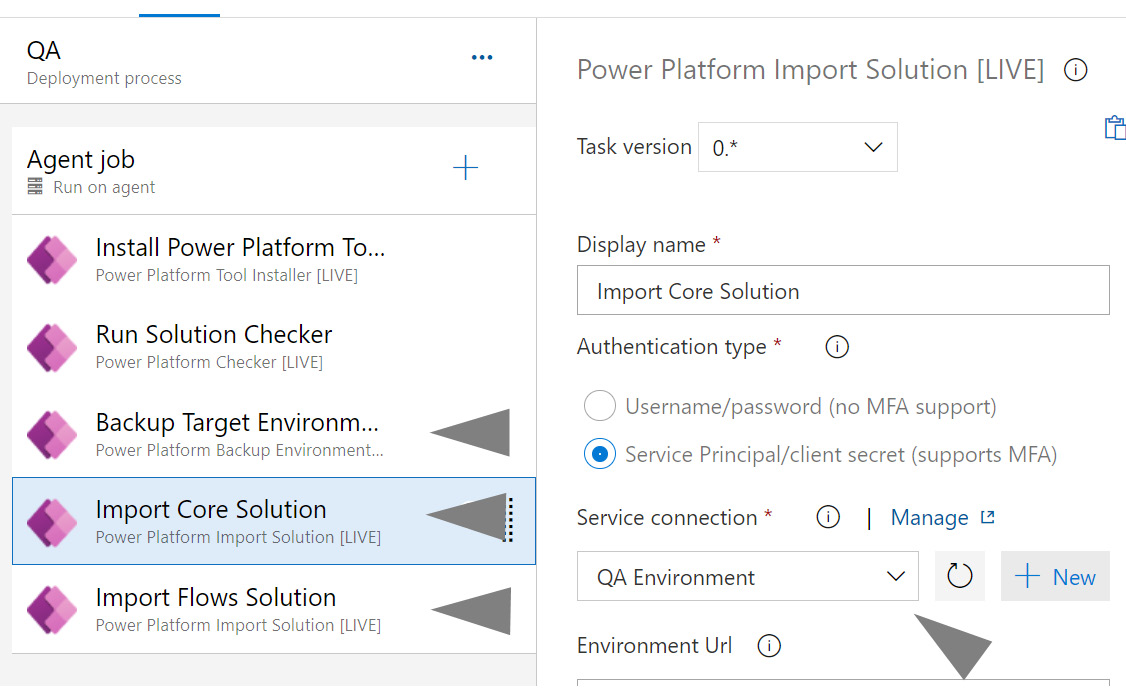
Figure 14.62 – Updating the Power Platform tasks to ensure they point to the QA environment
- Configure the PROD deployment stage name and target
Clone the QA stage, naming the new stage appropriately (for example, PROD), and update all the Power Platform-related tasks, ensuring they point to the production Power Platform environment:
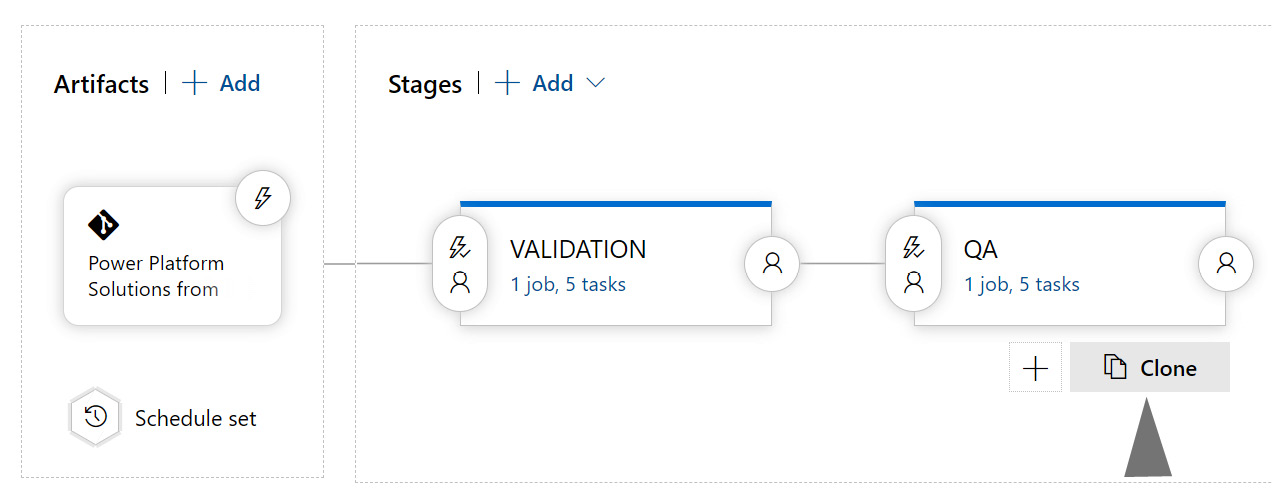
Figure 14.63 – Creating a production Release stage as a clone of the QA stage
On the newly created PROD stage, select the trigger option:

Figure 14.64 – Editing the trigger for the production Release stage
Configure the trigger for the PROD stage to be manual, providing additional control over the deployment:
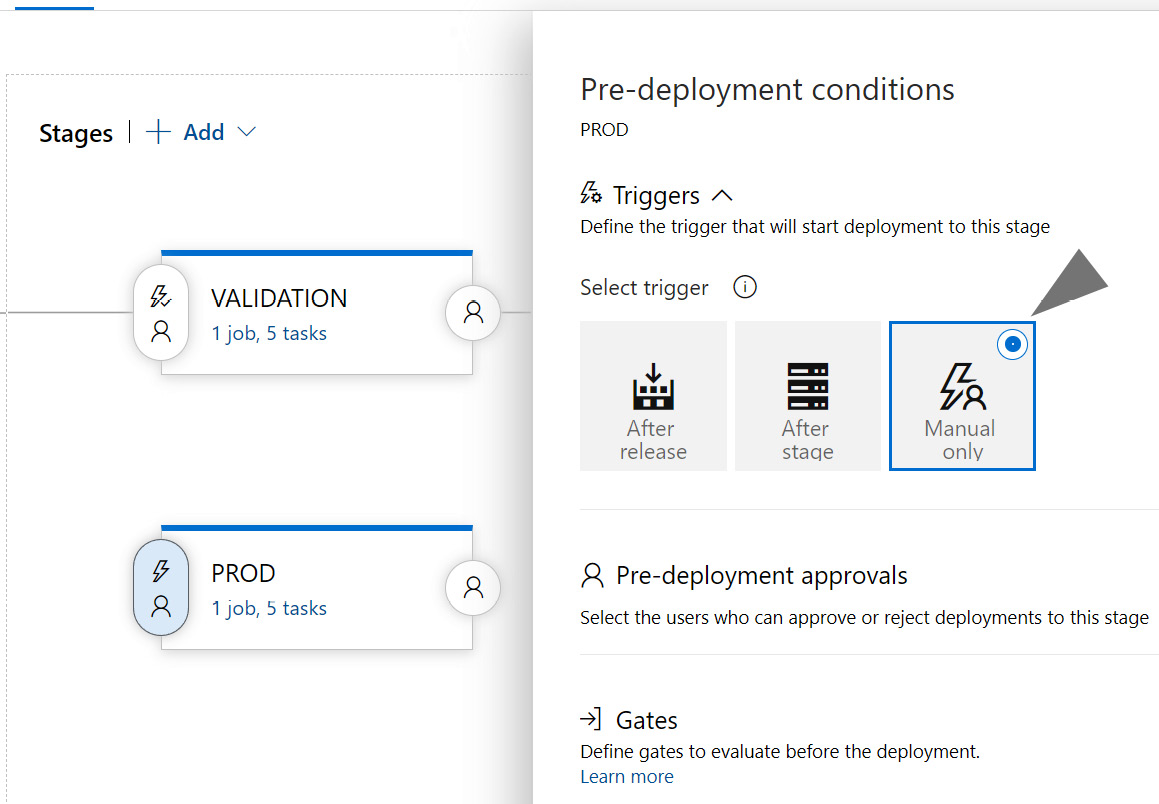
Figure 14.65 – Configuring the PROD deployment stage to trigger manually
The Power Platform-related tasks in the PROD stage should now also be updated, with each one pointing to the corresponding production Power Platform environment.
- Test the Release process
Now that we have a process in place, we are ready to test the release cycle end-to-end. Selecting the Create release option will kick off the deployments:
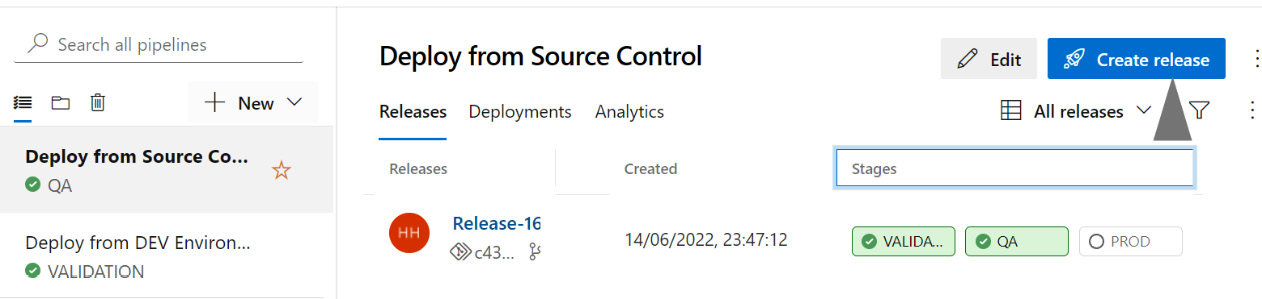
Figure 14.66 – Initiating a release
The Release starts with all stages pending execution:

Figure 14.67 – Release with all stages pending execution
As the release progresses, the VALIDATION stage will run through to completion. If successful, it will automatically trigger the QA deployment stage:

Figure 14.68 – Release progressing through to the QA deployment stage
Once the QA deployment is complete, the release will update the status of the stages accordingly. The PROD stage has been configured to be triggered manually. Once the QA deployment has been validated, the release into production may be initiated by selecting the release instance, as shown in the following diagram:

Figure 14.69 – Release with the VALIDATION and QA deployment stages completed
On the Release instance page, the PROD deployment may be initiated by selecting the Deploy option below the corresponding stage:

Figure 14.70 – Triggering the deployment to production
Once the deployment to production is complete, the stages will be marked accordingly:
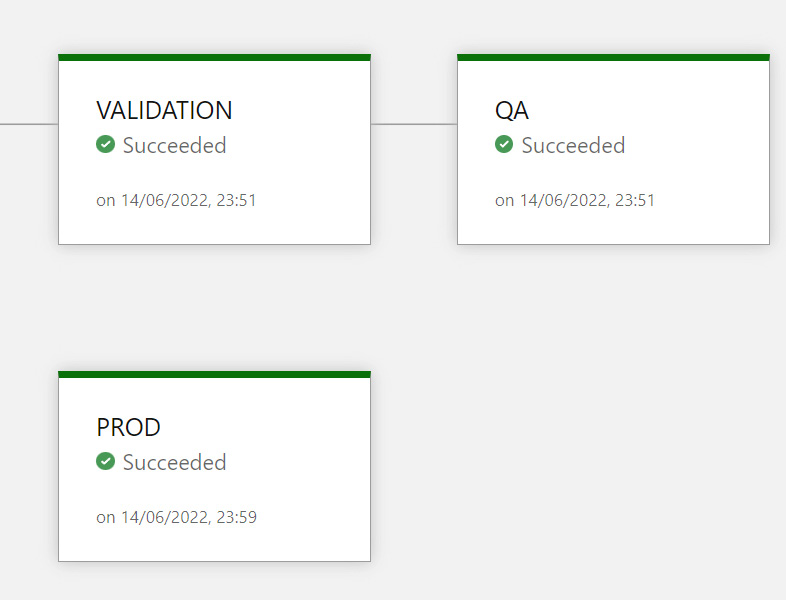
Figure 14.71 – Example of a completed Release in Azure DevOps
The Azure DevOps Release we configured in this section is an example of how a Power Platform application life cycle can be implemented. As a solution architect, you will assess the level of automation and controls required by the project.
Deploying configuration data as part of a pipeline
Azure DevOps pipelines may also be configured to deploy configuration data onto target environments. The Power DevOps Tools provide just such facilities, extending Azure DevOps capabilities. Reference data and Power Pages configuration may be automatically deployed to target environments using the Import Config Migration Data task. Please reference the following Azure DevOps Marketplace page for details: https://marketplace.visualstudio.com/items?itemName=WaelHamze.xrm-ci-framework-build-tasks.
Conclusion
In this section, we worked through the Azure DevOps pipeline and release management process.
Summary
In this chapter, you learned how to leverage Azure DevOps’s task management, source control, and release management capabilities. You are now ready to set up the ALM source control and release processes for Power Platform implementations.
In the next chapter, you will learn how to define go-live strategies, resolve performance bottlenecks, troubleshoot data migrations, and ensure the go-live readiness of your Power Platform projects.