
3
Start a new plan
In this chapter
A project’s schedule or plan is essentially a model that you construct for some project aspects that you’re anticipating—what you expect will happen or what you want to happen. This model focuses on certain key aspects of a project, such as tasks, resources, time frames, and possible associated costs. Note that this book refers to the types of documents that Project Online desktop client works with as plans, not documents or schedules.
This chapter guides you through procedures related to creating a new plan and setting its start date, setting nonworking days in a project calendar, and entering a plan’s title and other properties. No practice files are necessary to complete the practice tasks in this chapter.
Create a new plan and set its start date
As you might expect, Project focuses primarily on time. Sometimes you might know the expected start date of a project, the expected finish date, or both. However, when working with Project, you specify only one date, not both—either the plan’s start date or its finish date. After you enter the plan’s start date or finish date and any additional details, Project calculates the other date for you. Remember that Project is not merely a static repository of your schedule information or a Gantt chart drawing tool—it’s an active scheduling engine.
Most plans should be scheduled from a start date, even if you know that the plan should finish by a certain deadline date. Scheduling from a start date sets all tasks to begin as soon as possible and gives you the greatest scheduling flexibility. In this chapter and later chapters, you’ll see this flexibility in action as you work with a plan that’s scheduled from a start date.
To create a new plan
In Project, select the File tab, and then select New.
In the list of templates, select Blank Project or any other template you want.
Or
If you already have a list of available templates on the Start screen, select Blank Project or any other template you want.
When you create a new plan, Project sets the plan’s start date to the current date. As Figure 3-1 shows, Project draws a thin green vertical line in the chart portion of the Gantt Chart view at the current date.
![]() Tip
Tip
Line formatting can be changed to accommodate color blindness. See Chapter 16, “Format and print views: In-depth techniques,” and its discussion on gridlines.

FIGURE 3-1 The current date is shown in the Gantt Chart view; look for the green vertical line (your current date likely differs).
![]() Tip
Tip
The current date line is drawn at the start of the day.
To set (or change) the plan’s start date
On the Project tab, in the Properties group, select Project Information.
In the Project Information for ‘file name’ dialog, in the Start Date box, either enter the start date you want or select the arrow to select one from the calendar.
 Tip
TipIn the calendar, you can use the left and right arrows to navigate to any month and then select the date you want, or you can select Today to quickly choose the current date.
Select OK to accept the start date and close the Project Information dialog.
To save the new plan
Select the File tab, and then select Save As.
On the Save As page, navigate to the location where you want to save the plan.
In the Save As dialog, in the File name box, type the desired file name and select Save.
![]() Tip
Tip
You can adjust Project settings related to files. For example, you can set Project to automatically display the Project Information dialog each time you create a new plan. To make this change, select the File tab and then select Options. In the Project Options dialog, select Advanced, and then, under General, select the checkbox titled Prompt for project info for new projects. You can also instruct Project to automatically save the active plan at predefined intervals, such as every 10 minutes. In the Project Options dialog, select Save, select the Auto save every ‘amount’ minutes checkbox, and then specify the number of minutes you want.
Set nonworking days in the project calendar
Calendars are the primary means by which you control when each task and resource can be scheduled for work in Project. In later chapters, you’ll work with other types of calendars; in this chapter, we focus on the project calendar.
The project calendar defines the general working and nonworking days and times for tasks for the entire plan. Project includes multiple calendars, called base calendars, and any one of those calendars can serve as the project calendar for a plan. As Figure 3-2 shows, you select the base calendar to be used as the project calendar in the Project Information dialog.
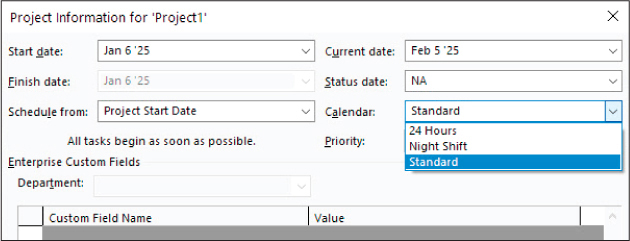
FIGURE 3-2 Set the plan’s start date, project calendar, and other essential schedule settings in the Project Information dialog.
![]() Important
Important
If you’re using Project Online desktop client or Project Professional instead of Project Standard, be aware that the Project Information dialog and some other dialogs may contain additional options related to Project Online or Project Server. This book uses only Project desktop features, so you can ignore these options. For more information, see Appendix C, “Integration with Microsoft 365 solutions for collaboration.”
The Calendar list contains the three base calendars that are included with Project:
24 Hours Has no nonworking time; all time is working time.
Night Shift Covers a night shift schedule of Monday night through Saturday morning, 11:00 PM to 8:00 AM (23:00 to 08:00), with a 1-hour break each day.
Standard The traditional working day and week, Monday through Friday from 8:00 AM to 5:00 PM (08:00 to 17:00), with a 1-hour break each day.
Only one of the base calendars serves as the project calendar; the Standard calendar is the default.
Think of the project calendar as your organization’s normal working days and hours. For example, this might be Monday through Friday, 8:00 AM through 5:00 PM (08:00 to 17:00), with a 1-hour lunch break each day. Your organization or specific resources might have exceptions to this normal working time, such as public holidays or vacation days (personal holidays). You’ll address resource vacations in Chapter 5, “Set up resources.”
You customize calendars as shown in Figure 3-3 in the Change Working Time dialog, which opens when you select the Change Working Time button on the Project tab in the Properties group.
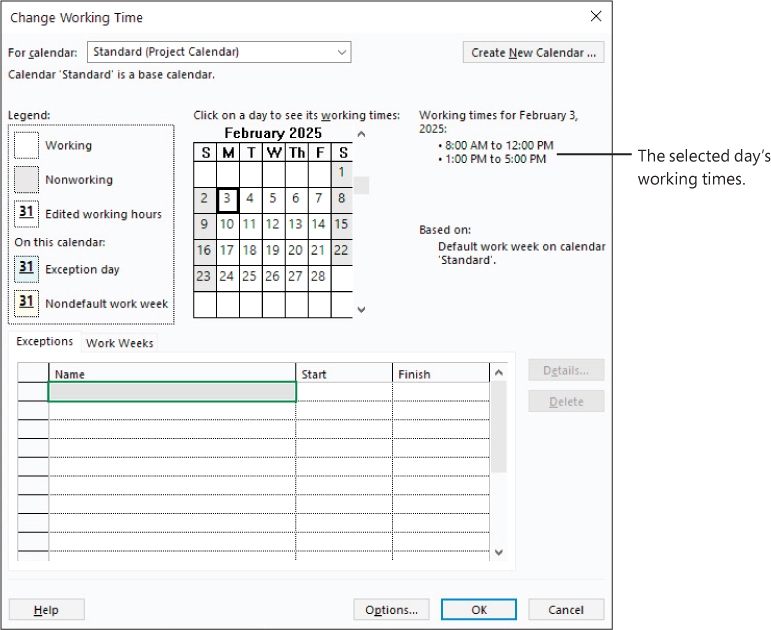
FIGURE 3-3 You customize a calendar’s working time in the Change Working Time dialog.
Use this dialog to set normal working schedules and working time exceptions for individual resources or the entire plan. Other common examples of working time adjustments include the following:
Recurring holidays or other times off that follow a known pattern, such as weekly, monthly, or annually.
Variable working times per week—for example, to address seasonal changes in working times.
Unique working hours for a resource. You’ll adjust such settings in Chapter 5.
To select the project calendar
On the Project tab, in the Properties group, select the Project Information button.
In the Project Information dialog, in the Calendar box, select the arrow and then select the calendar you want to use as the project calendar.
To set a specific date as nonworking
On the Project tab, in the Properties group, select the Change Working Time button.
On the Exceptions tab in the lower portion of the Change Working Time dialog, in the Name field, enter a description of the exception.
TipYou don’t need to name calendar exceptions, but it’s a good practice for you or others to identify the reason for the exception.
In the Start and Finish fields, enter or select the dates you want.
Select OK.
To set up a recurring nonworking time
On the Project tab, in the Properties group, select the Change Working Time button.
On the Exceptions tab of the Change Working Time dialog, in the Name field, enter a description of the recurring exception.
Select in the Start field, and then select Details.
In the Details for <name> dialog, under Recurrence Patterns, select the recurrence values you want, and then select OK.
Select OK to close the Change Working Time dialog.
To set up a custom work week
On the Project tab, in the Properties group, select the Change Working Time button.
Select the Work Weeks tab in the lower portion of the Change Working Time dialog.
Select a row below the [Default] value.
Enter a description and the date range you want to apply to the custom work week.
In the Start and Finish fields, enter or select the date range you want to apply to the custom workweek.
Select Details.
In the Details for <name> dialog, select the day and time values you want, and then select OK.
Select OK to close the Change Working Time dialog.
Enter the plan title and other properties
As with other Microsoft 365 apps, Project keeps track of several document properties. Some of these properties are statistics, such as how many times the document has been revised. Other properties include information that you might want to record about a plan, such as the project title, the project manager’s name, or keywords to support a file search. Some of these properties are used in views, reports, and page headers and footers when printing. You can view and record these properties in the Properties dialog shown in Figure 3-4.
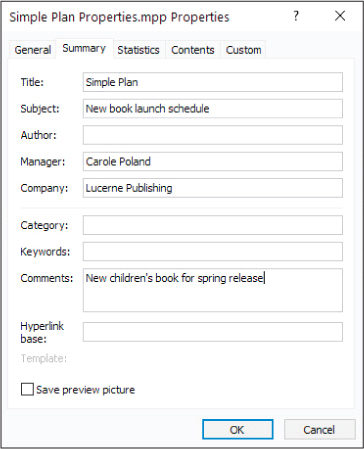
FIGURE 3-4 Record useful summary information about a plan in the Properties dialog.
![]() Tip
Tip
The project title and comments automatically appear on the Project Summary Task. For more information, see Chapter 4, “Build a task list.”
To enter a plan’s properties
Select the File tab, and then select Info.
On the right side of the Info screen, select Project Information. In the menu that appears, select Advanced Properties.
Enter the properties you want to record (all are optional), and then select OK.
Skills review
In this chapter, you learned how to
Create a new plan and set its start date
Set nonworking days in the project calendar
Enter the plan title and other properties

Practice tasks
No practice files are necessary to complete the practice tasks in this chapter.
![]() Important
Important
If you’re running Project Online desktop client or Project Professional, make sure that Project is not connected to Project Web App but is instead set to Computer mode. For more information, see Appendix C, “Integration with Microsoft 365 solutions for collaboration.”
Create a new plan and set its start date
The scenario: throughout this book, you play the role of a project manager at Lucerne Publishing, a book publisher that specializes in children’s books. Lucerne is about to publish a major new book, and you’ve been asked to develop a plan for the book launch. Start Project and perform the following tasks:
Create a new plan based on the Blank Project template.
Set the new plan’s start date to January 6, 2025.
Save the new plan as Simple Plan.
Set nonworking days in the project calendar
The scenario: at Lucerne Publishing, you need to account for an upcoming date on which the entire Lucerne staff will be unavailable to work on the book launch project. Continuing in the Simple Plan plan, perform the following task:
In the project calendar, create a nonworking day calendar exception named Staff at morale event for January 22, 2025, which is illustrated in Figure 3-5.
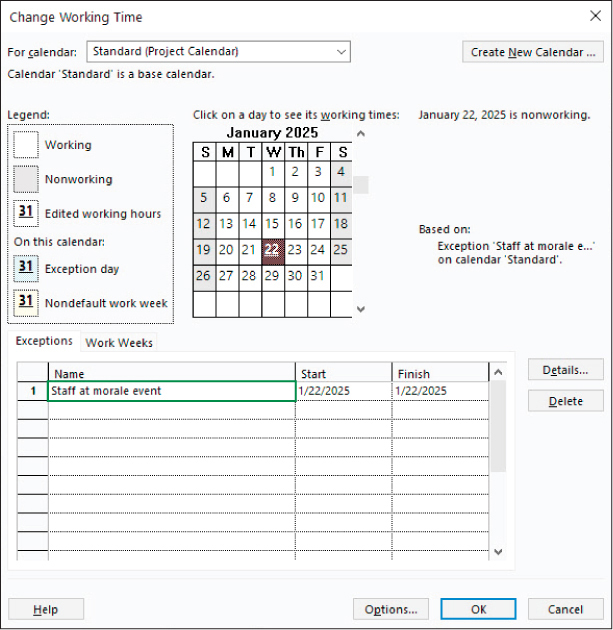
FIGURE 3-5 The calendar exception you created should look like this in the Change Working Time dialog.
Enter the plan title and other properties
The scenario: you want to record top-level information about the new book launch plan. These details don’t affect the overall schedule, but they relate to important supplemental information you want to keep in the plan. Continuing in the Simple Plan plan, perform the following task:
Give the Simple Plan the following properties:
Subject: New book launch schedule
Manager: Carole Poland
Company: Lucerne Publishing
Comments: New children’s book for spring release
Review the Gantt Chart view for this plan and, in the timescale, locate the vertical current date line and the date for the morale event you created in the previous section.
Notice that the morale event is shaded the same way as other nonworking time in the timescale.
![]() Tip
Tip
If you don’t see the shading for nonworking time, check to make sure that you’re viewing the timescale by days instead of by weeks or months.