Before planning a SharePoint installation, you should have a strong understanding of the intended purpose. You should identify whether the installation will serve sites on the intranet, extranet, or Internet. You should also determine how many users and documents the system must support. Finally, you need to decide if the system is mission-critical or if downtime can be tolerated. In this chapter, I walk you through the major components of SharePoint and help you plan your installation. At the end of the chapter is a complete installation procedure you can use to create a development environment for use with this book.
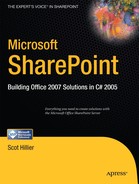
Windows SharePoint Services (WSS) is an application framework that is primarily designed to facilitate collaboration among teams through customizable web sites known as team sites. Team sites are secure, document-centric sites that provide a set of tools for sharing documents, tracking progress, and communicating with colleagues. Within a team site, document libraries provide basic document management capabilities. Task lists, contact lists, discussion forums, and calendars provide the means to coordinate and track associated work, which can be automated through workflow processes. All of these tools are managed through an administrative interface designed to allow groups to service themselves. Figure 2-1 shows a typical team site in WSS.
Every WSS team site you create may have one or more document library associated with it. A document library is like a mini document management system with check-in, checkout, version control, and approval capabilities built right in. Document libraries are intended to contain all of the documents that a team needs to accomplish a business function. These documents may be Office documents built into the Office suite or they may be non-Office documents such as Adobe Acrobat files, text files, e-mail, or even media assets. Just about any document may be stored in a document library. It is true, however, that there are several special integration points between Office documents and SharePoint that are not extended to other file types. I cover these special integration points throughout the book. Figure 2-2 shows a typical document library in a WSS team site.

Document libraries also support an event system that you can tap into programmatically. These events can call into .NET assemblies when new documents are placed in a library, modified, or deleted. This version of WSS also comes with its own workflow engine. Based on the Windows Workflow Foundation, the engine provides simple workflow processes such as document approval out of the box. Power users can develop more sophisticated workflows using the SharePoint Designer (formerly called Microsoft FrontPage) while developers can create custom workflows with Visual Studio 2005 and harness all the power of the .NET Framework.
Teams really need more than just document information in order to accomplish a business purpose. For example, teams may need a task list, a list of contacts, or a calendar to facilitate and coordinate their efforts. This type of information all falls under a broad category in WSS simply called lists.
In the previous version of WSS, lists used a different underlying infrastructure than document libraries. In the 2007 version, lists and libraries are essentially the same thing to SharePoint, although they are seen by users as quite different. Lists in WSS can be lists of anything, but most often they take the form of information typically found in Microsoft Outlook. In fact, many list types can be synchronized with information contained in Outlook. For example, you can create a list of key contacts on a WSS team site and synchronize it with your contact list in Outlook. Just like document libraries, lists are also capable of raising events that you can trap in code. Lists can also participate in workflow processes. Figure 2-3 shows a typical task list in a WSS team site.

Along with documents and lists, teams may also need functionality that is not a part of SharePoint out of the box. Adding this functionality is accomplished using a SharePoint technology called web parts. Web parts are .NET assemblies that add customized functionality to a site where normally a developer might use ASP.NET code. This version of WSS utilizes ASP.NET 2.0 web parts, which are the same web parts you can use in your own custom ASP.NET applications. Additionally, this version has complete backward compatibility for web parts created in the 2003 version. I cover the various ways to customize SharePoint through code in the second half of this book.
The latest version of WSS is built on top of ASP.NET 2.0, so developers can take advantage of the .NET Framework 2.0. Furthermore, Microsoft has done away with the previous approach of using an ISAPI filter to intercept HTTP requests for processing by SharePoint. Instead, WSS now utilizes an HttpModule and an HttpHandler that are registered inside of the web.config file. This approach gives WSS more stability by ensuring that an ASP.NET context always exists before any custom code is run. The HttpModule and HttpHandler allow the incoming page request to be processed by WSS and the appropriate HTML is constructed on the fly for return to the calling client. The web pages you see in a WSS site do not actually exist on the web server. Instead they are constructed from a combination of page templates located on the file system and data contained in the Content Database. The Content Database is a SQL Server 2005 database that maintains all of the web page definitions, documents, lists, and security information. This means that SharePoint products and technologies require an associated SQL Server 2005 installation. It also means that all documents in document libraries are saved in the Content Database as binary large objects (BLOB).
In previous versions of WSS, it was very difficult to create a new type of site that differed dramatically from the out-of-the-box templates. To accomplish this task, you had to create a new site definition using an XML language known as the Collaborative Application Markup Language (CAML). Even after these site definitions were created, branding the site remained challenging and was often accomplished by extensively modifying individual pages in Microsoft FrontPage.
WSS also introduces a new concept for deploying site functionality called a Feature. A Feature with a capital Fis a modular approach to defining a site. Using this new capability, developers can create packages of web parts, workflows, or other customizations that may be turned on and off by site administrators. This approach allows Features to be reused across sites, which makes the WSS site infrastructure much more maintainable.
For controlling site styling, WSS now takes advantage of ASP.NET master pages. Master pages were introduced in ASP.NET 2.0 and provide a way for developers and designers to specify the basic look and feel of a site in just one place. The master page defines colors, styles, and visual elementsoften called the chromethat will appear on every page. It is now possible to brand a significant portion of a site by changing a single file.
In the past, many developers were reluctant to use Microsoft FrontPage for customizations because it would cause a site to become "unghosted." Unghosting refers to a situation in which an individual page is separated from its site definition. This separation could lead to strange behavior and performance issues in the previous versions of WSS. In the latest version of WSS, unghosted pages are now called customized pages, and modifying an uncustomized page in the SharePoint Designer will still cause it to become separated from its site definition. However, the performance issues have now been eliminated, and the SharePoint Designer will even allow you to revert a customized page back to its uncustomized state. While there are still good reasons to avoid customizing pagessuch as when you are rolling out many sites with the same brandingthe improvements in the SharePoint Designer make it a serious option for organizations that need a tool specifically for nonprogrammers and content creators.
Microsoft Office 2007 is the most significant revision to the Office suite in ten years and is the result of countless hours of user testing by Microsoft. The entire user interface has been completely reworked around the central concept of a ribbon. The ribbon interface is designed to group functions together by activity. This approach is intended to make it easier for users to find commands that might have been buried deep in a menu tree in previous versions. Beginning and intermediate users of Office are likely to adopt the new interface quickly and become more productive as they discover new commands exposed on the ribbon. Advanced Office users, however, will probably react negatively to the new user interface because it is completely different, and familiar patterns of clicking will no longer work. In fact, I see this as the greatest obstacle to rolling out the new Office suite because advanced users with dozens of linked spreadsheets, for example, will have to relearn the interface before they can be productive again. Figure 2-4 shows the new ribbon interface in Word 2007.

Just like Office 2003, Office 2007 is tightly integrated with SharePoint. Along with the ribbon interface, Microsoft has also changed the interface Office users see when working with SharePoint. The Shared Workspace available in Office 2003 still exists, but it has been replaced as the primary view into WSS team sites. Instead, users will now see two panels that appear beneath the ribbon interface called the Document Information Panel (DIP) and the Document Action Panel (DAP).
The DIP is a view of the metadata associated with the current document. The purpose of the DIP is to make metadata visible throughout the document editing process so that users can update the information as they determine the right values. The goal is to get better metadata through a nonmodal interface as opposed to the old approach of demanding all the metadata values when the document is saved to a library. Additionally, you can synchronize the DIP with the document so that metadata is filled in automatically as the document is created, or document text is automatically added when a user enters metadata. Figure 2-5 shows the DIP.

The DAP is a view of tasks associated with the document that apply to the current user. These tasks become visible when the document is associated with a workflow in SharePoint. These tasks can involve review, approval, content creation, or any other activity dictated by an associated workflow.
With this version of Office, Microsoft has made significant improvements in the offline capabilities of WSS. The primary tool for working with WSS data offline is Microsoft Outlook. Outlook has the ability to synchronize with many different types of WSS data including lists, calendars, tasks, discussions, contacts, and document libraries. This means that users can, for example, take an entire document library offline, edit the documents, and then synchronize their changes later. Mobility has improved as well with the ability to create sites that specifically target mobile devices.
WSS sites are also enabled with Really Simple Syndication (RSS) and Outlook is equipped with an RSS reader. This means that end users can subscribe to SharePoint RSS feeds and collect all of the information in Outlook. However, RSS will not allow users to write data back to a WSS site. You can, however, send e-mail to lists in this version of WSS, which can include attachments that get saved into SharePoint.
With the acquisition of Groove Networks, Office now has the capability to support peer-to-peer integration with WSS sites and other users. Utilizing Microsoft Groove, end users can get documents from a WSS site and then take advantage of the peer-to-peer capabilities of Groove to share and edit the documents with others. Groove also makes an excellent offline solution with more capability than Microsoft Outlook alone. The capabilities of Groove are beyond the scope of this book, but they are worth investigating for those organizations where peer-to-peer capabilities may be beneficial.
Microsoft Office 2007 is available in no less than eight different suites. The suites range from Microsoft Office Basic 2007containing Word, Excel, and Outlookto Microsoft Office Enterprise 2007, which contains all of the standard Office products plus Communicator and Groove support. In this book, I cover all of the advanced integration and development techniques with Office products; therefore, I assume that you have one of the advanced suites available. Specifically, you should have the Microsoft Office Ultimate 2007, Microsoft Office Professional Plus 2007, or Microsoft Office Enterprise 2007 suite. Information on all the suites can be obtained at http://office.microsoft.com.
The Microsoft Office SharePoint Server (MOSS) is a significant new product with broad and deep capabilities designed to support a wide variety of enterprise functions to manage content, present business intelligence data, automate workflow processes, manage records, and build both public and private web sites. Although MOSS can be thought of as the next version of SharePoint Portal Server 2003 (SPS), it is really a completely new product. Its organizational structure and customization patterns are much different than those of SPS.
MOSS is based entirely on WSS technology and is a true superset of WSS functionality. Every enhancement you create in WSS will function identically in MOSS. This also means that the end user experience is consistent between MOSS and WSS. Navigation elements, styles, and site organization are the same whether you are in MOSS or WSS. This is a far cry from SPS, which often seems to have no relationship at all to WSS. For those who experienced SPS, you will find that the old Topic and Area structure has been eliminated in favor of a more flexible interface that can easily be changed.
Many of the portal features of MOSS will be familiar to anyone who has worked previously with SPS. Although the look and feel of MOSS more closely resembles the current version of WSS than the previous version of SPS, familiar capabilities of SPS such as Audiences, Profiles, My Site, and Single Sign-On (SSO) have been retained. These features differentiate a true organizational portal from a simple team collaboration site and should be thought of as one of the primary differences between MOSS and WSS.
Audiences in MOSS are used to target content at portal users. Within MOSS, you may define an audience based on user attributes such as membership in an Active Directory group. Then you may use that audience definition to show or hide content when a page is viewed.
MOSS user profiles allow you to define, search, and present metadata about portal users. Profiles draw information from Active Directory to provide basic information such as first name and last name, but you may also extend the metadata to include custom fields such as languages spoken or areas of expertise. Additionally, these custom fields can even be derived from other systems, for example like PeopleSoft. Once defined, profiles can be a search scope that allows users to locate people within the organization.
Along with their profile, every MOSS user can also be given their own personal sitecalled My Site. My Site functions as a personal workspace for MOSS users and allows them to organize their own documents and information. Through My Site, users may connect to colleagues, manage their profiles, and be alerted when key information changes somewhere in MOSS.
Although SSO services were available in SPS, my experience is that they were rarely used. In MOSS, however, SSO takes on new meaning, because it is used to facilitate access to several new features such as data in line-of-business systems. SSO allows you to specify a set of credentials for accessing a secondary system and then give those credentials an application name that may be invoked later by either a MOSS feature or your own custom code.
Enterprise Content Management (ECM) is a broad term that refers to managing the entire document life cycle from ideation through archival. This includes not only the same workflow capabilities I described earlier for WSS sites, but also the ability to archive these records and apply retention policies to them. Additionally, ECM encompasses web content management (WCM) to support the creation, approval, and deployment of web sites.
MOSS supports several different templates that allow organizations to create both public and private sites. One of those templates allows you to create a records repository that you can use to archive documents according to a document retention policy. Documents may be added to the records repository either manually from within a SharePoint document library, or automatically by associating a workflow with a retention policy. In the latter case, a document could, for example, be routed through a review process and then sent to the repository after it has reached a certain age. It might also be good to mention at this point that both WSS and MOSS have a recycle bin that works similarly to the Windows Recycle Bin and allows a single document to be recovered if it is inadvertently deleted.
Along with documents, MOSS also manages web content. Prior to the release of MOSS, the Microsoft Content Management Server (MCMS) was the primary way that organizations created, approved, and published web content. With the release of MOSS, MCMS is being retired. The major capabilities formerly in MCMS have been moved to MOSS. This includes creating page templates with content placeholders, implementing approval processes, and deploying pages in bulk from separate development environments to production environments. Figure 2-6 shows a typical MOSS page template in design mode with content being added to placeholders on the page.

Business intelligence represents a key area where MOSS brings many new capabilities that were unknown in previous versions of SharePoint. One of the MOSS templates available out of the box is a Report Center template designed to act as a hub for business intelligence data. While business intelligence capabilities can be utilized anywhere within MOSS, the Report Center template is specially designed to support report distribution and the creation of key performance indicator (KPI) dashboards. Reports can be delivered either by creating Excel spreadsheets or by designing reports in Microsoft Reporting Services. KPI dashboards can be created either by hand or by connecting them to a spreadsheet or an analysis cube built in SQL Server 2005.
Along with these features, MOSS also supports two new server-based versions of Office products: Excel Services and Office Forms Server. With these servers, you can distribute Excel spreadsheets and InfoPath forms to end users even when they do not have Excel or InfoPath installed. This means that spreadsheet-based reports and dashboards can be delivered over the web without exposing critical data or calculation formulas to users. It's also now possible to expose InfoPath forms over the web to traveling personnel, customers, and partners who might need to fill out a form but do not have the InfoPath client available.
Rounding out the business intelligence feature set is the Business Data Catalog (BDC). The BDC is a new no-code mechanism for exposing line-of-business data within MOSS. Using the BDC, you can define the data structure in back-end systems such as your customer relationship management (CRM) system or human resources database. This data may then be mapped into web parts for easy searching, displaying, and filtering.
Many of the advanced capabilities of MOSS are configured and delivered through a Shared Services Provider (SSP). The SSP allows you to configure things such as Enterprise Search, Excel Services, and the BDC one time and then use them across many different MOSS and WSS sites. Because you can configure multiple SSPs in the same farm, this architecture gives you the flexibility to expose specially configured services where you want them. For example, you may configure an SSP with a public search for use on the Internet, and another SSP with a private search for use on the corporate intranet.
While WSS is a free component, MOSS must be licensed separately. MOSS comes in several different versions that target different deployment scenarios and have different licensing requirements. Regardless of your scenario, however, every organization using MOSS must purchase the base MOSS 2007 server license. Along with the server license, you must also purchase the appropriate client access licenses (CAL) to meet your needs.
For general use, MOSS comes in a Standard and an Enterprise edition. The Standard edition gives you access to the basic set of MOSS functionality, including content management, workflow, and collaboration. The Enterprise edition includes the functionality of the Standard edition but adds the BDC, Excel Services, Office Forms Server, and more. Additional versions allow you to use MOSS solely for deploying Internet sites or separate features such as the Office Forms Server. In this book, I always assume that you have the MOSS 2007 Enterprise edition available.
Planning for a WSS or MOSS deployment is not trivial. There are many issues to consider as you try and decide exactly how much hardware and what configuration is necessary to support your end users. The Microsoft Office System technical library (http://technet2.microsoft.com/Office/en-us/library/3e3b8737-c6a3-4e2c-a35f-f0095d952b781033.mspx?mfr=true) is an excellent resource for performing detailed planning, and I will not try to repeat all of that information in this chapter. However, there are some fundamental considerations worth covering that will provide you a framework for deciding what type of deployment you will need.
Whenever I discuss SharePoint infrastructure with customers, they almost immediately jump on user capacity. This is because we tend to think of systems in terms of how many people are going to use them. However, determining the actual number of people who can access a SharePoint infrastructure is based on so many variables as to be nearly meaningless. First of all, you must consider the usage profile. Light site usage for simple browsing might mean that you can support three to five times as many concurrent users as you can if people are performing heavy queries and displaying complicated data views. Performance will also be affected by whether the activity is distributed across the farm or concentrated in a single area. In any case, even a single-server deployment is good for several hundred concurrent users on a typical day with typical activity.
The total latency of a SharePoint farm is split about evenly between server-side processing and client-side processing. On the server, latency is affected by ASP.NET processing, trips to the database, and security trimming designed to remove all of the menu actions that are inappropriate for the current user. On the client side, latency is affected by client-side scripting and asynchronous processing (e.g., AJAX) as well as the quality of the client machine. The biggest impact on latency, however, is poorly designed custom web parts. When web parts make too many round trips to the database or exhaustively recurse the SharePoint object model, latency increases dramatically. Before deploying any new web part, you would be wise to profile its performance and address areas that will cause excessive latency.
Storage capacity is a major planning point in any SharePoint deployment. Since all of the pages, lists, and documents are stored in SQL Server 2005, you must adequately size the disk space to support not only your initial needs, but also to allow for growth over a period of years. Start by considering any existing documents that you want to migrate to SharePoint. For these documents, plan on having disk storage equal to one and a half times the total size of the documents to be migrated. Additionally, you'll need another 30% for indexing the new content, and an additional 60% for the search server. Finally, you'll need to consider growth, including the number of versions that will be created. This is calculated by assuming an average document size multiplied by an average number of versions. Table 2-1 details the planning formulas and shows an example based on migrating 100GB of existing documents with an average file size of 1MB and planning for five years of growth.
Table 2.1. Calculating Storage Requirements
Item | Formula | Example |
|---|---|---|
Existing documents | 1.5 file size | 1.5 100GB = 150GB |
Indexes | 30% of document storage | 150GB .3 = 45GB |
Search server | 60% of document storage | 150GB .6 = 90GB |
Growth | Average document size average number of versions documents created annually years | 1MB 5 10,000 5 = 250GB |
SharePoint offers new capabilities that make it a much stronger choice for extranet and Internet applications than it was previously, with templates specifically designed to support applications both inside and outside the firewall. Because SharePoint now also supports several different authentication providers including NT LAN Manager (NTLM), Kerberos, and Forms authentication, you should give some thought to access and authentication to determine the best combination.
NTLM and Kerberos
Integrated Windows Authentication is the simplest form of authentication for browser applications where the end user has a Windows account. Whenever a user browses to a site that uses Integrated Windows Authentication, the browser sends a token to the server identifying the Windows account of the user. If the server can authenticate the user with this information, access is granted. If the server cannot authenticate the user, a login box appears prompting the user to enter credentials manually. Both NTLM and Kerberos are forms of Integrated Windows Authentication.
NTLM uses a challenge-response protocol to authenticate the client to the server. It begins when the client attempts to connect to a secure application. The server sends a challenge to the client, and the client responds with a hashed value that the server can use to validate the user and password. All of this is seamless to the end user who simply sees the requested web page open in the browser.
NTLM is simple, works well, and developers have often been able to ignore authentication concerns because it was essentially transparent. As security concerns have grown, however, the need for a more secure authentication provider has become increasingly obvious. This is where Kerberos comes in to the picture.
Kerberos is a ticket-based authentication protocol. When a client wants to access a secure application, it requests a ticket from the key distribution center (KDC), which is the server running Active Directory. The KDC then creates a ticket based on the user credentials stored in Active Directory. The ticket is then sent back to the client, which can only use the ticket if it has the correct password. Once the user is authenticated, the ticket is cached locally where it remains until it expires.
Kerberos has several advantages over NTLM that SharePoint developers should care about. First, Kerberos has much better performance than NTLM. Because Kerberos caches credentials, servers can respond more quickly than under NTLM. Kerberos is also more secure than NTLM because the client can essentially authenticate the server as well as have the server authenticate the client. The biggest reason for developers to care about Kerberos, however, is delegation.
Take a step back and consider the process of connecting to a WSS team site using NTLM authentication. We know that NTLM will successfully authenticate a user that has a Windows account and grant access to the team site, which will then appear in the browser. While most of the page content will appear correctly, what if a web part on that page displays information from a line-of-business system with its own separate database? The web part itself must also authenticate against this other database. What credentials does it use? In many cases, we want the web part to use the same credentials as the current user. In other words, we want the web part to impersonate the current user.
SharePoint sites are set up so that web parts will initially impersonate the user accessing them. The user credentials may subsequently be passed to any system residing on the same server as SharePoint or on a different server that requires only a single additional authentication. If the data source requires a second authenticationlike when you access a web service, which subsequently accesses a databasethe impersonation will fail. This is typically referred to as the "double-hop" issue.
Kerberos, on the other hand, supports impersonation across machines. This type of extended impersonation is known as delegation. If the end user were authenticating to the team site using Kerberos, the web part would successfully authenticate to the line-of-business database and information would appear in the page.
It's important to point out that Kerberos requires some additional configuration that can only be accomplished if you have rights to Active Directory. Additionally, there are other ways to solve the double-hop issue. Many developers, for example, utilize a SQL Server standard security account buried in a connection string that a web part uses to access the database. The MOSS SSO service can also be used to gain access to any system in the enterprise. The bottom line, however, is that Kerberos is superior to NTLM in several ways and you should utilize it where you can. In the exercise in this chapter, "Creating a Development Environment," I detail the steps necessary to set up and configure Kerberos.
Forms Authentication
One of the reasons that previous versions of SharePoint have not been ideal candidates for extranets is that they did not directly support forms-based authentication. Therefore, organizations would often have to create a separate domain for partners and customers where they could be assigned a Windows account for authentication. Under SharePoint 2007, however, you can now implement forms-based authentication and utilize a data store such as SQL Server to manage the accounts. I discuss setting up forms authentication in Chapter 3.
SharePoint has several limitations that you should keep in mind as you are planning your deployment. Generally, the limits presented here are not hard limits, but exceeding them can cause performance degradation. The limits are typically quite large and you're unlikely to run into most of them, but it is possible. For example, you could easily exceed the recommended 2,000 documents per folder unless you plan your document migration accordingly.
When examining the SharePoint limits, you'll see references to several terms that are specific to SharePoint. In SharePoint, a web application refers to an Internet Information Server site that has been extended with SharePoint. Each web application may contain one or more site collection. A site collection is typically a complete intranet, extranet, or Internet implementation. A site collection is made up of one or more sites. A site is a dedicated section of the site collection for team collaboration, business intelligence reporting, records management, or the like. Sites contain lists and documents and may have subsites underneath them. Table 2-2 lists the SharePoint limits associated with these terms.
Table 2.2. SharePoint Limitations
Item | Limit |
|---|---|
Number of site collections in a web application | 50K |
Number of sites in a site collection | 250K |
Number of subsites nested under a site | 2K |
Number of lists on a site | 2K |
Number of items in a list | 10M |
Number of documents in a library | 2M |
Number of documents in a folder | 2K |
Maximum document file size | 2GB |
Number of documents in an index | 50M |
Number of search scopes | 1K |
Number of user profiles | 5M |
SharePoint may be deployed in several different architectural configurations from a single server utilizing SQL Server Express to a multiserver farm with an active-passive SQL cluster. The exact deployment architecture will be based on the number of users, storage requirements, and availability requirements. Small team-based installations may be able to use a single server while large Internet presence sites will need a farm. Table 2-3 lists the various configurations and their specifications based on an average corporate user with an average amount of activity.
Table 2.3. Deployment Architectures
Configuration | Users | Sites | Documents | Index | Availability |
|---|---|---|---|---|---|
Single server | 500 | 1,000 | 10K | 100K | Low |
Small farm | 5,000 | Thousands | Tens of thousands | Hundreds of thousands | Low |
Medium farm | 100,000 | Tens of thousands | Hundreds of thousands | Hundreds of thousands | High |
Large farm | 500,000 | Tens of thousands | Millions | Millions | High |
Single-Server Configuration
A single-server deployment of WSS or MOSS can be created on a server that has a 2.8GHz processor with 2GB of RAM and a 100GB hard drive. In this scenario, you would utilize SQL Server Express to create the required databases directly on the server without the need for a separate installation of SQL Server 2005. This deployment is remarkably easy to set up by simply running the WSS or MOSS installation and following the steps. However, this is the least reliable configuration because everything obviously relies on the availability of a single machine.
Small Farm Configuration
System performance can be improved by moving the database off of the single server and onto its own server. This requires a separate installation of SQL Server, but improves performance significantly because all database operations can happen on the separate server. However, this configuration is really no more reliable than the single-server configuration because it is still vulnerable to a single failure.
Medium Farm Configuration
True enterprise reliability begins with the medium farm configuration. In this configuration, the web front-end servers, application server, and database servers are separate. A typical configuration would have two front-end web servers, a single application server, and an active-passive SQL Server cluster. Generally, these servers are dual-processor machines with at least 4GB of RAM and upward of 200GB hard drives. Performance and reliability in this configuration are greatly enhanced by separating the required functions across machines.
Large Farm Configuration
The large farm configuration is a scaled-out version of the medium farm configuration. In the large farm, upward of four front-end web servers are used to handle hundreds of thousands of users. An application server and active-passive SQL Server cluster are employed in the same way as the medium farm configuration. This configuration is typical for a large Internet presence site.
As discussed in this chapter, there are several different configurations you can use to set up a SharePoint environment. You can, for example, install WSS on a single server using the Express version of SQL Server and work many examples in the book. However, the exercises in this book assume that you have a certain development environment available when specifying the steps to follow. This means that if you create a development environment that differs significantly from the one described in this exercise, you may experience some difficulty getting certain examples to work. Furthermore, the examples and exercises will deal with features of both WSS and MOSS. Therefore, if you do not install the Enterprise edition of MOSS, you will not be able to work exercises that specifically require it. I have included setup instructions for WSS in this exercise because I recognize that many readers will have easy access to WSS while MOSS requires a separate license.
Tip
Even if you are not going to use the Enterprise edition of MOSS in your production environment, you can still get a trial version free for 180 days. The download and trial keys are available at http://www.microsoft.com/downloads/details.aspx?FamilyID=2e6e5a9c-ebf6-4f7f-8467-f4de6bd6b831&DisplayLang=en.
I have chosen to specify a development environment from scratch assuming you have no existing domain controller, e-mail server, or web server. My infrastructure will consist of three serversa domain controller, a web server, and a database serverin a medium farm configuration. I have selected this configuration because it is not overly complex, but it will allow you to get a feeling for the farm installation process. The only difference between the infrastructure described here and a production environment is that I would normally include an application server in the farm for handling expensive operations such as indexing. In this exercise, all of the services will reside on the web server.
Additionally, I will utilize Kerberos authentication throughout the farm. You may choose to complete this exercise without using Kerberos; however, you may have some issues later with authenticating web parts or assemblies using NTLM. Generally, I recommend using Kerberos authentication whenever it is practical to do so. You will need to be a domain administrator to properly configure Kerberos authentication.
For maximum flexibility, I recommend creating the development environment using Microsoft Virtual Server 2005 virtual machines. Virtual machines allow you to create multiple operating system installations on a single hardware platform, which can be reconfigured to set up various scenarios. Using virtual machines, for example, would allow you to create a development environment that can easily switch between MOSS and WSS. In this exercise, I include the instructions for downloading and installing Microsoft Virtual Server 2005.
This exercise is not intended to walk you through an exhaustive screen-by-screen installation of the required software. Instead, I focus on special areas of the installation where you need to configure the software or take special care to ensure a correct installation. Generally, I assume that you have some idea of how to install Microsoft server products, but I will try to give enough guidance to keep you from going astray.
In setting up the development environment, I use a single dual-processor server running Microsoft Virtual Server 2005. If you are using Microsoft Virtual Server 2005 to create your development environment, you must meet the minimum requirements to create and run virtual machines. In order to ensure that you have a trouble-free environment, I recommend that you install the software on a server-class machine with at least a 3GHz processor and at least 4GB of RAM (more is better).
If you are not using virtual machines, you must have servers that meet the minimum requirements for Windows 2003 operating systems, SQL Server, and SharePoint. Generally speaking, you should strive to have machines with at least a 3GHz processor and at least 2GB of RAM. Table 2-4 lists the virtual machines I created and the software installed on each.
When using virtual machines, I connect them to the required software through the use of an ISO file. An ISO file is a complete image of a CD-ROM or DVD, which can be mounted to a virtual machine. Once mounted, the ISO file appears as a CD or a DVD drive in the virtual machine. ISO files can be created using many popular disk-burning software titles such as Nero (http://www.nero.com), and are available directly through Microsoft subscription downloads for those readers with access to a software subscription.
Table 2.4. Machine Configurations
Machine | List of Software |
|---|---|
VSPDC | Microsoft Windows Server 2003 R2, Active Directory, POP3 service |
VSSQL | Microsoft Windows Server 2003 R2, SQL Server 2005 |
VSMOSS | Microsoft Windows Server 2003 R2, Microsoft .NET Framework 3.0, Microsoft Office SharePoint Server, Visual Studio 2005 |
VSWSS | Microsoft Windows Server 2003 R2, Microsoft .NET Framework 3.0, Microsoft Windows SharePoint Services, Visual Studio 2005 |
VSCLIENT | Microsoft Vista, Microsoft Office Ultimate 2007 |
Next, if you are using Microsoft Virtual Server 2005, proceed to the next section, "Section 1: Installing Virtual Server 2005." Otherwise, proceed to "Section 3: Creating the Domain Controller."
In this section, you'll download and install Microsoft Virtual Server 2005. Because you'll need several virtual machines for the development environment, my strategy will be to create one base operating system and then make copies of it for the other machines. This is possible because of the portable nature of the virtual hard drive (VHD) files used by Virtual Server. Before a base image can be copied, however, it must be processed using a utility called SYSPREP. SYSPREP guarantees unique identifiers for each of the operating systems you clone from the original base image.
Microsoft Virtual Server 2005 is available as a free download from Microsoft at http://www.microsoft.com/windowsserversystem/virtualserver/software/default.mspx. When you link to this address, you will be able to download the software after logging in using a Windows Live identity. The software is contained in a single self-extracting executable named SETUP.EXE. After downloading the software, simply run the executable and perform a complete install. Figure 2-7 shows the virtual machine management panel in Microsoft Virtual Server 2005. Once the software is installed, follow these steps to create the base machine image:
Log into the server where Microsoft Virtual Server 2005 is installed as a local administrator.
Select Start

In Virtual Server Administration Website, select Virtual Machines
On the Create Virtual Machine page, type VSIMAGE in the Virtual Machine Name field.
Specify a value in the Virtual Machine Memory.
Specify a size for a new Virtual Hard Disk.
Select External Network from the Virtual Network Adapter drop-down list.
Once the values are specified, click the Create button.

Tip
If possible, run your VHD files on separate disks. This will greatly improve performance.
In this section, you will create the base virtual PC (VPC) image that you will use to create the other virtual machines. Creating this image is accomplished by installing the operating system onto a virtual machine and then preparing the image for cloning. Once created, we'll use this image in the rest of the exercise to make setup easier.
Getting Started
In this section, I walk through a moderately detailed procedure for setting up Windows 2003 Server. In subsequent sections, I simply direct you to copy the base image. To get started, boot the server using the Windows Server 2003 R2 CD-ROM.
Follow these steps to boot the virtual machine:
On the Virtual Server 2005 home page, select Configure
On the VSIMAGE Status page, click the CD/DVD link.
On the VSIMAGE CD/DVD Drive Properties page, specify the complete path to the ISO image for the Windows 2003 Server R2 software.
Click the OK button to return to the VSIMAGE Status page.
On the VSIMAGE Status page, select VSIMAGE
Once the virtual machine is started, you may either click the screen thumbnail to view the session or utilize the Virtual Machine Remote Control Client to view the session. The Virtual Machine Remote Control Client is located in the Microsoft Virtual Server Program Group. I prefer to use the Virtual Machine Remote Control Client because it has a full-screen mode.
Formatting the Partition
When prompted during the installation, be sure to format the installation partition using the NTFS file format. SharePoint products require the NTFS file format.
Warning
The hard drive that you use to store your VHD files must also be formatted as NTFS. Many external USB hard drives are formatted as FAT32 by default.
Naming the Server
When prompted during installation, name this machine VSIMAGE. When you use this image to make copies later, you will change the copied machine name to match the entries in Table 2-4.
Skipping the Domain
When prompted during installation, do not join an existing domain because this server will be used as the base image. Later when you create the other servers, you will join them to a new domain.
Post-Setup Security
After the initial installation is complete, log on to the local machine as the system administrator. The Windows Server Post-Setup Security Updates page appears automatically. This page allows you to apply updates and configure automatic updates for the server. Once you have completed these tasks, click the Finish button.
This is a good time to install the Virtual Machine Additions. These additions help improve the performance and stability of virtual machines. You can install them through the Virtual Server web interface under the Configurations section.
Note
Installing the Virtual Machine Additions can unmount the Windows 2003 Server installation disk. Verify that the installation disk is still available because you will need it for preparing the virtual image.
Creating an Answer File
Preparing the base virtual image for cloning is accomplished using a utility called SYSPREP. SYSPREP is available in the SUPPORTTOOLS directory of the Windows 2003 installation disk. The utility, along with several other files, is contained in the file DEPLOY.CAB. In order to use SYSPREP, you must first create a configuration file known as an answer file. The answer file contains all of the information necessary to automate the operating system installation.
Follow these steps to create an answer file:
Locate
DEPLOY.CABin the SUPPORTTOOLS directory of the Windows 2003 installation disk.Double-click the
DEPLOY.CABfile to view the contents in the File Explorer.Create a new directory at
C:Deployand extract all of the files fromDEPLOY.CABinto the directory.Execute the file
C:Deploysetupmgr.exeto begin creating the answer file.On the Welcome screen of the wizard, click the Next button.
On the New or Existing Answer File screen, select Create New and click the Next button.
On the Type of Setup screen, select Sysprep Setup and click the Next button.
On the Product screen, select the version of the Windows Server 2003 operating system you are using and click the Next button.
On the License Agreement screen, select Fully Automate the Installation and click the Next button.
On the Name and Organization screen, type in values and click the Next button.
On the Display Settings screen, accept the default settings and click the Next button.
On the Time Zone screen, select your time zone and click the Next button.
On the Product Key screen, enter your product key and click the Next button.
On the Licensing Mode screen, make any changes you want and click the Next button.
On the Computer Name screen, type VSIMAGE in the Computer Name field and click the Next button.
On the Administrator Password screen, enter a password and click the Next button.
On the Networking Components screen, select Typical Settings and click the Next button.
On the Workgroup or Domain screen, leave the machine in the workgroup and click the Next button.
On the Telephony screen, click the Next button.
On the Regional Settings screen, click the Next button.
On the Languages screen, click the Next button.
On the Install Printers screen, click the Next button.
On the Run Once screen, click the Next button.
On the Additional Commands screen, click the Next button.
On the Identification String screen, click the Finish button.
When finished, save the file to
C:Deploysysprep.inf.
Prepping the Operating System
Once the answer file is created, you can run the SYSPREP utility. The SYSPREP utility will prepare the image for cloning so that all subsequent copies have unique identifiers and will not conflict on the network. Once prepared, you must never start the base operating system image because it will undo all of the changes you make in this section.
Follow these steps to prepare the base image:
Close all of the open windows in VSIMAGE.
Open a command prompt and execute
C:DeploySYSPREP.EXE.When the warning dialog appears, click the OK button.
In the System Preparation Tool dialog, check the box labeled Don't Reset Grace Period for Activation.
Ensure that the Shutdown Mode drop-down list is set to Shutdown.
Click the Reseal button.
When the warning dialog appears, click the OK button.
Wait until the system is prepared and shut down.
When the system is shut down, open the Virtual Server Administration web site.
On the Master Status page, select Remove from the fly-out menu associated with the VSIMAGE virtual machine.
Next, if you are going to have a separate domain controller for the development environment, proceed to "Section 3: Creating the Domain Controller." If you are going to join an existing domain, proceed to "Section 4: Creating the Database Server."
In this section, you will clone the base VPC image and create a domain controller. In my development environment, I use the VSPDC virtual machine as the domain controller. Although an Active Directory domain is not required for SharePoint to function, I assume its presence in this and many other exercises throughout the book.
Cloning the Base VPC
Once the base VPC image is prepared, it can be used to create as many images as you want. The basic process involves creating a new virtual machine without a hard drive and then attaching a copy of the prepared hard drive from the clone. When you first start the new image, it will subsequently be configured based on the options you selected in the answer file.
Follow these steps to create a new cloned image:
Log into the server where Microsoft Virtual Server 2005 is installed as a local administrator.
Select Start
In Virtual Server Administration Website, select Virtual Machines
On the Create Virtual Machine page, type VSPDC in the Virtual Machine Name field.
Specify a value in the Virtual Machine Memory.
Select the option Attach a Virtual Hard Disk Later.
Select External Network from the Virtual Network Adapter drop-down list.
Once the values are specified, click the Create button.
Open the File Explorer and copy the
VSIMAGE.VHDfile into the directory where theVSPDC.VMCfile was created.In Virtual Server Administration Website, select Configure
In the Configuration section, click the Hard Disks link.
Click the Add Disk button.
Specify the complete path to the
VSIMAGE.VHDfile you just copied and click the OK button.On the VSPDC Status page, select VSPDC
Configuring the Domain Controller
After you log in to the new virtual machine, you should immediately change the name to VSPDC. You should also configure the networking settings to a static IP address. Domain controllers function much better with static IP addresses.
After the new server starts up, the Manage Your Server applet will open automatically. This applet can be used to set up the server in various roles. Follow these steps to set up the server as a domain controller:
From the Manage Your Server applet, select the right-facing arrow to add or remove a role to the server.
On the Preliminary Steps screen, click the Next button.
On the Server Role screen, select Domain Controller (Active Directory) from the list of available roles and click the Next button.
On the Summary of Selections screen, click the Next button to start the Active Directory Wizard.
When the Active Directory Wizard starts, click the Next button.
On the Operating System Compatibility screen, click the Next button.
On the Domain Controller Type screen, make sure the Domain Controller for a New Domain option is selected and click the Next button.
On the Create New Domain screen, ensure the Domain in New Forest option is selected and click the Next button.
On the Install or Configure DNS screen, select No, Just Install and Configure DNS on This Computer and click the Next button.
On the New Domain Name screen, enter the name of a new domain (I use domain.local and will refer to it throughout the book) and click the Next button.
On the NetBIOS Domain Name screen, click the Next button.
On the Database and Log Folders screen, accept the default values by clicking the Next button.
On the Shared System Volume screen, click the Next button.
On the Permissions screen, accept the default selection by clicking the Next button.
On the Directory Services Restore Mode Administrator Password screen, enter a password and then click the Next button.
On the Summary screen, click the Next button.
When the Wizard completes, restart the server.
Setting Up the POP3 Service
In order to work with the many e-mail features of SharePoint, you will need an e-mail server with test accounts. Although you could certainly use Microsoft Exchange for this purpose, setting up a POP3 service uses significantly fewer resources, and SharePoint does not require Microsoft Exchange. Follow these steps to set up a POP3 service on the domain controller:
From the Manage Your Server applet, select the right-facing arrow to add or remove a role to the server.
On the Preliminary Steps screen, click the Next button.
On the Server Role screen, select Mail Server (POP3, SMTP) from the list of available roles and click the Next button.
On the Configure POP3 Service screen, enter the name of an e-mail domain (I use domain.local and will refer to it throughout the book) and click the Next button.
On the Summary of Selections screen, click the Next button to start the installation.
When the installation is complete, click the Finish button.
Adding Users and Groups to the Domain
After the domain controller is installed, you must add required users and groups to Active Directory. Whether you are setting up MOSS or WSS, several groups and accounts are required to run services and application pools. These groups and accounts do not need any special configuration because the installation process handles it for you. Table 2-5 describes the required accounts and indicates if they are required for a WSS or a MOSS installation.
Follow these steps to add the accounts:
Select Start
In the Active Directory Users and Computers management console, expand the tree until the Users folder is visible.
Right-click the Users folder and select New
In the New Object dialog, type the name of the account into the Full Name field and the User Logon name field.
Click the Next button.
On the next screen, give the account a password and uncheck the box titled User Must Change Password at Next Logon.
Check the boxes titled Password Never Expires and User Cannot Change Password.
Click the Next button.
Click the Finish button.
Repeat these steps to add each account.
When finished, add the SPAdmins group shown in Table 2-5.
Note
This is a good time to add some test users to Active Directory. These test accounts are useful for setting up various scenarios in SharePoint. When you add a new account, be sure to also set up a new mailbox for each account in the POP3 service.
Table 2.5. Required Users and Groups
Name | Group/Account | Description | WSS/MOSS |
|---|---|---|---|
SPAdmins | Group | The SharePoint administrators security group | WSS/MOSS |
SPConfigAcct | Account | The account used to connect to the Configuration database, run the administration application pool, and run the timer service | WSS/MOSS |
SPContentPool | Account | The account used for the site collection application pool | WSS/MOSS |
SPSearchAcct | Account | The account used to perform searches | WSS/MOSS |
SPCrawlAcct | Account | The account used to crawl and index content | WSS/MOSS |
SPSharedServicesPool | Account | The account used for the Shared Services application pool | MOSS only |
SPSharedServicesAcct | Account | The account under which Shared Services run | MOSS only |
Tip
Although SharePoint is supposed to grant all of the necessary permissions to your accounts, I have regularly seen DCOM errors in the System event log that indicate the application pool accounts were not given the required launch permissions for the IWAM Reg Admin Service component. After you complete the installation, check your System event log. If you see these errors, you can fix them by adding the SPContentPool and SPSharedServicesPool accounts to the launch permissions list of the IWAM Reg Admin Service component. The System event log message will give you the exact details to guide you in correcting the error.
Configuring Remote Desktop Administration
The Remote Desktop for Administration (RDA) is a handy way to access the domain controller when you are logged into another machine. This is especially helpful if you have created your development environment using separate machines. The RDA uses only about 2MB of memory and has little impact on processing power, so Microsoft recommends enabling it for every server.
The RDA is enabled from the System Properties dialog on the server. Clients attach to it using the Remote Desktop Connection applet. You can find the client applet on a Windows XP machine at Start
Follow these steps to enable the RDA:
Select Start
Select the Remote tab.
Check the box titled Enable Remote Desktop on this Computer.
If you want to provide access for any other accounts besides the domain administrator, click the Select Remote Users button and add the accounts.
Click OK.
Next, if you are going to create a database server for the development environment, proceed to "Section 4: Creating the Database Server." Otherwise, proceed to either "Section 5: Installing Windows SharePoint Services" or "Section 6: Installing Microsoft Office SharePoint Server."
Follow the same steps as you did for creating the image for the domain controller. There are only two differences in the installation process. First, be sure to name this server VSSQL. Second, join the server to the domain that you created earlier.
Adding the Application Server Role
ASP.NET is required on the server where SQL Server 2005 will be installed in order to support Reporting Services. The SQL Server 2005 setup will automatically install the .NET Framework 2.0, but you must first configure the Application Server role.
Follow these steps to configure the server:
From the Manage Your Server applet, select the right-facing arrow to add or remove a role to the server.
On the Preliminary Steps screen, click the Next button.
On the Server Role screen, select Application Server (IIS, ASP.NET) from the list of available roles and click the Next button.
On the Application Server Options screen, leave both boxes unchecked and click the Next button.
On the Summary of Selections screen, click the Next button.
Installing SQL Server 2005
SQL Server 2005 is the back end for all SharePoint data. You can also use Analysis Services with SharePoint to create dashboards of KPIs. Additionally, you can use SQL Reporting Services to create reports that may be viewed in SharePoint. Having a fully functional set of SQL Server services will significantly enhance your SharePoint installation.
Follow these steps to install SQL Server 2005:
Mount the SQL Server 2005 ISO file or insert the setup disk to start the installation.
On the installation Start screen, click the link titled Server Components, Tools, Books Online, and Samples.
On the End User License Agreement screen, accept the agreement and click the Next button.
On the Installing Prerequisites screen, click the Install button.
When the prerequisites are installed, click the Next button.
On the Welcome screen of the installation wizard, click the Next button.
When the System Configuration Check appears, verify that your system has passed all of the checks and click the Next button.
On the Registration Information screen, enter your Product Key and click the Next button.
On the Components to Install screen, select to install SQL Server Database Services, Analysis Services, Reporting Services, and Workstation Components, Books Online, and Development Tools. Then click the Next button.
On the Instance Name screen, make sure the Default Instance option is selected and click the Next button.
On the Service Account screen, select the Use the Built-In System Account option.
Select Local System from the drop-down list of accounts and click the Next button.
On the Authentication Mode screen, ensure the Windows Authentication Mode option is selected and click the Next button.
On the Collation Settings screen, click the Next button.
On the Report Server Installation Options screen, select the option to Install the Default Configuration and click the Next button.
On the Error and Usage Report Settings screen, click the Next button.
On the Ready to Install screen, click the Install button.
Configuring SQL Server 2005 Surface Areas
When configuring a farm environment for MOSS, you must modify the SQL Server surface areas to support communication among the components. This is because SQL 2005 installs in a secure mode that you must open up. Follow these steps to configure SQL Server surface areas:
Select Start
In the SQL Server 2005 Surface Area Configuration window, click the link titled Surface Area Configuration for Services and Connections.
In the Surface Area Configuration for Services and Connections dialog, select Remote Connections from the tree control.
Select the option labeled Using Both TCP/IP and Named Pipes.
Click the OK button.
When the alert dialog appears, click the OK button.
Close the SQL Server Surface Area Configuration dialog.
Reboot the VSSQL server.
Next, proceed to "Section 5: Installing Windows SharePoint Services" or "Section 6: Installing Microsoft Office SharePoint Server."
You can follow the steps in this section if you do not plan on deploying MOSS. If you are going to deploy MOSS, you can skip this section and move on to the MOSS deployment. Initially, you can follow the same steps as you did for creating the virtual server for the domain controller or database server. Name this server VSWSS and join the server to the domain that you created earlier.
Adding the Application Server Role
ASP.NET is required to run Windows SharePoint Services. In the next section, you will install the .NET Framework 2.0, but you must first configure the Application Server role. Follow these steps to configure the server:
From the Manage Your Server applet, select the right-facing arrow to add or remove a role to the server.
On the Preliminary Steps screen, click the Next button.
On the Server Role screen, select Application Server (IIS, ASP.NET) from the list of available roles and click the Next button.
On the Application Server Options screen, leave both boxes unchecked and click the Next button.
On the Summary of Selections screen, click the Next button.
Installing the .NET Framework 2.0
Windows SharePoint Services requires the .NET Framework 2.0. You can access and download the framework using Windows Update. Follow these steps to install the .NET Framework 2.0:
Launch the Microsoft .NET Framework Version 2.0 Redistributable Package
DOTNETFX.EXE.Follow the simple steps in the wizard to complete the installation.
When the installation completes, select Start
In the IIS Manager applet, click the Web Service Extensions folder.
Select ASP.NET 2.0.50727 from the list of extensions and click the Allow button.
Installing the .NET Framework 3.0
Windows SharePoint Services requires the .NET Framework 3.0 for workflow support. You can access and download the framework using Windows Update. The installation is straightforward and requires no special considerations.
Installing WSS Software
Installing WSS on the server requires installation and then configuration. The installation is straightforward and only requires a few steps through a wizard interface. Configuration is performed after the software is installed.
Follow these steps to install Windows SharePoint Services:
Run
SETUP.EXEfor WSS v3.On the License Agreement screen, accept the agreement and click the Continue button.
On the next screen, click the Advanced button.
On the Server Type tab, select the Web Front End option.
Click the Install Now button.
When the installation is complete, check the box to run the Configuration Wizard and click the Close button.
Configuring Authentication and Database Options
Configuring the basic WSS installation is done through a wizard interface. In the wizard, you will specify the database server and configuration database name. You will also select to use either NTLM or Kerberos as the authentication provider.
Follow these steps to configure WSS:
On the welcome screen, click the Next button.
In the warning dialog, click the Yes button to acknowledge that the listed services will be stopped.
On the Connect to a Server Farm screen, select No, I Want to Create a New Server Farm and click the Next button.
On the Configuration Database Settings screen, enter VSSQL in the Database Server field.
Enter WSS_Config in the Database Name field.
Enter DOMAINSPConfigAcct in the Username field.
Enter the password for the SPConfigAcct in the Password field.
Click the Next button.
On the Configure SharePoint Central Administration Web Application, select either NTLM or Kerberos as the authentication provider and click the Next button.
On the completion screen, click the Next button to apply the configuration settings.
After closing the configuration wizard, the Central Administration site will open automatically. If prompted with a login dialog, enter the administrator credentials.
When prompted, add the Central Administration site to the list of trusted sites.
After the Central Administration site opens, close it until you have finished configuring security.
Turning Off Internet Explorer Enhanced Security
Windows Server 2003 installs Internet Explorer with Enhanced Security activated. Although this is a good default setting for production machines, it can and will prevent content from being rendered in SharePoint. You'll want to disable Enhanced Security in the development environment to make sure you have complete access to administrative functions.
Follow these steps to disable Internet Explorer Enhanced Security:
Select Start
Click the Add/Remove Windows Components button on the Add/Remove Programs screen.
Uncheck the Internet Explorer Enhanced Security Configuration box.
Click the Next button.
Adding WSS to the List of Trusted Sites
You may find that when you access WSS sites that you are prompted for a username and password. You can eliminate this behavior by adding the VSWSS server to the list of trusted sites or the Local Intranet zone. In either case, you should also ensure that the browser settings are configured to automatically log the user on to the site.
Follow these steps to add the server to the list of trusted sites:
In the Internet Explorer, select Tools
On the Security tab, click the Trusted Sites icon.
Click the Sites button.
Clear the box titled Require Server Verification (https) for All Sites in this Zone.
Verify that
http://vswssis in the Websites list. If not, add it to the list.Click the Close button.
Click the Custom Level button.
In the Settings list, under User Authentication, select Automatic Logon with Current Username and Password.
Click the OK button.
Click the OK button to close the options dialog.
Configuring Kerberos Authentication
If you selected to use Kerberos as the authentication provider, you must perform additional configuration steps. The steps involve the definition of a Service Principal Name (SPN) for the application pool account. The SPN is used to authenticate the server to the client.
Follow these steps to configure Kerberos authentication:
Log in to VSPDC as a domain administrator.
Select Start
In the Active Directory Users and Computers applet, click the Computers folder.
Right-click VSWSS and select Properties from the context menu.
On the General tab, check the box labeled Trust Computer for Delegation and then click the OK button.
Click the Users folder.
Right-click the SPConfigAcct account and select Properties from the context menu.
On the Account tab, check the box labeled Account is Trusted for Delegation and click the OK button.
Repeat steps 7 and 8 for the SPContentPool account.
Download the SPN tool from the following URL:
http://www.microsoft.com/downloads/details.aspx?familyid=5fd831fd-ab77-46a3-9cfe-ff01d29e5c46&displaylang=en.Create the SPN for the SPConfigAcct by running the following command:
SETSPN -A HTTP/VSWSS.DOMAIN.LOCAL DOMAINSPConfigAcct
Repeat step 11 for the SPContentPool account.
Configuring WSS Components
Once you have the security settings properly configured, you can open the SharePoint Central Administration site on VSWSS by selecting Start
Designating the SharePoint Administrators Group
Earlier in the exercise, you created a security group for the SharePoint administrators. At this point, only the account you used to install WSS can function as the administrator. By adding a group to the list of administrators you can easily grant others administration capabilities through Active Directory.
Follow these steps to designate an administrator group:
Select Start
On the SharePoint Central Administration page, click the Operations tab.
Under the Security Configuration section, click the link titled Update Farm Administrator's Group.
On the People and Groups: Farm Administrators page, select New
On the Add Users page, enter DOMAINSPAdmins in the Users field.
Click the OK button.
The WSS Search Service is not running initially. In order to use search functions, you must configure the service with an appropriate account for searching and one for crawling. In this section, you will use the accounts you created earlier to configure the Search Service.
Follow these steps to configure the Search Service:
On the SharePoint Central Administration page, click the Operations tab.
In the Topology and Services section, click the link titled Services on Server.
On the Services on Server page, click the Start link next to the Windows SharePoint Services Search.
In the Service Account section, enter DOMAINSPSearchAcct in the User Name field.
Enter the account password in the Password field.
In the Content Access Account section, enter DOMAINSPCrawlAcct in the User Name field.
Enter the account password in the Password field.
Click the Start button.
Configuring Outgoing E-Mail
WSS uses an SMTP server to send alerts and messages to users. In this section, you will enter the e-mail settings for WSS. Follow these steps to configure the e-mail settings:
On the SharePoint Central Administration page, click the Operations tab.
In the Topology and Services section, click the link titled Outgoing E-mail Settings.
On the Outgoing E-Mail Settings page, enter VSPDC in the Outbound SMTP Server field.
Enter [email protected] in the From Address field.
Enter [email protected] in the Reply To field.
Click the OK button.
Creating a New Web Application and Site Collection
Once WSS is properly configured, you can finally create your first site. In this section, you will create a site collection based on the team site template. Follow these steps to create your first site:
On the SharePoint Central Administration page, click the Application Management tab.
On the Application Management page, click the link titled Create or Extend Web Application.
On the Create or Extend Web Application page, click the link titled Create a New Web Application.
On the Create a New Web Application page, select the option Use an Existing IIS Web Site.
Choose Default Web Site in the drop-down list.
Under the Authentication Provider, choose either Negotiate (Kerberos) or NTLM, depending upon the choice you made earlier.
In the Application Pool section, select Create a New Application Pool.
Enter WSS_Pool as the pool name.
Select the Configurable option for the application pool security account.
In the User Name field, enter DOMAINSPContentPool.
In the Password field, enter the account password.
In the Reset Internet Information Services section, select the option to Restart IIS Automatically.
In the Search Server section, select VSWSS from the drop-down list.
Click the OK button.
On the Application Created page, click the link titled Create Site Collection.
On the Create Site Collection page, enter Home Site in the Title field.
Use the drop-down list in the Web Site Address section and verify that just the single forward slash is selected. This will create the site at the root for the server.
Under the Primary Site Collection Administrator section, enter DOMAINAdministrator in the User Name field.
Click the OK button to create the new site collection.
Once the Site Collection is created, return to the Application Management tab.
Click the link titled Policy for Web Application under the Application Security section.
On the Policy for Web Application page, click the Add Users button.
On the Add Users page, click the Next button.
Under the Choose Users section, enter any accounts that should have administrative control over the Site Collection. Be sure to include the DOMAINAdministrator and VSWSSAdministrator accounts.
In the Choose Permissions section, check the box labeled Full Control.
Click the Finish button. You should now have full access to the new Site Collection.
Installing Visual Studio 2005 and SharePoint Designer
Throughout the book, I utilize Visual Studio 2005 and SharePoint Designer to customize SharePoint. For simplicity, you should install these products directly on the WSS server. There are no special considerations; simply install the products in a typical configuration.
Next, proceed to "Section 7: Creating a Test Client."
Installing MOSS is the best way to experience the information, examples, and exercises in the book. MOSS has many components that are simply not available in WSS. This section will walk you through creating a MOSS installation for development. Start out cloning Windows 2003 Server just as you did on every other machine. Name this machine VSMOSS and join it to the domain you created earlier.
Warning
Always install MOSS using a domain account that is a local administrator on every machine in the farm. Never install MOSS as simply a local administrator on the SharePoint server. The MOSS installation automatically makes the installation account the administrator for shared services, and using a local account can cause you to be denied access to the farm later.
Adding the Application Server Role
ASP.NET is required to run MOSS. In the next section, you will install the .NET Framework 2.0, but you must first configure the Application Server role. Follow these steps to configure the server:
From the Manage Your Server applet, select the right-facing arrow to add or remove a role to the server.
On the Preliminary Steps screen, click the Next button.
On the Server Role screen, select Application Server (IIS, ASP.NET) from the list of available roles and click the Next button.
On the Application Server Options screen, leave both boxes unchecked and click the Next button.
On the Summary of Selections screen, click the Next button.
Installing the .NET Framework 2.0
MOSS requires the .NET Framework 2.0. You can access and download the framework using Windows Update. Follow these steps to install the .NET Framework 2.0:
Launch the Microsoft .NET Framework Version 2.0 Redistributable Package
DOTNETFX.EXE.Follow the simple steps in the wizard to complete the installation.
When the installation completes, select Start
In the IIS Manager applet, click the Web Service Extensions folder.
Select ASP.NET 2.0.50727 from the list of extensions and click the Allow button.
Installing the .NET Framework 3.0
MOSS requires the .NET Framework 3.0 for workflow support. You can access and download the framework using Windows Update. The installation is straightforward and requires no special considerations.
Installing Microsoft Office SharePoint Server Software
Installing MOSS on the server requires installation and then configuration. The installation is straightforward and only requires a few steps through a wizard interface. Configuration is performed after the software is installed and is somewhat more complicated than the typical WSS installation.
Follow these steps to install MOSS:
Run
SETUP.EXEfor MOSS.On the License Agreement screen, accept the agreement and click the Continue button.
On the next screen, click the Advanced button.
On the Server Type tab, select Complete.
Click the Install Now button.
When the installation is complete, check the box to run the Configuration Wizard and click the Close button.
Configuring Authentication and Database Options
Configuring the basic MOSS installation is done through a wizard interface. In the wizard, you will specify the database server and configuration database name. You will also select to use either NTLM or Kerberos as the authentication provider.
Follow these steps to configure MOSS:
On the welcome screen, click the Next button.
In the warning dialog, click the Yes button to acknowledge that the listed services will be stopped.
On the Connect to a Server Farm screen, select No, I Want to Create a New Server Farm and click the Next button.
On the Configuration Database Settings screen, enter VSSQL in the Database Server field.
Enter MOSS_Config in the Database Name field.
Enter DOMAINSPConfigAcct in the Username field.
Enter the password for the SPConfigAcct in the Password field.
Click the Next button.
On the Configure SharePoint Central Administration Web Application, select either NTLM or Kerberos as the authentication provider and click the Next button.
Note
If you choose to use Kerberos authentication, further steps will be necessary to configure the authentication provider. Do not use Kerberos authentication if you do not have the ability to access and modify Active Directory.
On the completion screen, click the Next button to apply the configuration settings.
After closing the configuration wizard, the Central Administration site will open automatically. If you are presented with a login dialog, use the administrator credentials.
When prompted, add the Central Administration site to the list of trusted sites.
After the Central Administration site opens, close it until you have finished configuring security.
Turning Off Internet Explorer Enhanced Security
Windows Server 2003 installs Internet Explorer with Enhanced Security activated. Although this is a good default setting for production machines, it can and will prevent content from being rendered in SharePoint. You'll want to disable Enhanced Security in the development environment to make sure you have complete access to administrative functions.
Follow these steps to disable Internet Explorer Enhanced Security:
Select Start
Click the Add/Remove Windows Components button on the Add/Remove Programs screen.
Uncheck the Internet Explorer Enhanced Security Configuration box.
Click the Next button.
Adding MOSS to the List of Trusted Sites
You may find that when you access SharePoint sites that you are prompted for a username and password. You can eliminate this behavior by adding the VSMOSS server to the list of trusted sites or the Local Intranet zone. In either case, you should also ensure that the browser settings are configured to automatically log the user on to the site.
Follow these steps to add VSMOSS to the list of trusted sites:
In the Internet Explorer, select Tools
On the Security tab, click the Trusted Sites icon.
Click the Sites button.
Clear the box titled Require Server Verification (https) for All Sites in This Zone.
Verify that
http://vsmossis in the Websites list. If not, add it.Click the Close button.
Click the Custom Level button.
In the Settings list, under User Authentication, select Automatic Logon with Current Username and Password.
Click the OK button.
Click the OK button to close the options dialog.
Configuring Kerberos Authentication
If you selected to use Kerberos as the authentication provider, you must perform additional configuration steps. The steps involve the definition of a Service Principal Name (SPN) for the application pool account. The SPN is used to authenticate the server to the client.
Follow these steps to configure Kerberos authentication:
Log in to the domain controller as a domain administrator.
Select Start
In the Active Directory Users and Computers applet, click the Computers folder.
Right-click VSMOSS and select Properties from the context menu.
On the General tab, check the box labeled Trust Computer for Delegation and then click the OK button.
Click the Users folder.
Right-click the SPConfigAcct account and select Properties from the context menu.
On the Account tab, check the box labeled Account Is Trusted for Delegation and click the OK button.
Repeat steps 7 and 8 for the SPContentPool account.
Download the SPN tool from the following URL:
http://www.microsoft.com/downloads/details.aspx?familyid=5fd831fd-ab77-46a3-9cfe-ff01d29e5c46&displaylang=en.Create the SPN for the SPConfigAcct by running the following command:
SETSPN -A HTTP/VSMOSS.DOMAIN.LOCAL DOMAINSPConfigAcct
Repeat step 11 for the SPContentPool, SPSharedServicesPool, and SPSharedServicesAcct accounts.
Configuring MOSS Components
Once you have the security settings properly configured, you can open the SharePoint Central Administration site on VSMOSS. On the home page, you will see a task list of recommended actions you should take to configure MOSS. Figure 2-9 shows the MOSS Central Administration site. In this exercise, you will configure several items, but not all of the items in the task list. Several of these tasks will be configured later in the book where they are explained in more detail. The following sections will help you get the basic MOSS configuration completed.
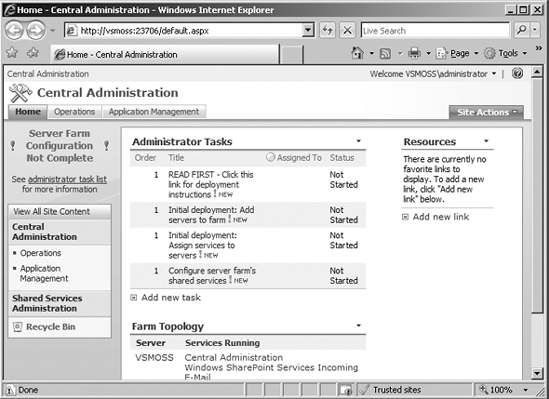
Designating the SharePoint Administrators Group
Earlier in the exercise, you created a security group for the SharePoint administrators. At this point, only the account you used to install MOSS can function as the administrator. By adding a group to the list of administrators you can easily grant others administration capabilities through Active Directory.
Follow these steps to designate an administrator group:
Select Start
On the SharePoint Central Administration page, click the Operations tab.
Under the Security Configuration section, click the link titled Update Farm Administrator's Group.
On the People and Groups: Farm Administrators page, select New
On the Add Users page, enter DOMAINSPAdmins in the Users field.
Click the OK button.
Starting Required Services
The MOSS Search Service is not running initially. In order to use search functions, you must configure the service with an appropriate account for searching and one for crawling. Additionally, you must start several other shared services that I will cover in Chapter 4. In this section, you will use the accounts you created earlier to configure the services.
Warning
In this exercise, you'll be running all of the farm services on the same machine as MOSS. Because many of these services are resource intensive, you would normally deploy these services to a separate application server for improved performance.
Follow these steps to configure the Search Service:
On the SharePoint Central Administration page, click the Operations tab.
In the Topology and Services section, click the link titled Services on Server.
On the Services on Server page, click the option titled Web Server for Medium Farm.
Click the Start link next to the Excel Calculation Services.
Click the Start link next to the Document Conversions Load Balancer Service.
Click the Start link next to the Document Conversions Launcher Service.
On the Launcher Service Settings page, select VSMOSS from the Load Balancer Server drop-down list.
Click the OK button.
Click the Start link next to Office SharePoint Server Search.
On the Office SharePoint Services Search Settings page, check the boxes labeled Use This Server for Indexing Content and Use This Server for Serving Search Queries.
Enter [email protected] in the E-mail Address field.
In the Farm Search Service Account section, enter DOMAINSPSearchAcct in the User Name field.
Enter the account password in the Password field.
Click the Start button.
On the Services on Server page, click the Start link next to Windows SharePoint Services Search.
In the Service Account section, enter DOMAINSPSearchAcct in the User Name field.
Enter the account password in the Password field.
In the Content Access Account section, enter DOMAINSPCrawlAcct in the User Name field.
Enter the account password in the Password field.
Click the Start button.
Setting Up the Shared Services Provider
The Shared Services Provider hosts several services that can be used across web applications in the farm. Services such as search and user profiles typically only need to be created one time and then used by all sites. In this section, you will create a new web application for the Shared Services Provider. Follow these steps to set up the Shared Services Provider:
Select Start
On the Application Management tab, under the Office SharePoint Server Shared Services section, click the link titled Create or Configure this Farm's Shared Services.
On the Manage This Farm's Shared Services page, click New SSP.
On the New Shared Services Provider page, click the link titled Create a New Web Application under the SSP Name field.
On the Create a New Web Application page, select the option Create a New IIS Web Site.
Enter SharedServices - 8080 in the Description field.
Enter 8080 in the Port field.
Under the Authentication Provider, choose either Negotiate (Kerberos) or NTLM, depending upon the choice you made earlier.
In the Application Pool section, select Create a New Application Pool and enter SSP_Pool in the Application Pool Name field.
Select the Configurable option for the application pool security account.
In the User Name field, enter DOMAINSPSharedServicesPool.
In the Password field, enter the account password.
Select the option Restart IIS Automatically.
Click the OK button.
On the New Shared Services Provider page, click the link titled Create a New Web Application under the My Site Location section.
On the Create a New Web Application page, select the option Create a New IIS Web Site.
Enter PersonalSites - 8081 in the Description field.
Enter 8081 in the Port field.
Under the Authentication Provider, choose either Negotiate (Kerberos) or NTLM, depending upon the choice you made earlier.
In the Application Pool section, select Use Existing Application Pool and choose SSP_Pool from the drop-down list.
Select Restart IIS Automatically.
Click the OK button.
On the New Shared Services Provider page, enter Shared Services in the SSP Name field.
Under the SSPService Credentials section, enter DOMAINSPSharedServicesAcct in the Username field.
Enter the account password in the Password field.
In the Index Server section, select VSMOSS from the Index Server drop-down list.
Click the OK button.
Configuring Outgoing E-Mail
Once the Shared Services are set up, you may return to the Central Administration pages to continue configuring additional components. In this exercise, you will configure an SMTP server for MOSS. MOSS uses an SMTP server to send alerts and messages to users. Follow these steps to configure the e-mail settings:
Click the Operations tab in SharePoint 3.0 Central Administration.
Click the link titled Outgoing E-Mail Settings under the Topology and Services section.
On the Outgoing E-Mail Settings page, enter VSPDC in the Outbound SMTP Server field.
Enter [email protected] in the From Address field.
Enter [email protected] in the Reply To field.
Click the OK button.
Creating a New Web Application and Site Collection
Once MOSS is properly configured, you can create a new web application and site collection. The site templates available to you include intranets, public web sites, wikis, and blogs. In this section, you will create a corporate intranet site. Follow these steps to create your first site:
Select Start
On the Application Management tab, under the SharePoint Web Application Management section click the link titled Create or Extend Web Application.
On the Create or Extend Web Application page, click the link titled Create a New Web Application.
On the Create a New Web Application page, select the option Use an Existing IIS Web Site.
Choose Default Web Site in the drop-down list.
Under the Authentication Provider, choose either Negotiate (Kerberos) or NTLM, depending upon the choice you made earlier.
In the Application Pool section, select Create a New Application Pool.
Enter Intranet_Pool as the pool name.
Select the Configurable option for the application pool security account.
In the User Name field, enter DOMAINSPContentPool.
In the Password field, enter the account password.
In the Reset Internet Information Services section, select the option to Restart IIS Automatically.
Click the OK button.
On the Application Created page, click the link titled Create Site Collection.
On the Create Site Collection page, enter Intranet in the Title field.
In the Web Site Address section, select /sites/ from the drop-down list and enter intranet in the URL field.
Under the Template Selection section, click the Publishing tab and then select the Collaboration Portal template.
Under the Primary Site Collection Administrator section, enter DOMAINAdministrator in the User Name field.
Click the OK button to create the new site collection.
Once the site collection is created, return to the Application Management tab.
Click the link titled Policy for Web Application under the Application Security section.
On the Policy for Web Application page, click the Add Users button.
On the Add Users page, click the Next button.
Under the Choose Users section, enter any accounts that should have administrative control over the site collection. Be sure to include the DOMAINAdministrator and VSMOSSAdministrator accounts so you can always access the site collection.
In the Choose Permissions section, check the box labeled Full Control.
Click the Finish button. You should now have full access to the new site collection.
Installing Visual Studio 2005 and SharePoint Designer
Throughout the book, I utilize Visual Studio 2005 and SharePoint Designer to customize MOSS. For simplicity, you should install these products directly on the MOSS server. There are no special considerations; simply install the products in a typical configuration.
In order to work with the examples in the book, you will need to create at least one client machine running Windows Vista or XP. While installing the operating system, you should name the client VSCLIENT and join the client machine to the domain you created earlier. Once joined to the domain, you should be able to view the site you created in SharePoint. Remember to add the SharePoint server to the list of trusted sites in order to avoid being prompted for credentials. After the operating system is installed, you will need to install Microsoft Office 2007. All of these setups are straightforward; you can simply use the typical installations.