While a SharePoint farm gives you the ability to create many separate web applications, there are several services that you will not necessarily want to recreate for each new web application. The most obvious example of such a service is the Search Service. In many scenarios, it makes sense to set up the Search Service one time and then share it across several web applications. This is the concept behind the Shared Services Provider (SSP) in SharePoint.
An SSP provides not only a shared Search Service, but also audiences, user profiles, personal sites, Excel Services, and the Business Data Catalog (BDC). Audiences allow you to target content at particular groups of users. The profile service allows you to track and share information about portal users. Personal sites give each user a private space to utilize. Excel Services makes spreadsheet information and calculations available as a web application, while the BDC allows you to integrate SharePoint sites with back-end line-of-business systems. I cover each of these services in detail throughout this chapter.
Creating an SSP is done through the Central Administration site in MOSS. While WSS sites can utilize an SSP, you cannot create one through WSS. Within a farm, you can configure zero or more SSPs, and MOSS will typically create one during the installation process. In fact, you already have one available if you set up the development environment described in Chapter 2.
Follow these steps to manage your SSP:
Log in to VSMOSS as a SharePoint administrator.
Select Start

From the home page of the Central Administration site, click the Application Management tab.
On the Application Management tab, click the link titled Create or Configure This Farm's Shared Services.
On the Manage This Farm's Shared Services page, you'll see a list of all the SSPs that you have defined on your farm. Additionally, you'll see all of the web applications that are currently using those services. From this page, you can create a new SSP, change the associations with web applications, and recover an SSP from a backed-up database. Figure 4-1 shows the page with several web applications listed.

When you create a new SSP, you get an administration site where you can configure and manage the Shared Services. You can access the administration site from the Manage This Farm's Shared Services page by clicking the appropriate link listed under Shared Services Administration. You can also hover over the name of the SSP in the list and select Open Shared Services Admin Site from the drop-down menu. In either case, you will be taken to the Shared Services Administration site shown in Figure 4-2.

Tip
If you should receive an "Access Denied" error, be sure your account has been given Full Control rights under the Policy for Web Application associated with the Shared Services web application.
When you first installed MOSS, you started the Search Service, which is configured with the basic settings necessary to search web applications. However, you will want to spend some time adjusting the search configuration to control how content is indexed and delivered through the service. From the home page of the Shared Services Administration site, clicking the Search Settings link will take you to the Configure Search Settings page where you can refine the Search Service configuration.
Note
If you are just using WSS, you'll have a separate Search Service available to you. You can configure the service from the Central Administration web site. Click the link titled Services on This Server on the Operations tab. On the Services page, start the Windows SharePoint Services Search Service.
The crawl settings on the Configure Search Settings page determines what content is indexed by the Search Service. The first setting to check in this section is the default content access account. This account is the one that is used to crawl content and create an index. Therefore, the account must have access to all of the content to be indexed. If you set up the development environment in Chapter 2, you should use the DOMAINSPCrawlAcct account you created during the MOSS installation.
After the content access account is set, you'll want to define the content sources to be indexed. By default, MOSS creates a content source for SharePoint sites. If you only intend to search SharePoint content, this source may be all you need. However, you can define other content sources including web sites, file shares, Exchange public folders, and business data from the BDC.
Along with the content source, you can also define crawl rules. Crawl rules allow you to specify what content is included or excluded from a source. You can also set a special account to use when crawling the source if the default account does not have access for some reason.
If the content you crawl has a different address than you want to appear in the search results, you can create a server name mapping. This is useful if, for example, you crawl content using an address inside the firewall but want to make the results available outside the firewall. Simply enter the address of the crawled content and the mapped address for the search results.
After you have configured the content sources, you need to specify a schedule for the crawl. You won't get any results back from the Search Service until a full crawl of the content sources has been completed. Because a full crawl is resource intensive, you should try to schedule it for off-hours.
Follow these steps to set up a crawl schedule:
From the Configure Search settings page, click Content Sources and Crawl Schedules.
On the Manage Content Sources page, hover over the Local Office SharePoint Server Sites content source and select Edit from the drop-down menu.
On the Edit Content Source page, click the Create Schedule under the Full Crawl Schedule list.
In the Manage Schedules dialog, accept the default settings by simply clicking the OK button.
Check the box labeled Start Full Crawl of This Content Source.
Click the OK button.
When the Search Service creates a content index, it does not include all of the file types it encounters. This is because many file types might not make any sense in the search results. For example, EXE files are not included in the content index because they are not documents and might even contain a virus. While the out-of-the-box settings index most of the commonly used file types, not every file type you may want is included. In particular, most organizations want to include Adobe Acrobat portable document format (PDF) files in the search results, but they are not included by default.
In order to include other file types, you must first install the appropriate IFilter. IFilters are used to build indexes for specific document formats. Each file type that you want to include must have an installed IFilter before it can be part of the index. After you install the IFilter, you must then provide an image to represent the file within SharePoint and specifically tell the index to include the file type.
Follow these steps to include PDF files in your search results:
Log in to VSMOSS as a SharePoint administrator.
Open Internet Explorer and navigate to
http://www.adobe.com/support/downloads/thankyou.jsp?ftpID=2611&fileID=2457to download the Adobe PDF IFilter v6.0.Download and install the IFilter on VSMOSS. The installation is straightforward and requires no special considerations.
Open the Internet Explorer and navigate to
http://www.google.com.On the Google home page, click the Images link.
Type ICPDF.GIF in the search field and click the Search Images button.
In the search results, locate a 16-by-16 PDF icon image and click it.
On the Google Images page, click the link titled See Image Alone.
When the image appears alone in the browser, right-click the image and select Save Picture As from the content menu.
Save the image to
C:Program FilesCommon FilesMicrosoft Sharedweb server extensions12TEMPLATEIMAGES.Open a copy of the File Explorer and locate the file
C:Program FilesCommon FilesMicrosoft Sharedweb server extensions12TEMPLATEXMLDOCICON.XML. Open this file in a text editor.In the
DOCICON.XMLfile, locate the<ByExtension>element. In this section, add the following code to specify the icon for use with PDF files:<Mapping Key="pdf" Value="icpdf.gif" />
Save and close
DOCICON.XML.On the Configure Search Settings page of the Shared Services Administration site, click the link titled File Types.
On the Manage File Types page, click the New File Type link.
On the Add File Type page, type pdf into the File Extension field and click the OK button.
Close the browser.
Select Start
Type iisreset into the Open field and click the OK button.
Once you complete the previous steps, you should be able to add PDF documents to libraries and immediately see them associated with the appropriate icon. After the search index is rebuilt, you should also be able to return them in the search results. Of course, users will still need to have the Adobe Acrobat Reader installed to view the documents. For other file types, you can search the Internet for available third-party IFilters. It is even possible to create your own custom IFilter, although that topic is well beyond the scope of this book.
While content sources define groups of documents to index, they may not correspond to groups of documents that users want to search. Search scopes allow you to define sets of documents from various content sources that should be searched together. Search scopes help users get better results by narrowing the search to items of interest.
Follow these steps to set up a new search scope:
From the Configure Search Settings page, click View Scopes.
On the View Scopes page, click New Scope.
On the Create Scope page, enter Special Interest Groups and click the OK button.
On the View Scopes page, locate the Special Interest Groups scope and click the Add Rules link.
On the Add Scope Rule page, select the Web Address option.
Enter the complete address to the softball site you created earlier in the Folder field (e.g.,
http://vsmoss/sites/intranet/softball).Click the OK button.
On the Configure Search Settings page, click the Start Update Now link under the Shared Scopes section.
Once the search scope is created, it must be added to the search page in order to use it. Requiring a separate operation to make the scope visible allows you to control which web applications can use the scope. This ensures that only appropriate users make use of the scope.
Follow these steps to add the scope to the search page:
Open the home page to the MOSS intranet site you created in Chapter 2 (e.g.,
http://vsmoss/sites/intranet/Pages/Default.aspx).Select Sites Settings
On the Site Settings page, click the Search Scopes link under the Site Collection Administration section.
Tip
If you do not see the Search Scopes link, make sure that you are on the Site Settings page for the top-level site in the Site Collection.
On the View Scopes page, click the Search Dropdown link.
On the Edit Scope Display Group page, check the box next to the Special Interest Groups scope.
Click the OK button.
Oftentimes organizations have important terms that are well-known by all of their members. These terms have definite meaning within an organization and are associated with certain documents. Therefore, when a user searches a particular term, you might want to ensure that it is always associated with the correct results. This is the purpose behind keywords and best bets.
Keywords allow you to define the terms that have special meaning in your organization. You can then associate those terms with a specific search result, or "best bet." The best bet results will appear at the top of the search results list whenever the keyword is used in a search. You can define keywords and best bets from the Site Settings page by clicking the Search Keywords link.
One of the best ways to improve search results is to understand how users are searching. In order to support this, Shared Services provides a set of search usage reports for profiling search activity. You can access these reports from the home page of the Shared Services Administration site under the Search section.
Although you will undoubtedly spend a significant amount of time deciding what content to display on which page, most users will be interested in only a subset of the information on a page. Furthermore, page real estate is often in short supply, especially if you want to limit the amount of scrolling required to view a page. With this in mind the Office SharePoint Standard Feature provides the ability to define audiences. Audiences in SharePoint are groups of users that share common interests and can be used to display or hide various content elements based on the audience membership of the current user.
Audiences can be defined based on various properties of user accounts in Active Directory. You can define an audience based on membership in an Active Directory group, position in the organizational structure, or other characteristics. Once defined, the audience must be compiled in order to make it available for use with web parts.
Follow these steps to define an audience:
Log in to VSPDC as a domain administrator.
Select Start
In the Active Directory Users and Computers dialog, expand the tree underneath the DOMAIN.LOCAL node until the Users folder is visible.
Right-click the Users folder and select New
In the New Object - Group window, enter Information Technology in the Group Name field.
Click the OK button.
In the Active Directory Users and Computers dialog, right-click the Information Technology group and select properties from the context menu.
Click the Members tab and then the Add button.
In the Select Users, Contacts, or Computers window, add some users to the group.
Click OK to close the dialog when you are finished.
Log in to VSMOSS as a site administrator.
Open the Central Administration web site by selecting Start
From the Central Administration home page, click the Application Management tab.
On the Application Management page, click the link titled Create or Configure This Farm's Shared Services.
In the Quick Launch area, click the link for the Shared Services Administration site.
On the Shared Services Administration home page, click the Audiences link.
On the Manage Audiences page, click the Create Audience link.
On the Create Audience page, type Information Technology in the Name field.
Click the OK button.
On the Add Audience Rule page, select the User option.
In the Operator drop-down list, select Member Of.
In the value field, type Information Technology and click the Check Names button.
Click the OK button.
On the Manage Audiences page, click the Start Compilation link, which will create the audience membership based on the rules you defined. Audiences will not have members until they are compiled.
Because audience membership can change over time, it's best to set up a compilation schedule. You can specify a compilation schedule by clicking the link on the Manage Audiences page. After that, the audience will always be available for use with web parts, documents, list items, and other content items in MOSS.
Using audiences to display or hide content is generally done as part of the configuration properties for an item. You can show or hide web parts in a page based on audience membership using the web parts property pane. Simply type the name of the audiences that you want to see the content. Figure 4-3 shows a Content Editor web part being targeted at the Information Technology audience.

Members of a SharePoint site are not simply anonymous users who view web pages and read documents. Instead, users are active participants whose information is part of the overall content. In MOSS, the information about portal users is significantly enhanced through user profiles.
User profiles are created in a separate database that is populated by both manual data entry and importing data directly from Active Directory. Once created, the profile may be viewed after a search within the People scope or as the result of following a link associated with a person. Figure 4-4 shows a typical public profile page.

Setting up profiles requires you to configure an import connection to Active Directory. Typically, the import is scheduled to run daily using a specific account you assign to this task. As a best practice, you should define a new group in Active Directory for all accounts that will be imported and create a new account that SharePoint can use for reading Active Directory information.
Follow these steps to create required groups and users:
Log in to VSPDC as a domain administrator.
Select Start
In the Active Directory Users and Computers dialog, expand the tree underneath the DOMAIN.LOCAL node until the Users folder is visible.
Right-click the Users folder and select New
In the New Object - User dialog, type SPProfileImport in both the Full Name and User Logon Name fields.
Click the Next button.
Uncheck the box labeled User Must Change Password at Next Logon.
Check the boxes labeled User Cannot Change Password and Password Never Expires.
Enter a password for the account and click the Next button.
Click the Finish button.
Right-click the Users folder and select New
In the New Object - User dialog, enter some information for a new user account. The exact information does not matter, because you will disable this account later for testing purposes.
In the Active Directory Users and Computers dialog, right-click the new user you created and select properties from the context menu.
On the Account tab of the Properties dialog, check the box labeled Account Is Disabled.
Click the OK button.
Right-click the Users folder and select New
In the New Object - Group window, enter Portal Profiles in the Group Name field.
Click the OK button.
In the Active Directory Users and Computers dialog, right-click the Portal Users group and select Properties from the context menu.
Click the Members tab and then the Add button.
In the Select Users, Contacts, or Computers window, add the users who will have profiles in SharePoint including the disabled account.
Click OK to close the dialog when you are finished.
The simplest way to configure the profile import is to let SharePoint automatically detect the domain controller on the network. This simplifies the import configuration, but it doesn't make it foolproof. In most organizations, Active Directory is full of disabled accounts, service accounts, and test accounts that we don't want to import into the profile database. Therefore, you'll need to create a custom LDAP query to properly configure the import to exclude such accounts.
Creating a proper LDAP query from scratch can be a challenge so I like to use the command-line utility LDIFDE.EXE, which is part of the Windows operating system, to help me determine the correct query for importing accounts. LDIFDE.EXE creates, modifies, and deletes Active Directory objects. You can also use it to run LDAP queries and dump the results to a text file. In this way, you can see which users are returned from an LDAP query and make adjustments until you get the correct result set. Listing 4-1 shows sample output for a single user as it appears in LDIFDE.EXE.
Example 4.1. LDIFDE.EXE Sample Output
dn: CN=Scot P. Hillier,CN=Users,DC=domain,DC=local
changetype: add
objectClass: top
objectClass: person
objectClass: organizationalPerson
objectClass: user
cn: Scot P. Hillier
sn: Hillier
givenName: Scot
initials: P
distinguishedName: CN=Scot P. Hillier,CN=Users,DC=domain,DC=local
instanceType: 4
whenCreated: 20051017174105.0Z
whenChanged: 20051017174908.0Z
displayName: Scot P. Hillier
uSNCreated: 13920
memberOf: CN=Portal Profiles,CN=Users,DC=domain,DC=local
uSNChanged: 13968
name: Scot P. Hillier
objectGUID:: xC6/b7NXn0ak+PIEdCyh4Q==
userAccountControl: 66048
badPwdCount: 0
codePage: 0
countryCode: 0
badPasswordTime: 0
lastLogoff: 0
lastLogon: 0
pwdLastSet: 127740444656093750
primaryGroupID: 513
objectSid:: AQUAAAAAAAUVAAAA+Tig7KBg3xJxhGmOUwQAAA==
accountExpires: 9223372036854775807
logonCount: 0
sAMAccountName: ScotHillier
sAMAccountType: 805306368
userPrincipalName: [email protected]
objectCategory: CN=Person,CN=Schema,CN=Configuration,DC=domain,DC=local
mail: [email protected]
In order to create the correct LDAP query for importing profiles, you should start by dumping all of the accounts from Active Directory into a text file. If you should happen to have thousands of accounts in your directory, start by dumping a single organizational unit or group. After dumping the accounts, examine the test file to locate the distinguished name (DN) that defines membership in the group you are targeting. Then use the DN to further refine the dump until you get what you want. You'll also want to add a special clause to the query to exclude all disabled accounts.
Follow these steps to create an LDAP query for importing profile information:
Log in to VSMOSS as a SharePoint administrator.
Select Start
Type ldifde -f c:users.txt -r "(&(objectCategory=Person)(objectClass=User))" into the Open field.
Click the OK button.
Open the file
c:users.txtin Notepad and verify that all of the accounts from Active Directory are returned.Search the text file for one of the usernames that you included in the Portal Profiles group. This person should have at least one
memberOfentry that looks like the following code. Copy this entry for use in the next step:memberOf: CN=Portal Profiles,CN=Users,DC=domain,DC=local
Select Start
Narrow the LDAP query to the Portal Profiles group by typing ldifde -f c:users.txt -r "(&(objectCategory=Person)(objectClass=User)(memberOf= CN=Portal Profiles,CN=Users,DC=domain,DC=local))" into the Open field.
Open the file
c:users.txtin Notepad and verify that you are returning all of the members of the Portal Profiles group including the disabled account.Select Start
Exclude disabled accounts from the LDAP query typing ldifde -f c:users.txt -r "(&(objectCategory=Person)(objectClass=User)(memberOf= CN=Portal Profiles,CN=Users,DC=domain,DC=local) (!(userAccountControl:1.2.840.113556.1.4.803:=2)))" into the Open field.
Open the file
c:users.txtin Notepad and verify that you are returning only the enabled accounts from the Portal Profiles group.
Once you have created a query that returns only the accounts you want in the profile database, you are ready to configure the import. Profiles are managed as part of the Shared Services infrastructure, which is configured through a separate web site. After the import is configured, you can run a full import to populate the database.
Follow these steps to configure the profile import:
Log in to VSMOSS as a SharePoint administrator.
Open the Central Administration web site by selecting Start
From the Central Administration home page, click the Application Management tab.
On the Application Management page, click the link titled Create or Configure This Farm's Shared Services.
On the Manage This Farm's Shared Services page, select Open Shared Services Admin Site from the drop-down menu.
On the Shared Services Administration home page, click the link titled User Profiles and Properties.
On the User Profiles and Properties page, click the link titled Configure Profile Import.
On the Configure Profile Import page, select the Custom Source option.
Under the Full Import Schedule section check the box labeled Schedule Full Import.
Click the OK button.
On the Import Connections page, click the link titled Create New Connection.
On the Add Connection page, type domain.local in the Domain Name field.
Click the option labeled Specify a Domain Controller.
Type vspdc.domain.local into the Domain Controller Name field.
In the Search Base field, type DC=domain,DC=local.
In the User Filter field, type "(&(objectCategory=Person)(objectClass=User)(memberOf= CN=Portal Profiles,CN=Users,DC=domain,DC=local) (!(userAccountControl:1.2.840.113556.1.4.803:=2)))".
In the Authentication Information section, select the option labeled Specify an Account.
Enter DOMAINSPProfileImport into the Account Name field.
Enter the password for the account you defined earlier.
Click the OK button.
Click the Home tab in Shared Services Administration.
On the Shared Services Administration home page, click the link titled User Profiles and Properties.
On the User Profiles and Properties page, click the link titled Start Full Import.
After the Import is complete, click the link titled View User Profiles and verify that the appropriate profiles have been created.
The properties that make up the profile can be changed at any time from the User Profiles and Properties page. On this page, you can select to add a new property or view the existing ones. Properties may be explicitly tied to an Active Directory field or they can be filled in manually. Additionally, you can specify whether the end user has the ability to edit the field and control how it appears on his or her profile page.
Along with all of the information, documents, and links you can present in MOSS, end users are also provided with a personal site known as My Site. My Site is easily accessed by clicking the associated link on the bar directly above the search box. A My Site is created for a user the first time it is accessed. Because a My Site is essentially created by the user without administrative permissions, you must enable self-service site creation in Shared Services before sites can be created. When first accessed, MOSS takes a moment to format the initial site and then prompts you to confirm the location using the message box shown in Figure 4-5.
Follow these steps to enable self-service site creation:
Log in to VSMOSS as a SharePoint administrator.
Open the Central Administration web site by selecting Start
From the Central Administration home page, click the Application Management tab.
On the Application Management page, click the link titled Self-Service Site Management.
On the Self-Service Site Management page, make sure that the web application associated with Shared Services is selected.
Click the On option and then click the OK button.
My Site consists of two pages accessed through the My Home and My Profile tabs. The My Home page is intended as a personal workplace for the individual end user. The My Profile page, on the other hand, acts like a business card that can be accessed by other portal users. In fact, this is the page shown in Figure 4-4.
When My Site is first created, it shows a list of tasks with associated links to help you configure the site. One of the first things you should do is update your profile information. Clicking the link titled Describe Yourself will open the Edit Details page where you can enter information about yourself. For each field that you edit, you can also specify the visibility of the information. This allows you to determine whether information is seen by everyone or just selected groups.
You will notice that the profile items on My Site are a subset of the items available in the profile database. This is because the administrator determines which properties in the profile database can be edited by the end user directly and which ones will appear in the profile view of My Site. You can click the My Profile tab to see how your profile will appear to others. On this page, there is a drop-down list that gives you a preview of the page for various groups.
On the My Home page, you will notice a reference to My Calendar. My Calendar is a web part that you can connect to an Exchange server so that your calendar will be visible on My Site. To display your calendar, you must modify the properties of the web part. This will require end users to know the exact name of the Exchange server.
My Home also provides a web part called the Colleague Tracker for indicating your relationship to other users. The Colleague Tracker allows you to create a virtual social network that places you within the formal and informal organizational structure. You can not only associate yourself with your manager, but you can also show your relationship to colleagues with similar interests. Once you have established these relationships, you can then decide how to display them to other users. Showing these relationships can help other users locate people within the organization or find a person with expert knowledge in a certain area.
Clicking the link titled Identify the People You Know will take you to the My Colleagues page. Here you can choose to add new colleagues to your list. When you add colleagues, SharePoint tries to help by suggesting additions based on information such as group membership or shared managers.
My Home can also be a useful place to aggregate information from many sites. To support this type of personalized view, My Home includes a rolled-up view of both SharePoint sites and tasks. This view shows all of the documents and tasks from a site where you are a member. Figure 4-6 shows an aggregated view based on the softball site you created earlier.

End users have full control over the items that appear on My Site. At any time, a user can customize My Site by clicking the link titled Add or Remove Web Parts. In this way, end users can make My Site a personalized workspace that shows them the information, documents, and links that they most care about. In addition to modifying the web parts that appear on My Site, users may also add new lists and pages directly by clicking the Create link under the Site Actions menu.
Although the administrator retains control over the appearance of the public view of My Site, end users can utilize the public view to share documents, sites, and links with other users. When documents and links are added to a list, the user may specify whether to show them on the public page. For example, the portal administrator may post a document describing the procedures to personalize My Site. This way, portal users can engage in self-service rather than sending all their questions directly to the portal administrator.
Administrators can add pages to My Site through the Shared Services administration pages. Clicking the link titled Personalization Links allows you to add a new link that will appear as a tab on My Site. Additionally, you can target the links to an audience so the tabs only appear for certain users.
Excel Services is a new technology that ships as part of Shared Services and allows you to calculate and display Excel spreadsheets using MOSS without necessarily having a copy of Excel on the client machine. With Excel Services you can use spreadsheets to create dashboards within SharePoint or simply share a spreadsheet using the browser. Additionally, Excel Services has a calculation engine that supports calculating spreadsheets on the server in order to offload resource-intensive calculations. Excel Services consists of three components: the Excel Web Access web part, Excel Calculation Services, and Excel Web Services.
The Excel Web Access web part is used to display a spreadsheet as HTML within the browser. Once you properly configure Excel Services, you can drop this web part on any page and use it to render a spreadsheet. The web part is also used when a spreadsheet is viewed full-screen in the browser by a user that does not have Excel 2007 installed.
Excel Calculation Services performs server-side calculation, caching, and session management for spreadsheets. In the case where you have many users accessing complicated spreadsheets, Excel Calculation Services can be load balanced for improved performance. Excel Calculation Services is designed from the ground up to support calculations on millions of rows by scaling out as necessary.
Excel Web Services provide a programmatic interface to Excel Services. Using these web services, you can develop custom applications that use the calculation engine. This allows your applications to offload resource-intensive calculations to the server.
Performing the initial configuration of Excel Services is straightforward and is accomplished from the home page of the Shared Services Administration site. Under the Excel Service Settings section, click the link titled Edit Excel Services Settings. On the Excel Services Settings page, you will find options for managing resources and security. In many cases, the out-of-the-box settings will work fine, and you should work with Excel Services before deciding to make changes here.
While the basic settings are fine to get started, there is one configuration step you must perform before you can use Excel Services: you must designate at least one trusted file location. Trusted file locations are SharePoint sites, file folders, or web sites where you want to enable Excel Services. Spreadsheets can only be processed by Excel Services if they come from a trusted location.
Follow these steps to create a trusted location:
Log in to VSMOSS as a SharePoint administrator.
Open the home page of the MOSS intranet site you created in Chapter 2 (e.g.,
http://vsmoss/sites/intranet/Pages/Default.aspx).Click the Document Center tab.
On the Document Center page, select Create from the Site Actions drop-down menu.
On the Create page, click the Document Library list.
On the New page, type Spreadsheets into the Name field.
Select Microsoft Office Excel Spreadsheet from the Document Template list.
Click the Create button.
When the Spreadsheets library opens, copy the URL of the library (e.g.,
http://vsmoss/sites/intranet/Docs/Spreadsheets).Select Start
From the home page of the Central Administration site, click the Application Management tab.
On the Application Management tab, click the link titled Create or Configure This Farm's Shared Services.
On the Manage This Farm's Shared Services page, click the link to open the Shared Services Administration site.
On the Home page of the Shared Services Administration site, click the Trusted File Locations link.
On the Excel Services Trusted File Locations page, click Add Trusted File Location.
Paste the address of the Spreadsheets library into the Address field.
Click the OK button.
Once the trusted file location is defined, you can create spreadsheets for use with Excel Services. While Excel Services allows you to share spreadsheets, you cannot create a spreadsheet using Excel Services. Excel 2007 must still be used for authoring spreadsheets. After you create the spreadsheet in Excel 2007, you can then make it available through the trusted library.
Follow these steps to create and share a spreadsheet:
Log in to VSCLIENT and select Start
Select File
In the New Workbook dialog, select a workbook template that has some data in it already. I used the Sales Report template from Office Online.
Download the template if necessary and click the Create button.
Once the spreadsheet is visible in Excel, select File
In the Save As dialog, paste the address of the trusted Spreadsheets library you created earlier along with an appropriate name for the spreadsheet (e.g.,
http://vsmoss/sites/intranet/Docs/Spreadsheets/Sales report.xlsx).Click the Save button.
After a spreadsheet is published to Excel Services, it will open in the browser automatically. You can also return to the document library and open the spreadsheet in either the web browser or Excel 2007 using the drop-down menu associated with the document. You'll also notice on that same menu an option to open a snapshot in Excel 2007. A snapshot is just a copy of the data in the spreadsheet without any of the underlying formulas. If you restrict a user's permission on the spreadsheet to just viewing the item, they will only be able to open a snapshot.
Although it is fairly simple to get started with Excel Services, not all of your existing spreadsheets will work. Excel Services does not, for example, support macros. Essentially, anything that cannot be rendered in HTML will have difficulty. The following lists some of the Excel features that are not supported by Excel Services:
ActiveX controls
Add-ins
Clip art and word art
Information Rights Management (IRM)
Linked spreadsheets
Query tables, SharePoint lists, web queries, and text queries
Smart documents
Smart Tags
Visual Basic for Applications (VBA)
Along with publishing spreadsheet data, you can also enable a level of interactivity through the use of parameters. Parameters allow you to specify cells within the published spreadsheet where a user can enter values. This allows a user to make use of the formulas in a spreadsheet without exposing it. This can be important when the formula is proprietary or you simply want to make a calculation available through the browser.
Follow these steps to create a spreadsheet that has parameters:
Log in to VSCLIENT and select Start
Enter Fahrenheit in cell A1.
Enter Celsius in cell B1.
In cell B2 enter the formula =(100/180)*(A2-32).
Right-click cell A2 and select Name a Range from the context menu.
In the New Name dialog, accept the name Fahrenheit by clicking the OK button.
Select File
In the Save As dialog, click the Excel Services Options button.
In the Show tab, select Sheets from the drop-down list.
Check the box next to Sheet1.
On the Parameters tab, click the Add button.
In the Add Parameters dialog, check the box next to the Fahrenheit parameter.
Click the OK button.
In the Excel Services Options dialog, click the OK button.
In the Save As dialog, paste the address of the trusted Spreadsheets library you created earlier along with an appropriate name for the spreadsheet (e.g.,
http://vsmoss/sites/intranet/Docs/Spreadsheets/Temperature Calculator.xlsx).Click the Save button.
After you save the sheet, it will open in the browser. You should now be able to enter a new value for the Fahrenheit parameter and see the resulting Celsius calculation. Figure 4-7 shows a picture of the spreadsheet.

Excel spreadsheets are often used to view and manipulate data from external systems. This data can be imported into a spreadsheet through the use of a data connection. Data connections are not new to Excel 2007, but SharePoint now provides a better way to manage them in the form of a data connection library so that they are available across the enterprise.
A data connection library is similar to any library you create in SharePoint, but it is intended to hold Office Data Connection (ODC) files that define connections to external data sources. These ODC files are created in Excel and can then be reused in different spreadsheets or even in InfoPath forms, which I discuss in Chapter 6.
You can create and manage data connections by clicking the Data tab in Excel. To create a new data connection, click From Other Sources to start the data connection wizard. The wizard will walk you through the process of defining a connection, which you can then save as an ODC file to the data connection library.
Follow these steps to create a data connection:
Log in to VSCLIENT and open the home page of the intranet site you created in Chapter 2 (e.g.,
http://vsmoss/sites/intranet/Pages/Default.aspx).Click the Document Center tab.
On the Document Center page, select Create from the Site Actions drop-down menu.
On the Create page, click the Data Connection Library link.
On the New page, type Data Connections in the Name field.
Select None from the Document Template list.
Click the Create button.
In the File Explorer, navigate to My DocumentsMy Data Sources.
Double-click the file named
+NewSQLServerConenction.odc. This will start Excel 2007.If you receive a warning that data connections are blocked, click the Enable button.
When the data connection wizard starts, enter VSSQLOFFICESERVERS in the Server Name field.
Click the Next button.
On the Select Database and Table screen, select WSS_Content from the drop-down list.
Select the Webs table from the list and click the Next button.
Name the new data source SharePointContent.odc and click the Finish button.
Return to the data connections library.
Click the Upload button on the toolbar.
On the Upload page, click the Browse button.
In the Choose File dialog, navigate to My Document/My Data Sources, select the
SharePoint Content.odcfile, and click the Open button.On the Upload page, click the OK button.
On the Data Connections page, click the Check In button.
Select Approve/Reject from the drop-down list associated with the new data connection file.
On the Approve page, select Approved and click the OK button. You can now close the Excel spreadsheet. You do not need to save it because you just used it to create the new data connection.
Once you have created and published a spreadsheet to Excel Services, you may access the cells and formulas through Excel Web Services. Excel Web Services is accessed through the server where the Shared Services reside. You can make use of the services in the development environment by setting a reference to them in Visual Studio at the following address: http://vsmoss/_vti_bin/excelservice.asmx.
Once you have a reference to Excel Web Services, you can call the OpenWorkbook method to access any spreadsheet published to Excel Services. This method takes the path to the workbook as an argument and returns a session identifier that you can use to perform operations on the workbook. The GetCell and SetCell methods allow you to read and write to the spreadsheet while the Calculate method calculates all the formulas in the workbook. Exercise 4.1 at the end of this chapter contains a complete exercise utilizing Excel Web Services.
Along with using Excel Services in your own applications, you can conversely provide assemblies that Excel Services can use. These custom assemblies are known as user-defined functions (UDF) and are called from an Excel spreadsheet in much the same way as a built-in function. The only difference is that UDFs are only available to workbooks that are published through Excel Services. Using UDFs, you can create custom functions that perform calculations and even access other data stores. The results are then returned to the spreadsheet for display in a cell.
UDFs are created as .NET assemblies that are decorated with special attributes. These attributes are found in the library Microsoft.Excel.Server.Udf. You can access this library from Visual Studio by setting a reference to the assembly C:Program FilesCommon FilesMicrosoft Shared web server extensions12ISAPIMicrosoft.Excel.Server.Udf.dll. Once you have the reference set, you can add a directive for the library using the following code:
Using Microsoft.Office.excel.Server.Udf;
When you create a UDF, you typically define a function that accepts arguments and returns a value for display in a cell. This is elementary programming with the exception that you must decorate the class with the UdfClass attribute and the method with the UdfMethod attribute. Listing 4-2 shows a simple class definition with a function for rolling a six-sided die.
Example 4.2. A User-Defined Function
using System;
using System.Collections.Generic;
using System.Text;

using Microsoft.Office.Excel.Server.Udf;

namespace UDFDice
{
    [UdfClass]
    public class Dice
    {
        [UdfMethod]
        public Int32 Roll()
        {
            Random r = new Random();
            return (Int32)((r.NextDouble() * 5) + 1);

        }
    }
}
Once you compile the assembly, you can save it to a file location or give it a strong name and place it in the Global Assembly Cache (GAC). Then you must make an entry in the user-defined functions list on the Shared Services Administration site that points to the new assembly. This is done by opening the list of user-defined assemblies using the link under the Excel Services Settings section. Once the new assembly is referenced in the list, you must specifically allow the use of user-defined functions from the trusted location page that you worked with earlier. When these configuration steps are complete, you can call the function from a spreadsheet cell. Just remember that the function will not work until you publish the spreadsheet to Excel Services.
The BDC is one of the Shared Services that allows you to integrate back-end line-of-business systems with SharePoint. Using the BDC, you can pull data from other databases or services and have that information appear in lists, web parts, search results, user profiles, and your own custom applications. Significantly, this integration requires no formal coding; instead, you describe the data source using an XML metadata file, and then the BDC performs all of the operations necessary to use the data in SharePoint. Figure 4-8 shows a conceptual drawing of the BDC architecture.

The heart of the BDC is the metadata database. The metadata database contains the XML used to describe the interface to a target data source. Creating this XML is the primary development task necessary to enable the BDC. Once created, the XML is uploaded using the Shared Services Administration site and is stored in the metadata database where it is available to every site in the SharePoint farm.
In order to provide a standard interface to the metadata, the BDC abstracts the metadata through a set of objects. These objects are part of the MOSS assembly Microsoft.SharePoint.Portal.dll and are contained in the libraries Microsoft.Office.Server.ApplicationRegistry.MetadataModel and Microsoft.Office.Server.ApplicationRegistry.Runtime. These libraries are the primary interface used by MOSS to access the target data and execute the commands defined by the metadata. Having this layer of abstraction is what permits integration of back-end systems without using any code, because the object libraries simply use ADO.NET or web services to perform all operations defined by the metadata.
The BDC infrastructure uses a data cache to hold metadata to minimize trips to the metadata database. This architecture improves BDC performance by making metadata available to SharePoint from the cache. Once per minute, the BDC infrastructure will check to see if any changes have occurred to the metadata and reload any objects that have changed.
Although the BDC is advertised as a "no-code" solution, creating the required XML metadata by hand may leave you longing to write code instead. As of this writing, there are several publicly available tools under development that purport to create BDC metadata, but most of these tools are still buggy and lack the features necessary to create a wide variety of BDC solutions. Therefore, I will show you how to create a metadata file for the BDC from scratch.
Listing 4-3 shows a complete file that I will use throughout this discussion. The file is used to integrate the BDC with a simple SQL Server 2005 database containing a single table. The database is named CRM and contains a table called Names. The Names table is made up of a primary key integer and several text fields with information such as first name, last name, and address. This example should give you all the fundamental knowledge you need to get started with the BDC.
Note
When creating metadata, open a new XML file in Visual Studio and set the SchemaLocation property to C:Program FilesMicrosoft Office Servers12.0BinBDCMetaData.xsd. This will activate IntelliSense for the metadata schema and make it easier to create the file.
Example 4.3. A Complete BDC Metadata File
<?xml version="1.0" encoding="utf-8" standalone="yes"?>
<LobSystem xmlns:xsi="http://www.w3.org/2001/XMLSchema-instance"
 xsi:schemaLocation=
 "http://schemas.microsoft.com/office/2006/03/BusinessDataCatalog BDCMetadata.xsd"
 SystemUtility=
 "Microsoft.Office.Server.ApplicationRegistry.SystemSpecific.Db.DbSystemUtility,
 Microsoft.SharePoint.Portal, Version=12.0.0.0, Culture=neutral,
 PublicKeyToken=71e9bce111e9429c"
 ConnectionManager=
 "Microsoft.Office.Server.ApplicationRegistry.SystemSpecific.Db.DbConnectionManager,
 Microsoft.SharePoint.Portal, Version=12.0.0.0, Culture=neutral,
 PublicKeyToken=71e9bce111e9429c"
 EntityInstance=
 "Microsoft.Office.Server.ApplicationRegistry.SystemSpecific.Db.DbEntityInstance,
 Microsoft.SharePoint.Portal, Version=12.0.0.0, Culture=neutral,
 PublicKeyToken=71e9bce111e9429c" Version="1.0.0.0" Name="MiniCRM"
 xmlns="http://schemas.microsoft.com/office/2006/03/BusinessDataCatalog">

    <Properties>
      <Property Name="WildcardCharacter" Type="System.String">%</Property>
    </Properties>

  <LobSystemInstances>
    <LobSystemInstance Name="ContactInfo">
      <Properties>
        <Property Name="AuthenticationMode"
          Type="System.String">PassThrough</Property>
        <Property Name="DatabaseAccessProvider"
          Type="System.String">SqlServer</Property>
        <Property Name="RdbConnection Data Source"
          Type="System.String">VSSQL</Property>
        <Property Name="RdbConnection Initial Catalog"
          Type="System.String">CRM</Property>
<Property Name="RdbConnection Integrated Security"
Type="System.String">SSPI</Property>
<Property Name="NumberOfConnections" Type="System.Int32">1</Property>
</Properties>
</LobSystemInstance>
</LobSystemInstances>
<Entities>
<Entity EstimatedInstanceCount="10000" Name="Customer">
<Identifiers>
<Identifier Name="CustomerID" TypeName="System.Int32" />
</Identifiers>
<Methods>
<Method Name="FindCustomers">
<Properties>
<Property Name="Title" Type="System.String">LastName</Property>
<Property Name="RdbCommandType" Type="System.Data.CommandType,
System.Data, Version=2.0.0.0, Culture=neutral,
PublicKeyToken=b77a5c561934e089">Text</Property>
<Property Name="RdbCommandText" Type="System.String">
SELECT * FROM Names WHERE Lastname LIKE @LastName</Property>
</Properties>
<FilterDescriptors>
<FilterDescriptor Type="Wildcard" Name="LastName"/>
</FilterDescriptors>
<Parameters>
<Parameter Direction="In" Name="@LastName">
<TypeDescriptor TypeName="System.String, mscorlib, Version=2.0.0.0,
Culture=neutral, PublicKeyToken=b77a5c561934e089"
Name="LastName" AssociatedFilter="LastName" />
</Parameter>
<Parameter Direction="Return"
TypeReflectorTypeName=
"Microsoft.Office.Server.ApplicationRegistry.SystemSpecific.Db.DbTypeReflector"
Name="Customers">
<TypeDescriptor TypeName="System.Data.IDataReader, System.Data,
Version=2.0.0.0, Culture=neutral, PublicKeyToken=b77a5c561934e089"
IsCollection="true" Name="CustomerDataReader">
<TypeDescriptors>
<TypeDescriptor TypeName="System.Data.IDataRecord, System.Data,
Version=2.0.0.0, Culture=neutral,
PublicKeyToken=b77a5c561934e089" Name="CustomerDataRecord">
<TypeDescriptors><TypeDescriptor TypeName="System.Int32, mscorlib,
Version=2.0.0.0, Culture=neutral,
PublicKeyToken=b77a5c561934e089" Name="ID"
IdentifierName="CustomerID" />
<TypeDescriptor TypeName="System.String, mscorlib,
Version=2.0.0.0, Culture=neutral,
PublicKeyToken=b77a5c561934e089" Name="FirstName" />
<TypeDescriptor TypeName="System.String, mscorlib,
Version=2.0.0.0, Culture=neutral,
PublicKeyToken=b77a5c561934e089" Name="LastName" />
<TypeDescriptor TypeName="System.String, mscorlib,
Version=2.0.0.0, Culture=neutral,
PublicKeyToken=b77a5c561934e089" Name="Title" />
<TypeDescriptor TypeName="System.String, mscorlib,
Version=2.0.0.0, Culture=neutral,
PublicKeyToken=b77a5c561934e089" Name="Company" />
<TypeDescriptor TypeName="System.String, mscorlib,
Version=2.0.0.0, Culture=neutral,
PublicKeyToken=b77a5c561934e089" Name="Address1" />
<TypeDescriptor TypeName="System.String, mscorlib,
Version=2.0.0.0, Culture=neutral,
PublicKeyToken=b77a5c561934e089" Name="Address2" />
<TypeDescriptor TypeName="System.String, mscorlib,
Version=2.0.0.0, Culture=neutral,
PublicKeyToken=b77a5c561934e089" Name="City" />
<TypeDescriptor TypeName="System.String, mscorlib,
Version=2.0.0.0, Culture=neutral,
PublicKeyToken=b77a5c561934e089" Name="State" />
<TypeDescriptor TypeName="System.String, mscorlib,
Version=2.0.0.0, Culture=neutral,
PublicKeyToken=b77a5c561934e089" Name="Zip" />
<TypeDescriptor TypeName="System.String, mscorlib,
Version=2.0.0.0, Culture=neutral,
PublicKeyToken=b77a5c561934e089" Name="Phone" />
<TypeDescriptor TypeName="System.String, mscorlib,
Version=2.0.0.0, Culture=neutral,
PublicKeyToken=b77a5c561934e089" Name="Fax" />
<TypeDescriptor TypeName="System.String, mscorlib,
Version=2.0.0.0, Culture=neutral,
PublicKeyToken=b77a5c561934e089" Name="EMail" />
</TypeDescriptors>
</TypeDescriptor>
</TypeDescriptors>
</TypeDescriptor>
</Parameter>
</Parameters><MethodInstances>
<MethodInstance Type="Finder" ReturnParameterName="Customers"
ReturnTypeDescriptorName="CustomerDataReader"
ReturnTypeDescriptorLevel="0" Name="FindCustomersInstance" />
</MethodInstances>
</Method>
<Method Name="FindCustomer">
<Properties>
<Property Name="Title" Type="System.String">ID</Property>
<Property Name="RdbCommandType" Type="System.Data.CommandType,
System.Data, Version=2.0.0.0, Culture=neutral,
PublicKeyToken=b77a5c561934e089">Text</Property>
<Property Name="RdbCommandText" Type="System.String">
SELECT * FROM Names WHERE ID=@ID</Property>
</Properties>
<FilterDescriptors>
<FilterDescriptor Type="Comparison" Name="ID"/>
</FilterDescriptors>
<Parameters>
<Parameter Direction="In" Name="@ID">
<TypeDescriptor TypeName="System.Int32, mscorlib, Version=2.0.0.0,
Culture=neutral, PublicKeyToken=b77a5c561934e089"
Name="ID" AssociatedFilter="ID" IdentifierName="CustomerID" />
</Parameter>
<Parameter Direction="Return"
TypeReflectorTypeName=
"Microsoft.Office.Server.ApplicationRegistry.SystemSpecific.Db.DbTypeReflector"
Name="Customer">
<TypeDescriptor TypeName="System.Data.IDataReader, System.Data,
Version=2.0.0.0, Culture=neutral, PublicKeyToken=b77a5c561934e089"
IsCollection="true" Name="CustomerDataReader">
<TypeDescriptors>
<TypeDescriptor TypeName="System.Data.IDataRecord, System.Data,
Version=2.0.0.0, Culture=neutral,
PublicKeyToken=b77a5c561934e089" Name="CustomerDataRecord">
<TypeDescriptors>
<TypeDescriptor TypeName="System.Int32, mscorlib,
Version=2.0.0.0, Culture=neutral,
PublicKeyToken=b77a5c561934e089" Name="ID"
IdentifierName="CustomerID" /><TypeDescriptor TypeName="System.String, mscorlib,
Version=2.0.0.0, Culture=neutral,
PublicKeyToken=b77a5c561934e089" Name="FirstName" />
<TypeDescriptor TypeName="System.String, mscorlib,
Version=2.0.0.0, Culture=neutral,
PublicKeyToken=b77a5c561934e089" Name="LastName" />
<TypeDescriptor TypeName="System.String, mscorlib,
Version=2.0.0.0, Culture=neutral,
PublicKeyToken=b77a5c561934e089" Name="Title" />
<TypeDescriptor TypeName="System.String, mscorlib,
Version=2.0.0.0, Culture=neutral,
PublicKeyToken=b77a5c561934e089" Name="Company" />
<TypeDescriptor TypeName="System.String, mscorlib,
Version=2.0.0.0, Culture=neutral,
PublicKeyToken=b77a5c561934e089" Name="Address1" />
<TypeDescriptor TypeName="System.String, mscorlib,
Version=2.0.0.0, Culture=neutral,
PublicKeyToken=b77a5c561934e089" Name="Address2" />
<TypeDescriptor TypeName="System.String, mscorlib,
Version=2.0.0.0, Culture=neutral,
PublicKeyToken=b77a5c561934e089" Name="City" />
<TypeDescriptor TypeName="System.String, mscorlib,
Version=2.0.0.0, Culture=neutral,
PublicKeyToken=b77a5c561934e089" Name="State" />
<TypeDescriptor TypeName="System.String, mscorlib,
Version=2.0.0.0, Culture=neutral,
PublicKeyToken=b77a5c561934e089" Name="Zip" />
<TypeDescriptor TypeName="System.String, mscorlib,
Version=2.0.0.0, Culture=neutral,
PublicKeyToken=b77a5c561934e089" Name="Phone" />
<TypeDescriptor TypeName="System.String, mscorlib,
Version=2.0.0.0, Culture=neutral,
PublicKeyToken=b77a5c561934e089" Name="Fax" />
<TypeDescriptor TypeName="System.String, mscorlib,
Version=2.0.0.0, Culture=neutral,
PublicKeyToken=b77a5c561934e089" Name="EMail" />
</TypeDescriptors>
</TypeDescriptor>
</TypeDescriptors>
</TypeDescriptor>
</Parameter>
</Parameters>
<MethodInstances>
<MethodInstance Type="SpecificFinder" ReturnParameterName="Customer"
ReturnTypeDescriptorName="CustomerDataReader"
ReturnTypeDescriptorLevel="0" Name="FindCustomerInstance" />
</MethodInstances></Method>
</Methods>
</Entity>
</Entities>
</LobSystem>Authoring the LobSystem Element
The LobSystem element describes the external data source you want to access with the BDC. It is the outermost element in the file. Most of the attributes associated with this element are boilerplate, but the Name and Version attributes should be set by you to give the system a unique name and track the metadata version you are using. Listing 4-4 shows the LobSystem attribute with the extraneous parts removed and the key attributes bolded.
Example 4.4. The LobSystem Element
<LobSystem xmlns:xsi=...
 xsi:schemaLocation=...
SystemUtility=...
ConnectionManager=...
EntityInstance=...Version="1.0.0.0" Name="MiniCRM"
The LobSystem attribute has several child elements defined in the schema, but we are most interested in the LobSystemInstances and the Properties elements. The LobSystemInstances element is used to contain the connection information for the data source, while the Properties element in this example simply defines the wildcard character that BDC should use when searching for partial strings. Since this data source is a SQL Server database, I define the wildcard to be a percent sign. Listing 4-5 shows how the wildcard character is defined.
Example 4.5. The Properties Element
<Properties>
  <Property Name="WildcardCharacter" Type="System.String">%</Property>
</Properties>
Authoring the LobSystemInstance Element
The LobSystemInstance element is a child of the LobSystemInstances element and is used primarily to provide connection information to BDC. BDC may connect to either a database or a web service. Using Property elements, you can define what data source BDC should connect with and how to make the connection. Listing 4-6 shows the elements necessary to connect to a SQL Server database. Each of these elements should be customized for your specific database.
Example 4.6. Using Property Elements to Connect to a Data Source
<LobSystemInstances>
  <LobSystemInstance Name="ContactInfo">
    <Properties>
      <Property Name="AuthenticationMode"
        Type="System.String">PassThrough</Property>
      <Property Name="DatabaseAccessProvider"
        Type="System.String">SqlServer</Property>
      <Property Name="RdbConnection Data Source"
        Type="System.String">VSSQL</Property>
      <Property Name="RdbConnection Initial Catalog"
        Type="System.String">CRM</Property>
      <Property Name="RdbConnection Integrated Security"
        Type="System.String">SSPI</Property>
      <Property Name="NumberOfConnections" Type="System.Int32">1</Property>
</Properties> </LobSystemInstance> </LobSystemInstances>
The AuthenticationMode property is used to specify what credentials the BDC should use when accessing the data source. Setting this value to PassThrough uses the application pool identity under which the BDC is running, unless you are using Kerberos authentication, in which case the BDC uses the identity of the SharePoint user. Setting this value to RevertToSelf forces the BDC to use the credentials from the application pool, but this can also cause problems later when you try to integrate the BDC with search, because it may not have sufficient privileges to crawl BDC data. Setting this value to WindowsCredentials causes the BDC to use credentials from the Single Sign-On (SSO) system. I discuss SSO in Chapter 11. Setting this value to Credentials also uses SSO, but for access to a web service.
The next few properties are specific to database access and are used to build a connection string to the target data. The DatabaseAccessProvider property is used to specify what provider to use with the target data source. You can set this property to SqlServer, OleDb, Oracle, or Odbc. The RdbConnection Data Source property is used to specify the name of the server where the database is located, while the RdbConnection Initial Catalog property is used to specify the name of the database within the server. The RdbConnection Integrated Security property specifies to use Windows authentication.
Authoring Entities
Perhaps the most arduous part of creating BDC metadata is authoring entities. Entities represent business objects for which you want to display information. Customers, orders, parts, and suppliers are all examples of business objects that you might define for the BDC. In my example, I have defined a single entity named Customer. When you define an entity, you must provide explicit detail about the database fields and queries you want the BDC to execute. This is painstaking work that begins by defining the entity name and a unique identifier. Listing 4-7 shows how the entity definition is started.
Example 4.7. Using an Entity Element to Define a Business Object
<Entities>
  <Entity EstimatedInstanceCount="10000" Name="Customer">
    <Identifiers>
      <Identifier Name="CustomerID" TypeName="System.Int32" />
    </Identifiers>
The Entity element is used to specify the name of the entity and approximately how many entities exist in the data source. The Name attribute should be unique across entities. The BDC uses the EstimatedInstanceCount attribute to make decisions about how to display entity information in SharePoint.
The Identifier element is used to specify a unique identifier for the entity. This is essentially a primary key and will be associated later with the primary key field from the database. The BDC uses this field when presenting information to automatically display detailed information for an entity through special BDC web parts.
Authoring Methods
Method elements are used by the BDC to define the SQL queries that should be executed to return data from the database. In most cases, you will need to define a query that returns groups of records based on a LIKE clause as well as a query that returns exact records based on a primary key value. These two queries help set up the basic BDC functionality that allows you to return a list of entities and then click to see the detail for a specific entity. Listing 4-8 shows two fragments that define methods. The first defines a query that will return multiple customers, while the second returns a specific customer based on a primary key.
Example 4.8. Using Method Elements to Define Queries
<Methods>
  <Method Name="FindCustomers">
    <Properties>
      <Property Name="Title" Type="System.String">LastName</Property>
      <Property Name="RdbCommandType...>Text</Property>
      <Property Name="RdbCommandText...>
        SELECT * FROM Names WHERE Lastname LIKE @LastName
      </Property>
    </Properties>
    <FilterDescriptors>
      <FilterDescriptor Type="Wildcard" Name="LastName"/>
    </FilterDescriptors>

  <Method Name="FindCustomer">
    <Properties>
      <Property Name="Title" Type="System.String">ID</Property>
      <Property Name=" RdbCommandType...>Text</Property>
      <Property Name=" RdbCommandText...>
        SELECT * FROM Names WHERE ID=@ID</Property>
</Properties>
    <FilterDescriptors>
      <FilterDescriptor Type="Comparison" Name="ID"/>
    </FilterDescriptors>
The Name attribute of the Method element should be unique and representative of the query to run. In my example, the first method named FindCustomers is used to return a set of customers based on a wildcard search. The second method returns a specific customer based on a primary key. The Title property is used to specify the field that should be used by default to represent the entity in some BDC displays. The RdbCommandText property is used to define the query to run. Notice the difference between the SQL statements in each method and how they return either a set of records or a specific record. This functionality is further defined by the FilterDescriptor element, which is set to either Wildcard or Comparison and then given a name so it can be referenced later by query parameters.
Authoring Parameters
Parameter elements are used to define the values that are sent into the query and the fields that are returned. Both of the methods I define in the metadata have input and output parameters. The input parameter is either a partial last name to use in a wildcard search or an integer value used to return an exact customer based on the primary key. The return values, on the other hand, are identical for both methods because I always want the same fields returned. Listing 4-9 shows the two input parameters and the common output parameters for the methods.
Example 4.9. Using Parameter Elements
<Parameters>
  <Parameter Direction="In" Name="@ID">
    <TypeDescriptor TypeName=...
     Name="ID" AssociatedFilter="ID"
     IdentifierName="CustomerID" />
  </Parameter>

<Parameters>
  <Parameter Direction="In" Name="@LastName">
    <TypeDescriptor TypeName=...
      Name="LastName"
      AssociatedFilter="LastName" />
  </Parameter>

  <Parameter Direction="Return"
    TypeReflectorTypeName=... Name="Customer">
    <TypeDescriptor TypeName=... IsCollection="true" Name="CustomerDataReader">
      <TypeDescriptors>
        <TypeDescriptor TypeName... Name="CustomerDataRecord">
           <TypeDescriptors>
            <TypeDescriptor TypeName=... Name="ID" IdentifierName="CustomerID" />
<TypeDescriptor TypeName=... Name="FirstName" />
            <TypeDescriptor TypeName=... Name="LastName" />
            <TypeDescriptor TypeName=... Name="Title" />
            <TypeDescriptor TypeName=... Name="Company" />
            <TypeDescriptor TypeName=... Name="Address1" />
            <TypeDescriptor TypeName=... Name="Address2" />
            <TypeDescriptor TypeName=... Name="City" />
            <TypeDescriptor TypeName=... Name="State" />
            <TypeDescriptor TypeName=... Name="Zip" />
            <TypeDescriptor TypeName=... Name="Phone" />
            <TypeDescriptor TypeName=... Name="Fax" />
            <TypeDescriptor TypeName=... Name="EMail" />
           </TypeDescriptors>
        </TypeDescriptor>
      </TypeDescriptors>
    </TypeDescriptor>
  </Parameter>
</Parameters>
Notice that each of the input parameters in the listing references the name of the FilterDescriptor defined earlier. This reference is how the BDC knows whether to apply the wildcard to the parameter before executing the query. Also notice that when the primary key field is used, it references the identifier created earlier. This tells the BDC that the parameter is a unique identifier. The return parameters are simply the data fields that will be returned from the query.
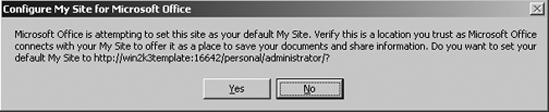
Once the metadata is complete, it may be uploaded to the BDC as a new application definition. Application definitions are uploaded from the Shared Services Administration site by clicking the Add Application link under the Business Data Catalog section. When the metadata is uploaded, the BDC will check it for errors and notify you if the XML is not correct. Once the application is uploaded, you may choose to view the definition where you should see any entities you have defined. Figure 4-9 shows the example application in Shared Services.
Tip
The example used here is targeted at SQL 2005 databases. If you wish to connect to web services or other types of databases, you should reference the examples in the MOSS SDK. For the most part, it is only a matter of using different elements in the application definition.
After viewing the application, you should click each entity you have defined. Clicking the entity will bring you to a page that shows the field names that will be returned, the filters you have available, and any defined actions. Field names will be used to create lists and views in SharePoint. Filters represent available wildcard search methods you defined. Actions are used to connect an item from a list to a detail view. Figure 4-10 shows the example Customer entity in Shared Services.

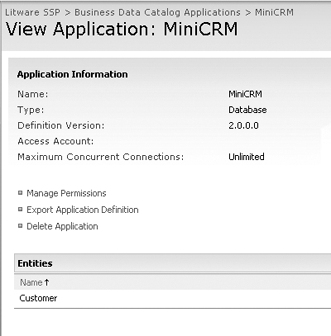
For each entity you define, you should configure the available actions. By default, the BDC defines an action called View Profile. Clicking this action will allow you to define what happens when it is invoked by an end user. On the Edit Action page, you can assign a parameter to use when displaying details about the entity. This is always the unique identifier you define in the metadata. In this example, I set the parameter to the ID field of the customer. Figure 4-11 shows the parameter setting in Shared Services.
Once the metadata is uploaded and configured, you are ready to use it in MOSS. MOSS ships with several web parts that know how to integrate with BDC information. The two basic parts are the Business Data List and the Business Data Item. The Business Data List web part displays the results of wildcard searches in a list form while the BDC Data Item web part displays an individual record based on the primary key. The BDC list also allows you to invoke the actions you define in the BDC so you can display a list of records and then click on one to display the details. These web parts bring to fruition the promise of integrating line-of-business systems with SharePoint. Figure 4-12 shows an example of these web parts displaying customer data.

Follow these steps to use the Business Data List web part:
Open the home page of the MOSS intranet site you created in Chapter 2 (e.g.,
http://vsmoss/sites/intranet/Pages/Default.aspx).Select Edit Page from the Site Actions menu.
When the page enters edit mode, click the Add a Web Part link for any zone.
In the Add Web Parts dialog, check the box for the Business Data List and click the Add button.
When the Business Data List is added to the page, click the link titled Open the Tool Pane.
Click the Browser button next to the Type field at the top of the Tool Pane.
In the Business Data Type Picker dialog, select the ContactInfo entry and click the OK button.
Click the OK button in the tool pane.
In the Business Data List web part, click the Edit View link.
Select the fields you want to display and select the Title option for the field that represents the primary key for the data. This will allow you to create a detail action for the items in the list.
Click the OK button.
In addition to displaying BDC information in web parts, you can also search BDC information. In order to make the BDC information available, you must start by creating a new method in the metadata that the Search Service can use during a crawl. This method returns all of the primary keys, which are then used to return each entity one at a time. The returned entities become part of the index. Listing 4-10 shows an example of the new method, which is similar to the other methods I show in Listing 4-8. I have removed parts to make it easier to read.
Example 4.10. A Method to Support Indexing BDC Data
<Method Name="CustomerIDEnumerator">
  <Properties>
    <Property Name="RdbCommandText" Type="System.String">
      SELECT ID FROM Names</Property>
    <Property Name="RdbCommandType" Type="System.String">Text</Property>
  </Properties>
  <Parameters>
    <Parameter Name="CustomerIDs" Direction="Return">
      <TypeDescriptor TypeName=... IsCollection="true" Name="CustomerDataReader">
        <TypeDescriptors>
          <TypeDescriptor TypeName=... Name="CustomerDataRecord">
            <TypeDescriptors>
              <TypeDescriptor TypeName="System.Int32"
                IdentifierName="CustomerID" Name="ID">
                <LocalizedDisplayNames>
                  <LocalizedDisplayName LCID="1033">ID</LocalizedDisplayName>
                </LocalizedDisplayNames>
              </TypeDescriptor>
            </TypeDescriptors>
          </TypeDescriptor>
        </TypeDescriptors>
      </TypeDescriptor>
    </Parameter>
  </Parameters>
  <MethodInstances>
    <MethodInstance Name="CustomerIDEnumeratorInstance"
      Type="IdEnumerator" ReturnParameterName="CustomerIDs" />
  </MethodInstances>
</Method>
Once the metadata is updated, you can proceed to create a new search content source and scope based on the metadata as I described in the section "Configuring Search." Additionally, you must be sure to give the account that will crawl the BDC permission to access the data source. This can be done through the BDC Permissions link in Shared Services. If you have trouble with this, or any part of BDC configuration, be sure to look at the event log. The files often have good descriptions of BDC errors.
Excel Services allows you to publish spreadsheets that can be viewed in a browser. Once the spreadsheet is published, however, you can also access it programmatically through web services. In this exercise, you will create a mileage calculator spreadsheet to determine the reimbursement for mileage traveled in a personal car. After creating the sheet, you will make a Windows application that uses Excel Services to calculate the reimbursement on the server and return the value to the application.
Before you can publish a spreadsheet to Excel Services, you must define trusted locations for documents. Trusted locations can come from SharePoint sites, other web sites, or file folders. In this exercise, you will create a document library to contain all of the published calculators for the company.
Follow these steps to create the trusted library:
Log in to VSMOSS as a SharePoint administrator.
Open the home page of the MOSS intranet site you created in Chapter 2 (e.g.,
http://vsmoss/sites/intranet/Pages/Default.aspx).Click the Document Center tab.
On the Document Center page, select Create from the Site Actions drop-down menu.
On the Create page, click the Document Library list.
On the New page, type Expense Calculators into the Name field.
Select Microsoft Office Excel Spreadsheet from the Document Template list.
Click the Create button.
When the Expense Calculators library opens, copy the URL of the library (e.g.,
http://vsmoss/sites/intranet/Docs/Expense%20Calculators).Select Start
From the home page of the Central Administration site, click the Application Management tab.
On the Application Management tab, click the link titled Create or Configure This Farm's Shared Services.
On the Manage This Farm's Shared Services page, click the link to open the Shared Services Administration site.
On the home page of the Shared Services Administration site, click the Trusted File Locations link.
On the Excel Services Trusted File Locations page, click Add Trusted File Location.
Paste the address of the Expense Calculators library into the Address field.
Click the OK button.
Once the trusted library is defined, you can create spreadsheets and publish them to Excel Services. In this section you will create a simple spreadsheet that allows you to define a reimbursement rate for each mile and a place to enter miles traveled. When you publish the spreadsheet, you will define a parameter so that the spreadsheet can be used directly from the browser to calculate reimbursements if desired.
Follow these steps to create and publish the spreadsheet:
Start Excel 2007.
Enter Mileage in cell A1.
Enter Rate in cell B1.
Enter Reimbursement in cell C1.
Enter 0 in cell A2.
Enter .445 in cell B2.
In cell C2 enter the formula =(A2*B2).
Right-click cell A2 and select Name a Range from the context menu.
In the New Name dialog, accept the name Mileage by clicking the OK button.
Select File
In the Save As dialog, click the Excel Services Options button.
In the Show tab, select Sheets from the drop-down list.
Check the box next to Sheet1.
On the Parameters tab, click the Add button.
In the Add Parameters dialog, check the box next to the Mileage parameter.
Click the OK button.
In the Excel Services Options dialog, click the OK button.
In the Save As dialog, paste the address of the trusted Spreadsheets library you created earlier along with an appropriate name for the spreadsheet (e.g.,
http://vsmoss/sites/intranet/Docs/Expense%20Calculators /Mileage Calculator.xlsx).Click the Save button.
In this section, you will create a simple application that works with Excel Services. Although the published spreadsheet may be used directly, you can also call it from a web service and take advantage of the server-side calculation engine of Excel Services. This allows you to utilize complex or proprietary calculations in applications.
For this example, you will create a Windows application. The application will allow you to enter a value for mileage traveled and it will return the current reimbursement rate and the value of the reimbursement. Because the calculation is all done on the server, the reimbursement rate may be changed at any time and the application does not have to be modified.
Follow these steps to create the application:
Start Visual Studio 2005.
In Visual Studio 2005, select File
In the New Project dialog, click the Visual C# node in the Project Types list.
In the Templates list, select Windows Application.
Type MileageCalculator in the Name field.
Click the OK button.
When the new project is created, drop a NumericUpDown control, two Label controls, and a Button control onto Form1.
Name the new controls
mileage,rate,reimbursement, andsubmit, respectively.Change the Text property of the button to Calculate. Your form should now appear as shown in Figure 4-13.

Calling a spreadsheet in Excel Services is done through a web services interface that allows you to read and write cells as well as calculate all the formulas in the sheet. After setting a reference to the web service, you will have access to several properties and methods for working with the spreadsheet. In this exercise, all of the code will be run when a button is clicked.
Follow these steps to code the application:
In Visual Studio 2005, select Project
In the Add Web Reference dialog, type
http://vsmoss/_vti_bin/excelservice.asmxin the URL field.Click the Go button.
After the web service is successfully located, type ExcelWebServices in the Web Reference Name field.
Click the Add Reference button.
Select Form1 in the Solution Explorer and then click the View Code button.
Add the following statements to reference the required namespaces:
using MileageCalculator.ExcelWebServices;
using System.Web.Services.Protocols;
Add the code from Listing 4-11 to pass the mileage to the spreadsheet, calculate the reimbursement, and return the value.
Example 4.11. Reimbursement Calculator
private void submit_Click(object sender, EventArgs e)
{
    ExcelService calcSheet = new ExcelService();
    Status[] outStatus;
    RangeCoordinates rangeCoordinates = new RangeCoordinates();
    string sheetName = "Sheet1";
    string targetWorkbookPath =

"http://win2k3template/Docs/Expense%20Calculators/Mileage%20Calculator.xlsx";
    calcSheet.Credentials = System.Net.CredentialCache.DefaultCredentials;

    try
    {
        string id = calcSheet.OpenWorkbook(
          targetWorkbookPath, "en-US", "en-US", out outStatus);

        object rateCell = calcSheet.GetCell(
          id, sheetName, 1, 1, true, out outStatus);
        calcSheet.SetCell(id, sheetName, 1, 0, mileage.Value);
        calcSheet.Calculate(id, sheetName, rangeCoordinates);
        object reimbursementCell = calcSheet.GetCell(
          id, sheetName, 1, 2, true, out outStatus);
rate.Text = rateCell.ToString();
reimbursement.Text = reimbursementCell.ToString();
calcSheet.CloseWorkbook(id);
}
catch (Exception x)
{
MessageBox.Show(x.Message);
}
}Once you have the application coded, you should be able to run it directly from Visual Studio. When the form appears, enter a value for the mileage traveled and click the button. The application should return the current reimbursement rate and the total reimbursement for the travel.