
Chapter 6 SQL Server 2008 Maintenance Practices
For SQL Server databases to perform at optimal levels, a database administrator (DBA) should conduct routine maintenance on each database. Some of these routine database tasks involve rebuilding indexes, checking database integrity, updating index statistics, and performing internal consistency checks and backups. These routine database maintenance tasks are often overlooked because they are redundant, tedious, and often time-consuming. Moreover, today’s DBAs are overwhelmed with many other tasks throughout the day. In recognition of these issues, SQL Server provides a way to automate or manually create these routine DBA chores with a maintenance plan. After the maintenance tasks are identified and created, routine maintenance should commence daily, weekly, monthly, or quarterly, depending on the task. Ultimately, these tasks will put organizations on the path to having healthier, consistent, and more trustworthy databases.
SQL Server 2008 doesn’t necessarily introduce any new compelling features and functionality associated with creating maintenance plans; however, the SQL Server Program team continues to deliver rich features that were introduced with the release of Service Pack 2 for SQL Server 2005. The following list describes some of these features:
![]() With SQL Server 2005, the installation of SQL Server Integration Services (SSIS) was warranted if organizations wanted to run maintenance plans. Integration Services is not required because maintenance plans are now a fully supported feature within the Database Engine.
With SQL Server 2005, the installation of SQL Server Integration Services (SSIS) was warranted if organizations wanted to run maintenance plans. Integration Services is not required because maintenance plans are now a fully supported feature within the Database Engine.
![]() The Maintenance Plan designer continues to support multiple subplans within a maintenance plan and the functionality to create independent schedules for each subplan.
The Maintenance Plan designer continues to support multiple subplans within a maintenance plan and the functionality to create independent schedules for each subplan.
![]() For increased administration, maintenance plans continue to support multiserver environments and logging maintenance plan information to remote servers. Maintenance plans can be configured for all target servers from one central master server.
For increased administration, maintenance plans continue to support multiserver environments and logging maintenance plan information to remote servers. Maintenance plans can be configured for all target servers from one central master server.
![]() With the release of SQL Server 2008, new backup compression options have been added to the Database Backup maintenance plan tasks.
With the release of SQL Server 2008, new backup compression options have been added to the Database Backup maintenance plan tasks.
![]() Separate execution schedules can be created for each subtask within a maintenance plan.
Separate execution schedules can be created for each subtask within a maintenance plan.
A maintenance plan performs a comprehensive set of SQL Server jobs that run at scheduled intervals. The maintenance plan conducts scheduled SQL Server maintenance tasks to ensure that relational databases within the database engine are performing optimally, conducting regular backups, and checking for anomalies. The Database Maintenance Plan, a feature included within the SQL Server Database Engine, can be used to automatically create and schedule these daily tasks. A comprehensive maintenance plan includes these primary administrative tasks:
![]() Running database integrity checks
Running database integrity checks
![]() Updating database statistics
Updating database statistics
![]() Reorganizing database indexes
Reorganizing database indexes
![]() Performing database backups
Performing database backups
![]() Cleaning up database historical operational data
Cleaning up database historical operational data
![]() Shrinking a database
Shrinking a database
![]() Cleaning up leftover files from the maintenance plan
Cleaning up leftover files from the maintenance plan
![]() Executing SQL Server jobs
Executing SQL Server jobs
![]() Cleaning up maintenance tasks
Cleaning up maintenance tasks
The Check Database Integrity Task verifies the health and structural integrity of both user and system tables within relational databases selected in the SQL Server Database Engine. When running this task, you have the option to also check the integrity of all index pages. This specific task can be created in the Maintenance Plan Wizard, which will manually create a maintenance task. On the other hand, you can use TSQL to create this task. When you create the Database Integrity Task, the database options available include all system databases, all user databases, or specific databases.
Although the following example shows basic syntax, it supplies the information you need to assess the health and integrity of the database on the AdventureWorks2008 database.
USE [AdventureWorks2008]
GO
DBCC CHECKDB(N'AdventureWorks2008') WITH NO_INFOMSGS
The Shrink Database Task reduces the physical database and log files to a specific size, similar to the Automatic Shrink Task available in SSMS. When creating a maintenance task, you can shrink all databases, all system databases, all user databases, or specific databases within a single task. This operation removes excess space in the database based on a percentage value you enter in MB. In addition, thresholds must be entered, indicating the amount of shrinkage that needs to take place after the database reaches a certain size and the amount of free space that must remain after the excess space is removed.
Finally, free space can be retained in the database or released back to the operating system. For example, if you believe that the database will grow again after a shrink operation, then it is a best practice to retain freed space in database files. This will condense the database based on contiguous pages, however, the pages are not de-allocated and the database files will not physically shrink. On the other hand, if you anticipate that the files will not regrow after a shrink operation, the second option will physically shrink the files and release the free space back to the operating system.
This TSQL syntax shrinks the AdventureWorks2008 database, returns freed space to the operating system, and allows for 15 percent of free space to remain after the shrink:
USE [AdventureWorks2008]
GO
DBCC SHRINKDATABASE(N'AdventureWorks2008', 15, TRUNCATEONLY)
GO
Tip
When you create maintenance plans, it is a best practice not to select the option to shrink the database. First, when shrinking the database, SQL Server moves pages toward the beginning of the file, allowing the tail end of the files to be shrunk. This process can increase the transaction log size because all moves are logged. Second, if the database is heavily used and there are many inserts, the database files will have to grow again. Since SQL Server 2005, Microsoft has addressed slow autogrowth with instant data file initialization; therefore, the growth process is not as slow as it was in the past. It should be noted that instant file initialization only occurs on the data file and not the log file. If the log file must grow, it still must “zero” out the new space to ensure consistency, which will cause performance issues. However, at times autogrow does not catch up with the space requirements, causing performance degradation.
Third, constant shrinking and growing of the database leads to excessive fragmentation. Therefore, if you need to shrink the database size, it should be done manually when the server is not being heavily utilized.
When there is a need to improve index scanning performance, look to the Reorganize Index Task.
This task defragments and compacts clustered and nonclustered indexes on all tables or views, or a particular table or view. The Reorganize Index Task can also be applied to all databases, system databases, user databases, or individually targeted databases. By also selecting an additional option, large object (LOB) data types such as images, text and FILESTREAM data will also be included in the compacting process.
To gain better insight into the operation of this task, use the TSQL syntax that follows to reorganize indexes for the AdventureWorks2008 [Sales].[SalesOrderDetail] table. This example also includes the option to compact large objects:
USE [AdventureWorks2008]
GO
ALTER INDEX [AK_SalesOrderDetail_rowguid]
ON [Sales].[SalesOrderDetail]
REORGANIZE WITH ( LOB_COMPACTION = ON )
GO
USE [AdventureWorks2008]
GO
ALTER INDEX [IX_SalesOrderDetail_ProductID]
ON [Sales].[SalesOrderDetail]
REORGANIZE WITH ( LOB_COMPACTION = ON )
GO
USE [AdventureWorks2008]
GO
ALTER INDEX [PK_SalesOrderDetail_SalesOrderID_SalesOrderDetailID]
ON [Sales].[SalesOrderDetail]
REORGANIZE WITH ( LOB_COMPACTION = ON )
The Rebuild Index Task aims to eliminate fragmentation by reorganizing all the table indexes in the database. This task is particularly good for ensuring that query performance and application response do not degrade. Therefore, when SQL is called on to conduct index scans and seeks, it operates at its full potential. In addition, this task optimizes the distribution of data and free space on the index pages, which allows for growth to take place faster.
The two Rebuild Index Task free space options consist of the following:
![]() Reorganize Pages with the Default Amount of Free Space— Drop the indexes on the tables in the database and re-create them with the fill factor that was specified when the indexes were created.
Reorganize Pages with the Default Amount of Free Space— Drop the indexes on the tables in the database and re-create them with the fill factor that was specified when the indexes were created.
![]() Change Free Space per Page Percentage To— Drop the indexes on the tables in the database and re-create them with a new, automatically calculated fill factor, thereby reserving the specified amount of free space on the index pages. The higher the percentage, the more free space is reserved on the index pages, and the larger the index grows. Valid values are from 0 through 100.
Change Free Space per Page Percentage To— Drop the indexes on the tables in the database and re-create them with a new, automatically calculated fill factor, thereby reserving the specified amount of free space on the index pages. The higher the percentage, the more free space is reserved on the index pages, and the larger the index grows. Valid values are from 0 through 100.
The Rebuild Index Task advanced options consist of the following:
![]() Sort Results in tempdb— The Sort Results in tempdb option is the first advanced option available in the Rebuild Index Task. This option is comparable to the
Sort Results in tempdb— The Sort Results in tempdb option is the first advanced option available in the Rebuild Index Task. This option is comparable to the SORT_IN_TEMPDB option for the index. When this option is enabled, the intermediate results are stored in tempdb during the rebuild of an index.
![]() Keep Index Online While Reindexing— The second advanced option allows users to access the underlying table, clustered index data, and the associated indexes during the index rebuild operation. It is worth mentioning that the online index option requires a significant amount of free space on the hard disk. For example, if the indexes on the table take up 3GB of space, then an additional 3GB of disk space is required for this process as the old indexes get swapped out once the new ones have been created.
Keep Index Online While Reindexing— The second advanced option allows users to access the underlying table, clustered index data, and the associated indexes during the index rebuild operation. It is worth mentioning that the online index option requires a significant amount of free space on the hard disk. For example, if the indexes on the table take up 3GB of space, then an additional 3GB of disk space is required for this process as the old indexes get swapped out once the new ones have been created.
Armed with the knowledge of what the Rebuild Index Task can do, use the following information to gain some hands-on experience. Use the Rebuild Index syntax that follows to rebuild indexes for the AdventureWorks2008 [Sales]. [SalesOrderDetail] table. The option to Reorganize pages using the default amount of free space has been selected. This example will also sort results in tempdb and keep the index online while reindexing.
USE [AdventureWorks2008]
GO
ALTER INDEX [AK_SalesOrderDetail_rowguid] ON [Sales].[SalesOrder
Detail] REBUILD PARTITION = ALL WITH ( PAD_INDEX = OFF,
STATISTICS_NORECOMPUTE = OFF, ALLOW_ROW_LOCKS = ON,
ALLOW_PAGE_LOCKS = ON, IGNORE_DUP_KEY = OFF, ONLINE = ON,
SORT_IN_TEMPDB = ON, DATA_COMPRESSION = NONE )
GO
USE [AdventureWorks2008]
GO
ALTER INDEX [IX_SalesOrderDetail_ProductID] ON [Sales].[Sales
OrderDetail] REBUILD PARTITION = ALL WITH ( PAD_INDEX = OFF,
STATISTICS_NORECOMPUTE = OFF, ALLOW_ROW_LOCKS = ON,
ALLOW_PAGE_LOCKS = ON, ONLINE = ON, SORT_IN_TEMPDB = ON,
DATA_COMPRESSION = NONE )
GO
USE [AdventureWorks2008]
GO
ALTER INDEX [PK_SalesOrderDetail_SalesOrderID_SalesOrderDetailID]
ON [Sales].[SalesOrderDetail] REBUILD PARTITION = ALL WITH (
PAD_INDEX = OFF, STATISTICS_NORECOMPUTE = OFF, ALLOW_ROW_LOCKS
= ON, ALLOW_PAGE_LOCKS = ON, ONLINE = ON, SORT_IN_TEMPDB = ON,
DATA_COMPRESSION = NONE )
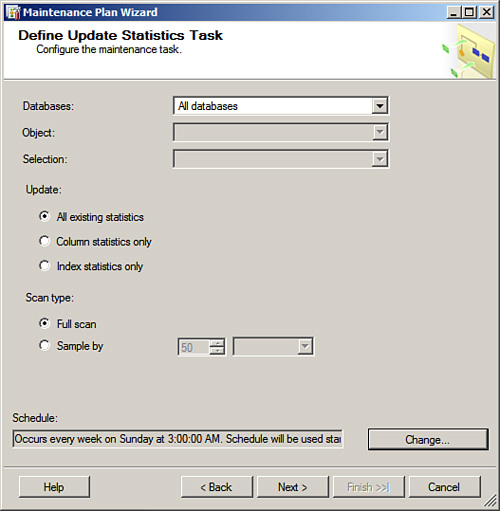
The Update Statistics Task ensures the data in the tables and indexes on one or more SQL Server databases are up to date by resampling the distribution statistics of each index on user tables.
Numerous choices are available to customize this task. Each of the options is explained next:
![]() Databases— First select the databases that will be impacted by this task. The choices range from All Databases, System Databases, or User Databases and These Databases.
Databases— First select the databases that will be impacted by this task. The choices range from All Databases, System Databases, or User Databases and These Databases.
![]() Object— After the databases are selected, decide in the Objects box whether to display both tables and views or only one of these options.
Object— After the databases are selected, decide in the Objects box whether to display both tables and views or only one of these options.
![]() Selection— Choose the tables or indexes that will be impacted. If the Tables and Views option was selected in the Objects box, this box will be unavailable.
Selection— Choose the tables or indexes that will be impacted. If the Tables and Views option was selected in the Objects box, this box will be unavailable.
![]() Update— The Update box offers three choices. Select All Existing Statistics if you need to update both columns and indexes. Select Column Statistics if you need to update only column statistics, and select Index Statistics if you need to update only index statistics.
Update— The Update box offers three choices. Select All Existing Statistics if you need to update both columns and indexes. Select Column Statistics if you need to update only column statistics, and select Index Statistics if you need to update only index statistics.
![]() Scan Type— The Scan Type section allows you to update statistics based on a Full Scan or by entering a Sample By value. The Sample By values can be either a percentage or a specific number of rows.
Scan Type— The Scan Type section allows you to update statistics based on a Full Scan or by entering a Sample By value. The Sample By values can be either a percentage or a specific number of rows.
The syntax to update statistics on the AdventureWorks2008 [Sales].[SalesOrderDetail] table with the advanced options to update all existing statistics and conduct a full scan is as follows:
use [AdventureWorks2008]
GO
UPDATE STATISTICS [Sales].[SalesOrderDetail]
WITH FULLSCAN
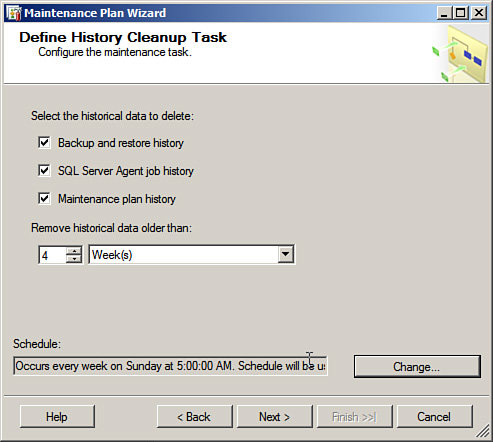
The History Cleanup Task offers organizations the perfect opportunity to remove historical data in a few simple steps. You can delete several types of history data using this task. The following two options are associated with this task.
![]() Historical Data to Be Deleted— Use the Maintenance Plan Wizard to purge several types of data, including Backup and Restore history, SQL Server Agent Job history, and Maintenance Plan history.
Historical Data to Be Deleted— Use the Maintenance Plan Wizard to purge several types of data, including Backup and Restore history, SQL Server Agent Job history, and Maintenance Plan history.
![]() Remove Historical Data Older Than— Use the wizard also to select the age of the data you want to delete. For example, you can choose to periodically remove older data based on daily, weekly, monthly, and yearly increments.
Remove Historical Data Older Than— Use the wizard also to select the age of the data you want to delete. For example, you can choose to periodically remove older data based on daily, weekly, monthly, and yearly increments.
When the History Cleanup Task is complete, you can save a report to a text file or email the report to an operator by clicking Next. The Select Report Options page is invoked and you must enable the check box Write a Report to a Text File, and then indicate the storage location of the report by specifying the file and folder location.
The following TSQL example removes historical data older than four weeks for the following items: Backup and Restore history, SQL Server Agent Job history, and Maintenance Plan history.
declare @dt datetime
select @dt = dateadd(wk,-4,getdate())
exec msdb.dbo.sp_delete_backuphistory @dt
EXEC msdb.dbo.sp_purge_jobhistory @oldest_date=@dt
EXECUTE msdb..sp_maintplan_delete_log null,null,@dt
The Execute SQL Server Agent Job Task allows you to run SQL Server Agent jobs that already exist as well as SSIS packages as part of the maintenance plan. This is done by selecting the job in the Available SQL Server Agent Jobs section in the Define Execute SQL Server Agent Job Task page. Alternatively, TSQL syntax can be used to execute a job by entering the appropriate Job ID of a specific job that already exists.
The syntax to execute a SQL Server Agent job is as follows:
EXEC msdb.dbo.sp_start_job @job_
id=N'35eca119-28a6-4a29-994b-0680ce73f1f3'
The Back Up Database Task is an excellent way to automate and schedule full, differential, or transaction log backups.
You can choose from an expanded set of options when creating full, differential, or transaction log backups with maintenance plans. With these expanded options, you can choose to back up a database or an individual component, set expiration dates, verify integrity, and even determine whether to use disk or tape. Each of the backup options is described in more detail in the following list:
![]() Specify the Database— A maintenance plan can be generated to perform a variety of backups, including backing up a single database, all databases, system databases, or all user databases.
Specify the Database— A maintenance plan can be generated to perform a variety of backups, including backing up a single database, all databases, system databases, or all user databases.
![]() Backup Component— The Backup Component section offers the option of either backing up the entire database or individual files or filegroups.
Backup Component— The Backup Component section offers the option of either backing up the entire database or individual files or filegroups.
![]() Backup Set Will Expire— To stipulate when a backup set will expire and can be overwritten by another backup, you need only to specify the number of days or enter a hard date such as September 5, 1974, for the set to expire.
Backup Set Will Expire— To stipulate when a backup set will expire and can be overwritten by another backup, you need only to specify the number of days or enter a hard date such as September 5, 1974, for the set to expire.
![]() Back Up To— This option allows the backup to be written to a file or a tape. A tape drive must be present on the system to back up to tape. The other option is having a backup written to a file residing on a network share.
Back Up To— This option allows the backup to be written to a file or a tape. A tape drive must be present on the system to back up to tape. The other option is having a backup written to a file residing on a network share.
![]() Back Up Databases Across One or More Files— When selecting the backup destination, you can either add or remove one or more disk or tape locations. In addition, you can view the contents of a file and append to the backup file if it already exists.
Back Up Databases Across One or More Files— When selecting the backup destination, you can either add or remove one or more disk or tape locations. In addition, you can view the contents of a file and append to the backup file if it already exists.
![]() Create a Backup File for Every Database— Instead of selecting the preceding option, Back Up Databases Across One or More Files, you can let SQL Server automatically create a backup file for every database selected. In addition, you can automatically create a subdirectory for each database selected.
Create a Backup File for Every Database— Instead of selecting the preceding option, Back Up Databases Across One or More Files, you can let SQL Server automatically create a backup file for every database selected. In addition, you can automatically create a subdirectory for each database selected.
Note
If the Automatically Create a Subdirectory option is selected, the new subdirectory created will inherit permissions from the parent directory. NTFS permissions should be used to secure the root folder to restrict unauthorized access.
![]() Verify Backup Integrity— This option verifies the integrity of the backup when it is completed by firing a TSQL command that determines whether the backup was successful and is accessible.
Verify Backup Integrity— This option verifies the integrity of the backup when it is completed by firing a TSQL command that determines whether the backup was successful and is accessible.
![]() Set Backup Compression— When using the Enterprise Edition of SQL Server 2008, the options available include: leverage backup compression based on the server default settings, compress the backup regardless of the server-level default, and finally, do not compress backup.
Set Backup Compression— When using the Enterprise Edition of SQL Server 2008, the options available include: leverage backup compression based on the server default settings, compress the backup regardless of the server-level default, and finally, do not compress backup.
Note
For a more thorough and detailed discussion of full, differential, and transaction log backups, see Chapter 7, “Backing Up and Restoring the SQL Server 2008 Database Engine.”
You can choose to back up a database in one of three ways when you create a maintenance plan. Using the wizard, you select the Define Back Up Database (Full) Task when it is necessary to capture the full database. Similarly, select Define Back Up Database (Differential) Task if it is important to record only data that has changed since the last full backup, or select the Define Back Up Database (Transaction Log) Task, which will back up only entries that are recorded to logs. The backup file extension for the Full and Differential Task is *.bak, whereas the Transaction Log Task is *.trn. Other than these noted differences, the options for each task are the same. If the Maintenance Plan wizard will not be used, then a DBA must choose the Back Up Database Task and specify the backup type. Backup types include Full, Differential and Transaction Log.
Caution
It is probably abundantly clear by now that maintenance plans are regularly used by DBAs to back up databases, including the transaction logs. A problem may occur during the restore process if you create a transaction log backup with the maintenance plan on a database that has already been configured for log shipping or is already part of another backup set. Ultimately, two sets of transaction log backups are created, one from the maintenance task and the other from the log shipping task or other backup job. Therefore, if a restore is needed, a combination of the transaction log backups is required to conduct the restore; otherwise, it is not possible to restore the database to the point of failure. If transaction log backups already exist based on log shipping, it is a best practice not to create additional transaction log backups with the maintenance plan. This will eliminate confusion and the potential of a botched restore resulting in lost data.
The Maintenance Cleanup Task is used to delete files such as backups and reports that reside on the database after the maintenance plan is completed. There are many options for deleting data using this task:
![]() Delete Files of the Following Type— You can choose to delete database backup files or maintenance plan text reports.
Delete Files of the Following Type— You can choose to delete database backup files or maintenance plan text reports.
![]() File Location— You can also choose to delete a specific file using the File Name box.
File Location— You can also choose to delete a specific file using the File Name box.
![]() Search Folder and Delete Files Based on an Extension— You can delete numerous files with the same extension within a specified folder using this option; for example, all files with the extension
Search Folder and Delete Files Based on an Extension— You can delete numerous files with the same extension within a specified folder using this option; for example, all files with the extension *.txt. You can also select to delete all first-level subfolders within the folder identified with this option.
![]() File Age— Files can be deleted by age. You will need to indicate the age of the files to be deleted. For example, you may choose to delete files older than two years. The unit of time also includes hours, days, weeks, and months.
File Age— Files can be deleted by age. You will need to indicate the age of the files to be deleted. For example, you may choose to delete files older than two years. The unit of time also includes hours, days, weeks, and months.
You can use several methods for creating a maintenance plan. You can use the Database Maintenance Plan Wizard from SQL Server Management Studio (SSMS), or you can manually create a maintenance plan using the tasks associated with the Maintenance Plan Tasks Toolbox. Review the following sections to appreciate how easy and straightforward it is to create a maintenance plan manually and with the wizard.
Maintaining SQL Server databases is a vital activity for DBAs everywhere. A well-maintained system requires the use of a maintenance plan that automates administrative tasks according to each organization’s needs. This section demonstrates using the Maintenance Plan Wizard to create a customized maintenance plan of all system and user databases.
For this example, the steps include the following maintenance tasks: Check Database Integrity, Reorganize Index, Rebuild Index, Update Statistics, and Clean Up History. In a production environment, you should not include both the Reorganize Index and Rebuild Index task in the same plan. These tasks would be considered redundant because one task rebuilds the indexes from scratch and the other reorganizes the indexes. They have only been included for explanation purposes. In production environments it is a best practice to create separate maintenance plans for system and user databases.
Note
How to create database and transaction log backups with the Maintenance Plan Wizard is discussed in Chapter 7 in the section titled “Automating Backups with a Maintenance Plan.”
1. Choose Start, All Programs, Microsoft SQL Server 2008, SQL Server Management Studio.
2. In Object Explorer, first connect to the Database Engine, expand the desired server, expand the Management folder, and then the Maintenance Plans folder.
3. Right-click Maintenance Plans and choose Maintenance Plan Wizard.
4. In the Welcome to the Database Maintenance Plan Wizard page, read the message and then click Next.
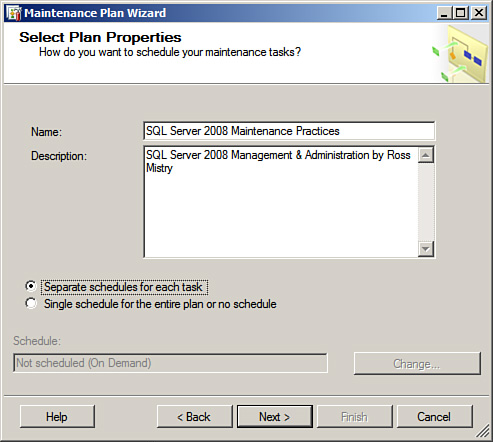
5. In the Select Plan Properties page, enter a name and description for the maintenance plan.
6. Choose either the first option (Separate Schedules for Each Task) or the second option (Single Schedule for the Entire Plan or No Schedule). For this example, a separate schedule will be created for the backup plan. Click Next as shown in Figure 6.1.
Note
Creating separate independent schedules for each subtask within a single maintenance plan is possible when working with SQL Server 2008. This was a new feature introduced with the release of SQL Server 2005 Service Pack 2. A scenario when this can be done includes; a weekly schedule for a full backup and an hourly schedule for a transaction log backup.
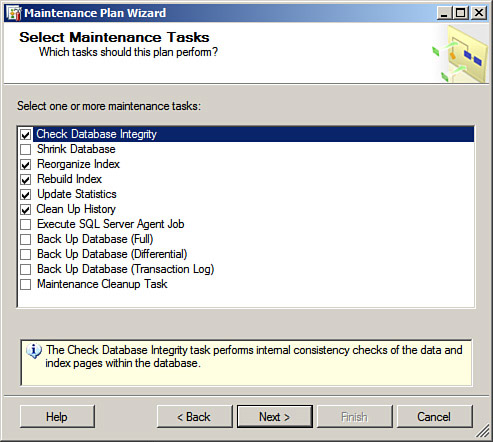
7. On the Select Maintenance Tasks page, as shown in Figure 6.2, place a check next to the following maintenance tasks: Check Database Integrity, Reorganize Index, Rebuild Index, Update Statistics, and Clean Up History, and then click Next.
8. On the Select Maintenance Task Order page, select the order in which the tasks should be executed and then click Next.
Tip
Many maintenance tasks, including reindexing or updating statistics, alter the database when they run. In recognition of this situation, it is a best practice to make the full database backup maintenance task the first order of operation when prioritizing maintenance tasks. This ensures that the database can be rolled back if the maintenance plan tasks that change the database fail.
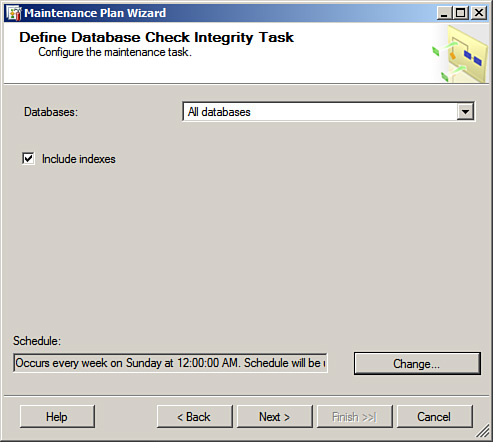
9. The first option in the maintenance plan is checking the database integrity. In the Define Database Check Integrity Task page, select All Databases from the drop-down list. The next item is to accept the defaults. Do this by validating that the Include Indexes Check option is enabled, which will that ensure all index pages and table databases have an integrity check run against them. Proceed to change the schedule by clicking Change, and then set this task so it reoccurs every week starting during nonpeak times, such as Sunday at midnight. Click Next to proceed as in Figure 6.3.
10. The second option selected is Reorganize Index. From the drop-down box on the Define Reorganize Index Task page, select All Databases. Ensure that the option for Compact Large Objects is enabled. Schedule this task to occur once a week on Sunday at 1 a.m. Click Next to proceed as in Figure 6.4.

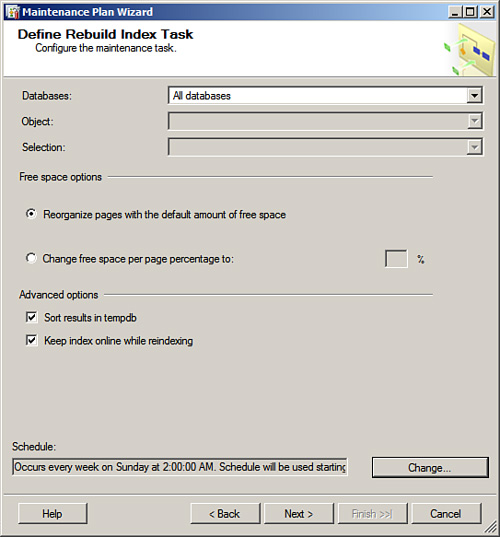
11. The Rebuild Index is the third task selected in the maintenance plan. On the Define Rebuild Index Task page, first select All Databases and then proceed to schedule this task to occur once a week on Sunday at 2 a.m. Verify in the Free Space Options area that the Reorganize Pages with the Default Amount of Free Space option is selected. In the Advanced Options section, enable Sort Results in tempdb and Keep Index Online While Reindexing, as shown in Figure 6.5. Click Next to proceed.
12. For the fourth task, on the Define Update Statistics Task page, select All Databases from the Databases drop-down list. Ensure that the default Update settings, All Existing Statistics and Scan Type, Full Scan, are selected. Set this task to occur weekly on Sundays at 3 a.m. Click Next to proceed as shown in Figure 6.6.
13. In the Define History Cleanup Task page, select the options to delete historical data, such as Backup and Restore History, SQL Server Agent Job History, and Maintenance Plan History. For the Remove Historical Data Older Than option, you can use the default of 4 weeks. This value should be based on the organization’s retention requirements, as shown in Figure 6.7. Schedule the task to reoccur on a weekly basis on Sundays at 5 a.m. and then click Next.
14. In the Select Report Options page, set the option to either write a report to a text file and enter a folder location, or to email the report. To email the report, Database Mail must be enabled, configured, and an Agent Operation with a valid email address must already exist. Click Next to continue.
15. The Complete the Wizard page summarizes the options selected in the Maintenance Plan Wizard. It is possible to drill down on a task to view advanced settings. Review the options selected, and click Finish to close the summary page.
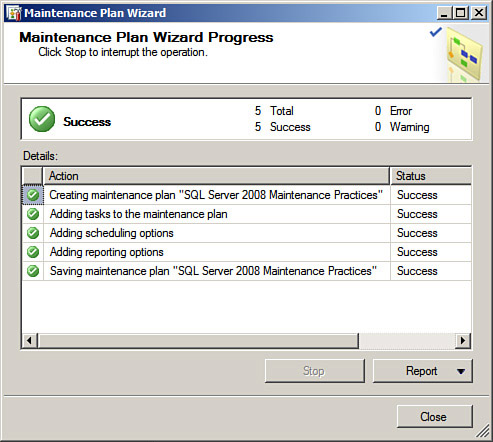
16. On the Maintenance Plan Wizard Progress page, review the creation status as shown in Figure 6.8, and click Close to end the Maintenance Plan Wizard.
Maintenance plans can also be created manually with the aid of the Maintenance Plan (Design tab). You can create a much more flexible maintenance plan with an enhanced workflow using the Maintenance Plan Design tab compared to the Maintenance Plan Wizard, because it is equipped with better tools and superior functionality.
Since the release of Service Pack 2 for SQL Server 2005, maintenance plan history can still be logged to a remote server when you’re creating a manual plan. This is a great feature when managing many SQL Servers within an infrastructure because all data that is logged can be rolled up to a single server for centralized management.
Note
Creating manual maintenance plans with the Maintenance Plan (Design tab) is very similar to the design surface available when creating packages with SSIS. For more information on creating Integration Service projects, see Chapter 3, “Creating Packages and Transferring Data with Integration Services.”
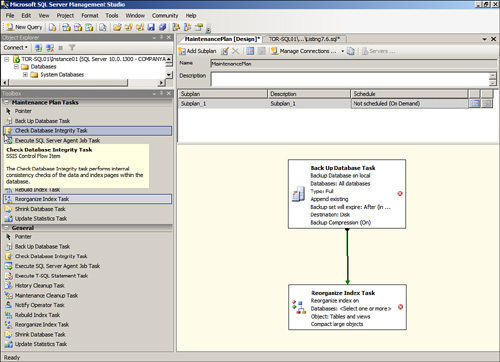
The Maintenance Plan design surface, as shown in Figure 6.9, can be launched by right-clicking the Maintenance Plans folder and selecting New Maintenance Plan.
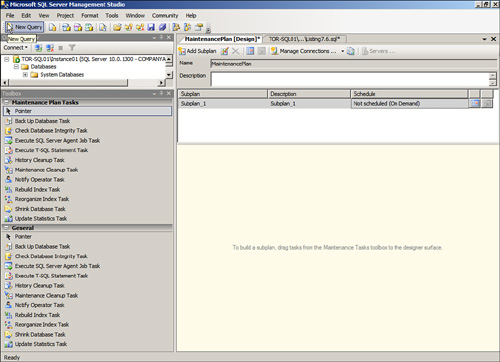
You will find the Maintenance Tasks toolbox in the left pane of the Maintenance Plan (Design tab). You can drag maintenance tasks from this toolbox to the design surface in the center pane. If more than one task is dragged to the designer, it is possible to create a workflow process between the two objects by establishing relationships between the tasks. The workflow process can consist of precedence links. As such, the second task will only execute based on a constraint, which is defined in the first task such as “on success, failure or completion.” For example, you can choose to create a workflow that will first back up the AdventureWorks2008 database and then, on completion, rebuild all the AdventureWorks2008 indexes, as illustrated in Figure 6.10.
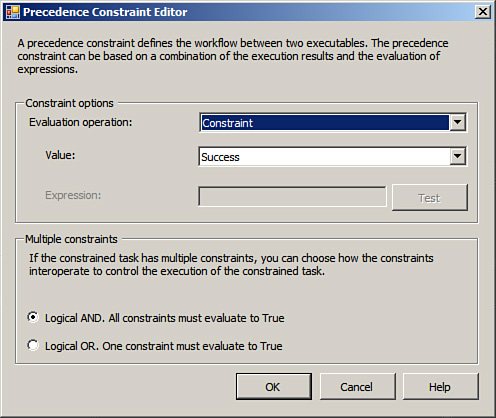
The Precedence Constraint link between two objects can control the workflow if there is a statement to execute the second rebuild index task when the first backup task is successful. In this situation, when a backup task fails, the second task will not fire. As for creating a precedence constraint, you should first highlight both of the maintenance tasks in the designer, right-click, and then choose Add Precedence Constraint. After the Precedence Constraint is created, either double-click the connector arrow or right-click it and select Edit. This will bring up the Precedence Constraint Editor, where you can define the constraint options, as shown in Figure 6.11.
In addition to creating precedence links, you also can execute tasks simultaneously. This is known as task parallelism and is commonly used when executing the same type of maintenance tasks on different SQL Servers. For example, you can execute a full backup of the master database on all the SQL Servers from a central master SQL Server starting on Sunday at 9:00 p.m.
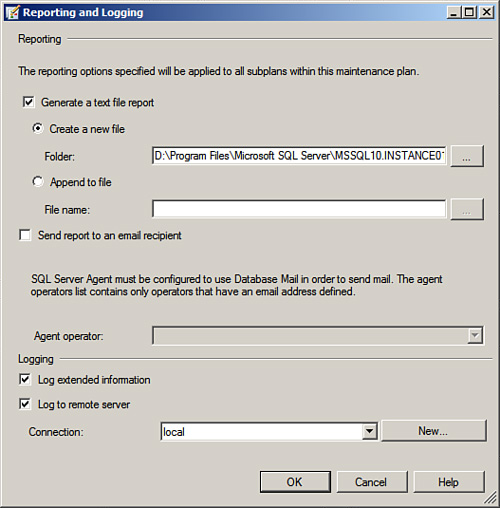
The final item worth mentioning is the reporting capabilities. After the maintenance plan is completed, you can create a report. To do this, locate the Reporting and Logging icon in the Maintenance Plan designer. The Reporting and Logging dialog box as shown in Figure 6.12 displays options such as Generate a Text File Report and Send Reports to an Email Recipient. Additional logging functionality exists, such as logging extended information and log maintenance plan history to a remote server.
All maintenance plans can be viewed under the Maintenance Plan folder in SSMS and stored in SQL Server as jobs. They require the SQL Server Agent to be running to launch the job at the scheduled interval. If the SQL Server Agent is stopped, the jobs will not commence. In addition, all jobs can be edited or changed for ongoing support or maintenance.
Follow these steps to view the maintenance plan jobs in SQL Server Management Studio:
1. Choose Start, All Programs, Microsoft SQL Server 2008, SQL Server Management Studio.
2. In Object Explorer, first connect to the Database Engine, expand the desired server, expand SQL Server Agent, and then expand the jobs folder.
3. Click Jobs to see a list of jobs created by the Maintenance Plan Wizard. The jobs are displayed in the Object Explorer Details tab located in the right pane; otherwise, the jobs are displayed under the Jobs folder in Object Explorer. This is shown in Figure 6.13.

If the SQL Server Agent is not running, a dialog box may appear, stating that the SQL Server Agent on the target server is not running. The SQL Server Agent must be started for SQL Server jobs to commence. Follow these steps to start the SQL Server Agent:
In the past, DBAs encountered numerous challenges when managing more than one maintenance plan within their pre—SQL Server 2005 Service Pack 2 infrastructure. The task of creating maintenance plans in a multiserver environment was exceedingly tedious because a maintenance plan had to be created on each and every server. Moreover, the task of verifying success, failure, and job history was equally difficult and time-consuming; it had to be conducted on each server because a method to centrally manage these plans did not exist. To clearly illustrate just how difficult life could get for DBAs, it is worth mentioning that a typical global organization may have well over 100 SQL Servers within its infrastructure; therefore, imagine the heartache and lack of operational efficiency that came along with managing maintenance plans.
Today, these nuisances continue to be alleviated. SQL Server 2008 offers support for multiserver maintenance plans. Specifically, you can now create maintenance plans for each of your SQL servers from a single central master server. This provides a significant difference in operational efficiency and administration.
To take full advantage of this new feature in SQL Server 2008, a multiserver environment containing one master server and one or more target servers must be constructed before a multiserver maintenance plan can be created. It should be mentioned that target servers can be used only to view the maintenance plans. As a result, multiserver maintenance plans must be created and maintained on the master server so that you can provide regular maintenance.
Note
To create or manage multiserver maintenance plans, you must be a member of the sysadmin fixed server role on each of the SQL Servers.
Multiserver maintenance plans can be created with either the Maintenance Plan Wizard or by manually using the Maintenance Plan (Design tab).
With each new release, SQL Server has become more self-maintaining. However, even with self-maintenance and automated maintenance plans, DBAs must conduct additional maintenance. Some maintenance procedures require daily attention, whereas others may require only yearly checkups. The maintenance processes and procedures that an organization follows depend strictly on the organization’s individual environment.
The categories described in the following sections and their corresponding procedures are best practices for organizations of all sizes and with varying IT infrastructures. The following sections will help organizations establish sound maintenance practices to help them ensure the health of their SQL Server Database Engine. The suggested maintenance tasks that follow are based on daily, weekly, monthly, and quarterly schedules.
Maintenance tasks requiring close and regular attention are commonly checked each day. DBAs who take on these tasks daily ensure system reliability, availability, performance, and security. Some of the daily routine maintenance tasks include the following:
![]() Check that all required SQL Server services are running.
Check that all required SQL Server services are running.
![]() Check Daily Backup logs for success, warnings, or failures.
Check Daily Backup logs for success, warnings, or failures.
![]() Check the Windows Event logs for errors.
Check the Windows Event logs for errors.
![]() Check the SQL Server logs for security concerns such as invalid logins.
Check the SQL Server logs for security concerns such as invalid logins.
![]() Conduct full or differential backups.
Conduct full or differential backups.
![]() Conduct Transaction Log backups on databases configured with the Full or Bulk-Logged recovery model.
Conduct Transaction Log backups on databases configured with the Full or Bulk-Logged recovery model.
![]() Verify that SQL Server jobs did not fail.
Verify that SQL Server jobs did not fail.
![]() Check that adequate disk space exists for all database files and transaction logs.
Check that adequate disk space exists for all database files and transaction logs.
![]() At least monitor processor, memory, or disk counters for bottlenecks.
At least monitor processor, memory, or disk counters for bottlenecks.
Maintenance procedures that require slightly less attention than daily checking are categorized in a weekly routine. The following list details these weekly tasks:
![]() Conduct full or differential backups.
Conduct full or differential backups.
![]() Review Maintenance Plan reports.
Review Maintenance Plan reports.
![]() Check database integrity.
Check database integrity.
![]() Shrink the database if needed.
Shrink the database if needed.
![]() Compact clustered and nonclustered tables and views by reorganizing indexes.
Compact clustered and nonclustered tables and views by reorganizing indexes.
![]() Reorganize data on the data and index pages by rebuilding indexes.
Reorganize data on the data and index pages by rebuilding indexes.
![]() Update statistics on all user and system tables.
Update statistics on all user and system tables.
![]() Delete historical data created by backups, restores, SQL Server agent, and maintenance plan operations.
Delete historical data created by backups, restores, SQL Server agent, and maintenance plan operations.
![]() Manually grow database or transaction log files if needed. Adjust automatic growth values if needed.
Manually grow database or transaction log files if needed. Adjust automatic growth values if needed.
![]() Remove files left over from executing maintenance plans.
Remove files left over from executing maintenance plans.
Some maintenance task are managed more infrequently, such as on a monthly or quarterly basis. Do not interpret these tasks as unimportant because they don’t require daily maintenance. These tasks also require maintenance to ensure the health of their environment, but on a less regular basis because they are more self-sufficient and self-sustaining. Although the following tasks may appear mundane or simple, they should not be overlooked during maintenance.
![]() Conduct a restore of the backups in a test environment.
Conduct a restore of the backups in a test environment.
![]() Archive historical data if needed.
Archive historical data if needed.
![]() Analyze collected performance statistics and compare them to baselines.
Analyze collected performance statistics and compare them to baselines.
![]() Review and update maintenance documentation.
Review and update maintenance documentation.
![]() Review and install SQL Server patches and service packs (if available).
Review and install SQL Server patches and service packs (if available).
![]() Test failover if running a cluster, database mirroring, or log shipping.
Test failover if running a cluster, database mirroring, or log shipping.
![]() Validate that the backup and restore process adheres to the Service Level Agreement defined.
Validate that the backup and restore process adheres to the Service Level Agreement defined.
![]() Update SQL Server build guides.
Update SQL Server build guides.
![]() Update SQL Server disaster recovery documentation.
Update SQL Server disaster recovery documentation.
![]() Update maintenance plan checklists.
Update maintenance plan checklists.
![]() Change Administrator passwords.
Change Administrator passwords.
![]() Change SQL Server service account passwords.
Change SQL Server service account passwords.
The maintenance plan feature alone should be one of the key selling points for SQL Server 2008. The ability to use an uncomplicated wizard to automate administrative tasks that SQL Server will perform against a single database or multiple databases has decreased the amount of manual work DBAs must do and ensures that tasks do not get overlooked. To take advantage of running tasks concurrently, or using precedence constraints to run tasks sequentially, you should create plans manually. This is the best way to develop maintenance plans for those looking for a lot of flexibility on advanced workflow.
SQL Server 2008 continues to allow organizations to extend their use of maintenance plans. The following are just some of the features SQL Server 2008 has brought to the table. SQL Server 2008 offers support for multiserver maintenance plans, SQL Server 2008 does not require SSIS to be installed, and supports the potential for remote logging.
In the end, the most important thing to take away from this chapter is the importance of having a maintenance plan in place early and ensuring that maintenance is scheduled accordingly to preserve the health of each database.
Some important best practices from the chapter include the following:
![]() DBAs should fully understand all maintenance activities required and implemented within the SQL Server environment.
DBAs should fully understand all maintenance activities required and implemented within the SQL Server environment.
![]() Use the Maintenance Plan Wizard to automate and schedule routine maintenance operations.
Use the Maintenance Plan Wizard to automate and schedule routine maintenance operations.
![]() When creating maintenance plans with the wizard, leverage the features included in SQL Server 2008 and create independent schedules for subtasks.
When creating maintenance plans with the wizard, leverage the features included in SQL Server 2008 and create independent schedules for subtasks.
![]() Maintenance tasks should be scripted, automated, and fully documented.
Maintenance tasks should be scripted, automated, and fully documented.
![]() Maintenance tasks should be conducted during nonpeak times or after hours, such as on weekends and after midnight.
Maintenance tasks should be conducted during nonpeak times or after hours, such as on weekends and after midnight.
![]() When you configure the order of the maintenance tasks, backups should be executed first, and then other tasks that change the database.
When you configure the order of the maintenance tasks, backups should be executed first, and then other tasks that change the database.
![]() Do not include the Shrink Task when creating Maintenance Plans. Manually shrink the database if needed during nonpeak hours.
Do not include the Shrink Task when creating Maintenance Plans. Manually shrink the database if needed during nonpeak hours.
![]() Maintenance tasks should be grouped into daily, weekly, and monthly schedules.
Maintenance tasks should be grouped into daily, weekly, and monthly schedules.
![]() Schedule and conduct routine maintenance tasks on a daily, weekly, and monthly basis.
Schedule and conduct routine maintenance tasks on a daily, weekly, and monthly basis.
![]() For a large enterprise environment running many SQL Servers, take advantage of subplans and the multiserver maintenance plan.
For a large enterprise environment running many SQL Servers, take advantage of subplans and the multiserver maintenance plan.