
Chapter 7 Backing Up and Restoring the SQL Server 2008 Database Engine
One of the most important tasks of a DBA is to ensure that the new SQL Server infrastructure is being correctly backed up. Designing and implementing a proper backup strategy lends assurance that a successful recovery process can be initiated if an organization experiences problems with its databases, systems, servers, or sites.
This chapter covers the areas database administrators and organizations need to consider when conducting SQL Server backups and recoveries of databases associated with SQL Server 2008 Database Engine. Specifically, this chapter highlights how to back up and restore a database by using SQL Server Management Studio, maintenance plans, and Transact-SQL.
With the tremendous amounts of data explosion occurring in our digital society, the size of databases used in organizations has increased exponentially over the past few years. As database sizes increase, so does the challenge of managing backups, while the cost of storage and storage management increases as well. Fortunately, Microsoft addresses these concerns by introducing backup compression in SQL Server 2008.
Another new and highly anticipated feature introduced with SQL Server 2008 is backup encryption. When a database is encrypted with Transparent Data Encryption (TDE), all backups associated with the encrypted database are also encrypted. The certificate used to encrypt the database must be present in order to restore the database, or the data restore will fail and the data will be left in a decrypted, unusable state. Therefore, ensure that the certificates associated with TDE and the encrypted databases are stored safely. For more information on Transparent Data Encryption. reference Chapter 11.
Backup compression allows a DBA to compress database backups associated with the Database Engine, thus reducing the cost linked to backup storage. Backup compression is disabled by default, and must be enabled at the server level in order to leverage this new rich feature. This can be achieved by enabling the Compress Backup option in the Database Settings page associated with the Server properties. Server properties can be accessed by right-clicking a desired SQL Server and selecting properties in SQL Server Management Studio. Alternatively, the following TSQL syntax can be used to enable backup compression at the server level:
USE master;
GO
EXEC sp_configure 'backup compression default', '1';
RECONFIGURE WITH OVERRIDE;
There may be situations when backup compression at the server level is enabled; however, the compression feature is not required when backing up a specific database. Therefore, a DBA can override the backup compression default server setting when conducting a database backup on a specific database. The backup compression override option is available when creating backups with SQL Server Management Studio, Transact-SQL, Maintenance Plan Wizard, and the SQL Server 2008 Integration Services Back Up Database Task.
Note
Backup compression is a feature included only in the Enterprise and Developer editions of SQL Server 2008. It is straight forward to implement in existing TSQL scripts as you can simply add COMPRESSION or NO COMPRESSION in the WITH options.
Finally, database compression has great results. Obviously, compression results will vary and are indicative of what kind of data is stored in the database. However, compression ratios of 4 to 1 have been achieved. Unfortunately, with any compression technology, there is always a performance trade-off. Backup compression does not increase disk I/O as compressed data is smaller; however, CPU usage typically increases. It is beneficial to test backup compression before using it in production, so that as a DBA, you are fully aware of the performance impact on the SQL Server system and associated SQL workload.
Note
It is recommended to create a policy with Policy Based Management that will govern the amount of CPU that can be consumed when conducting compressed backups. This will ensure that the compressed backup do not place excessive CPU pressure on the system causing performance degradation. For more information on Resource Governor, refer to Chapter 16 “Managing Workloads and Consumption with Resource Governor.”
Understanding how to back up the SQL Server 2008 Database Engine remains a big challenge for many organizations today, even for those organizations that make an effort to execute a backup strategy. Unfortunately, in many situations, it takes a disaster for them to realize that their backup strategy is inappropriate, or that specific SQL Server elements such as the transaction log or recovery model were overlooked. This awakening is far too late for those organizations, however, because they may have already experienced a horrific data loss.
Data loss is unacceptable in today’s competitive economy. Losing mission-critical data residing in SQL Server can be particularly harmful to an organization’s success because that data provides key information that ultimately gives an organization its competitive advantage. Organizations suffering catastrophic data loss are more susceptible to going out of business. Moreover, regulatory requirements such as compliance with the Sarbanes-Oxley Act or PCI place tremendous pressure on organizations to be more trustworthy and accountable for their data, especially financial information.
With organizations beginning to understand the value of their data, more and more organizations are also beginning to recognize that the backup and recovery operations of the SQL Server 2008 Database Engine are some of the most important SQL Server administrative tasks of database administrators. When you understand all the intricate details that make up SQL Server and the backup options available, you can better develop a database backup and restoration strategy that minimizes or eliminates data loss and corruption in your organization.
Say you’re working with a full installation of SQL Server, which includes all its components. With the ability to identify all these parts and understand how they are associated, you can understand that your focus should be not only on backing up databases, but also on the other SQL Server components and items installed such as Analysis Services, Reporting Services, Full-Text Catalogs, and Internet Information Services. You should take all of these components into account to successfully back up and restore a SQL Server environment.
Note
To successfully backup and restore a complete SQL Server environment involves backing up not only databases, but all other SQL Server components and items installed. However, this chapter focuses strictly on backup and recovery tasks associated with the SQL Server 2008 Database Engine.
The objective of all SQL Server 2008 backups is to restore a database to a known state. The most common need for backups is to recover data from accidental deletions due to human error. Other factors that might call for a recovery of data may include application errors, hardware failure, or the need to recover data to a prior state.
When organizations understand the objective and necessity for backups, they must attend to the business scope of their SQL Server backup and recovery plan. To help identify the scope, an organization needs to ask some of the following questions:
![]() Has a Service Level Agreement (SLA) already been defined?
Has a Service Level Agreement (SLA) already been defined?
![]() Is the data in each database considered to be mission-critical?
Is the data in each database considered to be mission-critical?
![]() Is there a clear statement of what should and shouldn’t be backed up?
Is there a clear statement of what should and shouldn’t be backed up?
![]() What is the frequency of the backups?
What is the frequency of the backups?
![]() What standards are acceptable for offsite storage and retrieval?
What standards are acceptable for offsite storage and retrieval?
![]() What is the escalation path for failed backups?
What is the escalation path for failed backups?
![]() What are the decision criteria for overrun jobs?
What are the decision criteria for overrun jobs?
![]() Will the backups be password protected?
Will the backups be password protected?
![]() How long will data be retained?
How long will data be retained?
![]() How much data can the organization afford to lose at any given moment?
How much data can the organization afford to lose at any given moment?
![]() What is the availability of resources governing the backup and restore process?
What is the availability of resources governing the backup and restore process?
![]() What is the financial cost of downtime?
What is the financial cost of downtime?
![]() Are there any regulatory requirements dictating how backups and restores should be conducted and managed?
Are there any regulatory requirements dictating how backups and restores should be conducted and managed?
After some of these questions are answered, the high-level scope of the desired backup starts to take shape. The organization then needs to address the technical aspects of the backup and recovery plan. Some of the technical questions may include the following:
![]() What SQL Server databases should be included in the backup and recovery plan?
What SQL Server databases should be included in the backup and recovery plan?
![]() Should I back up the system databases?
Should I back up the system databases?
![]() Which database recovery model should be used?
Which database recovery model should be used?
![]() How often should the backups occur?
How often should the backups occur?
![]() What type of media should be used?
What type of media should be used?
![]() Should I leverage the new SQL Server 2008 Backup Compression feature? If so, do I have the Enterprise Edition?
Should I leverage the new SQL Server 2008 Backup Compression feature? If so, do I have the Enterprise Edition?
![]() Which utilities such as Transact-SQL (TSQL), SQL Server Management Studio (SSMS), or third-party tools should be leveraged when creating backups?
Which utilities such as Transact-SQL (TSQL), SQL Server Management Studio (SSMS), or third-party tools should be leveraged when creating backups?
The Database Engine is the heart of SQL Server. It is responsible for storing data, databases, stored procedures, security, and many more functions such as full-text search, Database Mail, replication, and high availability. Because the Database Engine is one of the most vital components of the SQL Server database as a result of the crucial data it holds, it is essential for organizations to create a backup and recovery plan for the Database Engine.
Executing a successful database backup and restore plan begins with understanding the Database Engine storage architecture. This involves having intimate knowledge of how SQL Server leverages database files, filegroups, transaction logs, and the newly introduced file type, FILESTREAM.
SQL Server 2008 databases have three kinds of file types associated with them: database files, transaction log files, and FILESTREAM files. A SQL Server database is always made up of at least one data file and one transaction log file and FILESTREAM data is optional. The following sections elaborate on each of these files.
The default database files reside within a primary filegroup. A filegroup is a logical structure for grouping data files and managing them as a logical unit. The primary filegroup contains the primary data file and any secondary data files not stored in another filegroup. If you want to increase performance and the speed of the backup and recovery, it is recommended that you create additional files or filegroups and split database objects across these several filegroups to establish parallel processing.
The default extension for the database file within the primary filegroup is .mdf. Likewise, filegroups inherit the default extension .ndf. It is possible to create up to 32,766 user-defined filegroups.
Every relational database has a transaction log to record database activity. Transaction logs are responsible for recording every modification made to the database. As such, these logs are a critical component of the database, especially during recovery because the log is counted on to restore the database to a point in time or the point of failure. The default extension for a transaction log is .ldf. As with database files, additional transaction log files can be added to increase performance, backups, and restore times.
Until SQL Server 2008, organizations have been creatively inventing their own mechanisms to store unstructured data. Now SQL Server 2008 introduces a new data type that can assist organizations by allowing them to store unstructured data such as bitmap images, music files, text files, videos, audio files in a single data type which is more secure and manageable. If FILESTREAM data is being leveraged, the DBAs must also take these files into consideration when backing up the database.
Tip
It is a best practice to place the database, transaction logs and backups on separate disks. This will prevent catastrophic failure in the event that a single disk fails. In addition, this also increases performance and allows a DBA to restore a database to the point of failure.
When you’re confident that you understand the database and transaction log files within the Database Engine, you should turn your attention to the various Database Engine recovery models in SQL Server. The level of understanding you have of each of these models significantly affects your database backup and restore strategy.
Each model handles recovery differently. Specifically, each model differs in how it manages logging, which governs whether an organization’s database can be recovered to the point of failure. The three recovery models associated with a database in the Database Engine are Full, Simple, and Bulk-Logged:
![]() Full— This model captures and logs all transactions, making it possible to restore a database to a given point in time or up to the minute. Based on this model, you must conduct maintenance on the transaction log to prevent logs from growing too large and disks from becoming full. When you perform backups, space is made available again and can be used until the next planned backup. Organizations may notice that maintaining a transaction log slightly degrades SQL Server performance because all transactions to the database are logged. Organizations that insist on preserving critical data often overlook this issue because they realize that this model offers them the highest level of recovery capabilities.
Full— This model captures and logs all transactions, making it possible to restore a database to a given point in time or up to the minute. Based on this model, you must conduct maintenance on the transaction log to prevent logs from growing too large and disks from becoming full. When you perform backups, space is made available again and can be used until the next planned backup. Organizations may notice that maintaining a transaction log slightly degrades SQL Server performance because all transactions to the database are logged. Organizations that insist on preserving critical data often overlook this issue because they realize that this model offers them the highest level of recovery capabilities.
![]() Simple— This model provides organizations with the least number of options for recovering data. It truncates the transaction log after each backup. This means a database can be recovered only up to the last successful full or differential database backup. This recovery model also requires the least amount of administration because transaction log backups are not permitted. In addition, data entered into the database after a successful full or differential database backup is unrecoverable. Organizations that store data they do not deem to be mission-critical may choose to use this model.
Simple— This model provides organizations with the least number of options for recovering data. It truncates the transaction log after each backup. This means a database can be recovered only up to the last successful full or differential database backup. This recovery model also requires the least amount of administration because transaction log backups are not permitted. In addition, data entered into the database after a successful full or differential database backup is unrecoverable. Organizations that store data they do not deem to be mission-critical may choose to use this model.
![]() Bulk-Logged— This model maintains a transaction log and is similar to the Full recovery model. The main difference is that transaction logging is minimal during bulk operations to maximize database performance and reduce the log size when large amounts of data are inserted into the database. Bulk import operations such as
Bulk-Logged— This model maintains a transaction log and is similar to the Full recovery model. The main difference is that transaction logging is minimal during bulk operations to maximize database performance and reduce the log size when large amounts of data are inserted into the database. Bulk import operations such as BCP, BULK INSERT, SELECT INTO, CREATE INDEX, ALTER INDEX REBUILD, and DROP INDEX are minimally logged.
Because the Bulk-Logged recovery model provides only minimal logging of bulk operations, you cannot restore the database to the point of failure if a disaster occurs during a bulk-logged operation. In most situations, an organization has to restore the database, including the latest transaction log, and rerun the bulk-logged operation.
This model is typically used if organizations need to run large bulk operations that degrade system performance and do not require point-in-time recovery.
Note
When a new database is created, it inherits the recovery settings based on the model database. The default recovery model is set to Full.
Now that you’re familiar with the three recovery models, you need to determine which model best suits your organization’s needs. The next section is designed to help you choose the appropriate model.
Selecting the appropriate recovery model affects an organization’s ability to recover, manage, and maintain data.
For enterprise production systems, the Full recovery model is the best model for preventing critical data loss and restoring data to a specific point in time. As long as the transaction log is available, it is even possible to get up-to-the-minute recovery and point-in-time restore if the tail-end of the transaction log is backed up and restored. The trade-off for the Full recovery model is its impact on other operations.
Organizations leverage the Simple recovery model if the data backed up is not critical, data is static and does not change often, or loss is not a concern. In this situation, the organization loses all transactions since the last full or last differential backup. This model is typical for test environments or production databases that are not mission-critical.
Finally, organizations that typically select the Bulk-Logged recovery model have critical data, but do not want to degrade system performance by logging large amounts of data, or they conduct these bulk operations after hours so as not to interfere with normal transaction processing. In addition, such organizations do not need point-in-time or up-to-the-minute restores.
Note
You can switch the recovery model of a production database and switch it back. This does not break the continuity of the log; however, there could be negative ramifications to the restore process. For example, a production database can use the Full recovery model, and immediately before a large data load, the recovery model can be changed to Bulk-Logged to minimize logging and increase performance. The only caveat is that your organization must understand that it lost the potential for point-in-time and up-to-the-minute restores during the switch.
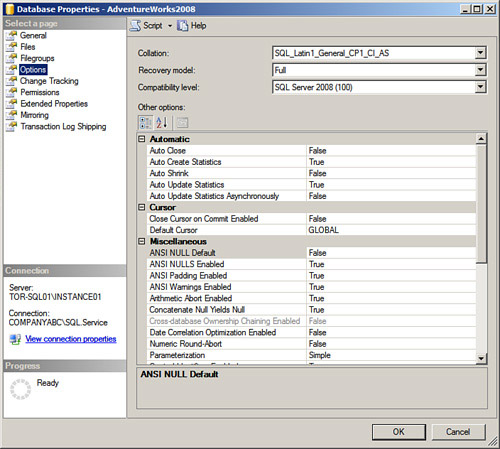
To set the recovery model on a SQL Server 2008 database using SSMS, perform the following steps:
1. Choose Start, All Programs, Microsoft SQL Server 2008, SQL Server Management Studio.
2. In Object Explorer, first connect to the Database Engine, expand the desired server, and then expand the database folder.
3. Select the desired SQL Server database, right-click on the database, and select Properties.
4. In the Database Properties dialog box, select the Options tab.
5. In the Recovery Model field, select either Full, Bulk-Logged, or Simple from the drop-down list, as shown in Figure 7.1, and click OK.
Not only can you change the recovery model of a database with SSMS, but you can also make changes to the database recovery model using TSQL commands such as ALTER DATABASE. You can use the following TSQL script to change the recovery model for the AdventureWorks2008 database from Simple to Full:
—Switching the Database Recovery model
Use Master
ALTER DATABASE AdventureWorks2008 SET RECOVERY FULL
GO
Now that you’ve selected the appropriate recovery model, you should turn your attention to fully understanding the different backup methods available. This is the third step in successfully creating a backup and recovery solution for the Database Engine. The backup utility included in SQL Server offers several options for backing up databases. The following sections identify the following SQL Server backup methods:
![]() Full backups
Full backups
![]() Differential backups
Differential backups
![]() Transaction log backups
Transaction log backups
![]() File and filegroup backups
File and filegroup backups
![]() Partial backups
Partial backups
![]() Differential partial backups
Differential partial backups
![]() Copy-only backups
Copy-only backups
![]() Mirrored backups
Mirrored backups
The full backup is also commonly referred to as full database backup. Its main function is to back up the entire database as well as transaction logs, filegroups, and files. As a result, a full backup can be used to restore the entire database to its original state when the backup was completed.
Equally important, many people refer to the full database backup as the baseline for all other backups. The reason is that the full database backup must be restored before all other backups can be created or restored, such as differential backups, partial backups, and transaction logs.
The following script illustrates how to conduct a full database backup for the AdventureWorks2008 database.
Note
For this example and others in this chapter, the backup set is located on the X: drive on a proprietary backup file called SQLBackup. Please change the syntax in these examples to reflect the backup location and file of your choice based on your environment.
—SQL SERVER 2008 MANAGEMENT & ADMINISTRATION BY ROSS MISTRY
—CHAPTER 7 BACKING UP AND RESTORING![]() THE SQL SERVER 2008 DATABASE ENGINE
THE SQL SERVER 2008 DATABASE ENGINE
—FULL BACKUP EXAMPLE
USE AdventureWorks2008
BACKUP DATABASE [AdventureWorks2008]
TO DISK = N'X:SQLBackup.bak'
WITH DESCRIPTION = N'SQL Server 2008 Management &![]() Administration', NOFORMAT, NOINIT, NAME = N'AdventureWorks2008-
Administration', NOFORMAT, NOINIT, NAME = N'AdventureWorks2008-
FullDatabaseBackup', SKIP, NOREWIND, NOUNLOAD,
COMPRESSION, STATS = 10, CHECKSUM, CONTINUE_AFTER_ERROR
GO
declare @backupSetId as int
select @backupSetId = position from msdb..backupset where
database_name=N'AdventureWorks2008'
and backup_set_id=(select max(backup_set_id)
from msdb..backupset where database_name=N'AdventureWorks2008' )
if @backupSetId is null begin raiserror
(N'Verify failed. Backup information for database![]() ''AdventureWorks2008'' not found.', 16, 1) end
''AdventureWorks2008'' not found.', 16, 1) end
RESTORE VERIFYONLY FROM DISK = N'X:SQLBackup.bak'
WITH FILE = @backupSetId, NOUNLOAD, NOREWIND
GO
This example conducts a full database backup on the AdventureWorks2008 database. The additional options consist of Backup Set Will Not Expire, Backing Up to Disk, Append to the Existing Backup Set, Verify Backups When Finished, Perform Checksum Before Writing to Media, Continue on Error and Compress Backup.
Unlike a full database backup, a differential database backup backs up only data that changed after the last successful full database backup was conducted, resulting in a smaller backup.
The following script illustrates how to conduct a differential database backup for the AdventureWorks2008 database.
—SQL SERVER 2008 MANAGEMENT & ADMINISTRATION BY ROSS MISTRY
—CHAPTER 7 RESTORING THE SQL SERVER 2008 DATABASE ENGINE
—DIFFERENTIAL BACKUP EXAMPLE
USE AdventureWorks2008
BACKUP DATABASE [AdventureWorks2008] TO DISK =
N'X:SQLBackup.bak' WITH DIFFERENTIAL , DESCRIPTION = N'SQL
Server 2008 Management & Administration', NOFORMAT, NOINIT, NAME
= N'AdventureWorks2008-DifferentialDatabaseBackup', SKIP,
NOREWIND, NOUNLOAD, COMPRESSION, STATS = 10, CHECKSUM,
CONTINUE_AFTER_ERROR
GO
declare @backupSetId as int
select @backupSetId = position from msdb..backupset where
database_name=N'AdventureWorks2008' and backup_set_id=(select
max(backup_set_id) from msdb..backupset where database_name=
N'AdventureWorks2008' )
if @backupSetId is null begin raiserror(N'Verify failed. Backup
information for database ''AdventureWorks2008'' not found.', 16,
1) end
RESTORE VERIFYONLY FROM DISK = N'X:SQLBackup.bak' WITH FILE =
@backupSetId, NOUNLOAD, NOREWIND
GO
This differential example creates a copy of all the pages in the database modified after the last successful full or differential AdventureWorks2008 database backup. The additional options consist of Backup Set Will Not Expire, Backing Up to Disk, Append to the Existing Backup Set, Verify Backups When Finished, Perform Checksum Before Writing to Media, Continue on Error, and Compress Backup.
Transaction log backups are useful only for those databases using a Full or Bulk-Logged recovery model. The transaction log backs up all data as of the last full backup or transaction log backup. As with a differential backup, it is worth remembering that a transaction log backup can be executed only after a full backup has been performed.
Additional options for backing up the transaction log include
![]() Truncate the Transaction Log— If log records were never truncated, they would constantly grow, eventually filling up the hard disk and causing SQL Server to crash. This option is the default transaction log behavior and truncates the inactive portion of the log.
Truncate the Transaction Log— If log records were never truncated, they would constantly grow, eventually filling up the hard disk and causing SQL Server to crash. This option is the default transaction log behavior and truncates the inactive portion of the log.
![]() Back Up the Tail of the Log— This option is typically used as the first step when restoring SQL Server to a point in failure or point in time. Backing up the tail portion of the log captures the active log that has not been captured by a previous backup before a disaster occurs. This option allows you to recover the database and replay any transactions that have not been committed to the database or included in the backup sets already taken.
Back Up the Tail of the Log— This option is typically used as the first step when restoring SQL Server to a point in failure or point in time. Backing up the tail portion of the log captures the active log that has not been captured by a previous backup before a disaster occurs. This option allows you to recover the database and replay any transactions that have not been committed to the database or included in the backup sets already taken.
The following script illustrates how to create a transaction log backup for the AdventureWorks2008 database.
—SQL SERVER 2008 MANAGEMENT & ADMINISTRATION BY ROSS MISTRY
—CHAPTER 7 BACKING UP AND RESTORING![]() THE SQL SERVER 2008 DATABASE ENGINE
THE SQL SERVER 2008 DATABASE ENGINE
—TRANSACTION LOG BACKUP EXAMPLE
USE AdventureWorks2008
BACKUP LOG [AdventureWorks2008] TO
DISK = N'X:SQLBackup.bak'
WITH DESCRIPTION = N'SQL Server 2008
Management & Administration',
NOFORMAT, NOINIT,
NAME = N'AdventureWorks2008-TransactionLogBackup',
SKIP, NOREWIND, NOUNLOAD, COMPRESSION,
STATS = 10, CHECKSUM, CONTINUE_AFTER_ERROR
GO
declare @backupSetId as int
select @backupSetId = position
from msdb..backupset
where database_name=N'AdventureWorks2008'
and backup_set_id=(select max(backup_set_id)
from msdb..backupset
where database_name=N'AdventureWorks2008' )
if @backupSetId is null begin raiserror(N'Verify failed.
Backup information for database![]() ''AdventureWorks2008'' not found.', 16, 1) end
''AdventureWorks2008'' not found.', 16, 1) end
RESTORE VERIFYONLY FROM
DISK = N'X:SQLBackup.bak'
WITH FILE = @backupSetId,
NOUNLOAD, NOREWIND
GO
This example conducts a transaction log database backup on the AdventureWorks2008 database. The additional options consist of Backing Up to Disk, Append to the Existing Backup Set, Verify Backups When Finished, and Perform Checksum Before Writing to Media, Continue on Error, and Compress Backup. The transaction log behavior truncates the transaction log when complete.
The following script illustrates how to create a transaction log (tail-log) backup for the AdventureWorks2008 database.
Note
It is a best practice to use the master database when performing the tail-log transaction log backup with TSQL.
—SQL SERVER 2008 MANAGEMENT & ADMINISTRATION BY ROSS MISTRY
—CHAPTER 7 BACKING UP AND RESTORING![]() THE SQL SERVER 2008 DATABASE ENGINE
THE SQL SERVER 2008 DATABASE ENGINE
—TRANSACTION LOG - TAIL LOG BACKUP EXAMPLE
USE Master
BACKUP LOG [AdventureWorks2008]
TO DISK = N'X:SQLBackup.bak'
WITH NO_TRUNCATE ,
DESCRIPTION = N'SQL Server 2008 Management &
Administration', NOFORMAT, NOINIT,
NAME = N'AdventureWorks2008-TransactionLogBackup',
SKIP, NOREWIND, NOUNLOAD, NORECOVERY ,
COMPRESSION, STATS = 10,
CHECKSUM, CONTINUE_AFTER_ERROR
GO
declare @backupSetId as int
select @backupSetId = position
from msdb..backupset
where database_name=N'AdventureWorks2008'
and backup_set_id=(select max(backup_set_id)
from msdb..backupset
where database_name=N'AdventureWorks2008' )
if @backupSetId is null begin raiserror
(N'Verify failed. Backup information for database
''AdventureWorks2008'' not found.', 16, 1) end
RESTORE VERIFYONLY FROM DISK = N'X:SQLBackup.bak'
WITH FILE = @backupSetId, NOUNLOAD, NOREWIND
GO
This example conducts a backup of the tail of the transaction log on the AdventureWorks2008 database and leaves the database in the restoring state. The additional options consist of Back Up to Disk, Append to the Existing Backup Set, Verify Backups When Finished, Perform Checksum Before Writing to Media, Continue on Error and Compress Backup. The transaction log behavior truncates the transaction log when complete.
Instead of conducting a full backup, organizations can back up individual files and filegroups. This backup method is often favorable to organizations that just can’t consider backing up or restoring their databases because of size and the time required for the task. When you use file and filegroup backups, backing up the transaction log is also necessary because the database must use the Full or Bulk-Logged recovery model.
The basic syntax for creating a file or filegroup backup is as follows:
BACKUP DATABASE { database_name ¦ @database_name_var }
<file_or_filegroup> [ ,...n ]
TO <backup_device> [ ,...n ]
[ <MIRROR TO clause> ] [ next-mirror-to ]
[ WITH { DIFFERENTIAL ¦ <general_WITH_options> [ ,...n ] } ]
[;]
Partial backups were introduced as a new feature in SQL Server 2005. Primary filegroups and read-write filegroups are always backed up when a partial backup is executed. Any filegroups marked as read-only are skipped to save time and space. Partial backups should not be confused with differential backups. Unlike differential backups, partial backups are best used when read-only filegroups exist and you have chosen not to back up this data because it is static. If you choose to back up a read-only filegroup, this choice must be identified in the BACKUP command. It is worth mentioning that a partial backup can only be created with TSQL; this functionality is not included in SSMS.
The basic syntax for creating partial and differential backups is as follows:
—Creating a Partial Backup
BACKUP DATABASE { database_name ¦ @database_name_var }
READ_WRITE_FILEGROUPS [ , <read_only_filegroup> [ ,...n ] ]
TO <backup_device> [ ,...n ]
[ <MIRROR TO clause> ] [ next-mirror-to ]
[ WITH { DIFFERENTIAL ¦ <general_WITH_options> [ ,...n ] } ]
[;]
A differential partial backup has many of the features of a differential backup and a partial backup. Only data that has been modified in the primary filegroups and read-write filegroups and not marked as read-only is backed up since the last partial backup. As with partial backups, this functionality is not included in SSMS and can be created only with TSQL.
The capability to make copy-only backups was introduced in SQL Server 2005 and continues to exist with SQL Server 2008. This backup type provides an entire independent backup of a database without affecting the sequence of the backup and restore process.
A common scenario for creating a copy-only backup is when you need to refresh a staging database from production. You can simply create a copy-only backup and restore it to the staging environment without affecting the sequence of the conventional backup or restore process. SSMS now supports copy-only backups. It is possible, however, to create copy-only backups on both the database files and logs.
The basic syntax for creating a copy-only backup for a database file is as follows:
The basic syntax for creating a copy-only backup for a transaction log file is as follows:
BACKUP LOG database_name TO <backup_device>
.. WITH COPY_ONLY ...
Mirrored backups, also called mirrored media sets, another new feature that was introduced with SQL Server 2005, but that continues to be delivered in SQL Server 2008, are a large timesaver. Unlike in the past when you were given the arduous task of creating additional backup copies in the event of a media failure, SQL Server 2008 can create a maximum of four mirrors during a backup operation, which increases reliability and performance. Moreover, SQL Server 2008 also ensures the reliability of the media through database and backup checksums. The only shortcoming to mirrored backups is that the media for each mirror must be the same. For instance, if a backup is committed to tape, all mirrors must also be committed to tape.
A mirrored backup is not necessarily a backup type, per se, but an optional clause available when you’re creating full, differential, or transaction log backups.
The following TSQL syntax creates a media set called AdventureWorks2008MediaSet using three tape drives as backup devices:
BACKUP DATABASE AdventureWorks2008 TO TAPE = '\. ape01', TAPE =![]() '\. ape02', TAPE = '\. ape03'
'\. ape02', TAPE = '\. ape03'
WITH
FORMAT,
MEDIANAME = 'AdventureWorks2008MediaSet'
Typically, the speed of a backup device is a bottleneck that causes backup performance degradation. To increase the speed of any type of backup, it is a best practice to use multiple backup devices. When using multiple backup devices, backups are written in parallel, thus increasing backup times and performance.
The following sections focus on SQL Server 2008 backup and restore strategies for databases within the Database Engine. The examples include backing up all user and system databases to disk with a maintenance plan, compressing backups, backing up the AdventureWorks2008 database using the Full recovery model, and restoring the AdventureWorks2008 database to the point of failure.
If you want to restore a SQL Server 2008 installation, it is imperative not only to back up SQL Server user databases such as AdventureWorks2008, but also the system databases. The main SQL Server 2008 system databases are
![]() Master Database— The master database is an important system database in SQL Server 2008. It houses all system-level data, including system configuration settings, login information, disk space, stored procedures, linked servers, and the existence of other databases, along with other crucial information.
Master Database— The master database is an important system database in SQL Server 2008. It houses all system-level data, including system configuration settings, login information, disk space, stored procedures, linked servers, and the existence of other databases, along with other crucial information.
![]() Model Database— The model database serves as a template for creating new databases in SQL Server 2008. The data residing in the model database is commonly applied to a new database with the Create Database command. In addition, the tempdb database is re-created with the help of the model database every time SQL Server 2008 is started.
Model Database— The model database serves as a template for creating new databases in SQL Server 2008. The data residing in the model database is commonly applied to a new database with the Create Database command. In addition, the tempdb database is re-created with the help of the model database every time SQL Server 2008 is started.
![]() Msdb Database— Used mostly by SQL Server Agent, the msdb database stores alerts, scheduled jobs, and operators. In addition, it also stores historical information on backups and restores, Mail, and Service Broker.
Msdb Database— Used mostly by SQL Server Agent, the msdb database stores alerts, scheduled jobs, and operators. In addition, it also stores historical information on backups and restores, Mail, and Service Broker.
![]() Tempdb— The tempdb database holds temporary information, including tables, stored procedures, objects, and intermediate result sets. Each time SQL Server is started, the tempdb database starts with a clean copy.
Tempdb— The tempdb database holds temporary information, including tables, stored procedures, objects, and intermediate result sets. Each time SQL Server is started, the tempdb database starts with a clean copy.
Note
By default, the master, msdb, and tempdb databases use the Simple recovery model, whereas the model database uses the Full recovery model by default.
It is a best practice to include the system database with the existing user database backup strategy. At a minimum, the system databases should be backed up at the time a configuration is added, changed, or removed relative to a database, login, job, or operator.
To perform a full SQL database backup on the AdventureWorks2008 database using SSMS, do the following:
1. Choose Start, All Programs, Microsoft SQL Server 2008, SQL Server Management Studio.
2. In Object Explorer, first connect to the Database Engine, expand the desired server, and then expand the database folder.
3. Select the AdventureWorks2008 database.
4. Right-click on the AdventureWorks2008 database, select Tasks, and then select Backup.
5. On the General page in the Back Up Database window, review the name of the database being backed up and validate that the Backup Type option is set to Full.
6. Type the desired name and description for the backup, and in the Backup Component section, choose Database, as shown in Figure 7.2.
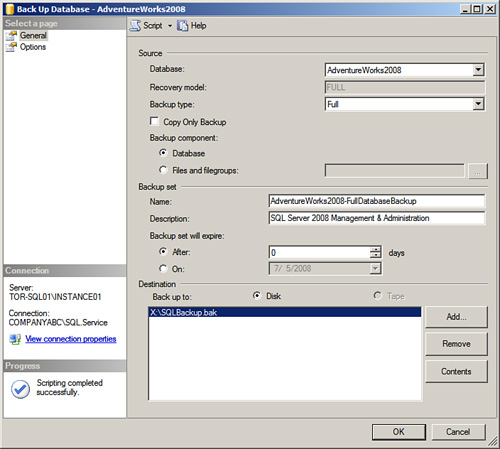
The Destination section identifies the disk or tape media that will contain the backup. You can specify multiple destinations in this section by clicking the Add button. For disk media, a maximum of 64 disk devices can be specified. The same limit applies to tape media. If multiple devices are specified, the backup information is spread across those devices. All the devices must be present to restore the database. If no tape devices are attached to the database server, the Tape option is disabled.
7. In the Destination section, choose the Disk option, as shown in Figure 7.2. Accept the default backup location, or remove the existing path and click Add to select a new destination path for the backup.
8. In the Select Backup Destination window, type the path on the hard disk where the database backup will be created, including the backup filename, and then click OK. Alternatively, you can choose a backup device instead of storing the backup on hard disk.
As mentioned earlier, the Copy Only Backup option can now be enabled when conducting a backup with SQL Server Management Studio. The option is found in the Back Up Database window (see Figure 7.2).
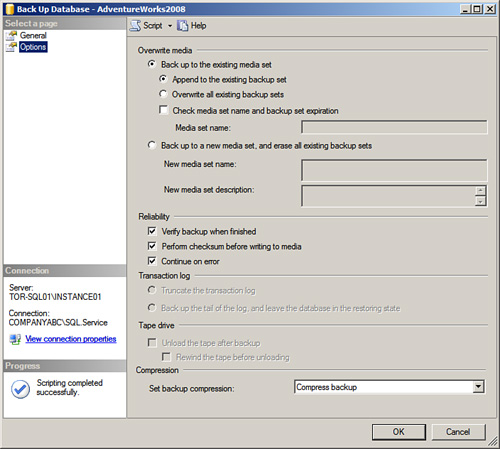
9. Initialize the backup or enter advanced backup options by clicking Options in the Select a Page pane.
The Overwrite Media section allows you to specify options relative to the destination media for the backup. The two options available are Back Up to the Existing Media Set and Back Up to A New Media Set, and Erase All Existing Backup Sets.
![]() When the first option, Back Up to the Existing Media Set, is selected, there are three potential settings to be configured. The first setting, Append to the Existing Backup Set, assumes that any prior backups that were contained on the media set are preserved and the new backup is added to them. The second setting, Overwrite All Existing Backup Sets, replaces any former backups on the existing media set with the current backup. An optional setting exists; Check Media Set Name and Backup Set Expiration, forces SQL Server to verify the media set name and backup set expiration settings before a backup occurs on an existing media set by providing a media set name to be utilized.
When the first option, Back Up to the Existing Media Set, is selected, there are three potential settings to be configured. The first setting, Append to the Existing Backup Set, assumes that any prior backups that were contained on the media set are preserved and the new backup is added to them. The second setting, Overwrite All Existing Backup Sets, replaces any former backups on the existing media set with the current backup. An optional setting exists; Check Media Set Name and Backup Set Expiration, forces SQL Server to verify the media set name and backup set expiration settings before a backup occurs on an existing media set by providing a media set name to be utilized.
![]() The second option, Back Up to a New Media Set, and Erase All Existing Backup Sets, allows you to create a new media set and erase previous backups sets by inputting a new media set name and description.
The second option, Back Up to a New Media Set, and Erase All Existing Backup Sets, allows you to create a new media set and erase previous backups sets by inputting a new media set name and description.
Options in the Reliability section can be used to ensure that the backup that has been created can be used reliably in a restore situation. Verifying the Backup When Finished is highly recommended but causes the backup time to be extended during the backup verification. Similarly, the Perform Checksum Before Writing to Media option helps ensure that you have a sound backup but again causes the database backup to run longer. Finally, the backup process will fail if errors are found in the checksum analysis; therefore, indicate whether or not you want the backup process to proceed or stop by enabling the setting Continue on Error.
The options in the Transaction Log section are available for databases that are in the Full or Bulk-Logged recovery model. These options are disabled in the Simple recovery model and are only available if a Transaction Log backup is selected The Truncate the Transaction Log option causes any inactive portion of the transaction log to be removed after the database backup is complete. This is the default option and helps keep the size of your transaction log manageable. The Backup the Tail of the Log option is related to point-in-time restores.
The options in the Tape Drive section are enabled only when you select Tape for the destination media. The Unload the Tape After Backup option rejects the media tape after the backup is complete. This feature can help identify the end of the backup and prevent the tape from being overwritten the next time the backup runs. The Rewind the Tape Before Unloading option is self-explanatory and causes the tape to be released and rewound prior to unloading the tape.
The last set of options is the compression settings to be used during the backup process. The options include: Use the Default Server Settings, Compress Backup, and Do Not Compress Backup.
10. On the Options page, in the Overwrite Media section, maintain the default settings, Back Up to the Existing Media Set, and Append to the Existing Backup Set.
11. In the Reliability section, choose the options Verify Backup When Finished, Perform Checksum Before Writing Media, and Continue on Error.
12. In the Compression section, set the compression for this database backup to Compress Backup, as shown in Figure 7.3. Click OK to execute the backup.
13. Review the success or failure error message and click OK to finalize.
To perform a differential SQL database backup on an individual database using SSMS, do the following:
1. Right-click on the AdventureWorks2008 database, select Tasks, and then select Backup.
2. On the General page in the Back Up Database window, review the name of the database being backed up and validate that the Backup Type option is set to Differential.
3. Type the desired name and description for the backup, and in the Backup Component section, choose Database.
4. In the Destination section, choose the Disk option. Accept the default backup location, or remove the existing path and click Add to select a new destination path for the backup.
5. In the Select Backup Destination window, type the path on the hard disk where the database backup will be created, including the backup filename, and then click OK. For this example, use the same destination path and filename used in the previous full backup steps.
6. On the Options page, in the Overwrite Media section, maintain the default settings, Back Up to the Existing Media Set and Append to the Existing Backup Set.
7. In the Reliability section, choose the options Verify Backup When Finished, Perform Checksum Before Writing to Media, and Continue on Error.
8. Set the desired backup compression settings. Then click OK to execute the backup.
9. Review the success or failure error message and click OK to finalize.
To perform a transaction log SQL database backup on an individual database using SSMS, do the following:
1. Choose Start, All Programs, Microsoft SQL Server 2008, SQL Server Management Studio.
2. In Object Explorer, first connect to the Database Engine, expand the desired server, and then expand the database folder.
3. Select the AdventureWorks2008 database.
4. Right-click on the AdventureWorks2008 database, select Tasks, and then select Backup.
5. On the General page in the Back Up Database window, review the name of the database being backed up and validate that the Backup Type option is set to Transaction Log.
6. Type the desired name and description for the backup, and in the Backup Component section, choose Database.
7. In the Destination section, choose the Disk option. Accept the default backup location, or remove the existing path and click Add to select a new destination path for the backup.
8. In the Select Backup Destination window, type the path on the hard disk where the database backup will be created, including the backup filename, and then click OK. For this example, use the same destination path and filename used in the previous full backup steps.
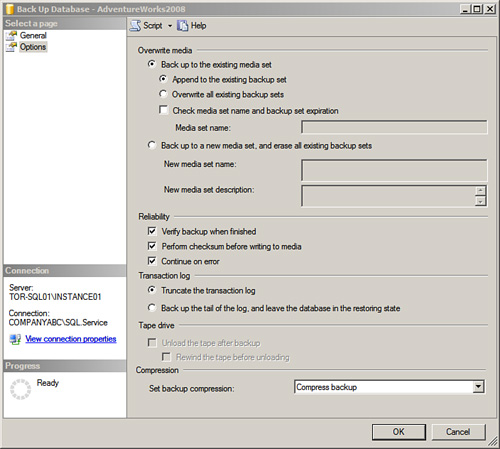
9. Initialize the backup or enter advanced backup options by clicking on Options in the Select a Page pane.
The Transaction Log section allows you to specify options relative to how the transaction log should be handled during the backup. The two choices are
![]() Back Up the Tail of the Log, and Leave the Database in the Restoring State
Back Up the Tail of the Log, and Leave the Database in the Restoring State
After a checkpoint is performed, the inactive portion of the transaction log is marked as reusable. If the default option—Truncate the Transaction Log—is selected, the backup truncates the inactive portion of the transaction log, creating free space. The physical size of the transaction log still remains the same, but the usable space is reduced.
The second option—Back Up the Tail of the Log, and Leave the Database in the Restoring State—is typically used if a disaster occurs and you are restoring the database to a point in failure. Ultimately, this option backs up the active logs that were not already backed up. These active logs can then be used against the recently recovered database to a point in failure or point in time.
10. On the Options page, in the Overwrite Media section, maintain the default settings, Back Up to the Existing Media Set and Append to the Existing Backup Set.
11. In the Reliability section, choose the options Verify Backup When Finished, Perform Checksum Before Writing Media, and Continue on Error.
12. In the Transaction Log section, choose the option Truncate the Transaction Log.
13. In the Compression section, set the compression for this database backup to Compress Backup.
14. Review the settings, as shown in Figure 7.4, and click OK to execute the backup.
15. Review the success or failure error message and click OK to finalize.
Instead of backing up a database and transaction logs individually with SSMS or TSQL, you can automate and schedule this process with a single task by creating a maintenance plan. The Database Backup maintenance plan reduces the efforts required to create individual backups on all user and system databases. In addition, it is possible to create subtasks and schedule these items at separate times. Maintenance plans are discussed further in Chapter 6, “SQL Server 2008 Maintenance Practices.”
Follow these steps to start the creation of a customized backup maintenance plan for all user and system databases by using the Maintenance Plan Wizard:
1. Choose Start, All Programs, Microsoft SQL Server 2008, SQL Server Management Studio.
2. In Object Explorer, first connect to the Database Engine, expand the desired server, and then expand the Management folder.
3. Right-click Maintenance Plans and choose Maintenance Plan Wizard.
4. In the Welcome to the Database Maintenance Plan Wizard page, read the message and click Next.
5. On the Select Plan Properties page, enter a name and description for the maintenance plan.
6. Choose either the first option, Separate Schedules for Each Task, or the second option, Single Schedule for the Entire Plan or No Schedule. For this example, create a separate schedule for the backup plan, as shown in Figure 7.5. Then click Next.

Note
The ability to create separate independent schedules for each subtask within a single maintenance plan was a new feature released with SQL Server 2005 Service Pack 2.
7. In the Select Maintenance Tasks page, check the Back Up Database (Full) and Back Up Database (Transaction Log) maintenance tasks, as shown in Figure 7.6, and click Next.
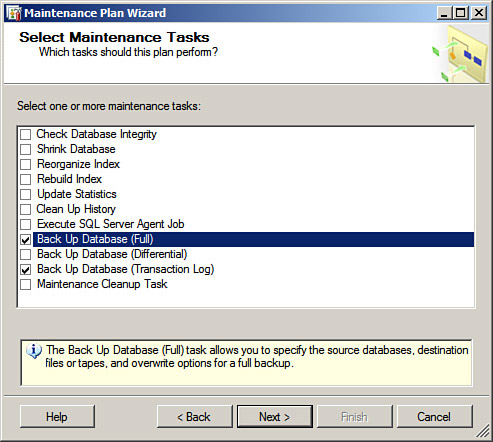
8. On the Select Maintenance Task Order page, review the order in which the tasks will be executed and click Next. For this example, the Back Up Database (Full) task should be listed first and then the Back Up Database (Transaction Log) task should follow.
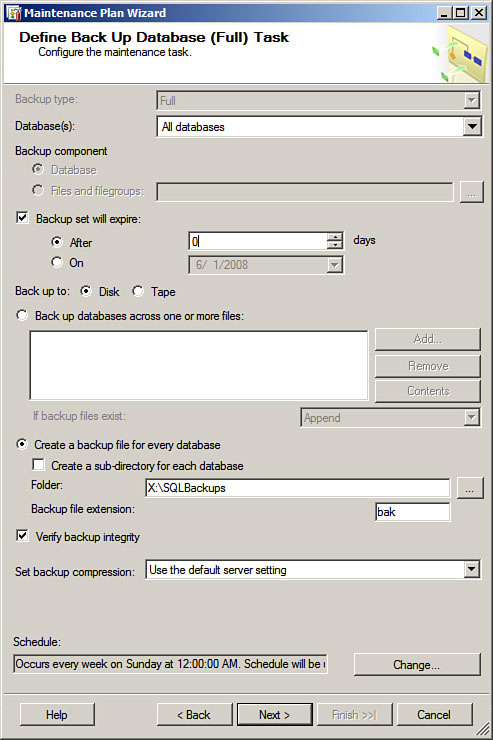
The Define Back Up Database (Full) page includes an expanded set of options when you’re creating full backups with the Maintenance Plan Wizard. You can choose a database to be backed up, choose an individual component, set expiration, verify integrity, and decide whether to use disk or tape. The backup options are
![]() Database(s)— Specify the database. It is possible to generate a maintenance plan to back up an individual database, all databases, systems databases, or all user databases.
Database(s)— Specify the database. It is possible to generate a maintenance plan to back up an individual database, all databases, systems databases, or all user databases.
![]() Backup Component— In the Backup Component section, you can select either the entire database or individual files or filegroups.
Backup Component— In the Backup Component section, you can select either the entire database or individual files or filegroups.
![]() Backup Set Will Expire— This option allows you to specify when the backup set will expire and can be overwritten by another backup based on a number of days or a specific date.
Backup Set Will Expire— This option allows you to specify when the backup set will expire and can be overwritten by another backup based on a number of days or a specific date.
![]() Back Up To— This option allows the backup to be written to a file or tape. A tape drive must be present on the system, and it is possible to write to a file residing on a network share.
Back Up To— This option allows the backup to be written to a file or tape. A tape drive must be present on the system, and it is possible to write to a file residing on a network share.
![]() Back Up Databases Across One or More Files— For the backup destination, you can either add or remove one or more disk or tape locations. In addition, you can view the contents of a file and append to the backup file if it already exists.
Back Up Databases Across One or More Files— For the backup destination, you can either add or remove one or more disk or tape locations. In addition, you can view the contents of a file and append to the backup file if it already exists.
![]() Create a Backup File for Every Database— Instead of selecting the option Back Up Databases Across One or More Files, you can let SQL Server automatically create a backup file for every database selected. In addition, it is also possible to automatically create a subdirectory for each database selected.
Create a Backup File for Every Database— Instead of selecting the option Back Up Databases Across One or More Files, you can let SQL Server automatically create a backup file for every database selected. In addition, it is also possible to automatically create a subdirectory for each database selected.
Note
The subdirectory inherits permissions from the parent directory. Therefore, use NTFS permissions to secure this folder and restrict unauthorized access.
![]() Verify Backup Integrity— This option verifies the integrity of the backup when completed by firing a TSQL command that verifies whether the backup was successful and accessible.
Verify Backup Integrity— This option verifies the integrity of the backup when completed by firing a TSQL command that verifies whether the backup was successful and accessible.
![]() Set Backup Compression— This option controls the compression settings associated with a database backup.
Set Backup Compression— This option controls the compression settings associated with a database backup.
![]() Schedule— This option enables you to create a separate schedule for this specific task.
Schedule— This option enables you to create a separate schedule for this specific task.
9. In the Define Back Up Database (Full) Task page, choose All Databases from the drop-down list next to Databases and click OK.
10. Check the Backup Set Will Expire option and enter 0 days so that the backup set will not expire.
11. Select the option Create a Backup File for Every Database and then click the ellipsis button to specify a backup folder. In the Locate Folder page, select a folder on the hard disk where the database backup will be created and click OK.
12. Check the option Verify the Backup Integrity.
13. In the Compression section, set the compression for this database backup to Compress Backup.
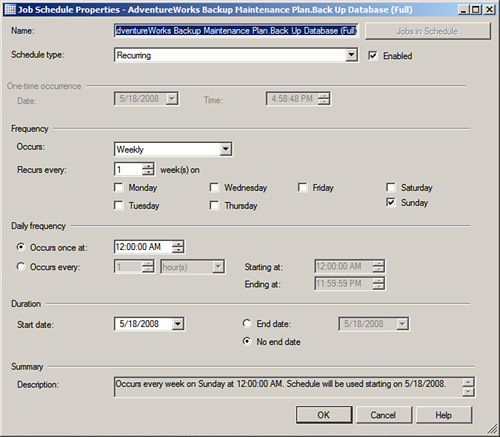
14. Click Change in the Schedule section. In the Job Schedule Properties page, configure this schedule type to repeat on a weekly basis. Set the frequency for every Sunday starting at 12:00 a.m., as shown in Figure 7.7, and click OK.
15. Review the Define Back Up Database (Full) Task settings, configured as shown in Figure 7.8, and click Next to continue configuring the maintenance plan.
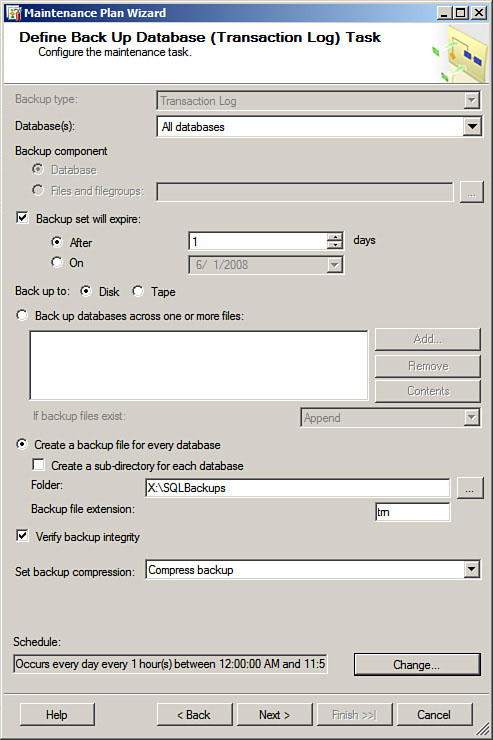
The next page, Define Backup Database (Transaction Log) Task, focuses on backup settings for the transaction logs. The settings and options within this page are similar to the settings and options for creating full database backups explained previously. The only difference with the transaction logs is that databases using the Simple recovery model are excluded and the backup file extension is .trn, not .bak.
16. Similar to the preceding steps, in the Define Back Up Database (Transaction Log) Task, select All Databases, Backup Set Will Not Expire, Create a Backup File for Every Database, and Create a Sub-Directory for Each Database. In addition, select a backup folder and check the option Verify Backup Integrity and Compress Backup, as shown in Figure 7.9.
Note
When you select the option to back up all databases, databases with the simple recovery model will be excluded as Transaction Log backups do not apply.
17. Click Change in the Schedule section. In the Job Schedule Properties page, configure the frequency of this job to daily and the daily frequency to every 1 hour, and click OK.
18. Review the Define Back Up Database (Transaction Log) Task settings and click Next to continue configuring the maintenance plan.
19. On the Select Report Options page, set the option to either write a report to a text file and enter a folder location, or email the report. If you want to email the report, Database Mail must be enabled and configured, and an Agent Operation with a valid email address must already exist. Click Next to continue.
20. The Complete the Wizard page summarizes the options selected in the Maintenance Plan Wizard. It is possible to drill down on a task to view advanced settings. Review the options selected and click Finish to close the summary page.
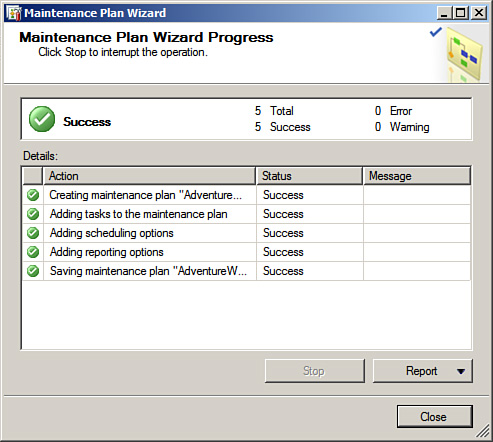
21. In the Maintenance Plan Wizard Progress page, review the creation status, as shown in Figure 7.10, and click Close to end the Maintenance Plan Wizard.
22. The maintenance plan is then created and should be visible under the Maintenance Plan folder in SSMS. In addition, you can find the maintenance plan jobs in the Jobs folder within the SQL Server Agent.
When database corruption or a disaster occurs, you need to restore the database to the point of failure or until a specific date and time. If the database is set to the Full recovery model during the backup, the high-level plan for restoring the database consists of the following sequential tasks: The first step, if possible, is to back up the active transactions (the tail-log), and leave the database in a restoring state. The next step includes restoring the latest full backup and then the most recent differential backups, provided that differential database backups were taken. Finally, subsequent log files should be restored in sequence with the final log being the tail-log.
If the Simple recovery model is used, it is not possible to make transaction log backups; therefore, the restore process consists of restoring the last full backup and most recent differential backup.
Follow these steps to restore the database to the point of failure:
1. Choose Start, All Programs, Microsoft SQL Server 2008, SQL Server Management Studio.
2. In Object Explorer, first connect to the Database Engine, click New Query, and execute the following code to conduct full database, differential, and multiple transaction log backups.
— FULL BACKUP ADVENTUREWORKS2008
USE AdventureWorks2008
BACKUP DATABASE [AdventureWorks2008]
TO DISK = N'X:AdventureWorks2008.bak'
WITH DESCRIPTION = N'SQL Server 2008 Management
and Administration',
NOFORMAT,
NOINIT,
NAME = N'AdventureWorks2008-Full Database Backup',
SKIP, NOREWIND, NOUNLOAD, STATS = 10
GO
—DIFFERENTIAL BACKUP ADVENTUREWORKS2008
USE AdventureWorks2008
BACKUP DATABASE [AdventureWorks2008]
TO DISK = N'X:AdventureWorks2008.bak'
WITH DIFFERENTIAL ,
DESCRIPTION = N'SQL Server 2008 Management
and Administration',
NOFORMAT, NOINIT,
NAME = N'AdventureWorks2008-
![]() Differential Database Backup',
Differential Database Backup',
SKIP, NOREWIND, NOUNLOAD, STATS = 10
GO
— TRANSACTION LOG BACKUP
USE AdventureWorks2008
BACKUP LOG [AdventureWorks2008]
TO DISK = N'X:AdventureWorks2008.bak'
WITH DESCRIPTION = N'SQL Server 2008 Management
and Administration',
NOFORMAT,
NOINIT,
NAME = N'AdventureWorks2008-Transaction Log Backup',
SKIP, NOREWIND, NOUNLOAD, STATS = 10
GO
3. To restore the database to the point in failure, first close any connections to the database including any outstanding query windows and then execute the following script to perform the tail-log backup to begin disaster recovery. Close the query window before moving on to the next step, which includes restoring full, differential, and transaction log backups taken in step 2 using SSMS.
— TAIL LOG TRANACTION LOG BACKUP
BACKUP LOG [AdventureWorks2008]
TO DISK = N'X:AdventureWorks2008.bak'
WITH NO_TRUNCATE ,
DESCRIPTION = N'SQL Server 2008 Management
and Administration',
NOFORMAT,
NOINIT,
NAME = N'AdventureWorks2008-![]() Transaction Tail Log Backup',
Transaction Tail Log Backup',
SKIP, NOREWIND, NOUNLOAD, NORECOVERY , STATS = 10
GO
4. In Object Explorer, right-click on the AdventureWorks2008 database, select Tasks, Restore, and then select Database. (Notice that the database is in a recovering state and is not operational.)
5. On the General page in the Restore Database window, check all the database, differential, and transaction log backups in the Select the Backup Sets to Restore section, as shown in Figure 7.11. Notice that the tail-log backup is the final backup in the list.
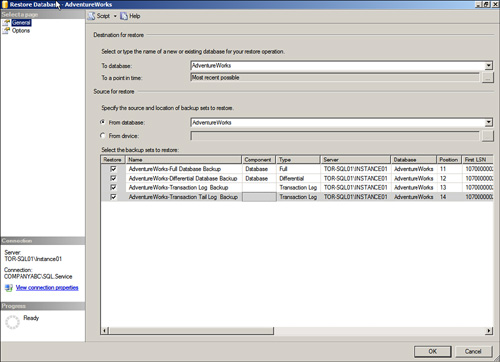
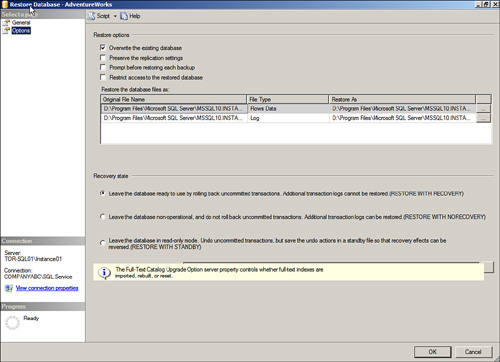
6. On the General page in the Restore Database window, select the options Overwrite the Existing Database and Leave the Database Ready to Use by Rolling Back Uncommitted Transactions, as shown in Figure 7.12, and click OK.
7. Review the restore success message and click OK.
Note
If there is a need to restore the database to a specific point in time, it is possible to input a date and time value in the To a Point in Time section on the General page of the Restore page. The restore process will stop rolling back any entries in the transaction log after this specified period.
The process of backing up and restoring full-text catalogs is similar to backing up and restoring database files. Unlike in SQL Server 2000, each full-text catalog in SQL Server 2008 is treated as a file and is automatically included in regular full or differential backups. As a result, when backing up the full-text catalog, you should follow the full and differential backup steps described earlier in the chapter.
In SQL 2005, it was possible to back up and restore your full-text catalog separately from the rest of your database. During a backup, your full text catalog would be stored in a separate file group and then backed up with this file group. When you restored this file group, the catalog would be restored into the file system. This allowed your full-text catalogs to be more portable as they could be stored in a database backup, or in a separate file group backup.
In SQL 2008, the catalog is essentially a container of properties for a group of full text indexes. It exists in the database completely; it is no longer stored in the file system. When you back up your database, your full-text catalog and indexes are backed up with your database; you can’t do more granular backups that only contain the full-text catalog. Nor is there a way to restore only the full-text catalog; database restores contain the database objects as well as any full-text indexes or catalogs that are in that database backup.
Full-text indexing is now aware of both log shipping and database mirroring.
In SQL 2005, you could log-ship and mirror a full-text-enabled database, but on recovery you would need to run a full population. This is no longer necessary in SQL 2008.
Database snapshots were first introduced with SQL Server 2005. The database snapshot provides a read-only copy of a SQL Server database at a specific point in time. This static view provides a comprehensive picture of the full database, tables, views, and stored procedures. Organizations can use a database snapshot to protect the state of a database at a specific time, to do offload reporting, or to maintain historical data. For instance, an organization can revert to a snapshot in the event it runs into problems. Keep in mind that this feature is available only with SQL Server 2008 Enterprise Edition.
When using database snapshots, some limitations exist, as follows:
![]() It is not possible to drop, detach or restore a database if a snapshot already exists. The snapshot must be removed first.
It is not possible to drop, detach or restore a database if a snapshot already exists. The snapshot must be removed first.
![]() Snapshots of the system databases such as the model, master or tempdb are not supported.
Snapshots of the system databases such as the model, master or tempdb are not supported.
![]() Full text indexing is not supported with database snapshots.
Full text indexing is not supported with database snapshots.
Caution
Database snapshots are a convenient feature, but they are not a replacement for maintaining a backup and restore plan. A backup and recovery plan is still necessary because changes made after the snapshot is taken are lost unless an organization also maintains regular and full backups that include the latest transaction log. This ensures that the most recent data is available for recovery. As a result, a snapshot should be viewed only as an extra layer of protection for preserving a database to a specific point in time.
If you want to fully use and manage snapshots, two tools are necessary. You must use TSQL to create and revert to snapshots and SSMS to view snapshots. Both TSQL and SSMS can be used to delete snapshots. The following sections show how to create, view, revert to, and delete database snapshots.
In the Query Analyzer, execute the following script to create a database snapshot for the AdventureWorks2008 database:
—Creating a database Snapshot with Transact-SQL
Use AdventureWorks2008
CREATE DATABASE AdventureWorks2008_Snapshot_05072007_1200_SS ON
( NAME = AdventureWorks2008_Data, FILENAME =
"X:AdventureWorks2008_Snapshot_0507200711/16/2004_1200_SS.ss" )
AS SNAPSHOT OF AdventureWorks2008;
GO
After creating the database snapshot, you can view it using SSMS. Follow the steps in the preceding section to view the AdventureWorks2008 database snapshot and then follow these steps to view the snapshot:
In Query Analyzer, execute the following script to revert the AdventureWorks2008 database with the database snapshot created in the preceding steps:
USE Master
RESTORE DATABASE AdventureWorks2008
FROM DATABASE_SNAPSHOT =![]() 'AdventureWorks2008_Snapshot_0507200705072007_1200_SS'
'AdventureWorks2008_Snapshot_0507200705072007_1200_SS'
GO
You can drop a database snapshot by either right-clicking on the snapshot in SSMS and choosing Delete or by issuing a DROP statement that identifies the name of the snapshot to be dropped.
The following script drops the AdventureWorks2008 snapshot created in the preceding steps:
DROP DATABASE 'AdventureWorks2008_Snapshot_05072007_1200_SS'
Tip
When naming snapshots, it is a best practice to first include the name of the source database supplemented with the date and time of when the snapshot was taken. For example; <DatabaseName>_snapshot_<yyyy_mm_dd>_<hhmm>
For more information on database snapshots, see the topic “Database Snapshots” in SQL Server 2008 Books Online.
Although you, as database administrator, are charged with maintaining the SQL Server database, you can easily get caught up in daily administration and fire-fighting because your workload is often laborious. It is nonetheless imperative for you to develop and implement a strategic SQL Server backup and recovery plan. Currently, the backup maintenance task is likely the easiest tool available to implement the backup strategy for all user and system relational databases. In the event that Analysis Services, Reporting Services, or Internet Information Services is being used, it is important for each component to find its way into your organization’s backup and restore plan. Finally, your organization should make it a habit to test and document your backup and recovery plan prior to implementation.
The following are best practices for backing up and restoring SQL Server 2008:
![]() Define and document an SLA relevant to the SQL Server 2008 environment.
Define and document an SLA relevant to the SQL Server 2008 environment.
![]() Test the backup and recovery plan on a periodic basis and also before production to validate that it is operational and the SLA can be met.
Test the backup and recovery plan on a periodic basis and also before production to validate that it is operational and the SLA can be met.
![]() Select the appropriate recovery model for all systems and user databases. Use the Full recovery model for mission-critical databases that need to be restored to the point of failure in the event of a disaster.
Select the appropriate recovery model for all systems and user databases. Use the Full recovery model for mission-critical databases that need to be restored to the point of failure in the event of a disaster.
![]() Isolate database and transaction log files on separate spindles for recovery purposes.
Isolate database and transaction log files on separate spindles for recovery purposes.
![]() Save the backups locally on a redundant disk drive separate from the online databases and back up to tape on a regular basis.
Save the backups locally on a redundant disk drive separate from the online databases and back up to tape on a regular basis.
![]() If database or transaction log backups are stored locally on disk, do not store them on the same volumes as the database and transaction log files. If a drive or volume failure occurs, both the files and backups could be lost.
If database or transaction log backups are stored locally on disk, do not store them on the same volumes as the database and transaction log files. If a drive or volume failure occurs, both the files and backups could be lost.
![]() For retention and recovery purposes, the backups stored to disk should be committed to tape.
For retention and recovery purposes, the backups stored to disk should be committed to tape.
![]() Commit to doing frequent backups if the system is an online transaction processing (OLTP) environment. An OLTP database is also known as the databases residing in the SQL Server Database Engine.
Commit to doing frequent backups if the system is an online transaction processing (OLTP) environment. An OLTP database is also known as the databases residing in the SQL Server Database Engine.
![]() Try to schedule backups when SQL Server is not in the process of being heavily updated.
Try to schedule backups when SQL Server is not in the process of being heavily updated.
![]() Use maintenance plans to streamline, automate, and schedule backups for all system and user databases.
Use maintenance plans to streamline, automate, and schedule backups for all system and user databases.
![]() For large databases, consider introducing additional files or filegroups and include a combination of full, differential, filegroup, and transaction log backups to reduce backup and restore times.
For large databases, consider introducing additional files or filegroups and include a combination of full, differential, filegroup, and transaction log backups to reduce backup and restore times.
![]() Speed up the backup process by selecting multiple backup devices.
Speed up the backup process by selecting multiple backup devices.
![]() Leverage the new Backup Compression feature to minimize the backup footprint on disk. However, first test the impact in a dedicated lab before rolling out into production.
Leverage the new Backup Compression feature to minimize the backup footprint on disk. However, first test the impact in a dedicated lab before rolling out into production.
![]() When restoring the database to the point in failure, remember to first back up the tail-log and then conduct the restore.
When restoring the database to the point in failure, remember to first back up the tail-log and then conduct the restore.