As demonstrated in the last few chapters, you can cable some systems together and manually configure their IP addresses, subnet masks, and default gateways to create a very basic TCP/IP network. Over this network, users can send information to, and receive information from, each other. You can even add a Web server to this small network and host some information for the clients to access. However, without the addition of some sort of naming convention and resolution, you’ll soon find that the use and management of this network becomes fairly tedious.
If you use only the basic configuration, you’ll be stuck using IP addresses for everything. Instead of typing something like www.totalsem.com into your Web browser, you’ll need to enter the IP address of the totalsem.com Web server. The answer to resolving this issue is the powerful TCP/IP application, Domain Name System (DNS). Microsoft fully adopted host names and DNS, instead of their proprietary NetBIOS names and Windows Internet Name Service (WINS), as the default naming convention with the introduction of Windows 2000. You will only work with NetBIOS names on small peer-to-peer networks nowadays (it’s used to populate Network with the names of machines, and allows you to navigate by name on a LAN without a DNS server). Furthermore, you should be aware that WINS existed, though it is almost never used today, except in the case of supporting really old applications. DNS resolves fully qualified domain names (FQDNs) to IP addresses, while WINS resolves NetBIOS names to IP addresses.
In several of the following labs, you will configure, diagnose, and repair typical problems relating to name resolution.
Lab Exercise 10.01: Exploring DNS
To begin your journey in the study of network naming, you will study Domain Name System (DNS), which enables the user to enter a much easier-to-remember, human-readable name, such as www.microsoft.com or netlabserver, as opposed to an IP address such as 192.168.10.254.
As a network tech, and in subsequent lab exercises, you will utilize and configure DNS to resolve host names to IP addresses.
Learning Objectives
In this lab, you will define the DNS services and explore the configuration settings a TCP/IP host needs to use them. When you have completed this lab, you will be able to
![]() Describe the functions of the DNS advanced network services
Describe the functions of the DNS advanced network services
![]() Detail the common client configuration settings of DNS
Detail the common client configuration settings of DNS
Lab Materials and Setup
The materials you will need for this lab are
![]() The Mike Meyers’ CompTIA Network+ Guide to Managing and Troubleshooting Networks textbook
The Mike Meyers’ CompTIA Network+ Guide to Managing and Troubleshooting Networks textbook
![]() Windows 7/8/8.1 with Internet access
Windows 7/8/8.1 with Internet access
![]() Pencil or pen
Pencil or pen
![]() Paper
Paper
Getting Down to Business
Having recently finished Chapter 8 on network naming in the Mike Meyers’ CompTIA Network+ Guide to Managing and Troubleshooting Networks textbook, you know that you are going to have to implement DNS on the Network Lab’s systems. You want to get a jump on the setup, so you set out to define DNS, and examine how it’s configured on the client machines in use at the home office of ITCF.
Step 1 Describe the function of the DNS service on a TCP/IP network.
![]()
![]()
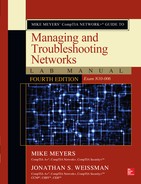
Step 2 Local PCs cache any addresses resolved by DNS on the hard disk. To view a display of resolved addresses cached on your PC, you will use the command-line utility ipconfig /displaydns. Open a command prompt and type ipconfig /displaydns. You should see a list of results similar to what’s shown in Figure 10-1. What are your results?
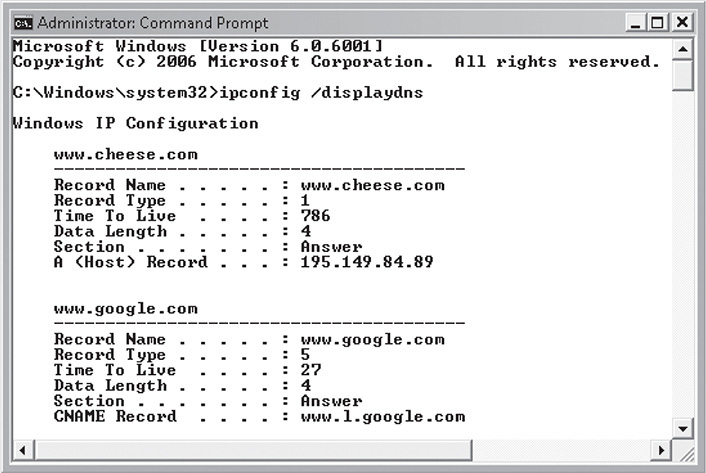
FIGURE 10-1 Section of output from the command ipconfig /displaydns
![]() Hint
Hint
Many anti-malware programs such as Spybot Search & Destroy utilize the hosts file to map malicious Web site redirections to the loopback address of 127.0.0.1. When your browser is instructed to go to www.antivirus-2009-pro.com, a known malware site, it resolves to the local machine and never gets off the ground.
If you are using a system with anti-malware programs running, you may receive an extremely full output when you run ipconfig /displaydns, because the hosts file is copied into the DNS cache automatically. To narrow down the content of the DNS cache, temporarily disable the hosts file by navigating to c:windowssystem32driversetchosts and renaming the hosts file to hosts.lab. (See Lab Exercise 10.02 for additional information on working with the hosts file.)
![]()
![]()
Step 3 WINS is pretty much a legacy service, so there is a good chance that your network is not running a WINS server. However, NetBIOS names are still used in a limited sense, so you can explore NetBIOS names with the nbtstat utility. Start by opening a command-line window, and then run nbtstat –A [IP address], where the IP address is a valid address of a Windows machine on your network. This will return a list of the system’s NetBIOS name table and generate a cache entry of the system’s NetBIOS name (in the example shown in Figure 10-2, the NetBIOS name of the system is LANDMARQ).
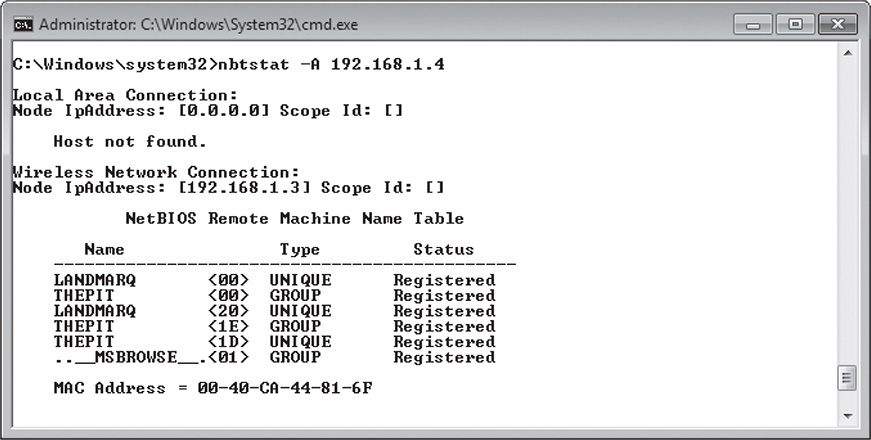
FIGURE 10-2 Result of the nbtstat –A [IP Address] command
![]() Note
Note
Like other command-line utilities you have explored, the nbtstat command has a number of switches allowing you to modify the output of the command. As with the other commands, you can type nbtstat /? to return a list of valid switches. Note the switch in the preceding lab step is a capital –A, displaying output based on the IP address of the remote machine, rather than a lowercase –a, which would display output based on the name of the remote machine.
Windows machines cache any addresses resolved by WINS (or by broadcast) on the hard disk. To view a display of resolved addresses cached on your PC, type nbtstat –c in the command-line window. You should see an entry for the machine you just connected with, as shown in Figure 10-3. What are your results?
FIGURE 10-3 Result of the nbtstat –c command
![]()
![]()
Step 4 To view your PC’s TCP/IP configuration, including advanced settings including showing details of the DNS servers, type ipconfig /all at a command prompt. What are your results?
![]()
![]()
Step 5 To further explore the DNS process, run the Wireshark program on your client system and start capturing frames. Open your Web browser and access a Uniform Resource Locator (URL) for a Web site you’ve never visited—for example, go to the www.cheese.com Web site. After the Web page appears, stop the capture. Look for two lines in the capture file (they should look similar to Figure 10-4). The first line is the initial query from your system, while the second line is the response. You’ll have plenty of other lines in your capture file—look for the ones labeled DNS under the Protocol column.

FIGURE 10-4 Wireshark capture showing a DNS query and response
![]() Cross-Reference
Cross-Reference
As you learned while using Wireshark in Lab Exercise 7.05, you may apply a filter to limit the frames that the Wireshark capture displays. In this case, apply a DNS filter after capturing the frames.
Click the initial query line in Wireshark and look in the lower pane. This is a detailed breakdown of the frame. Expand the User Datagram Protocol in the details pane of the Wireshark utility. Referring to the OSI model, DNS is in the UDP datagram at Layer 4. The data is then encapsulated by a Layer 3 IP packet. Finally, the IP packet is encapsulated by a Layer 2 frame. Why would the designers of DNS use UDP instead of TCP?
![]()
![]()
Step 6 Go through both the query and response frames in detail and answer the following questions. What port does DNS use? What port will the response to the DNS query use? What is the IP address for www.cheese.com? What are the IP addresses for the name servers?
![]()
![]()
Step 7 Close Wireshark and run the ipconfig /displaydns command. Can you find the listing for www.cheese.com? Record some of the information that is displayed.
![]()
![]()
Lab Exercise 10.02: Using the hosts File for Name Resolution
When the Internet was in its early stages, the engineers created a text file named hosts. This text file had a listing of every valid IP address on the Internet (it was actually ARPANET back then) along with a corresponding host name. The hosts file is still included on modern operating systems, and is actually merged into the host DNS resolver cache. Therefore, if an entry is present in the hosts file, a DNS query will not be issued. Later, Microsoft created its own naming convention called NetBIOS and developed their own resolution text file called lmhosts. The lmhosts file resolves NetBIOS names to IP addresses, and is used, for example, when you don’t want to take the trouble to set up a WINS server.
You are going to continue your exploration of network naming with a quick review of the hosts file. Normally, you would be working with a network that already has a configured DNS server and this file would not be necessary; however, you will want to be aware of it for the CompTIA Network+ exam.
In an actual production network, you would almost always be using DHCP to fill in all of the critical TCP/IP settings. However, in your network lab, the TCP/IP configuration is manual, to encourage you to explore the critical settings that are often automated.
Learning Objectives
In this lab, you will explore the early name resolution process of the hosts file. When you have completed this lab, you’ll be able to
![]() Examine and configure entries in a hosts file
Examine and configure entries in a hosts file
Lab Materials and Setup
The materials you’ll need for this lab are
![]() Windows 7/8/8.1
Windows 7/8/8.1
![]() Windows Server 2012/2012 R2
Windows Server 2012/2012 R2
![]() Network switch
Network switch
![]() Cabling
Cabling
![]() Pencil or pen
Pencil or pen
![]() Paper
Paper
For this and subsequent lab exercises in this chapter, it will make the labs run much smoother if you configure the client machines and server as follows:
1. Standardize the IP addressing scheme for the network. I used the network ID of 192.168.10.0/24 for all of the systems and used the “best practice” of placing the router in the lower ranges of the available network addresses (192.168.10.1), the server in the upper ranges of the available network addresses (192.168.10.254), and the clients starting at 192.168.10.11. It will also keep the output from some of the command-line utilities less cluttered if you disable IPv6. In Windows Server 2012/2012 R2 and Windows 7/8/8.1, disable IPv6 by selecting Control Panel | Network and Sharing Center | Change adapter settings. Right-click Local Area Connection and select Properties. Uncheck the box for Internet Protocol Version 6 (TCP/IPv6), and click OK.
2. In Windows 7/8/8.1, the process of editing the hosts file will require you to utilize User Account Control (UAC) to open Notepad as administrator of the client system. To launch Notepad with administrative privileges, click Start | All Programs | Accessories. Right-click Notepad and select Run as administrator from the drop-down menu.
3. You will also want to enable the viewing of hidden files, file extensions (*.txt), and protected operating system files. In Windows 7/8/8.1, select Start | Control Panel | Appearance and Personalization (Windows 7 only) | Folder Options and then the View tab. Select Show hidden files, folders, and drives; uncheck Hide extensions for known file types; and uncheck Hide protected operating system files as shown in Figure 10-5.
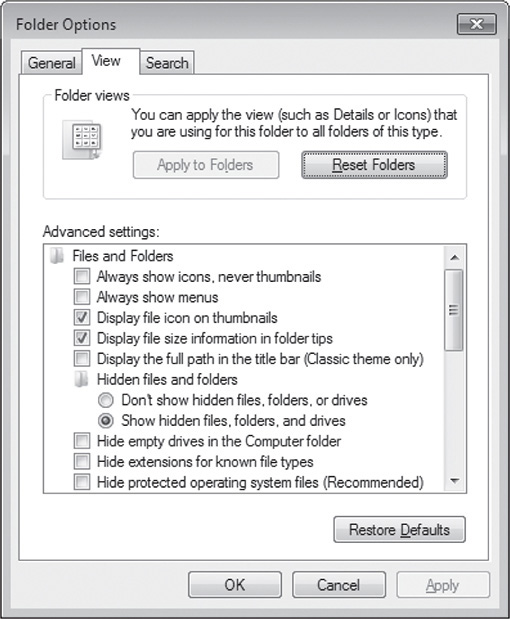
FIGURE 10-5 Folder Options window
Getting Down to Business
Having just finished the configuration of the intranet Web site www.troubleticket.local on the network lab setup, you are pleased with the results of the test communications. CJ stops by to see how the project is progressing and, after hearing that you are very happy with the results, attempts to access the Trouble Ticket application by typing in the fully qualified domain name (FQDN). To his surprise, it returns an error message: “The address is not valid.”
CJ recommends that you study and implement name resolution on the Network Lab network and contact him when you have resolved (pun intended) the issue. You set out on your quest and delve into the hosts file as a precursor to implementing DNS.
![]() Note
Note
If you can re-create this scenario in class—great! If not, go through the exercise anyway. Use the differences between your classroom setup and the one described here to contrast results!
Step 1 Log on to one of the client machines, open a browser, and type the URL www.troubleticket.local to see what happens. What are the results?
![]()
![]()
What test could you run to determine whether this is a DNS problem? What are the results?
![]()
![]()
Step 2 To verify the results, you open a command prompt and type ipconfig /displaydns. What is the initial output from running this command?
![]()
![]()
Step 3 Now you are going to use the hosts file to create an entry to allow you to use the FQDN of www.troubleticket.local to access the intranet Web site. To open the hosts file, open Notepad with elevated privileges, navigate to c:windowssystem32driversetc, and open the hosts file. Enter the following line of text:
![]()
Here, www.troubleticket.local is the FQDN of your intranet Web site and 192.168.10.254 is the IP address of your Web server. Now select File | Save As and select All Files (*.*) from the drop-down menu. Highlight the hosts file in the file pane and select Yes when prompted if you would like to replace this file.
Step 4 Open your Web browser and enter www.troubleticket.local. What are the results?
![]()
![]()
Step 5 Once again, open your command prompt and type ipconfig /displaydns. You should see a response similar to the one in Figure 10-6.
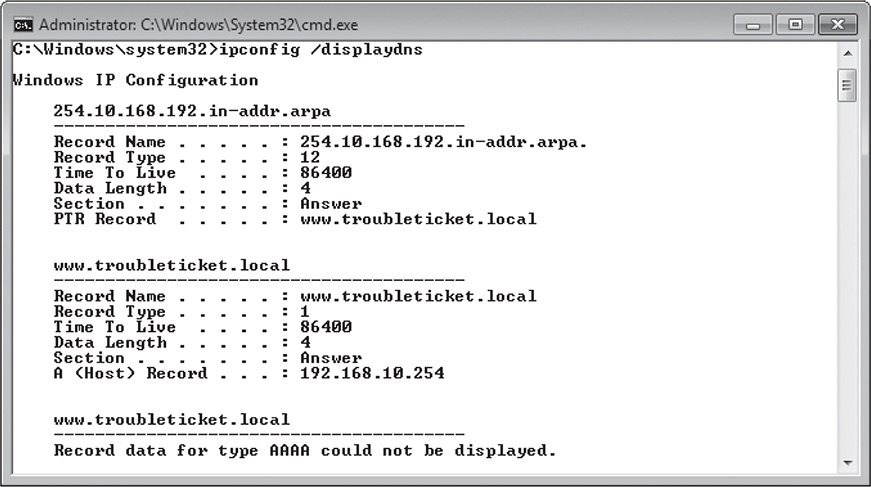
FIGURE 10-6 Output of the ipconfig /displaydns command
Record the results in the following space.
![]()
![]()
Step 6 Now navigate back to the c:windowssystem32driversetc folder and open the hosts file with Notepad. Remove the entry for www.troubleticket.local. This will return the hosts file to its default status.
Lab Exercise 10.03: Using the hosts File for Protection
We’ve discussed how antivirus software uses the hosts file, but this lab exercise has you acting as the actual antivirus software, by modifying the hosts file for protection.
Learning Objectives
In this lab, you will manually edit your hosts file to prevent your browser from being redirected to undesirable sites, for instance ad sites. At the end of this lab you will be able to
![]() Understand how the hosts file can protect you in a most unique way
Understand how the hosts file can protect you in a most unique way
![]() Keep yourself protected with the hosts file in the future
Keep yourself protected with the hosts file in the future
Lab Materials and Setup
The materials you will need for this lab are
![]() Windows 7/8/8.1 with Internet access
Windows 7/8/8.1 with Internet access
![]() Pencil or pen
Pencil or pen
![]() Paper
Paper
Getting Down to Business
Here’s a great way to prevent ads and other browser redirections through the hosts file itself. There’s nothing to download. There’s nothing to install. Let’s get started!
Step 1 Go to www.amazon.com, and notice all the ads. Specifically, notice the ad in the far right column under the top banner. (The site may have changed since this was written, so your browser may return a different-looking page.)
![]()
![]()
Step 2 Open a new tab in the browser and enter http://someonewhocares.org/hosts/. What do you see? What are the various sections?
![]()
![]()
Step 3 Copy and paste the body of the page (not the menu on the right) into c:windowssystem32driversetchosts, running Notepad as an administrator as before.
![]()
![]()
Step 4 Clear the DNS resolver cache by opening a command prompt and typing ipconfig /flushdns. Then open a different browser, and go to www.amazon.com again. Look at the area of the ad described earlier in the far right column under the top banner. What do you see? How did this happen? If the Web site has changed in appearance, see if you can spot differences between the page loaded earlier in the previous browser, and the page loaded in this step.
![]()
![]()
![]() 15 MINUTES
15 MINUTES
Lab Exercise 10.04: Installing and Configuring a DNS Server
If it ended up being your job to configure and maintain a hosts file on every computer that needed to access Web sites by their URLs, just the sheer number of entries would be astounding! DNS to the rescue! DNS allows a distributed database of host name–to-IP-address mappings (called zones) to be stored on dedicated DNS servers and be accessed by clients to resolve those host names to IP addresses.
From the Internet DNS root servers to simple intranet DNS servers, the goal is to make the access to Web sites as transparent to the end user as possible, while keeping administrative overhead to a minimum. Even entry-level network techs are expected to have some understanding of DNS server configuration and maintenance.
Learning Objectives
In this lab, you will install a DNS server. When you have completed this lab, you’ll be able to
![]() Install and configure a DNS server on a Microsoft Windows Server 2012/2012 R2 system
Install and configure a DNS server on a Microsoft Windows Server 2012/2012 R2 system
![]() Configure DNS server entries to resolve host names to IP addresses
Configure DNS server entries to resolve host names to IP addresses
Lab Materials and Setup
The materials you’ll need for this lab are
![]() Windows 7/8/8.1 client machine
Windows 7/8/8.1 client machine
![]() Windows Server 2012 R2
Windows Server 2012 R2
![]() Network switch
Network switch
![]() Cabling
Cabling
![]() Pencil or pen
Pencil or pen
![]() Paper
Paper
Getting Down to Business
Having played with the hosts file, you realize that even for the intranet Web site, you will not want a network tech or administrator tied up with configuring hosts files on all of the client systems. You have to learn about DNS servers anyway, so you dive in and begin configuring the Windows Server 2012/2012 R2 machine to provide DNS services. You hope to have this up and running before CJ returns to check on your progress!
Step 1 Log on to your Windows Server 2012/2012 R2 machine as Administrator, and change the computer name to netlabserver (Start | right-click This PC | Properties | Change Settings | Change | type netlabserver | OK. Then, launch the Server Manager. If your server doesn’t have a static IP address, give it one, or else the machine cannot be a DNS server. In the static configuration, add the loopback address of 127.0.0.1 for the DNS server address.
Click Add roles and features, click the Next button three times, and then select the box for DNS Server and click Next. In the Add Roles and Features Wizard that pops up, click Add Features. Click Next three more times, to arrive at the Confirmation screen. Put a check in the box next to Restart the destination server automatically if required. Click Yes and then Install.
Shortly thereafter you should see Installation succeeded on followed by the name of your machine. When you do, click the Close button.
Once the DNS server is installed, open the DNS management tool by clicking Windows Button | Administrative Tools | DNS. Select the server in the pane on the left, and launch the New Zone Wizard by clicking Action | New Zone. Follow the steps to configure the DNS server to provide resolution for the Network Lab network:
a. Click Next.
b. Select Primary zone (click Next).
c. Select Forward lookup zone (click Next).
d. Enter the Zone name: troubleticket.local (click Next).
e. Select Create a new file with this file name (click Next).
f. Select Do not allow dynamic updates (click Next).
g. Verify the settings in the Completing the New Zone Wizard screen as shown in Figure 10-7, and click Finish.
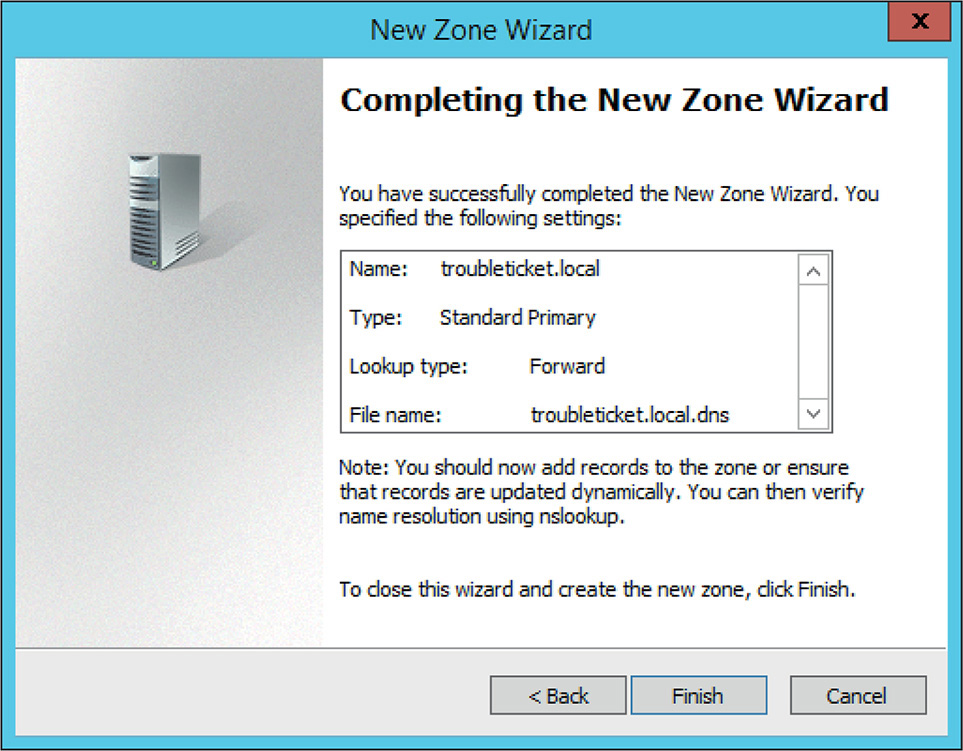
FIGURE 10-7 Completing the New Zone Wizard
During the configuration of the DNS server, the wizard might attempt to find “root hints” for this DNS server. You may receive an error message stating, “The Configure a DNS Server Wizard could not configure root hints. To configure the root hints manually or copy them from another server, in the server properties, select the Root Hints tab.”
Click Finish to complete the installation of the DNS zone.
Step 2 Expand the netlabserver and expand Forward Lookup Zones. Select the troubleticket.local forward lookup zone and record the records that appear in the Contents pane:
![]()
![]()
Step 3 Right-click troubleticket.local and select New Host (A or AAAA) from the drop-down menu. This will open the New Host applet. Enter the name of your Network Lab server in the Name field, and your Network Lab server’s IP address (such as 192.168.10.254) into the IP address field. Do not check the box Create associated pointer (PTR) record at this time. What is the FQDN of the new record?
![]()
Click Add Host to add the new record and then click Done to close the New Host applet.
Step 4 Lastly, right-click troubleticket.local and select New Alias (CNAME) from the drop-down menu. This will open the New Resource Record applet. Enter www in the Name field and your FQDN for the target host (netlabserver.troubleticket.local). What is the FQDN of the new record?
![]()
Click OK to add the new record. The fully configured forward lookup zone should be similar to that shown in Figure 10-8.
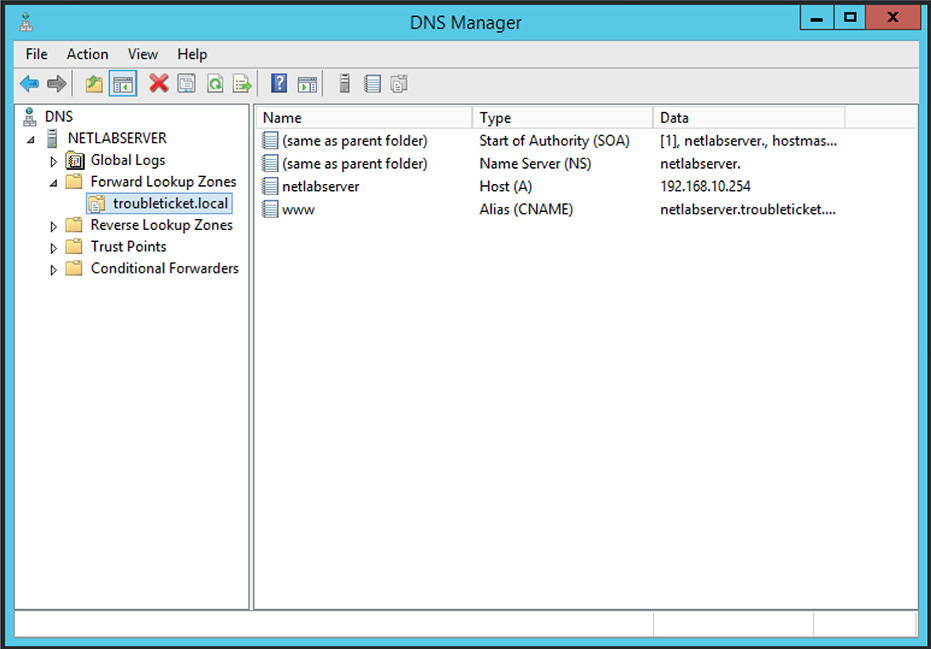
FIGURE 10-8 DNS management screen with records for netlabserver and www.troubleticket.local
Close the DNS management utility and log off the Windows Server 2012/2012 R2 machine.
Lab Exercise 10.05: Troubleshooting Network Naming Services
The hierarchical structure of DNS makes it a robust, tolerant, and fast way to resolve fully qualified domain names (FQDNs) to IP addresses. When DNS problems take place, however, you’ll want to remember that the secret to solving DNS issues is twofold. First, remember that DNS is robust and not prone to error. Many errors that might point to DNS issues are actually something else, such as the configuration of TCP/IP settings (both manual and automatic). Second, remember how DNS works. Many times the best way to diagnose and fix a DNS issue is to think through the process of DNS resolution and then test potential problem areas. Knowing how DNS works will also give you the ability to get around problems you can’t immediately fix—like a downed DNS server.
In this lab exercise, you’ll explore some of the core troubleshooting tools that will help resolve issues with DNS (you have already seen some of these, like ping and ipconfig /displaydns).
Learning Objectives
In this lab, you will review the DNS name resolution process. When you have completed this lab, you’ll be able to
![]() Define the tools to test DNS settings and servers
Define the tools to test DNS settings and servers
![]() Use these tools properly in different troubleshooting scenarios
Use these tools properly in different troubleshooting scenarios
Lab Materials and Setup
The materials you’ll need for this lab are
![]() A system with Internet connectivity to facilitate downloading utilities
A system with Internet connectivity to facilitate downloading utilities
![]() Windows 7/8/8.1 client system
Windows 7/8/8.1 client system
![]() Windows Server 2012/2012 R2
Windows Server 2012/2012 R2
![]() Network switch
Network switch
![]() Cabling
Cabling
![]() Pencil or pen
Pencil or pen
![]() Paper
Paper
Getting Down to Business
After configuring the Web server in the last chapter and the DNS server in this chapter, you invite a few of your co-workers in to test the connectivity to the Trouble Ticket intranet Web site www.troubleticket.local. All complain that they cannot access the Web site. You have an idea what the problem is (the client machines have not been configured at this point), and you decide to run a few diagnostic tests to see if they will provide answers to this riddle and get the network running at optimum performance!
Step 1 To set up this lab exercise, log on to one of the client machines and open the Local Area Connection Properties dialog box (Start | Control Panel, click Network and Sharing Center in icon view, click Change adapter settings, right-click the Local Area Connection icon, and select Properties). Select Internet Protocol Version 4 (TCP/IPv4), click Properties, and confirm that there are no entries for the Preferred DNS Server or the Alternate DNS Server. Select OK to save settings.
Now open a command prompt. At the command prompt, enter ipconfig /displaydns. What are the results?
![]()
![]()
If there are any listings in the DNS cache, enter ipconfig /flushdns. What are the results if you run ipconfig /displaydns again?
![]()
![]()
Step 2 You now look at the system of one user who has complained that she cannot access the Trouble Ticket Web site in her Web browser, even though she can access other computers on the local network. What test could you run to determine whether this is a DNS problem?
![]()
![]()
![]() Tech Tip
Tech Tip
To successfully perform the next few steps from the client machine, you will prepare the DNS server by enabling “Allow zone transfers to any server” using the DNS management tool. It must be stressed that you would NEVER enable “Allow zone transfers to any server” on a production DNS server! This would compromise the entire organization by allowing unscrupulous people to transfer the entire DNS database. You will enable “Allow zone transfers to any server” in Step 3 to demonstrate the power of the nslookup command in Steps 4, 5, and 6. You will then disable “Allow zone transfers to any server” in Step 7.
Step 3 Log on to your DNS server (possibly netlabserver) and perform the following substeps to enable “Allow zone transfers to any server”:
a. Open the DNS management tool by clicking Windows Button | Administrative Tools | DNS.
b. Expand netlabserver and Forward Lookup Zones (as shown in Figure 10-8 in the prior lab exercise), right-click troubleticket.local, and select Properties from the drop-down menu. Click the Zone Transfers tab and select Allow zone transfers and To any server.
c. Click OK to save your settings and close the troubleticket.local Properties window.
Step 4 You now are certain enough you have a DNS problem that you want to check the DNS server from the client system. On the client machine, launch a command prompt and type ping www.troubleticket.local and then press ENTER. Next, type ping 192.168.10.254 and press ENTER (substitute the IP address of your Web server if it’s different from the one in the example). What are the results? Are they what you expected?
![]()
Now type nslookup to enter the nslookup shell, which takes a different set of commands than the main shell you were just in. Once you are in the nslookup shell, enter the IP address of the DNS server you want to query, that is, 192.168.10.254, by typing the following line at the nslookup prompt:
<Server 192.168.10.254
You can now verify the records you configured earlier by typing the following line:
<ls -d troubleticket.local
See Figure 10-9 for examples of these commands and their responses. Using the results from your own output, or the information in Figure 10-9, write a short description/definition for each of the important records in the following list:

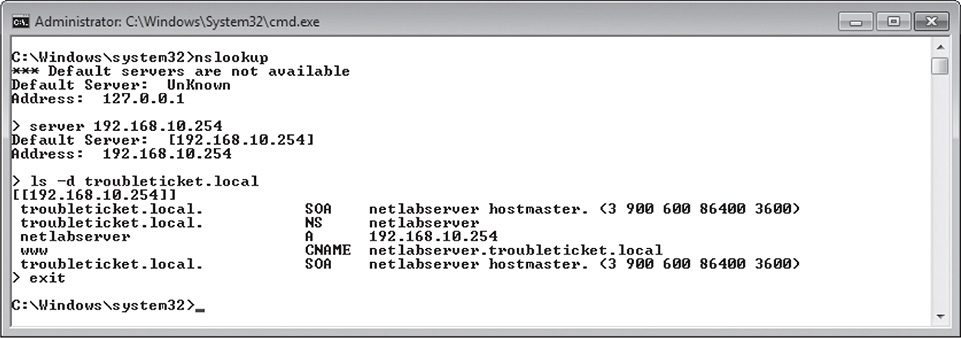
FIGURE 10-9 The nslookup commands and their output
![]() Cross-Reference
Cross-Reference
To further explore DNS record entries, consult the “DNS Servers” section in Chapter 10 of the Mike Meyers’ CompTIA Network+ Guide to Managing and Troubleshooting Networks textbook.
Why would you run the nslookup command to confirm that the DNS server is working? Why is ping a less than optimal choice?
![]()
![]()
Step 5 If the results of your nslookup were satisfactory, what two items would you want to check on the client system to make sure the client itself wasn’t giving incorrect DNS data? How would you confirm that the problem wasn’t with the IP configuration?
![]()
![]()
Step 6 One of the features that has been added to DNS is the dynamic registration of clients in the domain. This service is known as Dynamic Domain Name System (DDNS). If there was a connection problem, and the client was not able to register with the DNS server, the command ipconfig /registerdns can be used to force a dynamic update.
Open a command prompt and type ipconfig /? as shown in Figure 10-10. Record the various switches that can be used to troubleshoot and manage name resolution components.
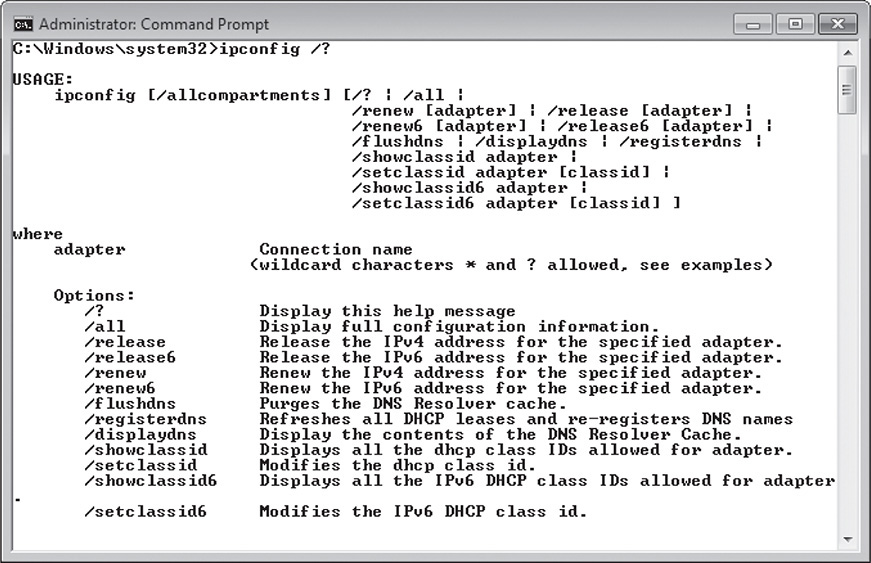
FIGURE 10-10 Output of the ipconfig /? command
![]()
![]()
Step 7 To disable the Allow zone transfers to any server setting, log on to your DNS server and perform the following substeps:
a. Open the DNS management tool by clicking Windows Button | Administrative Tools | DNS.
b. Expand netlabserver and Forward Lookup Zones, right-click troubleticket.local, and select Properties from the drop-down menu. Click the Zone Transfers tab and uncheck Allow zone transfers.
c. Click Apply or OK to save your settings and close the troubleticket.local Properties window.
![]() 30 MINUTES
30 MINUTES
Lab Exercise 10.06: Configuring a DNS Client
DNS servers make Web surfers’ lives much easier, since they will not have to enter the IP address of every Web site they would like to visit. There is one important component to using the service, though; the client machine must be configured to query the DNS server for the host name–to-IP-address resolution.
Most often, advanced TCP/IP configuration settings such as DNS servers and routers (default gateways) are configured by the DHCP server. However, for the purposes of this lab, you will manually configure the DNS server address to better understand the workings of name resolution.
Learning Objectives
In this lab, you’ll configure a client machine to use DNS. When you have completed this lab, you will be able to
![]() Configure the TCP/IP properties with the address of the DNS server
Configure the TCP/IP properties with the address of the DNS server
![]() Connect to a Web site using the Uniform Resource Locator (URL)
Connect to a Web site using the Uniform Resource Locator (URL)
Lab Materials and Setup
The materials you will need for this lab are
![]() Windows 7/8/8.1 client system
Windows 7/8/8.1 client system
![]() Windows Server 2012/2012 R2
Windows Server 2012/2012 R2
![]() Network switch
Network switch
![]() Cabling
Cabling
![]() Pencil or pen
Pencil or pen
![]() Paper
Paper
Getting Down to Business
So now you have configured a DNS server for your Network Lab network! All that needs to be done to take advantage of it is to make sure each client machine points to the DNS server to retrieve the mapping and connect with the Web server requested. Remember, the next time CJ stops in (unlike the situation with your co-workers in the last lab exercise), you want him to be able to get to the Trouble Ticket Web application with no hassles.
Step 1 Before you change the configuration of any of the TCP/IP settings, make sure that you can still access the intranet Web site using the IP address (192.168.10.254). Record the results in the following space:
![]()
Now try to access the Web site using the URL: www.troubleticket.local. What are the results?
![]()
Step 2 In Windows 7/8/8.1, open Control Panel | Network and Sharing Center. Select Change adapter settings from the side menu, right-click Local Area Connection, and select Properties from the drop-down menu. Highlight Internet Protocol Version 4 (TCP/IPv4) and click Properties.
Under the Use the following DNS server addresses radio button, in the Preferred DNS server box, enter the IP address of your DNS server (192.168.10.254) as shown in Figure 10-11. Close the dialog box.
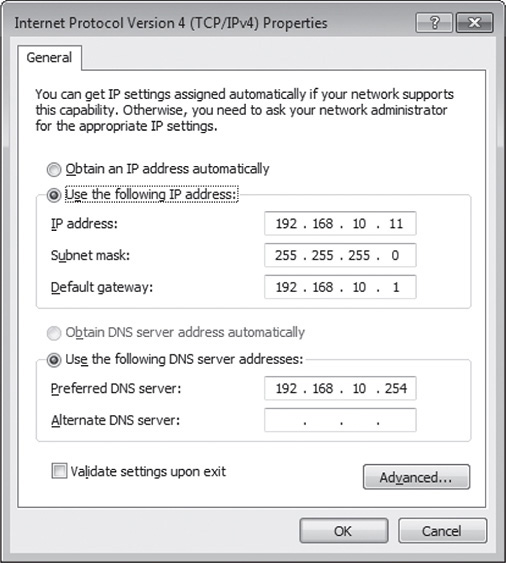
FIGURE 10-11 Internet Protocol Version 4 (TCP/IPv4) Properties dialog box
Step 3 Now try to access the Web site once again using the URL: www.troubleticket.local. What are the results?
![]()
![]() 30 MINUTES
30 MINUTES
Lab Exercise 10.07: Exploring Dynamic DNS on the Web
You briefly interacted with Microsoft’s DDNS in Lab Exercise 10.05 when you explored ipconfig /registerdns to force an update of DNS. There is another form of DDNS, Dynamic DNS on the Web. When a home user or small office sets up an Internet connection, they will probably use a consumer Internet service provider (ISP) to provide the connectivity. This is a completely acceptable solution for Internet access, but what happens if the user or business would like to host their own Web site? Even if the user or business has secured their own domain name, it can be tricky to host the site on an internal server because the external IP address is likely to change. Since these ISPs are providing services to hundreds of thousands of people, they will charge a fairly stiff premium for a static address for the SOHO (small office/home office).
DDNS on the Web will track the external IP address and dynamically update the DNS service to resolve the FQDN to the new IP address. There are a number of companies who provide various levels of DDNS service. It is somewhat beyond the scope of this Lab Manual to have you configure an internal Web server, obtain a domain name, and host it using a DDNS service. However, you can gain a better understanding of DDNS by visiting the Web sites of these providers and exploring some of the services they provide. And that is just what you are going to do in this lab exercise!
Learning Objectives
In this lab, you’ll explore the Web sites of various DDNS providers. When you have completed this lab, you will be able to
![]() Define DDNS for Web services
Define DDNS for Web services
![]() Detail some of the characteristics and components needed to implement a DDNS
Detail some of the characteristics and components needed to implement a DDNS
Lab Materials and Setup
The materials you will need for this lab are
![]() Internet access
Internet access
![]() Pen or pencil
Pen or pencil
![]() Paper
Paper
Getting Down to Business
ITCF has a number of clients that are operating SOHO businesses. One of these clients would like to develop a better Web presence, and they feel that hosting their Web site on their own in-house server would allow them to be more responsive to customer’s needs. They currently utilize a consumer ISP for their Internet connection, and they ask you to prepare a proposal for providing a solution using DDNS.
Step 1 To begin our exploration of DDNS on the Web, head to http://dyn.com/dns/dyndns-pro-free-trial/. What are some benefits of the Remote Access Free Trial?
![]()
![]()
Step 2 A company called No-IP provides yet another DDNS service. Visit them at www.noip.com/remote-access. What are some of the packages/services they offer?
![]()
![]()
Step 3 Lastly, check out FreeDNS by Joshua Anderson at the URL http://freedns.afraid.org. What are some of the features offered by this DDNS service provider?
![]()
![]()
Lab Analysis
1. Zach is attempting to access a Web site, but he keeps receiving an error message. Someone told him that there may be a file on his computer that is keeping him from loading the site. He asks you to explain the relationship between the hosts file and DNS, and give an example of how they might conflict.
![]()
![]()
2. Andrew wants to know about DNS root servers. Explain their purpose to him.
![]()
![]()
3. While installing and configuring a DNS server, Evan observes various identifiers for the DNS record entries such as Host (A or AAAA), Alias (CNAME), and Mail Exchanger (MX). What are these identifiers?
![]()
![]()
4. After finally getting a number of systems configured in his SOHO, Michael discovers that one system cannot access the address www.ibm.com. It was able to access this Web site earlier, but now it just returns a message, “The address is not valid.” What commands should Michael run, and why would he run them to diagnose the problem?
![]()
![]()
5. Now that Oscar has finished working through nearly half of the lab exercises, especially Chapters 2, 7, and this chapter, Chapter 10, he realizes that he has explored many of the different types of network addresses. To help you study, he asks you to name four different types of addresses found in a data transmission, referenced on the CompTIA Network+ exam.
![]()
![]()
Key Term Quiz
Use the terms and commands from the list below to complete the sentences that follow.
Dynamic DNS (DDNS)
fully qualified domain name (FQDN)
hosts
ipconfig /displaydns
nslookup
ping
1. When troubleshooting DNS, you could use the _______________ command to query the DNS server.
2. _______________ can either refer to DNS servers being updated automatically, or a mechanism that will allow you to run a Web server at home, with an IP address that changes.
3. You can run the _______________ command with the _______________ to test if DNS is configured correctly. If this task returns an error, you can run the command with the IP address to further clarify if there is a problem with DNS.
4. A way to map names to IP addresses without a DNS server is through a file called _______________.
5. _______________ is the command to see the names and IP addresses that have been resolved for you by your DNS server.