Obviously, one of the reasons you are spending all of this time and effort studying the minute details of the network infrastructure is to better provide networking services to users. The most popular applications—World Wide Web, e-mail, streaming audio and video, file transfers, Voice over IP, and so on—all require the configuration of specific components of the TCP/IP suite of protocols.
The two important protocols that operate at the Transport layer of the OSI model and the TCP/IP model are the Transmission Control Protocol (TCP) and User Datagram Protocol (UDP). There are also uncomplicated, specialized protocols that are associated with the Network layer of the OSI model and the Internet layer of the TCP/IP model, the Internet Control Message Protocol (ICMP), and the Internet Group Management Protocol (IGMP). TCP/IP applications use either a unique service port number or a combination of specific service port numbers over one of the Transport layer protocols. For instance, when you open your browser and navigate to your favorite Web site, you are using some random registered port to connect with a Web server listening on TCP port 80 to transfer packets between the correct applications, for example, Internet Information Services (IIS) or an Apache Web server, and your browser.
To effectively perform the management of even the smallest network, administrators must develop a strong command of the network applications and the mechanisms they use to communicate over TCP/IP.
Lab Exercise 9.01: Transport Layer and Network Layer Protocols
All of the upper-layer data communications that take place over the TCP/IP protocol suite (HTTP, FTP, SMTP, and so on) will be segmented at the Transport layer into either TCP segments or UDP datagrams. At the Network layer, two specialized protocols, ICMP and IGMP, provide for low-level messaging and management communication. In this lab exercise, you will explore the TCP, UDP, ICMP, and IGMP protocols.
Learning Objectives
In this lab, you will research and define the important characteristics of the Transport and Network layer protocols. By the end of this lab, you will be able to
![]() Define the Transmission Control Protocol
Define the Transmission Control Protocol
![]() Define the User Datagram Protocol
Define the User Datagram Protocol
![]() Define the Internet Control Message Protocol
Define the Internet Control Message Protocol
![]() Define the Internet Group Management Protocol
Define the Internet Group Management Protocol
Lab Materials and Setup
The materials you will need for this lab are
![]() The Mike Meyers’ CompTIA Network+ Guide to Managing and Troubleshooting Networks textbook
The Mike Meyers’ CompTIA Network+ Guide to Managing and Troubleshooting Networks textbook
![]() Internet access
Internet access
![]() Pencil or pen
Pencil or pen
![]() Paper
Paper
Getting Down to Business
Maggie notices that you have been aggressively studying the configuration of IP addressing and routing. After some discussion, she agrees that you are really getting a handle on the IP component of the TCP/IP protocol suite. She thinks it would be an excellent time to delve into the other protocols that enable the TCP/IP protocol suite to successfully deliver packets between hosts.
You agree, fire up your favorite browser, and dive into some research on the protocols that work hand in hand with IP to communicate information from one machine to another over the network.
For further information on TCP, UDP, ICMP, and IGMP, review the “TCP,” “UDP,” “ICMP,” and “IGMP” sections in Chapter 9 of the Mike Meyers’ CompTIA Network+ Guide to Managing and Troubleshooting Networks textbook.
Step 1 Research Transmission Control Protocol (TCP) and provide a short summary of its features. Make sure to include discussion regarding the OSI model and TCP/IP model layer or layers it occupies. Define the communication method used (such as connection-oriented or connectionless, reliable or unreliable), and some of the Application layer protocols that require it for their functionality.

Step 2 Research User Datagram Protocol (UDP) and provide a short summary of its features. Make sure to include discussion regarding the OSI model and TCP/IP model layer or layers it occupies. Define the communication method used (such as connection-oriented or connectionless, reliable or unreliable), and some of the Application layer protocols that require it for their functionality.
Step 3 Research Internet Control Message Protocol (ICMP) and provide a short summary of its features. Make sure to include discussion regarding the OSI model and TCP/IP model layer or layers it occupies. Define the communication method used (such as connection-oriented or connectionless, reliable or unreliable), and some of the applications that take advantage of its functionality.
Refer to Chapter 7, “TCP/IP Basics,” and review Lab Exercise 7.02: Configuring IP Addresses and Subnet Masks, and Lab Exercise 7.05: IP Addressing, MAC Addressing, and Ethernet: Working Together, to see ICMP in action. Pay special attention to the Tech Tips and the output of the Wireshark utility.
Step 4 Research Internet Group Management Protocol (IGMP) and provide a short summary of its features. Make sure to include discussion regarding the OSI model and TCP/IP model layer or layers it occupies. Define the communication method used (such as connection-oriented or connectionless, reliable or unreliable), and some of the applications that take advantage of its functionality.
![]() 30 MINUTES
30 MINUTES
Lab Exercise 9.02: Analyzing TCP/IP Ports and Associations
By this point, you should appreciate the complexity of the TCP/IP suite’s many network functions. To the novice technician, it might seem as if these many capabilities could spill over into one another, but TCP/IP does a great job of keeping its different functions separate. It does this by using port associations.
Learning Objectives
In this lab, you will define the function of TCP/IP port associations and review the common port number assignments. You’ll also use several utilities that will allow you to explore and analyze protocols, ports, and processes. When you have completed this lab, you will be able to
![]() Define the function of TCP/IP port associations
Define the function of TCP/IP port associations
![]() List some of the well-known port number assignments
List some of the well-known port number assignments
![]() Explore the various protocols, ports, and processes employed in a typical network communication
Explore the various protocols, ports, and processes employed in a typical network communication
Lab Materials and Setup
The materials you will need for this lab are
![]() PC running Windows 7/8/8.1
PC running Windows 7/8/8.1
![]() Internet access
Internet access
![]() Pencil or pen
Pencil or pen
![]() Paper
Paper
Getting Down to Business
After exploring the higher-layer transport protocols, you would like to know how TCP/IP keeps track of all the different sessions on a typical networked PC. You decide to examine the protocols, ports, and processes involved in the typical browsing of a Web site.
Step 1 Start with a description of the function of a TCP or UDP port.
![]()
![]()
Step 2 Match the following port numbers to the appropriate protocols.

![]() Note
Note
Some protocols use more than one port number.

Windows lists all of the well-known ports and protocol services that are associated with them in a file without an extension, simply named “services.” This file is more than just a list, though. It is used by Windows to map port numbers to services, and can be tweaked to modify a default port that a service is associated with. Access this list in Windows 7 by opening Notepad (Start | All Programs | Accessories | Notepad) and navigating to c:windowssystem32driversetc. Change the view from “Text Documents (*.txt)” to “All Documents (*.*)” to view and open the services file. Other network operating systems maintain an equivalent document of port-to-service mappings. Linux, for example, also uses a file named “services” located in the /etc directory.
Step 3 The services file is a static list of well-known ports on a Windows PC. You will seldom if ever see all of these endpoint ports open or active at one time. You can view a static listing of the active ports using the netstat command-line utility. Netstat has a number of switches to customize the output of the list. Run the netstat /? command and provide a description of the following switches:
netstat -a
![]()
netstat -b
![]()
![]()
netstat -o
![]()
![]() Note
Note
You’ll be making heavy use of the help functions of commands throughout the rest of the Lab Manual in order to use some of these more advanced functions! When in doubt, type the command and add a space and /? to the end of the command! For example, type ping /? to explore the ping options.
![]() Cross-Reference
Cross-Reference
For further information on the configuration and usage of the netstat, TCPView, and Process Explorer utilities, consult the “Connection Status” section in Chapter 9 of the Mike Meyers’ CompTIA Network+ Guide to Managing and Troubleshooting Networks textbook. You will also find excellent figures of netstat, TCPView, and Process Explorer in action!
Step 4 Maggie calls you over to see a system that she suspects may have a Trojan horse. Before running your company’s standard antivirus program, she wants you to run netstat. Why would she want you to do this?
![]()
![]()
On your lab system, run netstat without any switches. Are there any established connections? See Figure 9-1.

FIGURE 9-1 Output of the netstat utility with no established connections
![]()
Now launch a Web browser, navigate to www.microsoft.com, and run netstat with the -ano switches. Record some of the connections.
![]()
![]()
Step 5 While running netstat with the -n switch, you see connections to foreign systems using these ports. Use the Internet (check out www.iana.org/assignments/port-numbers) to determine what program is using these port numbers, and fill in the following table:

Step 6 After waiting for a few moments, if you run netstat –ano once again, you will find that the status of some of the connections will change and/or disappear. Netstat is a static utility; however, a gentleman named Mark Russinovich has written a number of wonderful Microsoft utilities that are available for free. One of these, TCPView, is a dynamic, graphical endpoint tool.
Launch your browser and search for TCPView (the current version, v3.05, is available at http://technet.microsoft.com/en-us/sysinternals/bb897437.aspx). Download the ZIP file and extract the TCPView executable. Close all Internet connections and launch TCPView. In the Options menu, select Always On Top.
Now open your browser and load www.microsoft.com, observing the activity in TCPView. Record some of the features of TCPView.
![]()
![]()
Step 7 When you ran netstat with the -o switch, it added a column that displayed the process ID of each of the applications that were using the endpoint connections to communicate. Another of Mark Russinovich’s tools, Process Explorer, is an excellent, dynamic process ID tool.
Fire up your Internet browser one more time and search for Process Explorer (the current version, v16.04, is available at http://technet.microsoft.com/en-us/sysinternals/bb896653.aspx). Download the ZIP file and extract the procexp.exe executable file. Close all Internet connections and launch Process Explorer.
You should see a number of running processes, many of which are local programs that are running. Launch a Web site, such as www.microsoft.com, and observe if any new processes launch. Record the results in the following space.
![]()
![]()
![]() 1 HOUR
1 HOUR
Lab Exercise 9.03: Understanding Web Servers and Ports with WampServer
In essence, most people mistakenly equate the World Wide Web with the Internet! In reality, the Internet is the infrastructure, while the World Wide Web is the multimedia content with hyperlinks. They probably make this mistake because the World Wide Web, using the Hypertext Transfer Protocol (HTTP), is the most widely used TCP/IP application. That said, one of the best ways to develop and practice the skills needed to support TCP/IP applications is to install and configure a server to support an Internet or intranet Web server.
There are really two important components associated with hosting a Web site. The first, and the one that you will be concerned with the most as a network support technician, is the installation, configuration, and management of the Web server itself. A close second would be the development and layout of the actual content (the actual Web pages), as a Web designer. To configure the Web server, you will probably work with the world’s single most popular Web server, Apache HTTP Server.
Learning Objectives
In this lab, you will install and configure Apache HTTP Server. When you have completed this lab, you will be able to
![]() Install and configure server-side and client-side networking applications
Install and configure server-side and client-side networking applications
![]() Configure TCP/IP addressing and service ports
Configure TCP/IP addressing and service ports
![]() Troubleshoot TCP/IP applications
Troubleshoot TCP/IP applications
Lab Materials and Setup
The materials you will need for this lab are
![]() Two PCs running Windows 7/8/8.1
Two PCs running Windows 7/8/8.1
![]() Pencil or pen
Pencil or pen
![]() Paper
Paper
Getting Down to Business
WampServer is an environment for developing Web applications for Windows. The W in “Wamp” stands for Windows, the operating system that this platform is run on. (Alternatively, there is LAMP for Linux and MAMP for Macs.) The a stands for Apache, the world’s most used Web server. The m stands for MySQL, the world’s most used open source relational database management system (second to Oracle Database for market share when including proprietary systems). The p stands for PHP, the world’s most used server-side scripting language. Bundling these applications together in one environment is obviously of great benefit for Web developers.
Step 1 On one machine, go to www.wampserver.com/en/ and click Start Using WampServer. Assuming you’re using a 64-bit machine, select the 64-bit download. Alternatively, if you’re using a 32-bit machine, select the 32-bit download. On the white pop-up that follows, click download directly (which might be hard to see because it’s a yellow hyperlink). Wait five seconds, and a download dialog box will pop up. Click Save File. Run the executable from the Downloads folder, accept all default selections, and open up the program.
![]()
![]()
Step 2 If you have Skype running, stop it at this time. In the Notification Area, click the orange WampServer icon “(a stylized W)” and select Start All Services (see Figure 9-2). The orange icon will change to green. Skype uses port 80, and will prevent the Web server from listening on the same port.

FIGURE 9-2 Starting services
![]()
![]()
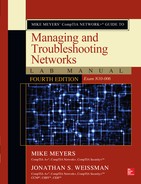
Step 3 Click the green WampServer icon. Mouse over Apache | Service and click Test Port 80 (see Figure 9-3). You should see a message that the port is being used by the Apache Web server (see Figure 9-4).
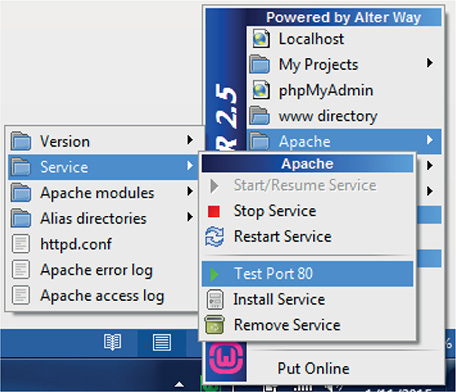
FIGURE 9-3 Testing port 80

FIGURE 9-4 Server using port 80
![]()
![]()
Step 4 Open a Windows command-line interface, type netstat –n, and then press ENTER. You should see an entry, possibly at the very top, with TCP 127.0.0.1:80 in the first two columns. What does all of this mean?
![]()
![]()
Step 5 Click the green WampServer icon. Click www directory to bring you to the root folder for the Web server. In the menu bar, click Organize | Folder and search options | View. In the Folder Options dialog box, under Advanced settings, make sure there is no check mark in the Hide extensions for known file types check box (see Figure 9-5). If that box is checked, click it to remove the check mark. Click Apply to close the Folder Options dialog box.

FIGURE 9-5 Hide extensions check box
To create a default Web page, right-click a blank area inside the root folder, mouse over New, and then select Text Document. Change the filename and extension to index.html, which will be the default page that loads for your Web site. Right-click the file and select Open with | Notepad. Type Hello, world! in the file, then save it and exit Notepad.
![]()
![]()
Step 6 On the second machine, open up a browser. In the address bar, type the IP address of the machine running the server service in the previous steps, followed by the name of the file you just created (192.168.1.52/index.htm, for example). You should see the simple Web page you just made. In this step, what is the Web client and what is the Web server?
![]()
![]()
Step 7 Click the green WampServer icon. Mouse over Apache | Service and click Stop Service. The WampServer icon should now turn back to orange, which means in this case that the Web server component of WampServer has been stopped.
![]()
![]()
Step 8 Click the orange WampServer icon. Mouse over Apache | Service and click Test Port 80. You should see a message indicating that port 80 is not being used by any application.
![]()
![]()
Step 9 Open a Windows command-line interface, type netstat –n, and then press ENTER. You should see that the entry that had TCP 127.0.0.1:80 in the first two columns is no longer present. Why do you think this is the case? What is the difference between an opened port and a closed port?
![]()
![]()
![]() 30 MINUTES
30 MINUTES
Lab Exercise 9.04: Configuring and Using FTP with FileZilla
Transferring files between computers is a very important process that all networks require. Whether files from the Web designer’s computer are being sent to the Web server or an Internet file server is acting as a repository for files, the underlying mechanism is File Transfer Protocol (FTP), which was designed for the uploading and downloading of files from computer to computer.
FTP is a major protocol in the TCP/IP suite, and this lab walks you through the entire process of transferring files with a free, open source program called FileZilla.
Learning Objectives
In this lab, you will set up both an FTP client and an FTP server. Then, you will transfer data between the two. By the end of this lab, you will be able to
![]() Install, configure, and manage an FTP server
Install, configure, and manage an FTP server
![]() Install an FTP client, and transfer files.
Install an FTP client, and transfer files.
Lab Materials and Setup
The materials you will need for this lab are
![]() Two PCs running Windows 7/8/8.1
Two PCs running Windows 7/8/8.1
![]() Pencil or pen
Pencil or pen
![]() Paper
Paper
Getting Down to Business
There are three ways that you can use FTP: a command-line interface, a Web browser, and a third-party application. This lab uses one of the simplest third-party FTP applications for Windows, especially for those “let me put up an FTP server so you guys can get a copy” type of situations. Let’s get started with FileZilla!
Step 1 Go to filezilla-project.org/download.php?show_all=1, then download, install, and run the FileZilla FTP Client on one machine. Be sure to Decline all additional requested packages.
Go to filezilla-project.org/download.php?type=server, then download, install, and run the FileZilla FTP Server on the other machine. Stop when you see the Connect to Server dialog box.
What port does the FileZilla FTP Server listen on by default?
![]()
![]()
Step 2 On the machine on which you installed the FileZilla FTP Server, in the Connect to Server dialog box, click OK. In the menu bar at the top, select Edit | Users, and then click the Add button on the right side of the dialog box. Type bob for the username, and then click OK. Put a check in the check box Password: under Account settings, and type bob into the Password text box (see Figure 9-6). Click Shared folders on the left side of the dialog box. Minimize FileZilla, and using Windows Explorer, create a folder called bobftp off of the root of the C: drive. Go back to the FileZilla window. Click Add, then browse to the bobftp folder, check all unchecked check boxes in the Files section (Write, Delete, Append) and all unchecked check boxes in the Directories section (Create, Delete), and click OK (see Figure 9-7).

FIGURE 9-6 Creating a user account

FIGURE 9-7 Setting up the shared folder
Step 3 Start sniffing with Wireshark on the FTP server. Use the display filter of ftp || ftp-data to restrict the output to related packets. You may have to allow FTP through the firewall on this machine. To do so, follow these steps:
1. Click the Start button, and in the Search programs and files box, type Windows Firewall.
2. Click the Windows Firewall selection under Control Panel.
3. Click Allow a program or feature through Windows Firewall.
4. Click the Change Settings button.
5. Click the Allow another program button.
6. Don’t select FileZilla Server Interface from the list, but rather click Browse.
7. Find the directory you installed FileZilla Server to.
In most cases, this will be C: Program Files (x86)FileZilla Server.
8. Double-click or select FileZilla server.exe and click Open.
9. Click Add, and then click OK.
10. Verify that FileZilla server.exe has been added to the exceptions list, and that there is a check mark in the box next to it
11. Click OK to close the window.
12. Open a command prompt with administrative rights and execute the following command: netsh advfirewall set global StatefulFTP disable.
On the machine on which you installed the FileZilla FTP Client, type in the IP address of the FTP server in the Host: box, and provide the username of bob and password of bob in the Username: and Password: boxes. Leave the Port: box blank, and FTP will use its default port for establishing the connection (see the top of Figure 9-8).

FIGURE 9-8 FileZilla FTP Client
What do you see in Wireshark on the server related to the bob account? What port is being used by the FTP server?
Step 4 With Wireshark still running on the FTP server, on the FTP client, create a text file called bobsfile on the desktop, and type a sentence into that file. In the FileZilla FTP Client on the same machine, in the Local site: pane, browse to the desktop. From the pane below, where you can see the files on the desktop, drag and drop bobsfile.txt to the pane to its right, which represents the FTP server’s directory for the user bob (see the middle of Figure 9-8).
On the FTP server, use Windows Explorer to browse and open the file that was just uploaded to the server, then open a command-line interfaces and run netstat –n. What ports are relevant to this lab? What are represented by the local address and foreign address values?
![]()
![]()
Step 5 What port was used for the data transfer in the previous step? Why wasn’t port 20 used? Use this link as a reference: http://slacksite.com/other/ftp.html.
![]()
![]()
![]() 30 MINUTES
30 MINUTES
Lab Exercise 9.05: The TCP Three-Way Handshake in Action
You’ve heard much about the TCP three-way handshake up to this point, but now it’s time to actually see it in action. In order to form a bidirectional line of communication at Layer 4 with the sequencing, acknowledging, connection-oriented features, and guaranteed delivery of TCP, each host needs to acknowledge a segment sent from the other side.
Learning Objectives
In this lab, you will analyze the TCP Three Way Handshake with Wireshark. Seeing the sequence and acknowledgement numbers will solidify your knowledge of the steps involved.
![]() Establish a connection between two hosts.
Establish a connection between two hosts.
![]() Observe and record the TCP flags.
Observe and record the TCP flags.
![]() Observe and record the sequence and acknowledgment numbers.
Observe and record the sequence and acknowledgment numbers.
Lab Materials and Setup
The materials you will need for this lab are
![]() The Mike Meyers’ CompTIA Network+ Guide to Managing and Troubleshooting Networks textbook
The Mike Meyers’ CompTIA Network+ Guide to Managing and Troubleshooting Networks textbook
![]() A PC running Windows 7/8/8.1
A PC running Windows 7/8/8.1
![]() Pencil or pen
Pencil or pen
![]() Paper
Paper
Getting Down to Business
Before starting this lab, it would be a great idea to review the “TCP” section in Chapter 8 of the Mike Meyers’ CompTIA Network+ Guide to Managing and Troubleshooting Networks textbook; it contains a great look at the TCP three-way handshake.
Step 1 Open Wireshark, and start capturing packets. Enter ip.addr==75.126.29.106 in the Filter field, which will limit the display to packets to and from the Total Seminars Web server, and click Apply. Open a browser, and head to www.totalsem.com. After the page loads, stop the Wireshark capture.
![]()
![]()
Step 2 Look at the first three rows in the Wireshark capture (see Figure 9-9). What TCP flags are set for each of those segments?

FIGURE 9-9 The TCP three-way handshake
![]()
![]()
Step 3 Select the first row. In the middle pane in Wireshark, expand the TCP segment fields, and click the Sequence number field. Look in the bottom pane to see the actual sequence number (see Figure 9-10). Record the number here.

FIGURE 9-10 The first sequence number
![]()
![]()
Step 4 Select the second row. In the middle pane in Wireshark, expand the TCP segment fields, and click the Sequence number field. Look in the bottom pane to see the actual sequence number. Record the number here. Then, click the field called Acknowledgement number. Record the number here.
![]()
![]()
Step 5 Select the third row. In the middle pane in Wireshark, expand the TCP segment fields, and click the Acknowledgement number field. Look in the bottom pane to see the actual sequence number. Record the number here.
![]()
![]()
Step 6 Explain how the four numbers you captured proves that a TCP three-way handshake occurred.
![]()
![]()
Lab Analysis
1. One of your co-workers, Scott, asks you to explain the main operational difference between TCP and UDP. How does this difference affect which services use TCP or UDP?
![]()
![]()
2. Ann has configured Apache HTTP Server to host an equipment sign-out application. Students who use the university video cameras and accessories to complete assignments in their film class will complete the online form. She has configured the server to use the alternate port of 8080 as opposed to the well-known port of 80 for the HTTP service. Why would Ann choose to configure the application in this manner?
![]()
![]()
3. After working with FileZilla, Harrison notices that sometimes protocols use different ports in different situations. Passive FTP doesn’t use port 20, in this case. Shortly thereafter, while setting up e-mail, Harrison is instructed to use TCP port 995 for POP3, port 993 for IMAP4, and port 587 for SMTP. Use the Web to find out why you would you use these port numbers, instead of the well-known port numbers of 110 for POP3, 143 for IMAP4, and 25 for SMTP?
![]()
![]()
4. While capturing packets with Wireshark, Meir pings one of the other computers on his network. He examines the output of the capture, and finds the section relating to the ping activity. What is the underlying protocol you would expect Meir to observe?
![]()
![]()
Key Term Quiz
Use the vocabulary terms from the following list to complete the sentences that follow.
Apache HTTP server
Hypertext Transfer Protocol (HTTP)
Internet Control Message Protocol (ICMP)
Internet Group Management Protocol (IGMP)
Internet Information Services (IIS)
Internet Message Access Protocol version 4 (IMAP4)
netstat -b
Post Office Protocol version 3 (POP3)
Simple Mail Transfer Protocol (SMTP)
Transmission Control Protocol (TCP)
User Datagram Protocol (UDP)
1. A command-line utility that will allow you to explore all of the current connections and the associated program executable is _______________.
2. The _______________ and the _______________ are defined in the Transport layer of the OSI model, whereas the _______________ and the _______________ are defined in the Network layer of the OSI model.
3. When working with e-mail, the _______________ is associated with sending e-mail and the _______________ and the _______________ are associated with receiving e-mail.
4. The UNIX/Linux-based _______________ and the Microsoft product _______________ are two of the most popular Web servers in use today.
5. When working with the _______________, the most common well-known port used is 80. However, when implementing an intranet, many administrators will use the alternate port of 8080.