Project 6
Minecraft Modding with Friends: The Multiplayer Version of Spleef
Making Minecraft minigames can be a lot of fun because after you make it you can play games inside of Minecraft for hours, but what is even more fun is making minigames that you can play with your friends. In this project, I show you how to convert single-player games (games that only have player) into multiplayer games (games that have more than one player). I also explain how to change the gameplay loop (for the single-player Spleef game from Project 3) so that you can design a multiplayer game from the ground up.

Start from the Single-Player Spleef Game
Rather than remake the entire Spleef game, you can start from the single-player version and turn it into a multiplayer version.
Note: Before you begin this section, you should have already built Spleef. If you haven’t built it yet, go back to Project 4 and build a single-player Spleef game.
To start from single-player, follow these steps:
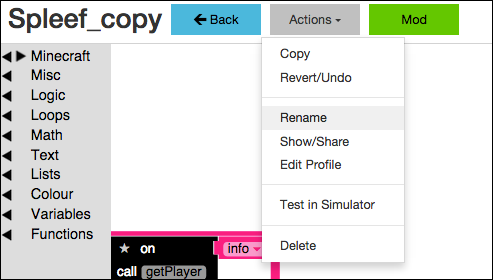
- Open the completed single-player Spleef mod (described in Project 4), click the Actions tab, and then choose Copy from the menu, as shown in Figure 6-1.
- Click to select the copied version of Spleef, shown in Figure 6'2, and then click on Code to go into the programming environment.
- At the top of the screen, click the Actions tab and choose Rename from the menu, as shown in Figure 6-3.
- Rename the mod to Spleef _Multiplayer, as shown in Figure 6-4.
- After the page reloads, click on the Spleef multiplayer mod again, as shown in Figure 6-5, and then click the code button to go into the programming environment.


Now you’re ready to start modifying your single-player version of Spleef to make it multiplayer.
 If you make a mistake at any point, you can always go back and make another copy of your single-player version.
 When an expert modder decides to use an earlier version of a chunk of code, it’s called reverting. This is why you should always test your code as you’re writing it, to avoid making a single tiny mistake just before you finish making your multiplayer game and then being unable to figure out how to undo it. On top of all that, you have to revert to the single-player version and start over.
Test, and test often!
Summarize the Gameplay Loop
Even though you’re making a multiplayer game, you can still use the gameplay loop to guide you in making small changes. At each iteration, you can test to ensure that you haven’t made any mistakes. This makes reverting to earlier versions easier because you’re making only small, incremental changes, and because they’re small, they’re easier to undo.
The gameplay loop (see Project 4) is shown in Figure 6-6.

Before you start iterating on the gameplay loop, summarize on paper the changes you plan to make, like this:
- Start: No changes need to be made to the scene yet, unless you want to enlarge the arena to make the games last longer.
- Goal: The new goal is to break 200 blocks before your opponent does.
- Challenge: The new challenge is adding a player to the scene.
- Reward: The new reward is beating the other player.
The new gameplay loop should be simple and not have a lot. After you successfully make the multiplayer game, you can always revisit the gameplay loop and make it more interesting, such as making the arena bigger.
Iteration 1: Refactor the Single-Player Version
Before you add a second player to the game, you need to do a bit of refactoring. Instead of referring to me, you should refer to a specific player who is defined in your mod. In this section, I walk you through the steps to do it — while setting up for the multiplayer version.
 Why would you start making your game multi-player by only replacing
 me rather than also including Player2? When you make a lot of changes to your code to refer to a player by name, rather than use the me block, you can test the changes you made before adding even more complexity with multiple named players. In Iteration 2, you add in Player2.
First you need to determine the Minecraft username of Player1 and put that info into your mod. Follow these steps:
Make a new function named SetupMultiplayer, and call it from
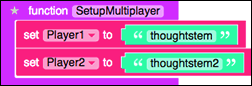
main, as shown in Figure 6-7 (and described in Project 2). The mainfunction already has other blocks in it because you’re starting from the Spleef game I show you how to build in Project 4.- Create a new variable named Player1, and set it to the first player’s Minecraft username, as shown in the example in Figure 6-8. In this example, I’m using
thoughtstemas Player1. Review your mod and replace any references to
mewith references to the player with the name of thePlayer1variable.For example, if your Minecraft name is
thoughtstem, Figure 6-9 shows three ways that you can reference your player in Minecraft.Start with
main(as shown in Figure 6-10) and step through it line by line. This means you will look at the functions when they are called frommain.Since the first function call in
mainisSetupMultiplayer, look at that function.SetupMultiplayer, shown in Figure 6-8, is the one I made for my multiplayer version, so nothing needs to change.- The second line in
mainis the call to thearenafunction. Figure 6-11 shows thearenafunction. - The
arenafunction only builds the arena. It has no indication of players in the game, so nothing needs to change here, either. - The next line in
mainis the event that is triggered when a block is broken. When any player breaks a block, theStartGamefunction is called. - In your
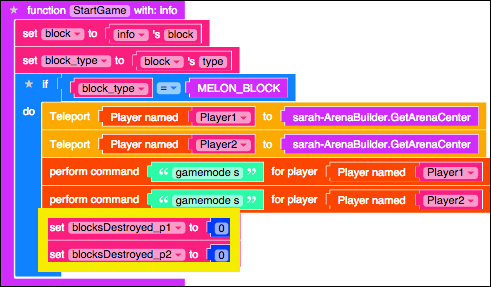
StartGamefunction, change themeblock to aPlayer named Player1block, as shown in the yellow box in Figure 6-12. - The next line in
mainis the event that is triggered when a player respawns. When any player respawns, theSetupPlayerfunction is called. - In the
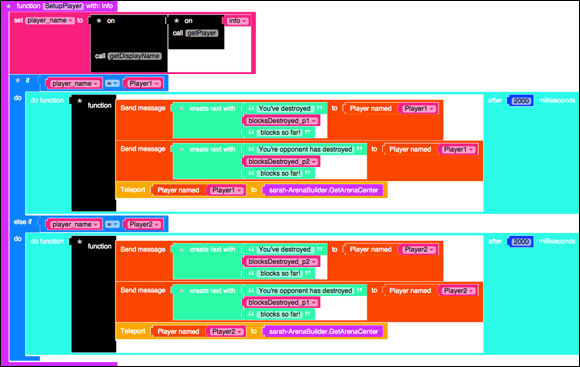
SetupPlayerfunction, replace the twomeblocks with thePlayer named Player1block, as shown in Figure 6-13. - Add an
ifstatement to ensure that the player who respawned was Player1 and not any other player in the Minecraft world (see Figure 6-14). This is in preparation for later in this project, when I show you how to add other players to your Minecraft world. In the respawn event line in
main(see Figure 6-15) is a reference tome. It doesn’t have to be changed, becausemeis the player who launched the mod. Regardless of who is playing the multiplayer Spleef game, the game-launcher (me) is the only one who finds out whenever anyone respawns (this is also described asmereceiving the event).The final line in
mainis the event that is triggered when a player moves.Change the final line so that Player1 (instead of
me) triggers this event.Figure 6-16 shows the change you make to
main.When any player moves, the function
removeBlockAfterStepis called.Change the
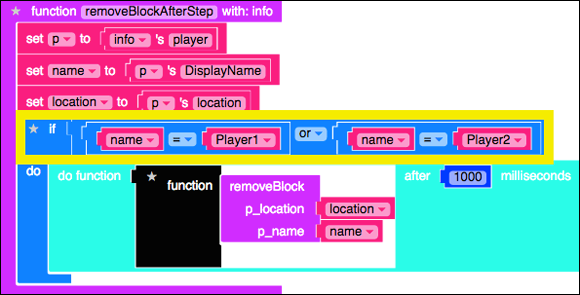
removeBlockAfterStepfunction to ensure that it was Player1 who moved, as shown in Figure 6-17.First get the name of the player who moved, and then use an
ifstatement to ensure that it was Player1.- The
removeBlockAfterStepfunction calls theremoveBlockfunction. In this function, you’re sending a message tome, but you want to send it to the player who just made a block disappear. Add a parameter named
p_name, and send the function the name of the player who just moved.Figure 6-18 shows how to change
removeBlockandremoveBlockAfterStep.


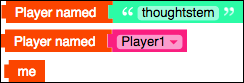
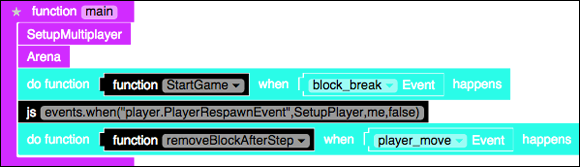


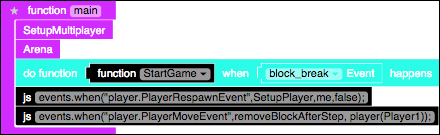

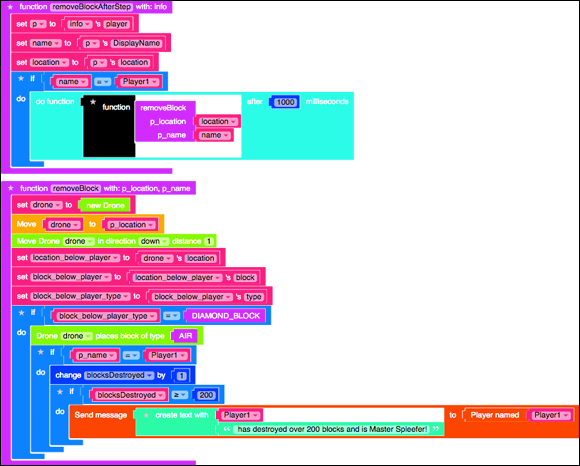
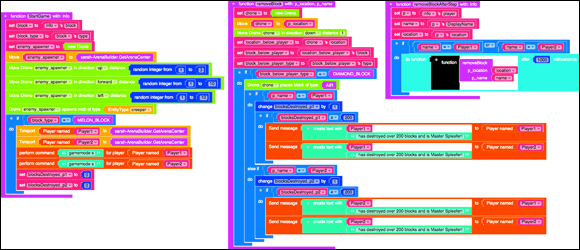
Figure 6-19 shows the entire code block you now have for your Spleef multiplayer mod.

Test your mod to make sure that it behaves exactly as the original Spleef game (described in Project 4) behaved. There should be no changes to how you play and what happens during play; it’s still the single-player version of Spleef.
If you don’t recall how the original single-player version of the Spleef game works, go back and experiment with it first, and then with the multiplayer version, to make sure that they both do the same thing.
Iteration 2: Add in Player2
After Iteration 1 (making your Spleef game independent of the me block) you can move on to Iteration 2 and add in another player so that your game becomes multiplayer. In this section, I walk you through the exact same process as the section “Iteration 1: Refactor the Single-Player Version.”
To add Player2, follow these steps:
Start with
mainand look at the first function,SetupMultiplayer. Add another variable namedPlayer2, and put the Minecraft username of the second player there.Figure 6-20 shows an example where the two players are
thoughtstemandthoughtstem2. It’s difficult to test the multiplayer version of Spleef without having a real-life second player to join you, so (in this section) work with a friend who also has Minecraft and who can join your server when you’re ready to test.Back in
main, the next function isarena. The previous section explains that thearenafunction doesn’t need to know what players are playing, so you can skip to the next line.The third line in
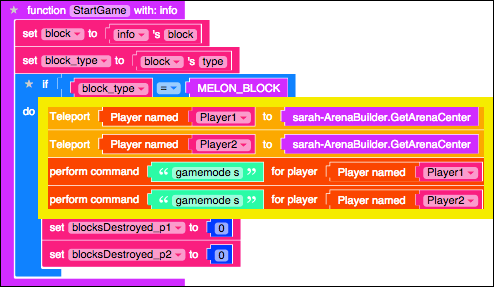
mainis the event that calls theStartGamefunction when a block is broken.In the
StartGamefunction, make sure both players are set to Survival mode. Also, because you don’t know which player broke the melon block, make sure both players are teleported to the center of the arena.Figure 6-21 shows how to make those changes.
- Still in the
StartGamefunction, rename theblocksDestroyedvariable to become more specific to Player1, and then add another variable for blocks destroyed for Player2, as shown in Figure 6-22. Back in
main, the next line is the event that is called whenever a player respawns.- The
SetupPlayeris called. To makeSetupPlayermultiplayer-safe, add anelse-ifstatement to theifstatement that essentially does the same as Player1, but for Player2. - Add a second message to let each player know how many blocks the other player has broken.
Figure 6-23 shows all these changes to the
SetupPlayerfunction. Be sure to use all the right variables for Player1 and Player2 or else when Player1 respawns, it will teleport Player2 back to the arena.
- The
- Back in
main, the next line is the event that is called when a player moves; theremoveBlockAfterStepfunction is called. Figure 6-24 shows the change to theifstatement that takes place. If either Player1 or Player2 was the one who moved, call theremoveBlockfunction. Change the
removeBlockfunction also, to increment the correctblocksDestroyedcounter and to announce the name of the 200-block destroyer.Figure 6-25 shows how to change this
ifstatement. ( Note: The fireworks display has been removed.)You’re done! Figures 6-26 and 6-27 show the final batches of code, which you can also see at
mod.learntomod.com/programs/sarah-Spleef_Multiplayer


Test the Multiplayer Spleef Game
To test this multiplayer version of Spleef, launch Minecraft and go to the LearnToMod server as I showed you in Project 1. Then type the command /open, as shown in Figure 6-28. This opens your Minecraft world to anyone else who has access to the LearnToMod server, but the only way they can get in is if they know the number that you see in Figure 6-29.


You see the message shown in Figure 6-29, but your number will probably be different.
Have a friend first join the LearnToMod server and then type the command /join ##, where ## represents the number displayed in your server when you type the open command. For example, Figure 6-30 shows what the other person would type if the message is the one shown in Figure 6-29.

Make sure the Minecraft usernames that are in your SetupMulitplayer function are those of you and your friends. For example, if your Minecraft username is thoughtstem and your friend’s username is thoughtstem2, your SetupMultiplayer function would look like Figure 6-31.

Click Mod in your LearnToMod account, and then run the Spleef_Multiplayer mod in Minecraft. You and your friend are teleported to the center of the arena, as shown in Figure 6-32.

When one of you breaks the melon block, you both should start making blocks below you disappear, as shown in Figure 6-33.

Play the multiplayer version to make sure you have written all of the code correctly as you think it should be.
Iteration 3: End the Game at 200 Blocks
You should have the multiplayer version of Spleef end whenever one player reaches 200 blocks. Before doing this, however, revisit your scene. Only 400 blocks are on the platform, so it might be difficult to achieve the goal of destroying 200 blocks because it would mean that a player would have to destroy exactly half of the blocks to win, minimizing the number of strategies (like destroying blocks on opposite sides of the arena) that the players can use. An easy fix is to double the size of the arena.
Here’s a quick fix: In the Arena function, change PlatformSize from 20 to 40 for both the lava platform and the diamond arena, as shown in Figure 6-34.

Now, in the removeBlock function, an easy way to end the game is to set both players to Creative mode, and move them to the arena’s center (which is directly above the arena). Figure 6-35 shows the three changes you need to make to end the game when one player destroys 200 blocks: in the removeBlock, StartGame, and endGame functions.

Congratulations! You have successfully made a multiplayer version of Spleef! Be sure to continue building onto this game (maybe try adding a third player), test out all of the changes you make in Iteration 3, and remember: Have fun!